need some pictures of door loom

#2
 01-02-2012, 04:37 PM
FTE Legend
Join Date: Oct 2005
Location: northwestern Ontario
Posts: 263,420
Received 4,196 Likes
on
2,689 Posts
<TABLE class=vt border=0 cellSpacing=1 cellPadding=4 width="100%" align=center><TBODY><TR><TD class="al vt"><FORM method=post action=http://www.electric-life.com/shopaddtocart.asp><INPUT value=1032 type=hidden name=productid></FORM></TD></TR><TR><TD class="al vt"><FORM method=post action=http://www.electric-life.com/shopaddtocart.asp><!-- START OF NORMAL PRODUCT DISPLAY --><TABLE border=0 cellSpacing=4 cellPadding=4 width="100%"><TBODY><TR><TD><TABLE border=0 cellSpacing=0 cellPadding=0 width="100%"><TBODY><TR><TD><TABLE border=0 cellSpacing=2 cellPadding=2 width="100%"><TBODY><TR><TD vAlign=top width="20%">
click to see more
</TD><TD vAlign=top width="50%" align=left>94202 NEW BILLET WIRE LOOMS DESIGNED FOR SUICIDE STYLE HINGES WITH SLIP-ON COLLARS.
</TD><TD vAlign=top width="30%" align=right><!-- Price :--><!--US$79.00-->Price: US $79
<INPUT class=txtfield value=1 maxLength=4 size=3 name=quantity> <INPUT class=imgbtn src="images/add-to-cart.jpg" type=image> </TD></TR></TBODY></TABLE></TD></TR><TR><TD><TABLE border=0 cellSpacing=0 cellPadding=0 width="100%"><TBODY><TR><TD vAlign=top width="20%" align=left></TD><TD vAlign=top width="50%" align=left></TD><TD vAlign=top align=left></TD></TR></TBODY></TABLE>This is the ones I got from <CITE>electric-life.com they have a slightly larger space for the wires</CITE>
</TD></TR></TBODY></TABLE></TD></TR></TBODY></TABLE></FORM></TD></TR></TBODY></TABLE>
#3
01-02-2012, 04:49 PM
Don't know how thick your hinges are, but here's how we tackled the problem on a 55 wagon...
*********************
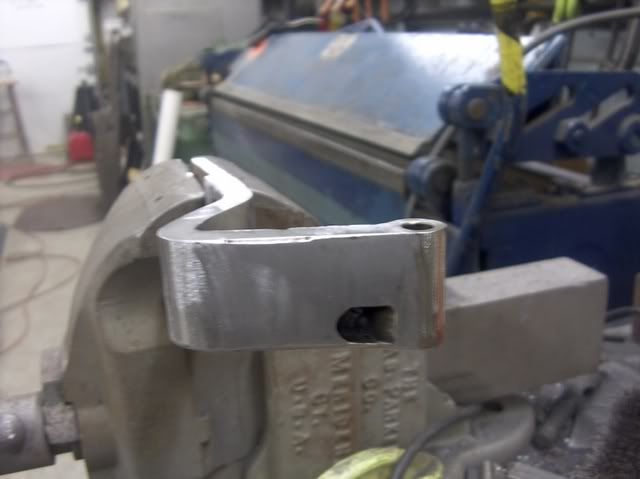
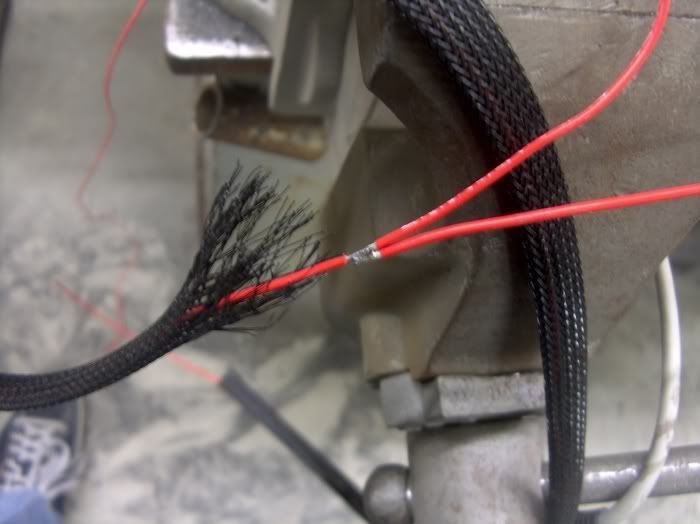
Working on a 55 C***y wagon, didn't really want to use those contact pads between the A pillar and the door, and have seen too many failures in the spring type loom deals. While working on replacing the hinge pins, began to brainstorm while the hinge was apart.

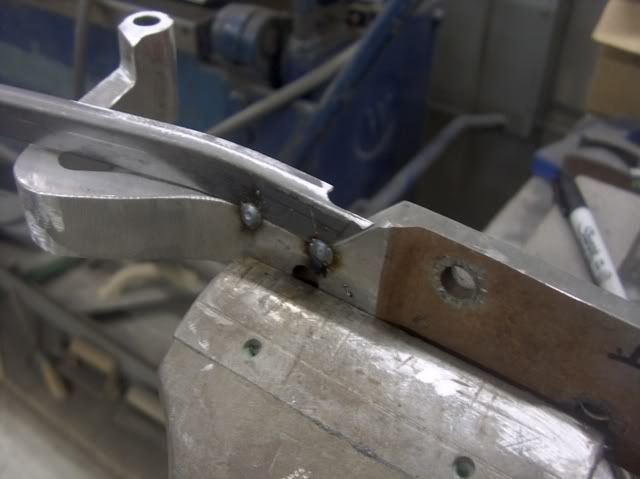
The cut into the hinge was 5/8 deep, Hinge cleaned up, scribed, and then cut using .045 cutoff wheel in 4-1/2 grinder:
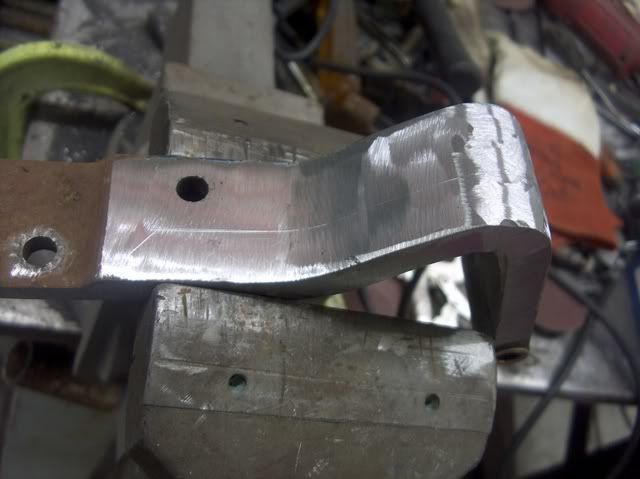
I used some 16 ga steel bent into small angles. Angle pieces trimmed to fit opening, tacked in place, and heat applied to follow bends of the hinge:
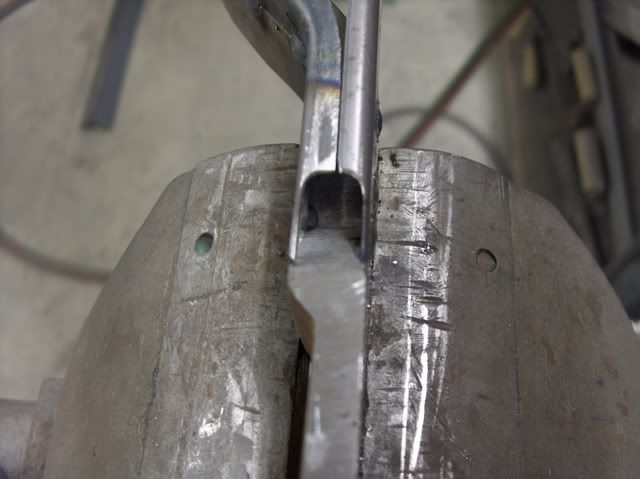
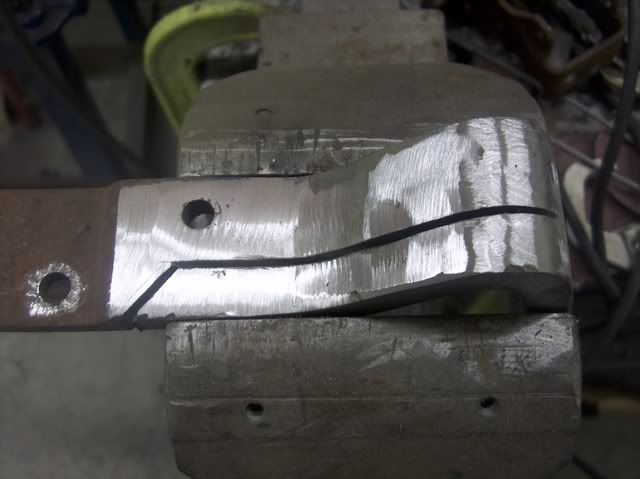
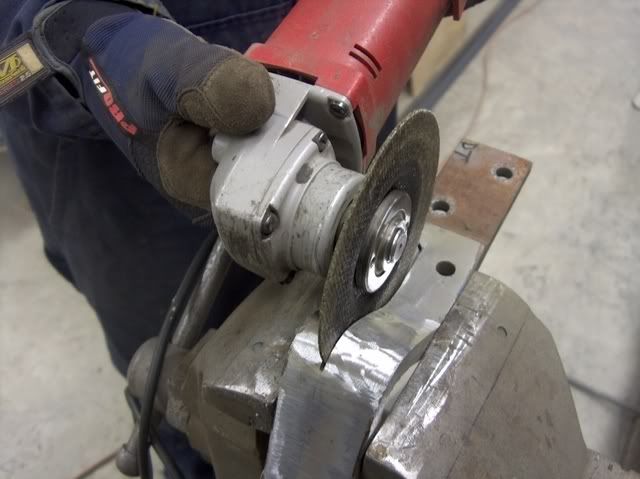
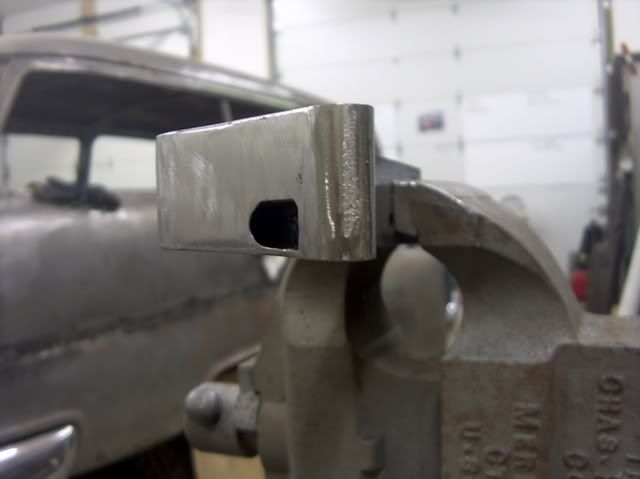
Mig was used to tack weld and join the two halves, the tig was used to final weld the angles to the hinge. (not very nice looking, but functional ) Then some grinding to smooth things out:
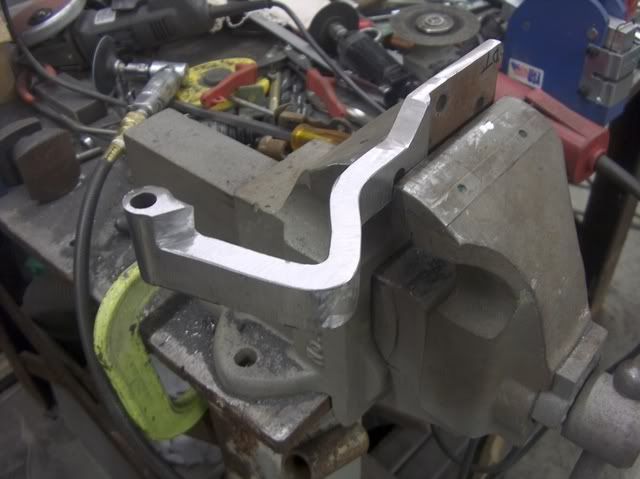
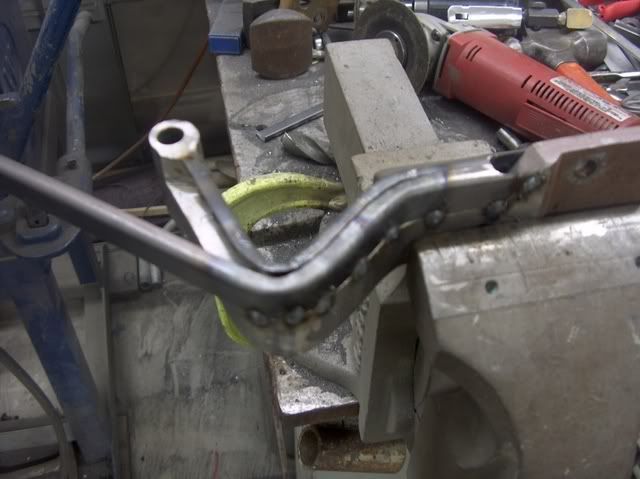
Wire dumps out right by the pivot point for minimal movement during opening/closing.
Wires and protective sleeving run in place........the first wire used as a pull wire, tied a knot into it and taped some sleeving tight on the other side of the knot to pull it through:


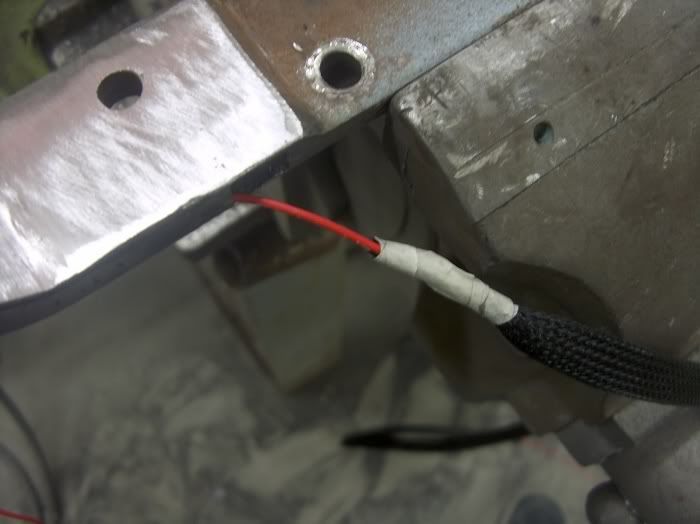
Then the same pull wire was stripped in the middle to pull back and forth, using as a pull wire.


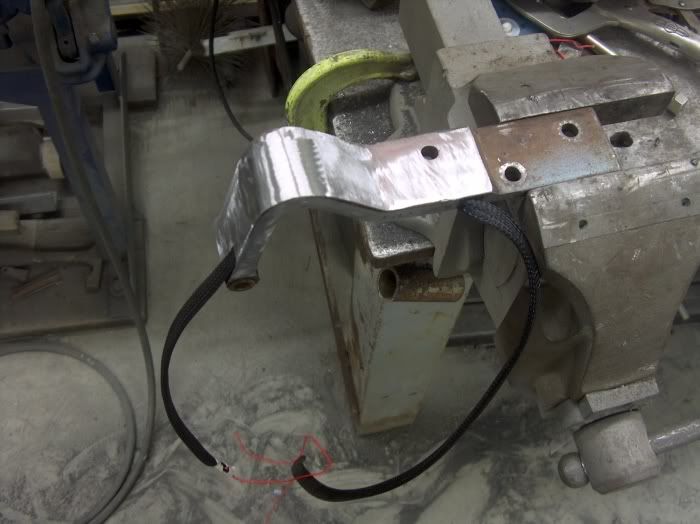
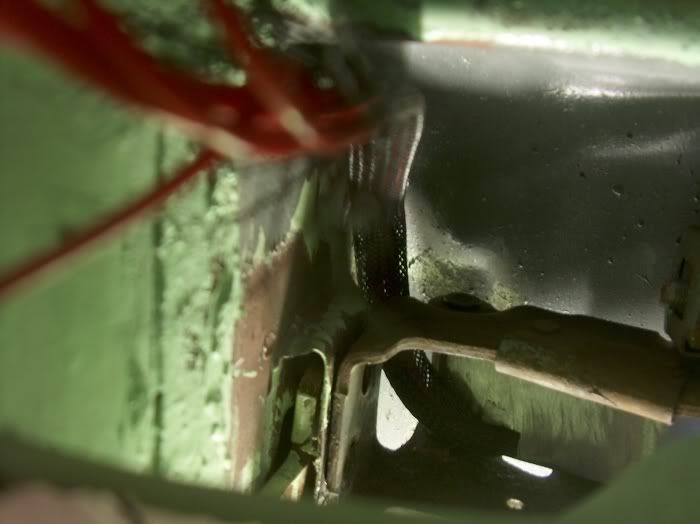
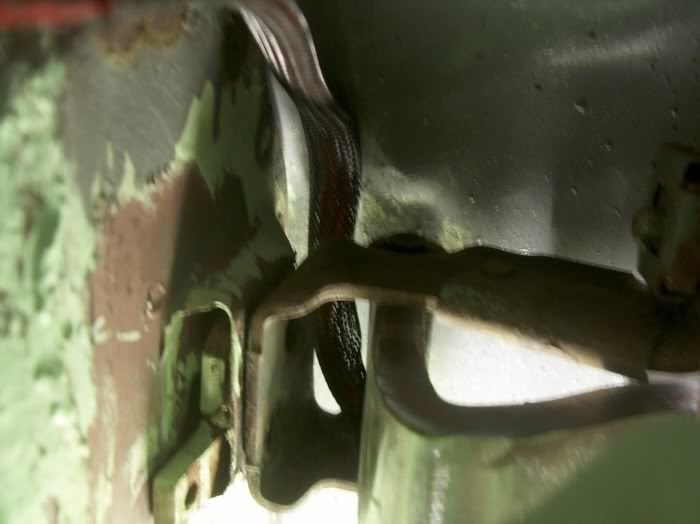
Installed, a view under the dash to show the hinge both open and closed with no chaffing issues:
Should be able to adapt this for other vehicle hinges.
*****************************
edited for a detail I missed ..........
*****************************
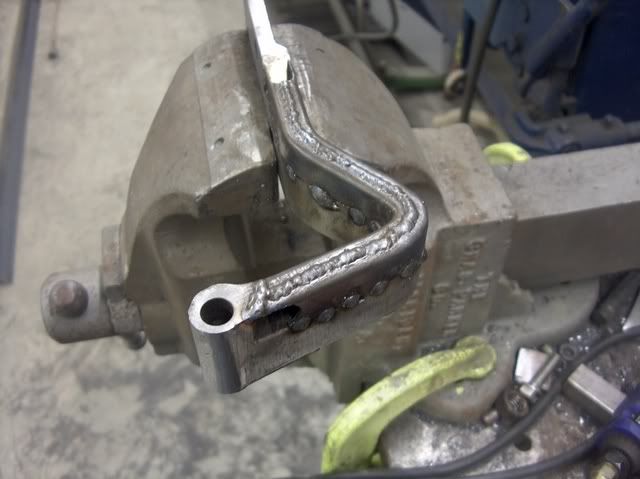
One thing to keep in mind is the effect the spring mechanism has on your wiring path. Shown here in the original form, this hinge uses two spring clips riveted onto the hinge bracket to hold the door open. (red arrows)

Over the years, some of the more "well used" hinges may show some metal has worn away where these clips have rubbed across the hinge. Where I wouldn't worry so much about this effect if rubbing across a solid piece of steel, after modification we now have a piece of 16 ga metal that would be more susceptible to damage and possible intrusion of the wire path given the same amount of wear. With that in mind, drill/grind out the rivet and remove the clip adjacent to the wire path to eliminate this as a future hazard... Shown below you can see the lower spring clip has been removed. Three remaining per door should still be more than sufficient to hold the door open. For this modification adapted to other door hinges with exposed springs to hold the door open, be aware of the hazard they pose in pinched/damaged wiring and plan accordingly.

*********************
Working on a 55 C***y wagon, didn't really want to use those contact pads between the A pillar and the door, and have seen too many failures in the spring type loom deals. While working on replacing the hinge pins, began to brainstorm while the hinge was apart.
The cut into the hinge was 5/8 deep, Hinge cleaned up, scribed, and then cut using .045 cutoff wheel in 4-1/2 grinder:
I used some 16 ga steel bent into small angles. Angle pieces trimmed to fit opening, tacked in place, and heat applied to follow bends of the hinge:
Mig was used to tack weld and join the two halves, the tig was used to final weld the angles to the hinge. (not very nice looking, but functional
) Then some grinding to smooth things out:Wire dumps out right by the pivot point for minimal movement during opening/closing.
Wires and protective sleeving run in place........the first wire used as a pull wire, tied a knot into it and taped some sleeving tight on the other side of the knot to pull it through:
Then the same pull wire was stripped in the middle to pull back and forth, using as a pull wire.
Installed, a view under the dash to show the hinge both open and closed with no chaffing issues:
Should be able to adapt this for other vehicle hinges.
*****************************
edited for a detail I missed ..........
*****************************
One thing to keep in mind is the effect the spring mechanism has on your wiring path. Shown here in the original form, this hinge uses two spring clips riveted onto the hinge bracket to hold the door open. (red arrows)
Over the years, some of the more "well used" hinges may show some metal has worn away where these clips have rubbed across the hinge. Where I wouldn't worry so much about this effect if rubbing across a solid piece of steel, after modification we now have a piece of 16 ga metal that would be more susceptible to damage and possible intrusion of the wire path given the same amount of wear. With that in mind, drill/grind out the rivet and remove the clip adjacent to the wire path to eliminate this as a future hazard... Shown below you can see the lower spring clip has been removed. Three remaining per door should still be more than sufficient to hold the door open. For this modification adapted to other door hinges with exposed springs to hold the door open, be aware of the hazard they pose in pinched/damaged wiring and plan accordingly.
#4
01-02-2012, 05:58 PM
Senior User
Join Date: Sep 2007
Location: Atwater, CA
Posts: 206
Likes: 0
Received 0 Likes
on
0 Posts

#6
01-03-2012, 12:48 AM
Join Date: May 2010
Location: Netherlands
Posts: 687
Likes: 0
Received 0 Likes
on
0 Posts
#7
01-03-2012, 08:29 AM
I did NOT reuse the door switch hole. the Electric Life swivel socket helps prevent kinking when closing the door, by changing the angle just enough.
use a right angle drill and a step bit to insure they are aligned (door and post).
I kept it this high cause the loom needs room to move on the inside, and will be worse with wires loaded thru it..
2 wires for door lock if powered, 2 wires for power windows.
none of them small..
I use door standoffs (see second photo) to prop the doors open at shows to keep kids from stepping on the running board to look into the truck. They connect to the bearclaw door latch on both sides. If you use the buttons, then you can't unlatch the latch with the door open to get the standoff out of the latch.
Sam
Trending Topics
#9
01-03-2012, 01:36 PM
yes, the parking brake is from some later model truck.. I'll find the info and post it.
67-72 ford truck, here is an ebay item link..
http://www.ebay.com/itm/parking-brak...-/130609494556
I had cables made by Control Cables
http://store.controlcables.com/servl..._streetrod.htm
also, what is the problem with the lock?
Sam
#11
01-03-2012, 02:04 PM
#13
01-03-2012, 03:11 PM
MidFifty says their 3239 kits does lock/unlock with stock handles and latches.
does NOT pop open the door
Remote Lock-Unlock with Lights & Sound . . . . . . .3239 . . . . .$199.00
remote locks and unlocks the door, chirps the horn and flashes the
lights, just like a new truck. Complete with 2 remotes, power box,
relays & instructions. All the figuring is done for you, easy install kit
Sam
looking at the kit, this is nothing special.. so, it must connect to the lock rod is all..
these can be had for <$50 US all over the place.