72 F-250 4X4 Power Steering - Instructions with Pictures
#1
 12-14-2010, 08:43 PM

72 F-250 4X4 Power Steering - Instructions with Pictures
Another member knew I had done this and asked me for some information on how I did it, I am posting it here in hope that it may save someone hours of research if they plan on doing this swap.
This is information on one way to convert your truck to power steering using the 1978/79 power steering unit.
I make no claim that this is the only or the best way, it's what worked for me.
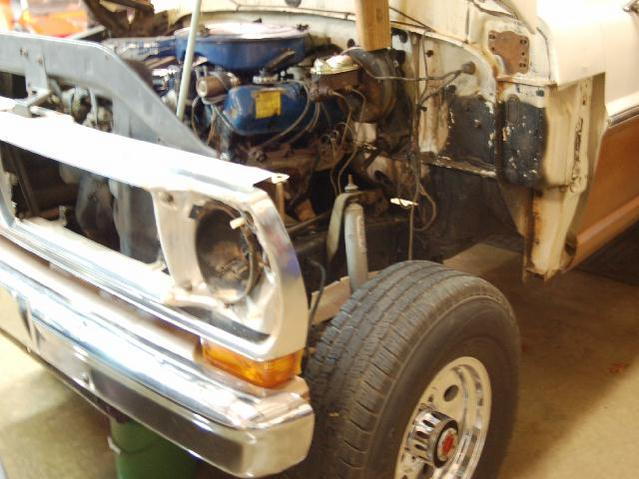
What the frame looks like after removing fenders, radiator and fan shroud. I took my inner fender off without removing the front radiator support but I would not do it again. Take everything on the front off or you will have one heck of a time getting the inner fender back in. Go buy a box of sandwich size or larger Baggies and keep everything separate and mark the bags, you will be glad when you go to reassemble everything.
When you have all the sheet metal off start by removing the drag link from the old pitman arm to the front knuckle. Remove the pitman arm and then you can remove the steering box, I undid my steering shaft at the steering box and steering column, was not sure which one was going to be the easiest to slide off. Mine came off easier at the column. Just set all that aside, you may or may not need the shaft and or drag link later, depending on what all you got from the donor truck. (Note: at this point I changed the upper and lower bearings in the steering column, it will never be easier to do than now while it is easy to access) The first thing I did was to cut off the upper flange on the frame where the steering box is located and cut a notch in the front cross member. I used the small 4” cut off blades on my small angle grinder, it took about 4 or 5 blades to cut everything. I could have just used the torch but this way I did not have to do a lot of extra grinding to clean up my cut.


This is what I ended up with after cutting the cross member and removing the bent up portion of frame. In simple terms it’s 1 � “ in and 4 � “ deep, angled the last 2 � “. You could get by with less than 4 � “ but that makes it easier to get your hand and tools in there to put on the washers and nuts. Notice how I left the bottom portion of the cross member in place. It does not interfere with anything and helps keep the cross member tied to the frame. Had I removed that piece, I would have almost cut into the large oval shaped hole. I also had to grind flush, the inner frame rail where the cross member was welded to the rail.

You need to use a piece of 3/8 or 1/4 X 5 X 8 � long channel to make the mount for the new steering box, look at the picture to see what I did, I used some 1” square tube for my support spacers, That’s what I had in my shop, but you can use round tubing if you want. Just make sure the spacers are the exact same length as the depth of the 5” channel. I left mine about a 1/16” long and then ground them down to be flush with the sides. For the outside of the frame I cut a piece of � x 5 x 8 flat bar for extra frame support. If you wonder why the boltholes are closer on one end, that’s the end at the cross member and that is as far in as it will go. I have kind of gotten out of order, once you have the C-Channel and flat bar cut you need to put the channel inside the frame and in the cross member to the depth of the cut. Now you are ready to test fit the new steering box. I’m sure this is not the only way, but this is what I did next. Turn the stub on the steering box all the way to one side or the other, then counting the turns, go all the way to the other side, (mine was exactly 4 turns) then go back half the turns to put your pitman arm in dead center location. (note: my pitman arm was never removed and was in it’s original location on the shaft) Be aware if there is any fluid in the unit it will come out when you do this, so you might want to do it outside. I put the steering box in with the pitman arm just under the frame and above the spring, there is a flange on the bottom of the steering box that I let sit on the bottom edge of the frame flange, the pitman arm just clears the frame, but it works. See picture below.

Strap or clamp it in place, make sure the front tires are going straight ahead, then install the drag link from the donor truck.
If you have to reuse your old drag link it will have to be shortened to 13 � “ long, this is center to center, on the back side at the grease fitting joints, ends rotated so that both ends point in the same direction then re-welded. There is tremendous stress on this piece so please have this done by a professional welder to be assured of no failure at this joint.
Just snug the bolts, this is just for the test fit. The steering box is now where it needs to go, c-clamp the box to the frame, it should clear the radiator support by at least � to � inch. I used red spray paint and marked the four mounting holes on the C-Channel. I used the drill press and a 1/2-inch bit and drilled the four holes, I then c-clamped the outside plate to it and drilled the four holes in it. Next is when I welded in the spacers.
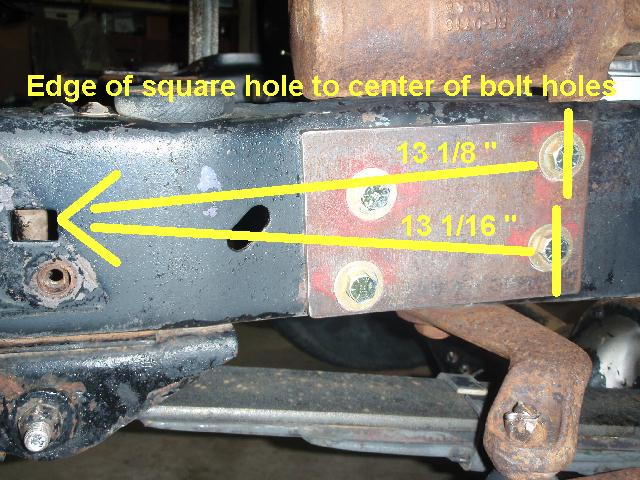
The holes in the frame are a little more tricky to do, for a reference, look at the outside frame picture and you can see the plate and bolts installed. The two nearest the cross-member are directly in line with the metal I cut out, I have put the measurements that worked on my truck and marked the reference points, that should help some.
I then put the C-Channel inside the frame, then on top of frame rail I marked the location of both ends of the C-Channel, I them took the C Channel and C- Clamped it on the outside of the frame in the exact same location and used it as a pattern to drill my four holes in the frame, after removing the C-Channel I enlarged them to 9/16” to make it easier to get the new bolts thru. Now you have a choice to make, weld or not weld, so far you have done nothing that would stop you from putting you old manual steering back on if you ever wanted to.

Install the box with the plate on the outside using all GRADE EIGHT BOLTS, WASHERS AND NUTS.
4 – 1/2" x 4“ Bolts
8 – 1/2" Flat Washers
4 – 1/2" Lock Washers
4 – 1/2" Nuts
The only problem is that the pump blocks you from putting in the bottom radiator bolt, I am just going to move up a little, drill a new hole and bolt it there.
If you want to weld all this in place now is the time, just tack everything good; remove the box then just weld as much as you want to. I would keep it to a minimum because of overheating the frame and compromising the strength of the steel. I did not weld mine in. If the �” grade eight bolts don’t hold it in place, the welding will not do anything to keep the box from falling. I also did not re-box in the area of the cross-member, I didn’t see any advantage except for cosmetic reasons and it looked like more work than it was worth. In addition the 250 4X4 has additional frame bracing at the front of the frame, unless you are going to be rock crawling or desert racing I think it will be strong enough
Reinstall the box and tighten everything down, USE LOCKTITE for extra help in keeping them tight.
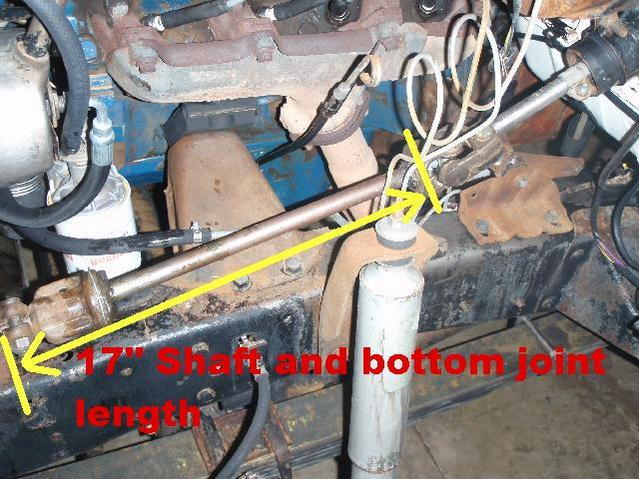
If you got the steering shaft from the donor truck it is still too long to fit. You can use your old one or new one to cut to length. I wanted as much room as possible inside the cab so I loosened the two bolts inside the cab and the collar clamp outside and moved my steering column as far down as it would go. You don’t have to do that but it moved about 1 1/2 “ down. I took my steering shaft and cut it off at the top u-joint, then ground the welding off and the short stub inside came out. I put the u-joint on the steering column, then put the slip joint end on the steering box, both with the bolts in to be sure they were in the correct location, I then put the shaft in the center of the bottom slide joint so it could go either way if needed, held the shaft up to the u-joint to get the correct length. (My shaft and bottom joint was 17”) I cut the shaft where it just came thru the socket on the u-joint and welded it in place. Mine was made from cast steel and I used 7018 DC rods to weld it. To get it on I removed the bolts inside under the steering column and moved it up, put the joint on and pushed it back in place, I had help doing this, you can’t be in two places at once.
Then install your pump, I used a 72 FE pump and bracket’s, I had the high pressure hose made at a local truck shop, you are on your own here. Look at the picture to see how mine goes, there is almost no twisting this hose so make sure the end fittings are at the correct angle, My two hoses were $55 dollars so you don’t want to mess up here,

I suggest you get the hose (mine was 12”) and fittings, go to you truck and put it together so the angles are correct, mark the hose and fittings somehow for alignment the return to have them crimped on.
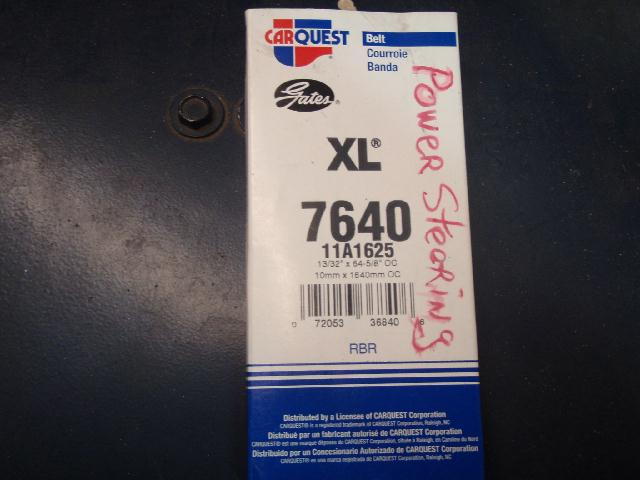
To install the fan-belt I had to change the pulley on my pump to line up with my water pump and alternator, mine was a double belt for the alternator water pump and crankshaft pulley’s. My power steering pump aliened with the front set so I got a belt to go around everything. It is a Gates Belt # XL 7640 - 64 5/8 long, look at the picture to see hookup. I put the alternator belt on and tightened it first ,then you tighten the power steering belt last.


The correct way is to add a third pulley to the crankshaft and run the power steering on a belt by itself, but the way I did it, works fine for me.
Fill it up with type F automatic transmission fluid, jack up the front end turn left and right 10 or 12 times to purge the system and fill as needed.
You will have to cut the inner fender to clear the steering box and bottom slide joint, here's what it looks like installed.
<a href="http://www.flickr.com/photos/tatedaniels/5280949741/" title="PC204332 by tpdaniels, on Flickr"><img src="http://farm6.static.flickr.com/5201/5280949741_68ab5bb77d.jpg" width="500" height="375" alt="PC204332" /></a>
Added note:
Last but not least I take no responsibility for any work preformed by using these instructions, This is how I did it after many hours of research on various forums and information gathered from many sites. I hope this helps.
This is information on one way to convert your truck to power steering using the 1978/79 power steering unit.
I make no claim that this is the only or the best way, it's what worked for me.
What the frame looks like after removing fenders, radiator and fan shroud. I took my inner fender off without removing the front radiator support but I would not do it again. Take everything on the front off or you will have one heck of a time getting the inner fender back in. Go buy a box of sandwich size or larger Baggies and keep everything separate and mark the bags, you will be glad when you go to reassemble everything.
When you have all the sheet metal off start by removing the drag link from the old pitman arm to the front knuckle. Remove the pitman arm and then you can remove the steering box, I undid my steering shaft at the steering box and steering column, was not sure which one was going to be the easiest to slide off. Mine came off easier at the column. Just set all that aside, you may or may not need the shaft and or drag link later, depending on what all you got from the donor truck. (Note: at this point I changed the upper and lower bearings in the steering column, it will never be easier to do than now while it is easy to access) The first thing I did was to cut off the upper flange on the frame where the steering box is located and cut a notch in the front cross member. I used the small 4” cut off blades on my small angle grinder, it took about 4 or 5 blades to cut everything. I could have just used the torch but this way I did not have to do a lot of extra grinding to clean up my cut.
This is what I ended up with after cutting the cross member and removing the bent up portion of frame. In simple terms it’s 1 � “ in and 4 � “ deep, angled the last 2 � “. You could get by with less than 4 � “ but that makes it easier to get your hand and tools in there to put on the washers and nuts. Notice how I left the bottom portion of the cross member in place. It does not interfere with anything and helps keep the cross member tied to the frame. Had I removed that piece, I would have almost cut into the large oval shaped hole. I also had to grind flush, the inner frame rail where the cross member was welded to the rail.
You need to use a piece of 3/8 or 1/4 X 5 X 8 � long channel to make the mount for the new steering box, look at the picture to see what I did, I used some 1” square tube for my support spacers, That’s what I had in my shop, but you can use round tubing if you want. Just make sure the spacers are the exact same length as the depth of the 5” channel. I left mine about a 1/16” long and then ground them down to be flush with the sides. For the outside of the frame I cut a piece of � x 5 x 8 flat bar for extra frame support. If you wonder why the boltholes are closer on one end, that’s the end at the cross member and that is as far in as it will go. I have kind of gotten out of order, once you have the C-Channel and flat bar cut you need to put the channel inside the frame and in the cross member to the depth of the cut. Now you are ready to test fit the new steering box. I’m sure this is not the only way, but this is what I did next. Turn the stub on the steering box all the way to one side or the other, then counting the turns, go all the way to the other side, (mine was exactly 4 turns) then go back half the turns to put your pitman arm in dead center location. (note: my pitman arm was never removed and was in it’s original location on the shaft) Be aware if there is any fluid in the unit it will come out when you do this, so you might want to do it outside. I put the steering box in with the pitman arm just under the frame and above the spring, there is a flange on the bottom of the steering box that I let sit on the bottom edge of the frame flange, the pitman arm just clears the frame, but it works. See picture below.
Strap or clamp it in place, make sure the front tires are going straight ahead, then install the drag link from the donor truck.
If you have to reuse your old drag link it will have to be shortened to 13 � “ long, this is center to center, on the back side at the grease fitting joints, ends rotated so that both ends point in the same direction then re-welded. There is tremendous stress on this piece so please have this done by a professional welder to be assured of no failure at this joint.
Just snug the bolts, this is just for the test fit. The steering box is now where it needs to go, c-clamp the box to the frame, it should clear the radiator support by at least � to � inch. I used red spray paint and marked the four mounting holes on the C-Channel. I used the drill press and a 1/2-inch bit and drilled the four holes, I then c-clamped the outside plate to it and drilled the four holes in it. Next is when I welded in the spacers.
The holes in the frame are a little more tricky to do, for a reference, look at the outside frame picture and you can see the plate and bolts installed. The two nearest the cross-member are directly in line with the metal I cut out, I have put the measurements that worked on my truck and marked the reference points, that should help some.
I then put the C-Channel inside the frame, then on top of frame rail I marked the location of both ends of the C-Channel, I them took the C Channel and C- Clamped it on the outside of the frame in the exact same location and used it as a pattern to drill my four holes in the frame, after removing the C-Channel I enlarged them to 9/16” to make it easier to get the new bolts thru. Now you have a choice to make, weld or not weld, so far you have done nothing that would stop you from putting you old manual steering back on if you ever wanted to.
Install the box with the plate on the outside using all GRADE EIGHT BOLTS, WASHERS AND NUTS.
4 – 1/2" x 4“ Bolts
8 – 1/2" Flat Washers
4 – 1/2" Lock Washers
4 – 1/2" Nuts
The only problem is that the pump blocks you from putting in the bottom radiator bolt, I am just going to move up a little, drill a new hole and bolt it there.
If you want to weld all this in place now is the time, just tack everything good; remove the box then just weld as much as you want to. I would keep it to a minimum because of overheating the frame and compromising the strength of the steel. I did not weld mine in. If the �” grade eight bolts don’t hold it in place, the welding will not do anything to keep the box from falling. I also did not re-box in the area of the cross-member, I didn’t see any advantage except for cosmetic reasons and it looked like more work than it was worth. In addition the 250 4X4 has additional frame bracing at the front of the frame, unless you are going to be rock crawling or desert racing I think it will be strong enough
Reinstall the box and tighten everything down, USE LOCKTITE for extra help in keeping them tight.
If you got the steering shaft from the donor truck it is still too long to fit. You can use your old one or new one to cut to length. I wanted as much room as possible inside the cab so I loosened the two bolts inside the cab and the collar clamp outside and moved my steering column as far down as it would go. You don’t have to do that but it moved about 1 1/2 “ down. I took my steering shaft and cut it off at the top u-joint, then ground the welding off and the short stub inside came out. I put the u-joint on the steering column, then put the slip joint end on the steering box, both with the bolts in to be sure they were in the correct location, I then put the shaft in the center of the bottom slide joint so it could go either way if needed, held the shaft up to the u-joint to get the correct length. (My shaft and bottom joint was 17”) I cut the shaft where it just came thru the socket on the u-joint and welded it in place. Mine was made from cast steel and I used 7018 DC rods to weld it. To get it on I removed the bolts inside under the steering column and moved it up, put the joint on and pushed it back in place, I had help doing this, you can’t be in two places at once.
Then install your pump, I used a 72 FE pump and bracket’s, I had the high pressure hose made at a local truck shop, you are on your own here. Look at the picture to see how mine goes, there is almost no twisting this hose so make sure the end fittings are at the correct angle, My two hoses were $55 dollars so you don’t want to mess up here,
I suggest you get the hose (mine was 12”) and fittings, go to you truck and put it together so the angles are correct, mark the hose and fittings somehow for alignment the return to have them crimped on.
To install the fan-belt I had to change the pulley on my pump to line up with my water pump and alternator, mine was a double belt for the alternator water pump and crankshaft pulley’s. My power steering pump aliened with the front set so I got a belt to go around everything. It is a Gates Belt # XL 7640 - 64 5/8 long, look at the picture to see hookup. I put the alternator belt on and tightened it first ,then you tighten the power steering belt last.
The correct way is to add a third pulley to the crankshaft and run the power steering on a belt by itself, but the way I did it, works fine for me.
Fill it up with type F automatic transmission fluid, jack up the front end turn left and right 10 or 12 times to purge the system and fill as needed.
You will have to cut the inner fender to clear the steering box and bottom slide joint, here's what it looks like installed.
<a href="http://www.flickr.com/photos/tatedaniels/5280949741/" title="PC204332 by tpdaniels, on Flickr"><img src="http://farm6.static.flickr.com/5201/5280949741_68ab5bb77d.jpg" width="500" height="375" alt="PC204332" /></a>
Added note:
Last but not least I take no responsibility for any work preformed by using these instructions, This is how I did it after many hours of research on various forums and information gathered from many sites. I hope this helps.
Last edited by tpdaniels; 12-21-2010 at 06:49 PM. Reason: add picture
#2
12-15-2010, 06:32 AM
Logistics Pro
great writeup lots of good information and details with pictures. this thread should be put up top of the page and stickied for power steering. will help people get to it easier. good work on it hows it drive? i'll be doing this conversion as soon as winters over and this is much help. did you use a donor steering shaft from a 78-79? and how much of the shaft did you have to shorten it by?
#3
12-15-2010, 07:39 AM
great writeup lots of good information and details with pictures. this thread should be put up top of the page and stickied for power steering. will help people get to it easier. good work on it hows it drive? i'll be doing this conversion as soon as winters over and this is much help. did you use a donor steering shaft from a 78-79? and how much of the shaft did you have to shorten it by?
Last edited by tpdaniels; 12-15-2010 at 07:43 AM. Reason: add information
#4
08-21-2011, 10:26 AM

New User
Join Date: Aug 2011
Location: Greeley,Co
Posts: 16
Likes: 0
Received 0 Likes
on
0 Posts
You know power steering columns are shorter from the dash mount up, can you use half ton power steering columns?????? Also a real hard part to find is 106 half inch speedometer for the 72 3/4 ton 4x4, can anybody help? Thanks Larry Larks278@hotmail.com
#7
09-27-2012, 03:43 PM
Cargo Master
Join Date: Nov 2005
Location: La Ribera, Baja, Mexico
Posts: 2,694
Likes: 0
Received 43 Likes
on
25 Posts
Trending Topics
#8
09-28-2012, 04:20 PM
Logistics Pro
I did mine the other month on my 71 f250 crew pretty much how you did it I liked that the best out of all the ways I've found. Haven't gotten to drive her yet still fabricating away with it. I'll post pics if anyone wants to see just to have this thread Alittle more helpful then it already is.
#10
09-29-2012, 03:58 PM
#11
09-30-2012, 12:04 AM
Post Fiend
Join Date: Sep 2006
Location: Island Southeast Alaska
Posts: 14,325
Likes: 0
Received 5 Likes
on
5 Posts
I contacted one of the Mods so we shall see what will be.
If and when I get ready to do something like this I would not want to have to search for it as the search function on here has a lot to be desired I think. Rather I would like to see it right away. But it ain't my call. I can only suggest.
But one good thing is that now anyone that Google's something like this can find this thread so ya will never now how many ya really have helped with this info. And did I say it is very well put together Bud.
Ya I know yer head is starting to swell but ya earned it.
#12
10-03-2012, 08:24 PM
#13
10-04-2012, 03:12 PM

you should look into a powersteering convertion kit by Benchworks steering systems in arizona. i bought the kit and love it Ford F250 Conversion
#15
10-08-2012, 04:39 PM
Best I can remember I had less than $400.00 in all the parts, the other is 1099.95 and that does not include the pump, belt or hoses from the looks of the picture of included parts, plus at least a $100 for shipping, more like at least $800 I kept in my pocket. Believe it or not I actually enjoyed figuring it out as I did it. I did get some information from another user that had done this swap, but no details, I just knew it could be done with a little fabrication.