Ford F-250: How to Check Transmission Line Pressure
Sometimes it can be difficult to locate the underlying cause of your F-250's misbehaving transmission. A line pressure test is a trick that can help you pinpoint the cause without cracking open the transmission pan or flushing fluid.
This article applies to the Ford F-250 and F-350 Super Duty (2005-2014).
The transmission in your Ford truck is one of the most costly components to replace. Early detection of problems can save you a lot of time and money on costly repairs. Testing the transmission line pressure is one proactive step that will alert you to potential problems. Replacing the line or draining and replacing the transmission fluid may be all that is needed. Dirty transmission fluid can cause more air to enter the system and a low pressure situation. Many transmission systems are controlled electronically, and the culprit may be a bad transmission control module. Line pressure testing can help identify many different problems. Testing the line pressure of your transmission is a very easy, relatively inexpensive process that can prevent an expensive transmission replacement.
Materials Needed
- 7/16 inch (11mm) socket with extension
- Open ended wrenches
- Pressure gauge that reads up to 300 PSI
- Shop rags
- Open area with plenty of unobstructed space in front and rear of vehicle
Step 1 - Park the truck on a flat, level surface
Park your truck on a flat level surface such as your garage floor. This will be sufficient for the idle testing, but for the wide open throttle tests, you will need an open area with no obstructions or anything that you don't want to run into.

Step 2 - Locate the transmission line pressure test port
The test port is located on the driver's side of the transmission just above the pan level. The port plug or bolt is 7/16 inch, or 11mm, and will take the 1/8 inch fitting. In some cases, the port plug will be a brass-colored bolt or some other color that is easily seen. Remove the bolt; you may need to use an extension on your ratchet to make the job a little easier.
Pro Tip
Take care in removing the port plug. The inner threads of the transmission can strip fairly easily. Also, you may experience some transmission fluid leakage from the port hole. It should not be much, but it must be wiped clean before continuing on to the rest of the test.
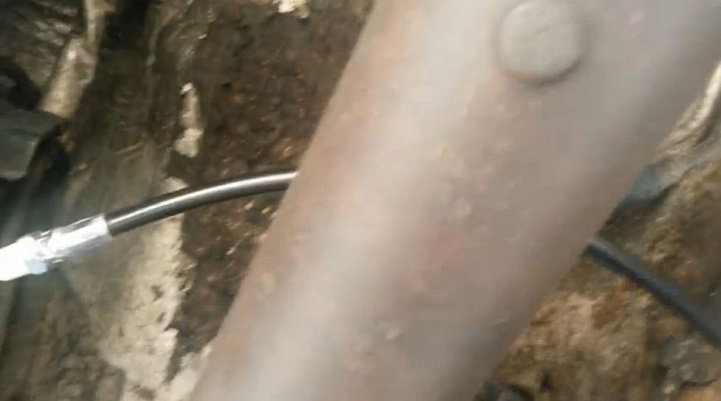
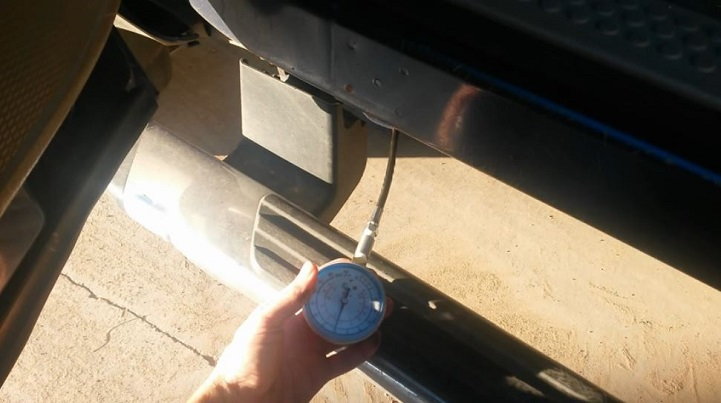
Step 3 - Attach pressure gauge hose to port tap
Match the testing fitment with the port tap bolt. You should thread the fitment into the testing port first, and then the hose into the fitment that is in the testing port. This will prevent stripping the threads on the transmission while connecting the hose to the port. Hand tighten the fitment first, and then tighten a small amount further with an open ended wrench. Attach the hose next, working it over the swing arm and drive shaft for better access. Attaching the hose to the fitment after the fitment has been inserted into the port hole will make sure that if you strip any threads, it will likely be the fitment threads at the female end. This is a lot easier and less expensive to fix than if you stripped out the transmission threads.
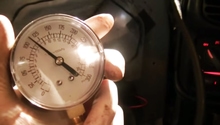
Step 4 - Place the gauge where you can read it while starting your truck
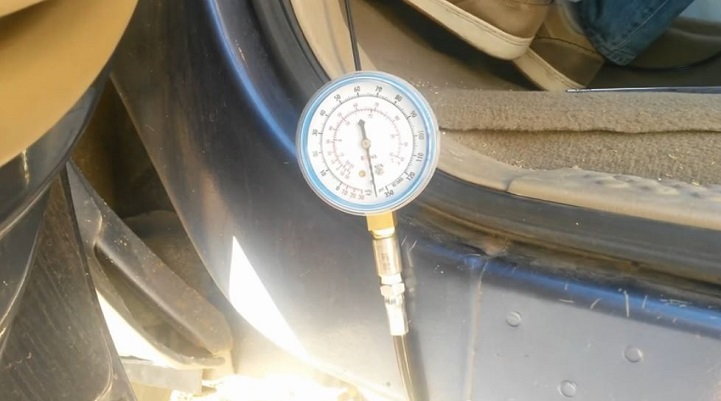
The gauge will not likely be able to reach up to the passenger window, but if you have running boards and can rest it on there, that should work. Otherwise, you may need help from a second person holding the gauge to give you the readings. You will need the normal operating pressure specifications for your truck in order to determine if your vehicle is within the acceptable range.
Step 5 - Start your vehicle and test pressure under idle
Start your truck and record the pressure while in park first. While the emergency brake is engaged and stepping firmly on the brake, put the truck in reverse and record the pressure. Repeat this again while in neutral. Do this while manually shifting through the gears (or use D, 2 and 1 for automatic transmissions). After the initial recordings are taken, crawl back under your truck and make sure there are no leaks where you have the hose and fitment inserted into the transmission. If there are leaks present, re-tighten the connections and repeat the idle test. Compare your readings with what are considered in spec from the transmission service manual for your truck.
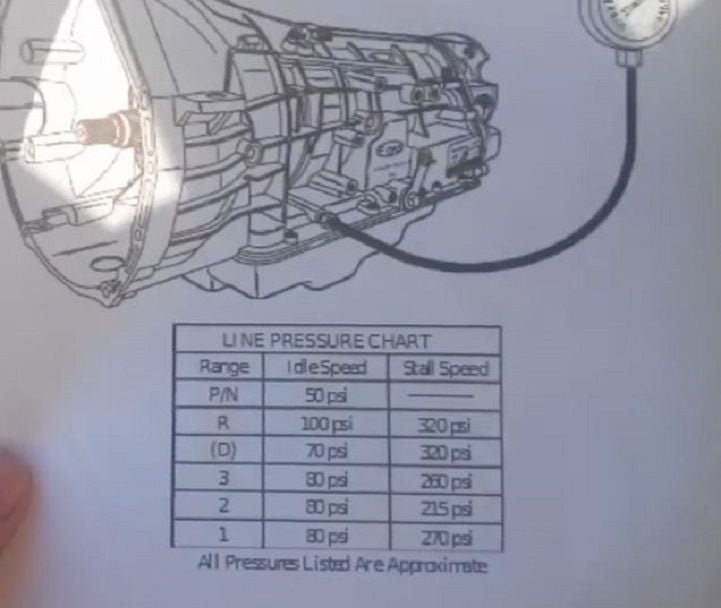
Pro Tip
Make sure you are using the correct transmission guide that shows the proper ranges. This one is for the 4R70W transmission:
Step 6 - Test pressure under wide open throttle
You will need to move your vehicle in an open area with no obstructions in the front or the rear to prevent any damage to your truck or to the object should you run into it. This portion of the test must be done precisely in order to not permanently damage the transmission. You will need to make sure the emergency brake is engaged and completely step on the brake pedal as hard as possible. For each gear, you will floor the gas pedal for no longer than one or two seconds. Depressing the gas pedal for any longer will result in permanent damage to the transmission system. You need a wide open area in case the vehicle lunges forward or backward and you can stop it without damaging your truck or any other obstruction. The pressure recorded is your pressure under wide open throttle. For automatic transmissions, you will need to drive the vehicle and record the pressure as it shifts from gear to gear. The pressure should be much higher than at idle.
Pro Tip
It cannot be emphasized enough that you make sure you are in a safe area with plenty of space in front and behind your truck, and that you do not keep the gas pedal floored for longer than one or two seconds (this is plenty time to get a reading). This test is really not good for your torque converter or your transmission so it needs to be done quickly and safely.
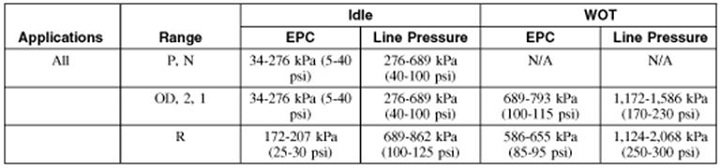
Line Pressure Charts for F-250/Super Duty Gas and Diesel
TorqueShift 5R110W (Gas Engine)
| Gear | Line Pressure | |
|---|---|---|
| Idle (psi) | WOT Stall (psi) | |
| P,N | 60 | — |
| R | 95 | 230 |
| D | 66 | 180 |
| 3 | 77 | 180 |
| 2 | 79 | 110 |
| 1 | 60 | 185 |
TorqueShift 5R110W (Diesel Engine)
| Gear | Line Pressure | |
|---|---|---|
| Idle (psi) | WOT Stall (psi) | |
| P,N | 50 | — |
| R | 100 | 320 |
| D | 70 | 320 |
| 3 | 80 | 260 |
| 2 | 80 | 215 |
| 1 | 80 | 270 |
TorqueShift 6R140 (Gas Engine)
| Gear | Line Pressure | |
|---|---|---|
| Idle (psi) | WOT Stall (psi) | |
| P,N | 90 | — |
| R | 90 | 240 |
| D | 90 | 230 |
| 3 | 90 | 180 |
| 2 | 90 | 240 |
| 1 | 90 | 230 |
TorqueShift 6R140 (Diesel Engine)
| Gear | Line Pressure | |
|---|---|---|
| Idle (psi) | WOT Stall (psi) | |
| P,N | 90 | — |
| R | 90 | 260 |
| D | 90 | 225 |
| 3 | 90 | 160 |
| 2 | 90 | 235 |
| 1 | 90 | 225 |
| Results | Source |
|---|---|
| High line pressure at idle - all ranges | Wiring harness Pressure Solenoid Main Regulator Valve stuck |
| Low line pressure at idle - all ranges | Pressure Control solenoid Low fluid line pressure blow off valve stuck Loose bolts on solenoid body causing leaks Restricted or damaged filter Transmission Fluid pump valve damage |
| Low line pressure in 1, 3 only |
Wiring harness |
| Low in 2 only | Wiring harness Shift Solenoid Pressure Control A (SSPC-B) Overdrive clutch assembly |
| Low in 3 only | Wiring harness Shift Solenoid Pressure Control A (SSPC-C) Intermediate clutch assembly |
| Low Pressure in R only |
Wiring harness |
Additional Advice
If your pressure readings are slightly off, check your transmission fluid. Black transmission fluid definitely needs to be changed. Inspect closely, looking for metal shavings. This indicates a serious transmission problem which will likely require a rebuild at best. If it is slightly dirty or reads low (take the reading while the engine is hot), consider draining and replacing the fluid or adding more if it is the correct color and just low. After changing, do the pressure test again to see if the values fall within the correct ranges for your vehicle. If they still read low, or if they are considerably far out of range, your transmission should be checked by a professional. Early detection can result in minor repairs or adjustments; a considerable cost savings from more expensive repairs due to driving under incorrect pressure and causing more damage.
Related Discussion and Sites
- 5r110W Technical Info - TruckTransDiag.com
- Shift kits for your Super Duty - Ford-Trucks.com
- How to Diagnose With a Pressure Gauge - Sonnax.com
- FORD SuperDuty 5R110W Transmission Pressure & Stall Speed Test - YouTube.com