When you click on links to various merchants on this site and make a purchase, this can result in this site earning a commission. Affiliate programs and affiliations include, but are not limited to, the eBay Partner Network.
I removed the carb on my 1980 F350 Dually Trailer Special, 400, 2150 2 barrel for cleaning and the choke heat riser tubing crumbled. Did this tube come from exhaust manifold or intake manifold? I haven't been able to find the source.
The truck has 90,8xx miles and is completely stock.
I have read some info on Bubba's page about ignition timing, what is the best setting?
Thanks
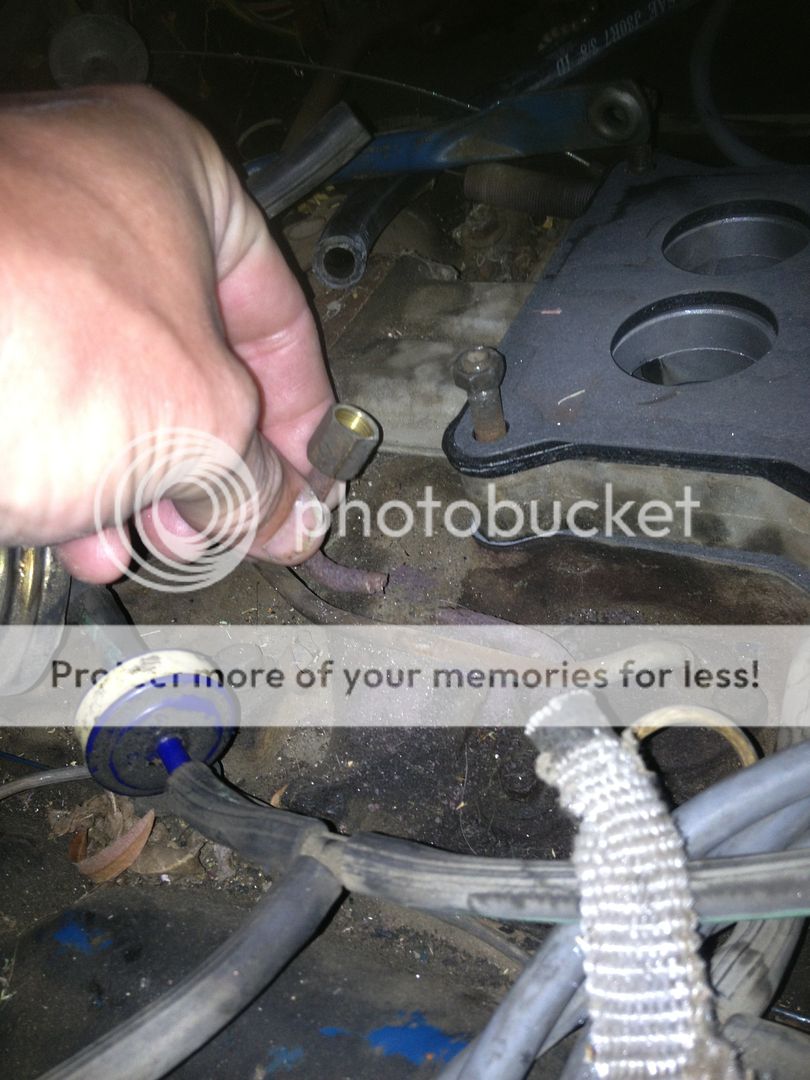
The picture below is one version they used, not sure if yours is like that or not. You can see it is in the exhaust stream that flows underneath the carb in the intake.
Best setting for timing is as high as you can get it, without it pinging under load. This will give you best power and fuel mileage for the type of fuel you use. Each vehicle is different, you will have to set the timing, road test it, set the timing, road test it again and keep doing this till you find the right number for your engine.
Best setting for timing is as high as you can get it, without it pinging under load. This will give you best power and fuel mileage for the type of fuel you use. Each vehicle is different, you will have to set the timing, road test it, set the timing, road test it again and keep doing this till you find the right number for your engine.
This^^^ Use a timing light w/ vacuum advance disconnected and plugged, and check that the mechanical advance moves smoothly up and down the RPM range and tops out where it should. If it doesn't it will never run right. Then make sure the vacuum advance isn't defective. Two different systems, work independently.
Best setting for timing is as high as you can get it, without it pinging under load. This will give you best power and fuel mileage for the type of fuel you use. Each vehicle is different, you will have to set the timing, road test it, set the timing, road test it again and keep doing this till you find the right number for your engine.
Spec label on core support shows 3 BTDC, Bubba's specs range from 4 to 12. I will try advancing some to see how she goes. I have driven the truck before when I borrowed to haul dirt-it was my father-in-laws truck. It ran ok then, now not so much. I am guessing the carb condition is the main cause.
The air filter lid and housing had water in them as well as a puddle in the intake manifold. I live north of Seattle-a lot of rain and the rubber weather strip/seal for cowl to hood is mostly gone. Could this be where the water is coming from?
Thanks for the pic and info.
I would say that is where the water is coming from.
If you do a search in here there is a fix for that using garage door sealing strip.
Don't know if it is the bottom of the door seal or the side / top seal?
Thinking the side / top because of the shape?
That reminds me I should find out as I will need that seal after my truck is painted.
BTW nice looking truck.
Hope that carb cleans up for you, it looks to be in ruff shape.
Dave ----
Water leaking from the cowl is a common problem. Another stop gap is to put a rubber washer under the wing nut for the aircleaner lid. This will help seal the lid, the water can then puddle on top of the lid without dripping in around the wing nut and stud for the lid.
I would say that is where the water is coming from.
If you do a search in here there is a fix for that using garage door sealing strip.
Don't know if it is the bottom of the door seal or the side / top seal?
Thinking the side / top because of the shape?
That reminds me I should find out as I will need that seal after my truck is painted.
BTW nice looking truck.
Hope that carb cleans up for you, it looks to be in ruff shape.
Dave ----
I found the thread with garage door weather stripping. Picked some up yesterday. looks like it should work fine. Thanks.
The picture below is one version they used, not sure if yours is like that or not. You can see it is in the exhaust stream that flows underneath the carb in the intake.
That is the same set up. Is that block bolted to intake manifold available? Both my tubes are broken off flush. I am not sure I want to touch the bolts either, they are VERY rusted. Looks like they will easily break off. Any suggestions?
I found the thread with garage door weather stripping. Picked some up yesterday. looks like it should work fine. Thanks.
not sure how to link the weather strip mod https://www.ford-trucks.com/forums/1...build-161.html
Dads Truck Build post 2411 pg 161
Carb is soaking now, should be clean as a whistle tomorrow evening. I hope. I did drive the truck home, didn't idle but it sort of ran. LOL
I doubt that block is available. Since I said that, if it is, someone will find it so stay tuned
If it were me, what I would do is take the plate off. If the bolts break off you will have to drill them out and then re-tap the threads. If you get it off you will find the line just loops around underneath the plate. The choke is sucking air through this line, and as the air goes in underneath the plate it is warmed by the exhaust gas. I would drill out where the pipes are rusted off, grind and clean the plate very well in this area, and then go to the store and get a short piece of universal brake line. Cut the line, bend it, and push it through the two drilled out holes. I would then use flux and solder the lines to the plate, and then re-install the plate. The high temp red silicone should hold it for a gasket under the plate. Bend the lines around and hook your hose back up and hook the other end to the choke housing.
Plan B: Skip this whole complete setup. Go to Lowes or the Hardware store and get a coil of soft copper line. Take this line and wrap it around the exhaust manifold several times. Hook one end to the choke, the other end to your rubber line, which should go to a nipple right under the aircleaner. This will do the same thing as the original line, air will flow through the line, the exhaust manifold will warm the air in the line, and it will warm the choke housing.
If I go with Plan B do I need to seal up the original holes in the manifold plate? I will seal them but is there anything under there to be concerned about? From the looks of the bolts in the plate I would bet the chances are very high that the bolts will break off. I will try to see if they will move but I will be surprised if they do.
It's just an exhaust passage under there, and the lines are just a loop hanging down in the exhaust stream. The worst that can happen, the lines rot out underneath the plate and you end up with an exhaust leak out of one of the holes where the pipes broke off. That is the reason it's so rusty and corroded, it gets very hot from the exhaust flowing underneath the plate, and exhaust gas is corrosive, that is why your exhaust system rots out all the time. So you can ignore it until it becomes a problem, you will hear it if it starts leaking.
I doubt that block is available. Since I said that, if it is, someone will find it so stay tuned
If it were me, what I would do is take the plate off. If the bolts break off you will have to drill them out and then re-tap the threads. If you get it off you will find the line just loops around underneath the plate. The choke is sucking air through this line, and as the air goes in underneath the plate it is warmed by the exhaust gas. I would drill out where the pipes are rusted off, grind and clean the plate very well in this area, and then go to the store and get a short piece of universal brake line. Cut the line, bend it, and push it through the two drilled out holes. I would then use flux and solder the lines to the plate, and then re-install the plate. The high temp red silicone should hold it for a gasket under the plate. Bend the lines around and hook your hose back up and hook the other end to the choke housing.
Plan B: Skip this whole complete setup. Go to Lowes or the Hardware store and get a coil of soft copper line. Take this line and wrap it around the exhaust manifold several times. Hook one end to the choke, the other end to your rubber line, which should go to a nipple right under the aircleaner. This will do the same thing as the original line, air will flow through the line, the exhaust manifold will warm the air in the line, and it will warm the choke housing.
Hay you are giving away my secrets!
This is on my 300 six when I switched to EFI exh. manifolds as they don't have a choke that needs to be heated to open.
Dave ----
1) The choke heater tube - On my '84 351W (2150 2bbl), the tube was still intact but severely corroded. I could have reinstalled it but instead converted to a full electric from these guys:
I bolted right up in place of the original choke mechanism. I forget the part number I used, but yours may be different. Please note this conversion is designed for full 12V from an ignition-switched source, not 7V like some Ford models that picked off power from an alternator stator. It works great, very simple mod.
2) The hole in the manifold for the choke heater tube - Either make a plate to cover it, or reinstall the original heater tube and cap the ends.
3) The cowl seal - When replacing it, consider this simple mod for easy access when (not if) your wiper motor fails:
4) The crud in the carb - There's so much debris caked in there, who knows what jets and tiny passages may be clogged. Even if soaked in some powerful cleaner, I doubt you'll ever get it clean enough. Save yourself a LOT of grief and either get a professionally rebuilt carb or send this one out for rebuilding. I played the "rebuild" game with the carb on my truck. By that, I mean I took it all apart, cleaned it and blew out all passages with compressed air, set the float level, installed pretty new gaskets, etc. Mine was pretty clean to start, no major crud. Over the past 25 years, I've "rebuilt" it twice and thought it was okay. Finally I replaced it last summer with a professionally rebuilt one. Holy cow, what a difference in performance, I don't know why I waited. In my overly-inflated opinion now, "rebuilding" a carb at home is like pissing your pants. It leaves you with a nice warm feeling for a little bit, but that's about it, and eventually you feel kind of silly.
 01-07-2019, 10:56 PM