When you click on links to various merchants on this site and make a purchase, this can result in this site earning a commission. Affiliate programs and affiliations include, but are not limited to, the eBay Partner Network.
1990 E-350 that has a new pump and the conversion fitting to R134 :
The van is new to me , PO says he had a new pump installed by a replicable mechanic but was not able to check to see if it worked due to it being winter time. I have never see the clutch engage so I deleted the hoses to the rear and capped them off thinking there was a leak in one of them and now I am trying to re-charge the system. when I cut the hoses to cap them off there was a very small amount of pressure released. The guy at the parts store could not find out what type of oil to use but did say the system needed to be running to suck the r-134 in.
My question are :
How do I get the pump to run to re-charge the system, can I bypass the switch on the canister ?
How much and what type of oil should I use to ensure I do not burn up the new compressor ? should I add it to the line by pouring it in before trying to pressureise the system with the R134 ?
Since you don’t know anything about the ac system other then what the PO has said, there are two ways to go about this.
You could charge the system and hope for the best or dig a little deeper into it and make sure it is right.
First question is why did he replace the compressor?
When a compressor goes bad it normally puts junk all through the system. Did the mechanic flush the system before installing the new compressor? Did he change the orifice tube and accumulator?
If you don’t want to take a chance on burning up the new compressor then you need to:
1- Vacuum the system out and check for leaks.
2- Find and fix any leaks.
3- Buy a flush kit and flush the system. I would flush it twice.
4- Add the proper amount of PAG oil as specified in the specs below.
4- Replace the orifice tube.
5- Replace the accumulator.
6- Re-vacuum the system and check for leaks again.
7- Fix any leaks if you find any.
8- Charge the system.
Note: Buy and use a set of gauges that register the high and low side when charging the system.
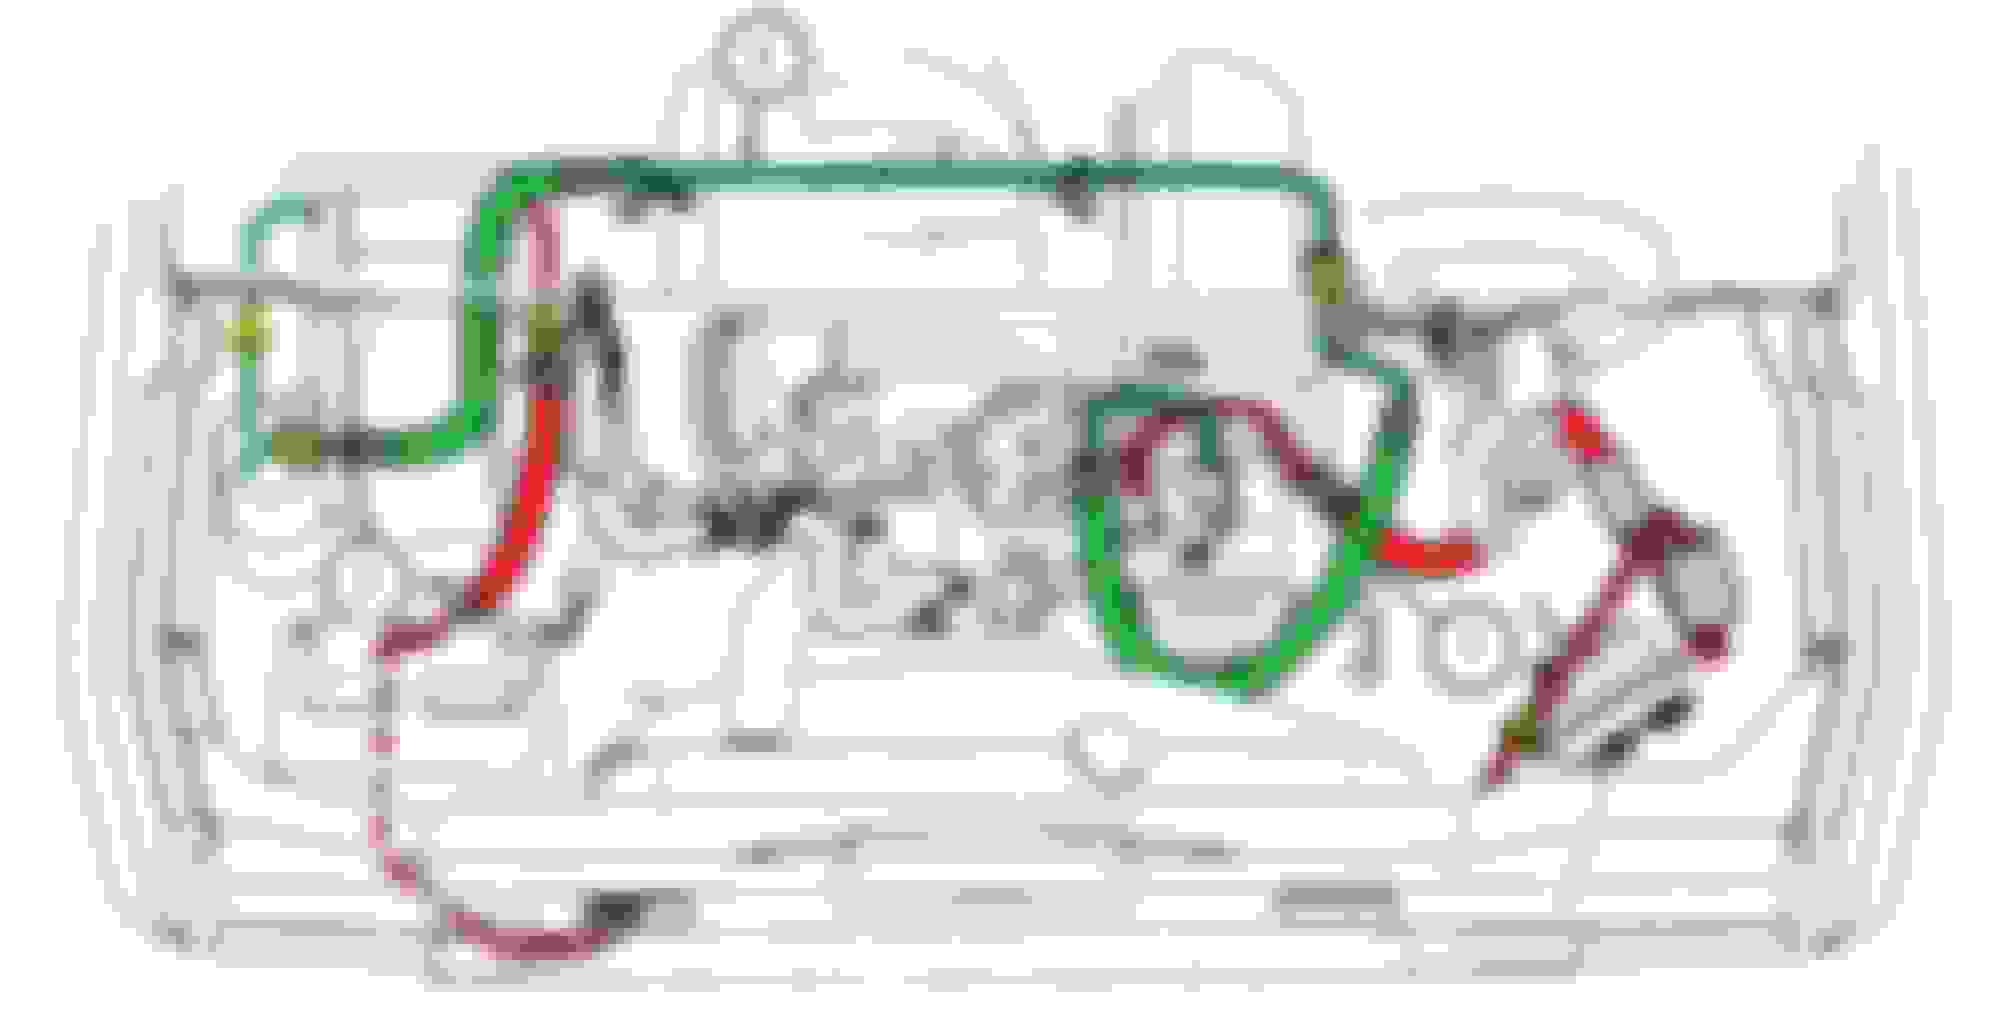
I bought a new Ford compressor and this is the tag that came with my compressor.
Note: the info below is for R12 which was originally in your system. You will be using R134a so you will use PAG oil. I have read that when converting to R134a, it will cool better if you use just a little less refrigerant then the specs call for, for R12. You will also want to make sure to but an orifice tube, accumulator, and clutch cycling switch (also called de-icing switch). There is an adjustment inside the de-icing switch (a small screw down inside between the electrical connectors). Use this adjustment to set it to the correct cut-in Cut-out pressures.
If you use the exact amount of oil and freon specified below, you should not have to worry about overcharging if you have flushed the system.
Again the info below is for an R12 so you might want to do some research for R134a when it comes to cut-in and cut-out and pressures.
Here is a pressure chart. Keep in mind that the chart is for ambient temperatures. Our van engines are closed and so the temperatures may be a bit higher.
Let me add yet another bit of info.. I have a ford manual for my van and in it is a chart for cut-in and cut-out time for the compressor. Again our vans originally had R12. If yo cold find someone with a 94 (I believe that is when Ford went to R134a) manual that has a similar chart for R134a, that would also help you out making sure your system is working properly. OH, depending on where you cut the ac lines to the rear, you may need a bit more R134a then is in the specs as you will have to fill the space in the lines..
Again tough I have heard that when converting to R134a, some people say the system works better with just a little less freon then the specs cal for so perhaps you will be ok.
Here is an example from my manual on the pressures... You should also think about investing in a Ford manual. They are much better then any other manual you will buy in a store. https://www.ebay.com/itm/FORD-1990-B...4383.l4275.c10
Here are some examples
The ac chart from my 88 Ford manual for R12:
The accumulator appears to have been changed at the same time as the pump, it has a sticker on it that states it is compatible with R-134 and made in China so I am hopeful the guy also changed the orifice tube but can not figure out how to get the line apart to double check. Can you use the same disconnect tools that you use for the fuel lines ?
Another concern is how the new pump is wired, they taped in to a plug that had 4 wires, 2 white, 1 gray, and one black. The white and gray wired were diked and the black wire leads down to the new pump. Does this look right for a conversion ? I am skeptical of this because I have never seen the clutch kick in and am trying to figure out why .
Read about when and why you to need to change accumulators.
Orifice tubes have a find screen in them and are known to get clogged up. They are 3 or 4 dollars.
Good idea to replace any O-rings when you take connectors loose to help insure you don't have a leak from a dried up o-ring you just disturbed.
The hose disconnect tools are different for the AC lines as they are larger. Sometimes it helps to spray a little wd40 or other type of lubricant on the spring lock connectors before trying to remove them.
Not sure about the connector on your 1990 van but on my 88, there is a factory pigtail that comes out of the socket with the 2 wires and connects directly to the compressor clutch socket.
In your case you do not have a factory installed AC compressor. The compressor you have is a rebuilt Driveworks compressor with a aftermarket clutch. They have grounded one side of the clutch to the compressor body and the single wire is the power source. That wire should go back to the pressure switch and somewhere in between is a wire that goes to the ECM to let it know you have turned on the AC so it will raise the RPM' s a little.
Jumped the clutch pressure switch with a paper clip today and got the clutch to kick in, so it appears the new pump is wired right. Trying to get the tools to remove the hose to check the orfice tube before I re charge the system.
Do they still make the hoses for these units ? I would like to replace them but I cant find the right ones coming off the pump ?
You know that you need to vacuum the system first? You can get a vacuum ump as a loaner tool.
The problem you will have with the lines is (if I am correct) you have a dealer installed AC system and not a factory installed system. Hoses for a dealer installed system can be much harder to find. If you want to change the hoses then I recommend that you check around your town and find a company that will make new hoses for you. My system is factory and after much searching around, I finally found the hoses. I found a local hydraulic shop that could have made the hoses for about the same price I paid for new factory hoses. In my case the van had sat for years and the compressor was bad. It had no refrigerant in the system and when I took the lines off you could see rust or corrosion inside the metal tubes.
Something else to think about when replacing lines on older cars is,,, the molecules in R134a are smaller then R12. In a NEW R12 HOSE, R134a will very slowly seep through the hose. The new type hoses for R134a have a barrier to prevent this. Testing has shown though, that OLD/USED R12 hoses do not have this problem because the mineral oil used in the R12 system permeates the rubber inside the hoses creating its own barrier. So when you convert from R12 to R134a, using the old lines should not have an issue. Buying new lines that were originally designed for use with R12 will. How slow does the R134a seep through the lines, I do not know..
I went back with R12 in my system and if I ever convert it to R123a then I should be ok.
So if your old hoses are in good condition (disconnect and look inside any steel fittings most are aluminum ) then you should be good to go.
Orfiice tube completely plug by gunk with mud like consistency. I hosed it out with brake cleaner and put it back in, not sure if this is a good idea or not .
I did not see any rust in the lines, but they were lightly covered in a oil type substance. all my lines have a spring type retention fitting on one end and attaches to whever it goes with a hose clamp on the other end.
I will probably just have a local shop make new ones with the barrior hose linked above
I would say not a good idea... You need to get a flush kit and flush the whole system, that gunk came from somewhere. The screen is there to catch the gunk but what is spread throughout the rest of the system?
When replacing a compressor with a OEM Ford compressor, Ford will not warranty the compressor unless you flush the system and install a inline filter kit they sell. The filter kit is a two part kit. After charging the system and running it for a short time you remove one of the two filters.
I did not install a filter in mine because I replaced every part with new parts.
I think it would be best if you at minimum flush the system, change the accumulator, change the orifice tube, change all the O-rings,and flush the compressor with new oil to clean it out. You can not run the flush through the compressor.
Whoever replaced the compressor the last time did not do a proper job or the orifice tube would not be so clogged. The majority of that gunk is fine particles from compressor parts wearing. Is it from the old compressor, new compressor, or both, who knows. What we do know is that the gunk is not supposed to be in side there and will cause a new compressor to fail much sooner then it should.
Are you planning on keeping this van?
How much are you willing to spend on the AC system?
Are you going to only want to connect the front AC?
If you are only going to use the front AC then there are options.. You do not need the lines that Tee off to the rear unit. I know at least one of the lines can be bought that have the newer hose for R134a
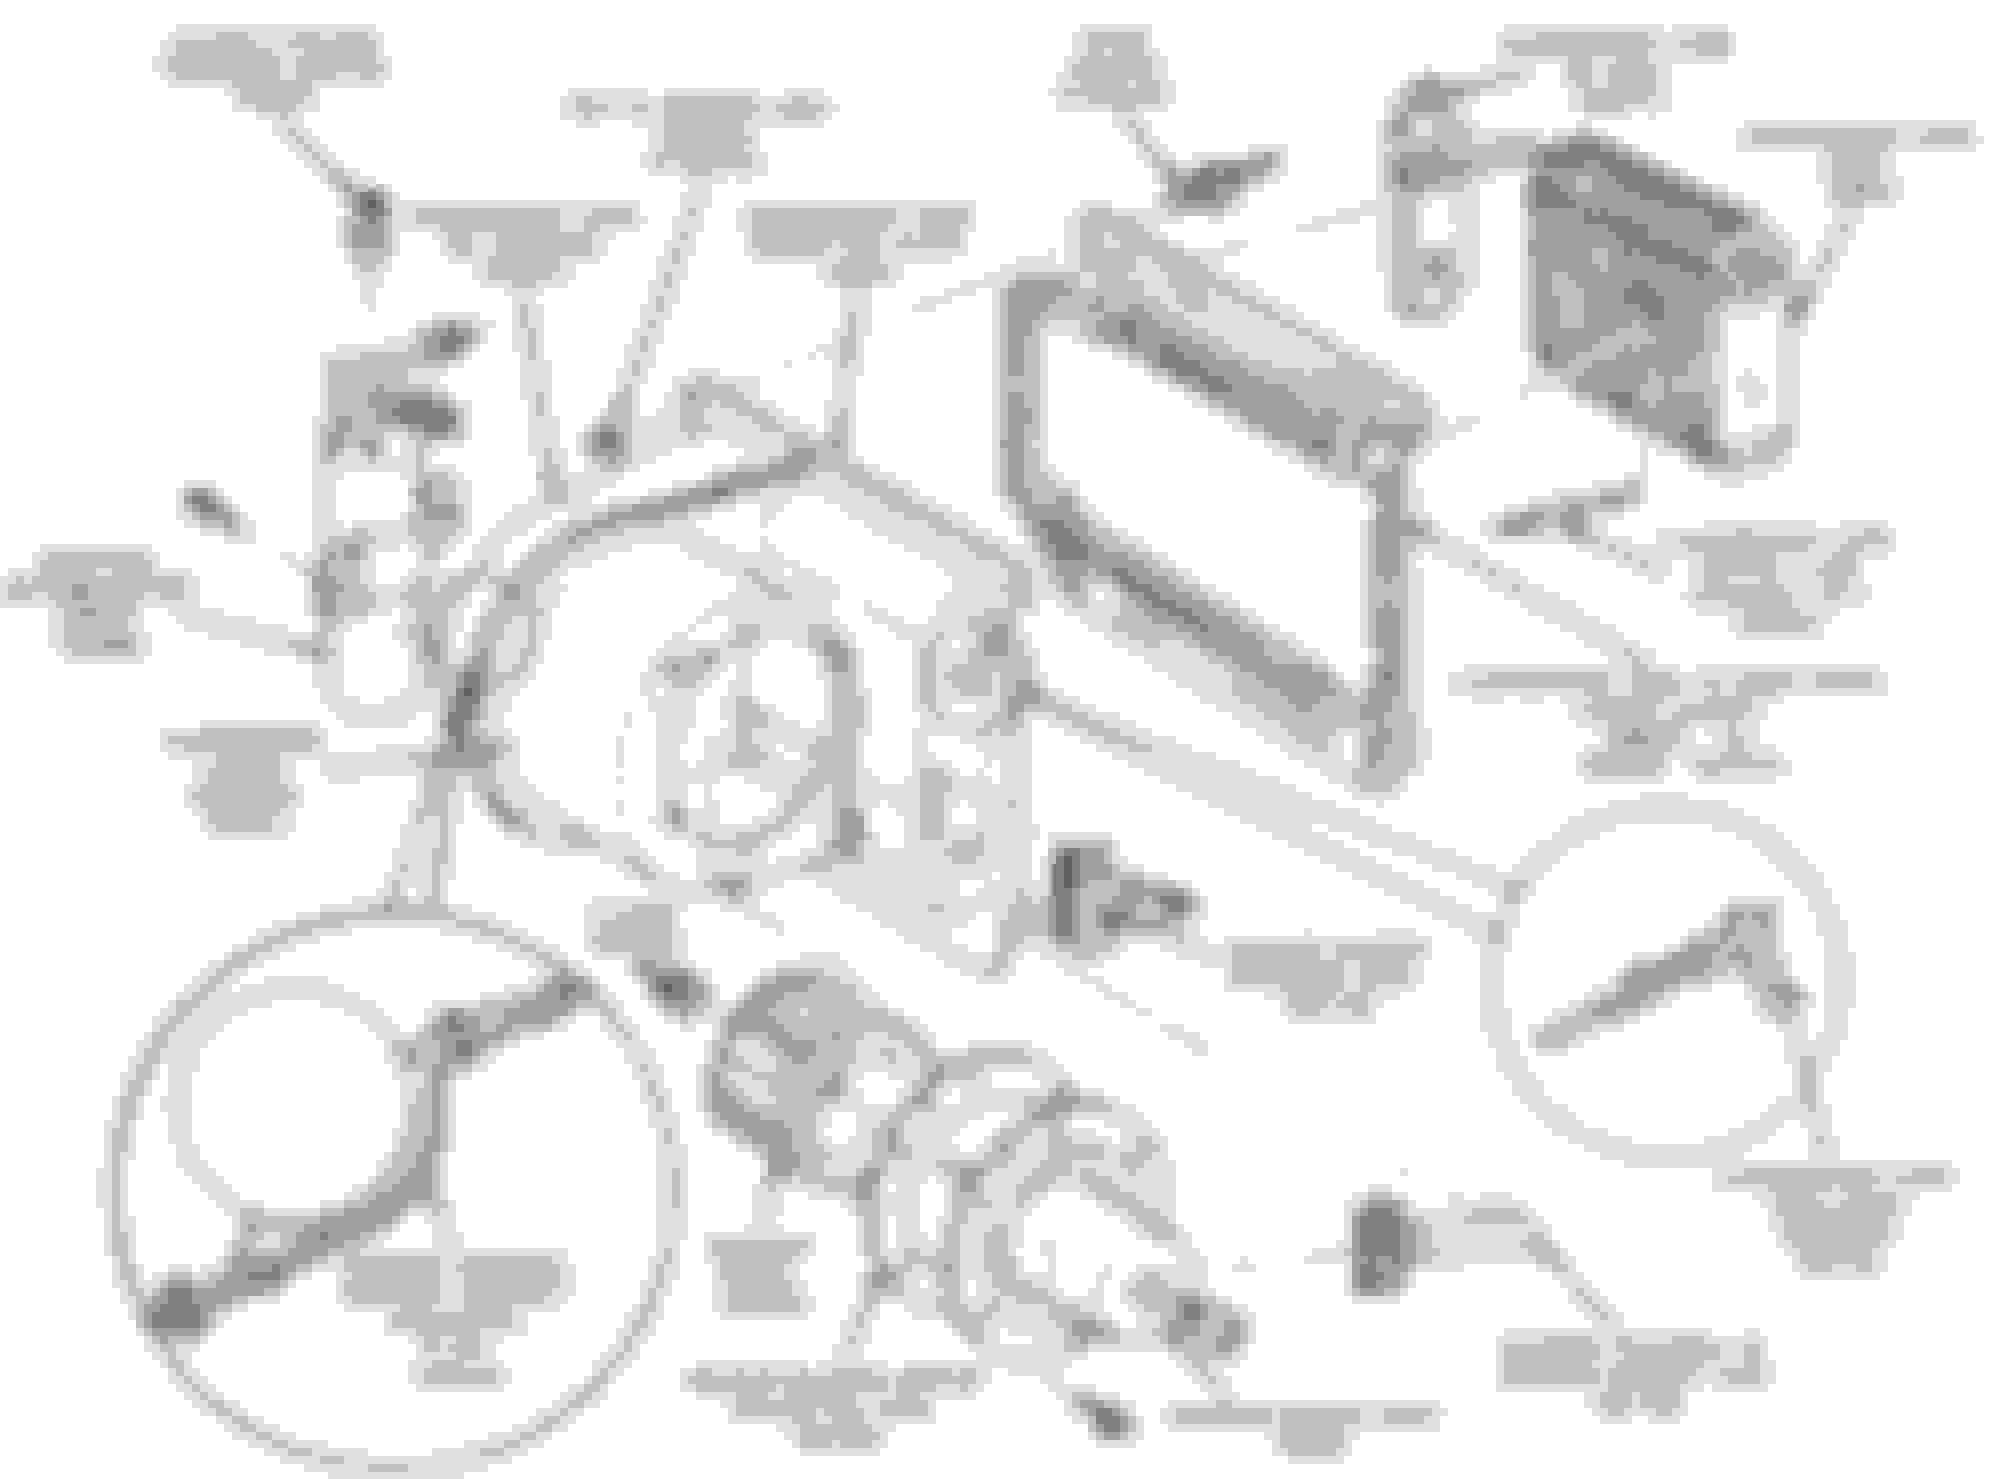
Ignore the markings on the pics as they are where I marked the drawings when helping someone else. These drawings are for a 1988 and I would assume yours should be the same. The only to know for sure wold be fore you to buy an 1990 Ford factory Service manual from Ebay like I did for my 85 and 88.
This is the diagram for a front unit only. Notice the compressor line connection is different because this is a factory compressor.
ALSO what engine do you have? There is a difference in the lines for a 5.0 and a 5.8.
IF yo changed the compressor to a factory installed compressor and delete the rear unit, there is only 3 lines you need to buy or replace.
This is also line #2 as shown above but I don't know if it is the barrier hose or not. It does have the updated part number so might be. You could contact the seller and find out and if it is then it would save you at least $20 compared to the one at Rock auto by the time you add their shipping. https://www.ebay.com/itm/YF1516-A-C-...-/201538418064
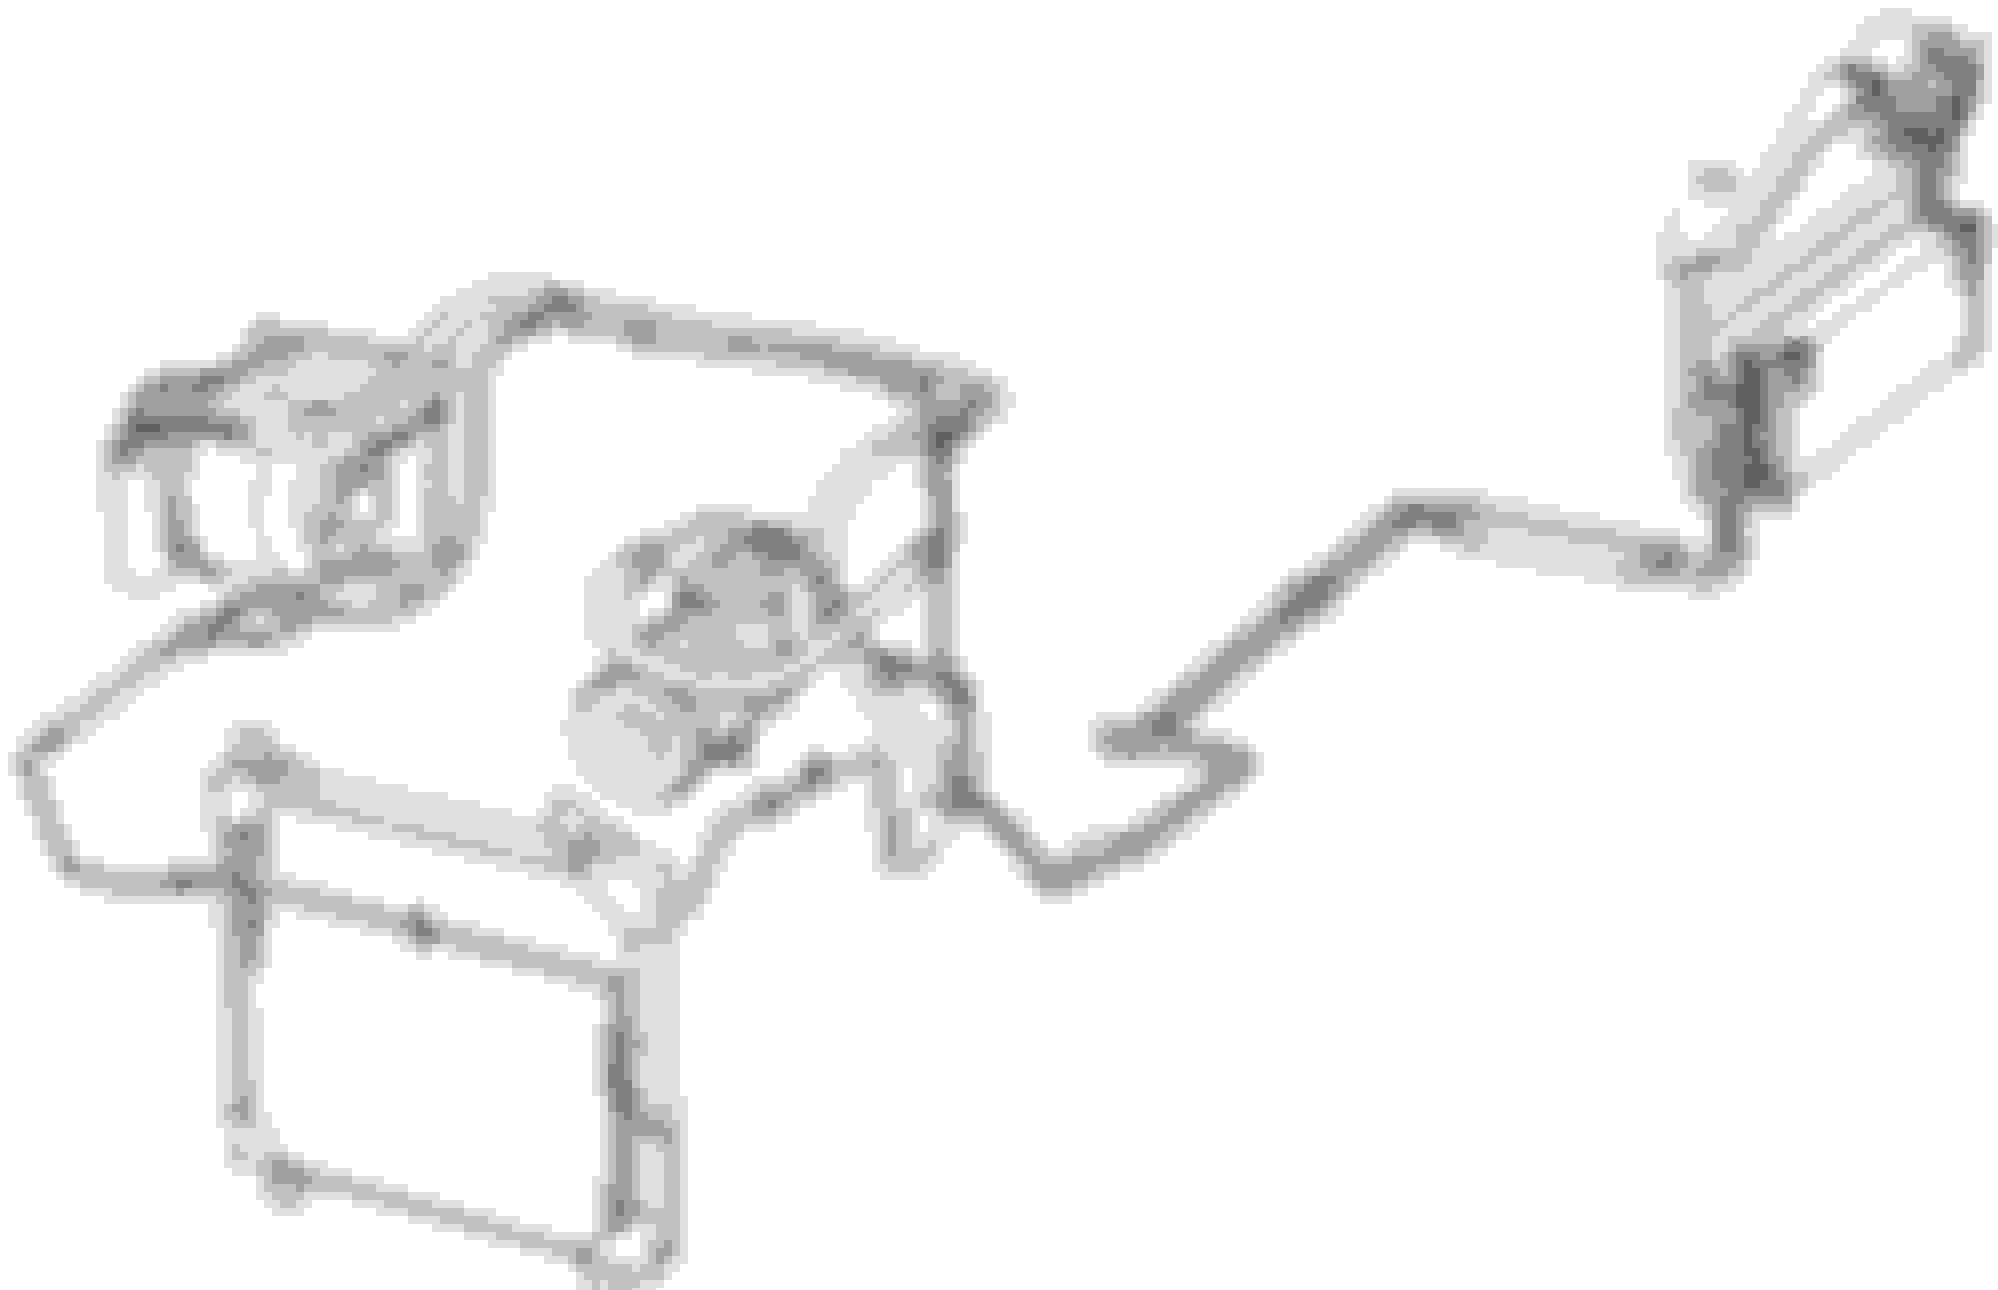
this is line #1 for the factory ac compressor but I don't know if it can be bought in the new barrier hose. Te old line is for a 5.0 engine and the new line is for a 5.8 engine but I was able to make the 5.8 line work. I don't know if it will work the other way around.
I dno't have a pic of line 3 for the front unit only. The pic below is the drawing for a duel system and should be similar to what you have before you cut the lines
Thinking about it a bit more, I believe line #3 is available through 4 Seasons also. If I remember when I was buying my parts I was sent one from 4 Seasons and it was a much smaller rubber hose and the fittings were aluminum where mine were steel so I sent it back and bought the R12 oem hose instead.
The link below has allot of Ford hoses listed and you might by chance just find the one for the compressor you have, I don't know because i believe your system is dealer installed. The info I shared with you and part numbers I have all that info on my computer from where I rebuilt my ac 2 years ago and again it is factory installed. http://www.oehq.com/motorcraft_air-c...098bc31032.htm
 04-21-2018, 01:38 PM