
2003 Excursion Fuel Pump Replacement
#1
 03-20-2018, 12:29 PM


2003 Excursion Fuel Pump Replacement

View between Excursion floor and Fuel Tank. Follow white wire to Fuel Pump lines and lock ring.
I am working on replacing the Fuel Pump on my 2003 Excursion 6.8 L . I do not want to drop the fuel tank as I have an add on Pullrite Hitch that is directly under the fuel tank. I am doing this replacement before it fails. Currently at 115,000 miles. This work will be done at my leisure in my work shop/storage building this Spring 2018.
My plan is to cut an access hole just above the fuel pump clamping ring, etc. It appears to be about 20 inches in from the extreme face of the rear bumper and about 8 inches toward the drivers side from vehicle centerline.
I have drilled a 3/8 inch diameter inspection hole at vehicle centerline 20 inches in from rear bumper. I was able to pass a coat hanger wire thru this hole out the drivers side near the tank filler inlet. I have a picture I was able to get looking in at the fuel pump access between the vehicle floor and the fuel tank.
There appears to be all clear around that area with about 2 inches clearance between underside of floor and top of tank.
I am just starting but the first step will be to cut out a section of the floor. More later.
Comments are encouraged. Photos will be added as work progresses.
Last edited by Richard2212; 03-20-2018 at 12:33 PM. Reason: Grammar
#2
03-20-2018, 02:33 PM


Wow, good luck! How do you plan to cut the access panel? And what do you plan to seal it with when you are done? Access panels make the FP swap much easier, especially with a Pullrite!
On a side note, I'm not sure how many miles most go before failure, but I would think much more than 115k. My stock FP currently has 205k on it.
On a side note, I'm not sure how many miles most go before failure, but I would think much more than 115k. My stock FP currently has 205k on it.
#3
03-20-2018, 04:11 PM
2003 Excursion Fuel Pump Replacement
We only use the Excursion to pull our 33 foot Travel Trailer about 5000 miles per year. I am thinking 15 year old Fuel Pump not just miles. Being stranded out somewhere pulling that trailer is not a pleasant thought. After this job is done then fuel pump problems will not be a big concern.
To cover the hole? There is enough space between the floor and the tank and tubes,etc that I think I can cut with a short blade in my Saber Saw. With a careful layout one cut around should be enough. Then either add a flange strip around the cutout piece or form a new piece. I will try a rectanglar hole to make it easier. Screw down with sealer and cover with the 1/8 inch sound deadener that covers the floor on the topside. All wishen-hopen at this point in time.
To cover the hole? There is enough space between the floor and the tank and tubes,etc that I think I can cut with a short blade in my Saber Saw. With a careful layout one cut around should be enough. Then either add a flange strip around the cutout piece or form a new piece. I will try a rectanglar hole to make it easier. Screw down with sealer and cover with the 1/8 inch sound deadener that covers the floor on the topside. All wishen-hopen at this point in time.
Last edited by Richard2212; 03-20-2018 at 08:06 PM. Reason: Grammar
#4
03-20-2018, 09:53 PM

#7
03-21-2018, 07:04 AM
Probably not a bad move. I bought my first camper in Tuscaloosa, Alabama...about 250 miles from home. Drove my 96 Dodge pickup down to get it and lost the fuel pump on the way back...on a Sunday. If I remember correctly, that cost me about $700.00 and most of the day.
Edit: I did learn that you can sometimes smack the bottom of the tank with something substantial while the ignition is on...rubber mallet...dead blow hammer...large smooth rock...and get the fuel pump running again. The failure tends to be that they won't restart when you shut them off. Might be a trick that'll at least get you home one day...
Edit: I did learn that you can sometimes smack the bottom of the tank with something substantial while the ignition is on...rubber mallet...dead blow hammer...large smooth rock...and get the fuel pump running again. The failure tends to be that they won't restart when you shut them off. Might be a trick that'll at least get you home one day...
Last edited by loganj01; 03-21-2018 at 07:28 AM. Reason: Additional info
Trending Topics
#8
03-21-2018, 07:18 AM

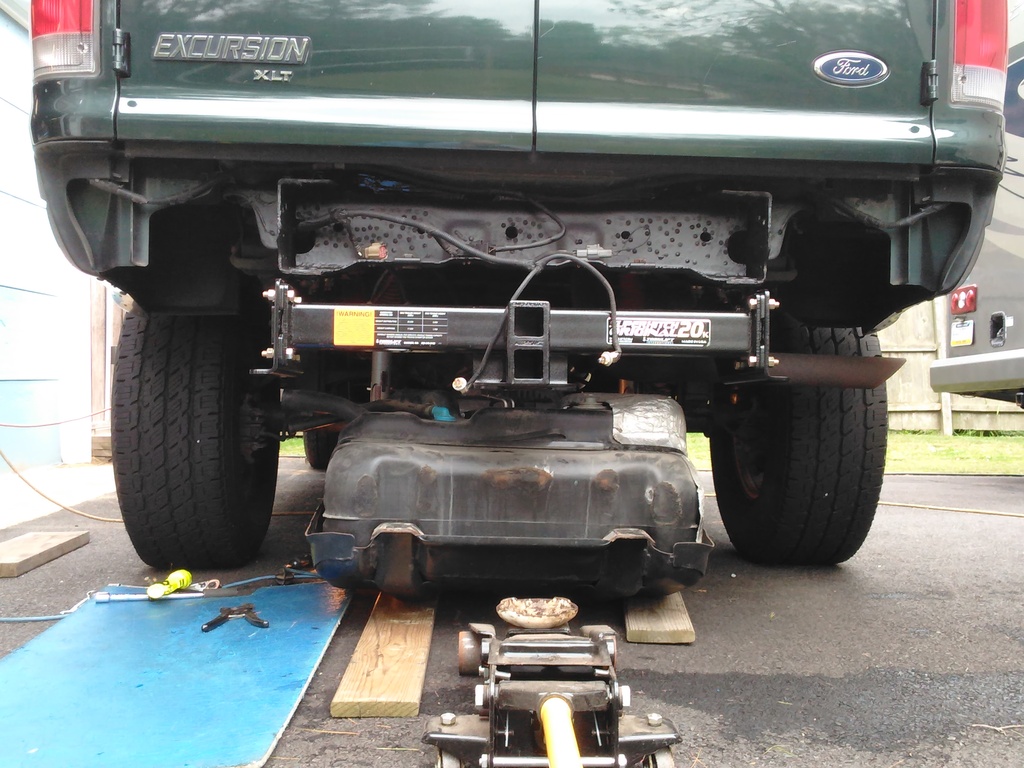
I am assuming that the Pull-Rite hitch assembly was welded into place and can not be unbolted to get it out of the way? I am somewhat familiar with the Pull-Rite hitch, but not intimately so, does the large arc flange actually go under the tank at all or is it only the swing receiver tube that is in the way of the tank coming down? Can the swing tube be removed easily? And one more question having nothing to do with the gas tank......Does the Pull-Rite use a special drawbar or WD setup unique to the <acronym title="Page Ranking">PR</acronym> or does it just use the standard stuff and the hitch itself provides all the towing improvements? I'm a Hensley Arrow user, so I too use a fancy pants hitch, just a different flavor than yours. 
Here are few pictures that may help with your project from when I had my tank out recently to install my new Torklift 20K SuperHitch.
The rear cab floor, to the left is the rear crossmember above the hitch.

Another shot of the floor, this one has the rear at the top of the pic and shows the extra body panel that may be in your way at the bottom.
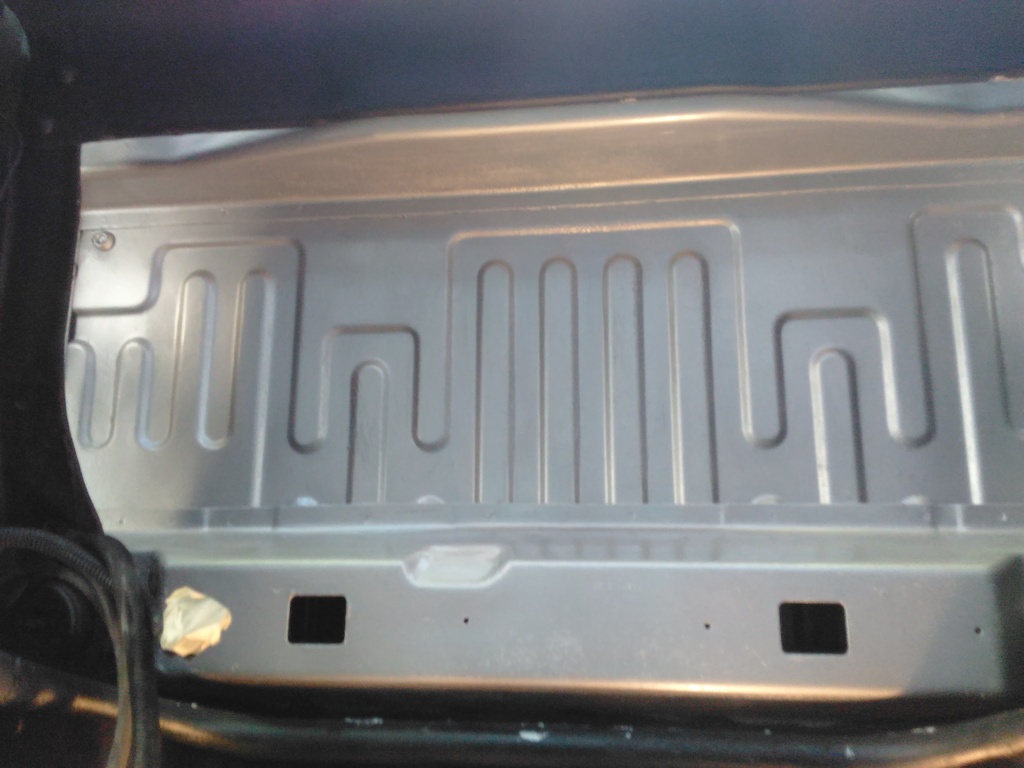
Looks like the pump access is only slightly offset to the driver's side from center.
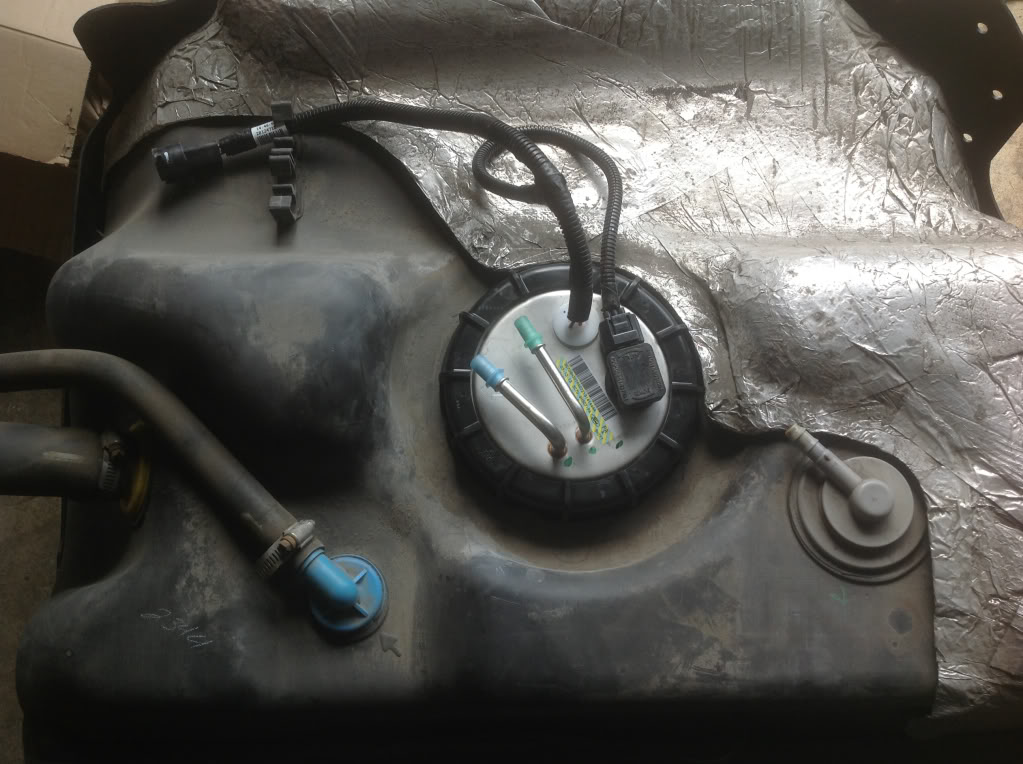
From the looks of this tank top shot the retaining ring may be totally rearward of that extra body bracing. Rear of the tank is at the bottom of picture.
Here are few pictures that may help with your project from when I had my tank out recently to install my new Torklift 20K SuperHitch.
The rear cab floor, to the left is the rear crossmember above the hitch.
Another shot of the floor, this one has the rear at the top of the pic and shows the extra body panel that may be in your way at the bottom.
Looks like the pump access is only slightly offset to the driver's side from center.
From the looks of this tank top shot the retaining ring may be totally rearward of that extra body bracing. Rear of the tank is at the bottom of picture.
#9
03-21-2018, 07:22 AM
My original fuel pump died suddenly with no warning signs at 96K miles and 9 years old. At a campground on the first trip with our then brand new current TT, I had just backed into the campsite and shut it off then realized it needed to be slightly repositioned to allow for the one slide to extend all the way........No start! No fun!

#11
03-21-2018, 07:47 AM
That picture looks like it has some mounting holes where it would be attached to the frame via bolts.......maybe, but I thought that Pull-Rite did weld some to the frames. And if I recall, they only mounted the hitches at their one facility in CA, no dealers or self installations were offered. Cool hitches though.
And that definitely looks like its all kinds of in the way of dropping the tank!
And that definitely looks like its all kinds of in the way of dropping the tank!
#12
03-21-2018, 08:03 AM
I did it in mine when I did the Cummins conversion. I felt that if I had to change anything in the future or put an in tank fuel system in I would not have to drop the tank.
In Tom's images you can see the section in the center that can be cut. I used a panel saw to cut it. I would NOT use an angle grinder as it generates too many sparks and there might be some gas fumes in the area.
Once I cut the panel out I riveted an aluminum 1" frame around the perimeter of the cut out piece. This then acts as a flange. Put it back in and used rivets again to secure the frame to the body. Prior to installing it I used RV roof seam sealer under then use it again on the top over.
Once the hatch is in you have plenty of room at access the fuel pump as well as the rest of the connections at the top of the tank. All you have to do is drill out those rivets. Clearance under there is about 2" or so. The fuel access is a little forward but plenty to get the assembly out.
You can't tell I did this mod and now fuel tank access is a piece of cake. I'll see if I can find the pics.
#13
03-21-2018, 08:05 AM
Probably not a bad move. I bought my first camper in Tuscaloosa, Alabama...about 250 miles from home. Drove my 96 Dodge pickup down to get it and lost the fuel pump on the way back...on a Sunday. If I remember correctly, that cost me about $700.00 and most of the day.
Edit: I did learn that you can sometimes smack the bottom of the tank with something substantial while the ignition is on...rubber mallet...dead blow hammer...large smooth rock...and get the fuel pump running again. The failure tends to be that they won't restart when you shut them off. Might be a trick that'll at least get you home one day...
Edit: I did learn that you can sometimes smack the bottom of the tank with something substantial while the ignition is on...rubber mallet...dead blow hammer...large smooth rock...and get the fuel pump running again. The failure tends to be that they won't restart when you shut them off. Might be a trick that'll at least get you home one day...
Last edited by Stewart_H; 03-21-2018 at 12:39 PM. Reason: Multi-quote is your friend
#14
03-21-2018, 08:16 AM
Great F/U. Pullrite pivot is just behind rear axle. Bolted in with about 6 bolts but heavy.
Thanks for the pix. The Fuel Pump access is about midway in the open area behind the R to L Brace.
The Pullrite does bolt on. I did the installation myself. The hitch comes with all the hardware to mount.
Thanks for the pix. The Fuel Pump access is about midway in the open area behind the R to L Brace.
That picture looks like it has some mounting holes where it would be attached to the frame via bolts.......maybe, but I thought that Pull-Rite did weld some to the frames. And if I recall, they only mounted the hitches at their one facility in CA, no dealers or self installations were offered. Cool hitches though.
And that definitely looks like its all kinds of in the way of dropping the tank!
And that definitely looks like its all kinds of in the way of dropping the tank!
Last edited by Richard2212; 03-21-2018 at 03:45 PM. Reason: spelling error
#15
03-23-2018, 07:37 PM
2003 Excursion Fuel Pump Replacement

2003 EX 6.8 L view thru hole in rear floor area.

2003 EX 6.8 L view of rear floor area showing future cut out for Fuel Pump replacement w/o dropping Tank.
[QUOTE=Richard2212;17874933]
I have cut out a floor section with a 2-1/4 inch hole saw. The hole is at "7 o'clock" over a section of the perimeter of the Fuel Pump Lock Ring. Pictures attached show 2-1/4 inch hole, Cam picture thru that hole looking in the "1 o'clock" direction and a top view of the floor with future cut out in "--------" ,vehicle front at top of floor picture. This step verifys future success.
Last edited by Richard2212; 05-25-2018 at 04:14 PM. Reason: Deleting duplicate pictures