1950 F-2 Restoration
#1
 03-25-2017, 06:45 PM

1950 F-2 Restoration
Hi, I am new to this forum, but I figured it would be a good place to post my project and check in if I need input on something. Also it should help me keep track of the journey and perhaps even help with motivation as it progresses.
So the truck is a 1950 F-2, it has been in the family since the 1960's. My Grandpa owned it, and my mom learned to drive on it. Sometime before it came into the family an overhead valve 6 cylinder had been swapped in. My dad tore it down in the early 1990's for a full restoration. It progressed in little bits over the years, the chassis and drivetrain are completely done. It is keeping the original 4 speed, and a period correct flathead V-8 has been swapped in. The engine will not be entirely stock as certain key upgrades will be made such as an electronic distributor and a few other goodies, but it will be mostly stock. The machine work was done locally, and it was assembled by my dad. Pretty much everything has been sandblasted over the years by me and my dad and is in some stage of paint and repair work. The worst of the body work is out of the way.
My dad passed away in the late 2000's and after a few years my mom sent it away to a shop to have it finished up since I was away at the time and didn't have the time or interest in doing anything with it. After a year or so there, more of the bodywork was out of the way, but it was costing far too much so it came back home and sat in the garage until now.
I am finally at a point where I can devote a little time here and there to finishing it up the way it was intended to be all those years ago. I have plenty of mechanical and electrical knowledge to do it, as well as the skills to do the rest of the body work. I don't have much painting experience, but I'll teach myself as I go.
It started a couple weeks ago with cleaning up the garage enough to get into the truck, clean the years of dust off, and remove the sheet metal and boxes of parts that had been temporarily bolted in place so nothing got lost. The paint on the cab was finished by my dad a long time ago in a blue color, however the shop that it was at wasn't happy with his choice of paint types, and had roughly premiered over parts of it again. Which is okay, my mom decided she wants it to be a green color, so we chose a period correct Meadow Green color.
So thats part of the story, and I'll get back on here and post more later. Pictures too if there is any interest in what is going on here.


#4
03-25-2017, 08:09 PM
Glad to see there is some interest in this project.
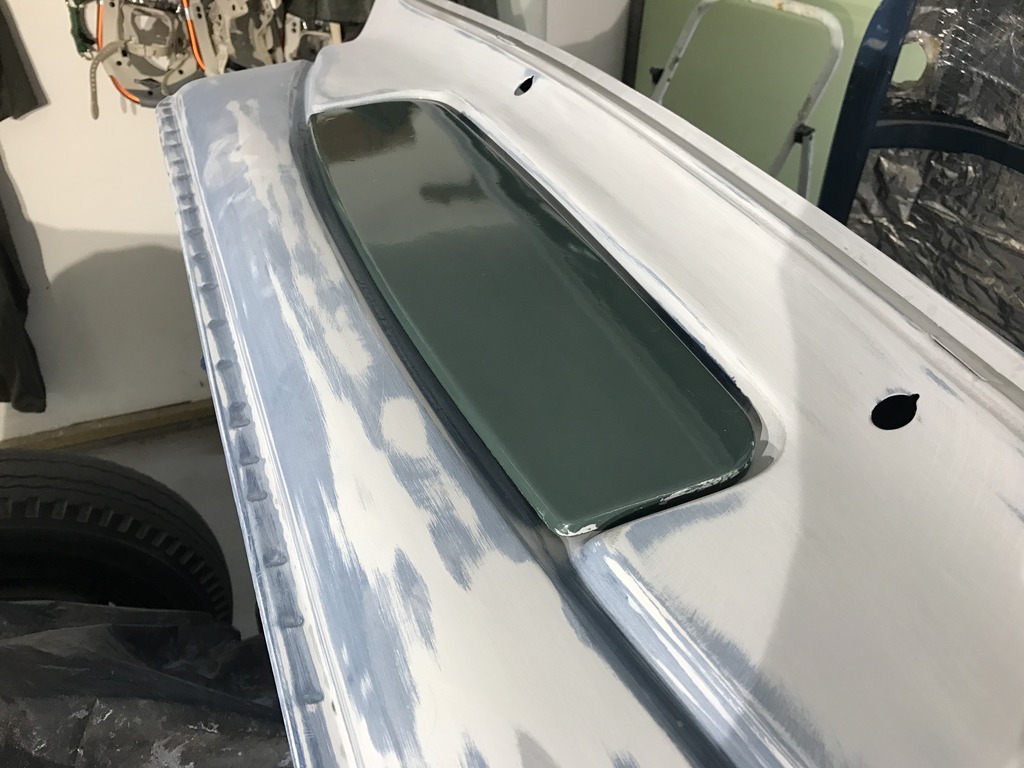
Testing teaser photo to make sure my way of posting pictures works on this site.
Photo is of brush painted cowl vent lid as test panel for color choice. It will get sanded back down again and prepped properly. Color choice is a go.
More photos to come later tonight if this works.
Testing teaser photo to make sure my way of posting pictures works on this site.
Photo is of brush painted cowl vent lid as test panel for color choice. It will get sanded back down again and prepped properly. Color choice is a go.
More photos to come later tonight if this works.

The following users liked this post:
#5
03-25-2017, 08:29 PM
A meadow green F2.
Nice.
That is going to be a nice truck. I like your approach to returning it back to nearly stock.
If you are missing any parts just give a shout there are plenty of us on here who have small to large parts stashes. At the top of this forum is an ongoing thread dedicated to finding parts and selling extra ones for our specific year trucks.
Same thing if you have a part and don't remember which way it goes on or where it belongs - just ask right here.
You've found the very best place on the planet for advice, support, encouragement, and archive information for trucks just like yours. The search feature is pretty good and every topic imaginable has been covered at some point in the last 10 years.
I'll be interested in following your progress since I'm beginning the restoration of a '49 F3 which will be almost identical to yours....including the Meadow Green color.
So welcome and keep up the good work!
When you have time add your location and maybe even a gallery of progress photos.
Tom
Last edited by pineconeford; 03-25-2017 at 08:34 PM. Reason: added some stuff.....
#6
03-25-2017, 09:31 PM
A meadow green F2.
Nice.
That is going to be a nice truck. I like your approach to returning it back to nearly stock.
If you are missing any parts just give a shout there are plenty of us on here who have small to large parts stashes. At the top of this forum is an ongoing thread dedicated to finding parts and selling extra ones for our specific year trucks.
Same thing if you have a part and don't remember which way it goes on or where it belongs - just ask right here.
You've found the very best place on the planet for advice, support, encouragement, and archive information for trucks just like yours. The search feature is pretty good and every topic imaginable has been covered at some point in the last 10 years.
I'll be interested in following your progress since I'm beginning the restoration of a '49 F3 which will be almost identical to yours....including the Meadow Green color.
So welcome and keep up the good work!
When you have time add your location and maybe even a gallery of progress photos.
Tom
Nice.
That is going to be a nice truck. I like your approach to returning it back to nearly stock.
If you are missing any parts just give a shout there are plenty of us on here who have small to large parts stashes. At the top of this forum is an ongoing thread dedicated to finding parts and selling extra ones for our specific year trucks.
Same thing if you have a part and don't remember which way it goes on or where it belongs - just ask right here.
You've found the very best place on the planet for advice, support, encouragement, and archive information for trucks just like yours. The search feature is pretty good and every topic imaginable has been covered at some point in the last 10 years.
I'll be interested in following your progress since I'm beginning the restoration of a '49 F3 which will be almost identical to yours....including the Meadow Green color.
So welcome and keep up the good work!
When you have time add your location and maybe even a gallery of progress photos.
Tom
A 49 F-3 would be a cool project too. I just updated my location. This truck has lived in California, Ohio, and Oregon to my knowledge, and who knows where else. Previously we had a 48 F-3 as a parts truck, then a 49 F-2 for a bit that was going to be a parts truck but was too nice. I was going to restore it someday, but my mom gave it to the guy that did some of the work on this one as trade for some of the labor that he put into this one. I need to get back in touch with that guy as the flathead v-8 that was in it that I put quite a bit of work into wasn't supposed to be part of the trade and was supposed to be mine. I would imagine that it is long gone though...
Also I had a 1945 Ford 1/2 ton pickup years ago that my dad and I were working on restoring for me as a father son project where I could learn about that sort of thing from him. I foolishly sold that one shortly after he died. I would love to have it now and finish it up. Its sitting in a carport, neglected, and covered with junk. Guy never did anything with it.
#7
03-25-2017, 09:37 PM
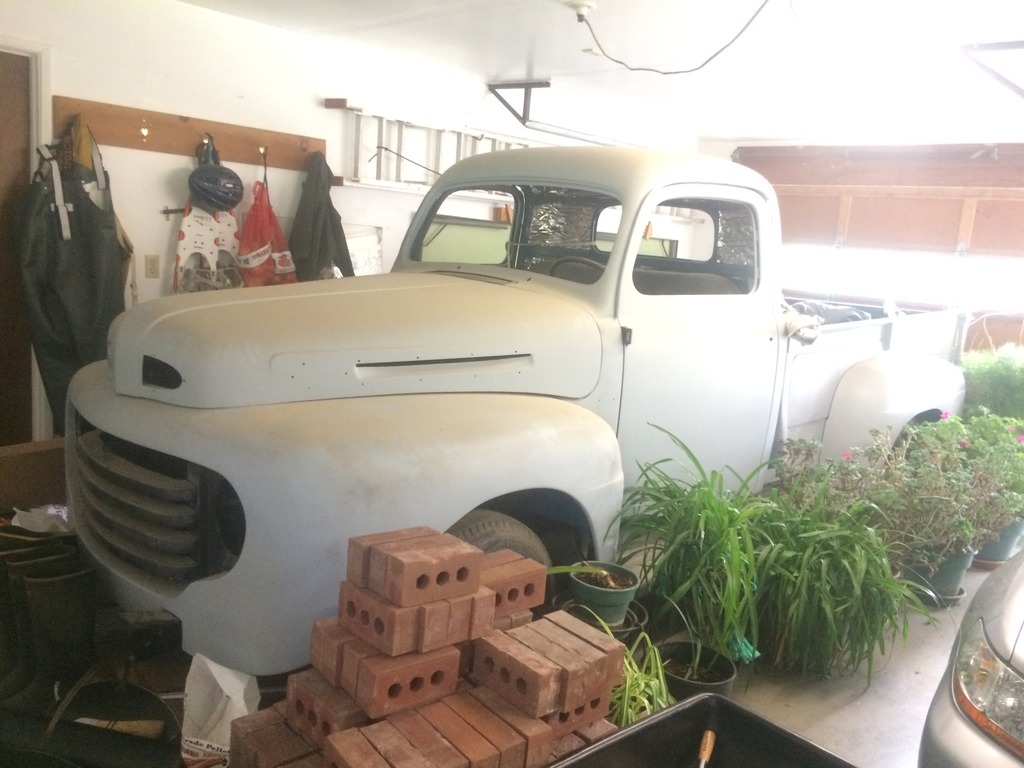
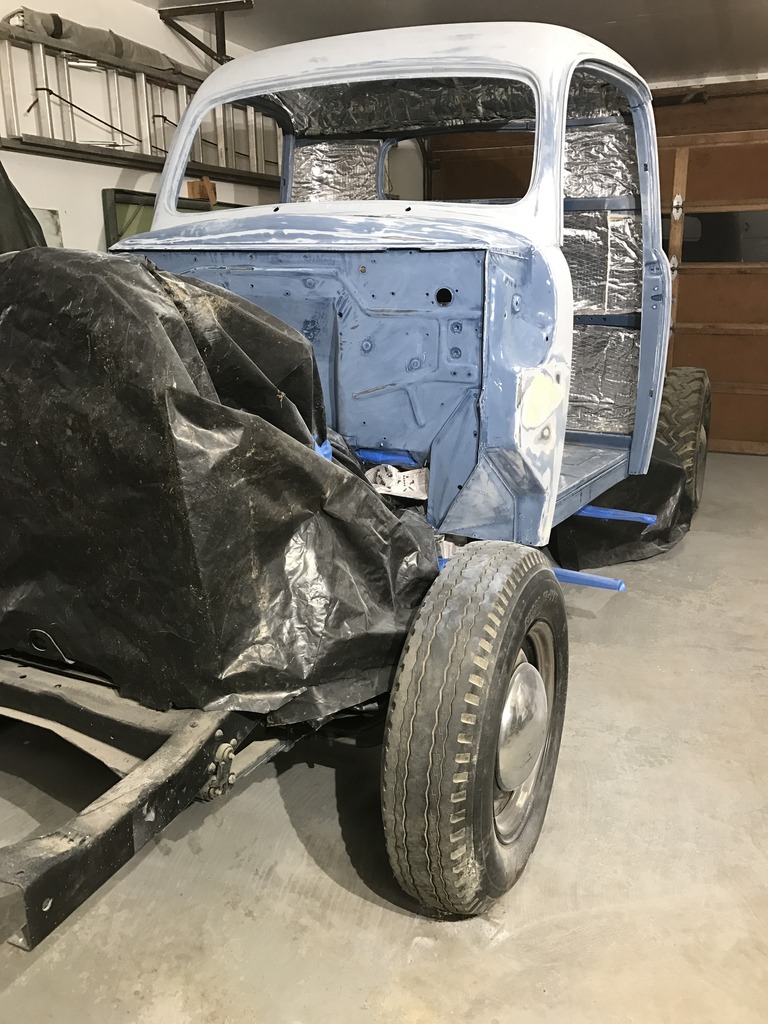
Here is what the truck looked like last year, stuff piled around it, neglected...
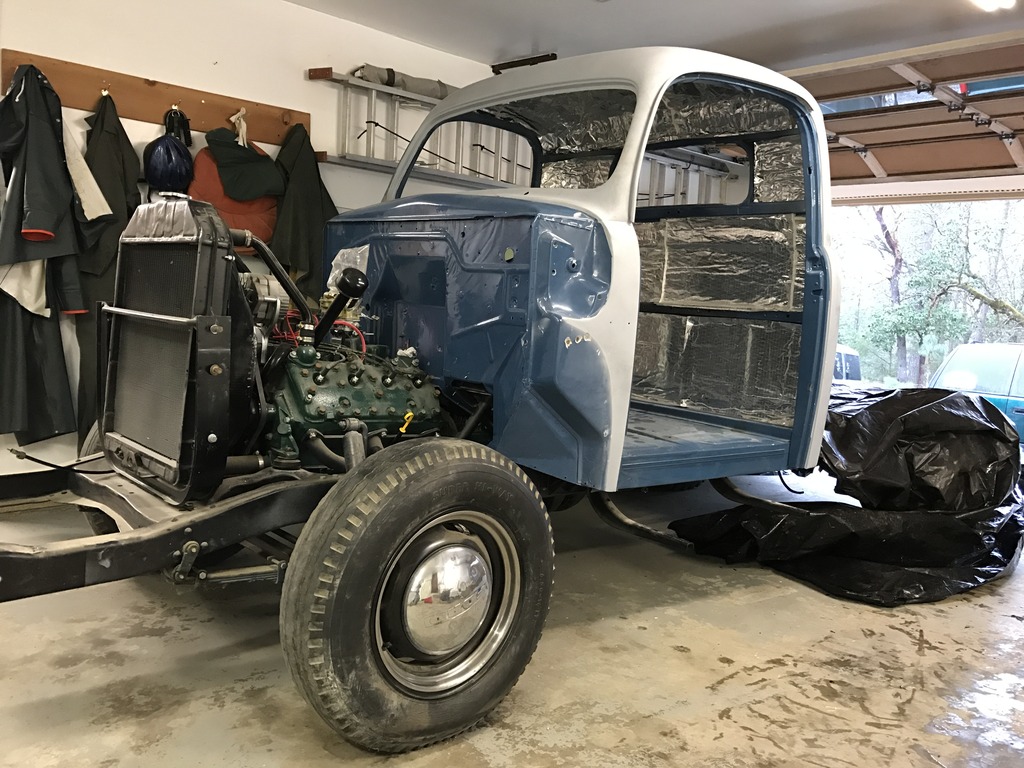
Stuff finally cleaned out from around it, ready for some work!
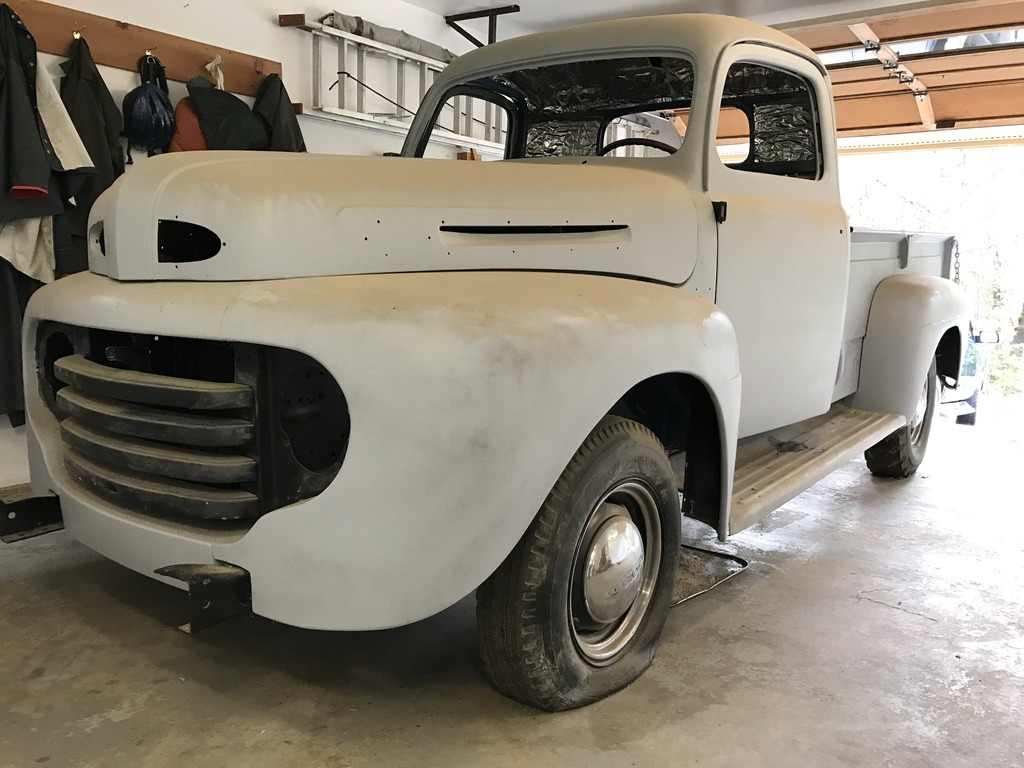
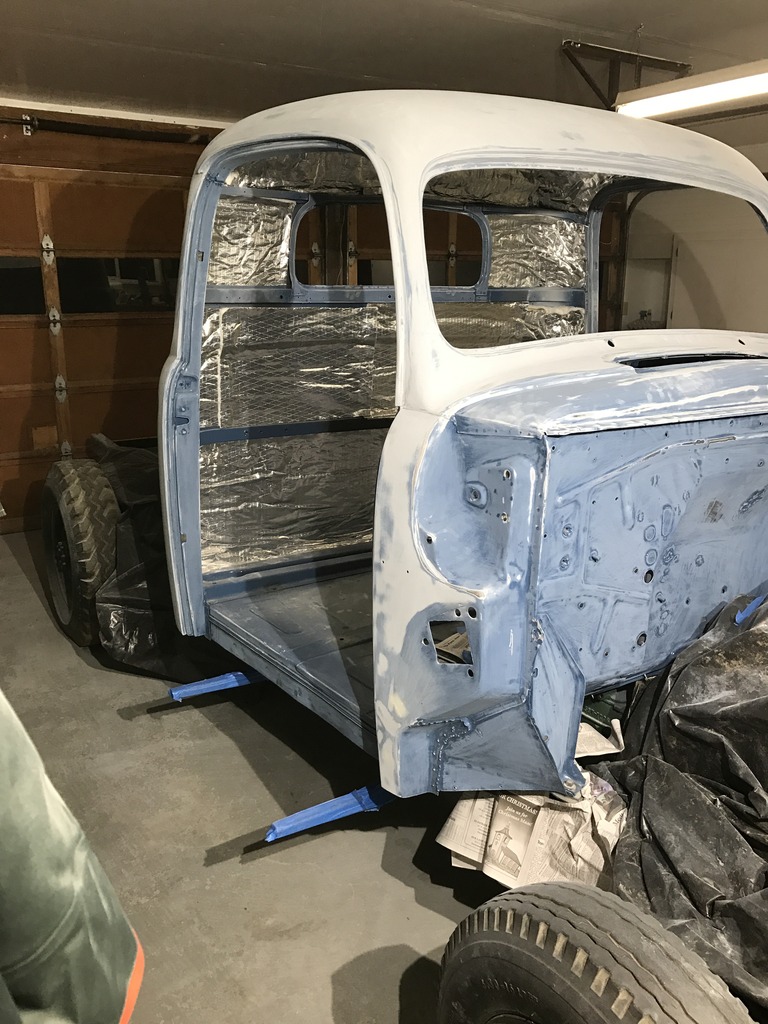
Sheet metal removed, ready to start prepping the cab
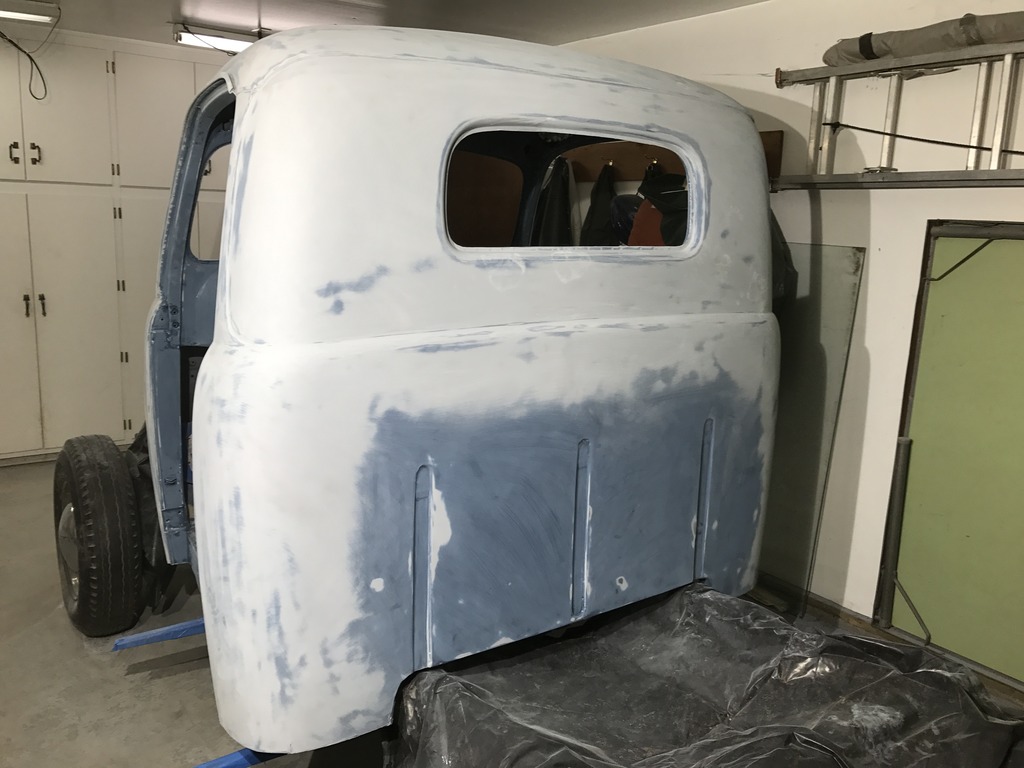
Like I mentioned before, cab had been painted blue at one point and was ready to go. It was completely sandblasted and cab corners and floor boards replaced prior to that. So I am not going to remove it to paint this time. The floor underneath the truck will still be blue, but I'm going to try not to let it bother me. If it does later on, I'll get under there and coat it with something at that point.
There are older pictures from back when my dad was working on it floating around somewhere. When I get a chance I'll have to dig around and see if I can compile a few to add on here. I'll get some good pictures of the engine and other components as soon as I finish painting the cab and get them uncovered again.

Stuff finally cleaned out from around it, ready for some work!

Sheet metal removed, ready to start prepping the cab

Like I mentioned before, cab had been painted blue at one point and was ready to go. It was completely sandblasted and cab corners and floor boards replaced prior to that. So I am not going to remove it to paint this time. The floor underneath the truck will still be blue, but I'm going to try not to let it bother me. If it does later on, I'll get under there and coat it with something at that point.
There are older pictures from back when my dad was working on it floating around somewhere. When I get a chance I'll have to dig around and see if I can compile a few to add on here. I'll get some good pictures of the engine and other components as soon as I finish painting the cab and get them uncovered again.
Trending Topics
#8
03-25-2017, 10:21 PM
#9
03-25-2017, 10:30 PM
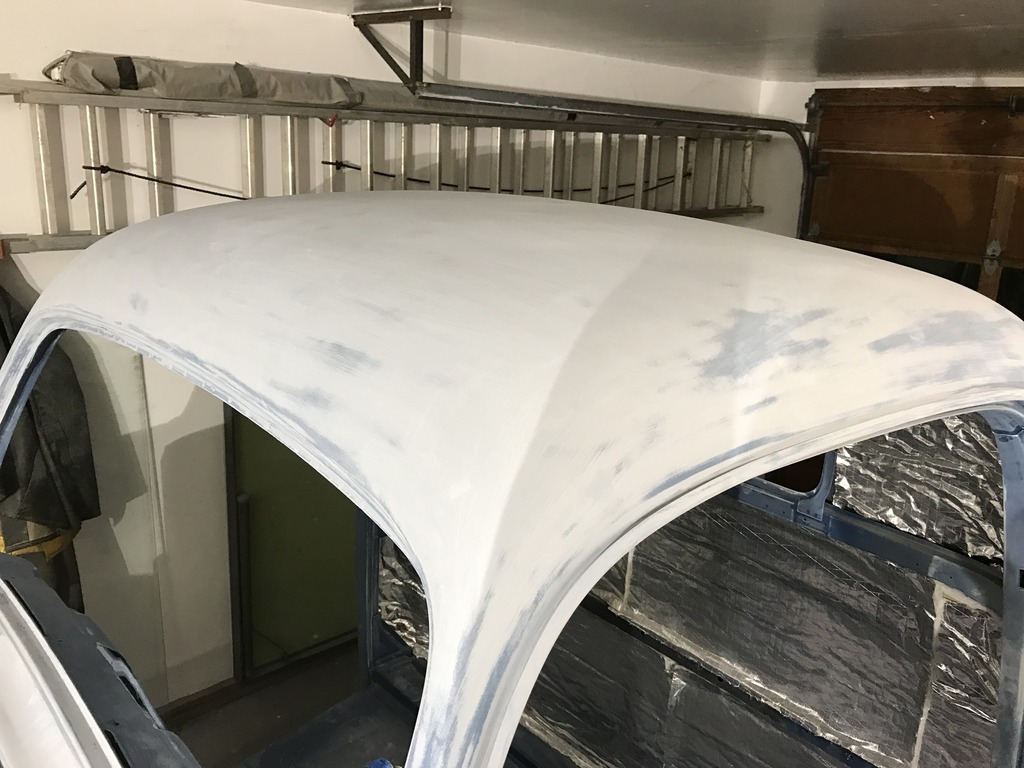
Okay, here is the latest. Blocked the cab in 80 grit, finished that today. Did a little touch up with some glaze here and there. I think I'm pretty much ready to clean the dust a bit better tomorrow and then shoot a coat of high solids primer. I'm planning on blocking the next coat of primer in 400 - hopefully not sand through anywhere but still get it smooth. If I sand through any significant areas I'll have to shoot another layer of primer.
Then after that I'll shoot a thin layer of primer sealer let that dry, then shoot base and clear with no sanding in between. Later on once everything is together wet sand the clear coat out to around 2000 grit.
At least that is what I am figuring based on the reading I have done, like I mentioned previously I don't have much paint experience so any input on how I should adjust my plan and technique would be really nice.
Anyhow, here are the picture of how the cab looks after the 80 grit...
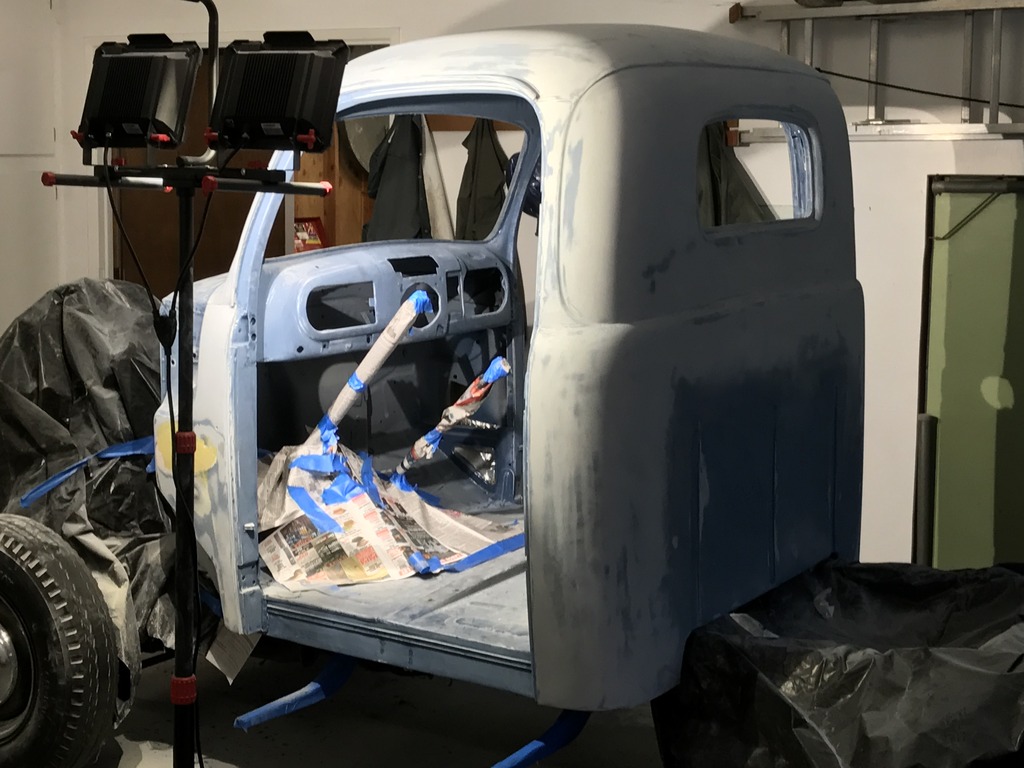
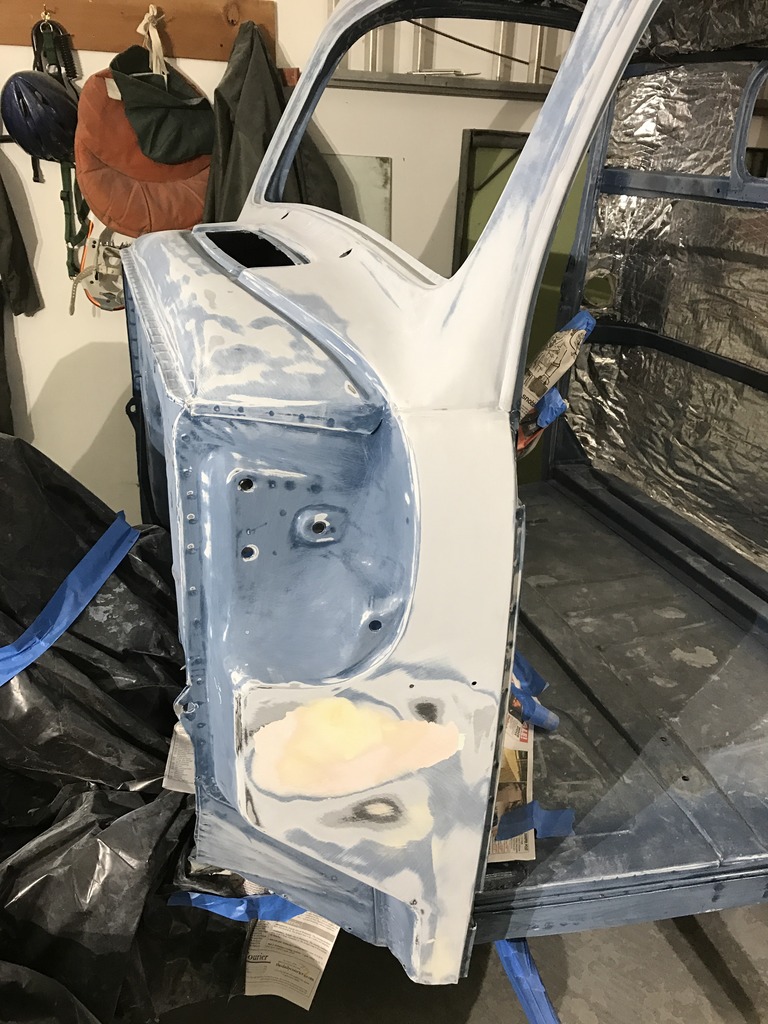
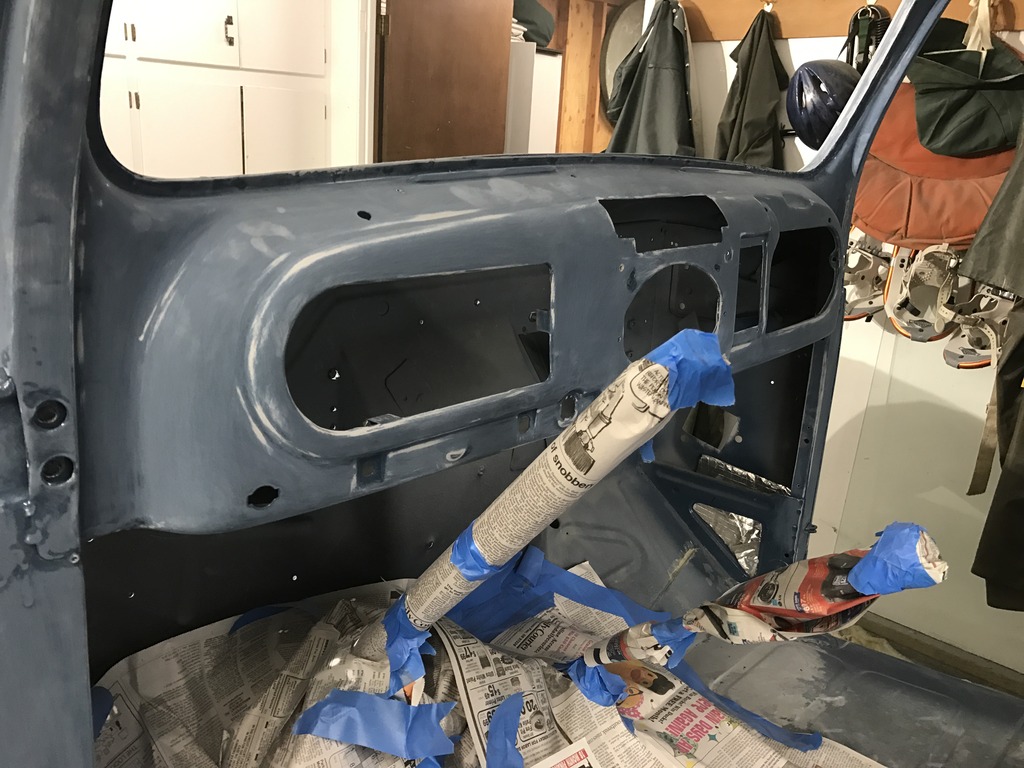
I'm not real concerned about the firewall looking real pretty, my dad never intended that part to be perfect either. The cab would probably have to come back off for me to clean it up any better than it is. It won't look too bad, and the engine should distract from my dad's poor welding on some of the old holes. I can weld pretty good now, but I'm not going to spend the time on that. I'll focus more on the external imperfections. Engine is quite pretty, so that should distract from the mess of a firewall too.
Insulation in the cab can stay, that will all be covered when the interior is done later on, so I'm not going to worry about overspray on that. Any suggestions before I shoot primer tomorrow?
Then after that I'll shoot a thin layer of primer sealer let that dry, then shoot base and clear with no sanding in between. Later on once everything is together wet sand the clear coat out to around 2000 grit.
At least that is what I am figuring based on the reading I have done, like I mentioned previously I don't have much paint experience so any input on how I should adjust my plan and technique would be really nice.
Anyhow, here are the picture of how the cab looks after the 80 grit...


I'm not real concerned about the firewall looking real pretty, my dad never intended that part to be perfect either. The cab would probably have to come back off for me to clean it up any better than it is. It won't look too bad, and the engine should distract from my dad's poor welding on some of the old holes. I can weld pretty good now, but I'm not going to spend the time on that. I'll focus more on the external imperfections. Engine is quite pretty, so that should distract from the mess of a firewall too.
Insulation in the cab can stay, that will all be covered when the interior is done later on, so I'm not going to worry about overspray on that. Any suggestions before I shoot primer tomorrow?
#10
03-25-2017, 10:56 PM
So now that everybody should be caught up on what stage I am at with this project, and a little bit of the history and what has been done to it (and I'll add more as I think of it), it is time for some questions.
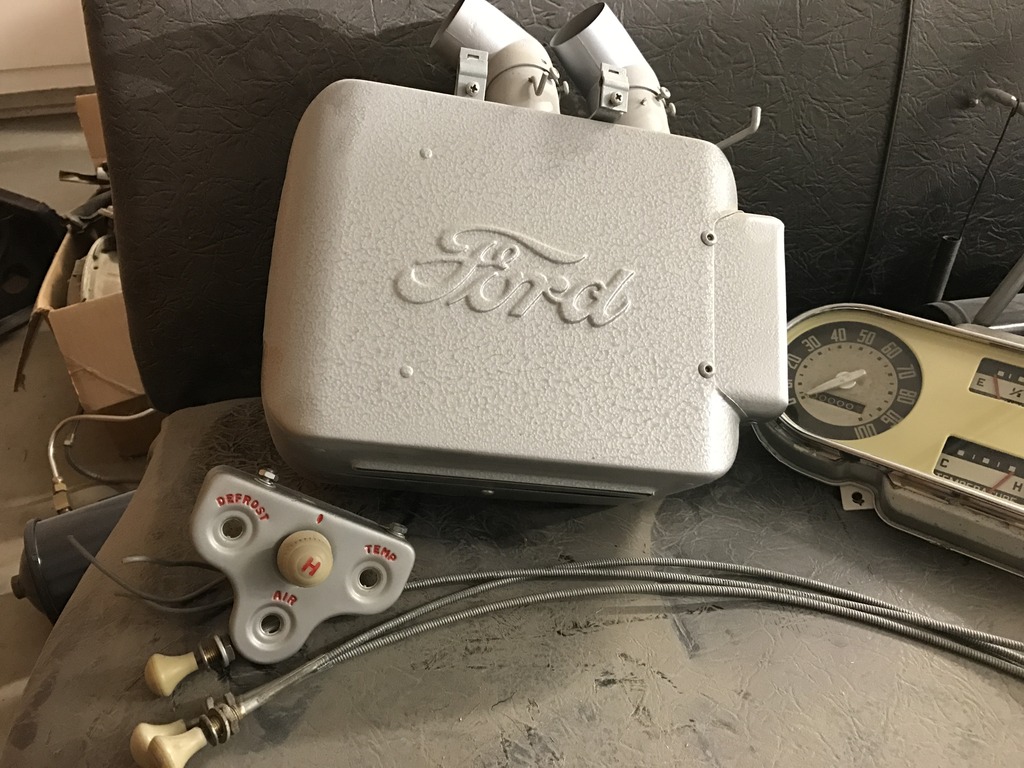
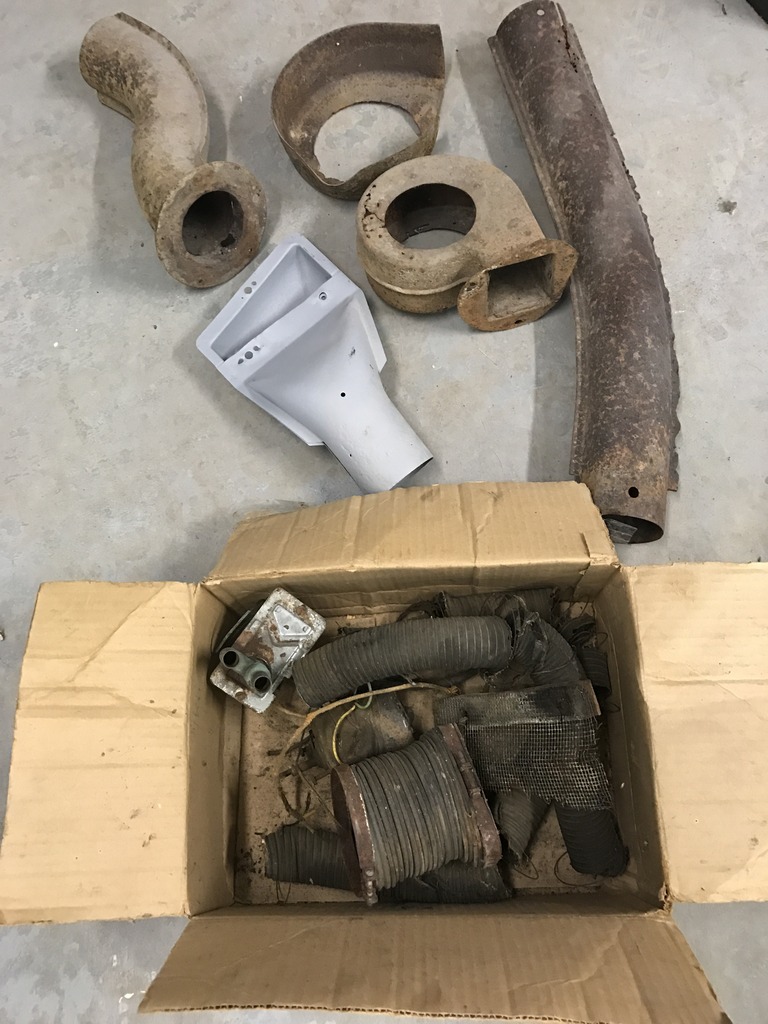
Firs question, I vaguely recall dad saying this was some special option. He pulled it out of the 1948 F-3 parts truck many years ago. I was probably only about 8-10 years old at the time, so I can't remember what was so special about it or how all the ductwork mounts. I know the long pipe runs in the fender somehow, but thats it. The heater box itself was cleaned up and mounted in the cab with the controls already, but I removed it last week while I get the cab painted.
Now, there is significant cancer on some of the parts, bad enough that large portions will likely disappear when I try and sandblast them. Probably why dad hadn't sandblasted and painted them yet. What are my options here? I could probably blast them anyway, and hope the general shape is retained enough then fiberglass them. How do all these parts install on the truck? I can figure out the inside of the cab stuff easy enough, but the other stuff I don't know about...


#11
03-25-2017, 11:01 PM
There's a regular here on FTE named Denny, he goes by First Rider. He has a beautiful red 48 F1, matter of fact he has two, one is straight stock, one is a little, as we say here, on the dark side. He is an expert on heaters for 48 to 52 trucks. He buys up old parts and restores them. He'll be able to answer your questions.
#12
03-25-2017, 11:08 PM
Looks can be quite deceiving though, this truck had a lot of cancer. All new cab corners and floor boards. Lots of homemade patch panels elsewhere on the fenders. The cab alone has probably a gallon of body filler under there. Fortunately it has been all fixed properly and looks very nice and smooth now for the most part. Since it was done right there shouldn't be any problems down the road for it.
But I'm going to have to figure out something for the bed. I haven't checked recently, but as of the last time I checked ~10 years ago there were no replacement panels, or patch panels for anything that was F-2 & F-3 specific. Only for F-1 models. Front panel of the bed is dented up badly, and is rusted out at the bottom. All the way along the bed where the wood sat there are rust holes as well, but not terribly bad and I can fix that easily enough. Fortunately I have plenty of time to come up with a game plan for that, the bed is quite a ways down the list of things to get done.
#13
03-25-2017, 11:11 PM
There's a regular here on FTE named Denny, he goes by First Rider. He has a beautiful red 48 F1, matter of fact he has two, one is straight stock, one is a little, as we say here, on the dark side. He is an expert on heaters for 48 to 52 trucks. He buys up old parts and restores them. He'll be able to answer your questions.
#14
03-25-2017, 11:22 PM
Cargo Master
Join Date: Jul 2016
Location: Swan River Valley M.B Can
Posts: 3,365
Received 542 Likes
on
309 Posts
You will need 2 or 3 coats of primer to cover 80 grit scratches . If you are not trying to straighten out bodywork there is no need to be that coarse ( 180 or finer if every thing is straight ) a tracer coat of paint or a dust that is hand applied with a pad is very helpful for your finish sanding . It will show any scratches that are not properly sanded and make sure you let the primmer fully cure before sanding as it will shrink after it dries .
#15
03-25-2017, 11:29 PM
You will need 2 or 3 coats of primer to cover 80 grit scratches . If you are not trying to straighten out bodywork there is no need to be that coarse ( 180 or finer if every thing is straight ) a tracer coat of paint or a dust that is hand applied with a pad is very helpful for your finish sanding . It will show any scratches that are not properly sanded and make sure you let the primmer fully cure before sanding as it will shrink after it dries .
Everything is straight, I just wasn't sure about the combination of whatever paints and primers were on there previously, and how they were overlapped and whatnot would do if I just sprayed right over them. So I recontoured a few areas that did need a tiny bit of work and blended everything really well with the 80 grit just to be on the safe side. Don't know if that was the right thing to do or not, but thats how I did it.