Big Blackie - The Build
#1
 04-23-2012, 08:44 PM

Join Date: Jan 2012
Location: Corvallis, OR
Posts: 582
Likes: 0
Received 0 Likes
on
0 Posts
Big Blackie - The Build
Hello friendly boys and girls! Here is where I will document all my slaving away, scraped knuckles and shrinking wallet as I work on my truck.
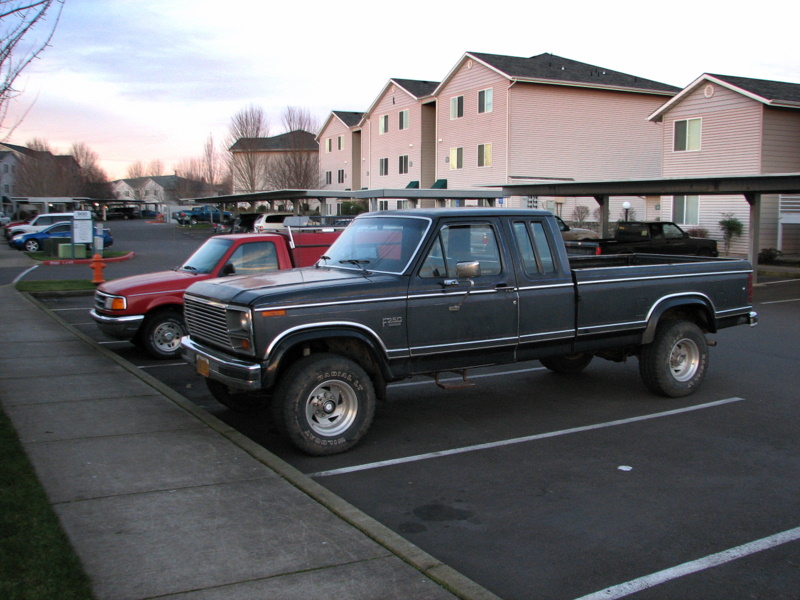
To introduce myself - my name is Luke, I was born and bred in Kansas but for the last decade I have lived in Oregon. I have always wanted a big, bad truck and the ones I thought looked best were the bullnose Fords. It took me 35 years but I finally bought Big Bluie about three months ago. Maybe my eyes are bad but it wasn't until later when I looked up the VIN info that I found out Big Bluie was actually a Big Blackie.
The truck is a 1983 F-250 4wd with a 460 engine and C6 trans (here is the VIN decode info if you care). Truck had 160k miles on it when I bought it and the 460 was apparently dropped in at some point by someone else since the VIN shows it came with a 351.
There have been many prior owners apparently but I only have the history of it from the guy I bought it from. He didn't use it often, but when he did he used it hard, mostly to haul wood. Bed is pretty dented up. He drove it out in Eastern Oregon where it's dry and the inside of the cab was as dusty as a crypt. Lots of little issues here and there which had either been neglected or fixed in a haphazard Farmer John manner (I am not a Farmer John type, but I don't have anything against them necessarily).
Well I didn't really spend much time enjoying the truck, no sooner had I gotten it home than I started stripping the interior. I live in an apartment so my initial thought was that I would "just do the interior" since that would be a simple affair. Three months later the cab is off the frame and I am knee deep in anything but a simple affair.
That's the background. I guess I'll just post up some photos of some of the work I've done over the past couple months... to catch you up to where I'm at now.
Here she was the day I bought her (our tiny Ranger is in the background):
#2
04-23-2012, 08:50 PM
Join Date: Jan 2012
Location: Corvallis, OR
Posts: 582
Likes: 0
Received 0 Likes
on
0 Posts
This truck has a black interior with the woodgrain highlights and mostly everything inside was in good shape, only very dirty. The trim on the steering wheel was broken as were the cruise control buttons, and the stereo bezel had been cut to pieces by the PO. The front seats had been re-upholstered with a cheap kit and even that was starting to tear.
I figured I'd just clean up the inside so I would have a respectable cab to drive in,so I started stripping.
Pictures of strip, strip, stripping:


I figured I'd just clean up the inside so I would have a respectable cab to drive in,so I started stripping.
Pictures of strip, strip, stripping:
#3
04-23-2012, 08:53 PM
Join Date: Jan 2012
Location: Corvallis, OR
Posts: 582
Likes: 0
Received 0 Likes
on
0 Posts
There is a remarkable amount of stuff inside of a truck cab. Since I live in an apartment without a garage, I had to find a place to put all this filthy stuff. I found the my living room/office had the most floor space, so that's where it went, much to the delight of my wife.
However as more turned into more I eventually broke down and got a storage unit...

However as more turned into more I eventually broke down and got a storage unit...
#4
04-23-2012, 08:59 PM

Join Date: Jan 2012
Location: Richmond
Posts: 3,462
Likes: 0
Received 0 Likes
on
0 Posts
Looking great man! What's the overall game plan for it? I'm not sure that I've seen much of the wood grain, especially with the black. I like it.
I hear ya on the apartment. My bedroom is 20x24. It's covered in parts from 3 vehicles. None of which I own haha. Last week in the screen porch I ran into something. Bumper from a BMW I wrecked when I was 16 haha.
I hear ya on the apartment. My bedroom is 20x24. It's covered in parts from 3 vehicles. None of which I own haha. Last week in the screen porch I ran into something. Bumper from a BMW I wrecked when I was 16 haha.
#5
04-23-2012, 09:02 PM
Join Date: Jan 2012
Location: Corvallis, OR
Posts: 582
Likes: 0
Received 0 Likes
on
0 Posts
I am trying to be meticulous about the rebuild and that means each and every component, part, screw and bolt will get my loving attention at some point or another. I decided to start with the instrument panel.
First I painted the white plastic back-piece with white paint - why? Because my white plastic was actually turning yellow and I wanted it bright. I also intend to install LED lighting in the dash and I wanted to make sure I had enough reflectivity-ness.
I also trimmed the edges of the individual gauges to let more light onto their faces, this was a trick I had read about elsewhere in the forums, though I can't remember from who. The lettering on the gauges was also touched up and the needles repainted with neon orange needle paint.
White back panel before:

White back panel after white paint:

Water temp - stock:

Water temp - sides trimmed to allow more light to the face:

All the gauges with trimmed sides:

Water temp - repainted:

All the gauges - repainted and re-installed:

First I painted the white plastic back-piece with white paint - why? Because my white plastic was actually turning yellow and I wanted it bright. I also intend to install LED lighting in the dash and I wanted to make sure I had enough reflectivity-ness.
I also trimmed the edges of the individual gauges to let more light onto their faces, this was a trick I had read about elsewhere in the forums, though I can't remember from who. The lettering on the gauges was also touched up and the needles repainted with neon orange needle paint.
White back panel before:
White back panel after white paint:
Water temp - stock:
Water temp - sides trimmed to allow more light to the face:
All the gauges with trimmed sides:
Water temp - repainted:
All the gauges - repainted and re-installed:
#6
04-23-2012, 09:08 PM
Join Date: Jan 2012
Location: Corvallis, OR
Posts: 582
Likes: 0
Received 0 Likes
on
0 Posts
Hey Dave, well no plan really, I was in too much a hurry to waste time with planning. But I guess it's turned into a full-on restoration by now.
The point of this truck generally is to have a better camping vehicle. Our Ranger is pretty good in mild weather (it's only 2wd) but terrible in the snow or mud or ice. I have gotten it in the ditch several times. Also I wanted something a bit bigger because I'd like to eventually haul a truck camper. However this rebuild is going to take so long it will be a while before I actually use the truck for its intended purpose.
I know what you mean about multiple cars... I have four myself. Aside from the F250 and the Ranger we have an Elantra as our daily driver, and what's more, a 1976 Granada which I have also been restoring over the last few years, but which is nearly complete now. Yes, car parts galore. I have even taken to storing some on my side of the bed...
#7
04-23-2012, 09:20 PM
Join Date: Jan 2012
Location: Corvallis, OR
Posts: 582
Likes: 0
Received 0 Likes
on
0 Posts
It came to pass that pretty much every window and door crack in this cab leaked water, so that most anything metal within the dash was rusted like crazy. The previous owner lived out in Eastern Oregon where maybe it doesn't matter as much, but I live on the "Wet" (West) side of the Cascades where it kind of does.
I decided to eradicate all rust, even if it was only cosmetic and even if the part would never be seen. This truck is 30 years old, I want it to last another 30 without me having to worry that my gas pedal is rusted through.
Some pieces I was able to sand or clean by hand but most of the interior bracketry and even the seat frames I just had sandblasted. Then in most cases I painted by hand with POR-15, my favorite paint.
Here is the ashtray before:

Here is the ashtray after - the tray was painted with POR-15 silver and the plastic housing with SEM paints:

Here are a bunch of rusty dash brackets:

Here they are sandblasted:

And here they are painted with POR-15 black:

I decided to eradicate all rust, even if it was only cosmetic and even if the part would never be seen. This truck is 30 years old, I want it to last another 30 without me having to worry that my gas pedal is rusted through.
Some pieces I was able to sand or clean by hand but most of the interior bracketry and even the seat frames I just had sandblasted. Then in most cases I painted by hand with POR-15, my favorite paint.
Here is the ashtray before:
Here is the ashtray after - the tray was painted with POR-15 silver and the plastic housing with SEM paints:
Here are a bunch of rusty dash brackets:
Here they are sandblasted:
And here they are painted with POR-15 black:
Trending Topics
#8
04-23-2012, 09:23 PM

Junior User
Join Date: Oct 2010
Location: Minnesota
Posts: 76
Likes: 0
Received 0 Likes
on
0 Posts
Hey Dave, well no real plan really, I was in too much a hurry to waste time with planning. But I guess it's turned into a full-on restoration by now.
The point of this truck generally is to have a better camping vehicle. Our Ranger is pretty good in mild weather (it's only 2wd) but terrible in the snow or mud or ice. I have gotten it in the ditch several times. Also I wanted something a bit bigger because I'd like to eventually haul a truck camper. However this rebuild is going to take so long it will be a while before I actually use the truck for its intended purpose.
I know what you mean about multiple cars... I have four myself. Aside from the F250 and the Ranger we have an Elantra as our daily driver, and what's more, a 1976 Granada which I have also been restoring over the last few years, but which is nearly complete now. Yes, car parts galore. I have even taken to storing some on my side of the bed...
Do you really go camping in the snow, mud, and ice? Keep us posted on your progress!
#9
04-23-2012, 09:31 PM
Join Date: Jan 2012
Location: Corvallis, OR
Posts: 582
Likes: 0
Received 0 Likes
on
0 Posts
Plastic dash pieces were washed in the sink/tub and some had touch-up paint applied. For example the vent registers and the instrument panel had the silver outline paint re-done by hand.
Some plastic pieces like the clear instrument bezel or the surface of the heater controls I polished using a NOVUS three-step plastic polishing kit which works quite well.
Washing dash pieces:

Vent registers, the one on the right shows the silver trim re-painted:

I even replaced the wiper felts on the vent registers:

Dash bezel detail, before paint and polish:

Dash bezel detail, after paint and polish:

Heater panel before polish:

Heater panel after polish:

Some plastic pieces like the clear instrument bezel or the surface of the heater controls I polished using a NOVUS three-step plastic polishing kit which works quite well.
Washing dash pieces:
Vent registers, the one on the right shows the silver trim re-painted:
I even replaced the wiper felts on the vent registers:
Dash bezel detail, before paint and polish:
Dash bezel detail, after paint and polish:
Heater panel before polish:
Heater panel after polish:
#10
04-23-2012, 09:40 PM
Join Date: Jan 2012
Location: Corvallis, OR
Posts: 582
Likes: 0
Received 0 Likes
on
0 Posts
Yes AnyExcuse, we like to camp in the winter because: A) you don't need air-conditioning, B) there are no mosquitos, C) there are usually also no people, and D) no matter what lousy place you pick, it will look beautiful in the snow.
We have gone on several trips where we drive as far as possible and then snowshoe to a remote cabin while pulling our supplies on sleds.
However the driving on these trips is always a harrowing, white-knuckle affair even with snow chains. After a few particularly bad experiences where I have gotten stranded in the middle of God Forsaken Nowhere I swore to myself I was never driving the Ranger in snow or mud again, and that is when the search for this truck became serious.
#11
04-23-2012, 09:46 PM
Join Date: Jan 2012
Location: Corvallis, OR
Posts: 582
Likes: 0
Received 0 Likes
on
0 Posts
Ok, back to the drudgery. Sorry for the flurry of posts all at once but I have quite a bit of stuff to put up here in order to get you, dear reader, caught up to the very present moment.
The seats were in somewhat sorry shape and I decided they probably needed re-upholstered. Frankly they kind of needed new foam but I have discovered that is basically not possible to find for most pieces.
First, the seat frames - I had them sandblasted and then powder coated. If I had to do it again I'd just have painted them myself because the powder coating was kind of expensive. But I'd never had anything powder coated before so it was a chance for me to see what it was like.
Seat frames before:


Seat frames after:


The seats were in somewhat sorry shape and I decided they probably needed re-upholstered. Frankly they kind of needed new foam but I have discovered that is basically not possible to find for most pieces.
First, the seat frames - I had them sandblasted and then powder coated. If I had to do it again I'd just have painted them myself because the powder coating was kind of expensive. But I'd never had anything powder coated before so it was a chance for me to see what it was like.
Seat frames before:
Seat frames after:

#13
04-23-2012, 09:59 PM
Join Date: Jan 2012
Location: Corvallis, OR
Posts: 582
Likes: 0
Received 0 Likes
on
0 Posts
I decided that if I could not replace the seat foams at least I could clean them. Frankly they didn't smell all that nice, but thankfully the prior owner wasn't a smoker or anything. They just smelled very old and musty and also quite moldy from all the rain water that had been leaking into the cab for who-knows how many years.
First I took the foams outside and scrubbed them with a solution of Kids'N'Pets Stain and Oder Remover. But that didn't quite satisfy me so I decided to toss them into a tub full of water and bleach.
I am quite fortunate that I decided to start with the rear bench instead of the front as this endeavor turned into quite the disaster. First I filled the entire bathtub full of water and dumped in a goodly amount of bleach. Then I tossed in my rear bench foam. Well they should have named me Harry Houdini because 50 gallons of bath water just up and disappeared - all soaked into my seat foam.
Now I had a five hundred pound piece of foam on my hands. Trying to move that thing around was like wrestling a bear. I got in the tub and jumped up and down on that sucker and I swear I was jumping up and down for half an hour and water was still coming out by the bucket-full. I was too afraid to lift the thing for fear of ripping it in half, it weighed so much.
But sometime after a great eternity I got the thing down to a point where I could manhandle it and I was able to remove it from the tub without destroying it. It still weighed more than a small elephant and I realized it would probably take about three years to dry out. But the bleach worked, that thing had no odor left to it whatsoever. Also my feet were bleached very, very clean. I probably won't need to shower again until 2013.
I figured in for a dime, in for a dollar so I went ahead and did all the other seat foams the same EXCEPT for the front lower bench piece which would have been utter folly.
After treading on the foam pieces for a great length of time I let them sit in the tub overnight to self-drain:

Later they spent three weeks! in the living room/office/workshop drying with a fan. Even then they still weren't dry but after another month in the storage unit they are back to normal:

First I took the foams outside and scrubbed them with a solution of Kids'N'Pets Stain and Oder Remover. But that didn't quite satisfy me so I decided to toss them into a tub full of water and bleach.
I am quite fortunate that I decided to start with the rear bench instead of the front as this endeavor turned into quite the disaster. First I filled the entire bathtub full of water and dumped in a goodly amount of bleach. Then I tossed in my rear bench foam. Well they should have named me Harry Houdini because 50 gallons of bath water just up and disappeared - all soaked into my seat foam.
Now I had a five hundred pound piece of foam on my hands. Trying to move that thing around was like wrestling a bear. I got in the tub and jumped up and down on that sucker and I swear I was jumping up and down for half an hour and water was still coming out by the bucket-full. I was too afraid to lift the thing for fear of ripping it in half, it weighed so much.
But sometime after a great eternity I got the thing down to a point where I could manhandle it and I was able to remove it from the tub without destroying it. It still weighed more than a small elephant and I realized it would probably take about three years to dry out. But the bleach worked, that thing had no odor left to it whatsoever. Also my feet were bleached very, very clean. I probably won't need to shower again until 2013.
I figured in for a dime, in for a dollar so I went ahead and did all the other seat foams the same EXCEPT for the front lower bench piece which would have been utter folly.
After treading on the foam pieces for a great length of time I let them sit in the tub overnight to self-drain:
Later they spent three weeks! in the living room/office/workshop drying with a fan. Even then they still weren't dry but after another month in the storage unit they are back to normal:
#14
04-23-2012, 10:12 PM
#15
04-23-2012, 11:12 PM
Join Date: Jan 2012
Location: Corvallis, OR
Posts: 582
Likes: 0
Received 0 Likes
on
0 Posts
Hey Trent! I grew up in Wichita but I also spent eight years in Lawrence (four for college, four working for the man).
I just went and found your "No Buck" thread, so I see you live close to LMC which must mean you're near or in Lenexa. That means I was pretty much your neighbor for a while. Go Jayhawks, eh? Unless you're a Wildcat fan... seems like most Kansans with an old Ford truck would probably lean that way.
It's interesting - when I lived in Kansas it would matter what team a person rooted for. But once I moved out to the west coast, anyone I meet from Kansas is like a long-lost brother, I don't care what school they went to.
Anyway you've done a great job on old "No Buck". You can't beat the look of a nice old stepside if you ask me.