
White face gauge installed w/pics
#1
 06-06-2010, 08:56 PM


White face gauge installed w/pics
After looking at different options, I installed a white face gauge overlay kit that i found on Ebay. here is the link to the kit i bought.
02-04 FORD F250 F350 SUPERDUTY BLUE GLOW GAUGES Diesel: eBay Motors (item 250642934270 end time Jul-01-10 00:37:46 PDT)
Lokking back on it, i wish i would have bought the black ISSPro gauges to match my factory ones. This was the cheapest way to match them up.
This is what i started out with.
I had to pull the dash so i snapped a few pics to show how this is done.
First, remove the radio. If you have the stock Ford stereo, you can remove it with a set of radio removal tools, or two peices of coat hanger about 10" long and fold them into a "U" shape. If you have an aftermarket stereo, you should have the removal tools for the stereo. After the stereo is removed, remove the two bolts at the top of the opening.

From here the dash will just pop off. you will have to pull gently but firmly. be careful not to pull too hard so that you do not mess up any connectors. I started from left to right looking at the dash. First are the two connectors for the light switch.

Next was the 4X4 switch.
Then onto the 12V and thats the last one. I also found another connector by the 12V that was connectoed to a false connection point. Anyone know what this might be?

Remove the entire dash and get it out your way. Now you have to remove the gauge cluster held by 4 bolts.

Once its loose you will have to remove the gear selector portion. To do this, pinch the two black tabs at the bottom of it. It should pull downward fairly easily.


Remove the 3 connectors.

Now the cluster should come out freely. Now it comes apart in two pieces. There are two tabs on the bottom and two on the top. just push them in and it will seperate.

Now came the fun part. As the kit came with no instructions, the Ebay add says you do not have to remove the needles. I tried to do this, but found no possible way to do it. knowing that removing them may cause problems, i did it anyway. One problem i ran into was new overlay not laying down onto the faxctory cluster well with out bubbles and wrinkles. I used a spray adhesive to get them on nice and smooth. It took a few tries to get them perfectly lined up where the factory lights will shine through the overlay just right. I also ran into another problem when putting the needles back on. I was pushing them down too far to where they did not clear the cluster causing them to catch and not move freely. So when you put them on, barely push them on. I put the needles back on with the cluster installed after everything was back up to operating temperature. My speedometer is now more acurate than before due to my larger tire size. For the wiring, it's just a negative and positive. I just tapped into the same power points for my A-pillar gauges.
I put everything back together and am pleased with the result. Here are some before and after pics.


Half intensity.

Full intensity. Needless to say, I keep it on half.

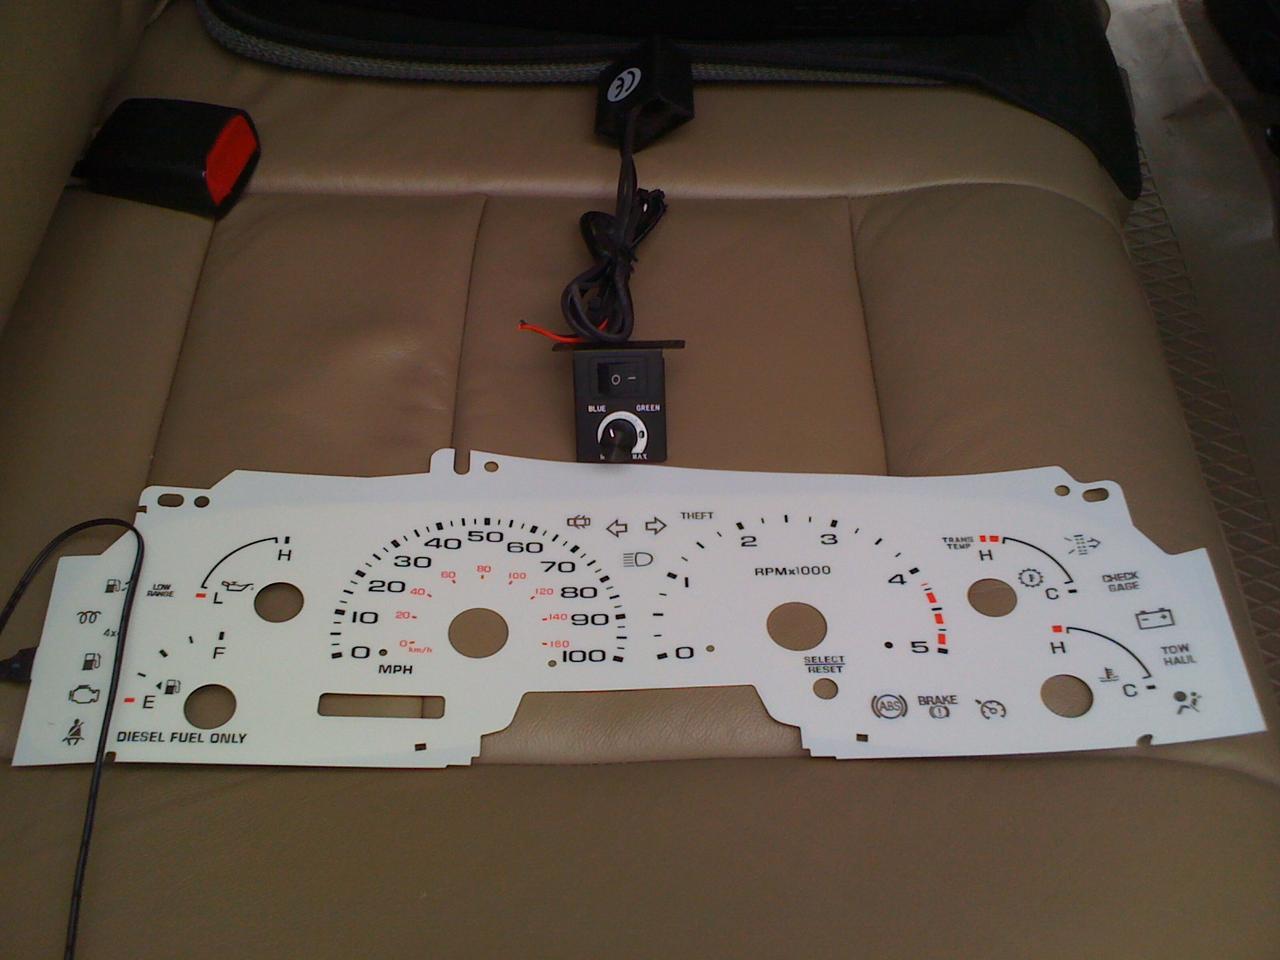
I intalled the switch/potentiometer below the dash under the stereo. It has a blue or green setting.

One thing I forgot to mention; while I had the clear plastic peice out, I used a head light restore kit on it that I had layin around. It actually worked really well and got out most of the surface scratches. Now I just need to change my orange needles out for some blue ones and I'll be set.
02-04 FORD F250 F350 SUPERDUTY BLUE GLOW GAUGES Diesel: eBay Motors (item 250642934270 end time Jul-01-10 00:37:46 PDT)
Lokking back on it, i wish i would have bought the black ISSPro gauges to match my factory ones. This was the cheapest way to match them up.
This is what i started out with.
I had to pull the dash so i snapped a few pics to show how this is done.
First, remove the radio. If you have the stock Ford stereo, you can remove it with a set of radio removal tools, or two peices of coat hanger about 10" long and fold them into a "U" shape. If you have an aftermarket stereo, you should have the removal tools for the stereo. After the stereo is removed, remove the two bolts at the top of the opening.
From here the dash will just pop off. you will have to pull gently but firmly. be careful not to pull too hard so that you do not mess up any connectors. I started from left to right looking at the dash. First are the two connectors for the light switch.
Next was the 4X4 switch.
Then onto the 12V and thats the last one. I also found another connector by the 12V that was connectoed to a false connection point. Anyone know what this might be?
Remove the entire dash and get it out your way. Now you have to remove the gauge cluster held by 4 bolts.
Once its loose you will have to remove the gear selector portion. To do this, pinch the two black tabs at the bottom of it. It should pull downward fairly easily.
Remove the 3 connectors.
Now the cluster should come out freely. Now it comes apart in two pieces. There are two tabs on the bottom and two on the top. just push them in and it will seperate.
Now came the fun part. As the kit came with no instructions, the Ebay add says you do not have to remove the needles. I tried to do this, but found no possible way to do it. knowing that removing them may cause problems, i did it anyway. One problem i ran into was new overlay not laying down onto the faxctory cluster well with out bubbles and wrinkles. I used a spray adhesive to get them on nice and smooth. It took a few tries to get them perfectly lined up where the factory lights will shine through the overlay just right. I also ran into another problem when putting the needles back on. I was pushing them down too far to where they did not clear the cluster causing them to catch and not move freely. So when you put them on, barely push them on. I put the needles back on with the cluster installed after everything was back up to operating temperature. My speedometer is now more acurate than before due to my larger tire size. For the wiring, it's just a negative and positive. I just tapped into the same power points for my A-pillar gauges.
I put everything back together and am pleased with the result. Here are some before and after pics.
Half intensity.
Full intensity. Needless to say, I keep it on half.
I intalled the switch/potentiometer below the dash under the stereo. It has a blue or green setting.
One thing I forgot to mention; while I had the clear plastic peice out, I used a head light restore kit on it that I had layin around. It actually worked really well and got out most of the surface scratches. Now I just need to change my orange needles out for some blue ones and I'll be set.
#2
06-06-2010, 09:09 PM

#3
06-06-2010, 09:37 PM

Postmaster
#4
06-06-2010, 09:38 PM
#5
06-06-2010, 09:46 PM
I think this is it. found it when i was searching for mine. Theyre not the same ones though.
99 00 01 02 02 Ford F150 F250 CLUSTER WHITE FACE GAUGES: eBay Motors (item 400124770847 end time Jun-24-10 21:57:26 PDT)
99 00 01 02 02 Ford F150 F250 CLUSTER WHITE FACE GAUGES: eBay Motors (item 400124770847 end time Jun-24-10 21:57:26 PDT)
#6
06-07-2010, 12:36 AM
Postmaster
#7
06-07-2010, 12:40 AM
Trending Topics
#8
06-07-2010, 05:40 AM
#11
09-30-2010, 04:53 PM
#14
09-30-2010, 05:11 PM
 Its not going to bother me though. To get the needles off, i gently but firmly pulled.
#15
09-30-2010, 05:26 PM
Posting Guru
Join Date: Jul 2010
Location: Fort Worth
Posts: 1,711
Likes: 0
Received 0 Likes
on
0 Posts

Thread
Thread Starter
Forum
Replies
Last Post
GreatNorthWoods
1948 - 1956 F1, F100 & Larger F-Series Trucks
21
10-10-2012 09:46 AM
cdrmotorsports
1999 to 2016 Super Duty
22
09-03-2010 12:02 PM

