did a fuel tank vent mod to front tank, mucho better
#1
 04-10-2010, 10:13 PM


did a fuel tank vent mod to front tank, mucho better
I finally replaced my leaking front tank last weekend and did the vent mod at the same time. It must take less then a quarter of the time now to fill. FYI if front tank is completely dry you can stuff almost 18 gallons in it if the fuel is up to the very top of the fill insert. The first thing is to take out the metal insert and inner rubber hose in the fill neck/hose.
This is the metal insert, took the sawzall and cut a strip about a 1/4" out of it so I could squeeze it together and pull it out.
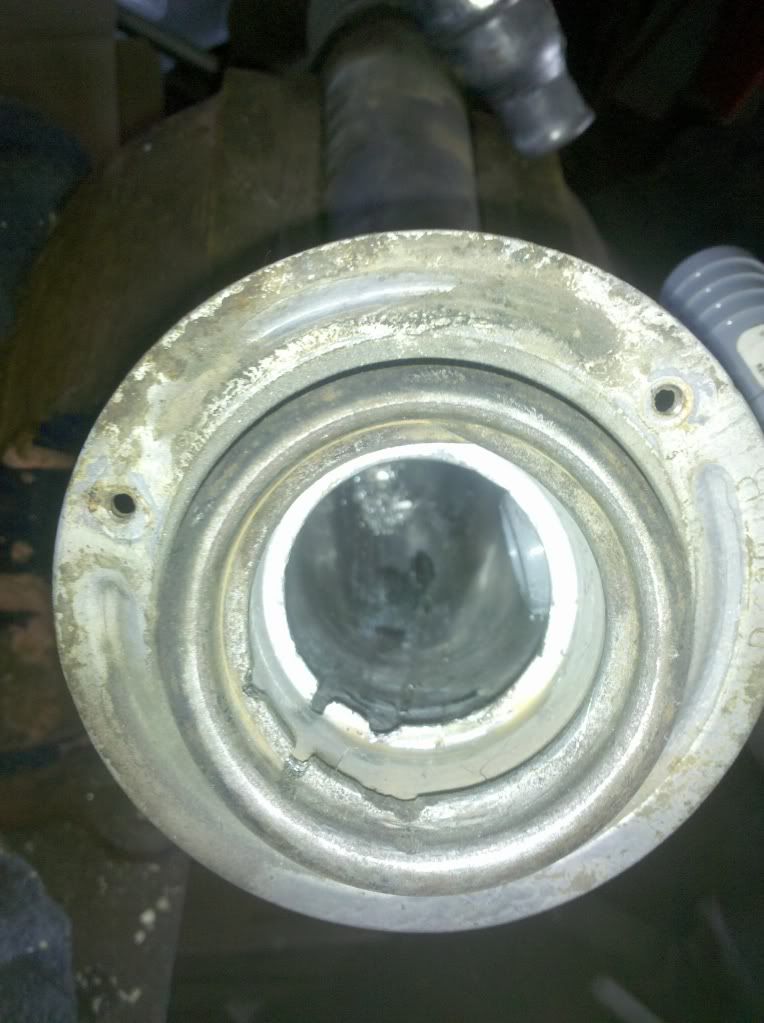
What the filler looks like without the insert
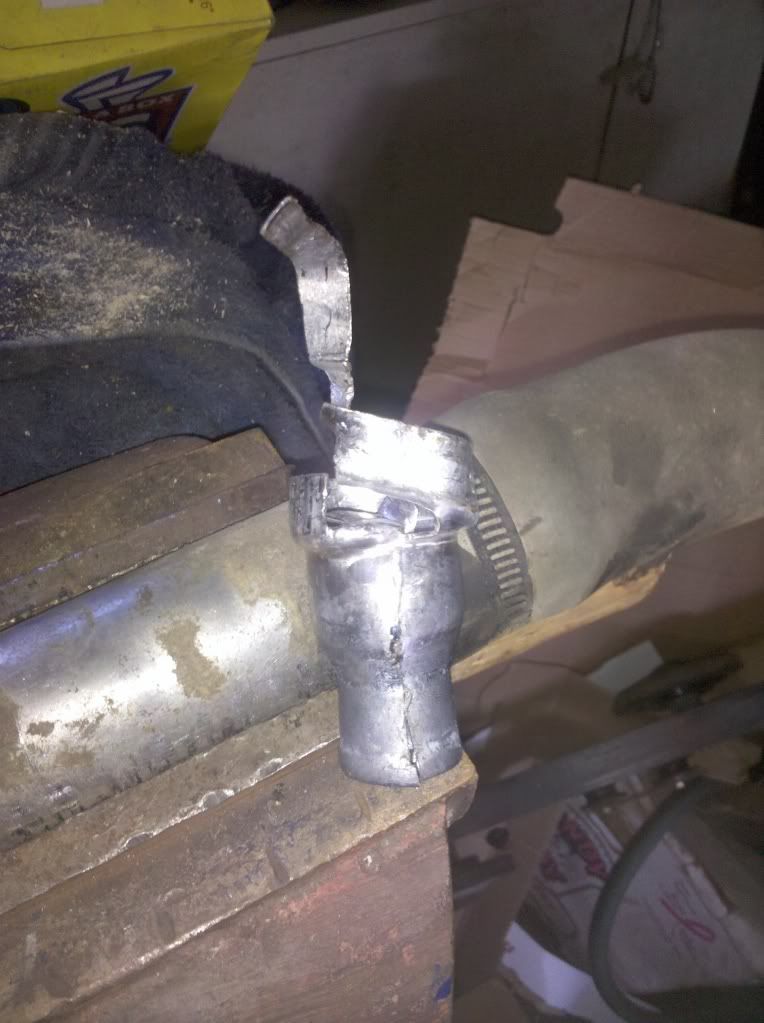
Used a 3/4" elbo that had a threaded end on it to fit into the rubber grommet that had the roll over valve it it with some silicone around it.
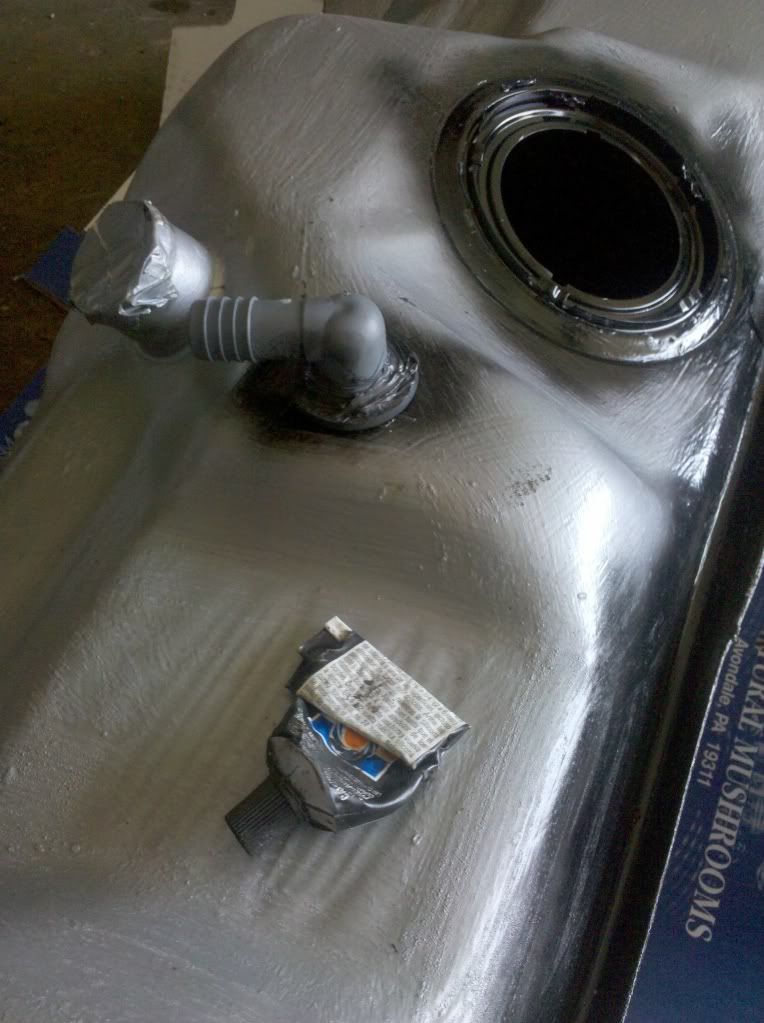
This is what it looked like semi assembled in the garage, used 3/4" diameter low pressure hydralic line, kind of stiff stuff.
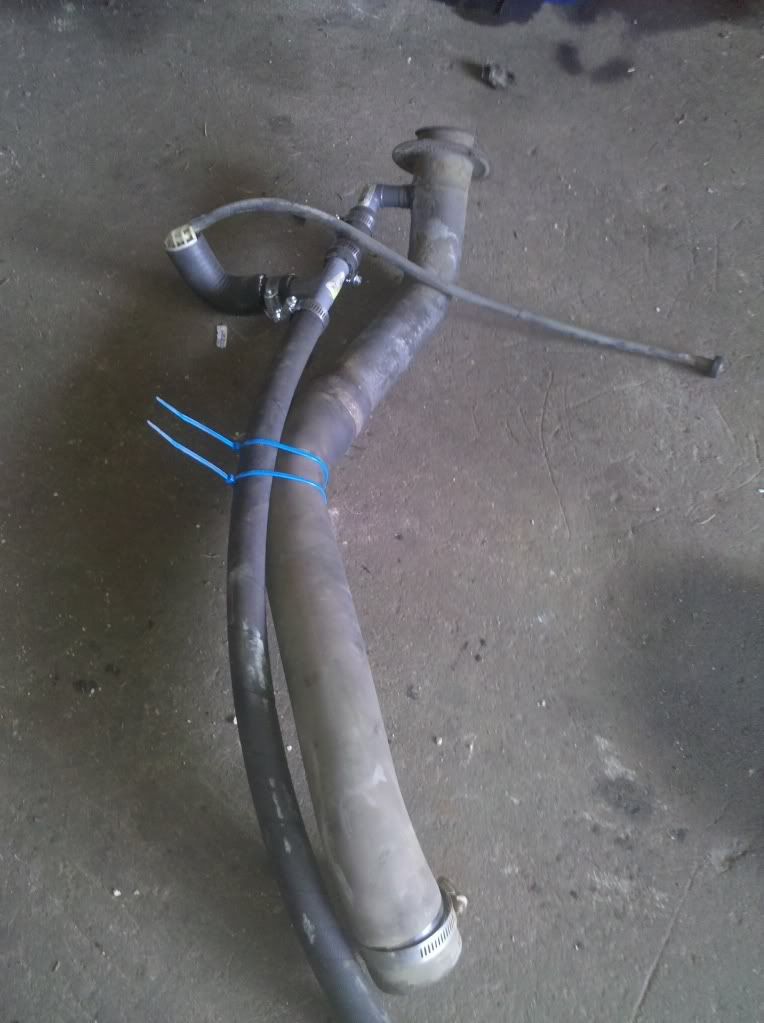
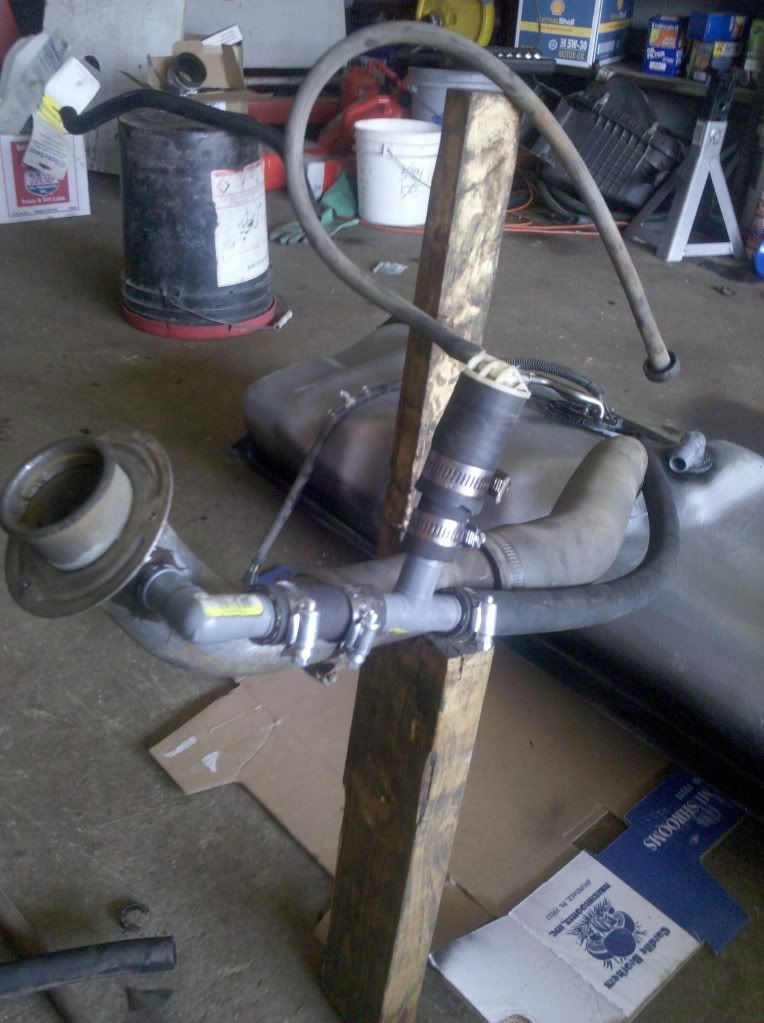
After I got it I found out that I didn't have as much room up between the wheel well so I had to put a 90 degree turn for the roll over valve to fit up there. The 90 degree pipe I think is the drain pipe from a washer, the hydralic hose fit into it perfect, nice tight fit.
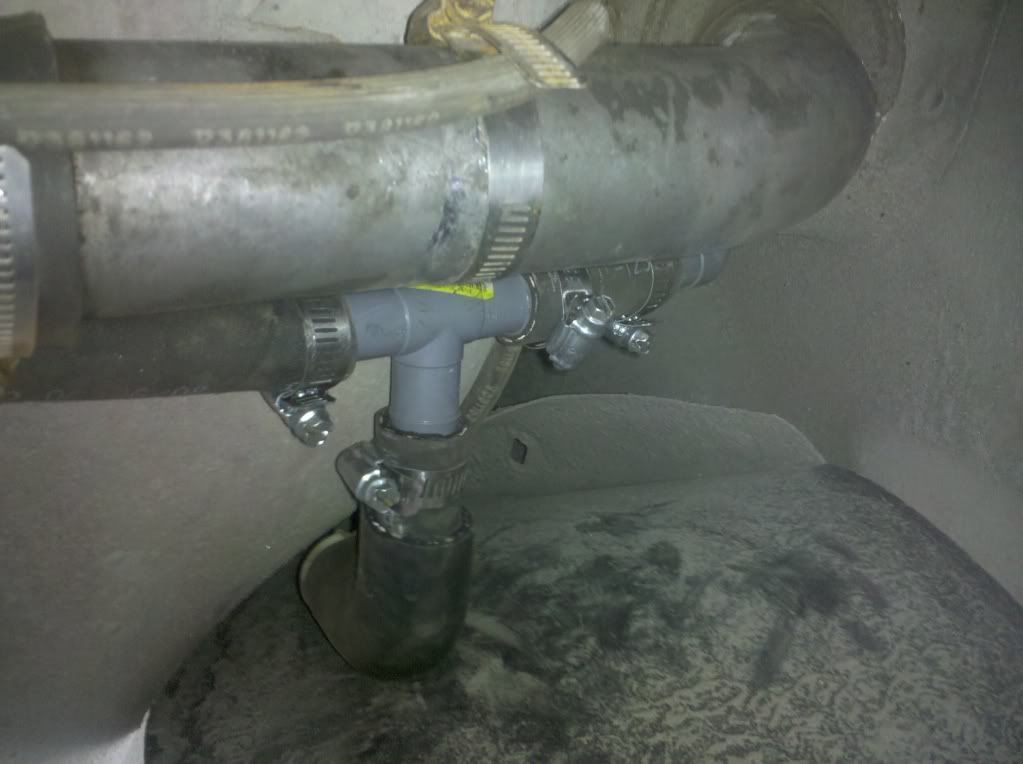
This pict shows it up inside the fender all hooked up. My only problem is because the low pressure hydralic line is so stiff I think it cocked the threaded 90 degree elbo in the tank grommet to the side so that when the tank is full it leakes slightly. If that 90 was a 45 degree or if I can find a better sealing type elbo to go into the grommet I think that would fix it. I will need to drop the tank again to fix when I come up with a better solution. But definitely going to do this to the rear tank very soon.
This is the metal insert, took the sawzall and cut a strip about a 1/4" out of it so I could squeeze it together and pull it out.
What the filler looks like without the insert
Used a 3/4" elbo that had a threaded end on it to fit into the rubber grommet that had the roll over valve it it with some silicone around it.
This is what it looked like semi assembled in the garage, used 3/4" diameter low pressure hydralic line, kind of stiff stuff.
After I got it I found out that I didn't have as much room up between the wheel well so I had to put a 90 degree turn for the roll over valve to fit up there. The 90 degree pipe I think is the drain pipe from a washer, the hydralic hose fit into it perfect, nice tight fit.
This pict shows it up inside the fender all hooked up. My only problem is because the low pressure hydralic line is so stiff I think it cocked the threaded 90 degree elbo in the tank grommet to the side so that when the tank is full it leakes slightly. If that 90 was a 45 degree or if I can find a better sealing type elbo to go into the grommet I think that would fix it. I will need to drop the tank again to fix when I come up with a better solution. But definitely going to do this to the rear tank very soon.
Last edited by wildstang; 04-10-2010 at 10:17 PM. Reason: add picture
#2
04-10-2010, 10:46 PM
#3
04-11-2010, 01:50 AM
Postmaster
#4
04-11-2010, 08:38 AM
Thanks Jose' and Craig. I did actually cut a hole into the outside of the filler tube. Through some JB weld over it, we'll see how long it lasts.
Jose' you and I had some conversations about yours a while ago. I am hoping to find something better then what I have currently in the roll over valve grommet without having to have something machined like you did for yours. Once I get that figured out the rear tank willl b next.
Jose' you and I had some conversations about yours a while ago. I am hoping to find something better then what I have currently in the roll over valve grommet without having to have something machined like you did for yours. Once I get that figured out the rear tank willl b next.
#5
04-11-2010, 02:02 PM
I like your vent in the vent line. This is a MUST!
I don't have it in my line yet and the tank has major vacuum. I need to get this done to my daily driver. I added a simple T and capped it with the oem cap like you show on my other truck, but I didn't add the oem roll-over vent like you did. Nice idea.

I don't have it in my line yet and the tank has major vacuum. I need to get this done to my daily driver. I added a simple T and capped it with the oem cap like you show on my other truck, but I didn't add the oem roll-over vent like you did. Nice idea.
__________________
'96 7.3 F-350 Reg Cab 4x4 - bought new.
'04 6.0 E-350 custom 4x4
'08 6.4 F-550 Reg Cab 6 spd 4x4
'17 6.7 F-250 KR ccsb 4x4
'96 7.3 F-350 Reg Cab 4x4 - bought new.
'04 6.0 E-350 custom 4x4
'08 6.4 F-550 Reg Cab 6 spd 4x4
'17 6.7 F-250 KR ccsb 4x4
#7
04-12-2010, 03:07 PM
Thanks Jose' and Craig. I did actually cut a hole into the outside of the filler tube. Through some JB weld over it, we'll see how long it lasts.
Jose' you and I had some conversations about yours a while ago. I am hoping to find something better then what I have currently in the roll over valve grommet without having to have something machined like you did for yours. Once I get that figured out the rear tank willl b next.
Jose' you and I had some conversations about yours a while ago. I am hoping to find something better then what I have currently in the roll over valve grommet without having to have something machined like you did for yours. Once I get that figured out the rear tank willl b next.
Trending Topics
#8
04-12-2010, 03:20 PM
Hotshot
#9
04-12-2010, 09:13 PM
If that 90* was more like a 45* coming out of the roll over vent grommet I don't think mine would either but hopefully tomorrow I can get to the plumbing store and find something that would work.
#11
04-14-2010, 11:08 AM
What did you use for the fitting to into the rollover grommett in the tank?
#12
04-14-2010, 11:21 AM
Hotshot
#13
04-14-2010, 11:32 AM
so you used 5/8" hose? Did you just stick the threaded part into the grommet or did you thread a nut or something onto the fitting from inside the tank? I think my problem is the low pressure hydralic line is very stiff so it is pushing too much on the fitting in the grommet and basically ovaling the opening.
#14
04-14-2010, 04:25 PM
Hotshot
#15
04-14-2010, 07:37 PM