
my F-150 project w/ pics.
#46
 05-09-2010, 04:21 AM


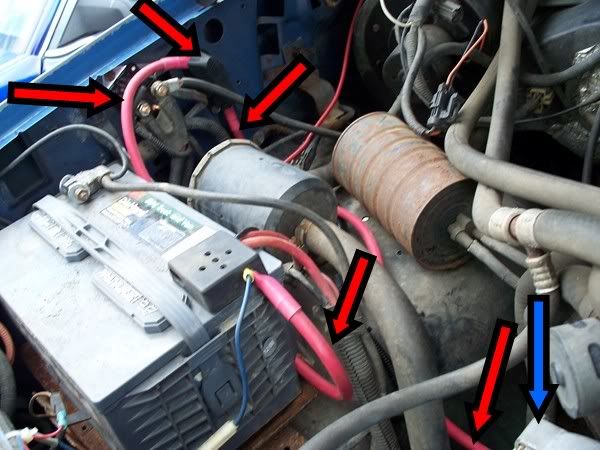
In this pic the red arrows is the charge cable & the blue the alt:
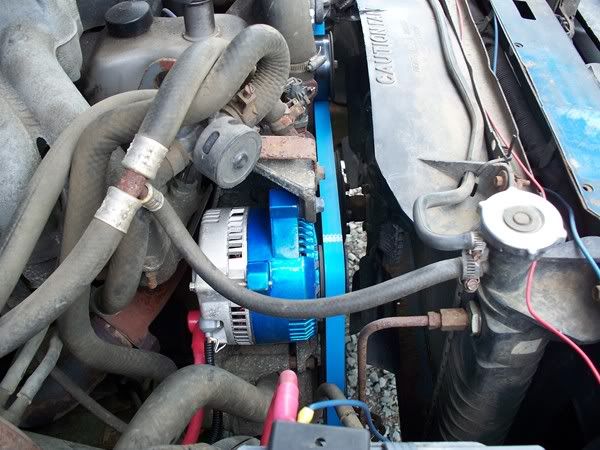
A quick pic of my alt ( I powdercoated the case anodize blue):
#47
05-09-2010, 07:43 AM
Posting Guru
Join Date: Jun 2003
Location: southwest michigan
Posts: 2,314
Likes: 0
Received 0 Likes
on
0 Posts
#48
05-09-2010, 10:37 PM
The one they provide was 2~3 feet long. They provide the maxi-fuse holder and two fuses, the cable, four ends (eyes) for the charge cable, solder pellets to attach the eyes, and the adapter. They also gave a good instruction sheet, it was a real straight forward swap. Make sure you order the right alt, Ford has multiple cases. I needed the case with the mounts at 6 and 12, 8" apart. I ordered one w/o thinking about that and had to order another one to match my truck.
Got some more done today after having to pull the lower intake back off realizing that it was sitting too far forward i had fogotten to take out the knock sensor. i didn't think about it when i put the intake on before, but since i did the MAF swap i don't need the knock sensor since the stangs didn't use one. then thinking about it i have a typhoon intake for a stang so it was built for not having a knock sensor so it hit the sensor and was too far forward. i took the sensor out and got everything set back up on it, ran my injector wires, MSD cap/rotor, Taylor plug wires, and built a new bracket for the throttle cable since my throttle is now on the opposite side of the engine. the cable wraps around behind the engine and back up to the new bracket. here are some pics from the stuff done today..
The fuel pressure regulator comes very close to the throttle body. if i were to do this again i would get the basic rail kit then get the remote mount regulator instead of the top mount regulator.
New wires. they clear the headers pretty decent. i wish several of them were shorter, but they will work.
#49
06-14-2010, 12:16 AM
Well guys i haven't been updating the thread much, but i thought i'd go ahead and post some more pics of some of the progress. I now have the injectors all connected, the 3G alternator installed and plugged in(minus charge cable), Centerforce clutch installed, tranny in the truck w/ a new high torque starter from RJM Injection, new gas tank installed w/ fuel filler neck modded, new fuel pump and sender installed, and a new throttle cable bracket built. i'm going to get a price on having a new driveshaft built this week or next week b/c the PO apparently smacked the driveshaft hard on something and it's all dented in and smashed up.. also i'm going to tear apart the transfer case and check all that out as well before i put it in the truck. Also i used studs on the VCs b/c the stock bolts were a fuzz too short for the job and found out it's going to be a trick trying to find a spot to mount the coil and stuff on the driver side. i think i may mod my harness a little more to move the coil up where the lightnings had it and i gotta look and see where the lightnings had some other stuff and how it all mounted.. May do that this week or next week also.. I have a week without the GF so things can actually get done!! here are the pics so far fellas!! Let me know what y'all think


Modding the filler neck...


Now, here are some pics of the truck before we did the tranny, clutch, and before my GF cleaned out the back of the truck of all the trash i've been throwing back there... now we don't have a starter on the ground or a front driveshaft hanging down.. lol. I love this truck all cleaned up. Oh and those are 33x12.50's with no lift on the truck.. they DID fit with the stock front bumper, but i'm probably still going to put around a 4" lift on it just for fun. Oh and i'm waiting to put the front clip back together until i can get my smoked headlights and signals, a new aluminum radiator, and electric fans for it.


Modding the filler neck...
Now, here are some pics of the truck before we did the tranny, clutch, and before my GF cleaned out the back of the truck of all the trash i've been throwing back there... now we don't have a starter on the ground or a front driveshaft hanging down.. lol. I love this truck all cleaned up. Oh and those are 33x12.50's with no lift on the truck.. they DID fit with the stock front bumper, but i'm probably still going to put around a 4" lift on it just for fun. Oh and i'm waiting to put the front clip back together until i can get my smoked headlights and signals, a new aluminum radiator, and electric fans for it.
#50
06-14-2010, 12:20 AM
Posting Guru
Join Date: Mar 2005
Location: Central,Texas
Posts: 1,453
Likes: 0
Received 0 Likes
on
0 Posts
Well guys i haven't been updating the thread much, but i thought i'd go ahead and post some more pics of some of the progress. I now have the injectors all connected, the 3G alternator installed and plugged in(minus charge cable), Centerforce clutch installed, tranny in the truck w/ a new high torque starter from RJM Injection, new gas tank installed w/ fuel filler neck modded, new fuel pump and sender installed, and a new throttle cable bracket built. i'm going to get a price on having a new driveshaft built this week or next week b/c the PO apparently smacked the driveshaft hard on something and it's all dented in and smashed up.. also i'm going to tear apart the transfer case and check all that out as well before i put it in the truck. Also i used studs on the VCs b/c the stock bolts were a fuzz too short for the job and found out it's going to be a trick trying to find a spot to mount the coil and stuff on the driver side. i think i may mod my harness a little more to move the coil up where the lightnings had it and i gotta look and see where the lightnings had some other stuff and how it all mounted.. May do that this week or next week also.. I have a week without the GF so things can actually get done!! here are the pics so far fellas!! Let me know what y'all think
Modding the filler neck...
Now, here are some pics of the truck before we did the tranny, clutch, and before my GF cleaned out the back of the truck of all the trash i've been throwing back there... now we don't have a starter on the ground or a front driveshaft hanging down.. lol. I love this truck all cleaned up. Oh and those are 33x12.50's with no lift on the truck.. they DID fit with the stock front bumper, but i'm probably still going to put around a 4" lift on it just for fun. Oh and i'm waiting to put the front clip back together until i can get my smoked headlights and signals, a new aluminum radiator, and electric fans for it.
 Hay you still out in spicewood with "death row diesel"?
#51
06-14-2010, 03:04 AM
Nice work Man. The truck is looking good. You know what would look cool. You should consider painting the red part of the valve covers blue like everything else. A guy on the Mustang forum I go on did that and it looks cool. You could also get the 5.0 distributor boot cover to conceal the red MSD cap. Just a thought.
#52
06-14-2010, 04:06 AM
Since he is from Austin, I bet he is a Longhorn fan. 
I think the color is fine. The paint job looks good. I kinda like it. I would not mess with a repiant. If you do decide to paint it, everything thats body color needs to be painted. There is just about nothing worse than seeing a cool car or truck and then opening the door or hood etc and seeing a completely different color.
I think the color is fine. The paint job looks good. I kinda like it. I would not mess with a repiant. If you do decide to paint it, everything thats body color needs to be painted. There is just about nothing worse than seeing a cool car or truck and then opening the door or hood etc and seeing a completely different color.
#53
06-14-2010, 06:12 AM
that is so awesome looking! that is my dream to be able to build my truck up nice like that. im getting there slowly but surly. ha i have a zf already so thats nice, i got a street/strip clutch, and new headlights. no where neer as far along as yours. love the color love the truck tho man keep up with the pics and ill be waiting for a vid! what are you gonna run for exhaust mufflers and headers?
#54
06-14-2010, 01:33 PM
Nice work Man. The truck is looking good. You know what would look cool. You should consider painting the red part of the valve covers blue like everything else. A guy on the Mustang forum I go on did that and it looks cool. You could also get the 5.0 distributor boot cover to conceal the red MSD cap. Just a thought.
Since he is from Austin, I bet he is a Longhorn fan.
I think the color is fine. The paint job looks good. I kinda like it. I would not mess with a repiant. If you do decide to paint it, everything thats body color needs to be painted. There is just about nothing worse than seeing a cool car or truck and then opening the door or hood etc and seeing a completely different color.
I think the color is fine. The paint job looks good. I kinda like it. I would not mess with a repiant. If you do decide to paint it, everything thats body color needs to be painted. There is just about nothing worse than seeing a cool car or truck and then opening the door or hood etc and seeing a completely different color.
that is so awesome looking! that is my dream to be able to build my truck up nice like that. im getting there slowly but surly. ha i have a zf already so thats nice, i got a street/strip clutch, and new headlights. no where neer as far along as yours. love the color love the truck tho man keep up with the pics and ill be waiting for a vid! what are you gonna run for exhaust mufflers and headers?
There was one thing i didn't think about.... the standpipe for the ECT sensor that also has 2 other hoses connecting to it won't fit in b/c of the crossover line on the fuel rails... probably going to cut it and weld it back up at a 45* angle or something... or cut it and weld in fittings in the middle of the standpipe so it can still be taken off and put in with everything still attached on the fuel rails and distributor.
#55
06-14-2010, 06:06 PM
There was one thing i didn't think about.... the standpipe for the ECT sensor that also has 2 other hoses connecting to it won't fit in b/c of the crossover line on the fuel rails... probably going to cut it and weld it back up at a 45* angle or something... or cut it and weld in fittings in the middle of the standpipe so it can still be taken off and put in with everything still attached on the fuel rails and distributor.
i dont even think i can do any of that type of stuff with my exhaust legally in California not sure where your at but come smog time for me id be putting my stock stuff back on, i have just a gutted cat and a single chamber and i love the way it sounds i think with a more custom exhaust like you 2 dual chambers would be awesome and give you a good rumble and a nice roar when it opens up. again cant wait to hear it fire up and see the finished product
#56
06-14-2010, 06:25 PM
#57
06-14-2010, 10:19 PM
1994 was a good year for colors. I had a '94 with a hand written paint code from the factory! It was Ultra Red but I don't have any good pics of it 
You should look at the Bronco Graveyard for the driveshaft they have good prices for the stock style shafts front and rear.
You should look at the Bronco Graveyard for the driveshaft they have good prices for the stock style shafts front and rear.
#58
06-14-2010, 10:32 PM
Ok, more pics now. excuse the dirty trans. i had been cleaning stuff all day and decided the trans was clean enough and i could clean it up a bit later if i felt like it. LoL. after sanding the frame and undercoating that, sanding/undercoating the fuel tank, and all that fun stuff i'm tired of cleaning and painting. tomorrow i'm modifying the headache rack and repainting it so more cleaning to do tomorrow. 


#60
06-16-2010, 11:40 PM
Ok guys, more updates!!! got the headache rack stripped, sanded, and repainted.. that is something i will never do again!! i did it b/c i was tired yesterday and wanted something fairly easy to do and since i had some aircraft remover i figured it'd be easy... NOT the case. after getting all the remover off i still had some of the old paint on there so i had to scrape and sand and fight it and it ended up taking me 6 hours from the time i started spraying aircraft remover til i got primer on it... Now it's painted and i'm happy and i also solve my issues with the coolant tree that houses the ECT and apparently 2 hoses attach to it too. LoL. i did this the way i did b/c i'm trying to keep things out of the way the best i can, the more thing i get out of the way, the happier i will be later on when the truck is running and i'm driving it daily. Also i feel it looks a lot cleaner when things are tucked out of the way. Oh yeah the crossover line for the fuel rails was in the way so i couldn't mount it the way it did from the factory. here are the pics, enjoy!


It looks like i missed some spots in this pic, but its the flash of the camera. i went over this thing like 5 times to make sure i got everything..


And here is a pic of the valve cover studs. If you ever plan to use VCs like these then you gotta either use longer bolts or studs and get ready for some modification of your electrical system to get stuff off of the valve covers.. i'm going to have to move my coil and stuff off of the valve cover..

It looks like i missed some spots in this pic, but its the flash of the camera. i went over this thing like 5 times to make sure i got everything..
And here is a pic of the valve cover studs. If you ever plan to use VCs like these then you gotta either use longer bolts or studs and get ready for some modification of your electrical system to get stuff off of the valve covers.. i'm going to have to move my coil and stuff off of the valve cover..