Magic Air Heater Cores
#1
 01-01-2010, 03:12 AM


Magic Air Heater Cores
There are current discussions going in other threads at the moment regarding the electric motor and fresh air ductwork of the '48-'50, 1951, and 1952 Magic Air fresh air heaters. If we're going to run down all the details, differences, and year-specifc idiosynchrasies of these heaters, I think an honest effort should be made to hammer out an accord on the heater cores as well except in it's own thread. It's basically a maintenance item and this will keep coming up as long as the trucks are around and we should be able to quote a workable replacement or at least one that can be easily modified to fit. There is some conflicting information floating around that all needs to come together as something we can confidently state as fact. Maybe once everybody agrees on what fits into where and what year, we can put all this Magic Air stuff together as a reference document. I've searched endlessly and combed the archives and internet for information. I'm going to post what I've got and it would be great if everybody else in the know can pitch in to fill the holes, refute anything that is incorrect, or independently verify.
I can't verify this because I don't have a copy of the Chassis Parts Catalog, but judging from the drawings and photos, I'm reasonably certain that the heater core was the same part number from '48 all the way through '51 even though the heater design changed considerably in 1951. The part number and the core changed in 1952 because the location in which the lower tube passes through the firewall was raised. All the above gibberish can be verified if someone with an e-copy of the Chassis Parts Catalog can post the proper page here. The part group number for the core is 18476 and I think it's on page number 558.
EDIT: I did a little more searching and our friend Bill the NumberDummy actually confirmed my suspicions here: https://www.ford-trucks.com/forums/5...ml#post4517766
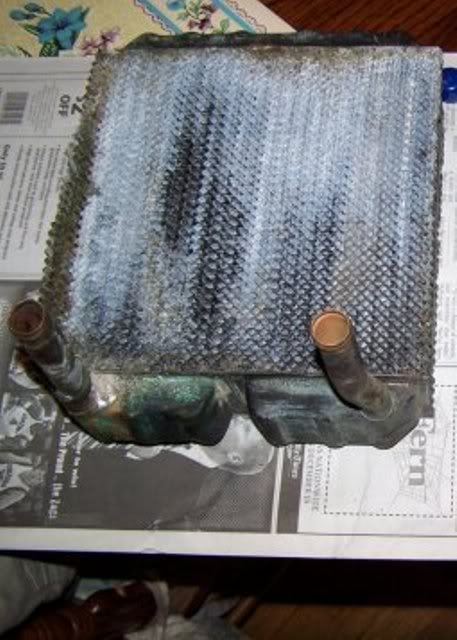
Here is a picture of a 1951 model OE core courtesy of 51ford fan. This is the same core that I believe fit the '48 - '50 heaters, too:
And here is a picture of a 1952 model OE core out of my F-2:
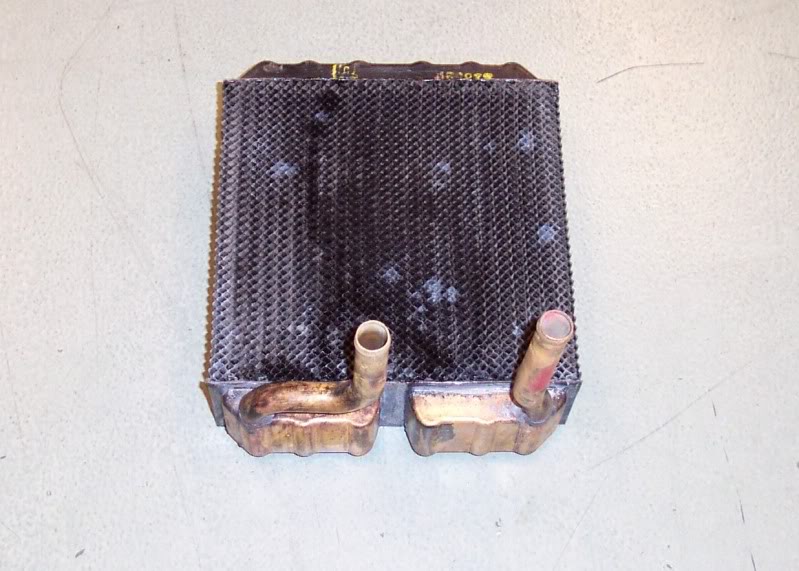
Notice that the 1952 core is basically identical to the 1951 and earlier core except for the shape of the lower tube. The core did have a factory number painted on it: 318527. That number is the same format that Proliance and others still use today, but nobody has a record of it, so who knows? I've pondered at great length why Ford would have gone to the trouble to make that one illogical change for what they knew would be only one model year and I think I may have figured out the answer. Ford introduced three all-new overhead valve engines across the truck line for 1952. I'd lay odds that part of one of those engines (probably one of the new Big Job V-8's) wanted to occupy the same location that the lower tube passed through the firewall. So they raised it a few inches. That's the only thing I can come up with, so that's my story and I'm sticking to it unless somebody else has another idea.
As for dimensions, both core part numbers are 7 3/4"L x 7 3/4"W x 2 1/2" thick with 5/8" OD tubes. Those measurements are of the actual core itself without regard for the tanks. That appears to be how all the replacement heater cores I've looked at are measured and documented.
Julie has frequently circulated the Proliance/Ready-Rad part# 399406 and states that it is a drop in replacement for the '48 - '51 or at least it was on her '51. It is listed as fitting 1970-1977 International Scouts. The core dimensions and tank shape are exactly the same as the OE Ford cores, but the tubes exit the end of the tank instead of the back of it and make a hard 90* turn to the rear. Here is a picture of that core:

I've not had one of these in my hands, but I'm not seeing how it could possibly fit without drilling new holes in the side of the housing for the tubes to pass through. The core and tank dimensions are supposed to be the same as the OE cores, so it would stand to reason that the tubes would stick out the side of the housing. Here is a picture of my 1952 core in my 1952 housing for reference:

Note that the core is a fairly snug fit in the housing. Certainly not enough room for the tubes to make a 90 between the end of the tank and the housing. The only way I can think of that it would work is if the 1951 housing is longer, but I don't think that's the case. It's all you, Julie. Pictures of your replacement core in the housing or comments/corrections on any of this would be appreciated so we can clear this up. Is there any chance that your old tank was soldered on to that new core? Now that scenario would make perfect sense.
EDIT: I found another post in the archives where another poster recommended the very same core, but made that exact mod. He had the tank with the tubes in it swapped off of his old core onto the new one. You can read it here: https://www.ford-trucks.com/forums/4...er#post3498567
Another replacement option presented by 51ford fan is Proliance/Ready-Rad part# 399204. The application is '60 - '67 Jeeps. This core is very similar, but slight shorter. The dimensions are 7"L x 7 3/4"W x 2 1/2" thick. The tubes again exit the end of the tank, but they don't have a 90* turn. Here is a picture of 51ford fan's new core before any mods sitting in his 1951 housing:

51ford fan stated that all he had to do to make it fit was trim the tubes off and solder on copper 90's. I happen to have a couple copper 90's laying around to measure and compare to my core and even though that core is 3/4" shorter, I'm pretty sure that the tubes would still be located too far outboard to hit the holes in the housing. Rod, you haven't posted for awhile, but if you're still around and have pics of your core after it was modified and set in the housing, it would be swell if you could post them or elaborate on any of this.
With all this being said, I have spent a bunch of time searching online and pouring through the dimensions and picture pages in a heater core catalog and it looks like those two part numbers are the two closest matches to the originals and likeliest candidates for replacements. No other cores that I found had length and width dimensions that were close. Those two dimensions are somewhat critical to making sure that the core properly fits into the tray without allowing air to pass around the sides of it. Gaps from a smaller core could be sealed or patched, but then you're going to be reducing airflow. One thing I have not yet checked in to is finding a slightly thinner core with the same 7 3/4" length and width and proper tube positions. It would be easy to shim the core up to meet the housing cover and inlet duct if everything else fit. I'll look into this once I can see straight again.
I can't verify this because I don't have a copy of the Chassis Parts Catalog, but judging from the drawings and photos, I'm reasonably certain that the heater core was the same part number from '48 all the way through '51 even though the heater design changed considerably in 1951. The part number and the core changed in 1952 because the location in which the lower tube passes through the firewall was raised. All the above gibberish can be verified if someone with an e-copy of the Chassis Parts Catalog can post the proper page here. The part group number for the core is 18476 and I think it's on page number 558.
EDIT: I did a little more searching and our friend Bill the NumberDummy actually confirmed my suspicions here: https://www.ford-trucks.com/forums/5...ml#post4517766
Here is a picture of a 1951 model OE core courtesy of 51ford fan. This is the same core that I believe fit the '48 - '50 heaters, too:
And here is a picture of a 1952 model OE core out of my F-2:
Notice that the 1952 core is basically identical to the 1951 and earlier core except for the shape of the lower tube. The core did have a factory number painted on it: 318527. That number is the same format that Proliance and others still use today, but nobody has a record of it, so who knows? I've pondered at great length why Ford would have gone to the trouble to make that one illogical change for what they knew would be only one model year and I think I may have figured out the answer. Ford introduced three all-new overhead valve engines across the truck line for 1952. I'd lay odds that part of one of those engines (probably one of the new Big Job V-8's) wanted to occupy the same location that the lower tube passed through the firewall. So they raised it a few inches. That's the only thing I can come up with, so that's my story and I'm sticking to it unless somebody else has another idea.
As for dimensions, both core part numbers are 7 3/4"L x 7 3/4"W x 2 1/2" thick with 5/8" OD tubes. Those measurements are of the actual core itself without regard for the tanks. That appears to be how all the replacement heater cores I've looked at are measured and documented.
Julie has frequently circulated the Proliance/Ready-Rad part# 399406 and states that it is a drop in replacement for the '48 - '51 or at least it was on her '51. It is listed as fitting 1970-1977 International Scouts. The core dimensions and tank shape are exactly the same as the OE Ford cores, but the tubes exit the end of the tank instead of the back of it and make a hard 90* turn to the rear. Here is a picture of that core:
I've not had one of these in my hands, but I'm not seeing how it could possibly fit without drilling new holes in the side of the housing for the tubes to pass through. The core and tank dimensions are supposed to be the same as the OE cores, so it would stand to reason that the tubes would stick out the side of the housing. Here is a picture of my 1952 core in my 1952 housing for reference:
Note that the core is a fairly snug fit in the housing. Certainly not enough room for the tubes to make a 90 between the end of the tank and the housing. The only way I can think of that it would work is if the 1951 housing is longer, but I don't think that's the case. It's all you, Julie. Pictures of your replacement core in the housing or comments/corrections on any of this would be appreciated so we can clear this up. Is there any chance that your old tank was soldered on to that new core? Now that scenario would make perfect sense.
EDIT: I found another post in the archives where another poster recommended the very same core, but made that exact mod. He had the tank with the tubes in it swapped off of his old core onto the new one. You can read it here: https://www.ford-trucks.com/forums/4...er#post3498567
Another replacement option presented by 51ford fan is Proliance/Ready-Rad part# 399204. The application is '60 - '67 Jeeps. This core is very similar, but slight shorter. The dimensions are 7"L x 7 3/4"W x 2 1/2" thick. The tubes again exit the end of the tank, but they don't have a 90* turn. Here is a picture of 51ford fan's new core before any mods sitting in his 1951 housing:
51ford fan stated that all he had to do to make it fit was trim the tubes off and solder on copper 90's. I happen to have a couple copper 90's laying around to measure and compare to my core and even though that core is 3/4" shorter, I'm pretty sure that the tubes would still be located too far outboard to hit the holes in the housing. Rod, you haven't posted for awhile, but if you're still around and have pics of your core after it was modified and set in the housing, it would be swell if you could post them or elaborate on any of this.
With all this being said, I have spent a bunch of time searching online and pouring through the dimensions and picture pages in a heater core catalog and it looks like those two part numbers are the two closest matches to the originals and likeliest candidates for replacements. No other cores that I found had length and width dimensions that were close. Those two dimensions are somewhat critical to making sure that the core properly fits into the tray without allowing air to pass around the sides of it. Gaps from a smaller core could be sealed or patched, but then you're going to be reducing airflow. One thing I have not yet checked in to is finding a slightly thinner core with the same 7 3/4" length and width and proper tube positions. It would be easy to shim the core up to meet the housing cover and inlet duct if everything else fit. I'll look into this once I can see straight again.
#2
01-01-2010, 03:27 AM
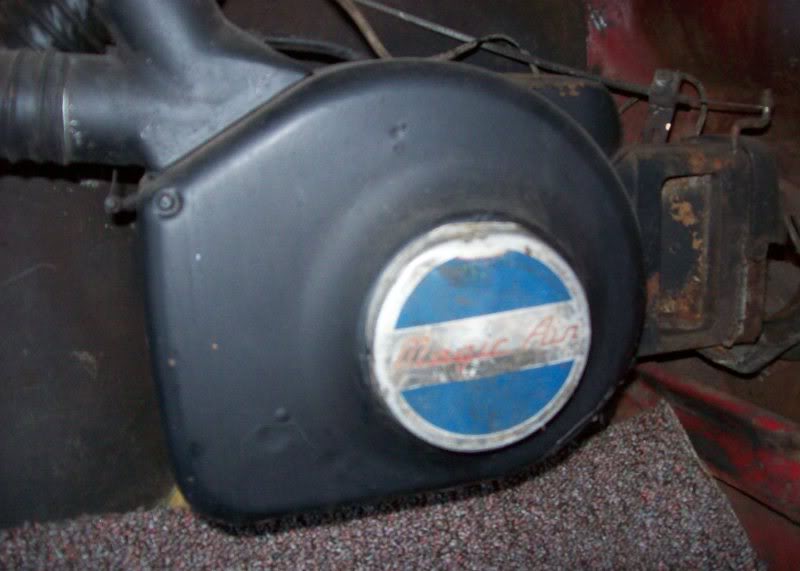
While I'm at it, I did notice one other little difference between the 1951 and the 1952 Magic air heaters. Here is the motor end cover badge on a 1951 model courtesy of 51panelman:
And here is the badge on my 1952 model:
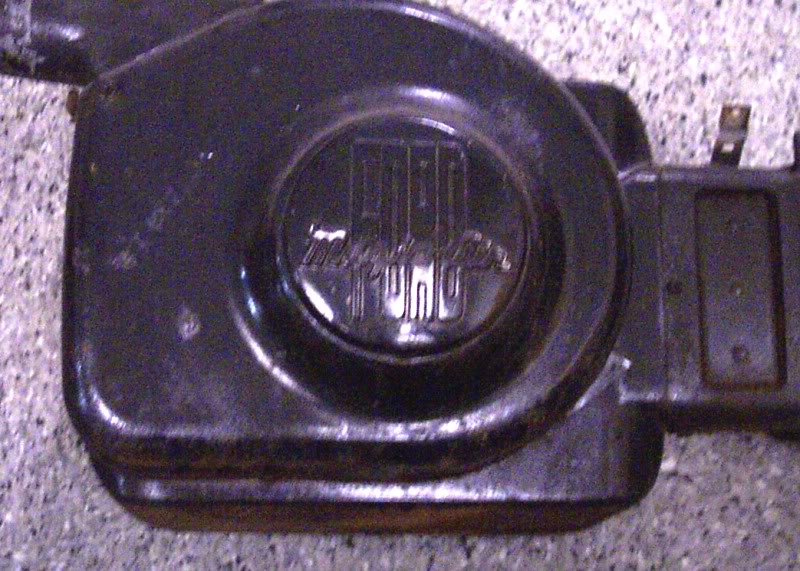
It's a little hard to see since it got painted black with the rest of the heater, but it has FORD embossed in tall block letters behind the Magic Air script. I've not seen this change pointed out before.
And here is the badge on my 1952 model:
It's a little hard to see since it got painted black with the rest of the heater, but it has FORD embossed in tall block letters behind the Magic Air script. I've not seen this change pointed out before.
#3
01-01-2010, 09:44 AM

You've done your homework on this. I'll be following the discussion.
As for the badges, here are two that I've taken pics of. The one matches your unrestored '51 pic, and matches my unrestored '51. I'm missing the badge on my '52 Magic Air, but your pic matches others I've seen. Here's what I assume the finish should look like. Anybody have an original untouched one for comparison to help confirm or disprove this? Stu
As for the badges, here are two that I've taken pics of. The one matches your unrestored '51 pic, and matches my unrestored '51. I'm missing the badge on my '52 Magic Air, but your pic matches others I've seen. Here's what I assume the finish should look like. Anybody have an original untouched one for comparison to help confirm or disprove this? Stu
#4
01-01-2010, 10:32 AM

Junior User
Join Date: Jun 2007
Location: Casey,IL
Posts: 69
Likes: 0
Received 0 Likes
on
0 Posts
Very good topic it was 9 degrees here this morning! I have just reviewed a Modine radiator/heater catalog and found what might be a near direct drop in replacement heater core. From the illustration, it appears that the outlets are very close to being in the proper location. The heater core measures 8"X7 7/8"X2". I know it's just a little larger but think it might work. The catalog lists it as part# 4R702356, it's application is for a '85-'87 Ford Econoline van with front heat and AC. Also, there are five different Ford part numbers listed for this core: D5UZ-18476-AA, D5UZ-18476-C, D5VA-18746-AA, E3UZ-18476-C, and E6UZ-18476-A
I also found the NAPA part number: NHC6603137. I hope this information might help. I DO NOT have one of these cores so I am just speculating that it might work. As I stated earlier, if the dimensions and illustration are accurate, this core is very close to the original except for the noted dimensional differences.
Heat is a good thing!
Tim
Last edited by rpol7966; 01-01-2010 at 10:53 AM. Reason: More Information
#5
01-01-2010, 10:37 AM

If the scout core fits in the box good, why not just put your old end tank on it? If your old tank is damaged or rotten, how about just moving the inlet pipes where they need to be? Looks like there is room for them...any competent rad shop should be able to do that. I've had inlets changed on radiators before......no big deal. Just thinking out loud here...........t/m
#6
01-01-2010, 11:27 AM

Post Fiend
Maybe once everybody agrees on what fits into where and what year, we can put all this Magic Air stuff together as a reference document. Execellant idea. It's only come out in bits and pieces up 'till now.
I can't verify this because I don't have a copy of the Chassis Parts Catalog, but judging from the drawings and photos, I'm reasonably certain that the heater core was the same part number from '48 all the way through '51 even though the heater design changed considerably in 1951. The part number and the core changed in 1952 because the location in which the lower tube passes through the firewall was raised. All the above gibberish can be verified if someone with an e-copy of the Chassis Parts Catalog can post the proper page here. The part group number for the core is 18476 and I think it's on page number 558. See the post below. And yes, the 52 Fresh Air Heater Core is singled out (as is the recirc heater core btw so they may have had the same problem/fix with that one too). Let me post page 557 as well just for grins. If you need any more pics or tables let me know.
EDIT: I did a little more searching and our friend Bill the NumberDummy actually confirmed my suspicions here: https://www.ford-trucks.com/forums/5...ml#post4517766
I've pondered at great length why Ford would have gone to the trouble to make that one illogical change for what they knew would be only one model year and I think I may have figured out the answer. Ford introduced three all-new overhead valve engines across the truck line for 1952. I'd lay odds that part of one of those engines (probably one of the new Big Job V-8's) wanted to occupy the same location that the lower tube passed through the firewall. So they raised it a few inches. That's the only thing I can come up with, so that's my story and I'm sticking to it unless somebody else has another idea. That may be absolutely true and I support your theory because I have a 51 heater and with the 390 installation in my truck I had to solder a double 90* dogleg (almost identical to the one you have pictured for the 52 core) right where the lower heater tube exited the firewall in order to clear the engine.
As for dimensions, both core part numbers are 7 3/4"L x 7 3/4"W x 2 1/2" thick with 5/8" OD tubes. 1/2 inch household plumbing copper fittings will solder up to them perfectly.
Julie has frequently circulated the Proliance/Ready-Rad part# 399406 and states that it is a drop in replacement for the '48 - '51 or at least it was on her '51. It is listed as fitting 1970-1977 International Scouts. The core dimensions and tank shape are exactly the same as the OE Ford cores, but the tubes exit the end of the tank instead of the back of it and make a hard 90* turn to the rear. Here is a picture of that core:
I've not had one of these in my hands, but I'm not seeing how it could possibly fit without drilling new holes in the side of the housing for the tubes to pass through. The core and tank dimensions are supposed to be the same as the OE cores, so it would stand to reason that the tubes would stick out the side of the housing. That's the one indeed. And mine was a direct drop in replacement. However we can't dismiss the possibility that the heater was modified before I got it or fixed once before. It didn't look like it, but then again I wasn't paying this much attention then either.
It's all you, Julie. That's kinda par for the course. And I don't know what to tell you other than "Hey, at the time what I did as far as the motor and the core worked just fine for me." With the restoration I did on my heater, it restored it to full working status - and that was the goal - results that worked. If your research pays off and you can "develope a better mouse trap" here - where you can actually find the parts, actually install them, and they really do fit and work, then that would be an incedible service for many people. And knowing what I know today as opposed to back then, I would venture to say it can be done. Good luck - sincerely. Pictures of your replacement core in the housing or comments/corrections on any of this would be appreciated so we can clear this up. Is there any chance that your old tank was soldered on to that new core? Very doubtful. The new core came in a sealed box and I threw the old one out whole.
And after talking about the motor replacements and thinking about finding one of those, I took a look at my heater and just how much trouble it would be to get it out to replace the motor - if indeed we can find one of those. And it's going to be a real chore because I have modified the fresh air intake to fit on the modified side door I installed to replace the duct.
I'm seriously thinking of buying another heater and just experimenting on it with the motor and now the core to see if all this actually fits and works before I tear mine out only find the effort on the motor fruitless.
There's another important input missing here as well BOR, and that is from Doug51F1. He actaully completely restored TWO of these heaters (52 models I believe judging from the boots, although mine had a 52 boot as well) and gave me an input and POC on where he got his motors. I'll have to check it out. Aren't these BEAUTIFUL?
As you experienced, it's not quite as easy to fine this stuff an d then have it actually fit, as to post the numbers.
I'd like to see his input on the cores he used and whether or not he hasd to modify them. I think between the four or five folks who have looked intothese there should be enough reliable info first of all to nail down the differences in the heaters and either find th ecorrect parts to rebuild or some that can be modified to work and how to make the modifications. This is a great start. It's just never gotten this kind of attention before.
Your efforts are yeilding outstanding results and are VERY helpful. Points given & saved to favorites. It's amazing how youare contributing - must be very "motivated" LOL.
#7
01-01-2010, 11:47 AM
Elder User
Join Date: Nov 2008
Location: Gunbarrel, Co.
Posts: 915
Likes: 0
Received 0 Likes
on
0 Posts

Trending Topics
#8
01-01-2010, 11:49 AM
Post Fiend
#9
01-01-2010, 01:44 PM
Stu,
Thanks for tacking up that pic of the 1952 badge. If I were to guess, I'd think that is what an unmolested original would look like, too. Seeing one will be helpful when the time comes to restore mine.
Tim,
Thanks for the lead. A thinner core could be made to fit fairly easily, but longer and wider might be a problem. As you can see in the pics, it's a fairly snug fit in the housing. What you can't see in the pics is that the core sits into a tray that has a short flange around the perimeter. It's important that the core has a decent seal to that tray because incoming air enters the core through a roughly triangular area in the center of the core, makes a 180* turn underneath it in the tray, and then passes back through the core again to exit the heater through the outside edges of the core around the triagular shape. 1/4" either way might not be a problem though. There is a little wiggle room in the tray and one flange could be cut off if absolutely necessary. I'll see if I can find one on the shelf somewhere and check it out.
Tinman52,
Moving the tubes or swapping tanks are both good, viable options. When it's all said and done, that may well end up being the best solution. Unfortunately, the corner radiator shops are drying up fast. I live near a good-sized town and there isn't one within 100 miles. Not all of us are skilled enough to do this level of work ourselves, so it would be nice if we could identify an off-the-shelf replacement for at least the '48 - '51 models. The tube difference on the '52's is actually minor and can be easily duplicated with 6" of 1/2" copper tube and a couple 90's. Just about anybody can sweat solder copper pipe or knows somebody that can.
Julie,
The input is appreciated. It's understandable that you can't remember all the details of how you did yours. I often can't remember what I did a week later, let alone a couple years. If you do pull the thing out to change your motor, though, by all means please get us some pics! I'm restoring my heater and it's in pieces, so I'm willing to use it as a guinea pig while it's apart. It's always better if stuff like this can be confirmed by more than one party, though. I sent PM's to Doug51F1 and 51ford fan and invited them to join the discussion.
Motivated and bored. I've got time on my hands at work and it's too cold to do much at home in the shop, either. Research and small restoration work keeps me occupied! And I do think that all this information should be assembled for those that come after us. It doesn't make much sense for every newbie to be forced to figure it out from scratch - or us old hands either.
Last thing - I've slanted this towards the '51 and '52 heaters, but there is no reason that we couldn't or shouldn't collect the '48 - '50 info here, too. I know that bobj49f2 has had experience with the earlier units. Where ya at, Bob?!?
Thanks for tacking up that pic of the 1952 badge. If I were to guess, I'd think that is what an unmolested original would look like, too. Seeing one will be helpful when the time comes to restore mine.
Tim,
Thanks for the lead. A thinner core could be made to fit fairly easily, but longer and wider might be a problem. As you can see in the pics, it's a fairly snug fit in the housing. What you can't see in the pics is that the core sits into a tray that has a short flange around the perimeter. It's important that the core has a decent seal to that tray because incoming air enters the core through a roughly triangular area in the center of the core, makes a 180* turn underneath it in the tray, and then passes back through the core again to exit the heater through the outside edges of the core around the triagular shape. 1/4" either way might not be a problem though. There is a little wiggle room in the tray and one flange could be cut off if absolutely necessary. I'll see if I can find one on the shelf somewhere and check it out.
Tinman52,
Moving the tubes or swapping tanks are both good, viable options. When it's all said and done, that may well end up being the best solution. Unfortunately, the corner radiator shops are drying up fast. I live near a good-sized town and there isn't one within 100 miles. Not all of us are skilled enough to do this level of work ourselves, so it would be nice if we could identify an off-the-shelf replacement for at least the '48 - '51 models. The tube difference on the '52's is actually minor and can be easily duplicated with 6" of 1/2" copper tube and a couple 90's. Just about anybody can sweat solder copper pipe or knows somebody that can.
Julie,
The input is appreciated. It's understandable that you can't remember all the details of how you did yours. I often can't remember what I did a week later, let alone a couple years. If you do pull the thing out to change your motor, though, by all means please get us some pics! I'm restoring my heater and it's in pieces, so I'm willing to use it as a guinea pig while it's apart. It's always better if stuff like this can be confirmed by more than one party, though. I sent PM's to Doug51F1 and 51ford fan and invited them to join the discussion.
It's amazing how youare contributing - must be very "motivated" LOL.
Last thing - I've slanted this towards the '51 and '52 heaters, but there is no reason that we couldn't or shouldn't collect the '48 - '50 info here, too. I know that bobj49f2 has had experience with the earlier units. Where ya at, Bob?!?
#10
01-01-2010, 02:44 PM
Post Fiend
My heater was one of the first things I bought,restored and installed. At that time, I took some pictures but they were more of a "before and after" kind of deal. I wasn't an FTE participant at the time so I didn't see any reason to keep the detailed records and documentation I do now.
If I do take it out, or get another one to experiment with, restore and sell, I'll be sure to keep good notes and lots of pictures....aren't digital camera's wonderful!
If I do take it out, or get another one to experiment with, restore and sell, I'll be sure to keep good notes and lots of pictures....aren't digital camera's wonderful!
#11
01-01-2010, 03:27 PM
Junior User
Join Date: Jun 2007
Location: Casey,IL
Posts: 69
Likes: 0
Received 0 Likes
on
0 Posts
BlueOvalRage, I share your concerns that any core larger than 7 3/4"X 7 3/4" might not fit in the case. If you will go to the NAPA website, do a search for the '85-'87 Econoline heater core. It gives dimensions that indicate that the core is 8"X7 3/4"X2". It also has a picture of the core! I really think that this core may be a near drop in.
Tim
Tim
#12
01-01-2010, 04:00 PM
#13
01-01-2010, 04:13 PM
Restored heaters
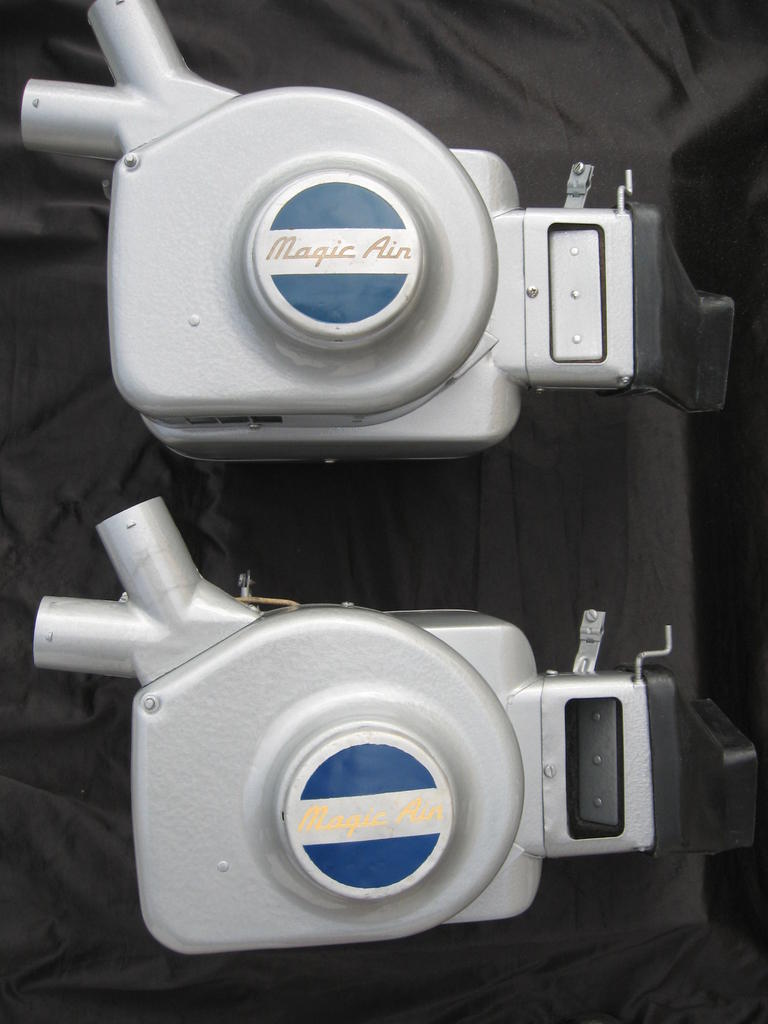
https://www.ford-trucks.com/forums/p...ictureid=22311
Julie , the long hrs .in the thin air must have affected your short term memory .JJ Could I get some credit for the 2 restored Magic Air heaters in the above link ? The heater boots should have been a dead give away .
The top heater is for the 1ST-RIDE with a 12 V motor conversion . The motor cover badge is an untouched original .
The bottom heater is for the stock truck w/ a 6 V. motor and a repainted badge .
Am trying real hard to understand the process on how to add pics . all please be patient .Ilya ,tried your instructions on the pic addition .Must be doing something wrong . Happy New Year to all . Later ,Denny
Last edited by firstrider; 01-01-2010 at 04:15 PM. Reason: typeing error
#14
01-01-2010, 06:33 PM
Post Fiend
This is a great thread, BOR! Thanks for taking the time to compile and present the info. I hope that we find a (fairly) easy solution to this.
On the heater colors.... The heater in my 51 (as pictured in the above post) appears to be unmolested as the rest of the truck. Thus, makes me believe that the color would have been black.
I have another heater in storage. Makes me want to find it and crack it open to see with my eyes what everyone is talking about. My very good friend owns a repair shop and has access to the parts at cost. I can buy the parts through him and return them without any issues. He also used to own a radiator shop. Although he recently consolidated it, the guy that worked on the radiators is still employed with him and can do what is needed on these cores.
Perhaps, once we find out the specifics, I'll get mine redone and tested. If that works out, I'm willing to get the tanks done for anyone who needs them for the price of parts and lunch money for the guy doing it.
#15
01-01-2010, 07:15 PM
Post Fiend
https://www.ford-trucks.com/forums/p...ictureid=22311
Julie , the long hrs .in the thin air must have affected your short term memory .JJ Could I get some credit for the 2 restored Magic Air heaters in the above link ? The heater boots should have been a dead give away .
The top heater is for the 1ST-RIDE with a 12 V motor conversion . The motor cover badge is an untouched original .
The bottom heater is for the stock truck w/ a 6 V. motor and a repainted badge .
Am trying real hard to understand the process on how to add pics . all please be patient .Ilya ,tried your instructions on the pic addition .Must be doing something wrong . Happy New Year to all . Later ,Denny
Julie , the long hrs .in the thin air must have affected your short term memory .JJ Could I get some credit for the 2 restored Magic Air heaters in the above link ? The heater boots should have been a dead give away .
The top heater is for the 1ST-RIDE with a 12 V motor conversion . The motor cover badge is an untouched original .
The bottom heater is for the stock truck w/ a 6 V. motor and a repainted badge .
Am trying real hard to understand the process on how to add pics . all please be patient .Ilya ,tried your instructions on the pic addition .Must be doing something wrong . Happy New Year to all . Later ,Denny
Your right Denny, and I apologize most profusely for mixing up your E-mail with one of Dougs. I need to stop staying up till all hours posting stuff here. It's hard enough keeping regular e-mails straight, but keeping everyones name and Delta Tau Ki (FTE) name separate is a reAl challenge sometimes. I'm sorry Denny...
He guys! Here's a pic of two heaters our very own "fisrtrider" restored....Aren't they BEAUTIFUL?
 (what an idiot)