Suspension and handling upgrades.
#31
 08-08-2011, 03:15 PM


These types of dampers are mainly for racers who tend to be pretty hard on them. So for civilian use, they're going to last longer. The QA1's on my Mustang have been doing very well for over 10 years, and I drive it pretty hard. They will wear out eventually, but they're totally rebuildable. (Of course, rebuilding them will cost more than buying a set of ordinary dampers.) Furthermore, you can customize them by requesting special valving to suit your needs.
I know what Ford says about load or towing capacity of the Aerostar, but I think they must exaggerate at least a little. The stock brakes and transmission seem barely adequate for just the van, and the rear axle looks to be the same (2wd) or smaller (4wd) than the one on my Mustang. Most people on this forum know that the first thing you want to do with one of these vans is to install a heavy duty transmission cooler from the aftermarket. The stock suspension also seems too softly sprung for real hauling. I think if you loaded it occasionally, it may be OK. But if you want to regularly use it like a truck, it's going to get worn out fast.
I know what Ford says about load or towing capacity of the Aerostar, but I think they must exaggerate at least a little. The stock brakes and transmission seem barely adequate for just the van, and the rear axle looks to be the same (2wd) or smaller (4wd) than the one on my Mustang. Most people on this forum know that the first thing you want to do with one of these vans is to install a heavy duty transmission cooler from the aftermarket. The stock suspension also seems too softly sprung for real hauling. I think if you loaded it occasionally, it may be OK. But if you want to regularly use it like a truck, it's going to get worn out fast.
#32
08-09-2011, 09:00 AM
I used my other Aerostar like this, the only reason I don't still have it is that it was totaled. It had 234,000 miles and held up just fine.
This van already has the heavy duty transmission cooler, shift kit, stronger bands, clutches, heavy duty torque converter, valve body calibration, stronger planetary gears. The trans will take it just fine. And the loads I haul the engine pulls just fine. I did have to upgrade the rear wheel bearing on my other van, I might eventually have to do the same on this one.
I will consider the QA1s next time I need shocks.
#33
08-10-2011, 12:50 AM
I was referring to stock setup of the van; it is probably designed for occasional towing and really heavy loading. But doing it everyday is going to wear it out really fast.
If the damper mounts on the Aerostar is as weak as you have found them to be, maybe a coil-over setup is not appropriate. If the mounts get damaged by the Monroe dampers with their weak helper springs, they won't stand a chance against more heavy duty springs and dampers. They will need heavy fortification.
If the damper mounts on the Aerostar is as weak as you have found them to be, maybe a coil-over setup is not appropriate. If the mounts get damaged by the Monroe dampers with their weak helper springs, they won't stand a chance against more heavy duty springs and dampers. They will need heavy fortification.
#34
08-14-2011, 02:16 AM
Ok, got my Timbren air stops installed. Those work great. They definitely limit the sag, and become active as you add weight, without adversely affecting the ride quality. They also reduce the body roll, and make the van feel stable and confident in corners.
My brakes have also improved, turns out the vacuum leak I have been fighting was interfering with the brake booster, and now that the leak is fixed, the brakes are working much better. I still feel the stock brakes are barely adequate, but I will handle that later.
The Monroe coilovers can do a good job at compensating for worn stock springs for normal duty use. For heavy duty use, I recommend pursuing other options first.
#35
10-21-2012, 08:52 PM

I have an infrequent need to haul enough of a load that some help in the back would be nice. I have to haul a 6x12' enclosed trailer 2000+ miles around Thanksgiving, and having just done 1400 miles six months ago with the same trailer, only more lightly loaded, I know how much the loaded van + tongue weight is going to make me re-aim my headlights for the trip 
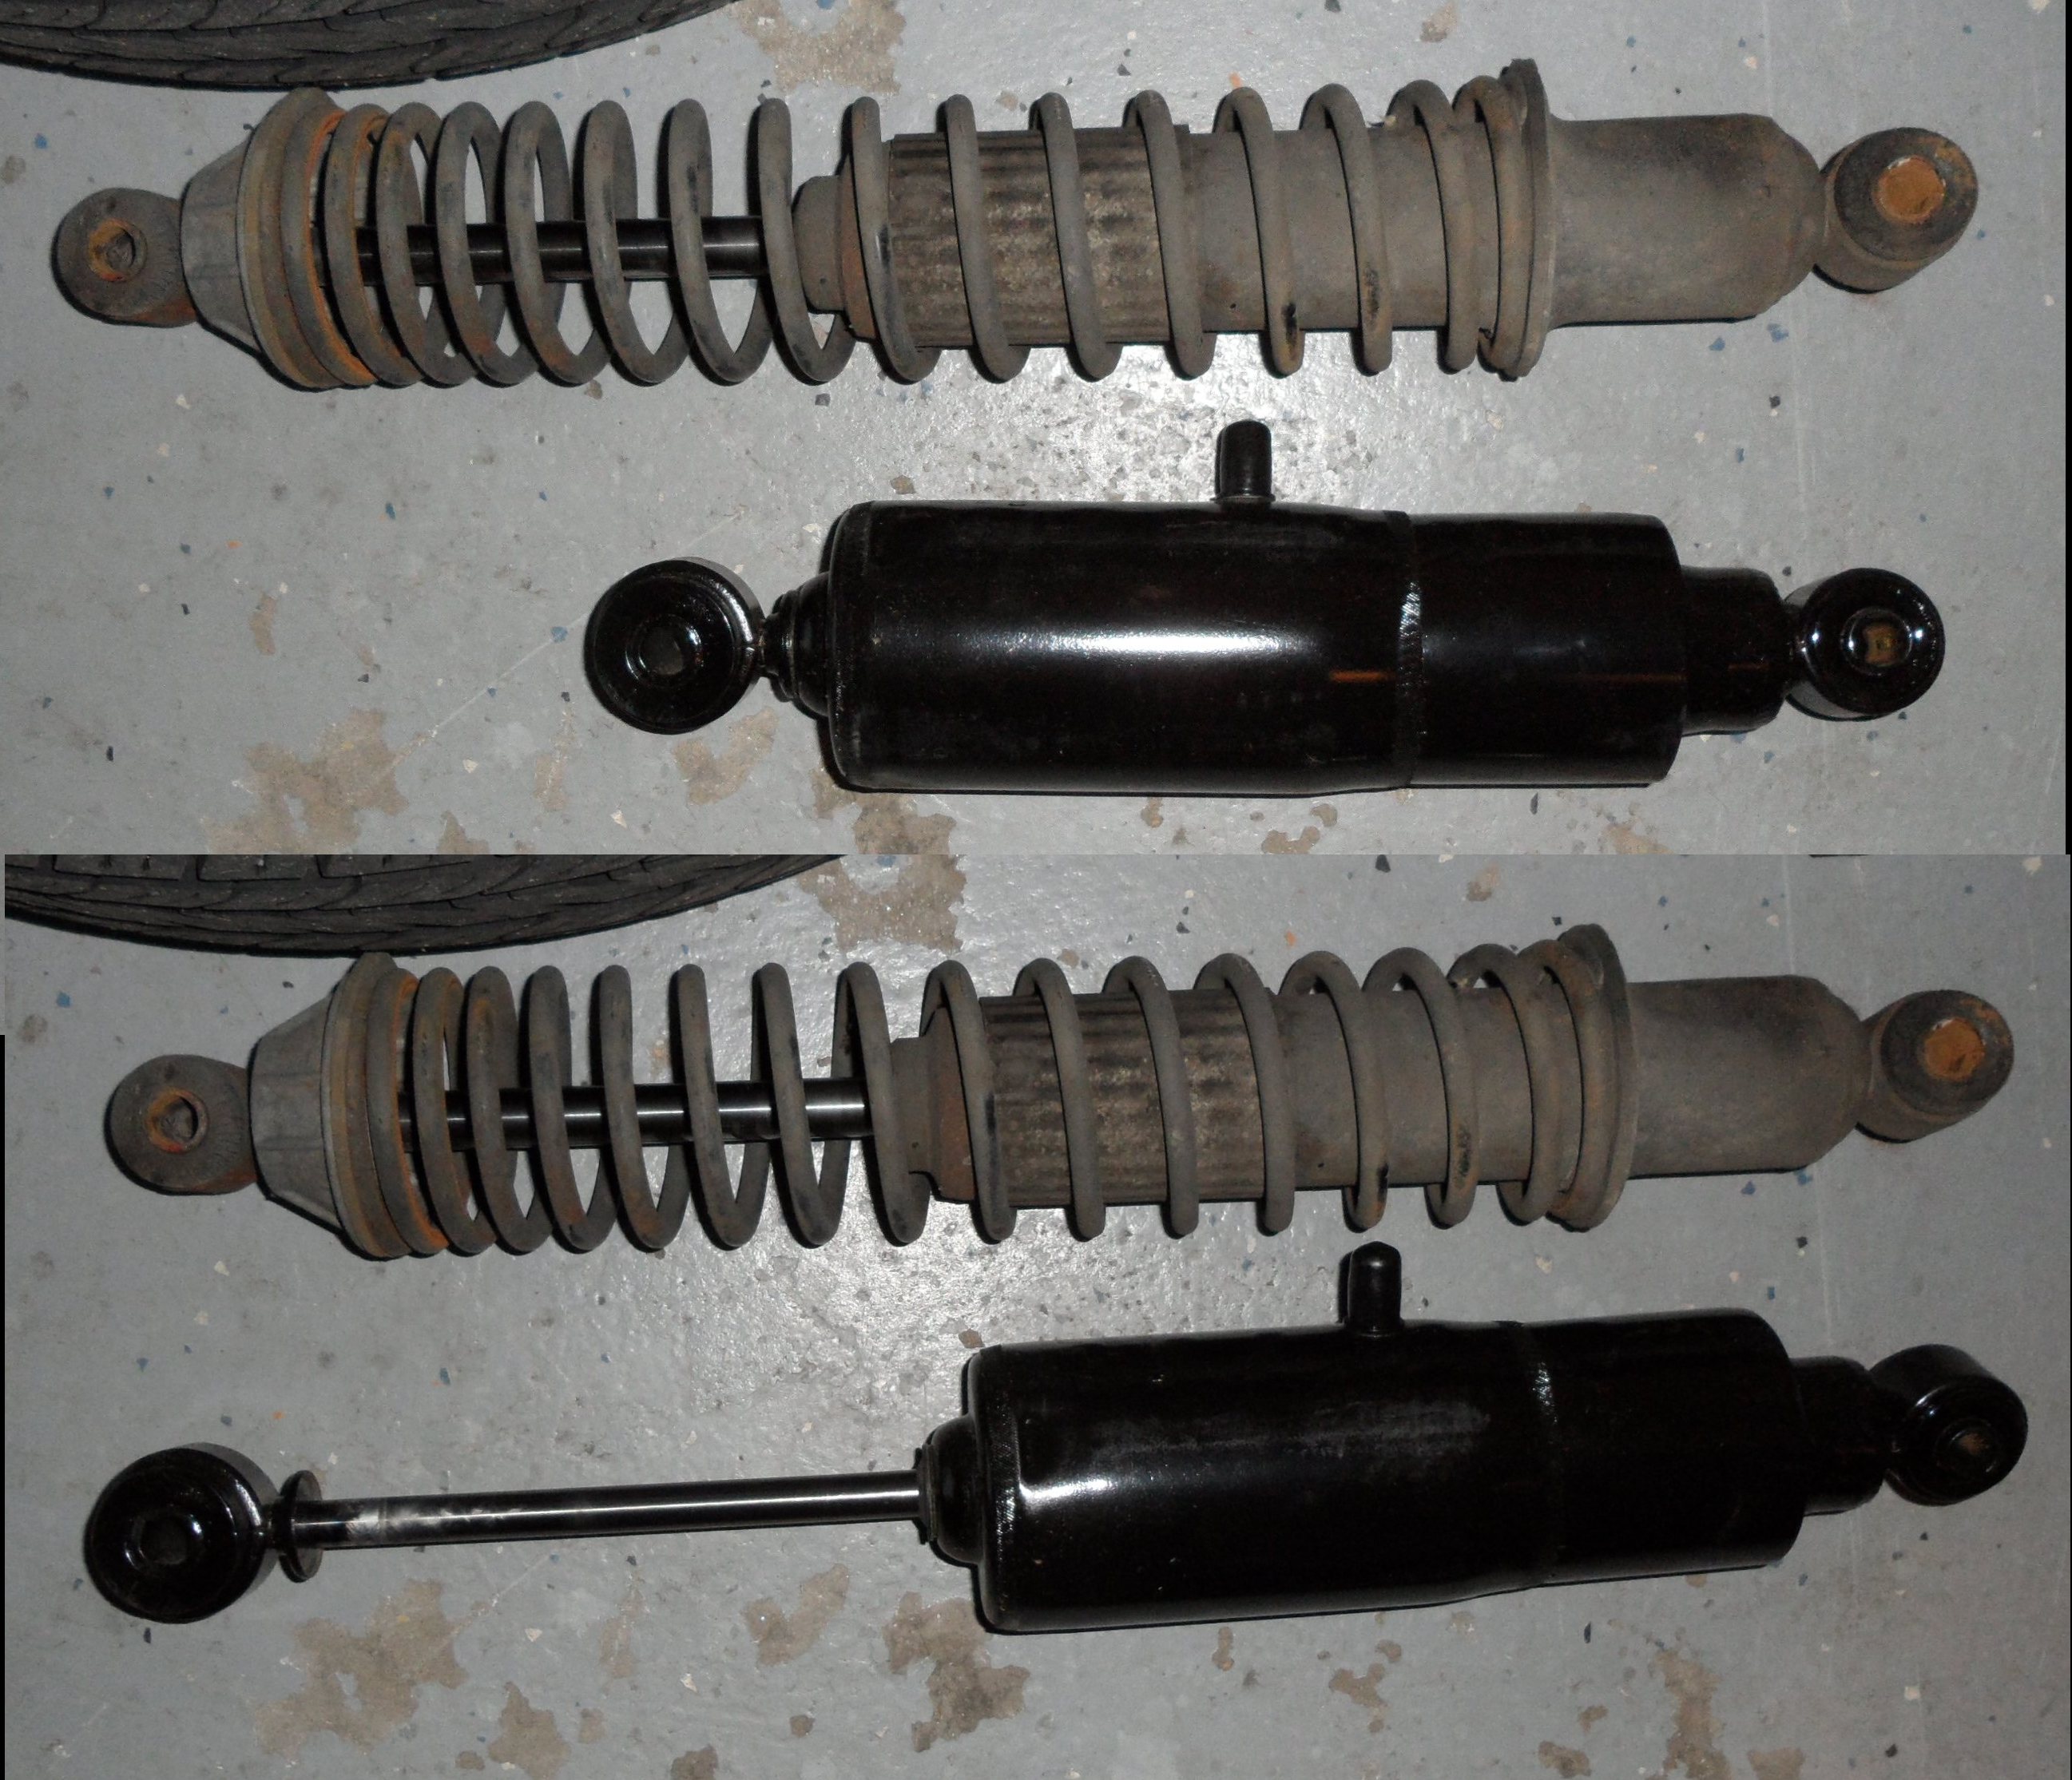
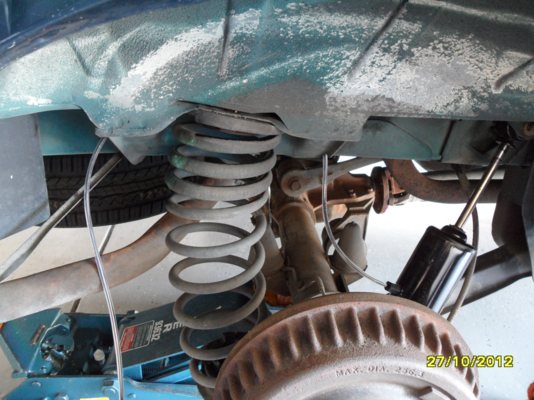
There's a pair of well-used Monroe Sensa-Trac 58616 shocks on there, that were on the van when I bought it.
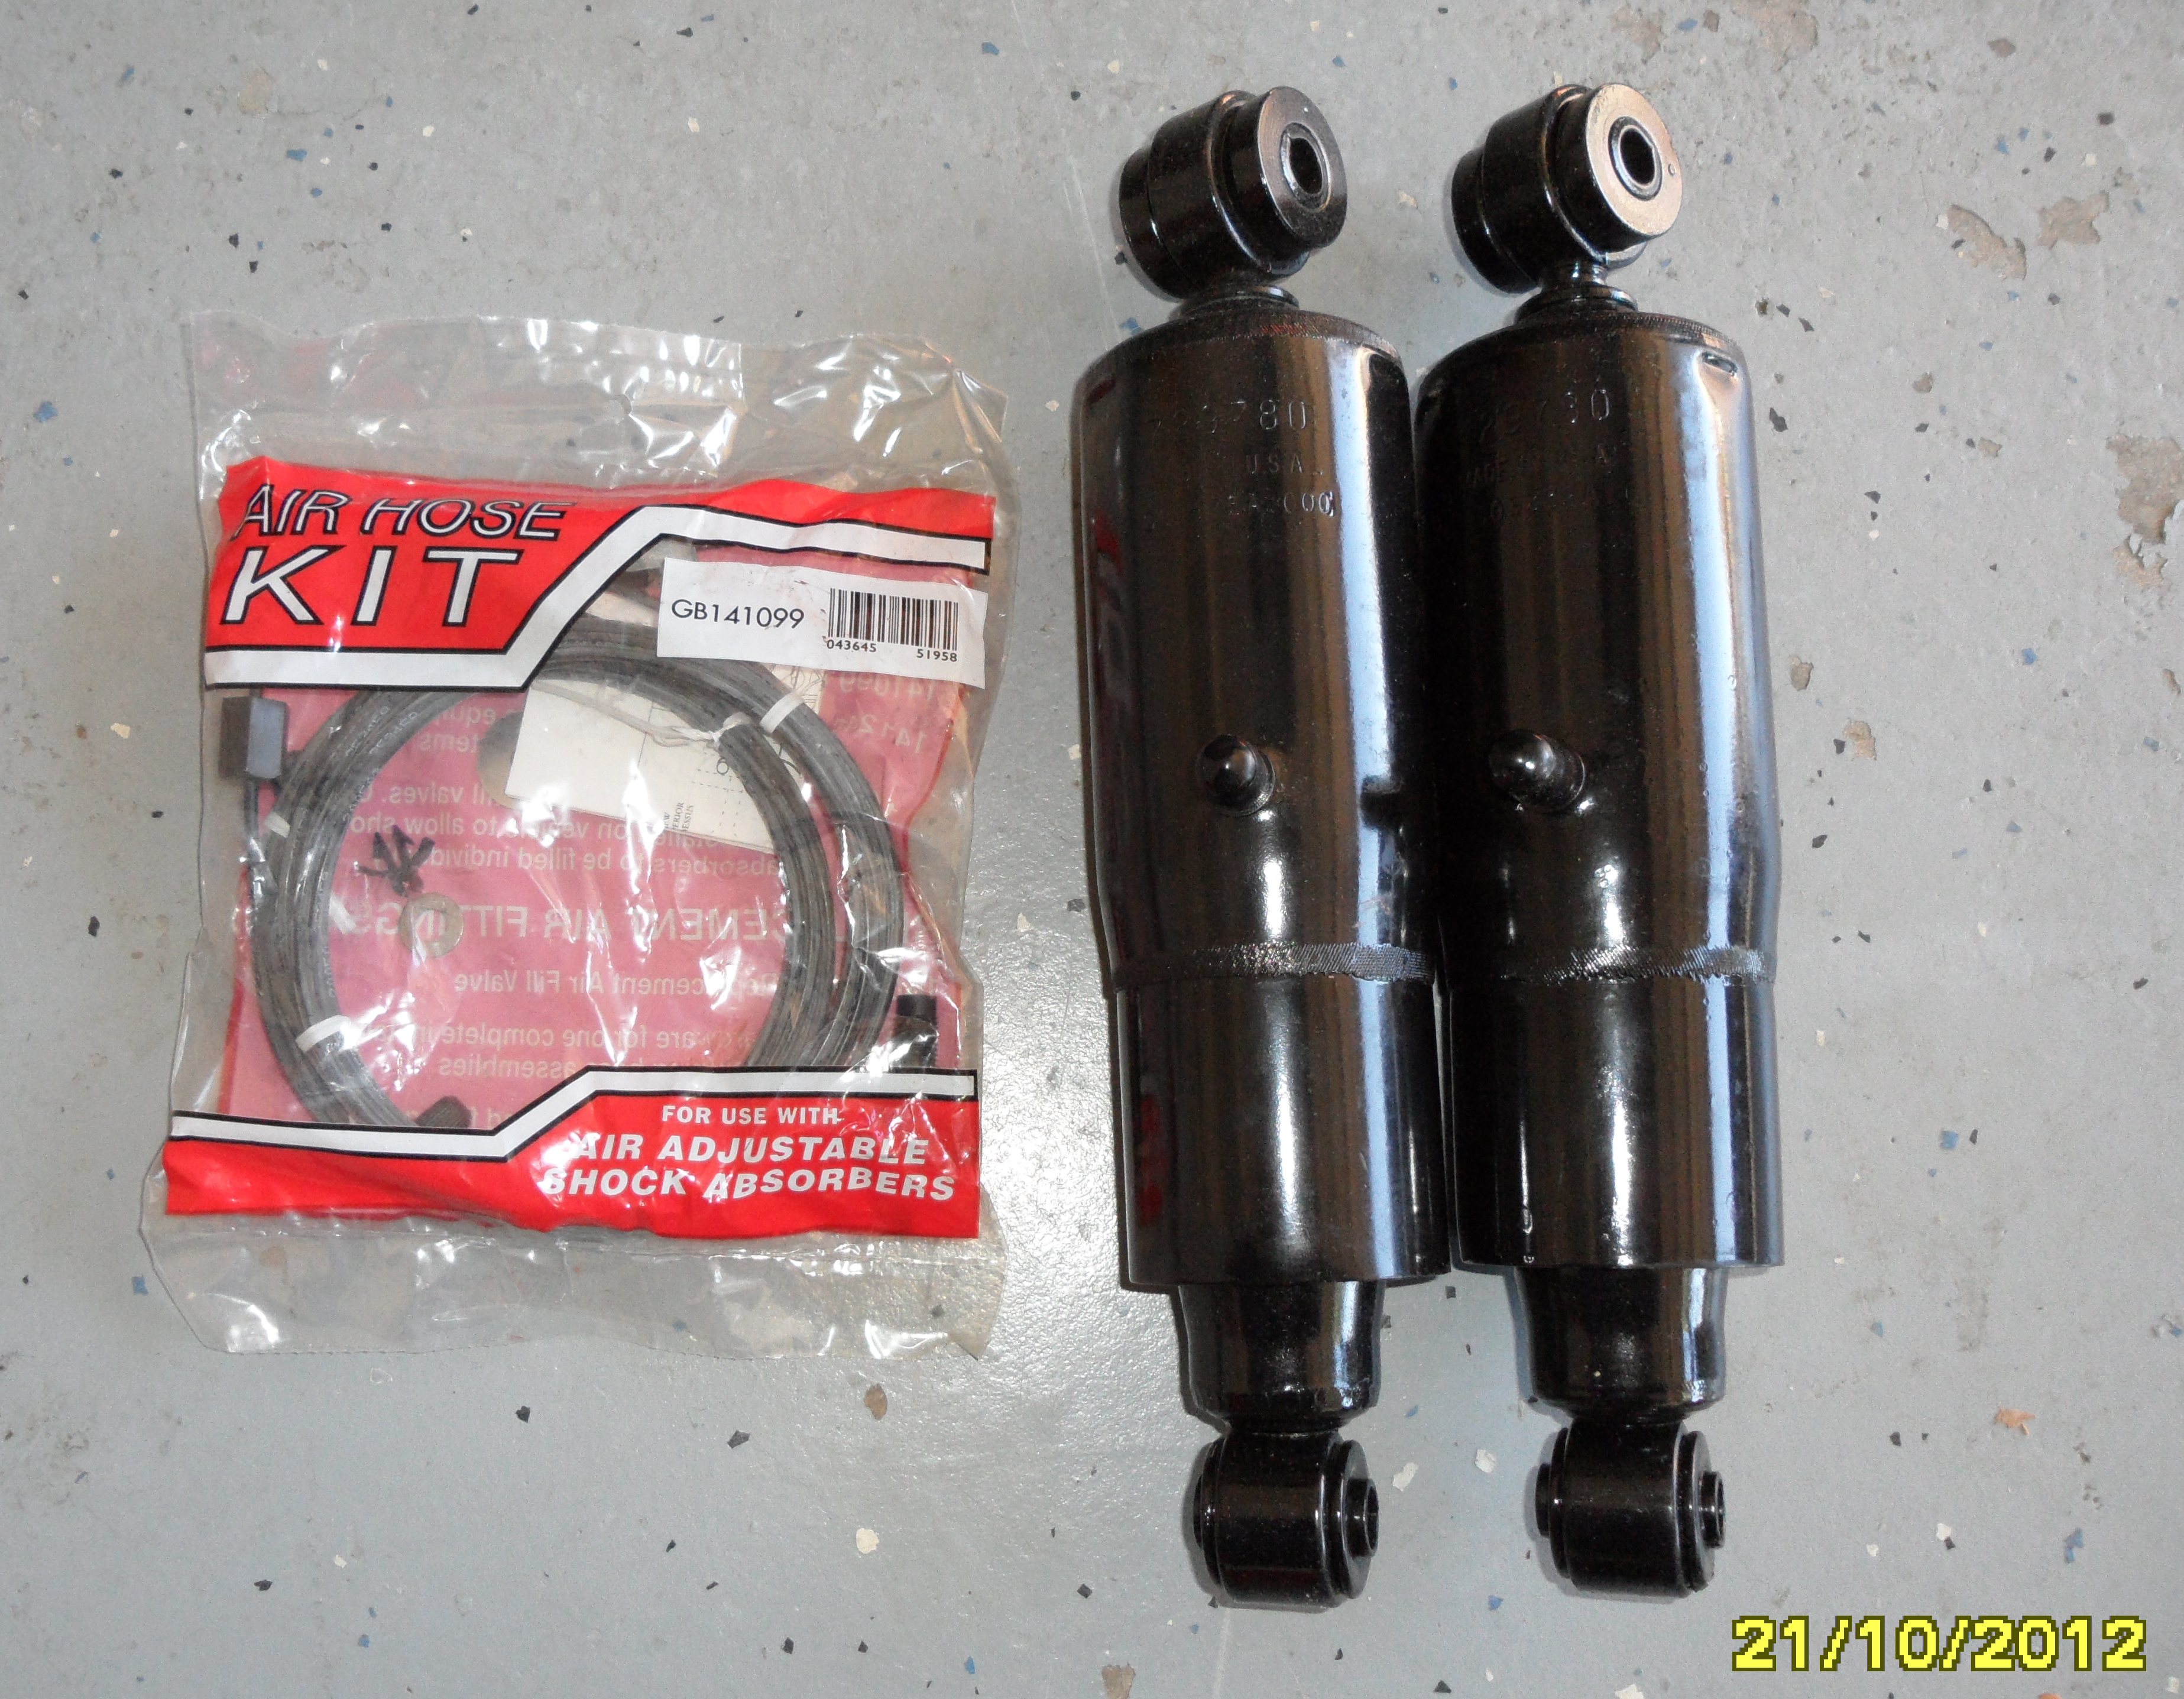
Since my need for rear-assist leveling is so infrequent, I've decided to mount up a pair of Gabriel 49221 air shocks. I'll probably take them off once I get home. My experience with air shocks as a teenager was that they leak. Once they run out of air, they quickly destroy themselves (ie you can't run them with no air pressure).
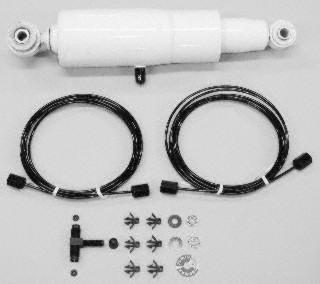
The kit's advertising picture:
RockAuto has a few left at $27/pair, which is a throw-away price IMO. They're closeouts, so I doubt they'll be available much longer. I bought two sets, for $64 shipped to my doorstep.
(click on any image for larger)
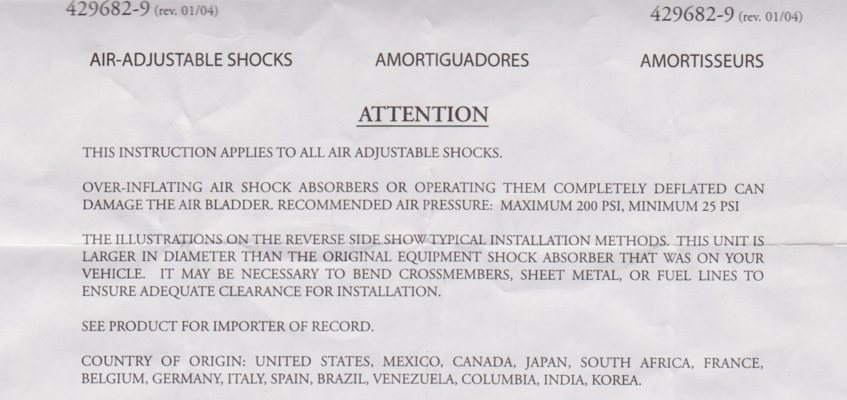
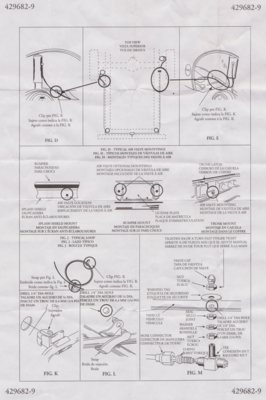
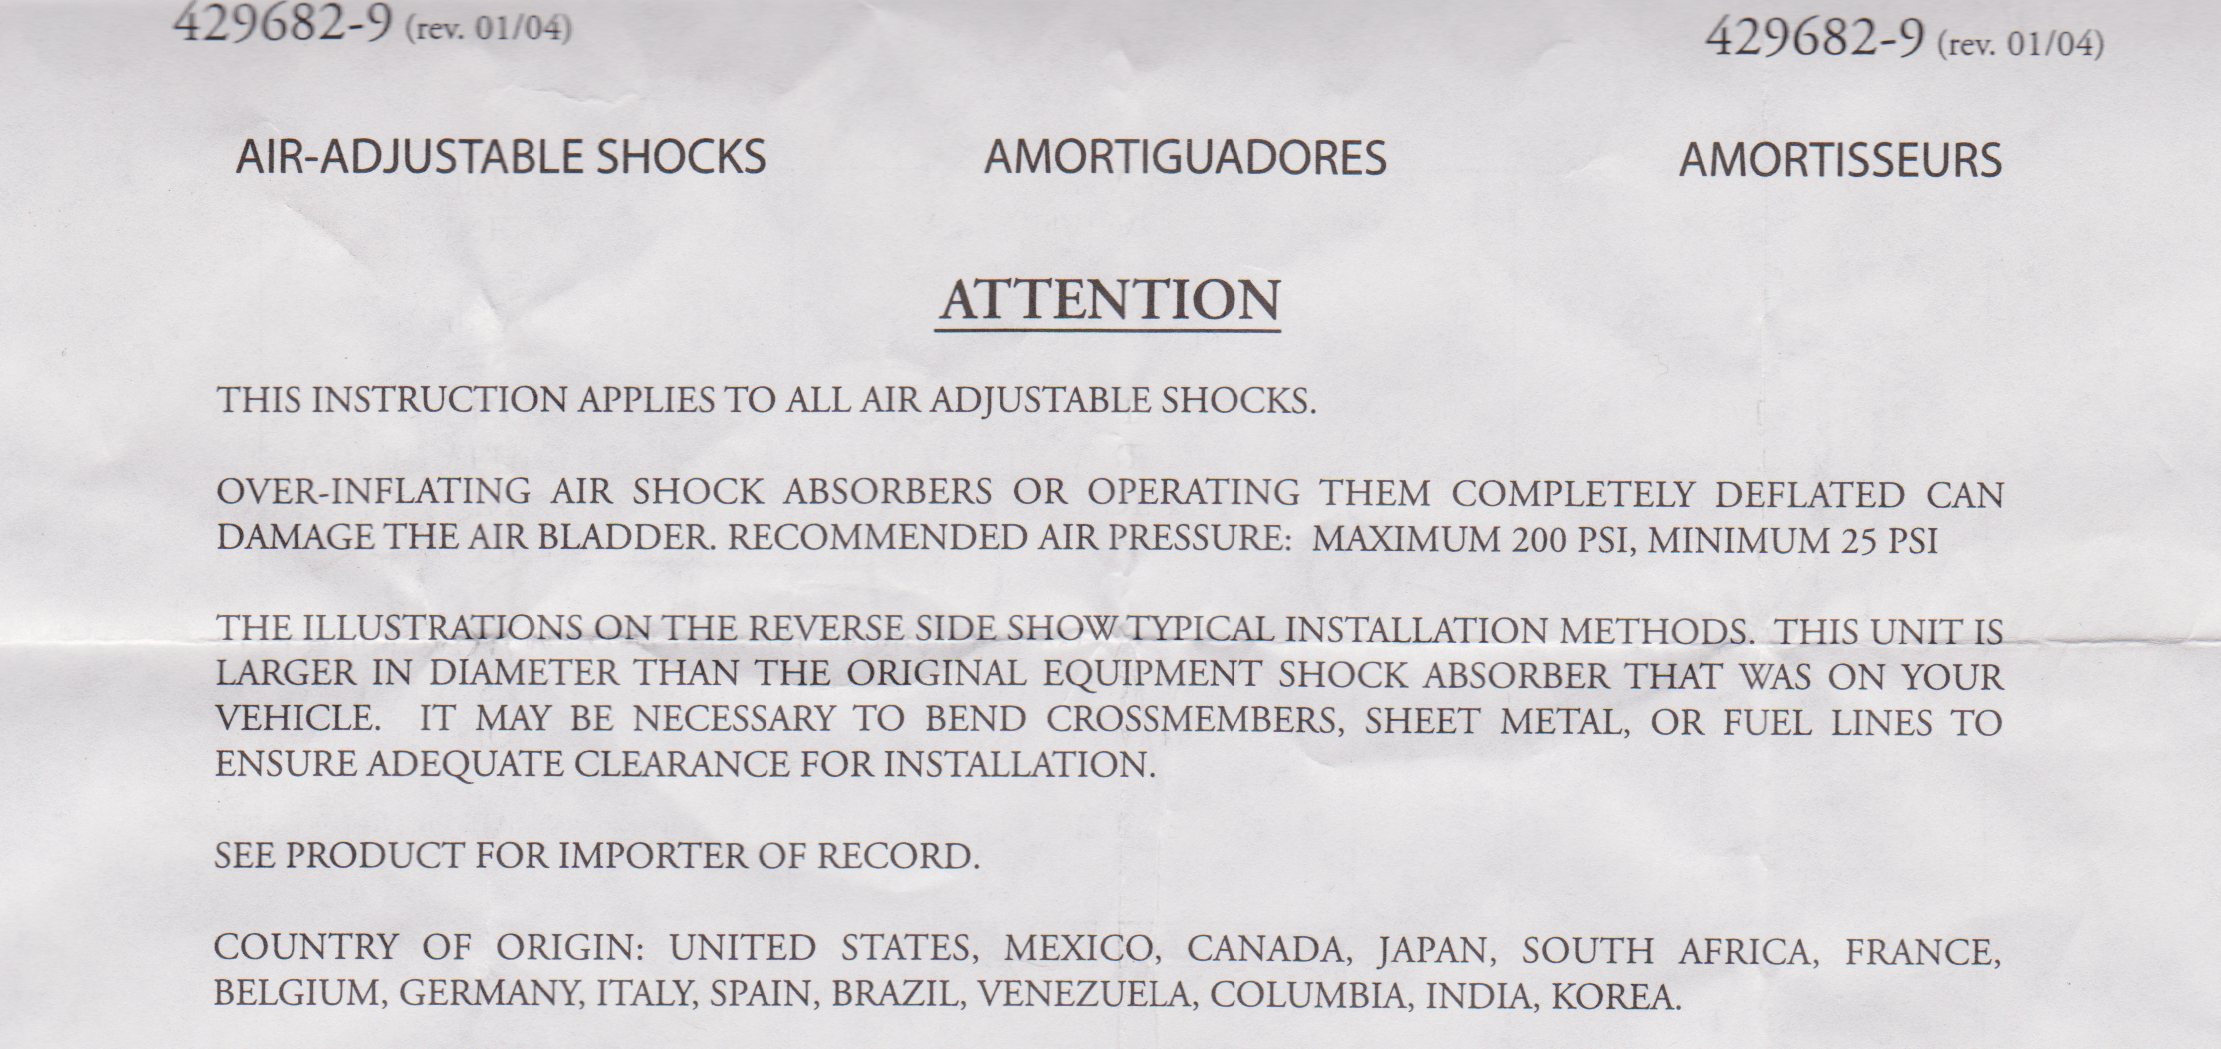
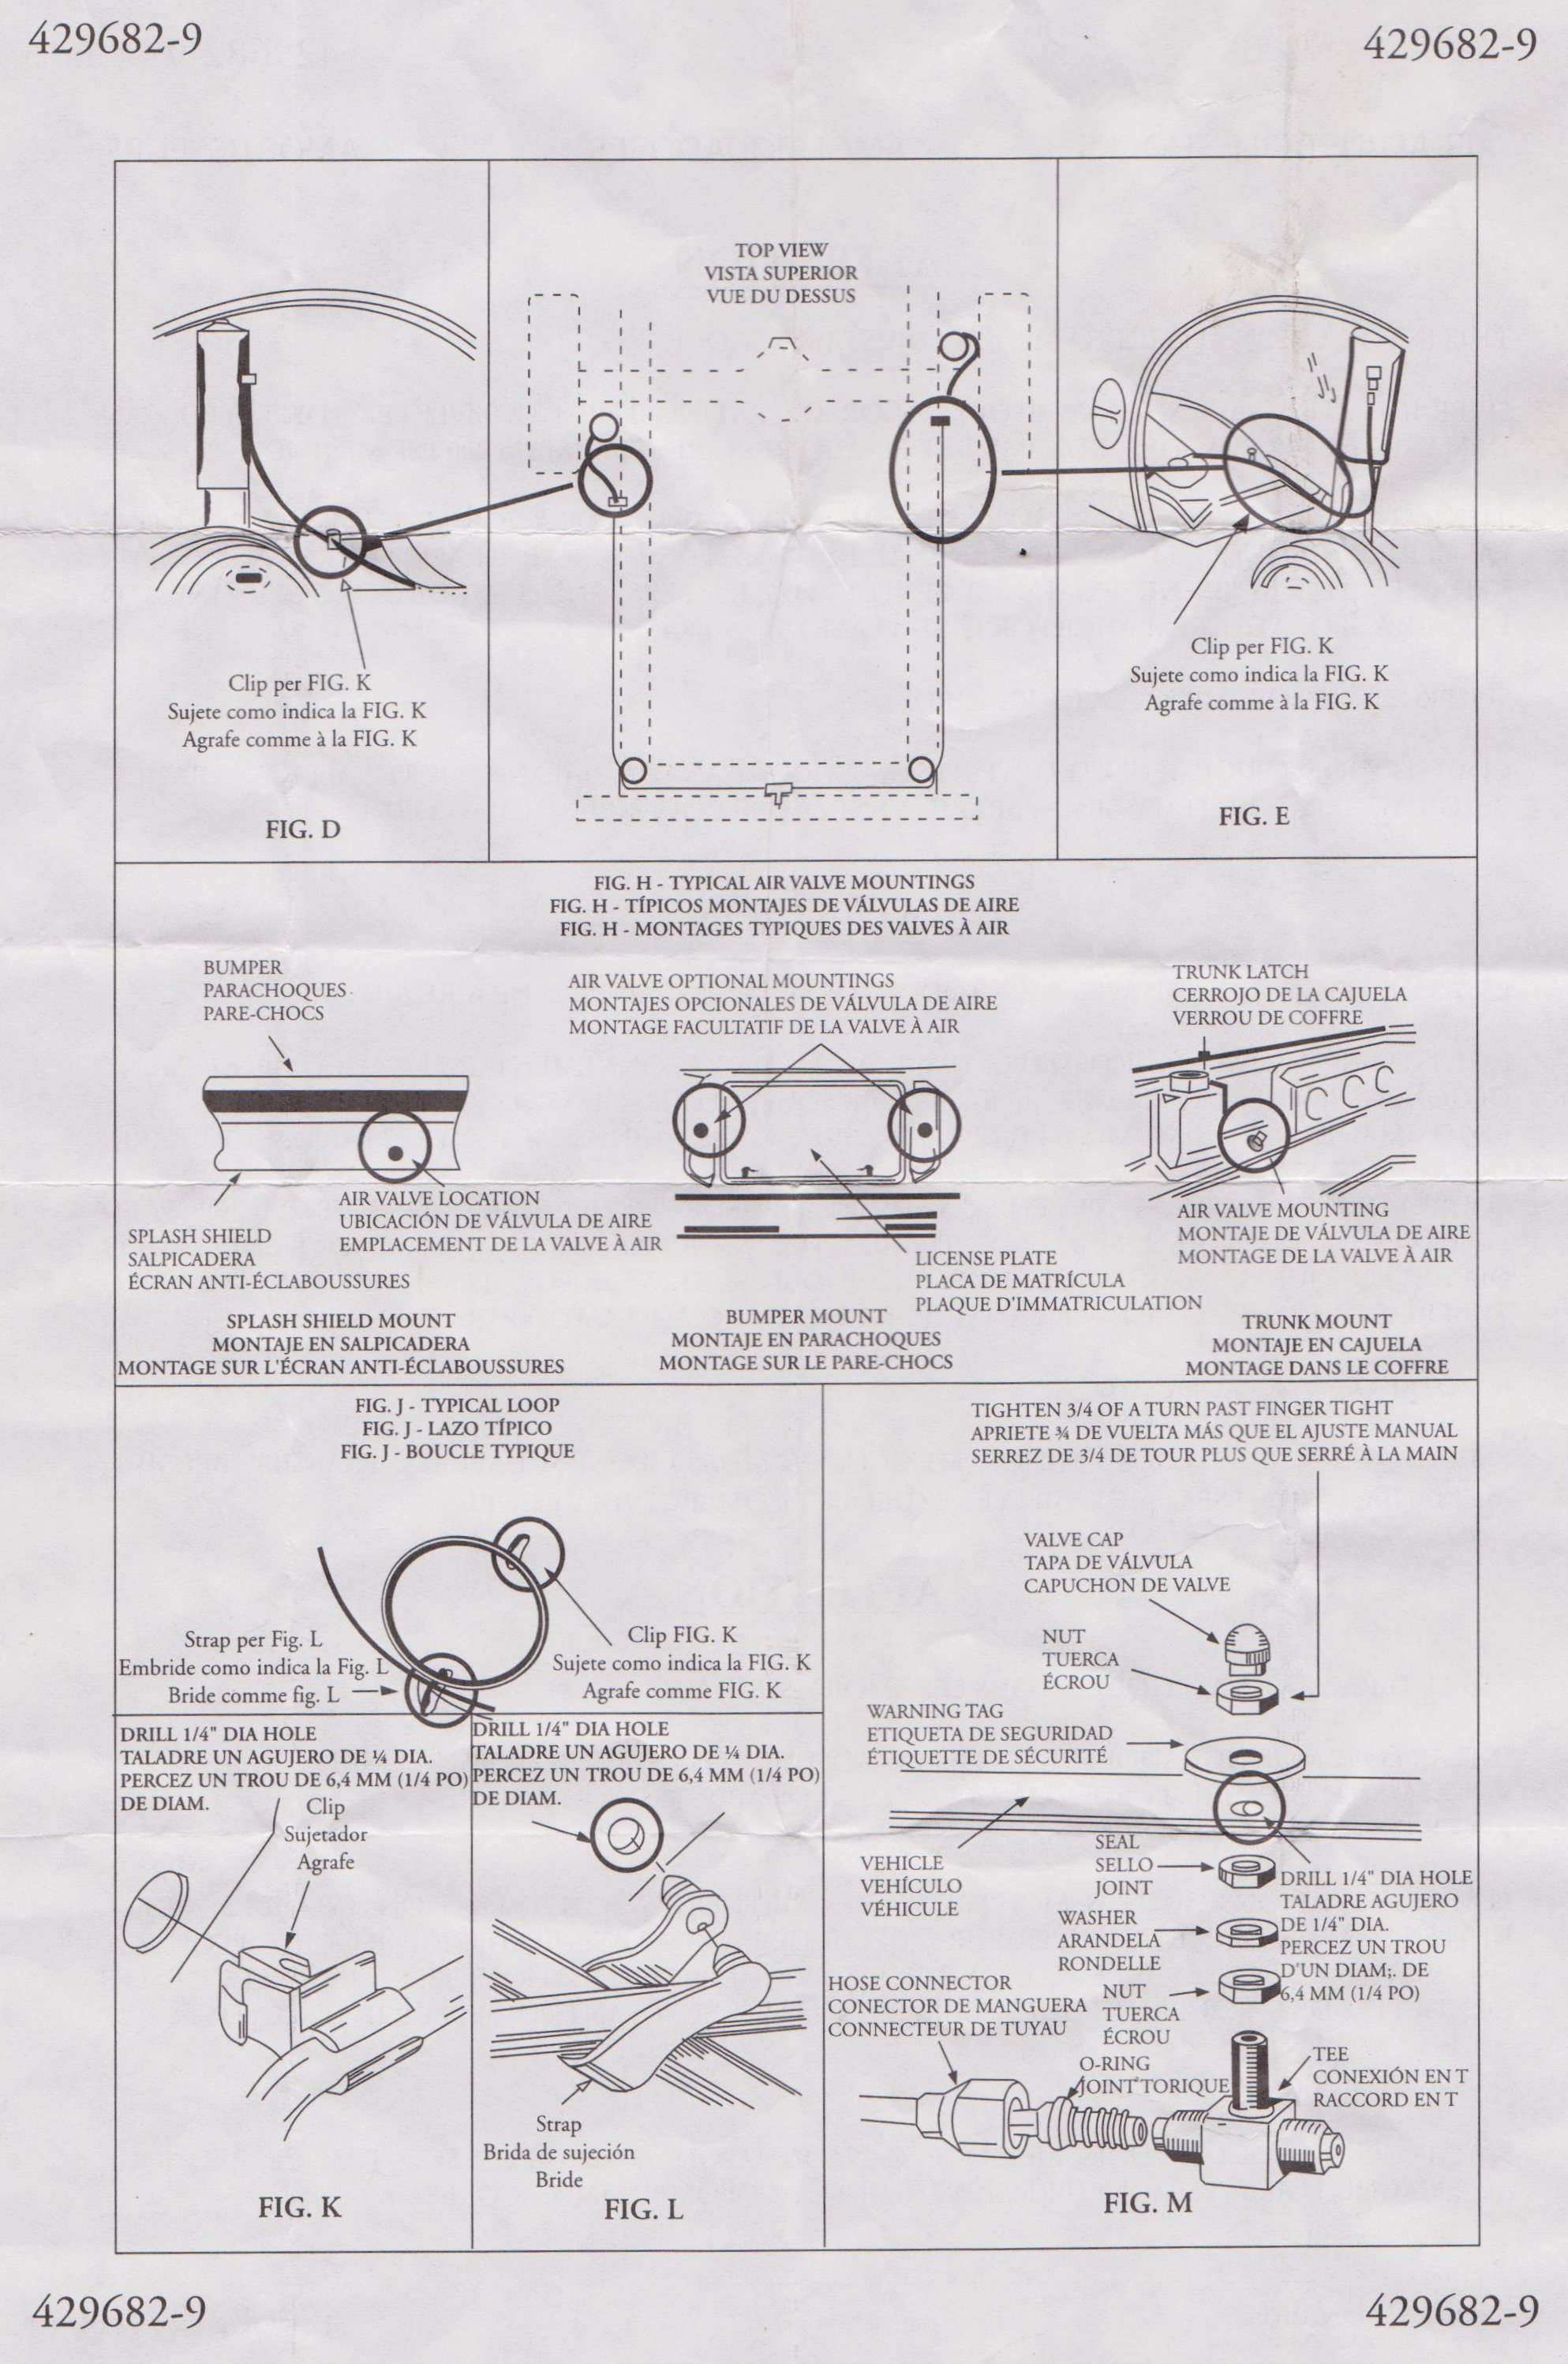
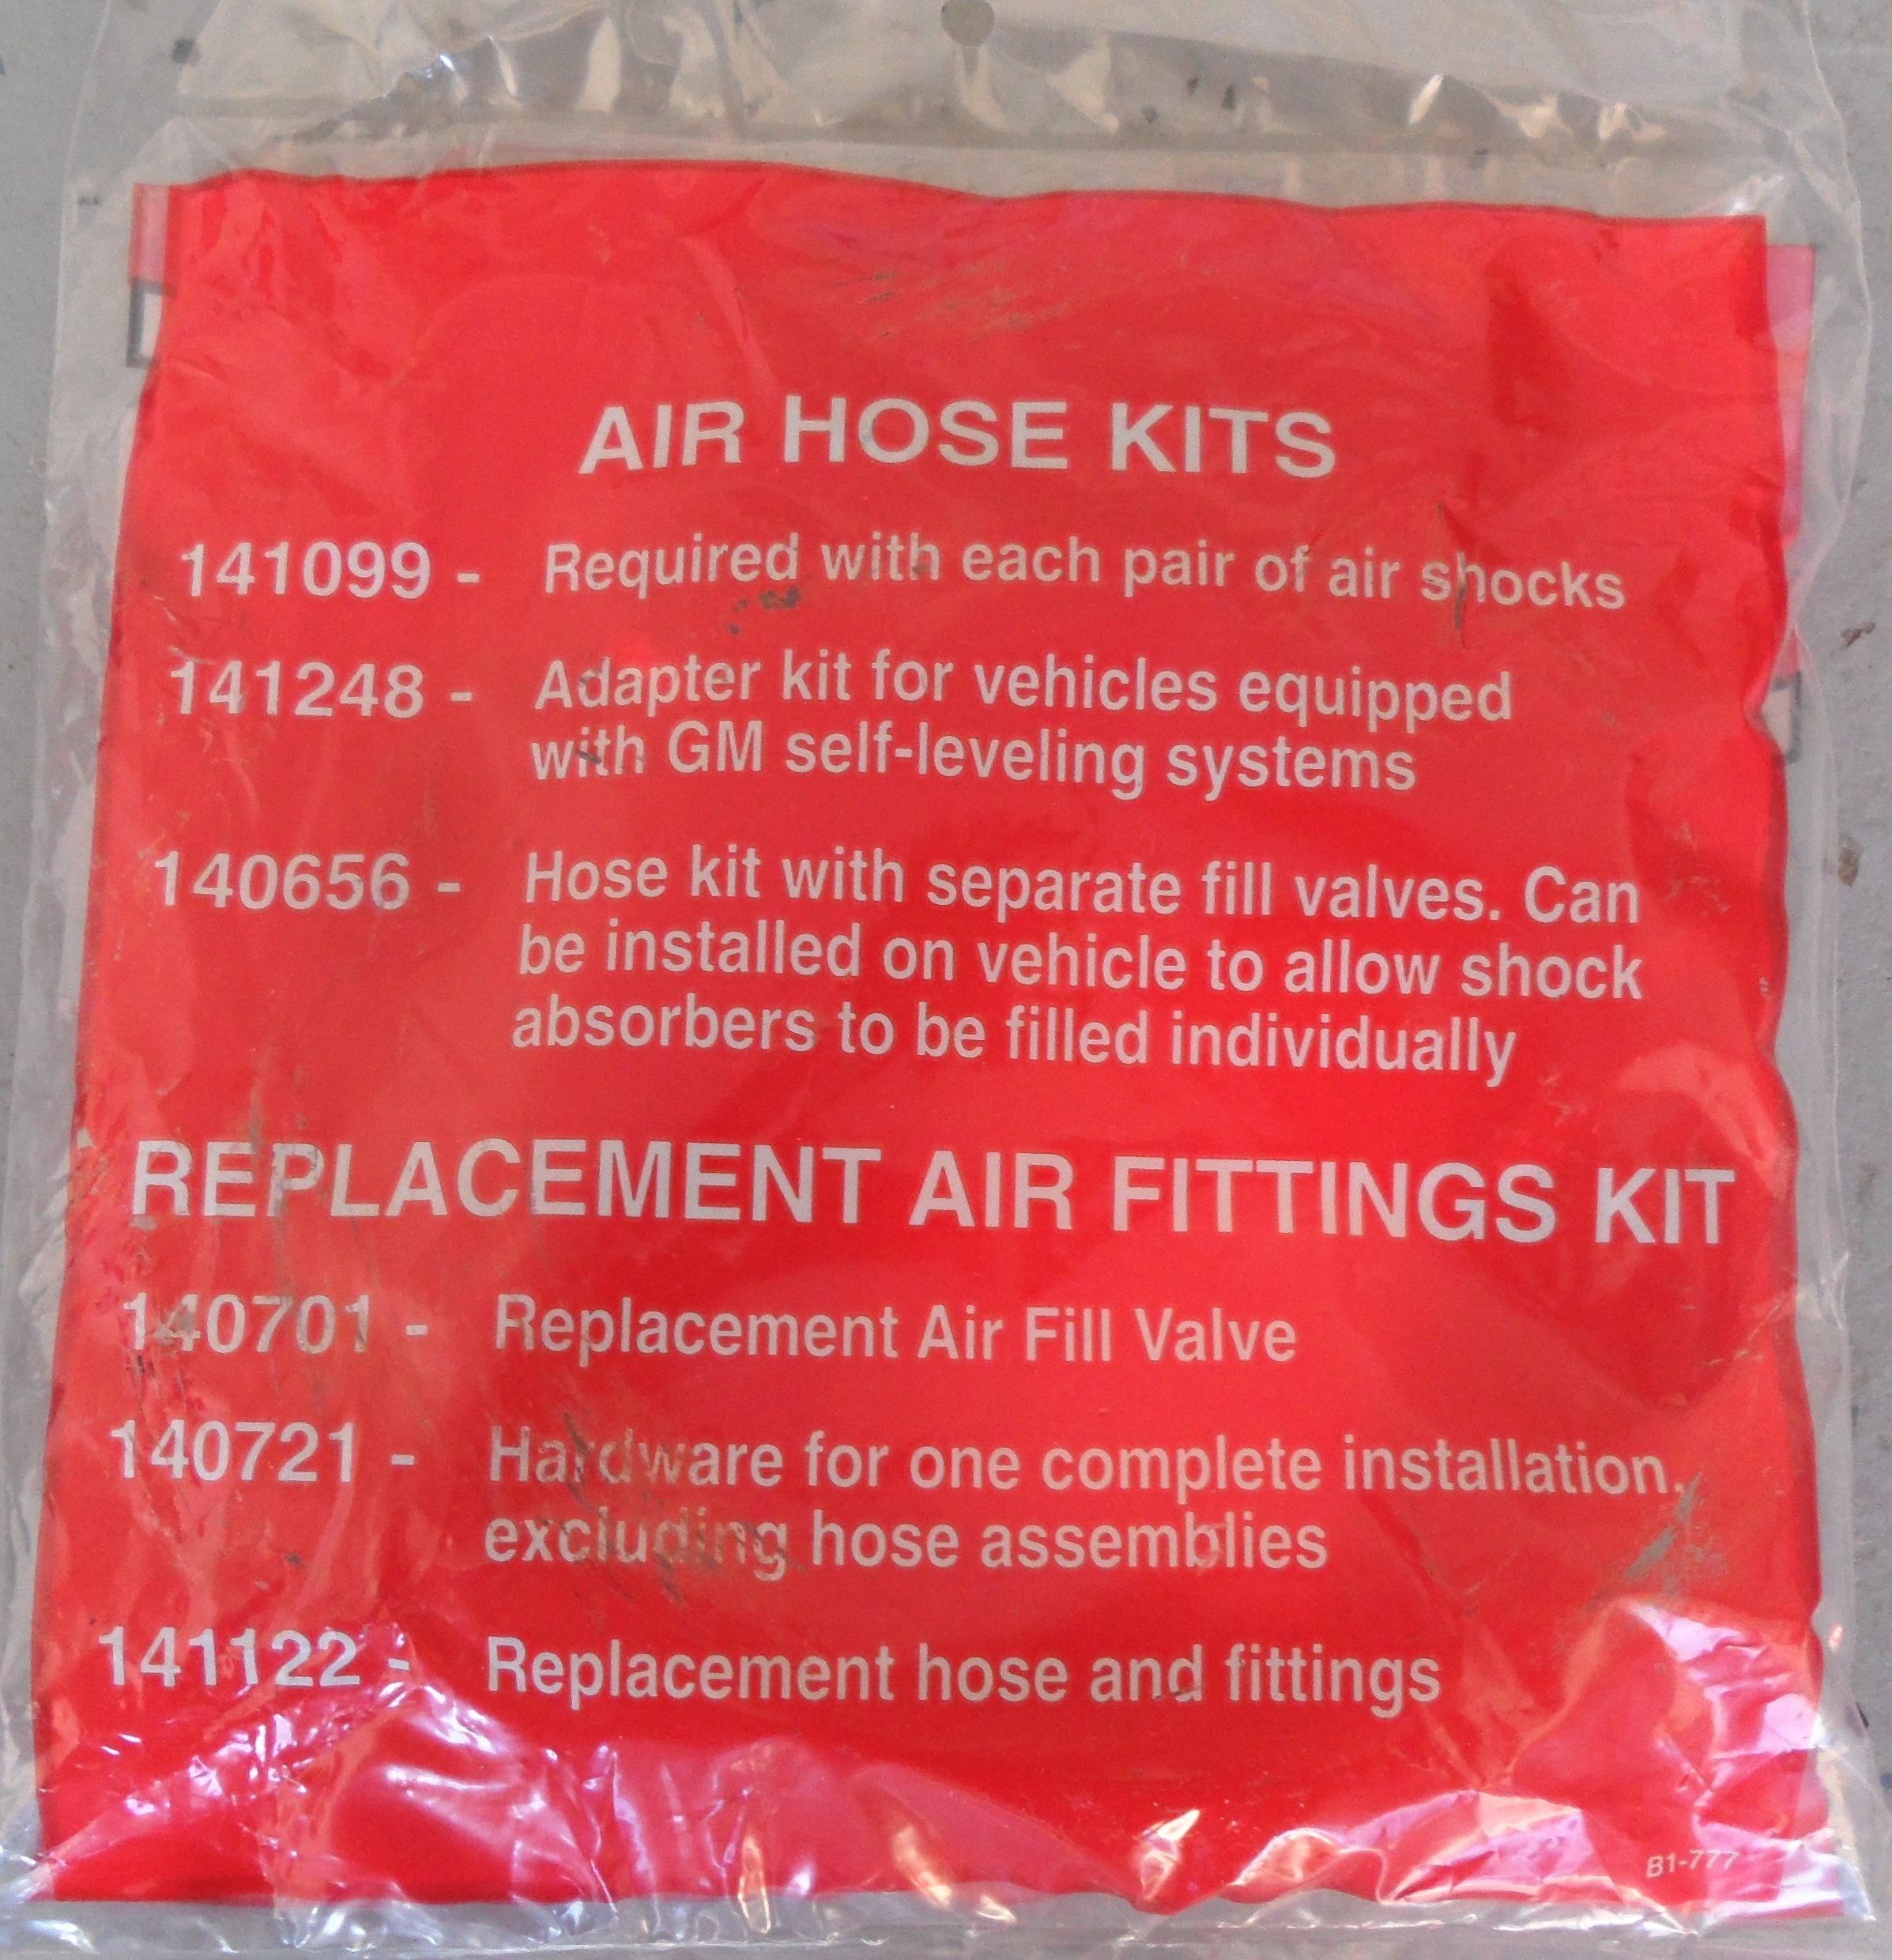
Instruction sheet (FWIW).
Note the warning on the first page:
The way to make them last is a dash pressure gauge and an onboard compressor, which is what I think Khan went to. For continuous use, that's what I'd do, but for a once-a-year trip like this, I'll just check them daily with a hand-held gauge.


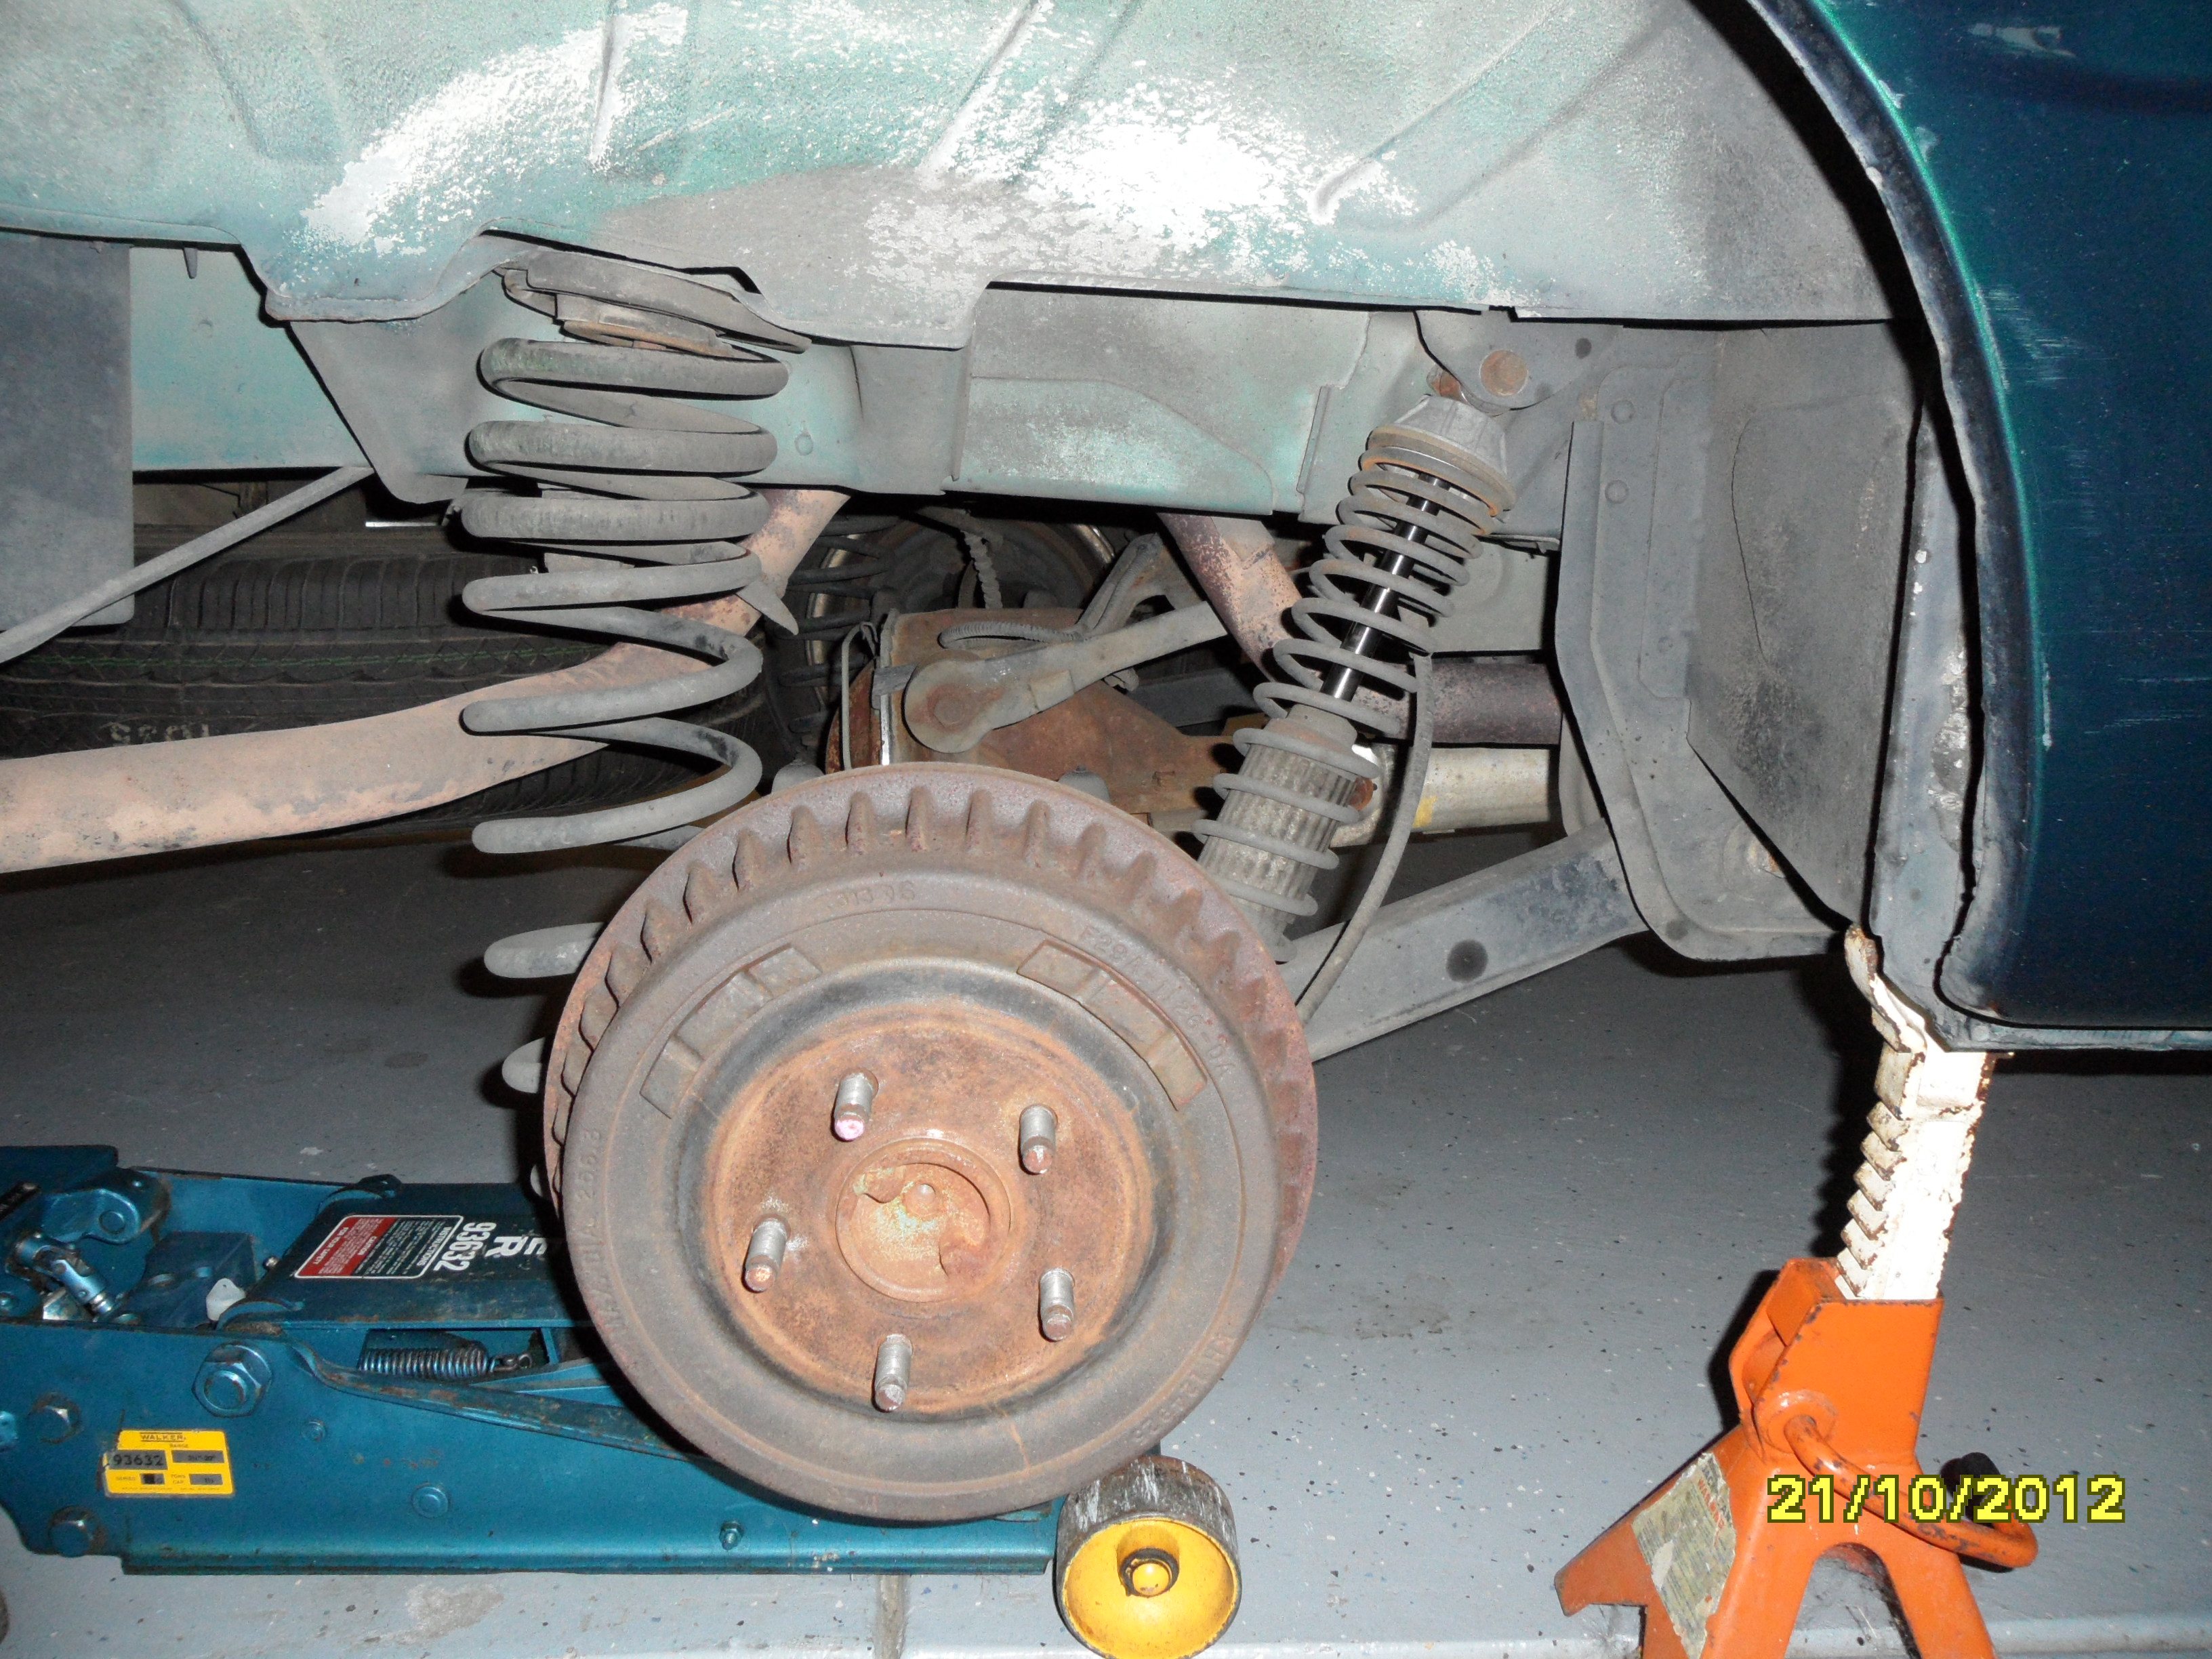
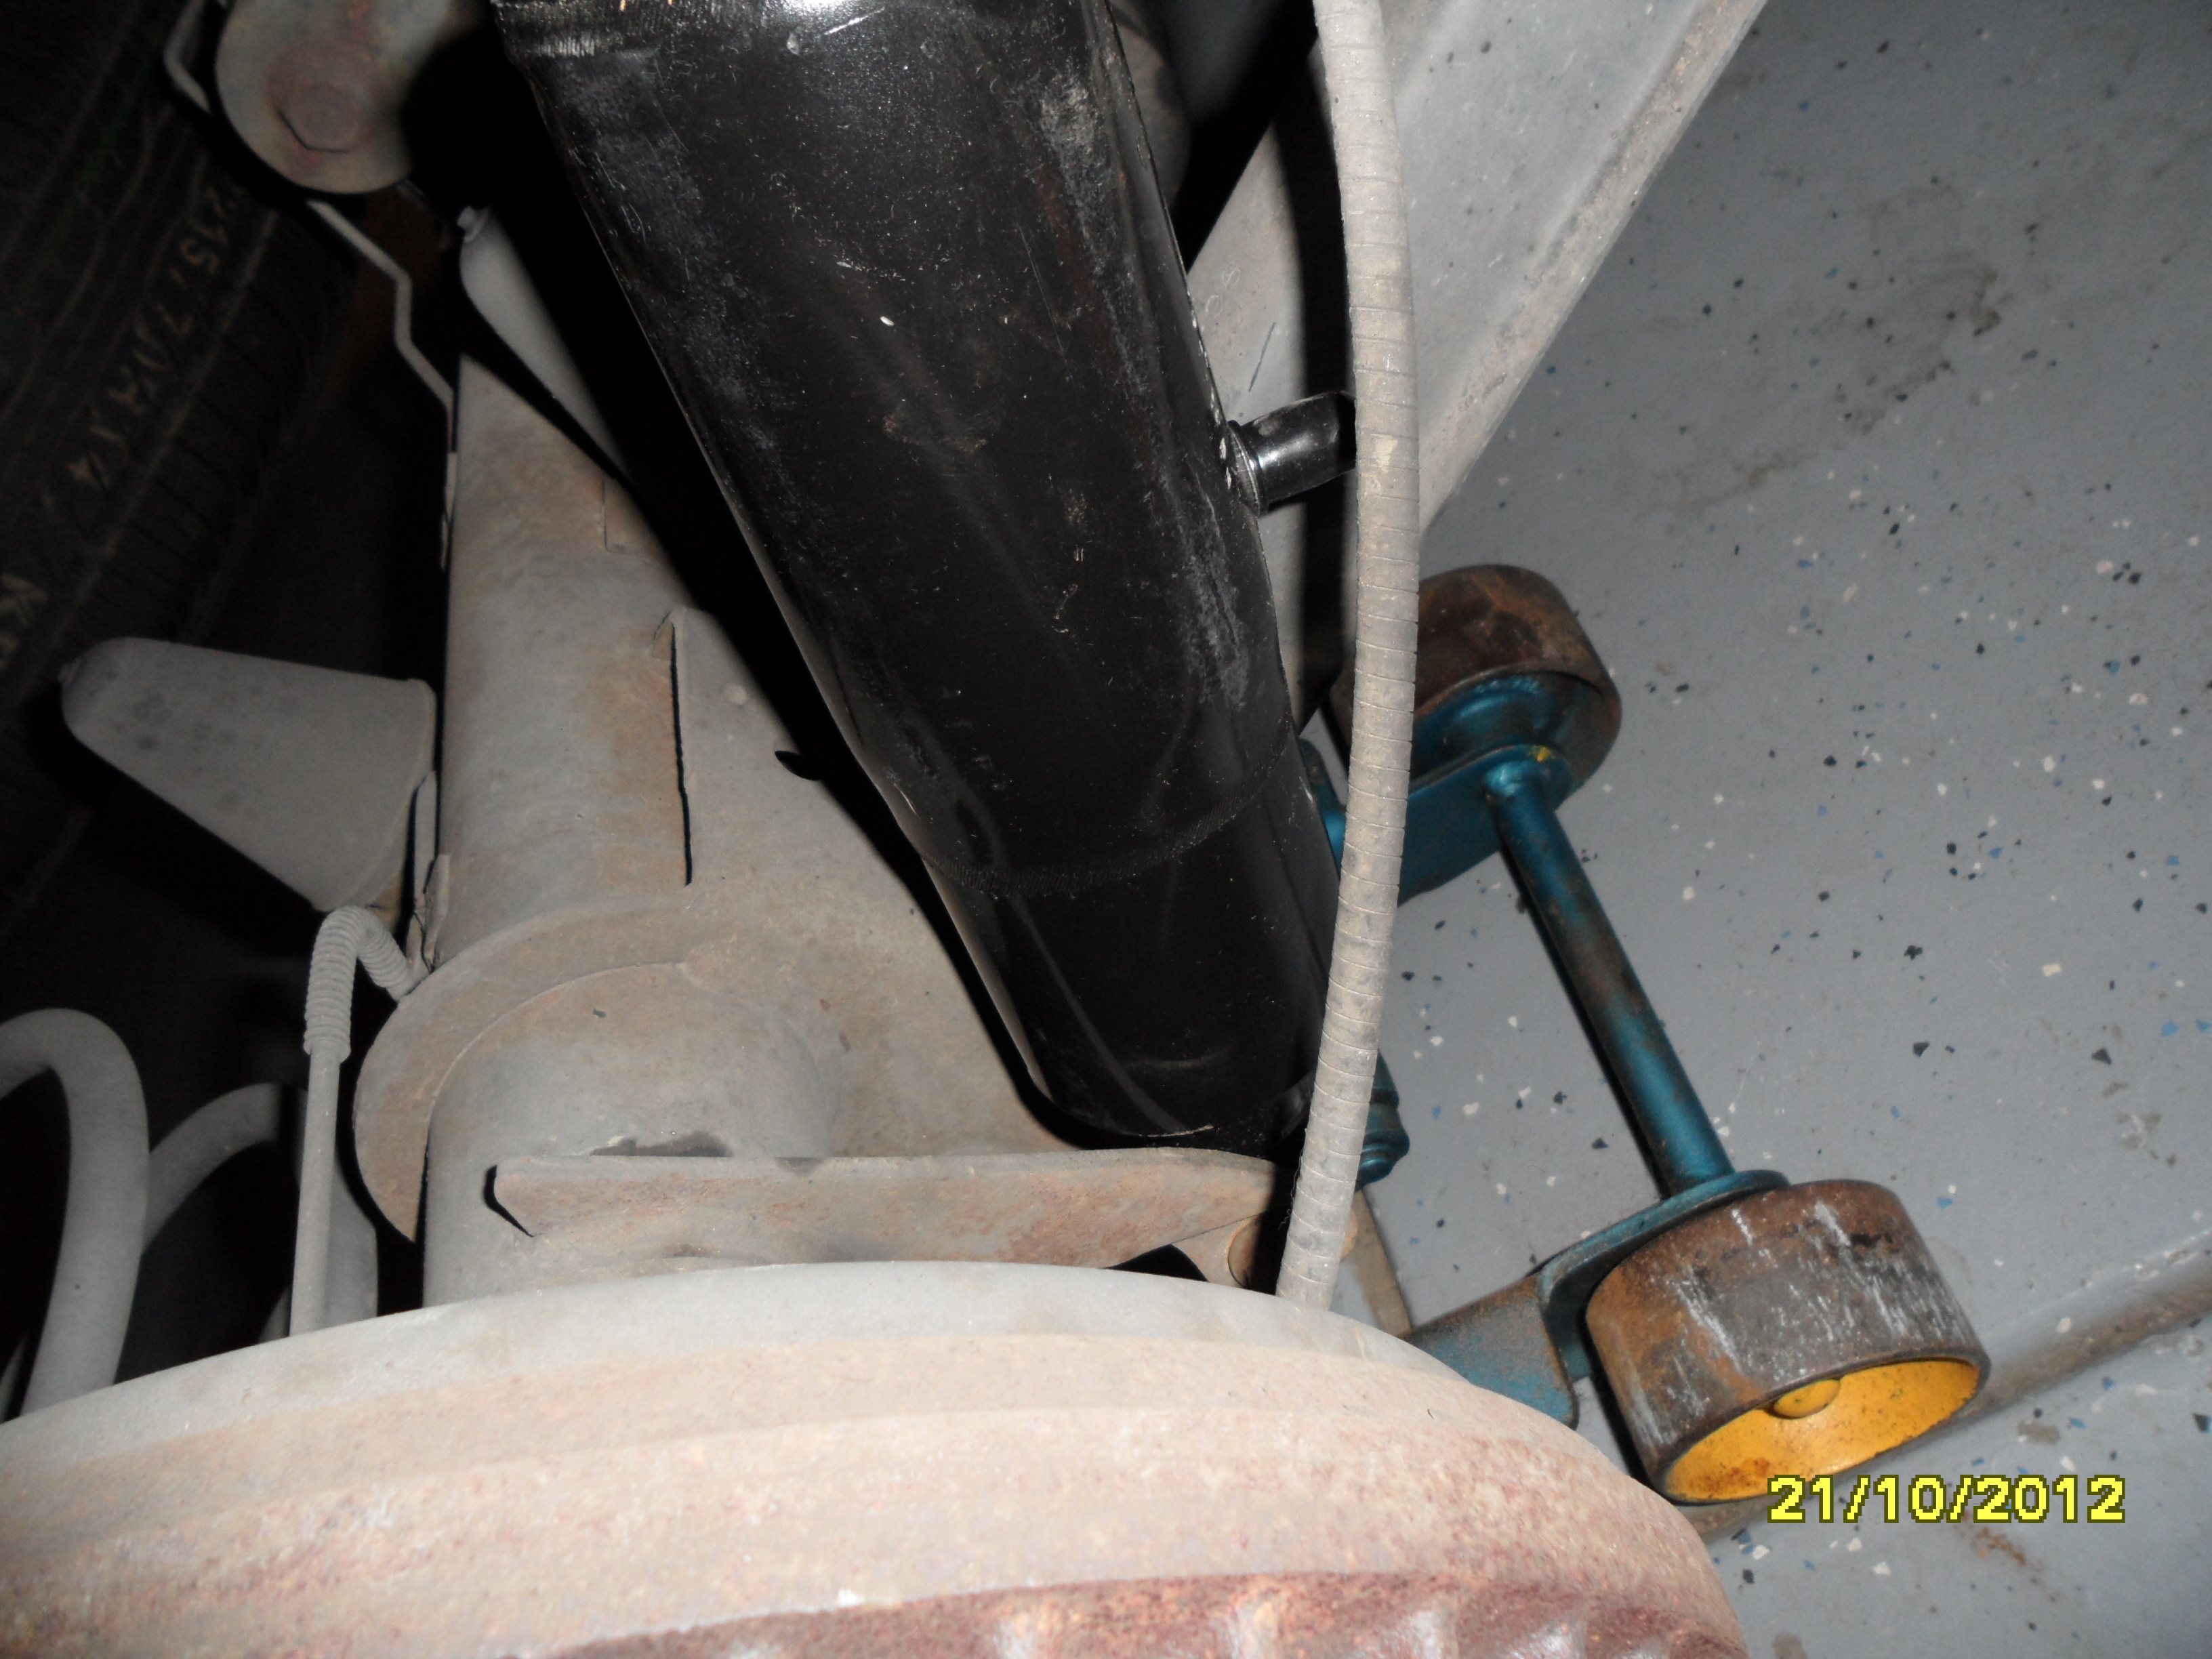
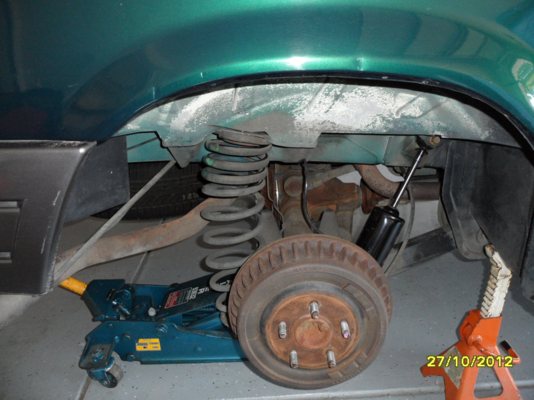
Tonight, I just had time to do a trial-fit, to make certain that they don't come close to contacting anything. Because they're larger diameter than either the OEM or Sensa-Tracs, I want to make sure they won't rub on anything. When I have more time, I'll fit them up and then run the plumbing (which will be the real work).
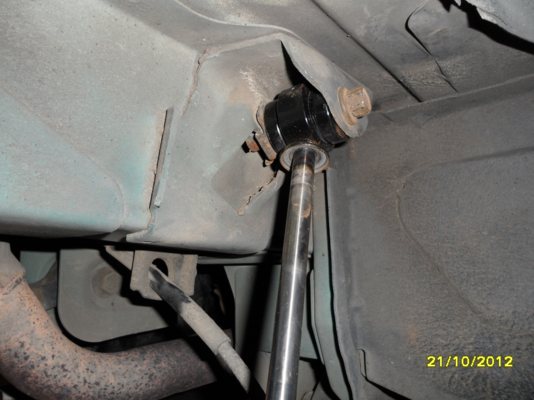
I didn't have any trouble removing the shock bolts, which is a nice surprise. I've had to cut them off in the past, but these just came right out (15mm heads on the 12mm bolts). I always use anti-seize going back in.

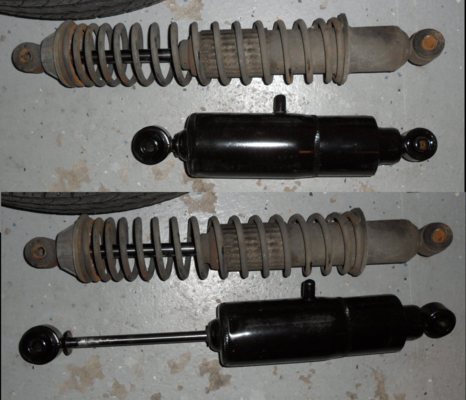
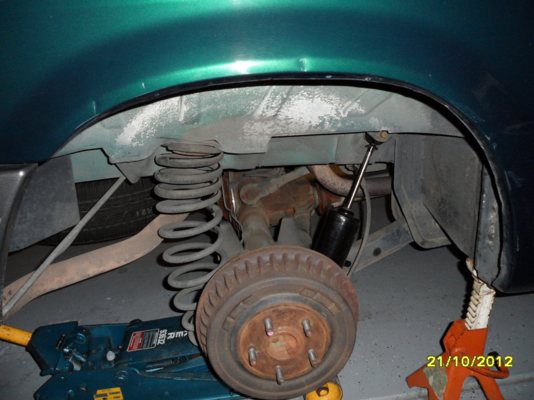
A side-by-side with the old Sensa-Trac:

Next weekend, I'll see if I can find time to mount them up for the next four weeks' commute (shakedown) and three weeks travel (loaded).
There's a pair of well-used Monroe Sensa-Trac 58616 shocks on there, that were on the van when I bought it.
Since my need for rear-assist leveling is so infrequent, I've decided to mount up a pair of Gabriel 49221 air shocks. I'll probably take them off once I get home. My experience with air shocks as a teenager was that they leak. Once they run out of air, they quickly destroy themselves (ie you can't run them with no air pressure).
The kit's advertising picture:
Code:
Part Number	                 49221
Extended Length in Inches	 18.33
Collapsed Length in Inches	 11.72
Stroke	                         6.61
Upper Mtg Code	                 ES141
Lower Mtg Code	                 ES141
Dust Tube	                 NO
(click on any image for larger)
Instruction sheet (FWIW).
Note the warning on the first page:
Originally Posted by Gabriel
. . . Operating them completely deflated can damage the air bladder. Recommended air pressure: Maximum 200 PSI, Minimum 25 PSI.
Tonight, I just had time to do a trial-fit, to make certain that they don't come close to contacting anything. Because they're larger diameter than either the OEM or Sensa-Tracs, I want to make sure they won't rub on anything. When I have more time, I'll fit them up and then run the plumbing (which will be the real work).
I didn't have any trouble removing the shock bolts, which is a nice surprise. I've had to cut them off in the past, but these just came right out (15mm heads on the 12mm bolts). I always use anti-seize going back in.
A side-by-side with the old Sensa-Trac:

Next weekend, I'll see if I can find time to mount them up for the next four weeks' commute (shakedown) and three weeks travel (loaded).
#37
10-27-2012, 10:10 PM
It took me around three hours to fuss around and get these installed, including a trip to the hardware store. It was pretty straightforward.
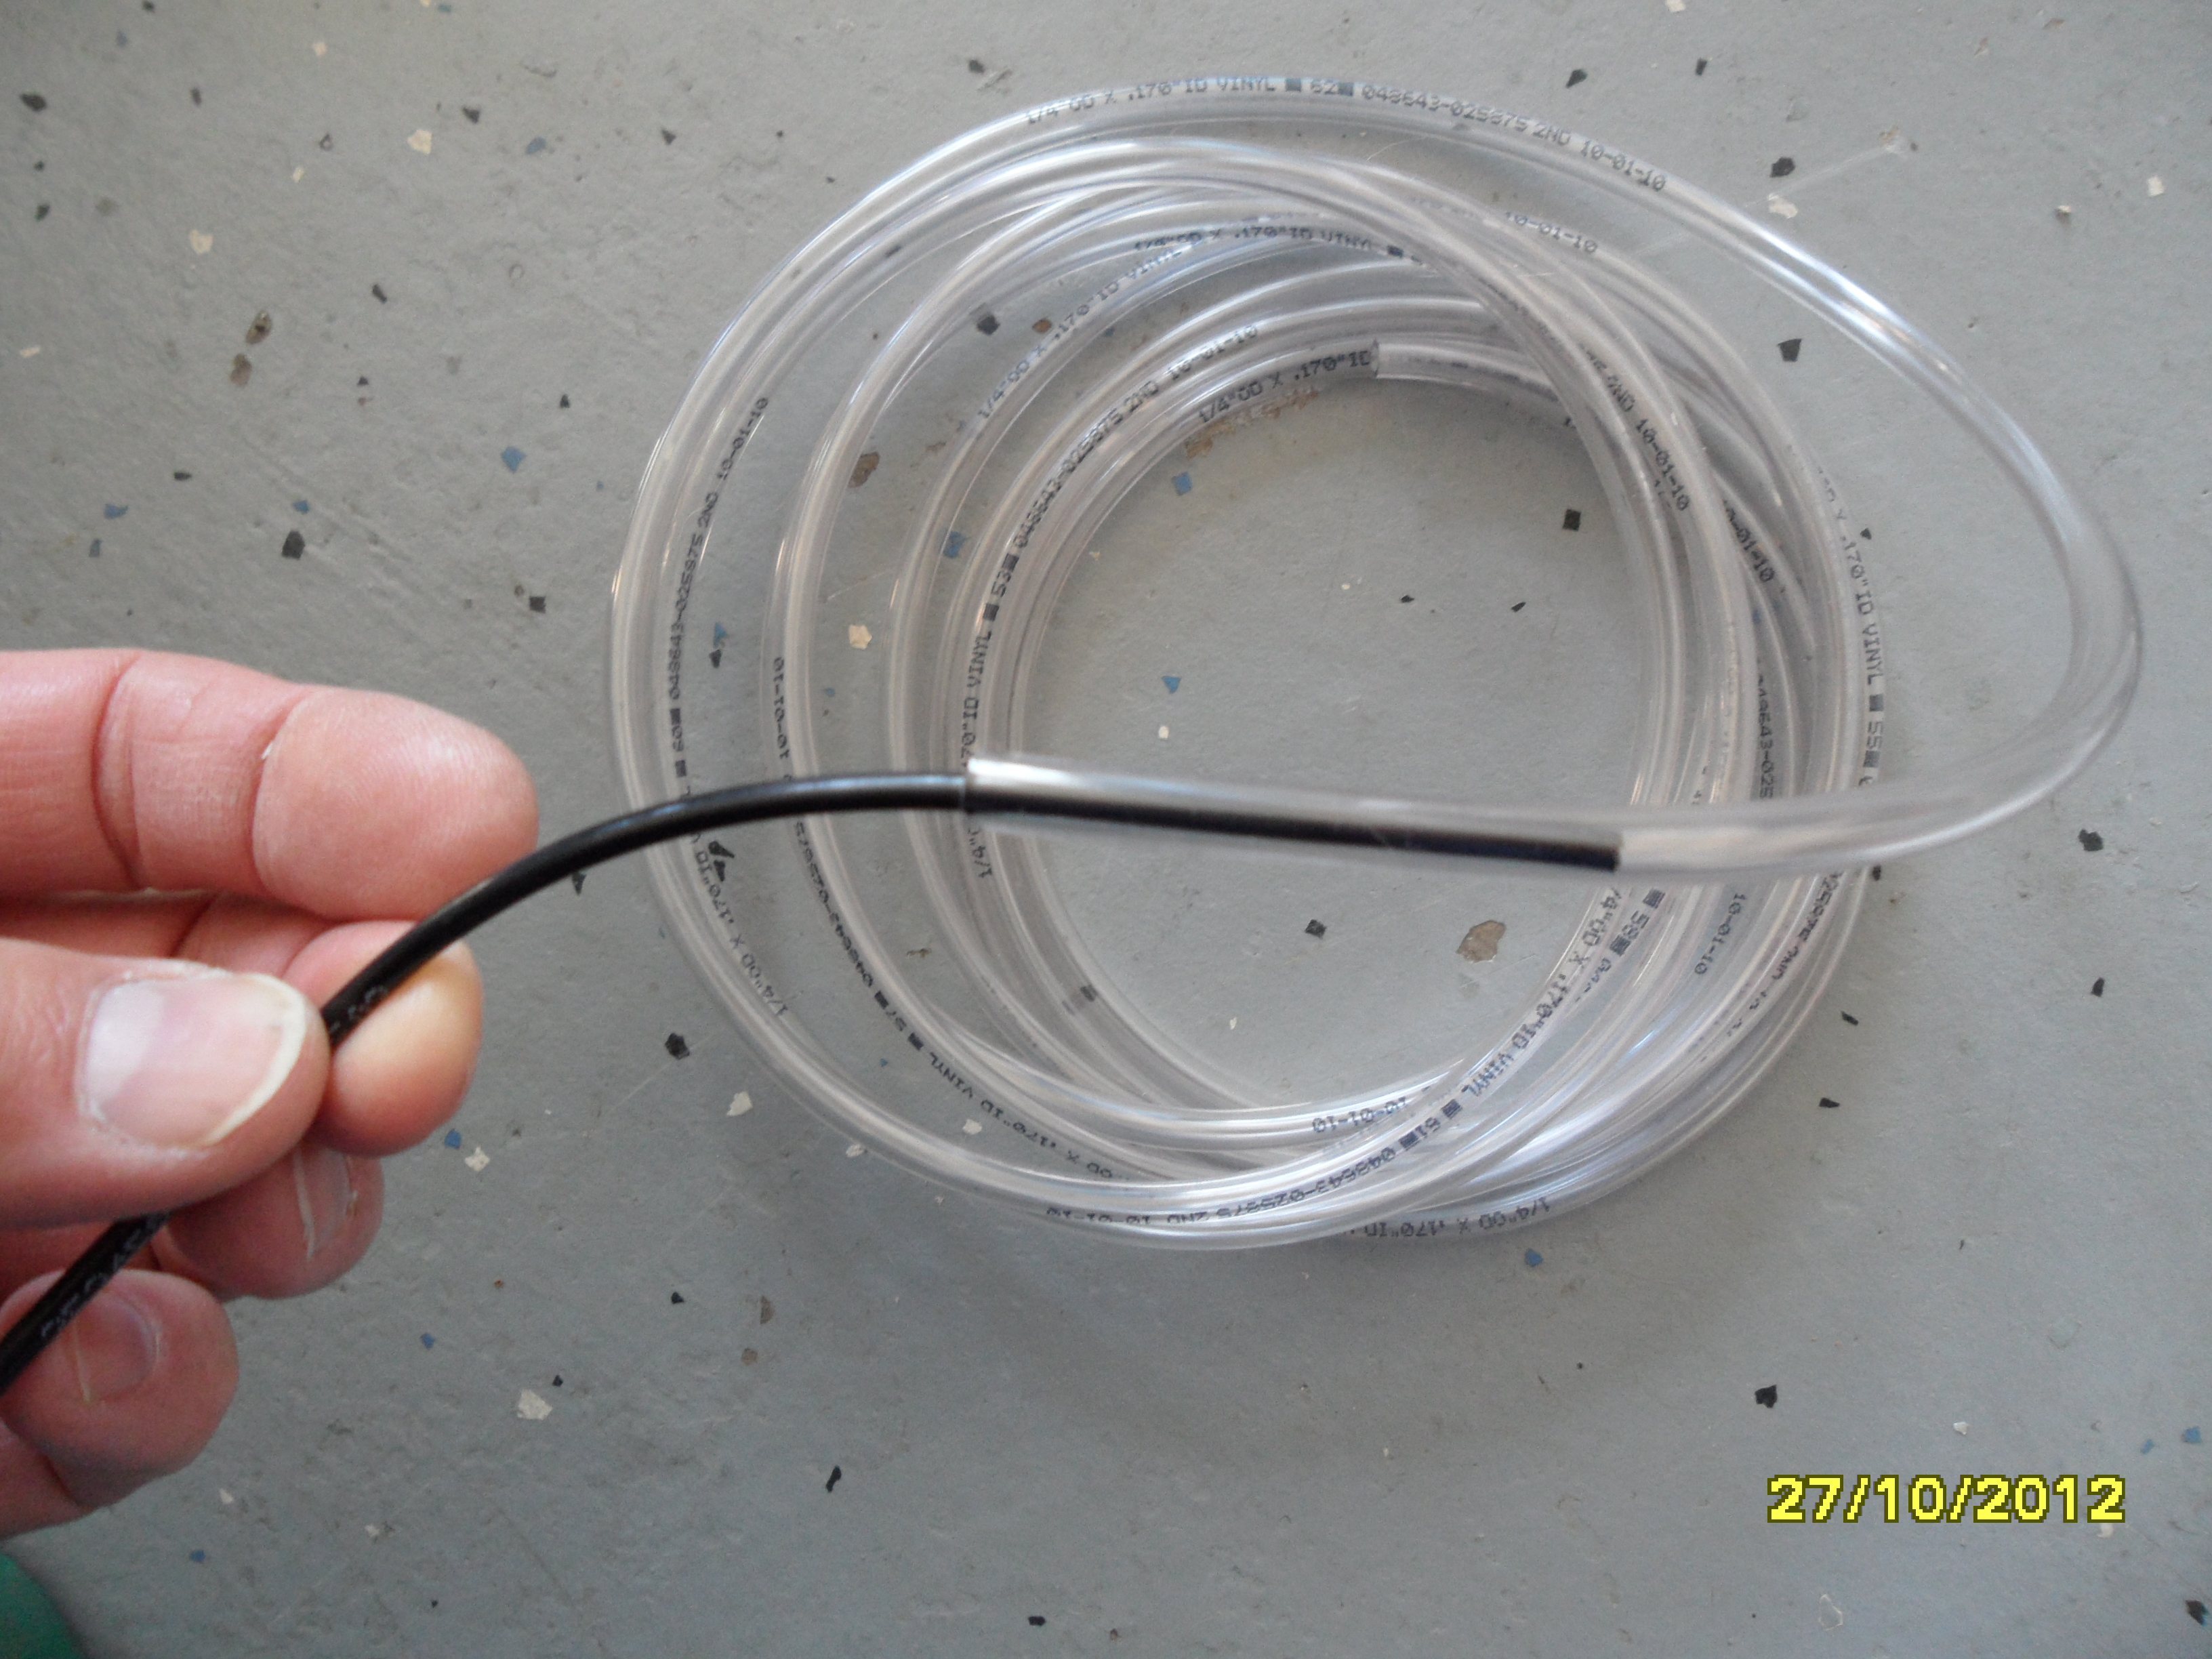
I decided to shield the air lines with some cheap, vinyl tubing, so if they rub on things it'll take a great deal longer to create a problem.
16' of 3/16" ID clear vinyl tubing ran about $3. It slips over the black tubing fine if you have a second person to hold the clear tubing in a straight line. Otherwise, you can only put on about 4-6' at a time. It's no problem to use several sections of clear tubing, because it's only a abrasion shield.

The larger tubing size renders the supplied hose clips useless, which is just as well: I really don't want to start punching 1/4" holes in anything and create places for rust to start, if there's an alternative.
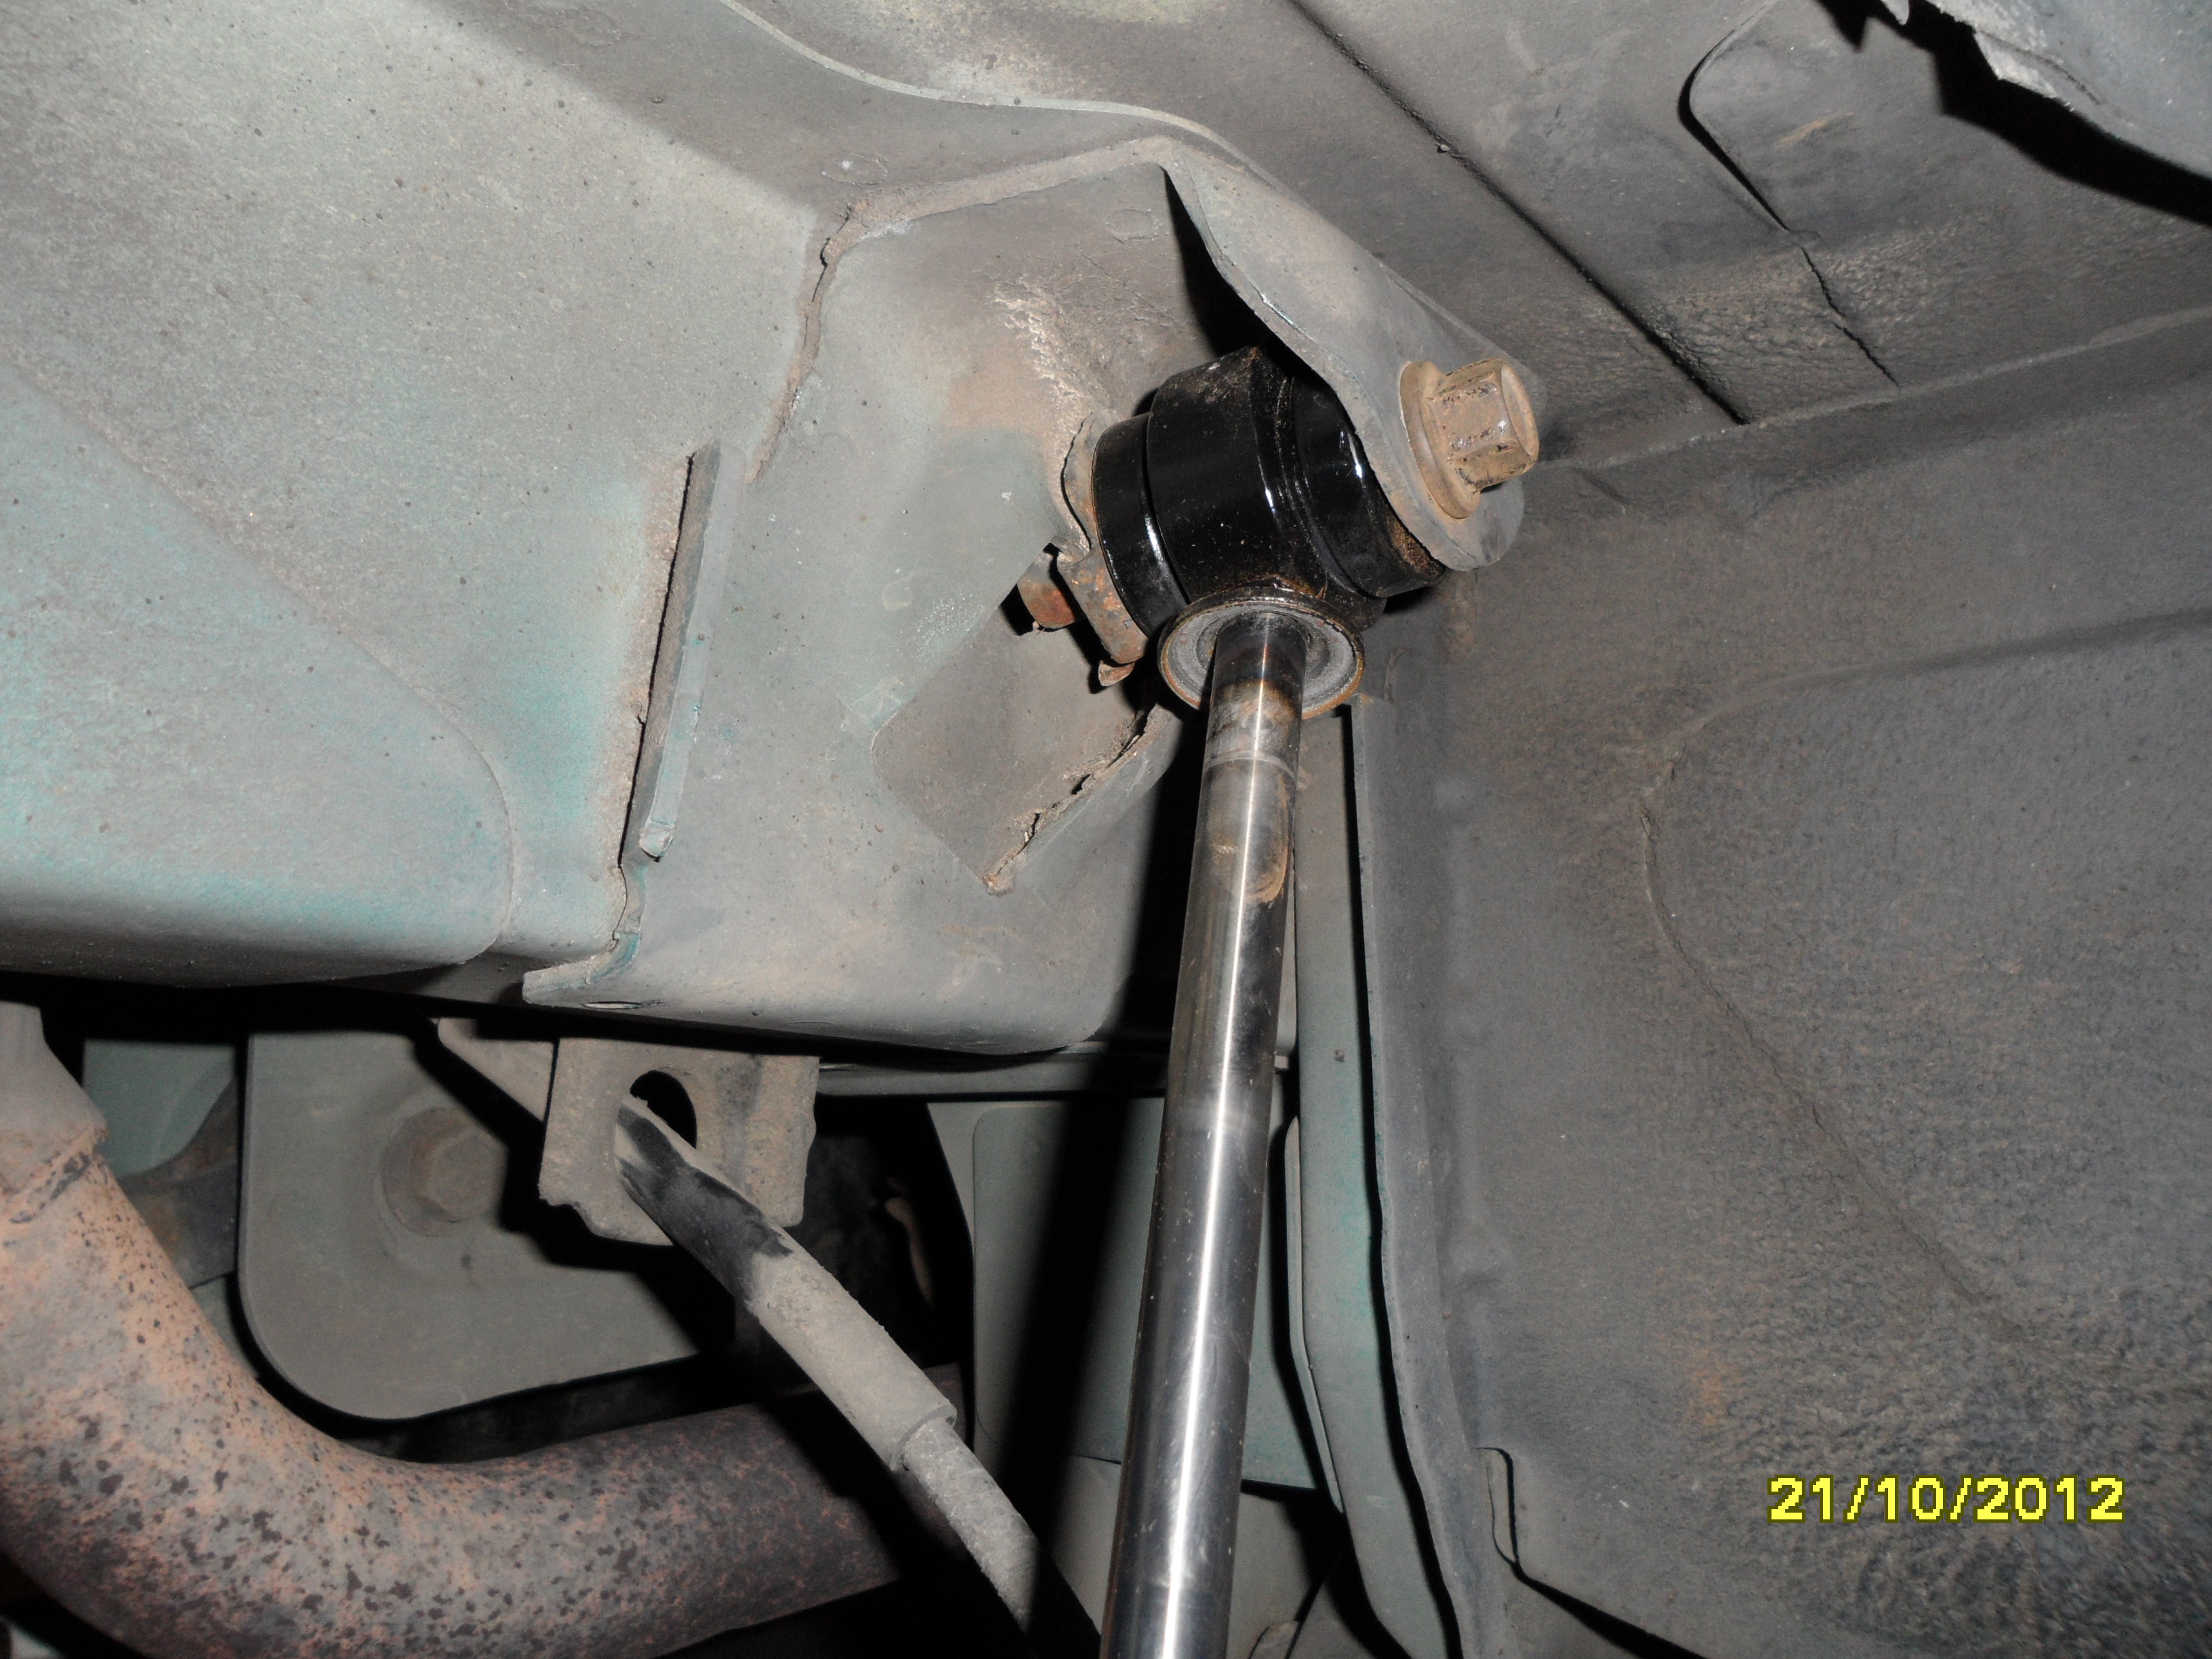
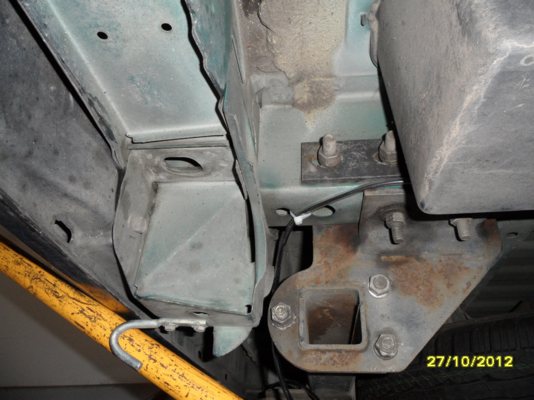
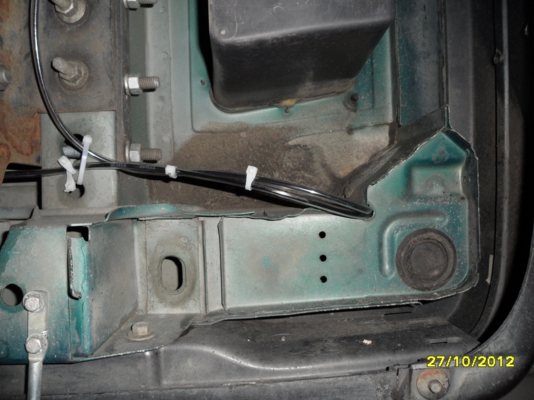
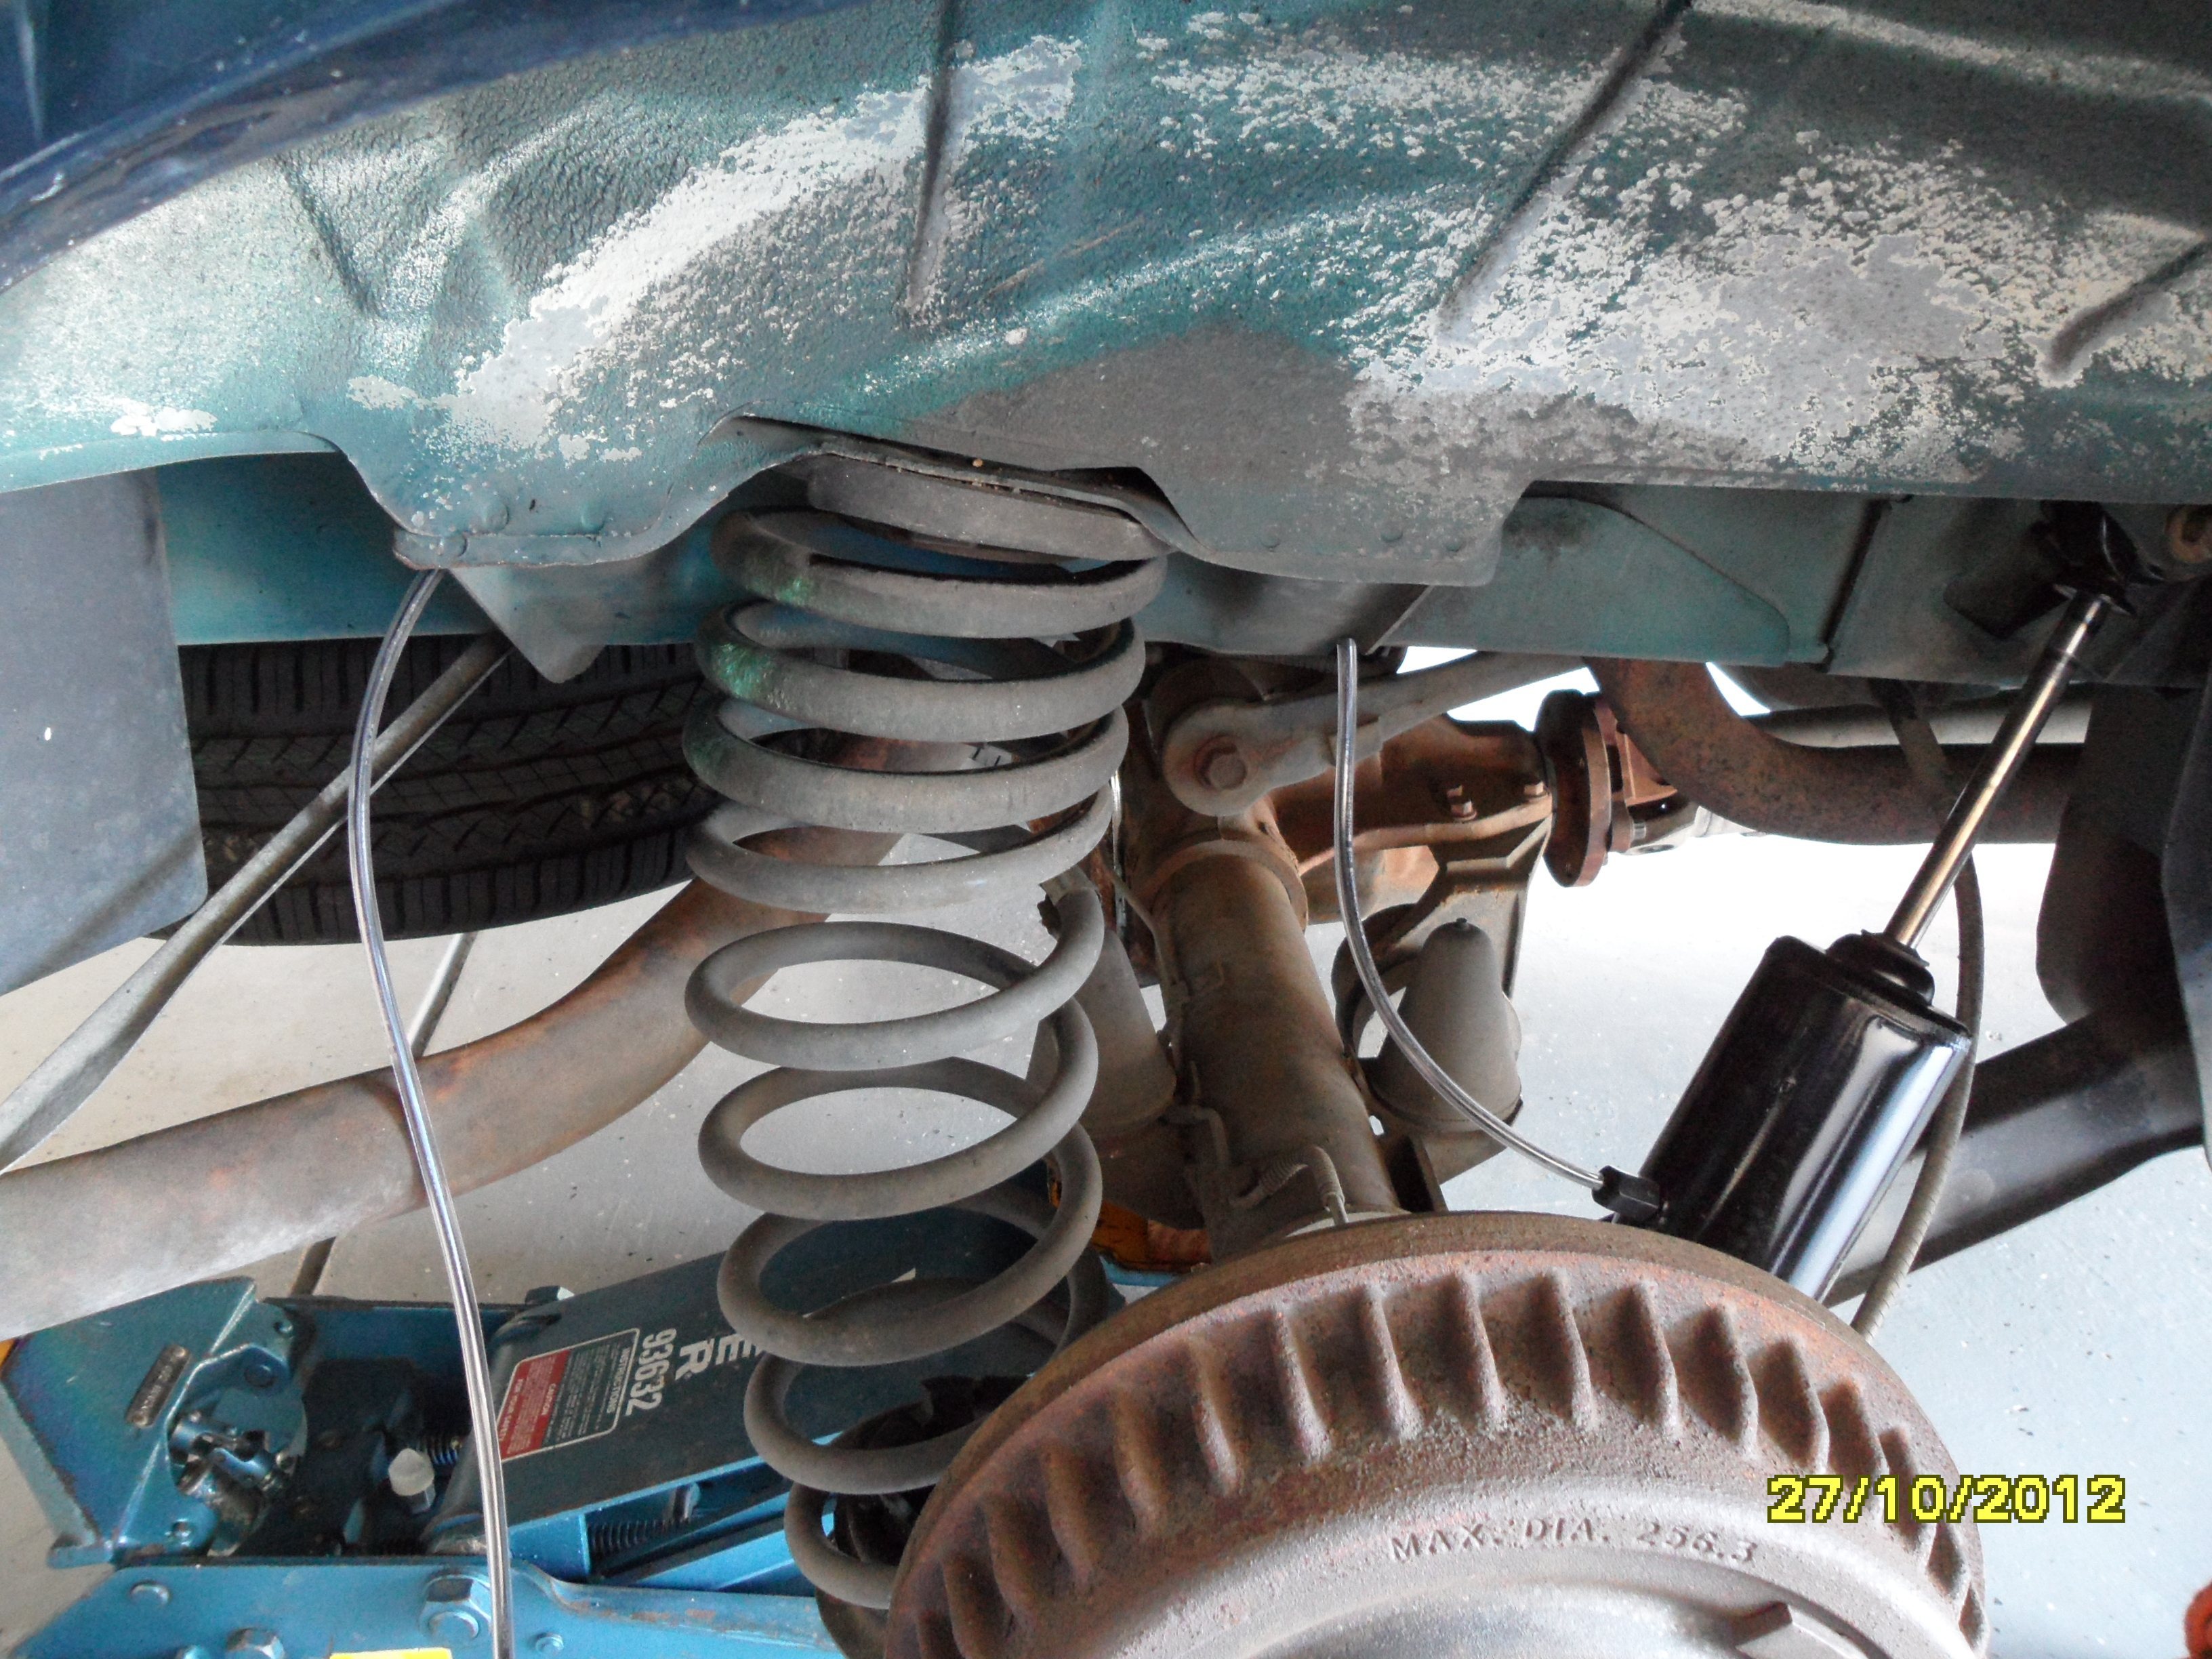
I was able to route the lines above the coil perches.
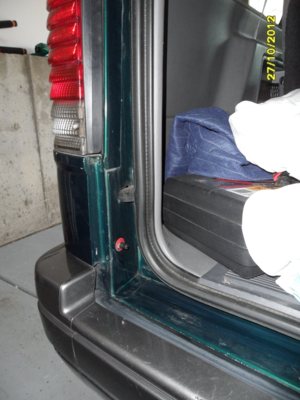
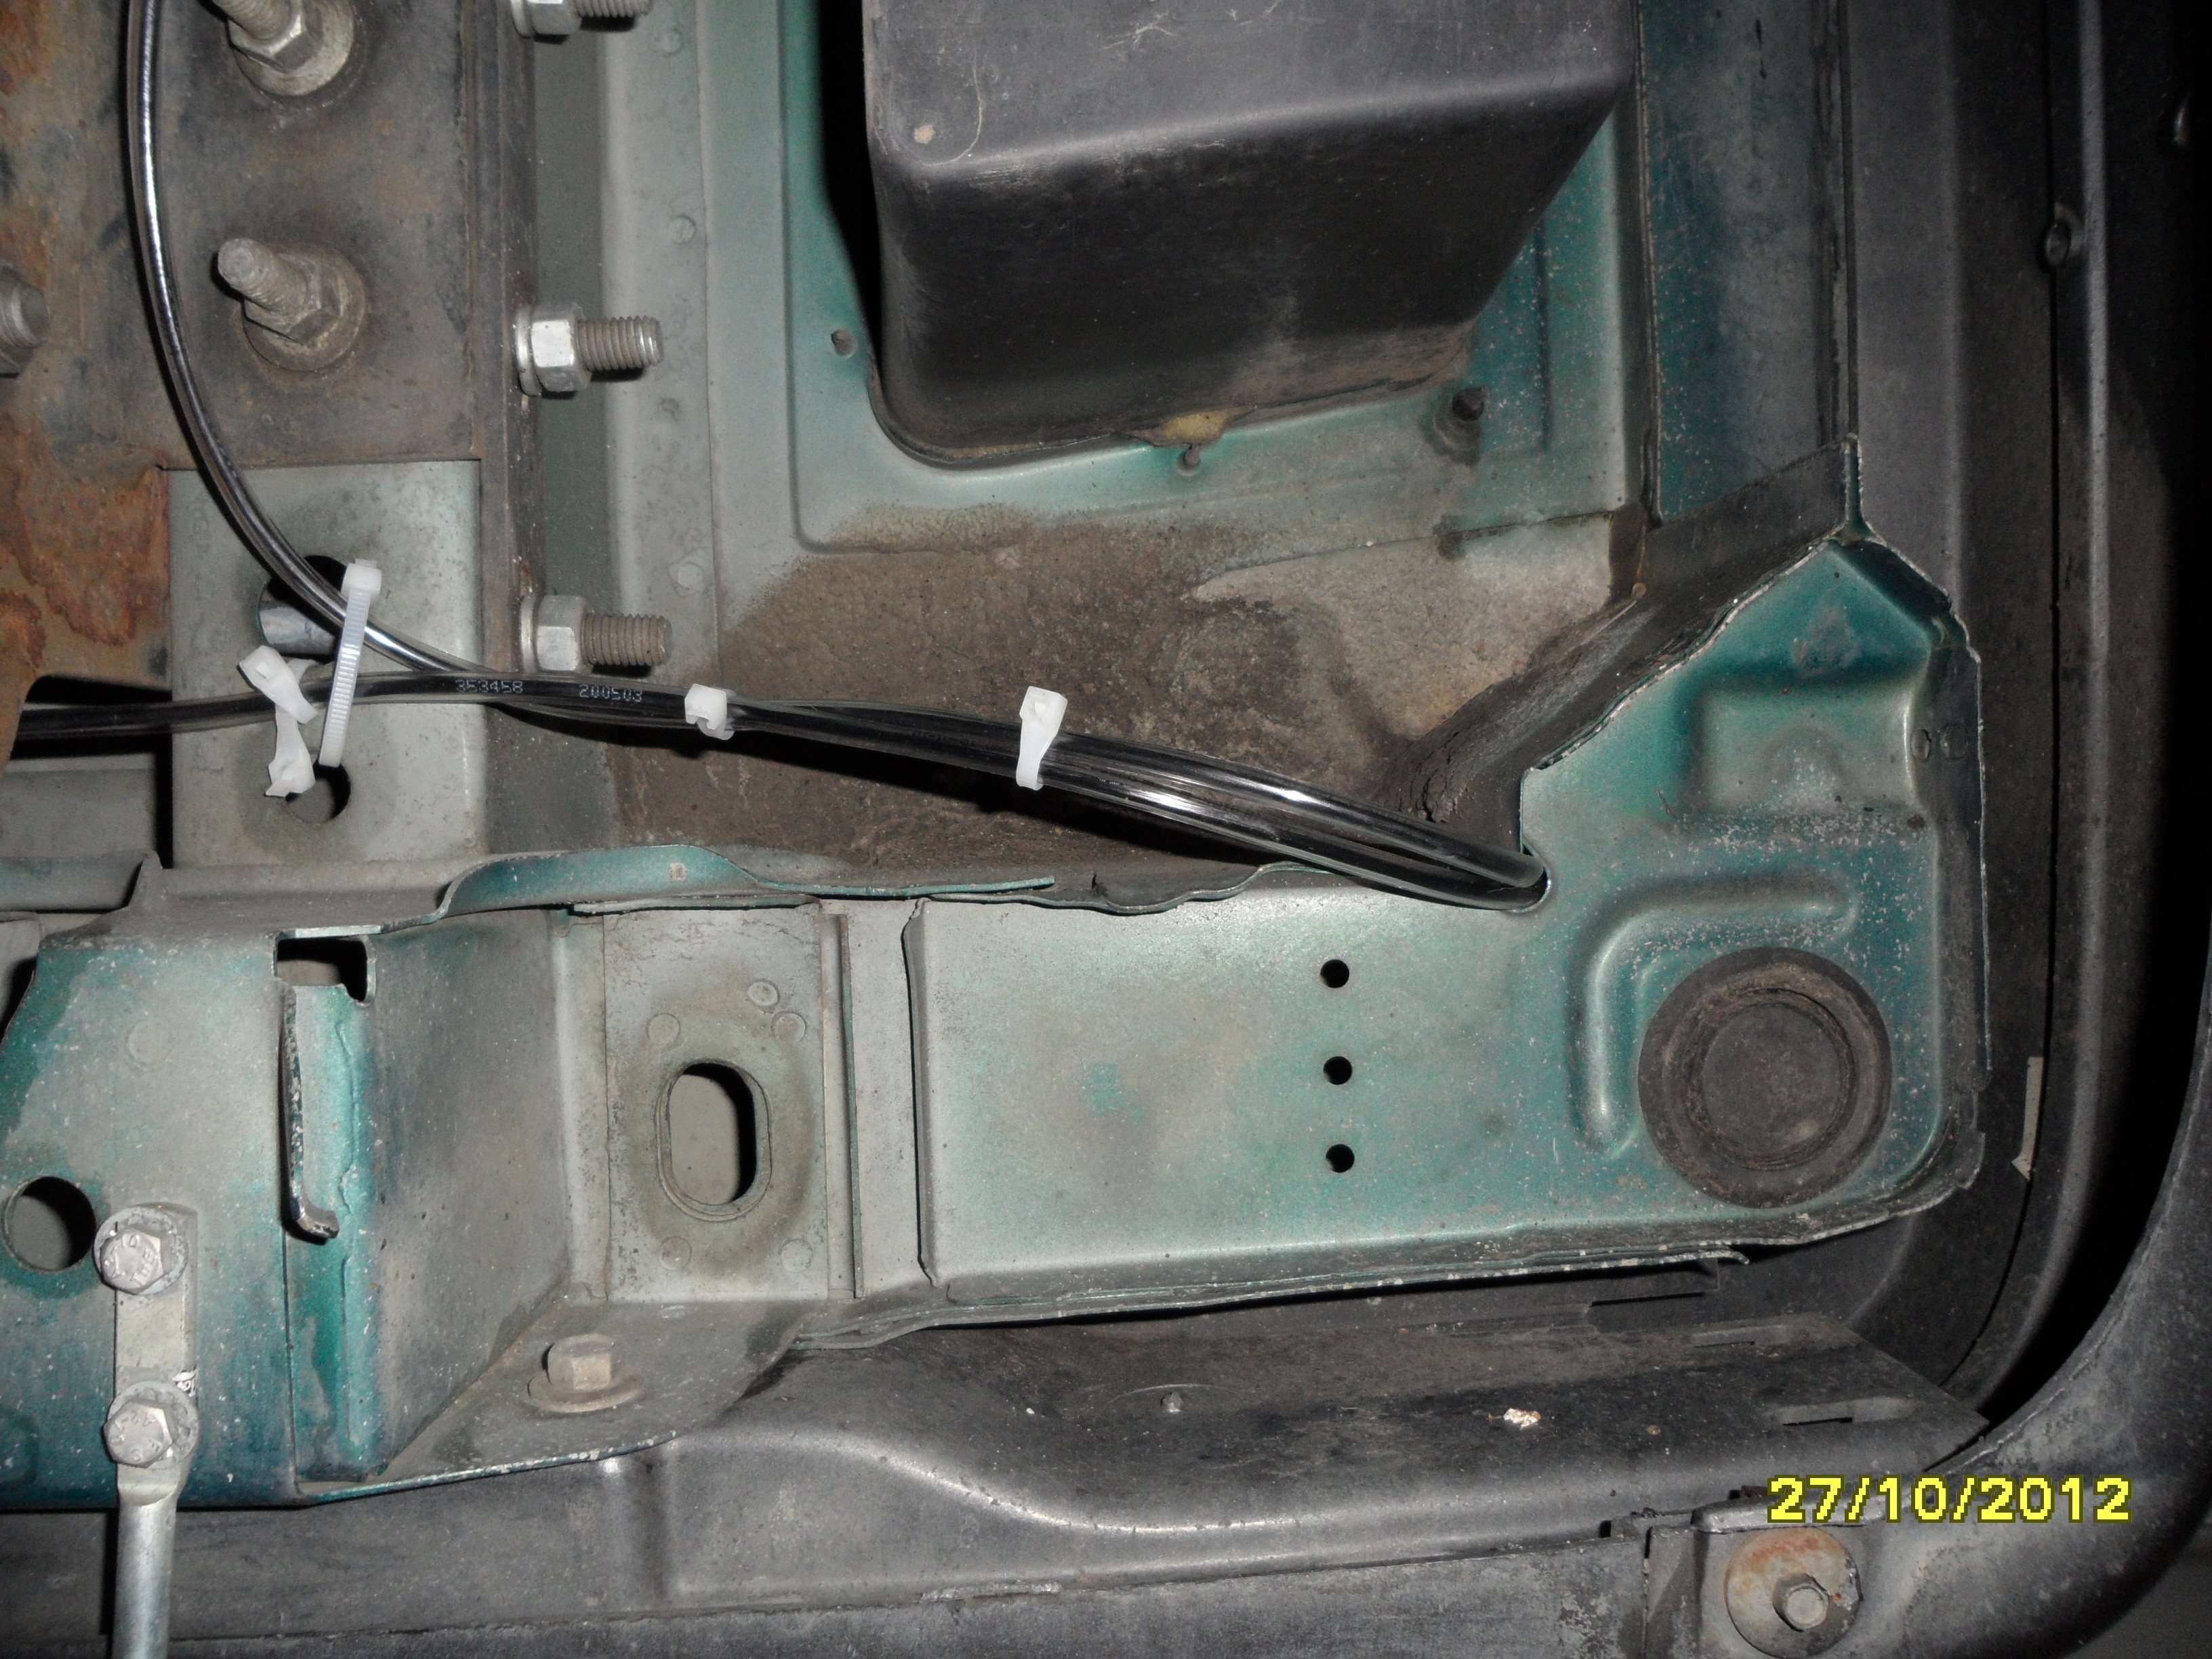
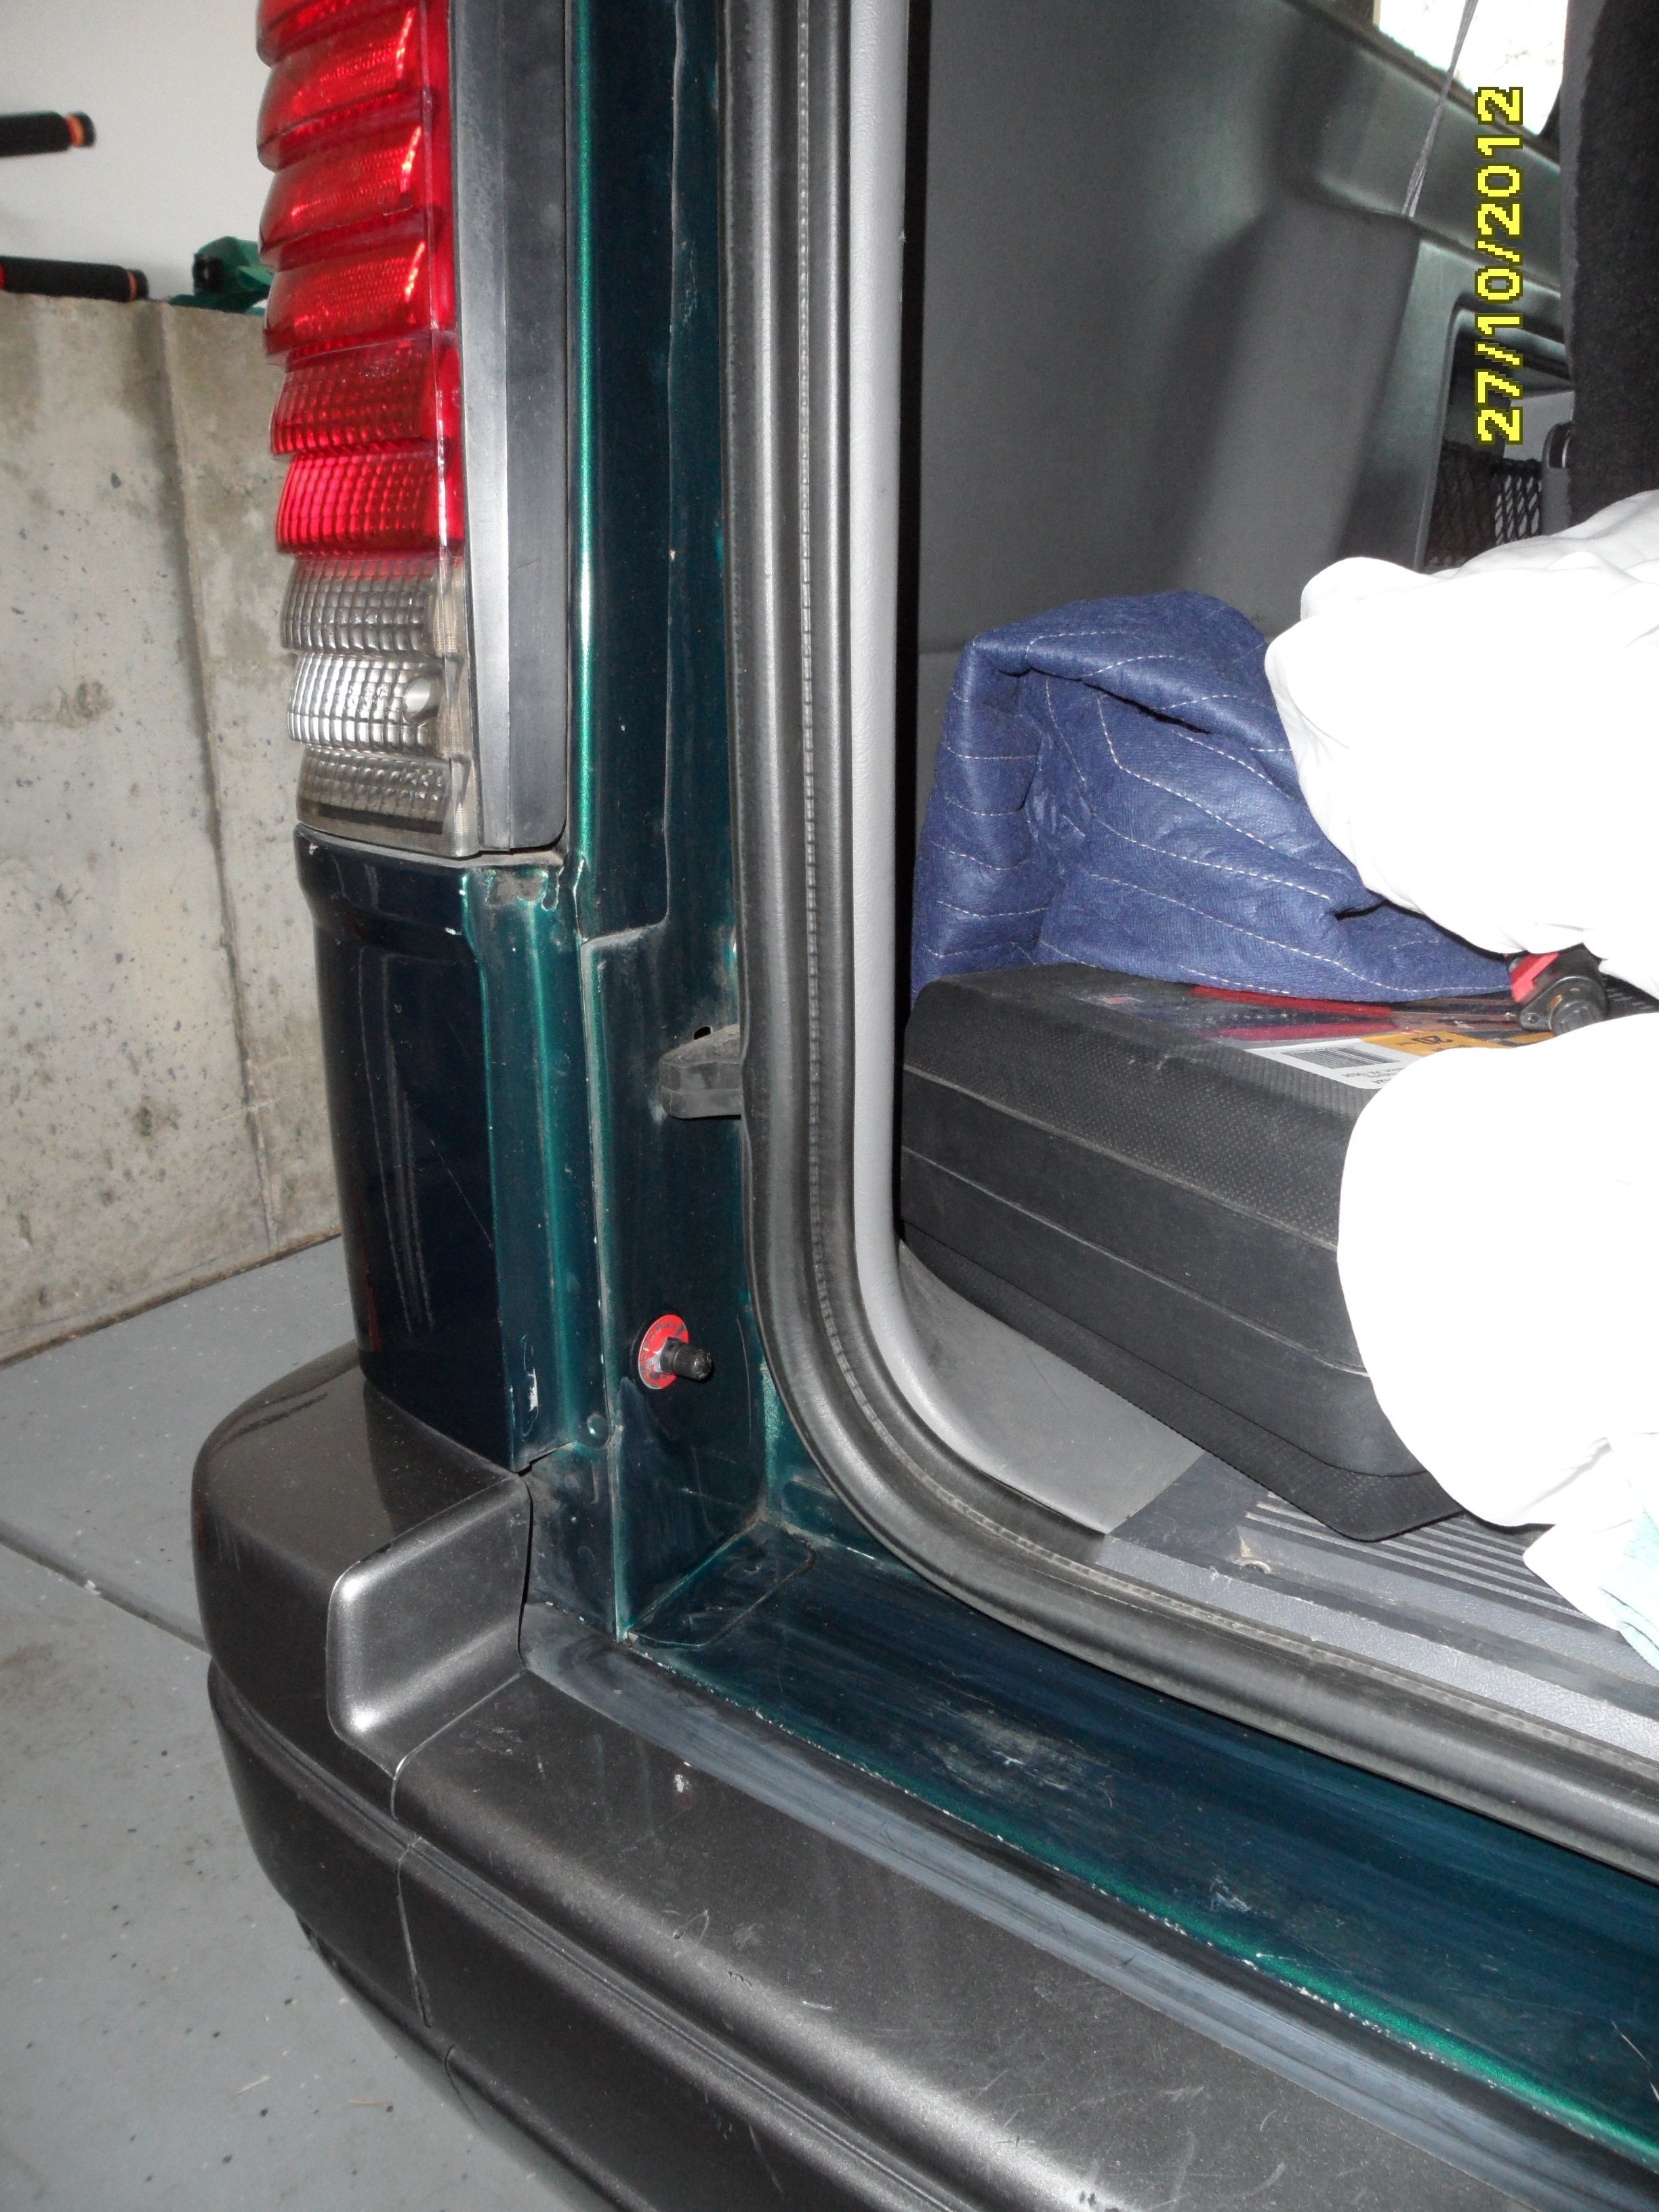
I took out the left taillight to route the lines up in this area.
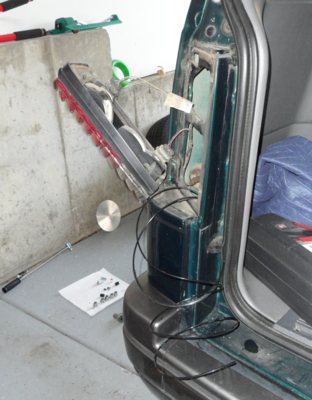
I routed the lines through an existing drain hole under the taillight.
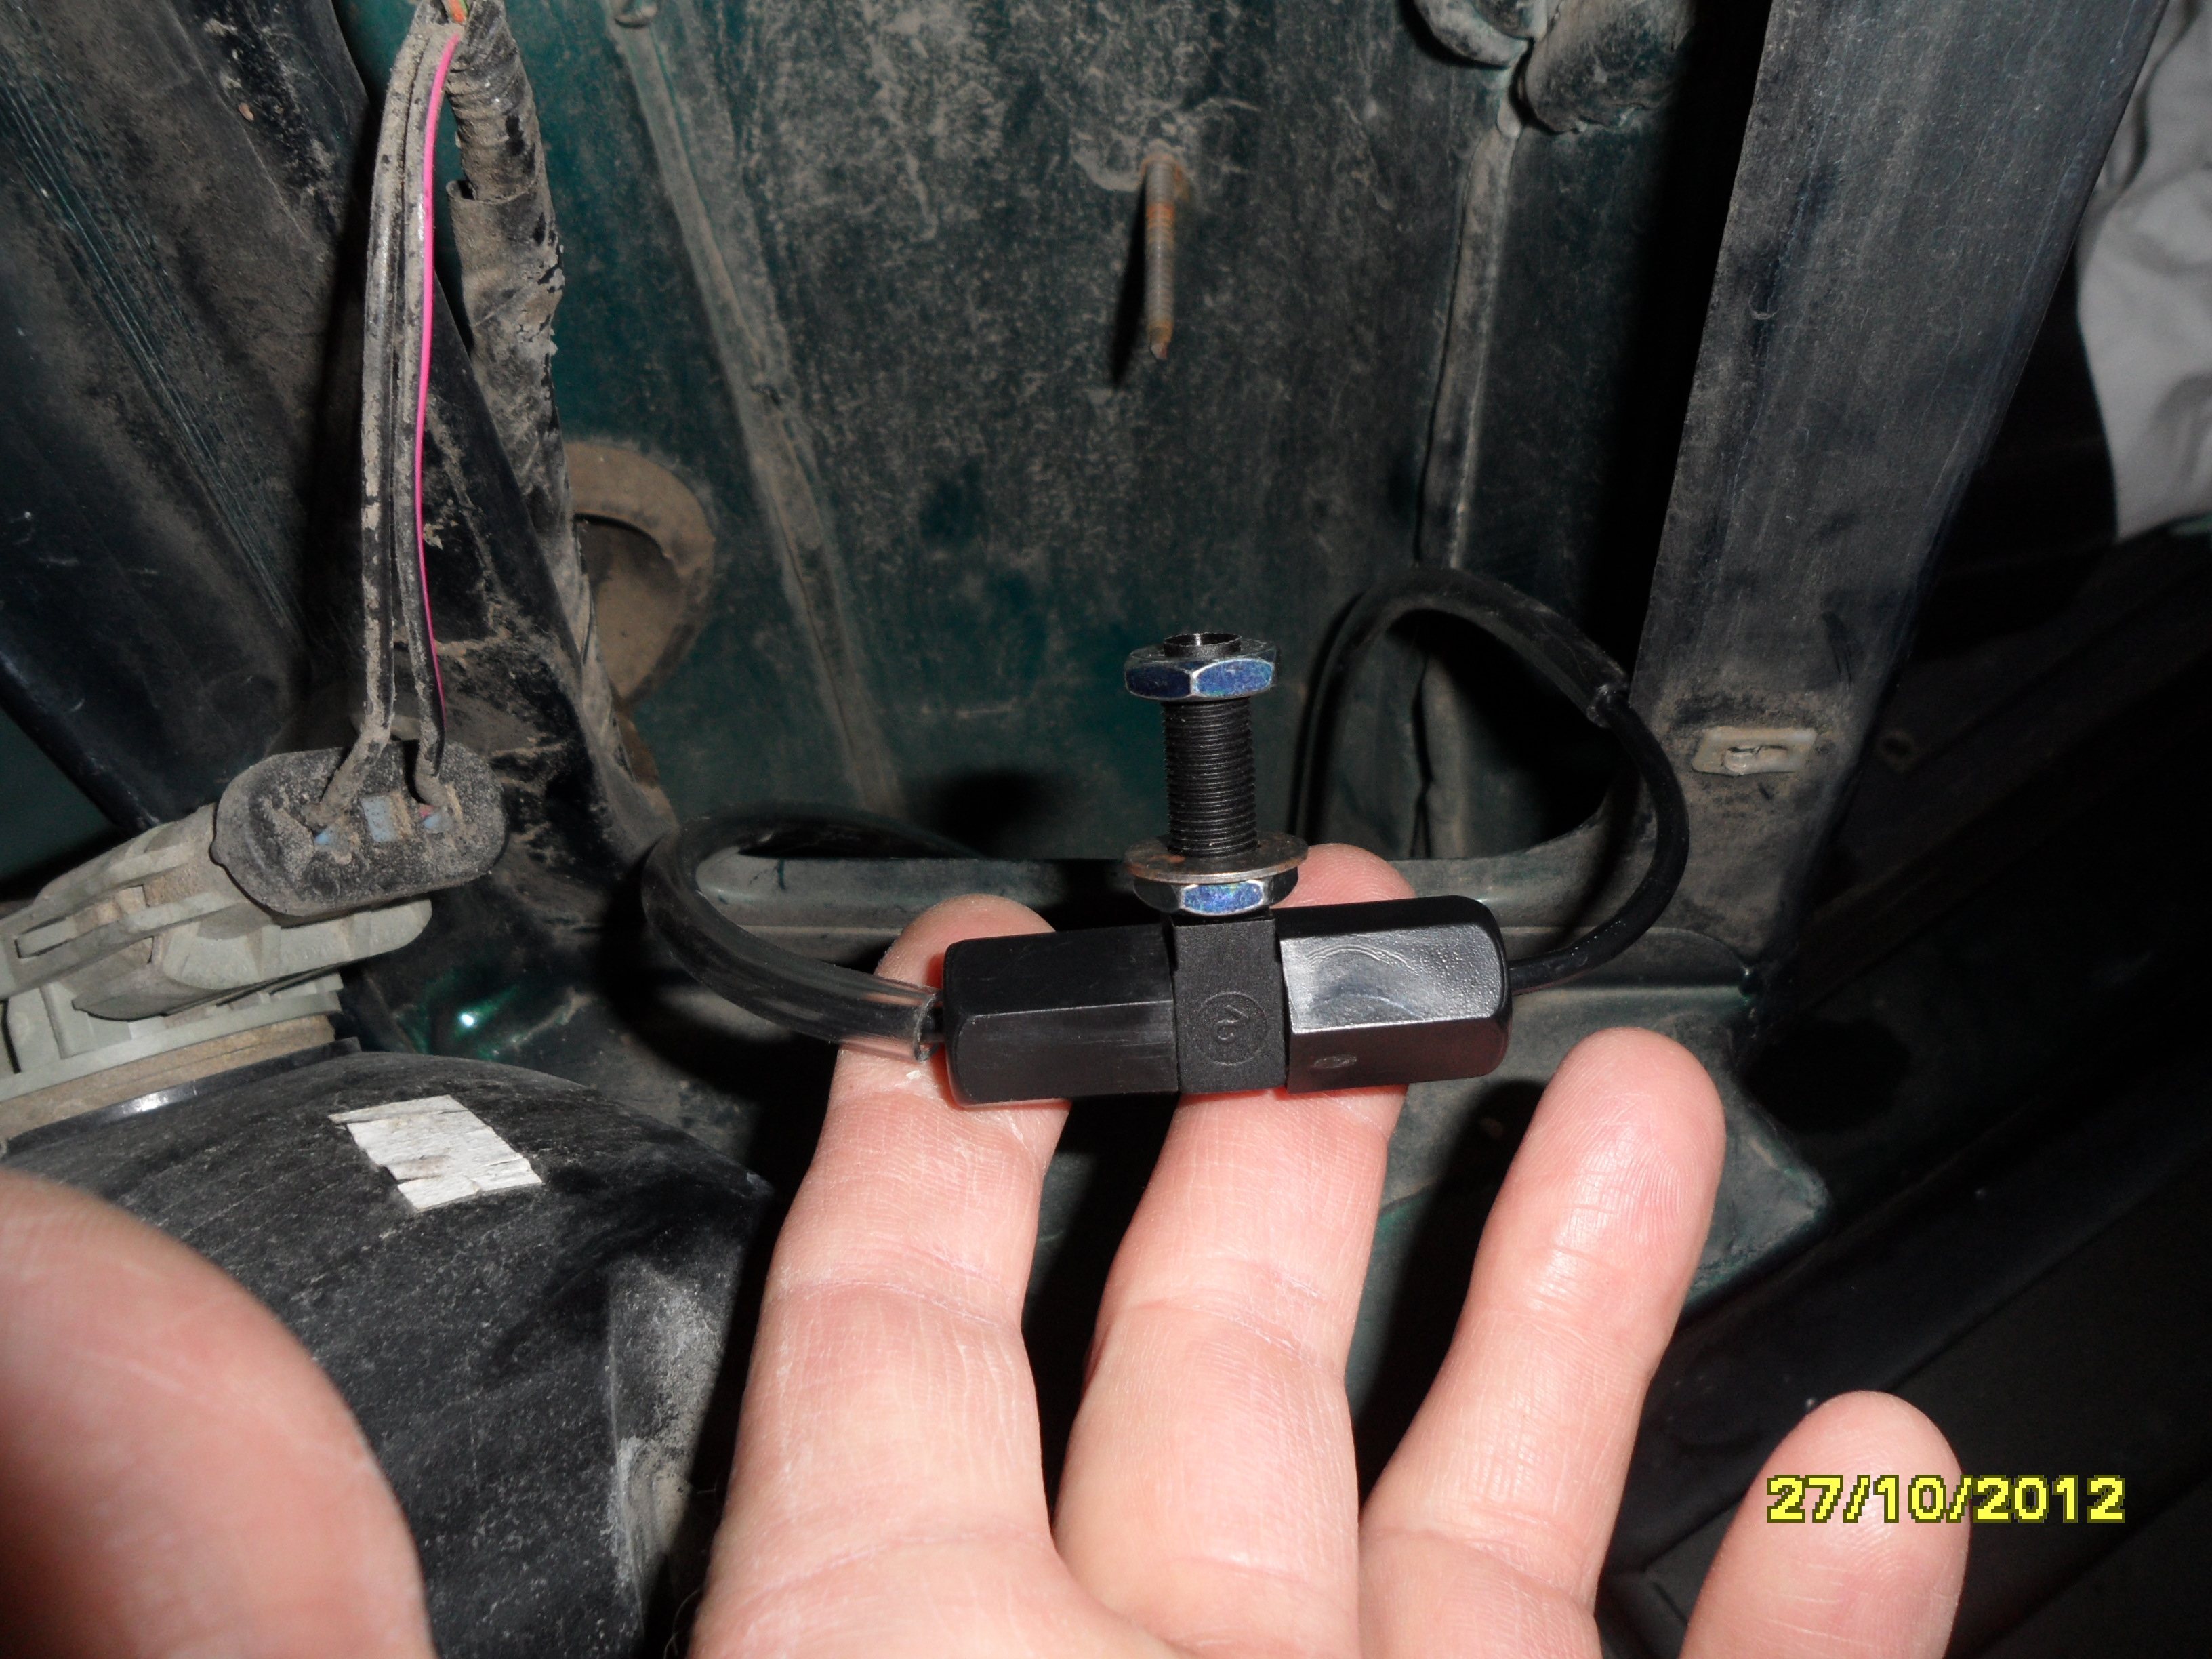
Cut the lines to remove the slack. About 4' from the driver's side, and about 1' from the passenger side. Assemble the ferrule nut, backer & o-rings, then assemble the tee.
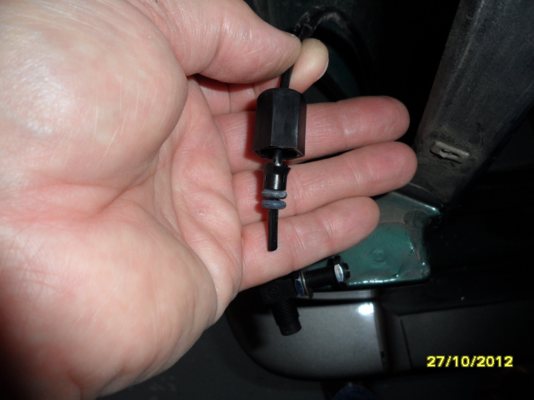
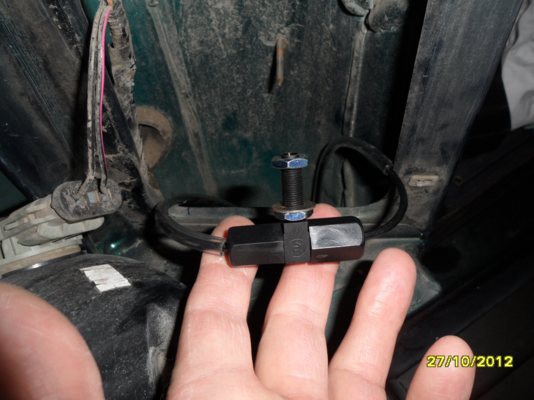
The instructions say to use a 1/4" hole to mount the tee, but I had to go two sizes larger than that to mount the tee. Fits well.
The compressor I have is merely an old tire inflator, and could only take the shocks up to 30 PSI. I'm going to a friend's house tomorrow to get some real pressure in there to test for leaks.
I decided to shield the air lines with some cheap, vinyl tubing, so if they rub on things it'll take a great deal longer to create a problem.
16' of 3/16" ID clear vinyl tubing ran about $3. It slips over the black tubing fine if you have a second person to hold the clear tubing in a straight line. Otherwise, you can only put on about 4-6' at a time. It's no problem to use several sections of clear tubing, because it's only a abrasion shield.
The larger tubing size renders the supplied hose clips useless, which is just as well: I really don't want to start punching 1/4" holes in anything and create places for rust to start, if there's an alternative.
I was able to route the lines above the coil perches.


I took out the left taillight to route the lines up in this area.

I routed the lines through an existing drain hole under the taillight.
Cut the lines to remove the slack. About 4' from the driver's side, and about 1' from the passenger side. Assemble the ferrule nut, backer & o-rings, then assemble the tee.

The instructions say to use a 1/4" hole to mount the tee, but I had to go two sizes larger than that to mount the tee. Fits well.
The compressor I have is merely an old tire inflator, and could only take the shocks up to 30 PSI. I'm going to a friend's house tomorrow to get some real pressure in there to test for leaks.
#38
10-28-2012, 01:51 AM
nice write up with great photos.
I've been lucky with my AirLift air bags, been in 10+ years and still no leaks, just the in the box hoses.
brought my out into the DS rear storage box, well protected area.
never been impressed with air bags before, but love them in the Aero especially the adjustable load carrying towing heavy.
even put them on my Dodge Cummins Ram to carry the camper, steady as a freight locomotive locked on the tracks going by an 18 wheeler on the freeway.
#39
11-06-2012, 09:51 PM
Hah! Now I know why my old Coleman inflator wouldn't bring the pressure above 30 PSI:
That's Windex sprayed on the shaft seal with the compressor running. It's leaking, out of the box.
Since I'd bought two pairs from RockAuto, I just swapped in another one, and ran them up to 200 PSI. No visible leaks when I sprayed the fittings & shaft seals, but according to my new tire inflator's gauge, it leaked down 10 PSI in about 15 minutes. That could be the compressor's valves leaking though. I've no good way of knowing. I'll check it again tomorrow and see what kind of loss we're talking about.
RockAuto offered a 30-day warranty on these, and it's only been three weeks (one week installed), so I got them to send me a replacement pair, and they don't want the old ones back, so it's possible I'll have three spares. That ought to be enough for this trip
I looked hard at a dash gauge and compressor, and even bid on a couple of Viair's on eBay, but I really don't have a spare $200 to do a decent compressor & gauge setup right now, so for this trip I'll just air up every morning if need be.
A Viair 480C in that driver-side storage cubby would be sweet, though.
For my reference later, the three digital air pressure gauges I looked at were:
I'd decided that I didn't want to run air tubing up to the dash, and these three were the only ones that had sufficient pressure range (ie at least 200 PSI).
Hmmm. This forum software's Preview shows the correct linking for Glowshift, but when saved, the link is broken.


That's Windex sprayed on the shaft seal with the compressor running. It's leaking, out of the box.
Since I'd bought two pairs from RockAuto, I just swapped in another one, and ran them up to 200 PSI. No visible leaks when I sprayed the fittings & shaft seals, but according to my new tire inflator's gauge, it leaked down 10 PSI in about 15 minutes. That could be the compressor's valves leaking though. I've no good way of knowing. I'll check it again tomorrow and see what kind of loss we're talking about.
RockAuto offered a 30-day warranty on these, and it's only been three weeks (one week installed), so I got them to send me a replacement pair, and they don't want the old ones back, so it's possible I'll have three spares. That ought to be enough for this trip
I looked hard at a dash gauge and compressor, and even bid on a couple of Viair's on eBay, but I really don't have a spare $200 to do a decent compressor & gauge setup right now, so for this trip I'll just air up every morning if need be.
A Viair 480C in that driver-side storage cubby would be sweet, though.
For my reference later, the three digital air pressure gauges I looked at were:
- Air Zenith AZ220K, $58 (but blinks if pressure is under 120 PSI, which is a deal-breaker)
- Dakota Digital , $118 + Transducer , $54 with one transducer. Expensive!
- Glowshift http://www.glowshiftdirect.com/tinted-7-dual-digital-air-pressure-gauge.aspx, $99 with two pressure transducers. Probably my choice, if I had the budget. That was supposed to read "GS-T713_DUAL"
I'd decided that I didn't want to run air tubing up to the dash, and these three were the only ones that had sufficient pressure range (ie at least 200 PSI).
Hmmm. This forum software's Preview shows the correct linking for Glowshift, but when saved, the link is broken.
#40
11-08-2012, 07:41 PM
I'd wanted to avoid a cheap plastic compressor, but I did want the ability to run these shocks at max (200 PSI). I hated to do it, but I bought a Slime COMP 07 Rechargable 12-Volt Tire Inflator from Amazon for $48. It's supposed to be rated for 230 PSI.
As expected, it crapped out after three uses.
The instructions say that its duty-cycle is 10 minutes ON, 25 minutes OFF.
It has its own battery, and you're supposed to run it from it, without being plugged into the car's power or using the AC adapter. I charged it for over a day before use, and it did run the shocks up to 200 PSI in six minutes, which I thought was OK, but when I shut it off, smoke came from the compressor case -- never a good sign.
Charged for another 24 hours, aired up from zero again, and again it worked fine. A bit less smoke when I turned it off.
Charged for two days, then went to air up the system again from zero (I'm changing out fittings), and this time it got to around 90 PSI and started to slow down, and the yellow "Charge Me" light came on. At 150 PSI, it quit altogether. I disconnected the hose from the load, tried to restart, and its fuse blew.
That's enough for me. Back to Amazon it goes.
I was hoping to avoid the cost of a real 12v compressor, but I'm gonna look at that option again. If I need 200 PSI while travelling, I'm not going to find it at a gas station.
#41
11-09-2012, 01:29 AM
ancient Chinese merchant proverb:
We put smoke in but no can guarantee white dude in USA can keep it inside.
still running an old ac powered shop compressor made in 1946 in the USA, before I was born. Never been serviced except for compressor oil change.
NO smoke inside.
one option is a carry along compressed air tank. old propane tank converted makes a good one for 200 psi and any truck tire shop will fill. P. tanks are rated for 200 psi and can easily hold 300 psi without bursting, required safety factor. use steel truck tire fittings
can't beat our Les Swaub stores in the NW, they all have truck tire shops in the back
#42
11-09-2012, 06:35 AM
I ordered a Viair 444c and a Glowshift T713_DUAL last night -- about $300. I'll have to pick up some 8 gauge wire in two colors, a relay socket (I've got relays), a momentary switch, and a gauge cup or bracket. I'm not going fancy, no timers or pressure switches or regulator. Just my thumb on the button is fine.
I hope this stuff all shows up early next week, as I pull out of here in seven days. I'm towing a 6x12' enclosed U-Haul (partially loaded) to LA, fully loading the trailer, then to Seattle, over twelve days.
I hope this stuff all shows up early next week, as I pull out of here in seven days. I'm towing a 6x12' enclosed U-Haul (partially loaded) to LA, fully loading the trailer, then to Seattle, over twelve days.
#43
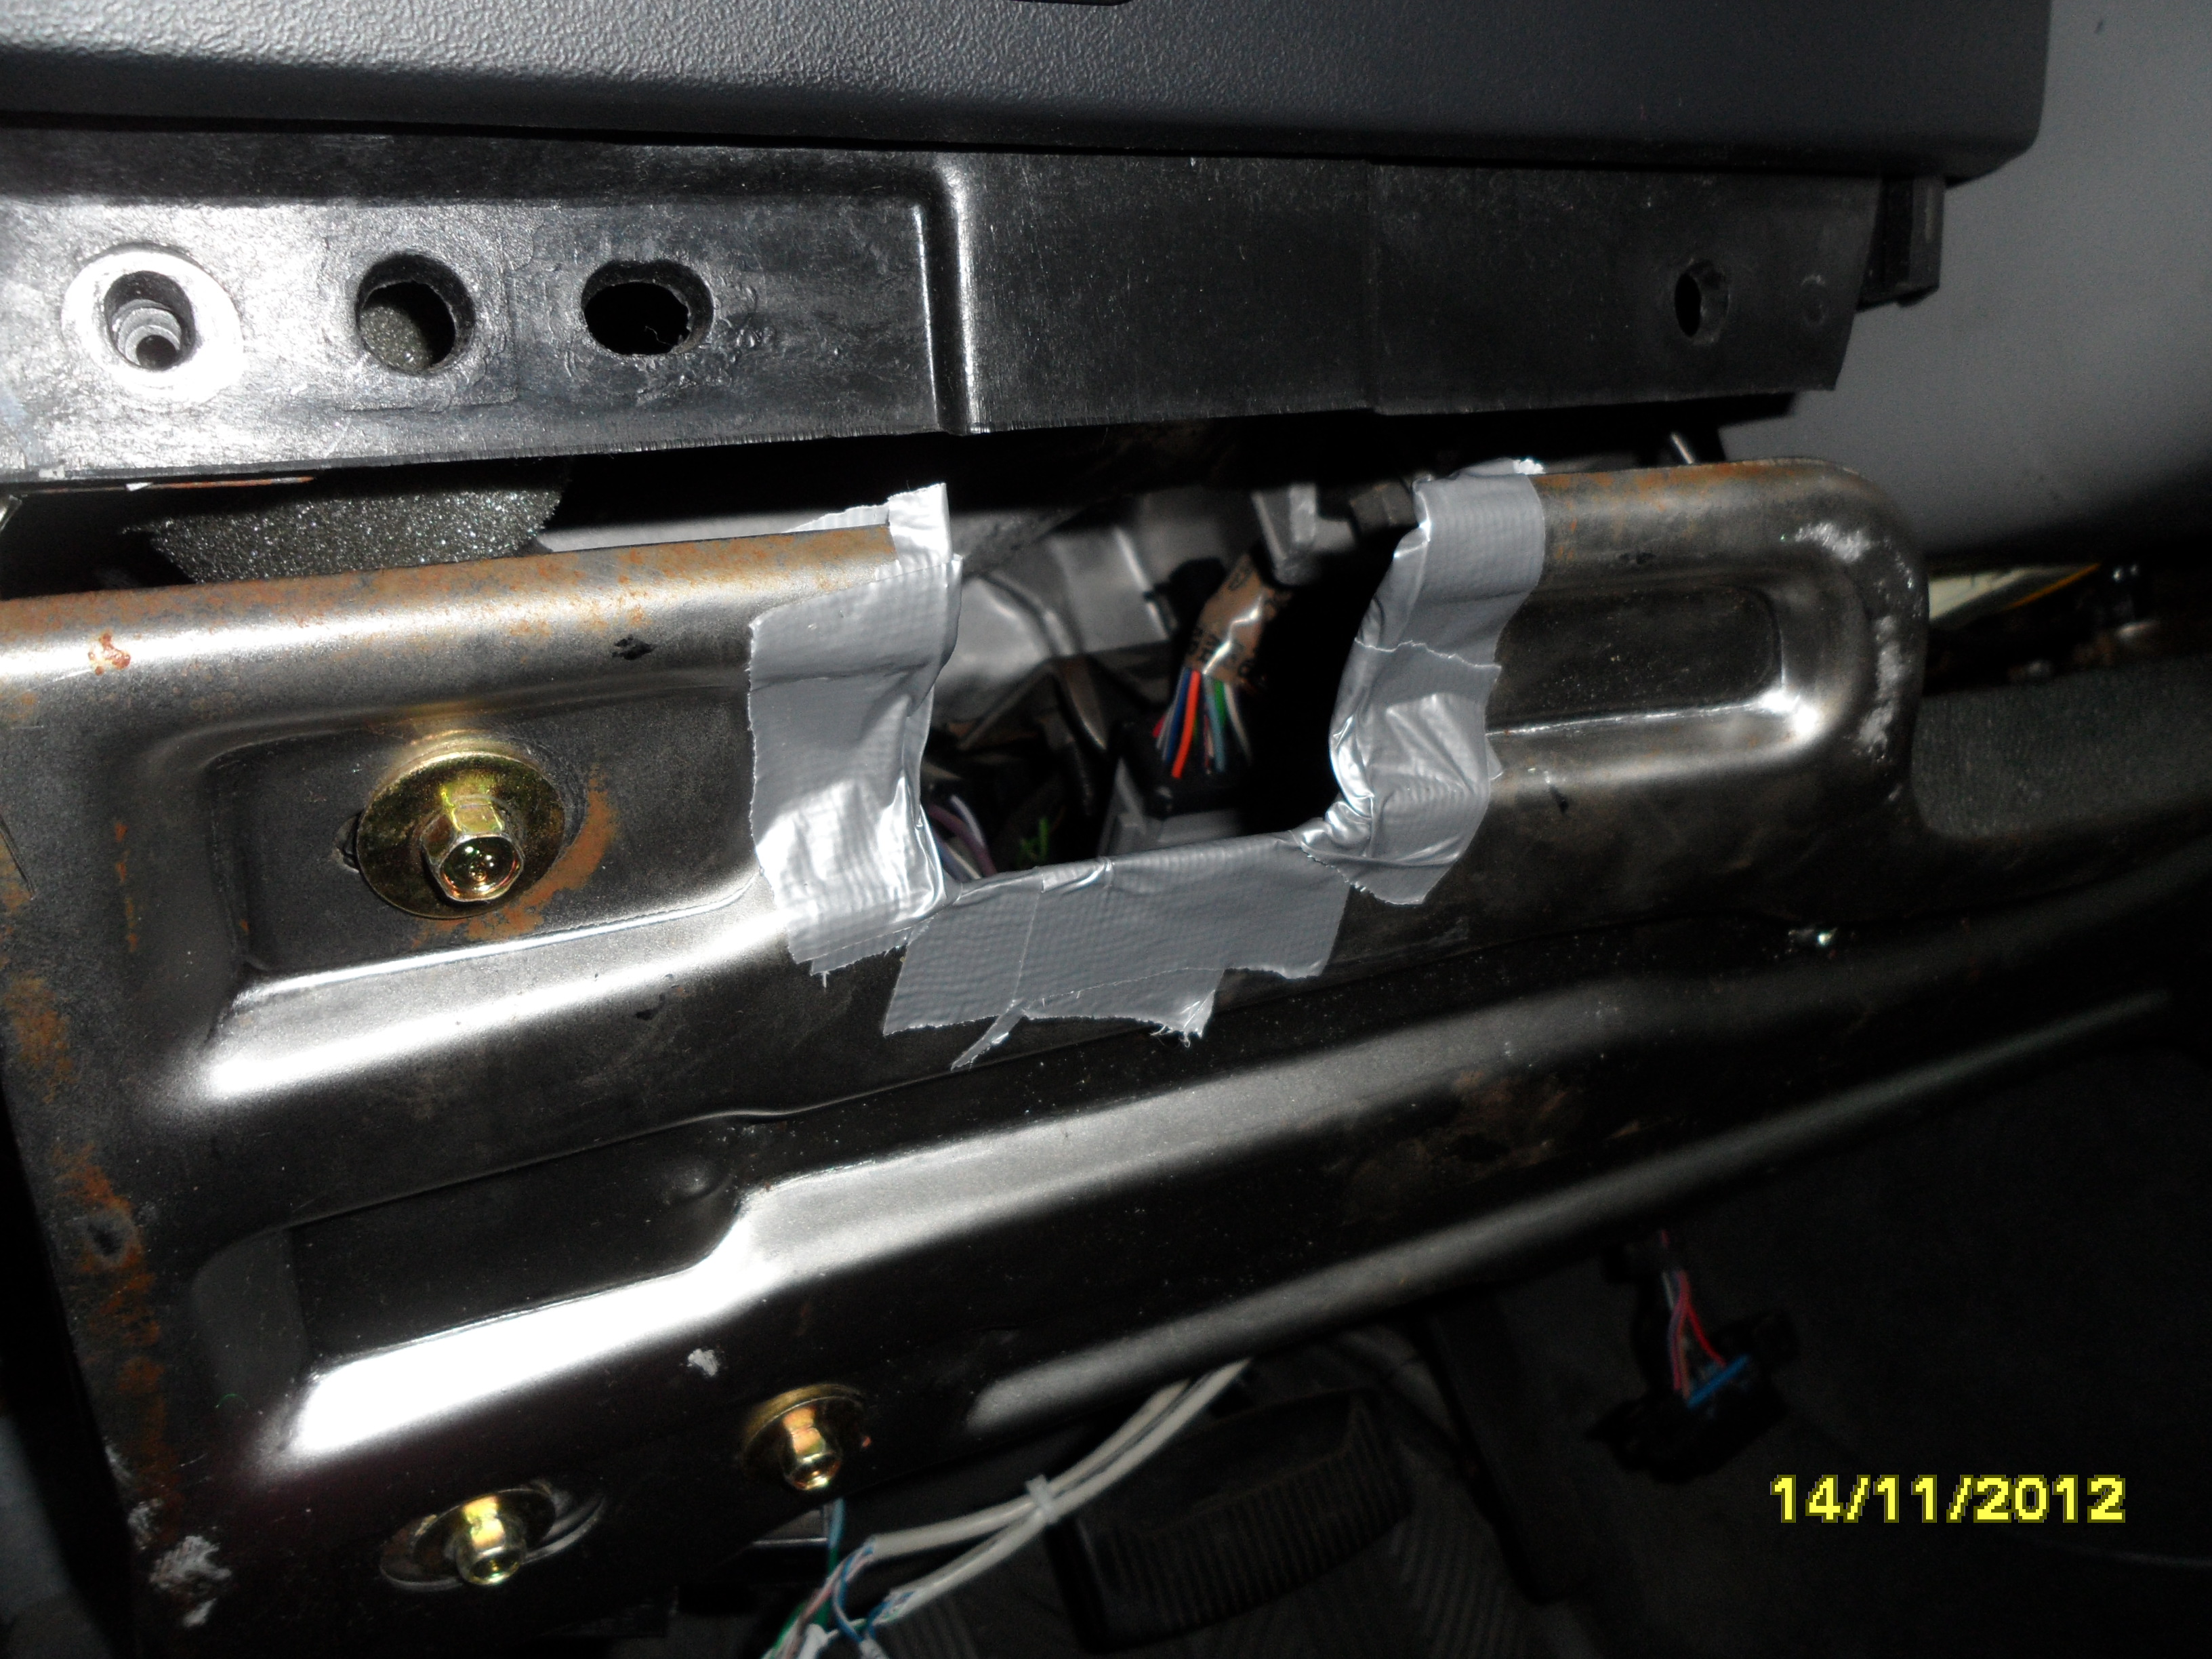
11-14-2012, 10:26 PM
I didn't get everything I'd want in a better-planned and budgeted process, but it's working well enough.
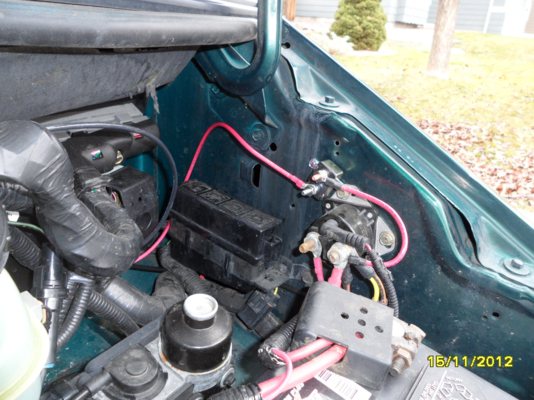
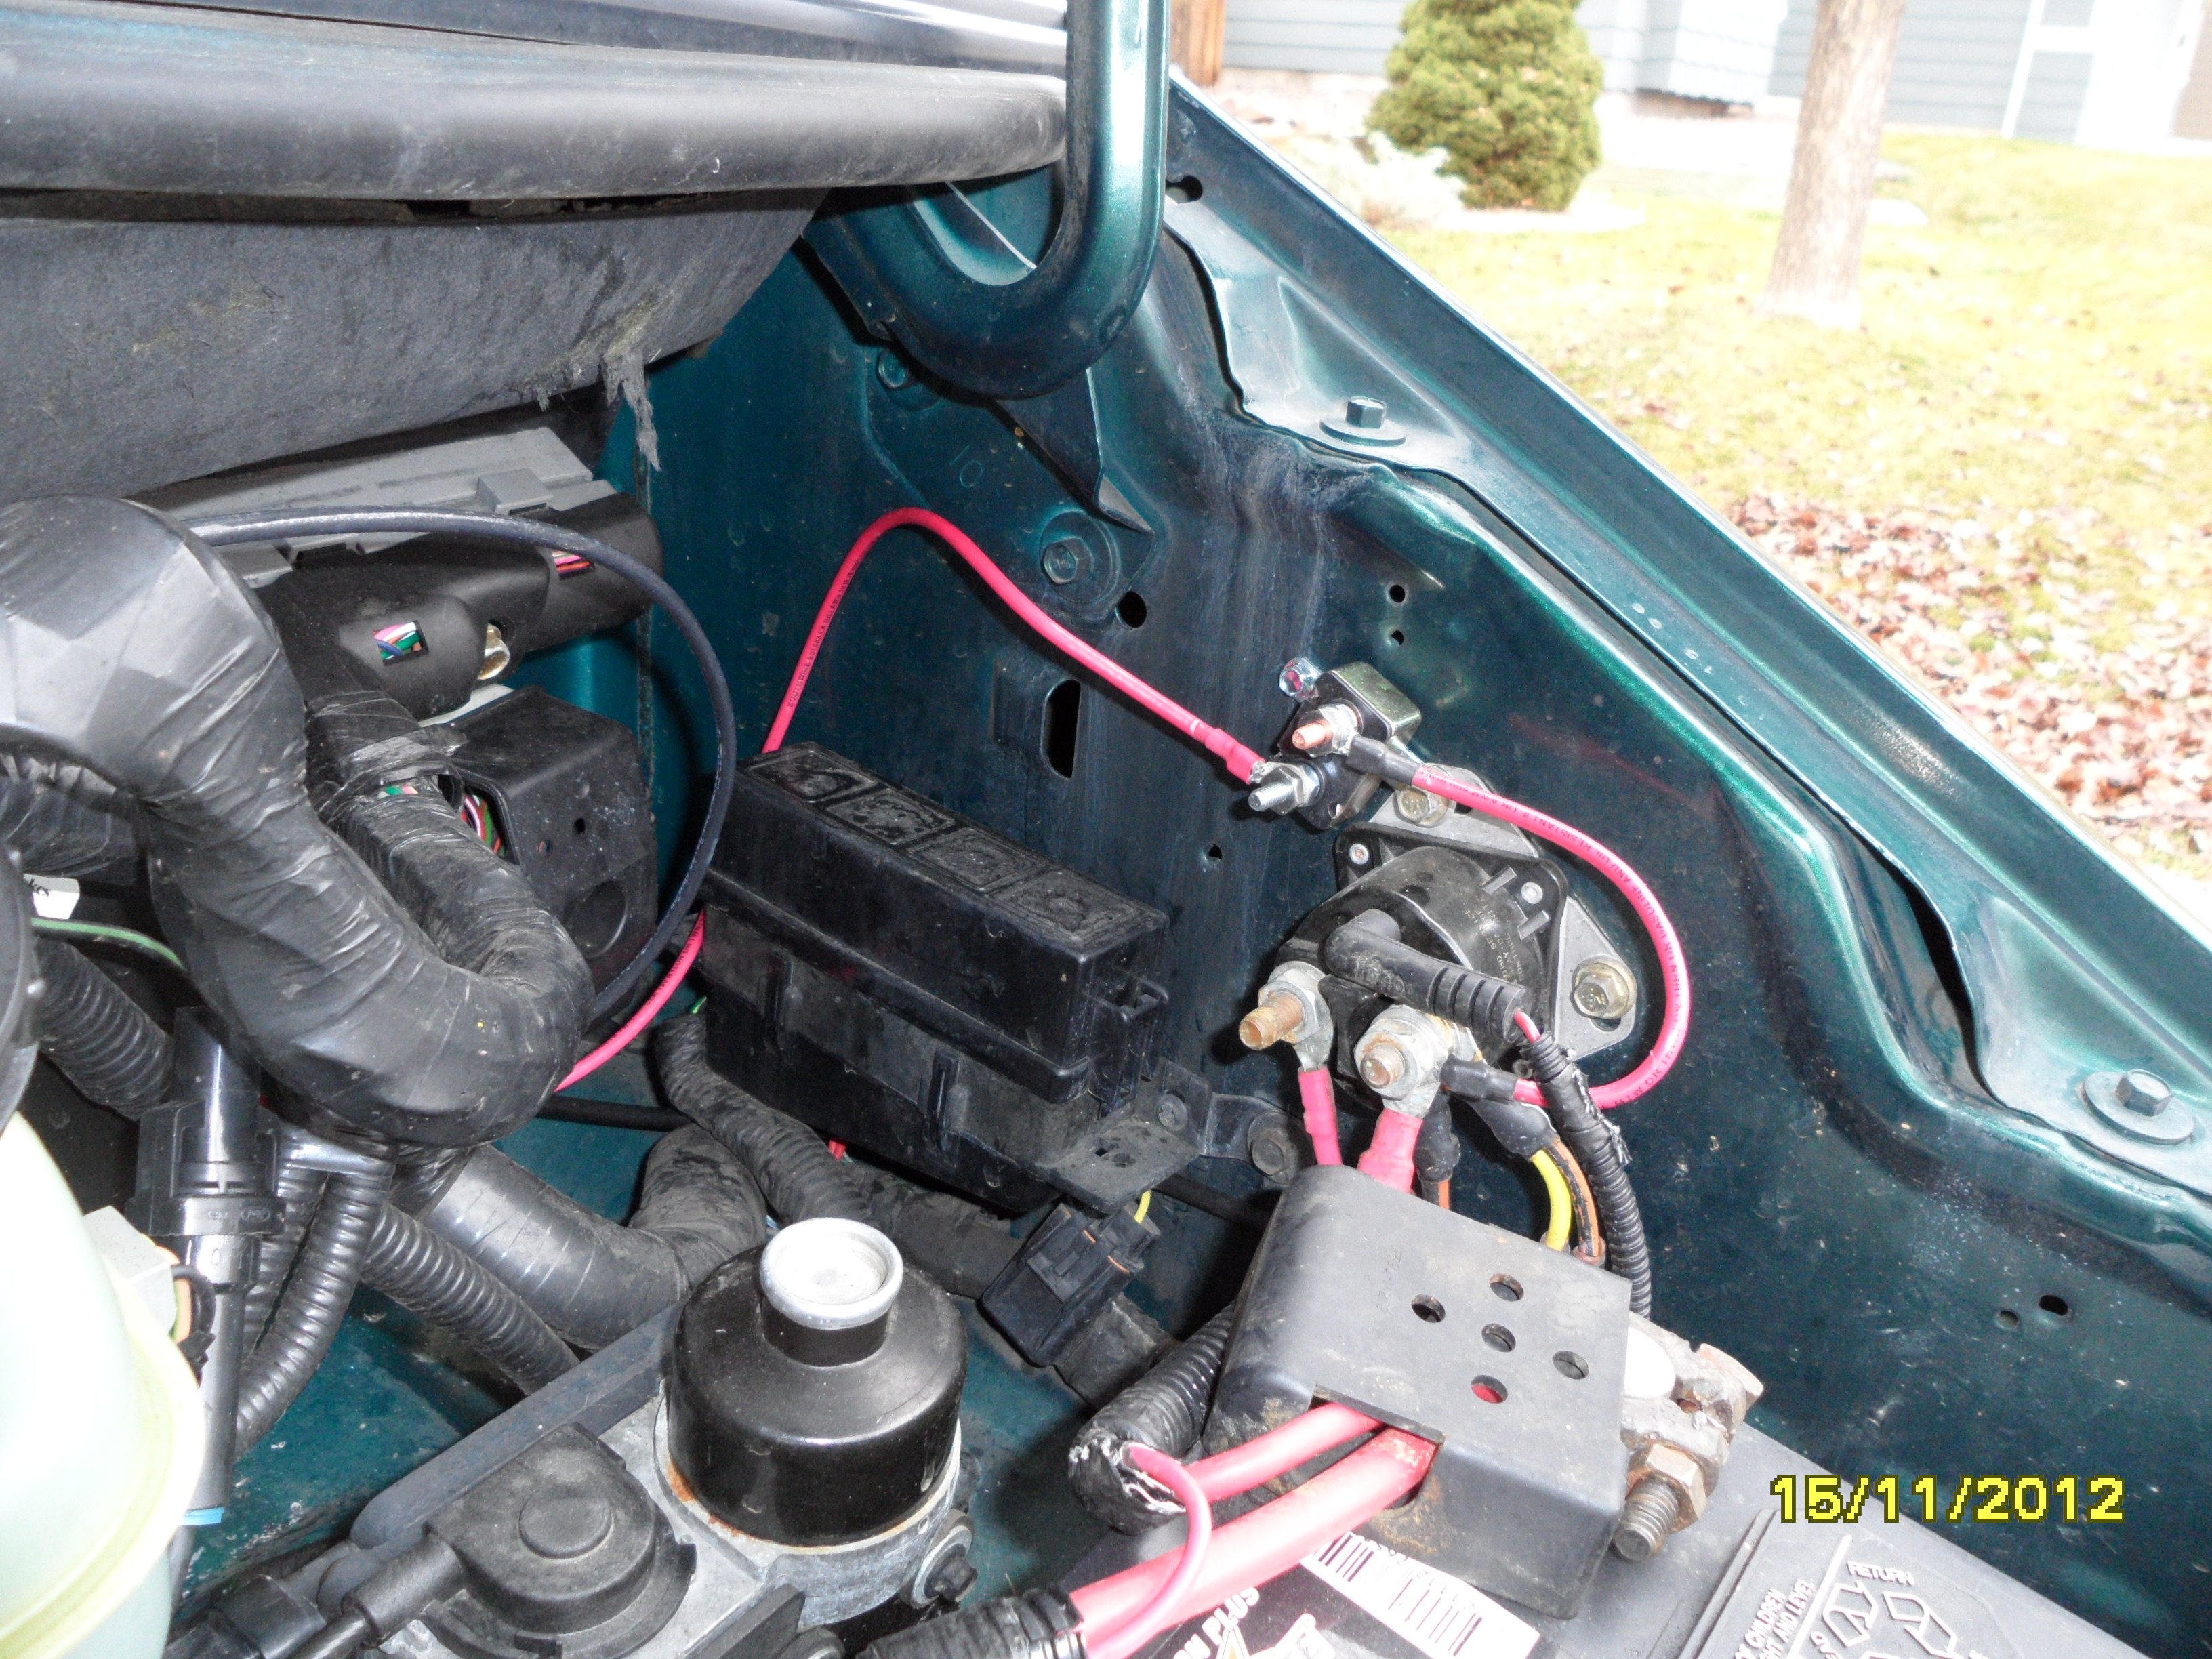
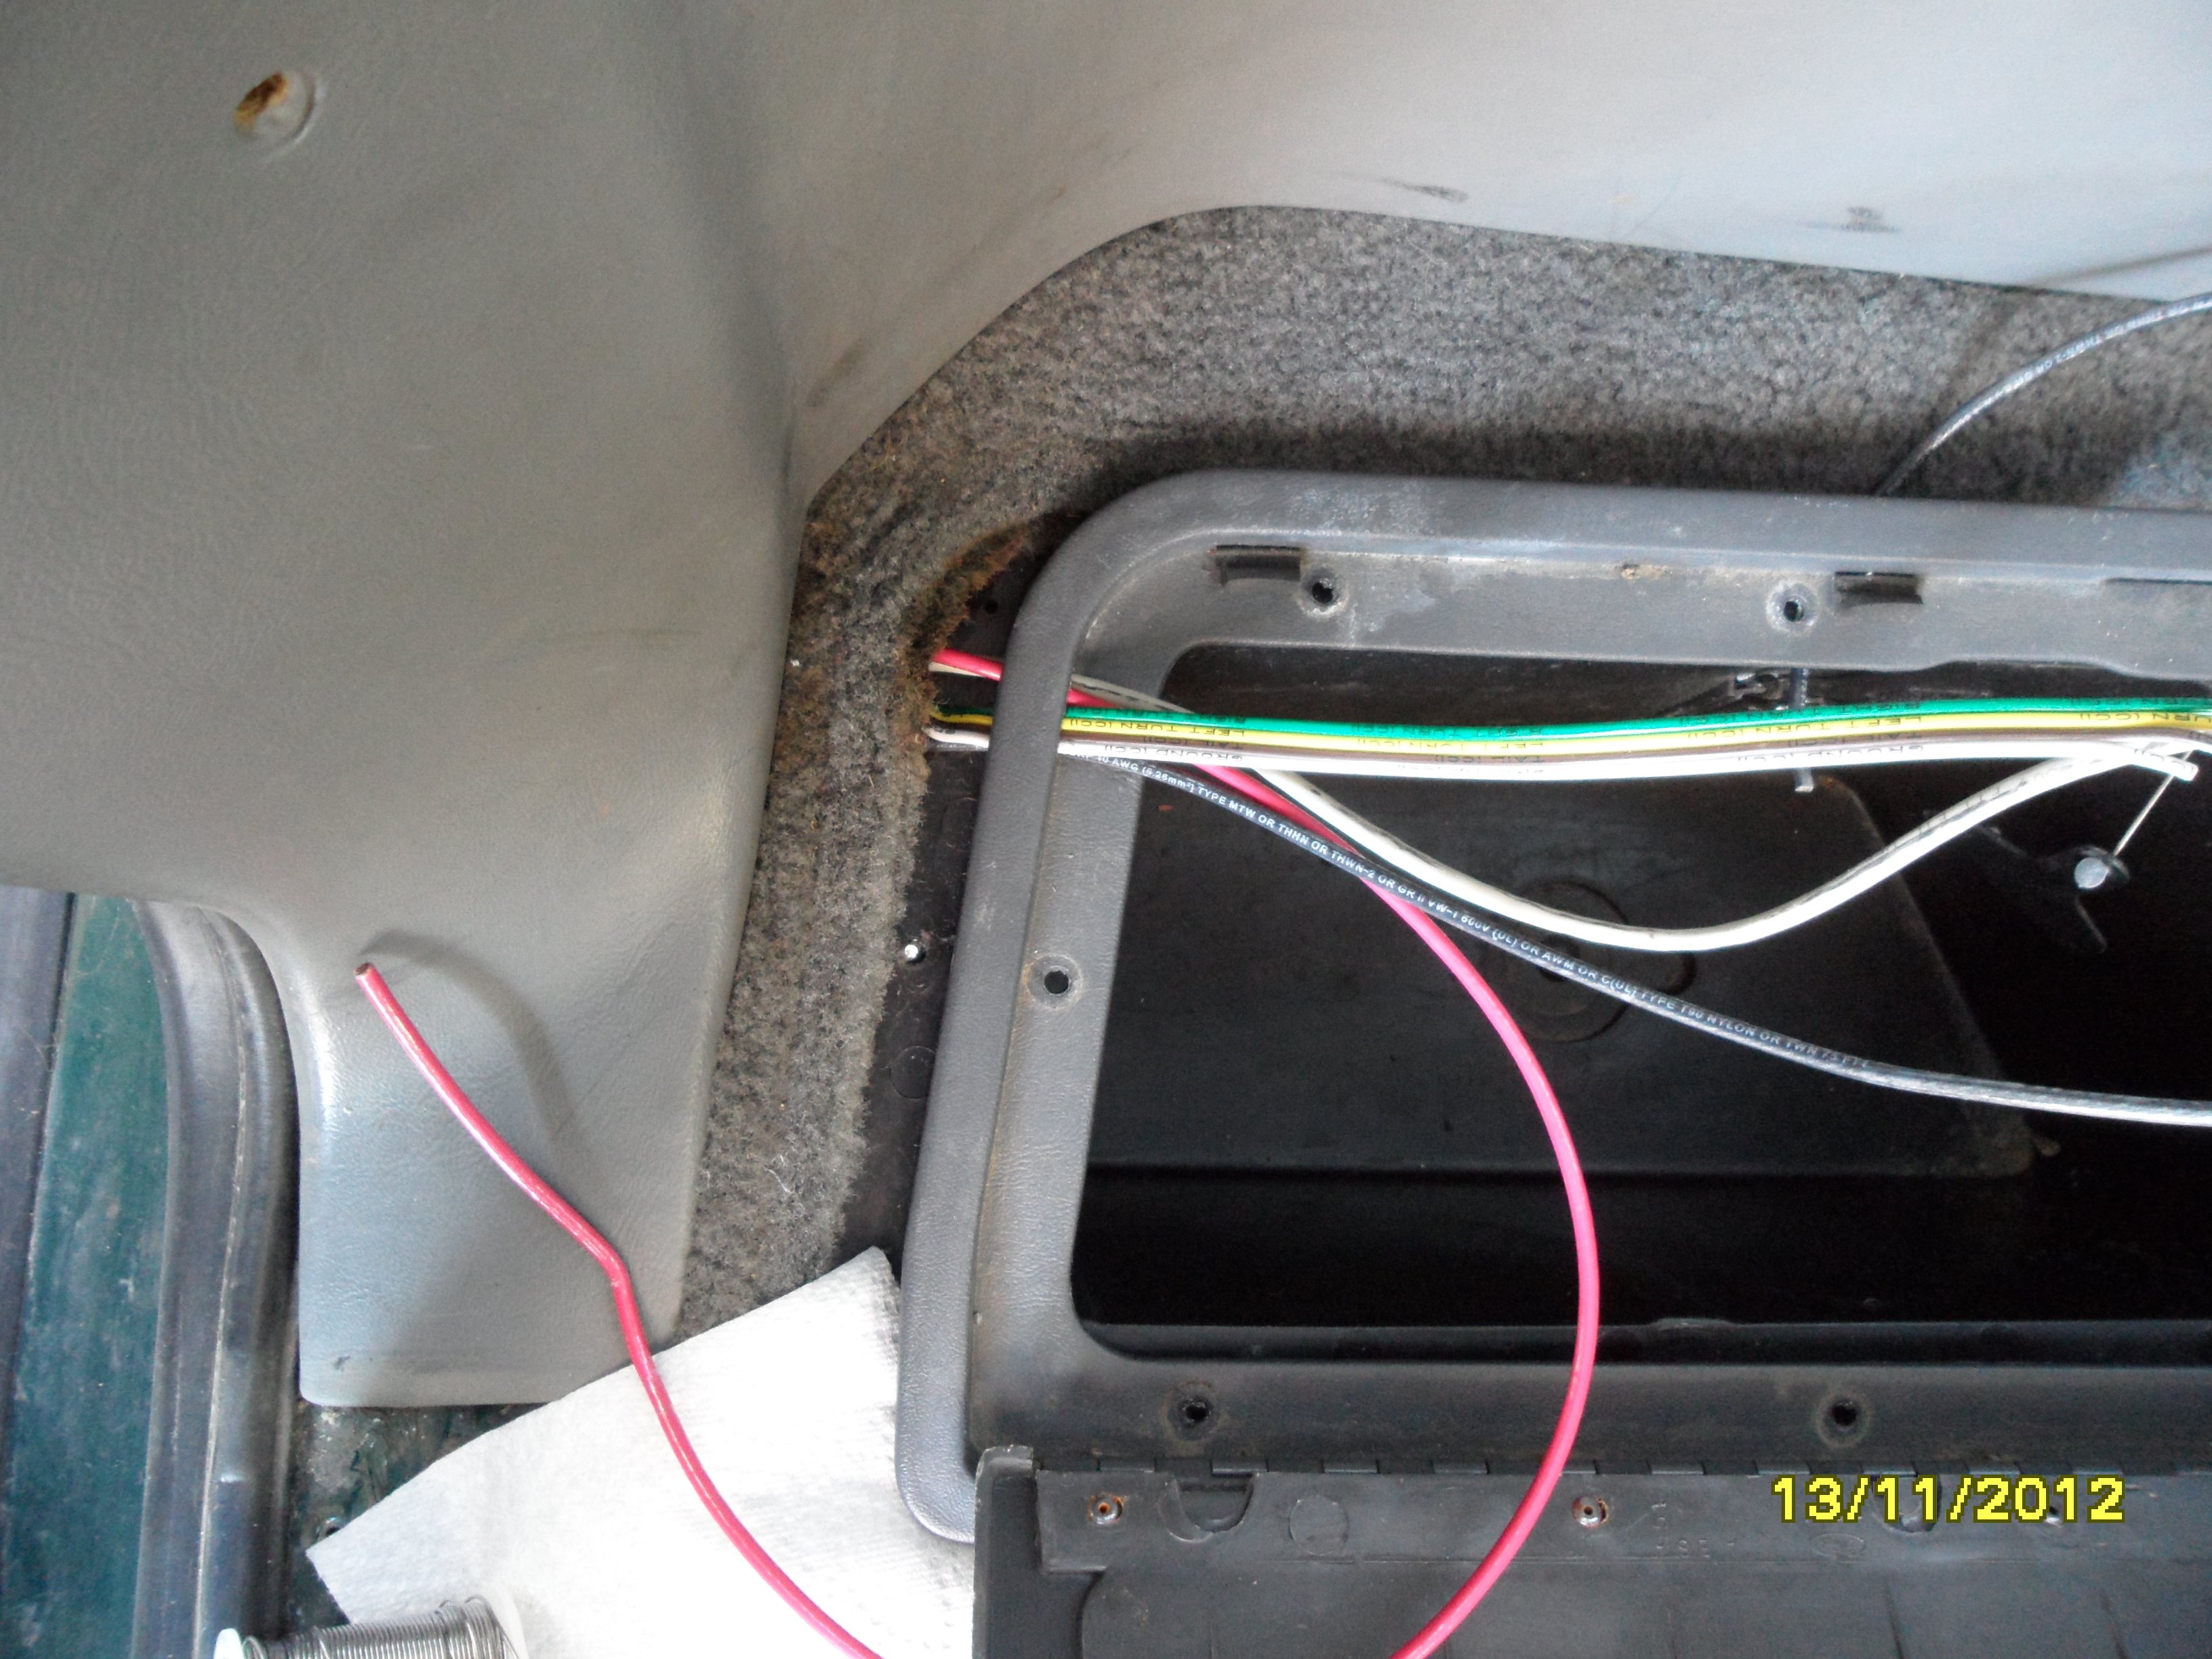
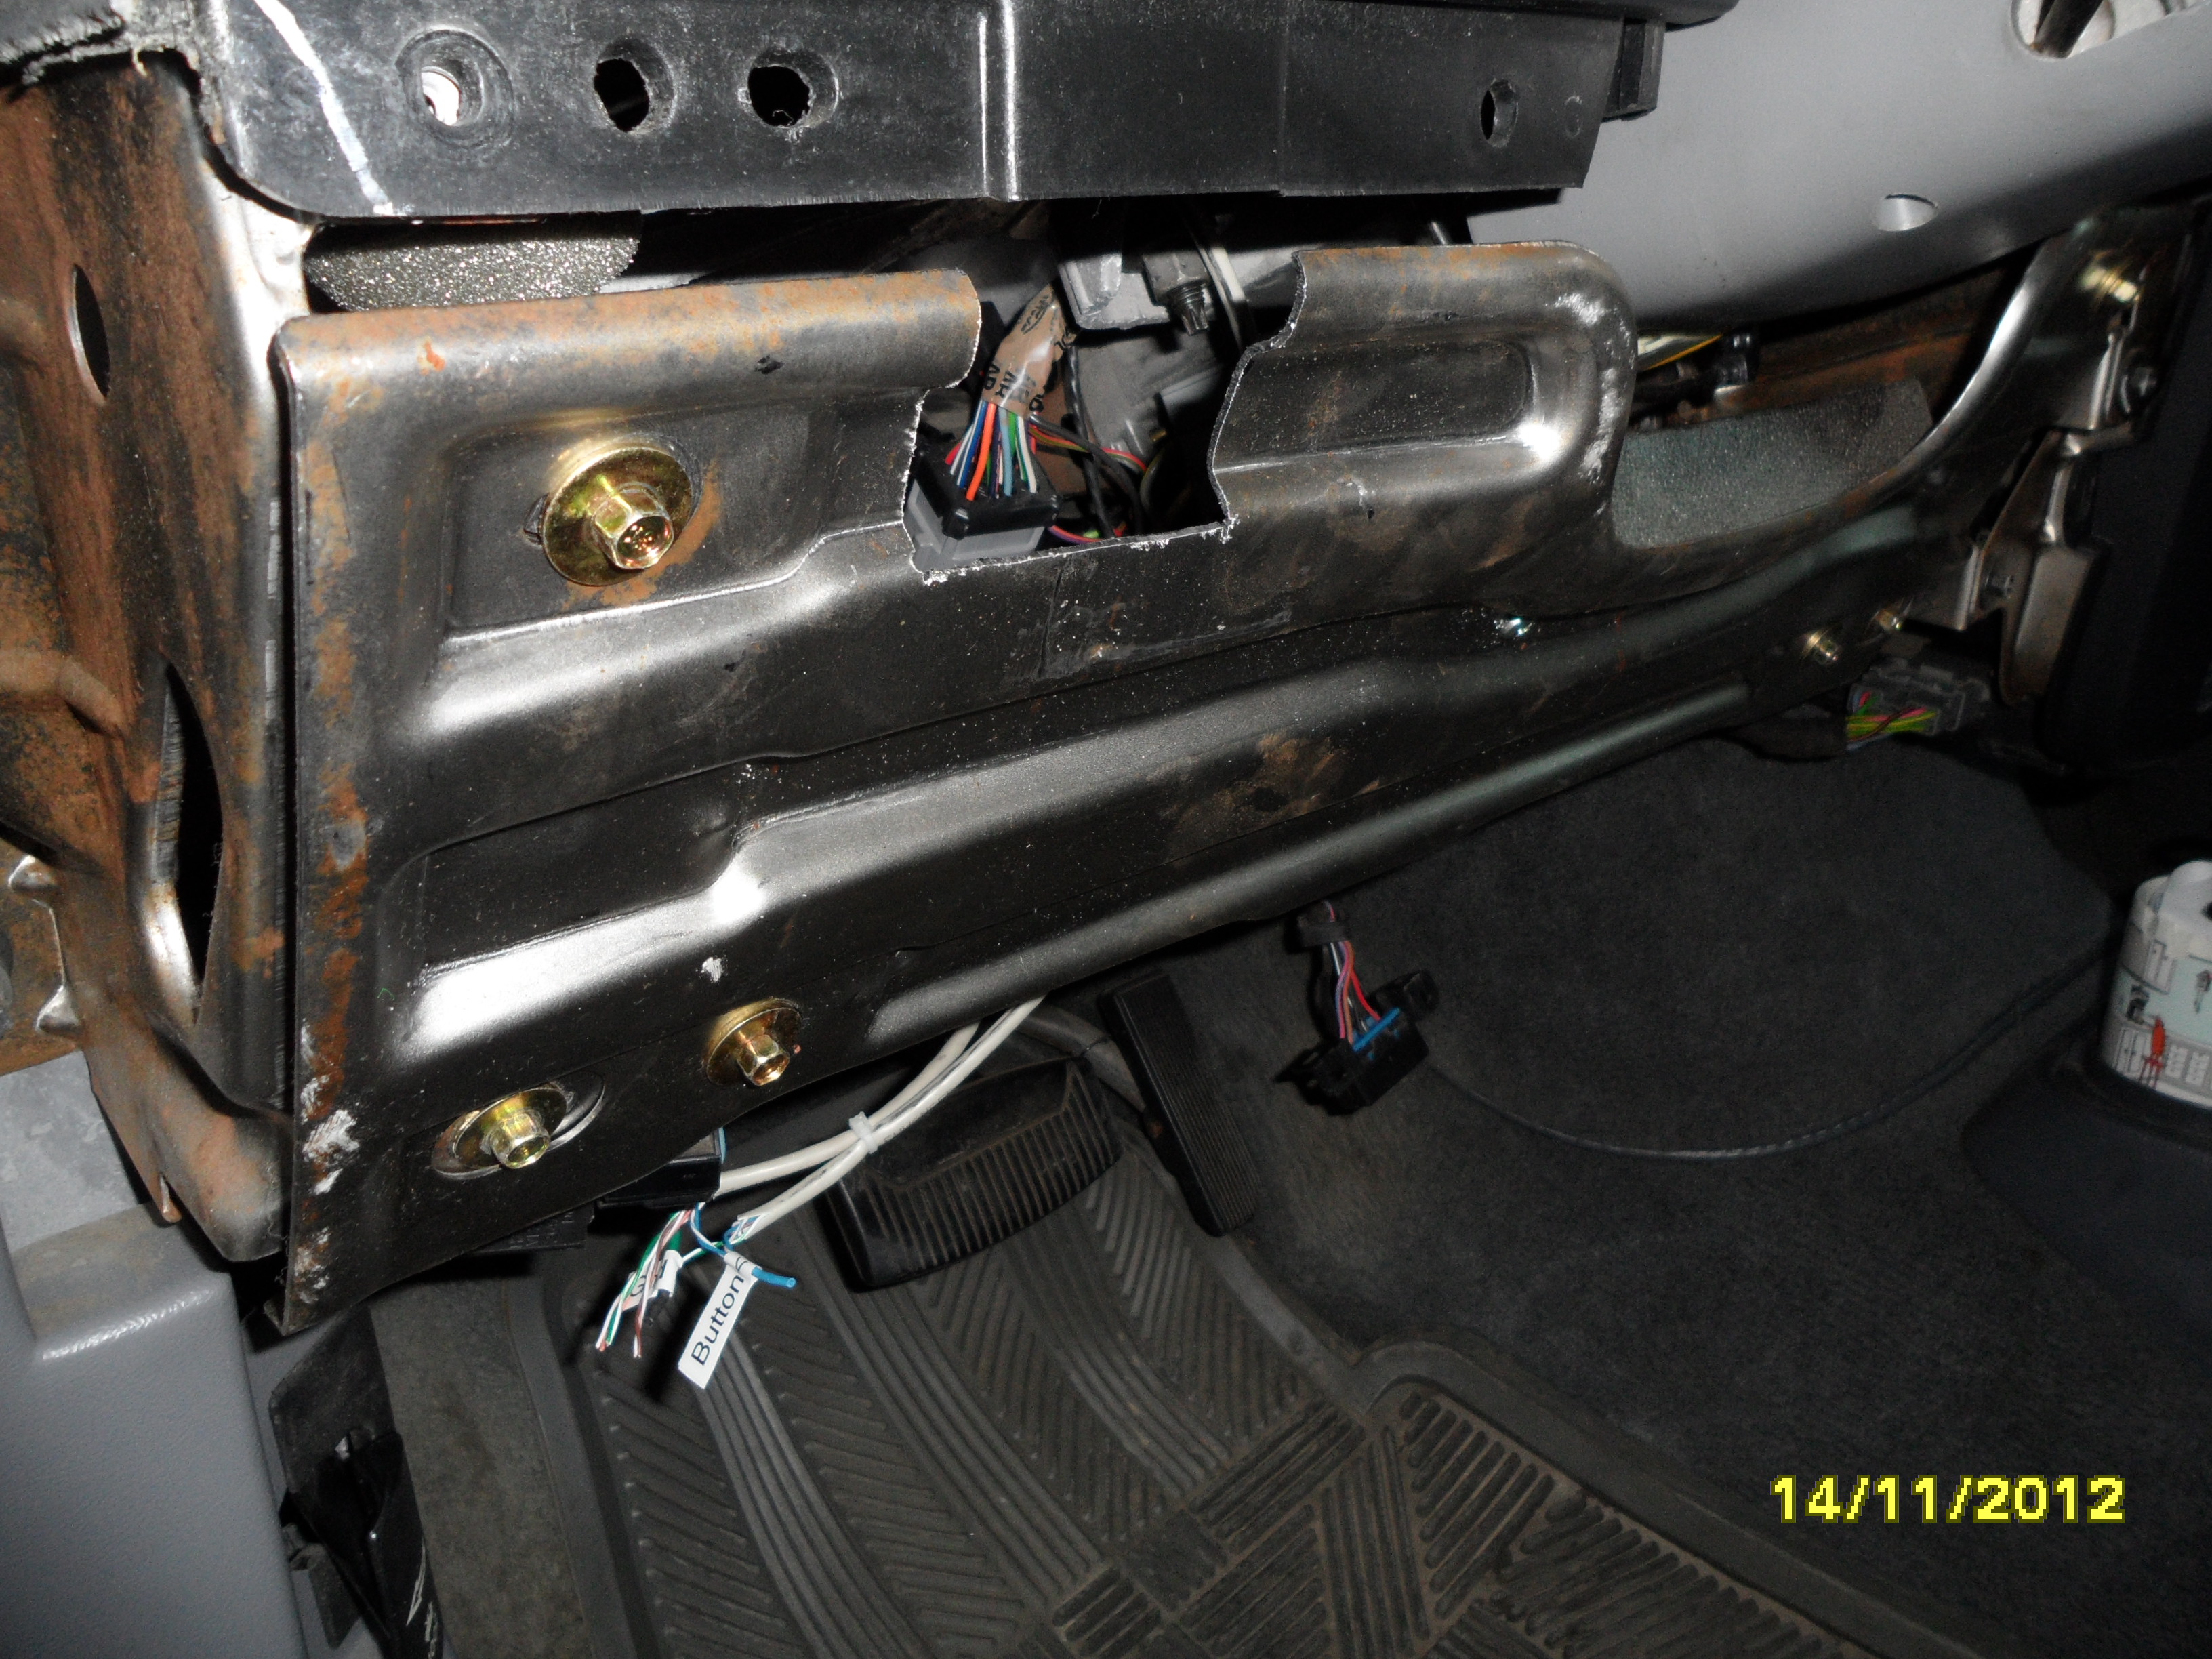
I installed an Balkamp Part No. 782-3001 (NAPA) 50A circuit breaker up at the starter solenoid, and ran neg & pos 10 gauge wiring to the back driver's side stowage compartment. Installed a 40A relay back there. And I ran wires from the there back up to the dash, for the relay trigger switch and pressure transducer wires. Why run a negative lead? Sometimes ground faults can cause the darndest issues, and this compressor tops out at 38A draw. Plus, if I ever add trailer brakes, I'm already set for the harness.
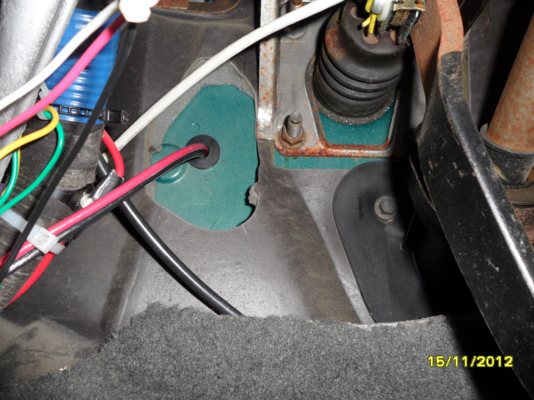
(Hmmm, I'd better go put a dab of RTV on that grommet, now that I think about it.)
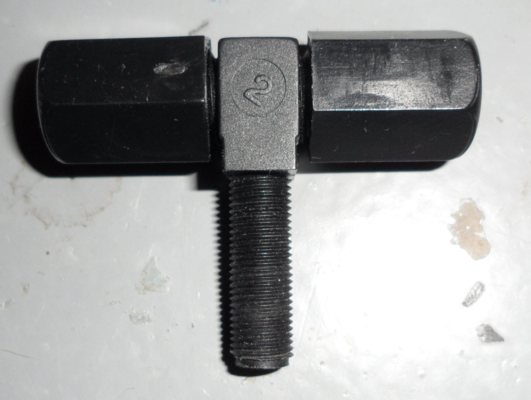
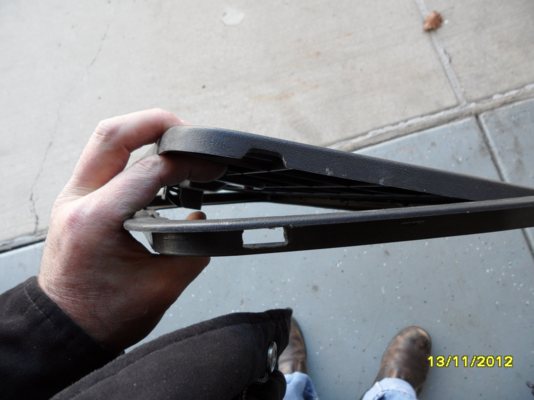
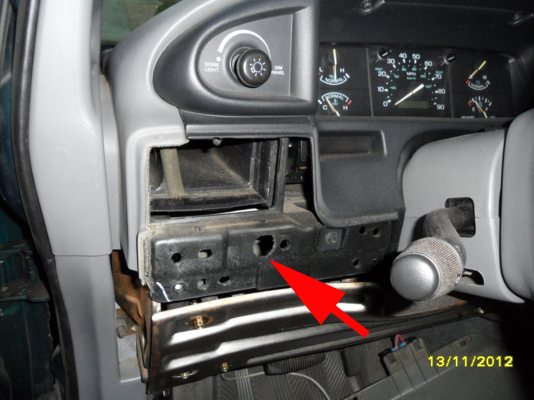
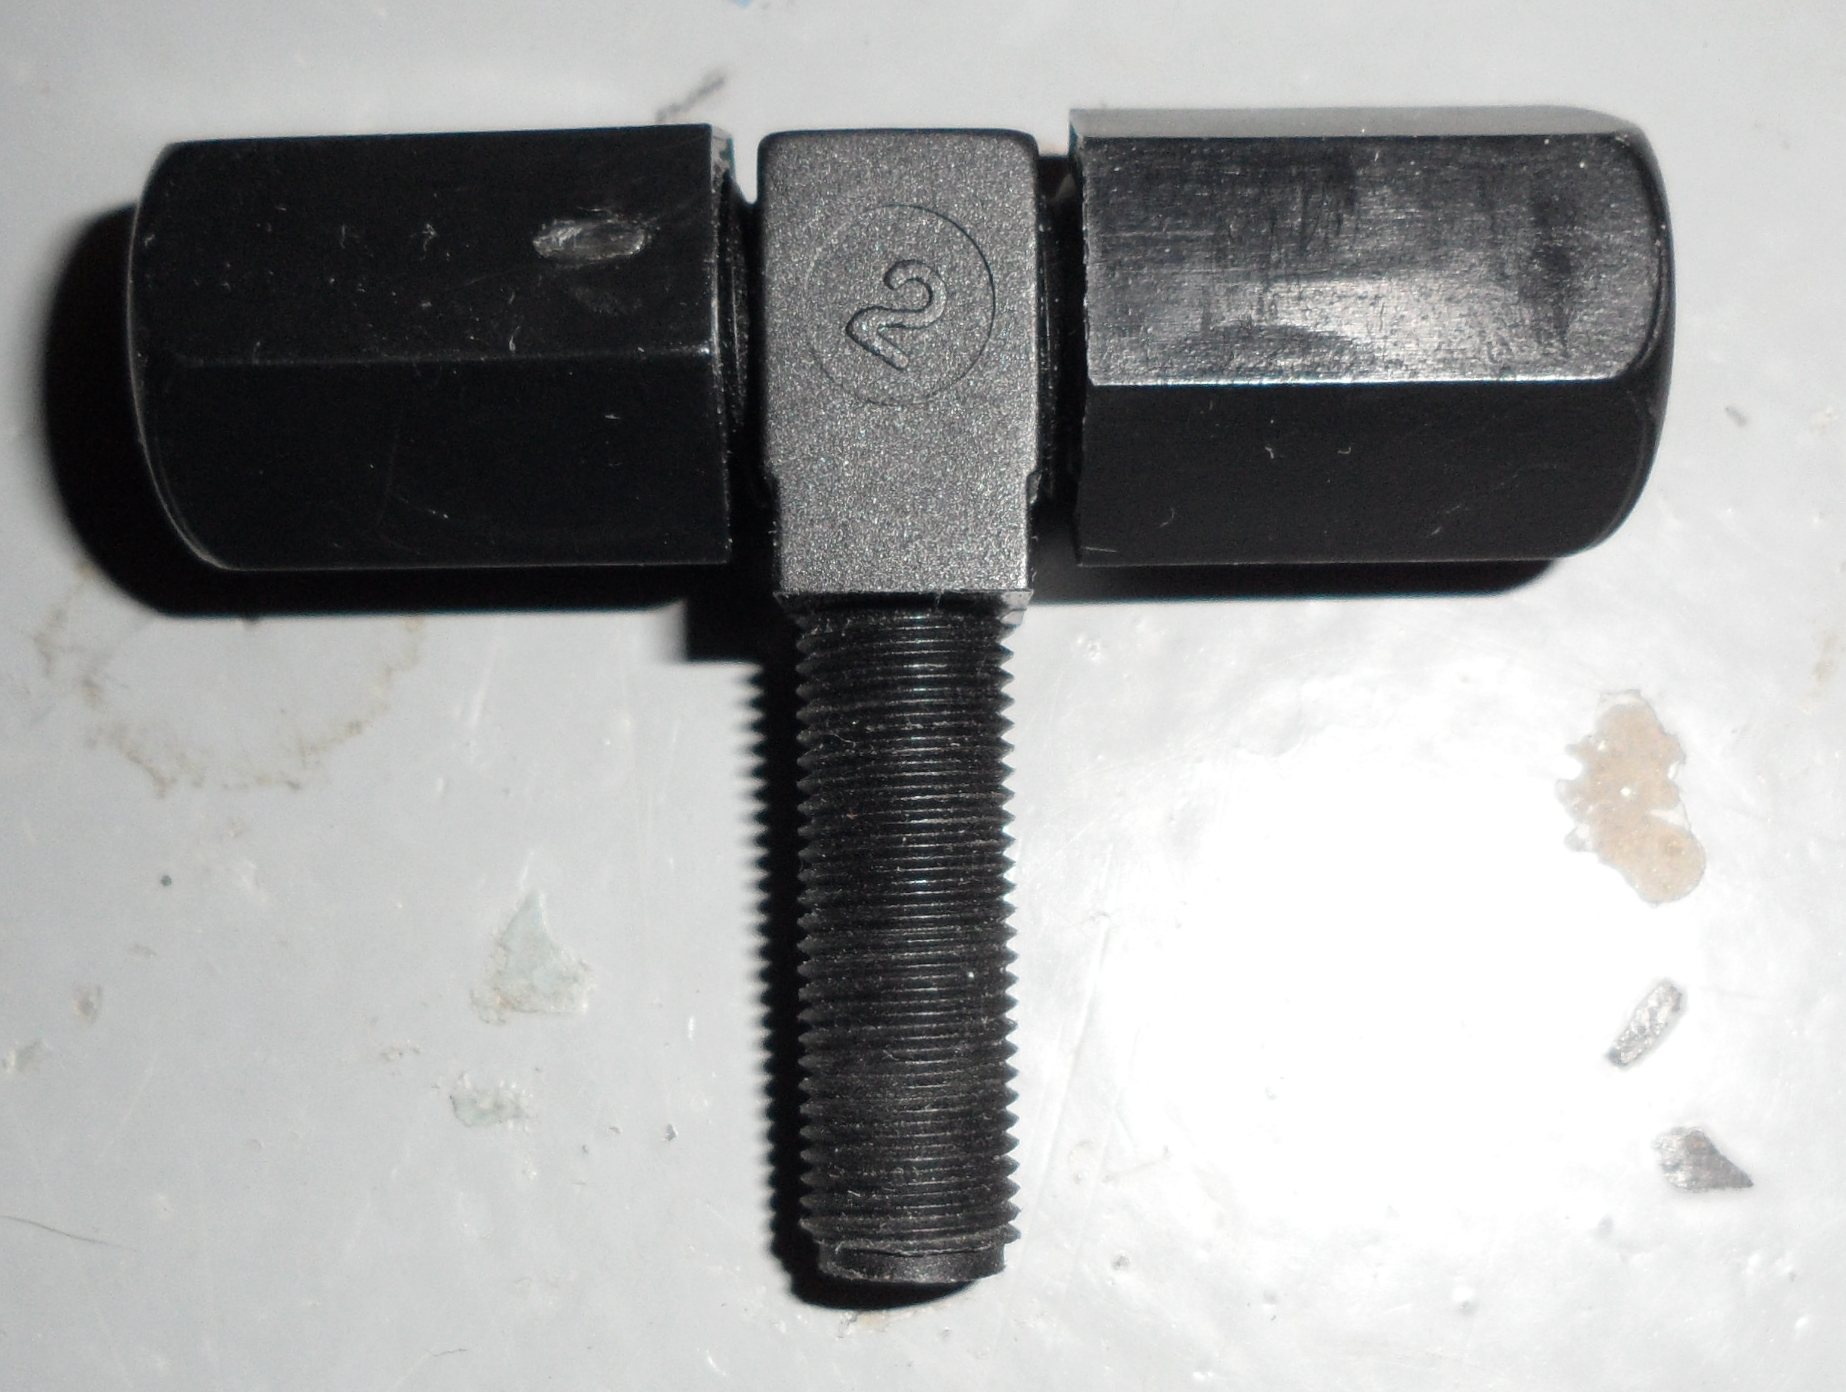
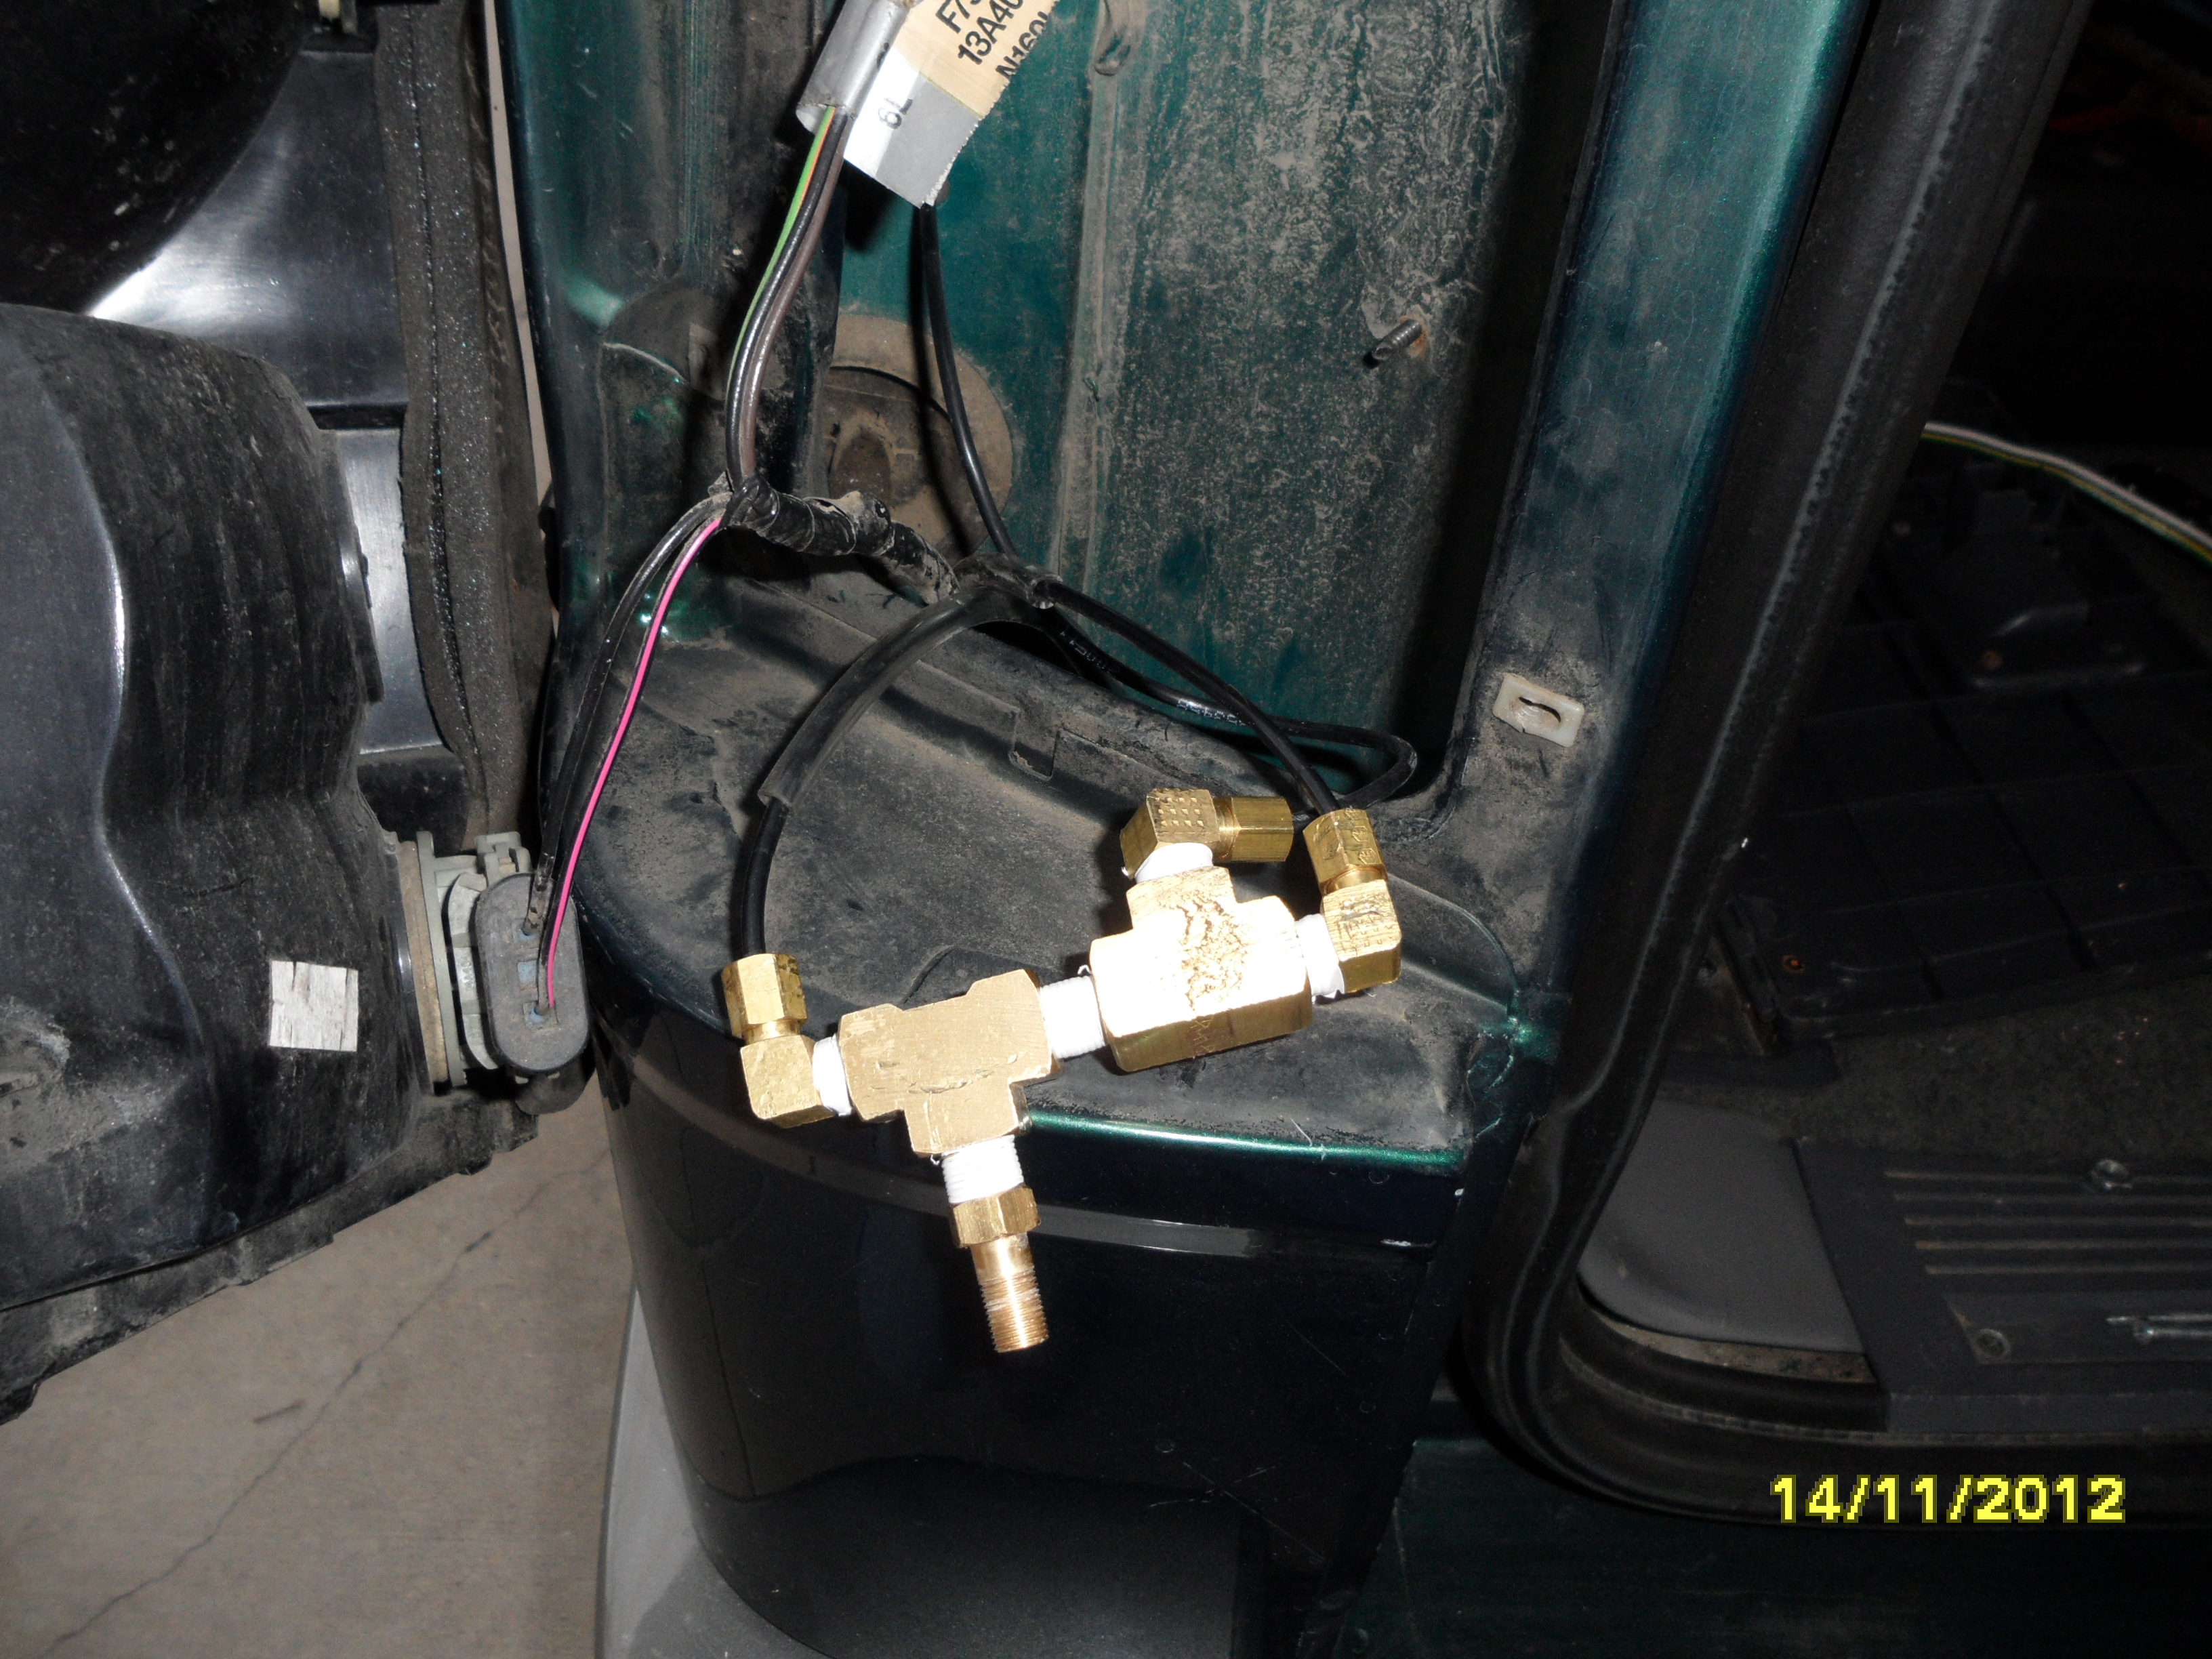
But before all that, I was trying to replace this nylon tee with brass:
(click on any image for larger)
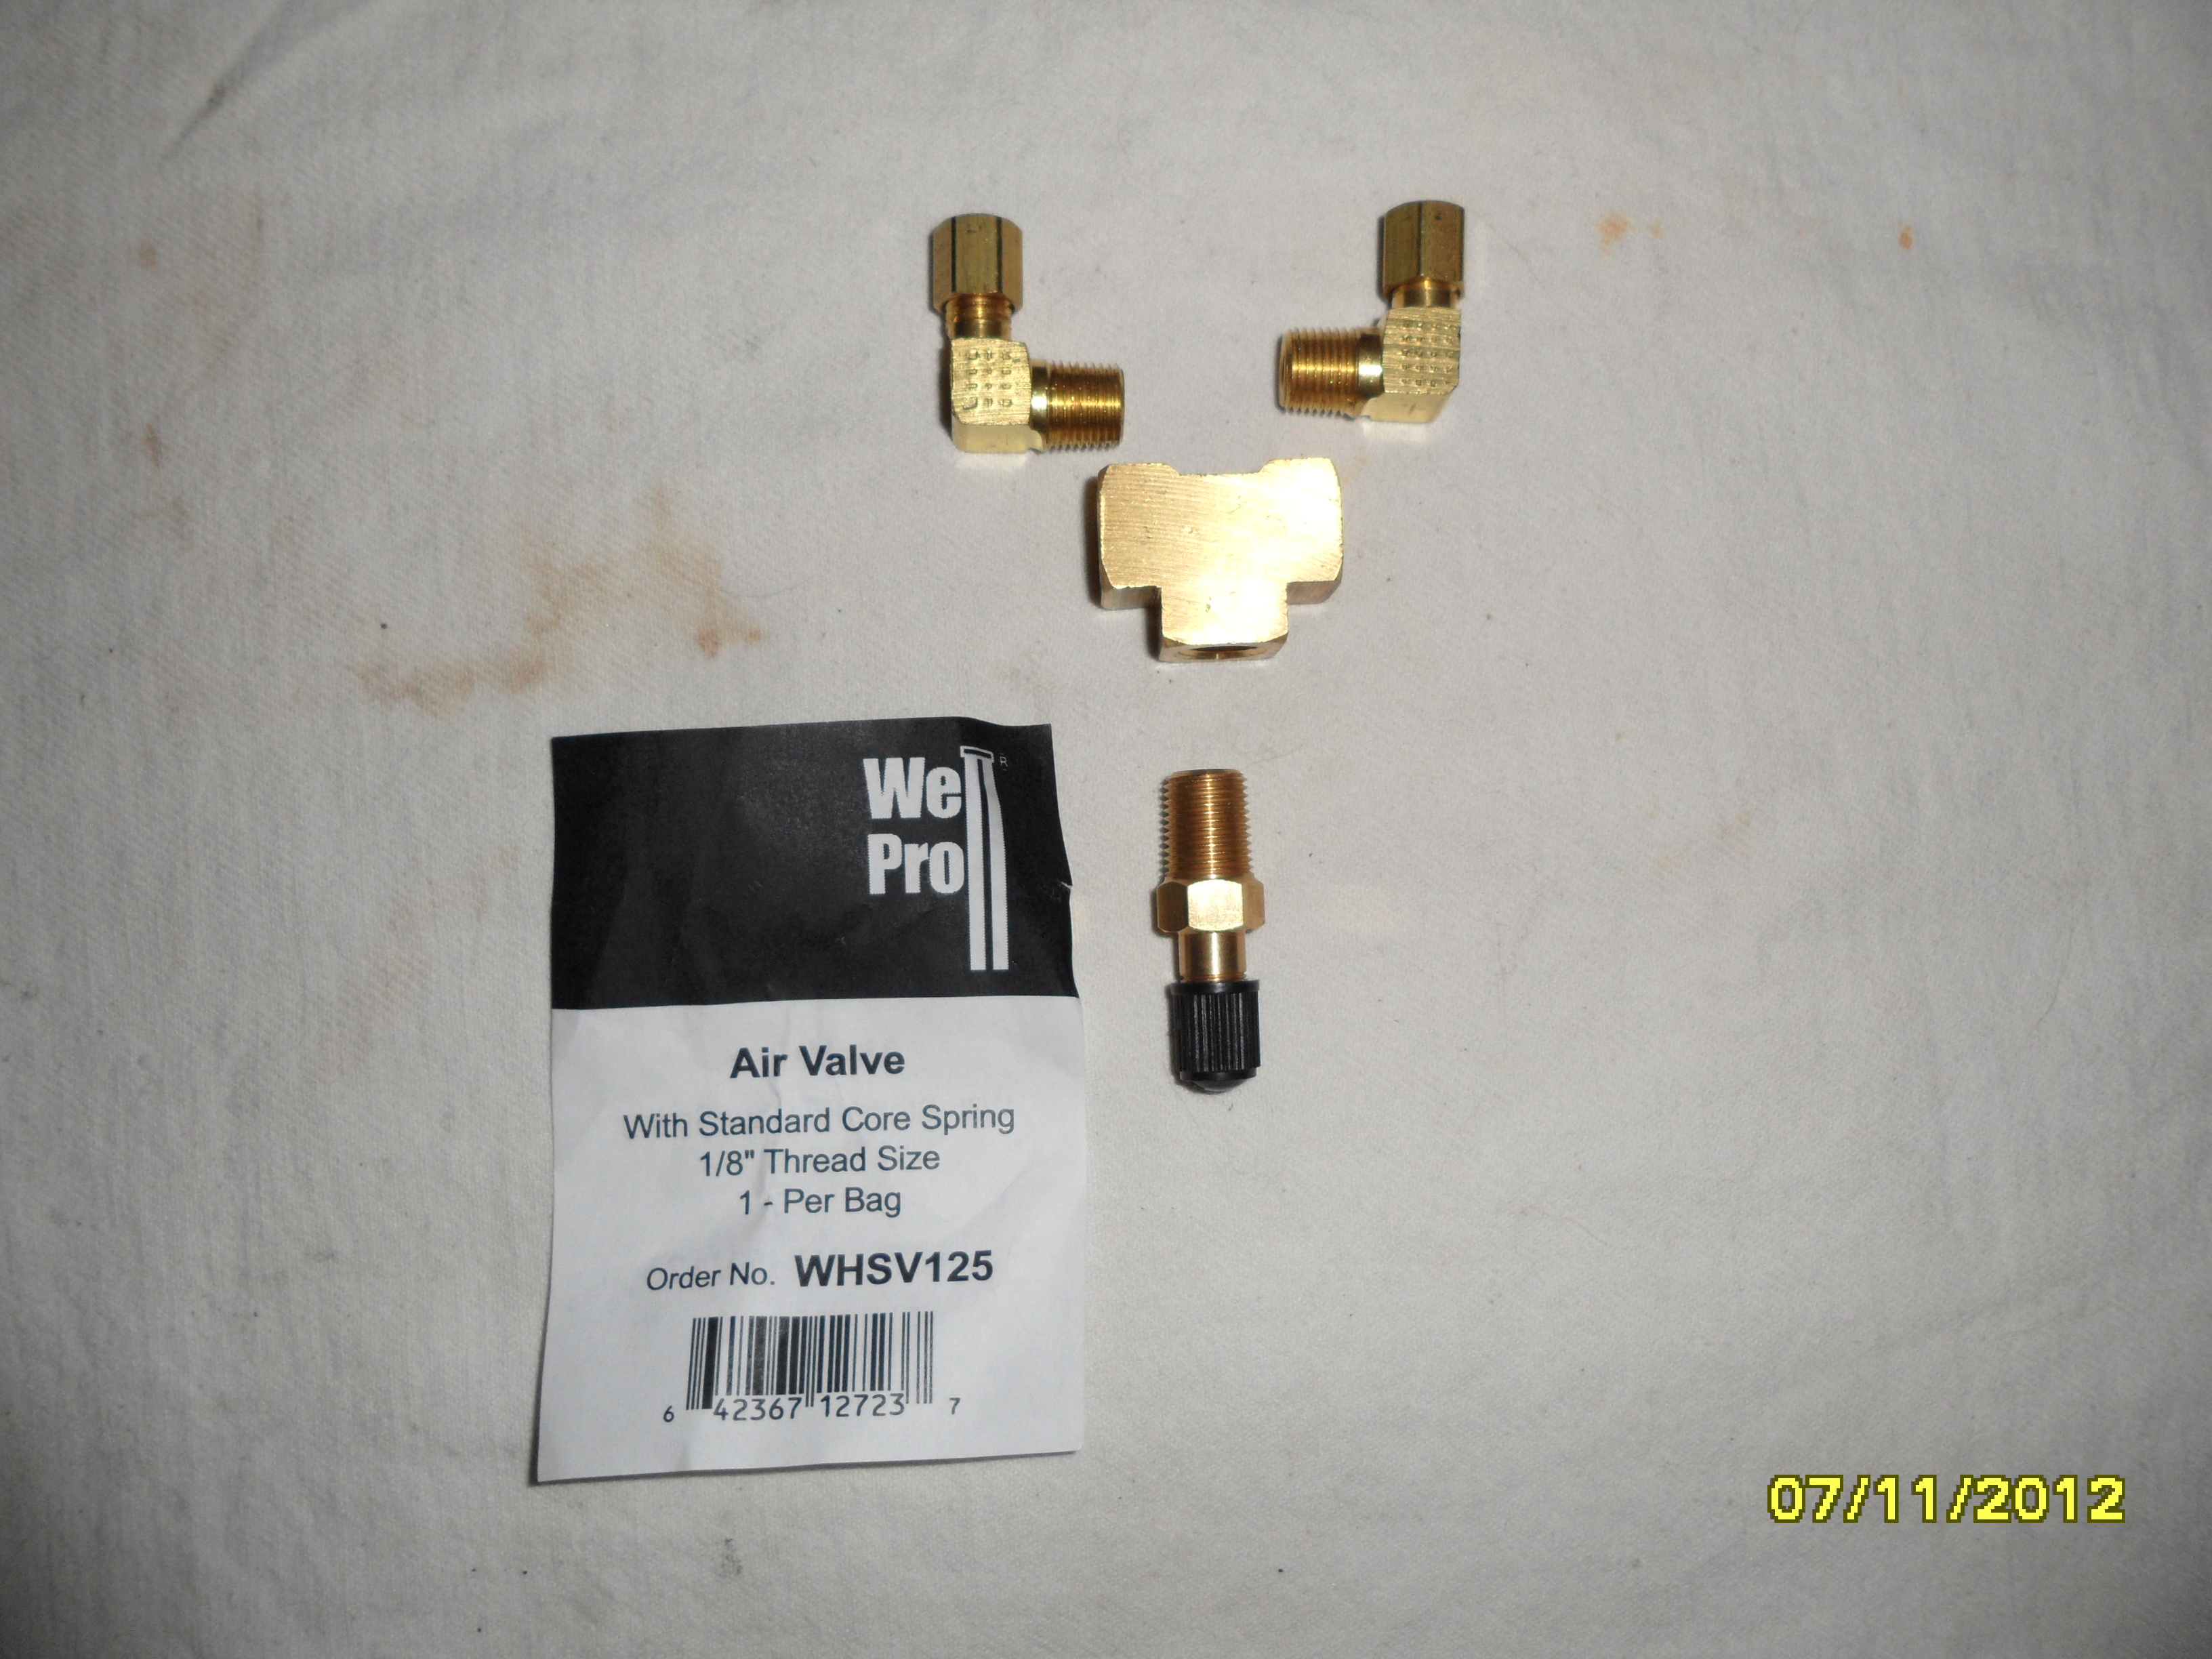
Unfortunately, even with a lot of searching, I've been unable to find a Schrader valve with 1/8" MNPT on one end, and fully-threaded exterior on the other. This was as close as I could do, and it doesn't work well. I need more threads on the valve end; the nut that holds it to the body also prevents most fill chucks from being pushed on it far enough to press the valve's pin. Oh, well. Unless I can find one in brass with fully-threaded valve end, I may just buy a 5/16"-32 ENFT die and extend the threads myself. That's not a die you'll find on the shelf just anywhere!

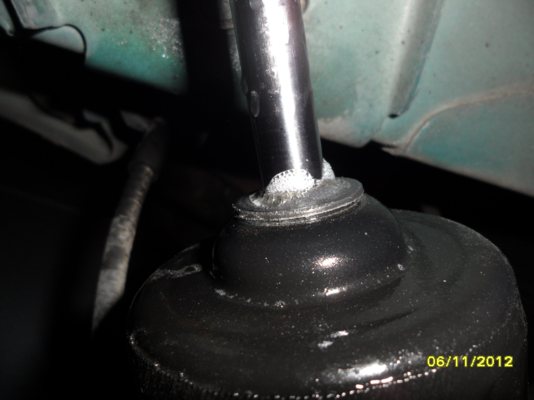
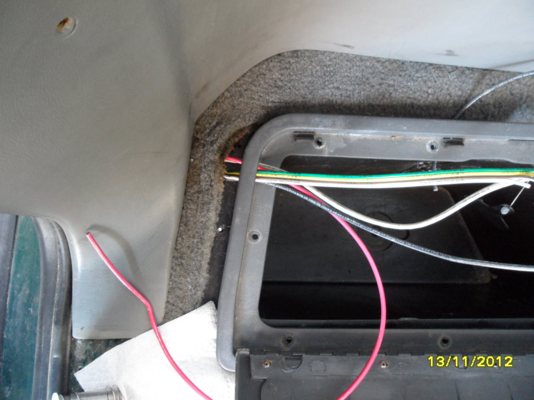
When I decided to go to an onboard compressor, this had to expand for the extra line to the compressor. A lot of messy brass here.

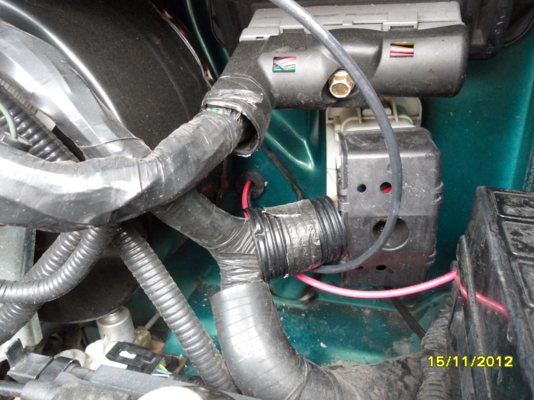
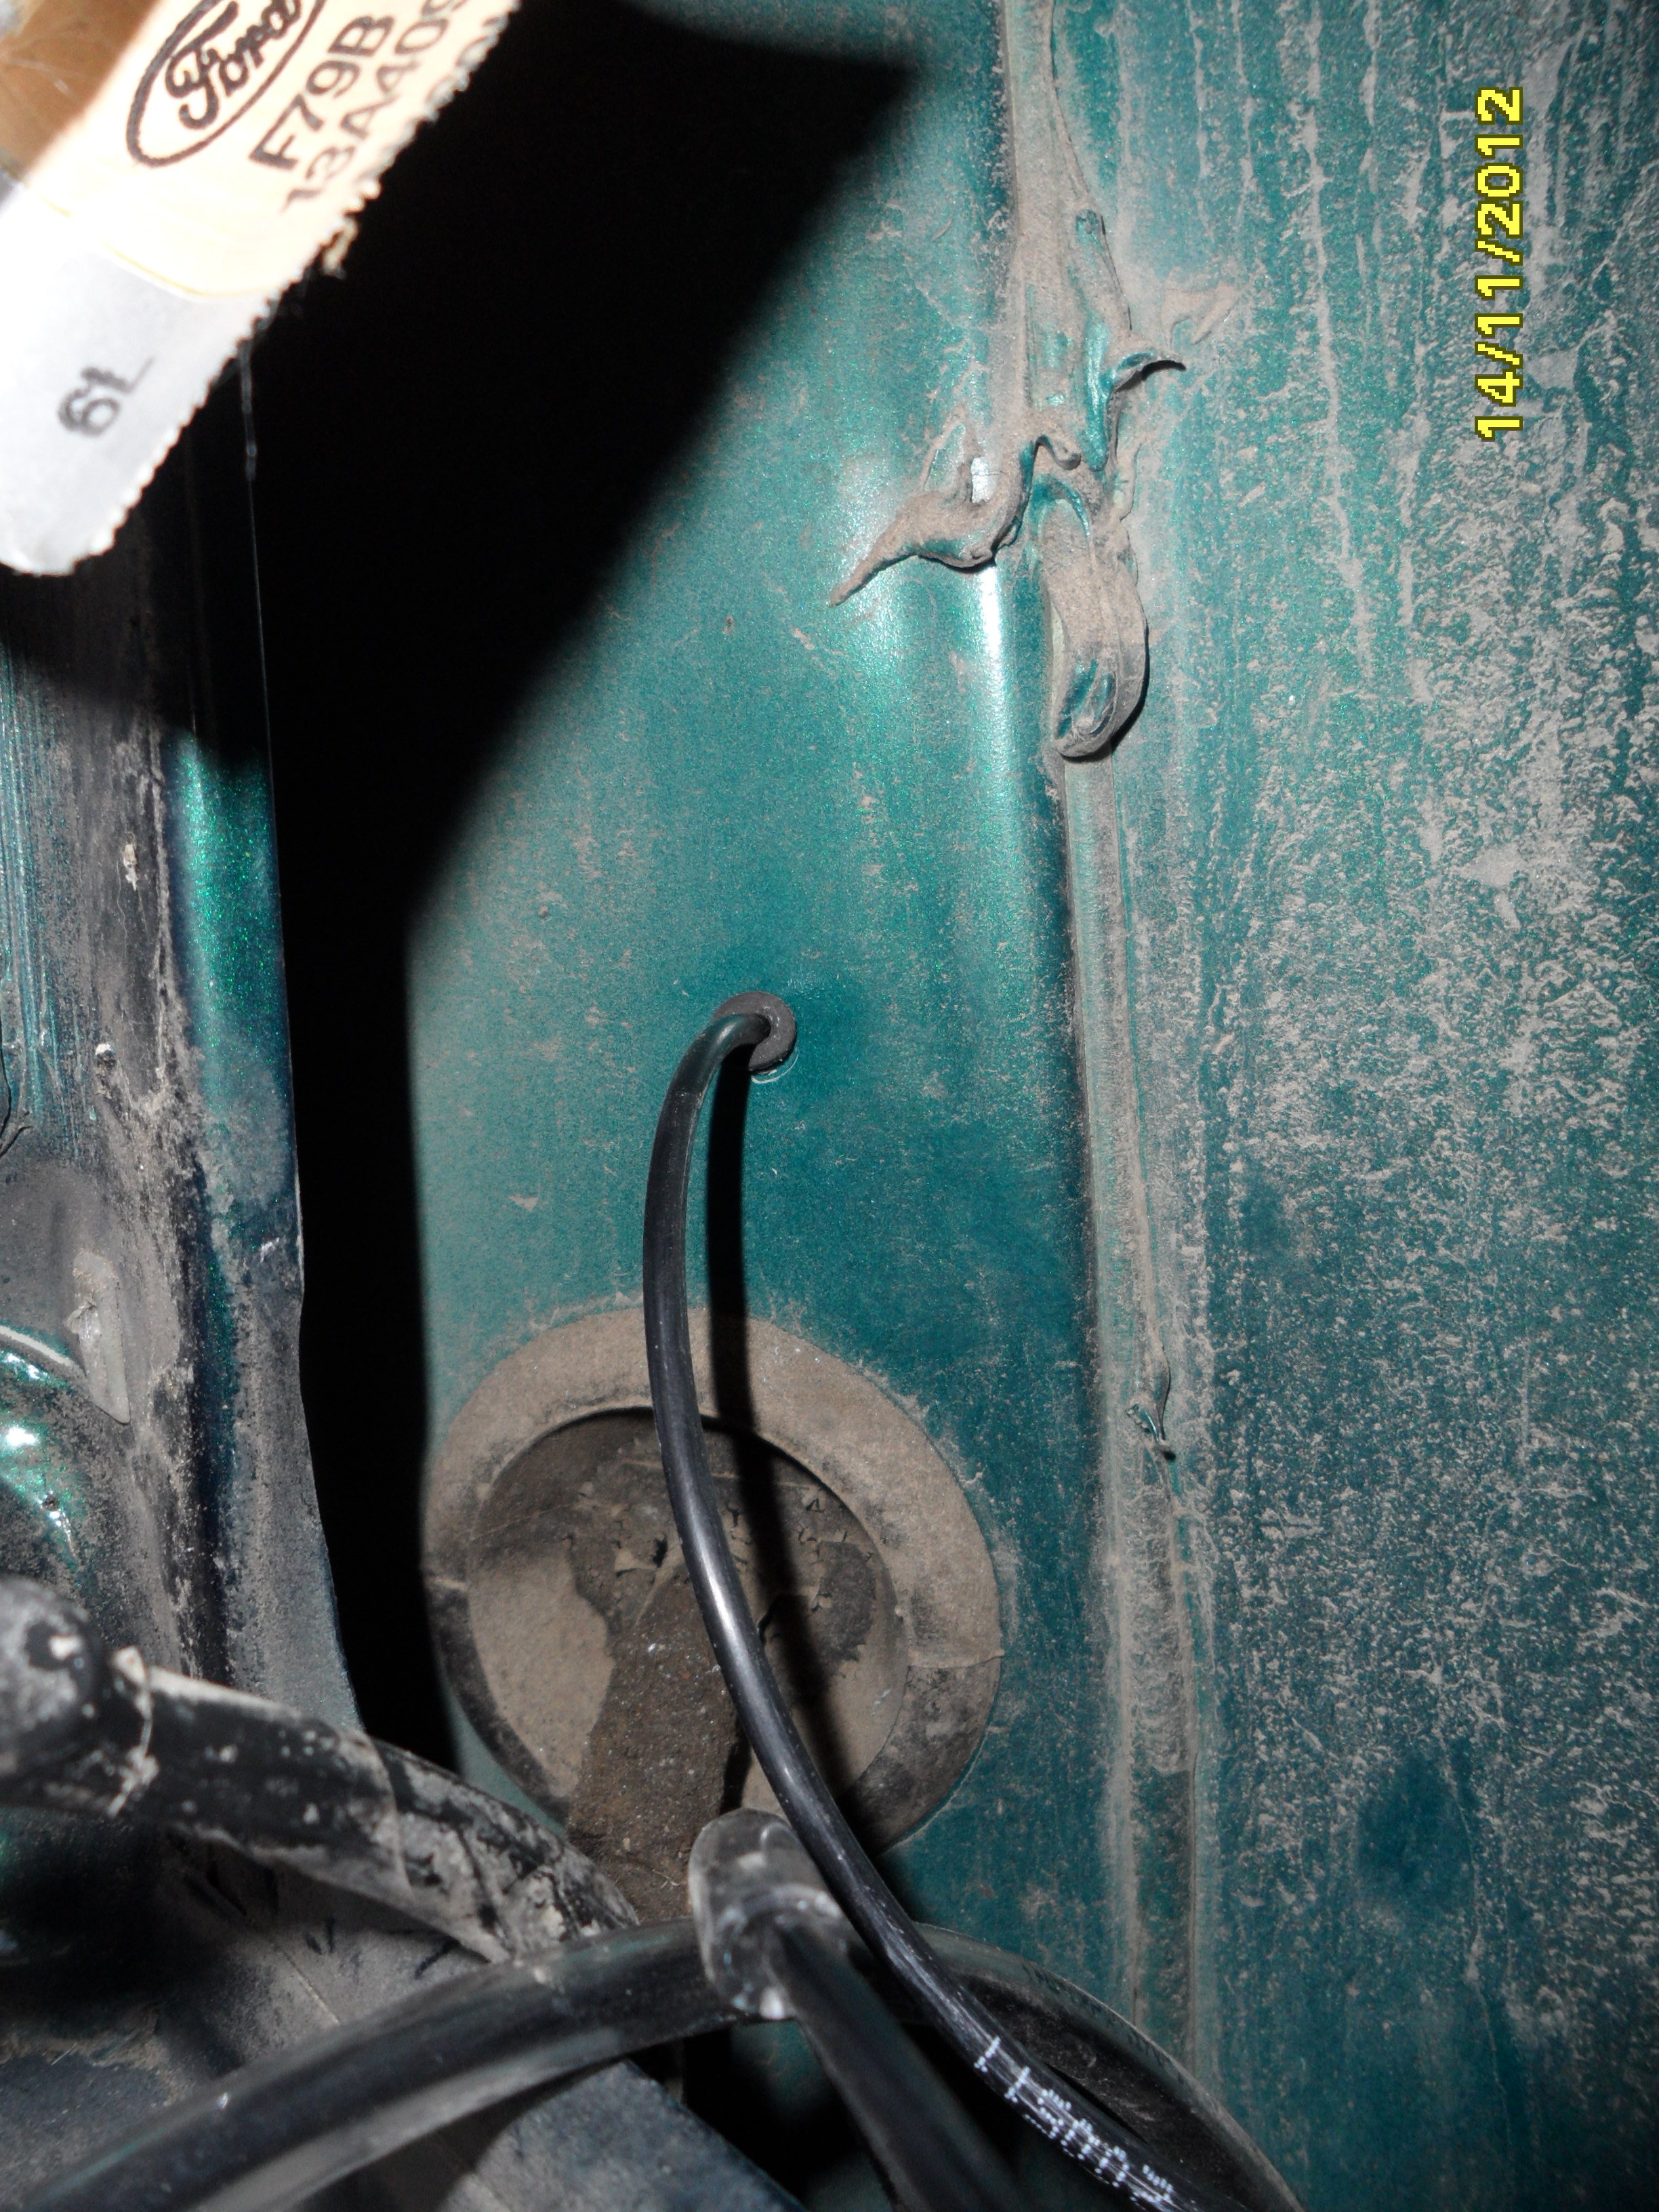
Small grommet behind the taillight for the air line to the stowage compartment and compressor.

More notching and a hole in the side of the stowage lid flange.
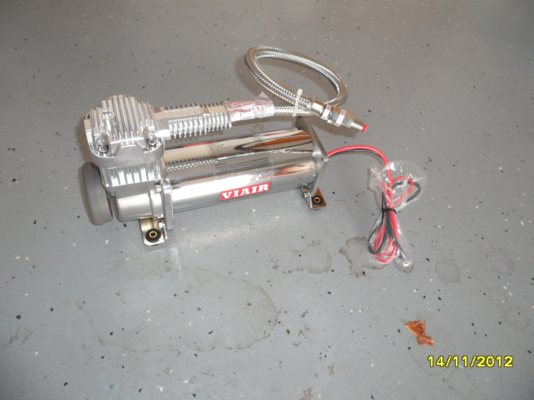
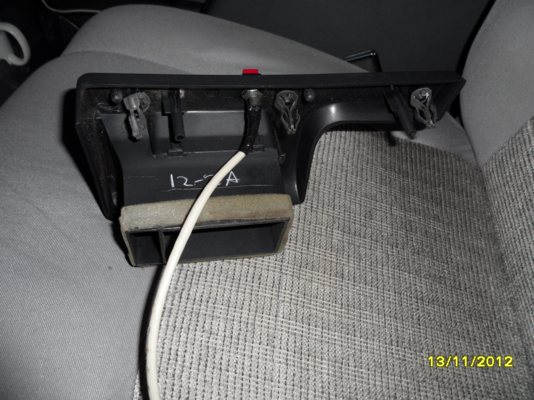
The itty-bitty 200 PSI compressor that could. Viair model 444c. It's normally sold as a pair of compressors, but I found an outfit on Amazon that breaks them up and sells them separately. About $180 + shipping.
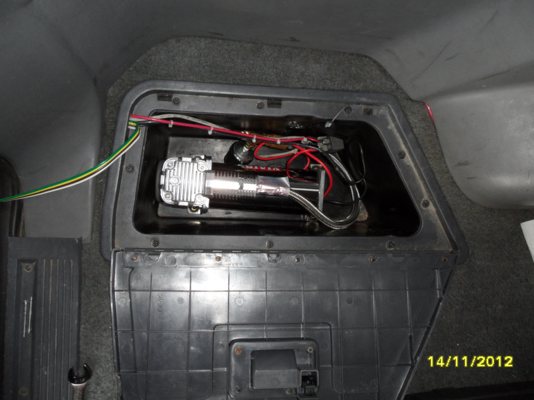
Fits with lots of room left over. Not bolted down. I don't want to perforate that plastic bin. I might bolt it to a piece of plywood and set it in that way, but for this trip, this will have to do.
Dremel a hole for the pushbutton switch (momentary contact: no leaving the compressor running unattended!).
Surprisingly, a quite decent switch was at Radio Shack, part No. 2751566. Since it runs a relay, it doesn't require hefty contacts.

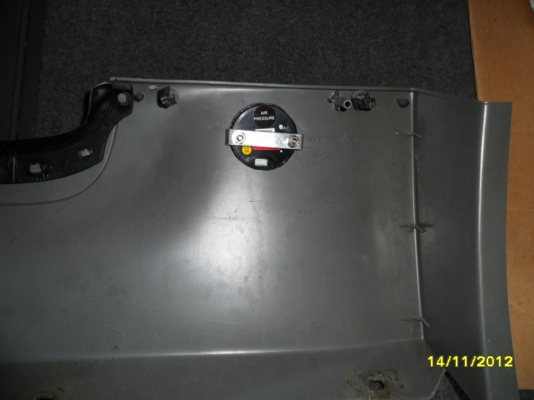
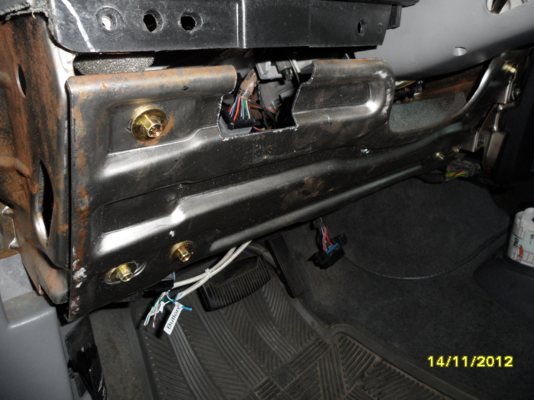
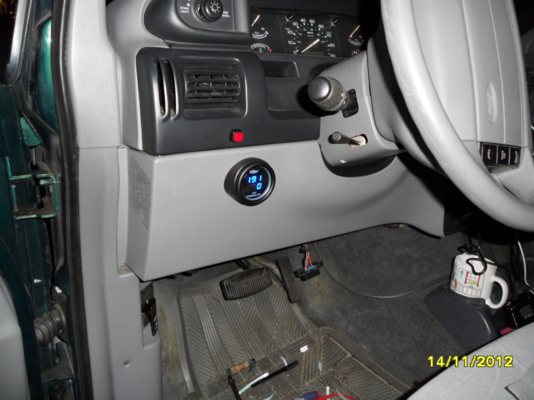
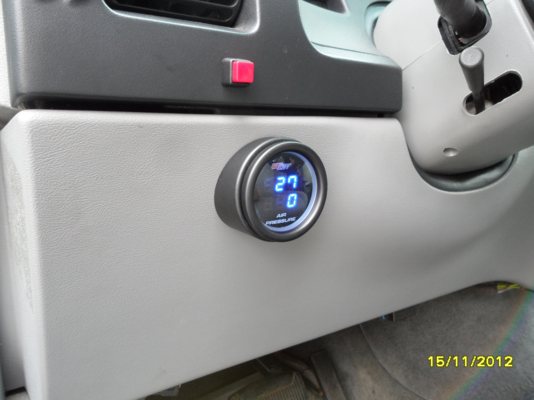
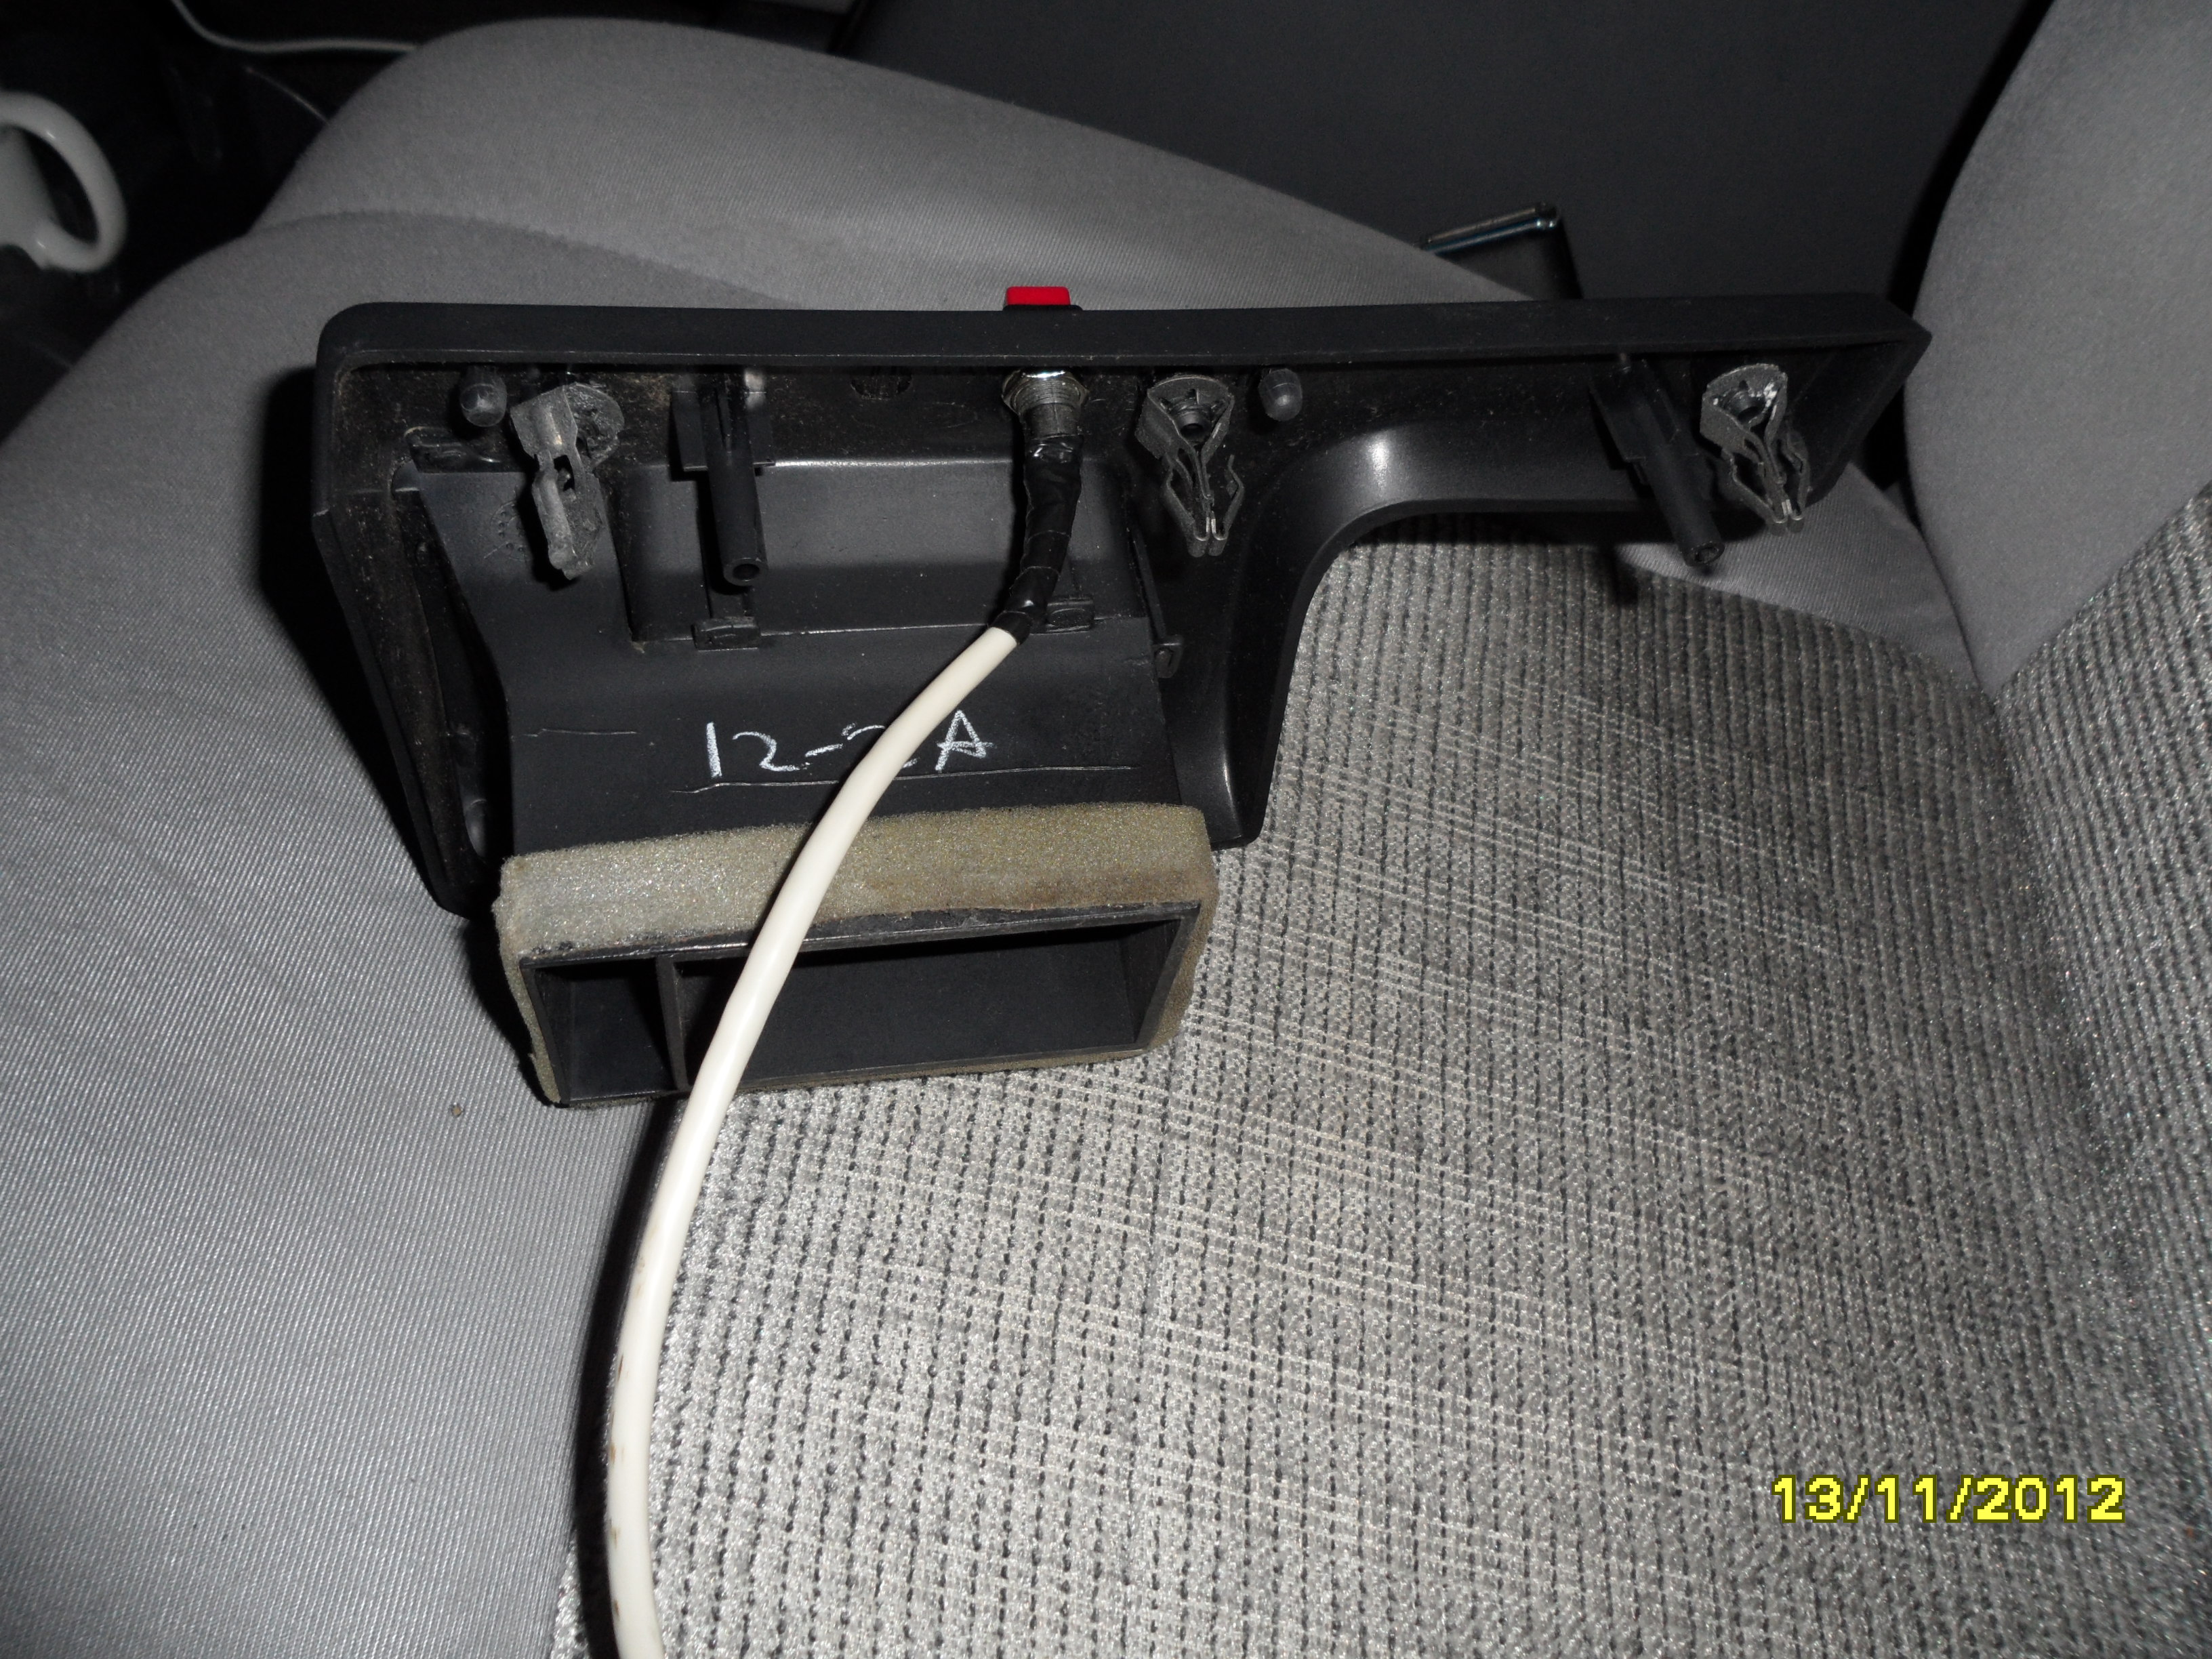
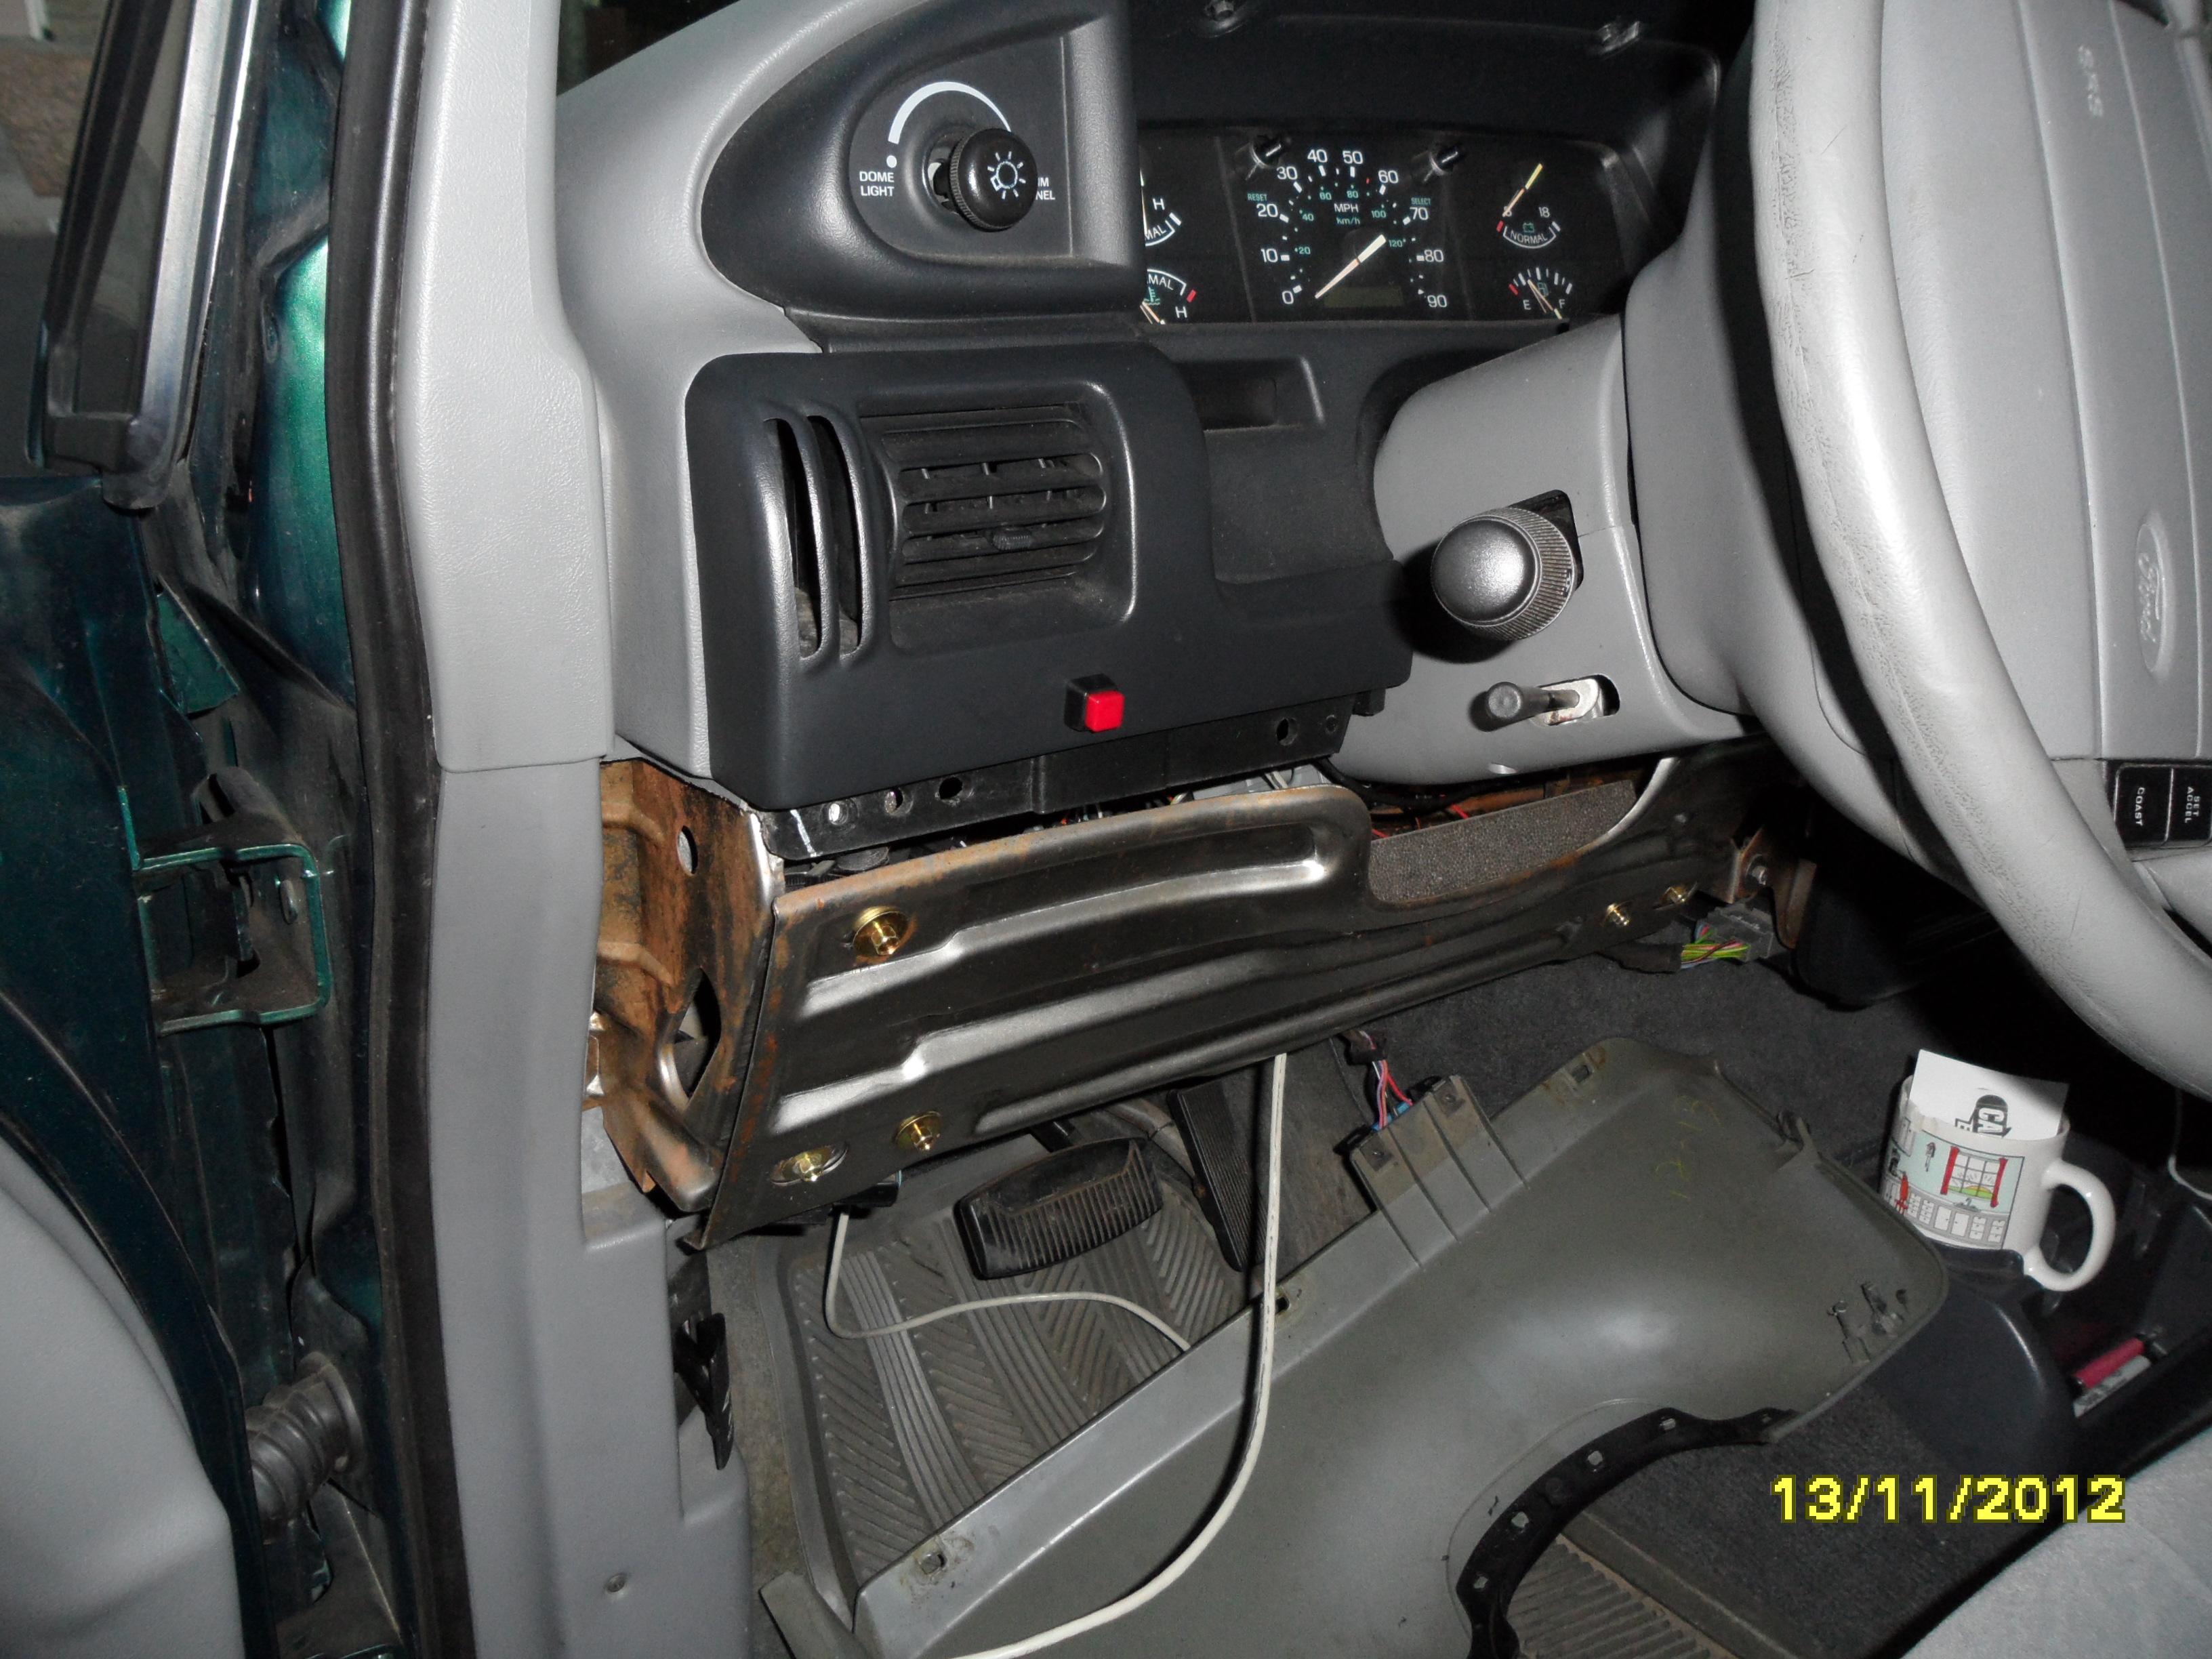
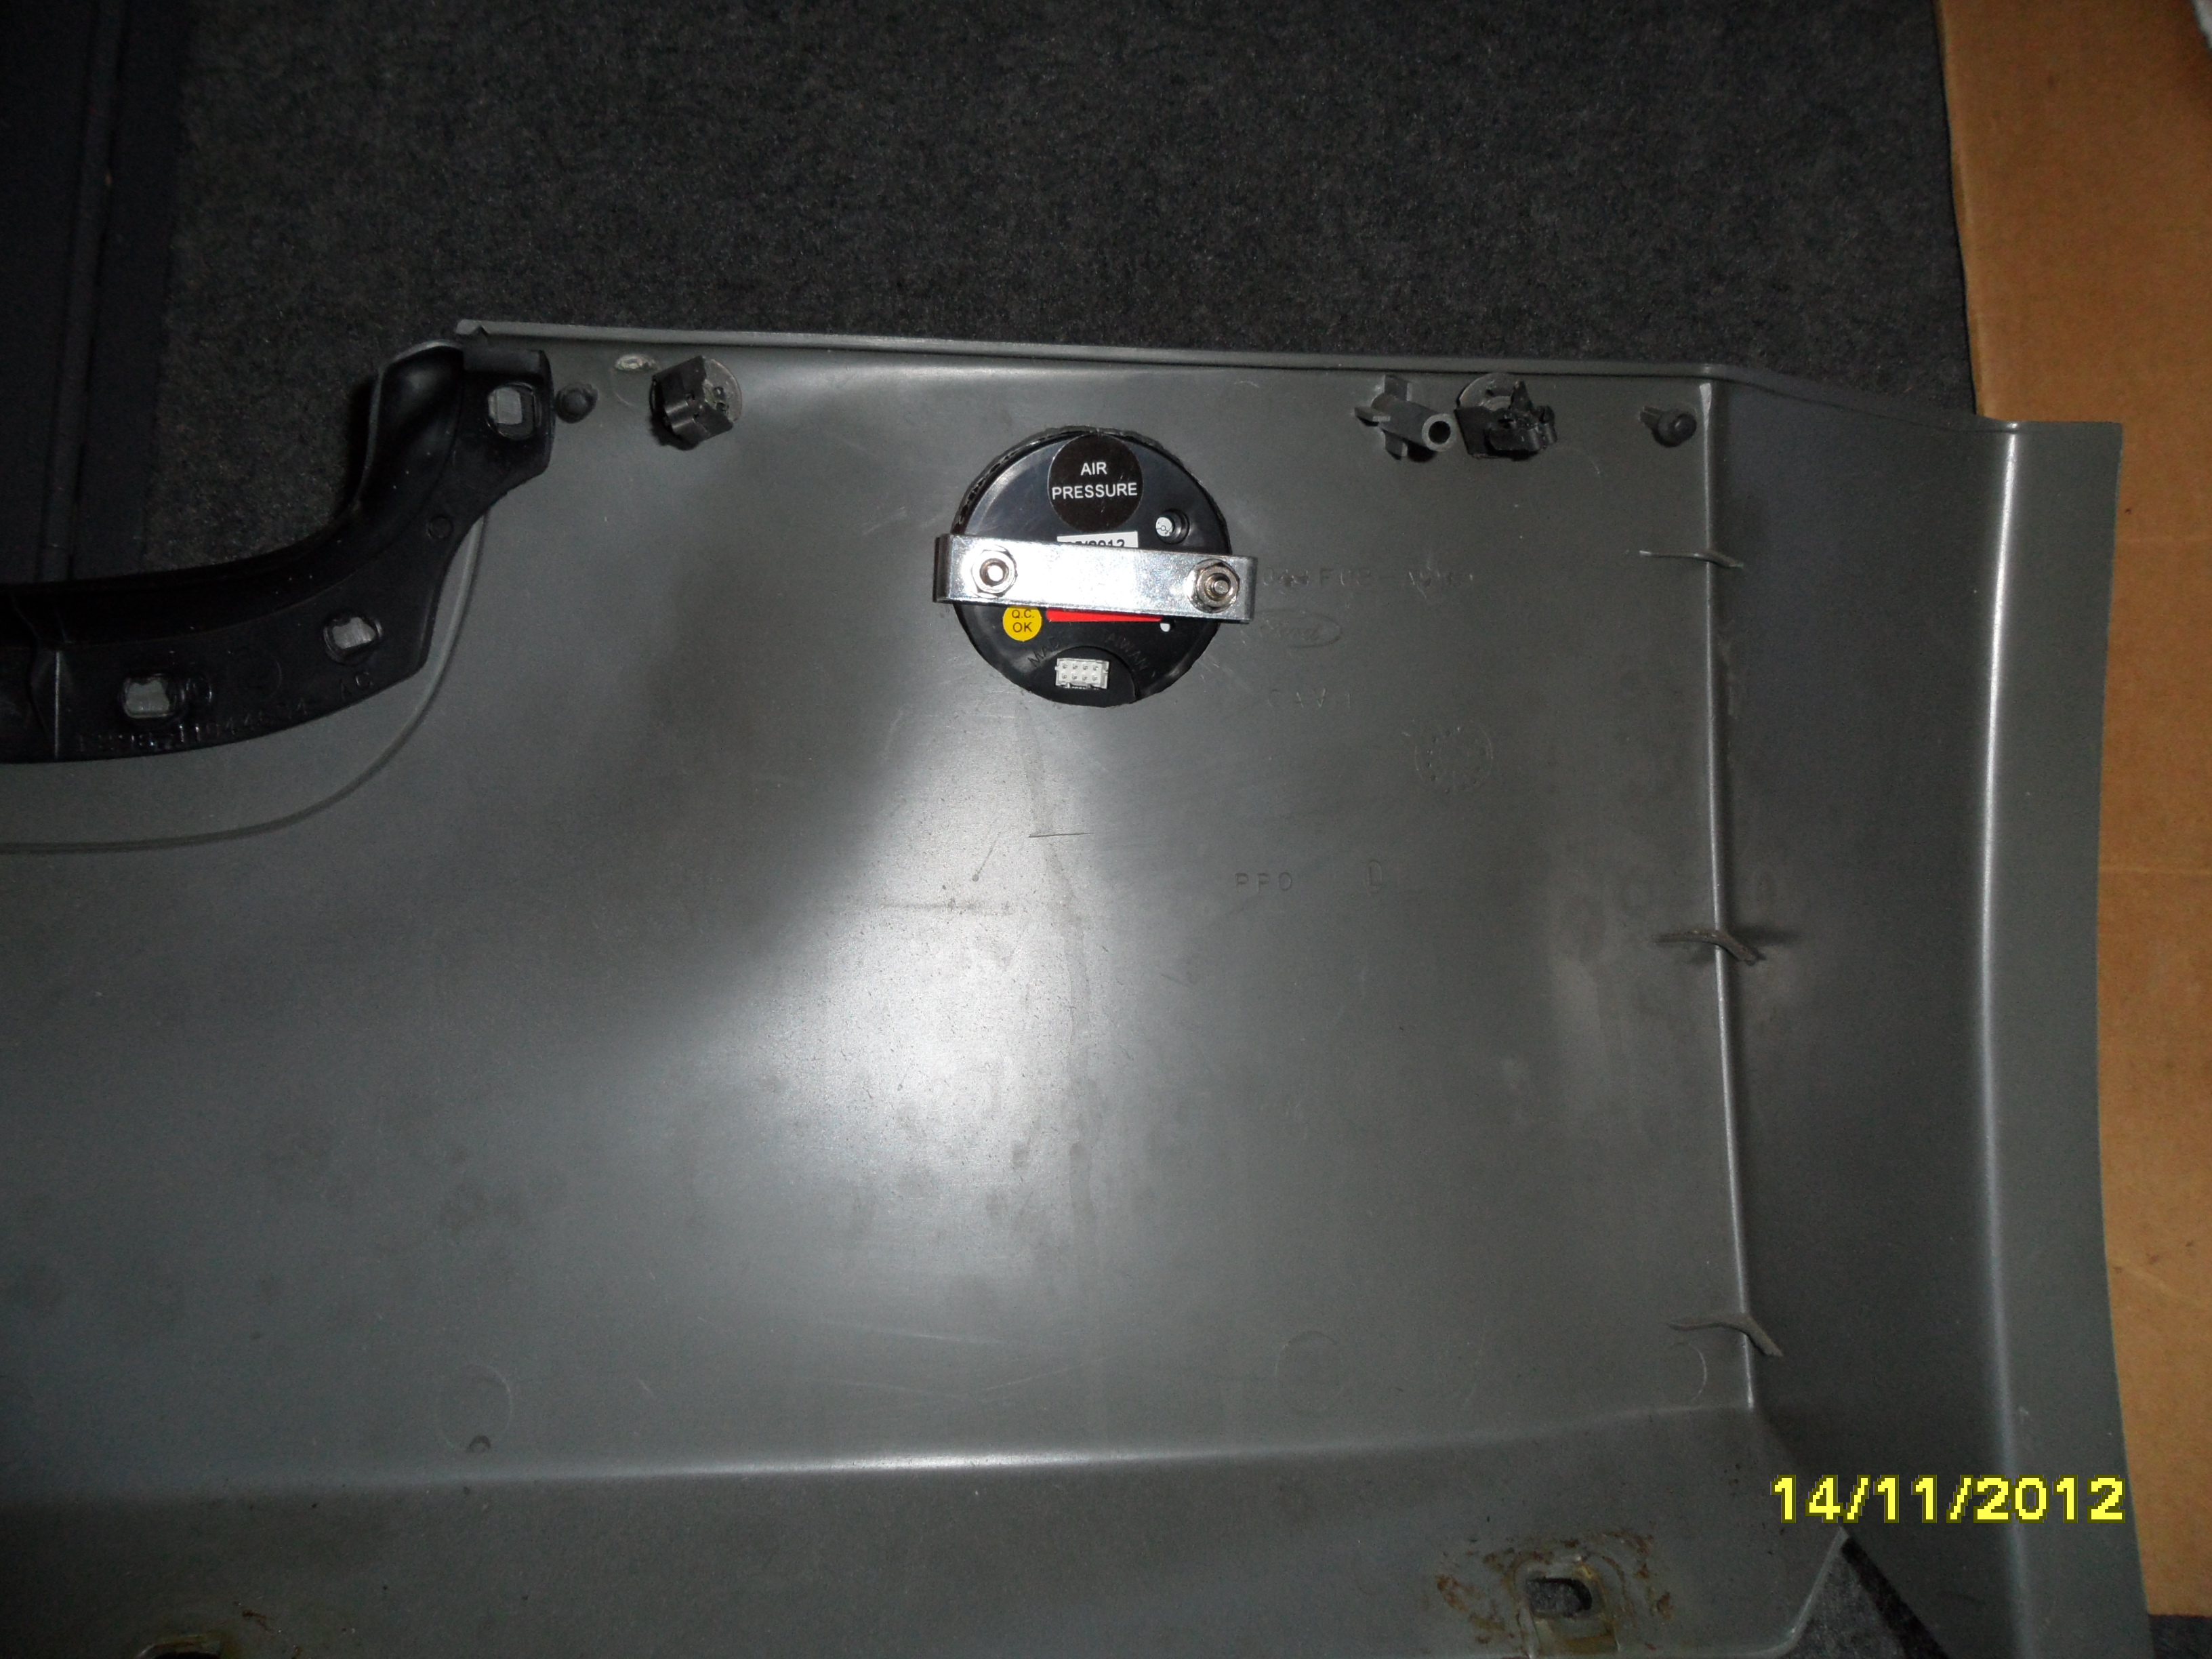
The Glowshift model GS-T713_DUAL air pressure gauge comes with a sort of hood trim ring. It's probably supposed to reduce surrounding glare. It came in very handy: upside-down, I used it and a pencil as a template, drew a line to the right circle size on the trim panel. I Dremeled the hole to that line. Then I mounted the gauge on the inverted trim ring.
Granted, the gauge is not exactly easy to see down there, but then I'm not going to be adjusting the air pressure while driving, either.
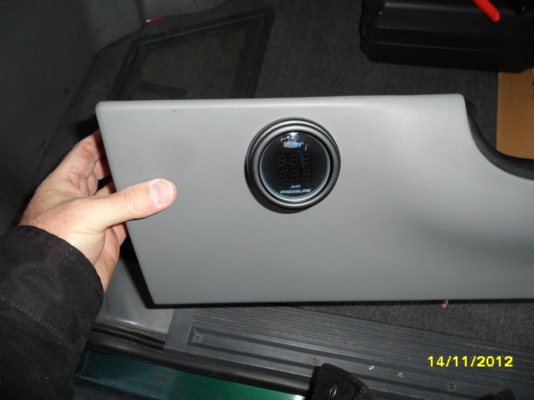
Some quick jigsaw work. The gauge is so shallow, I could almost not cut this panel, but I decided to anyway, to avoid future problems with pressure on the back of the gauge. Duct tape to tame the sharp edges -- I hate putting my hands around sharp edges (ever repair a clothes dryer?).

It hasn't left the driveway yet (it was below 25� when I got to this last pic, and I still had to clean up!), but the 444c brings the pressure up fast, and the gauge works well enough.
A couple of notes on the gauge: this is a dual-pressure gauge. It comes with two pressure transducers. I'm only using one. The lower gauge readout is therefore zero, and it blinks. I'm afraid I'll have to put a piece of tape over that half of the gauge; I cannot abide blinking lights.
And the gauge is wired to dim when the running lights are on. However, it doesn't dim very damned much! Therefor, it's a Good Thing it's at knee-level!
If I had more time, I'd have wired a dump valve for lowering, but I can use a key tip in that Schrader valve to manually lower it when needed. I don't plan on needing to lower it more than two or three times during this trip, when I drop the trailer for a day or two.
[later]
Zero pressure in the system = 10 PSI readout. I've got an email in to GlowShift to see if there's a calibration I can perform to correct this.
Fortunately, even at 10 PSI readout, it doesn't blink the display, so that implies I can put a 12 ohm resistor across the unused channel wires and have the display stop blinking (though probably not with a zero reading).
I installed an Balkamp Part No. 782-3001 (NAPA) 50A circuit breaker up at the starter solenoid, and ran neg & pos 10 gauge wiring to the back driver's side stowage compartment. Installed a 40A relay back there. And I ran wires from the there back up to the dash, for the relay trigger switch and pressure transducer wires. Why run a negative lead? Sometimes ground faults can cause the darndest issues, and this compressor tops out at 38A draw. Plus, if I ever add trailer brakes, I'm already set for the harness.
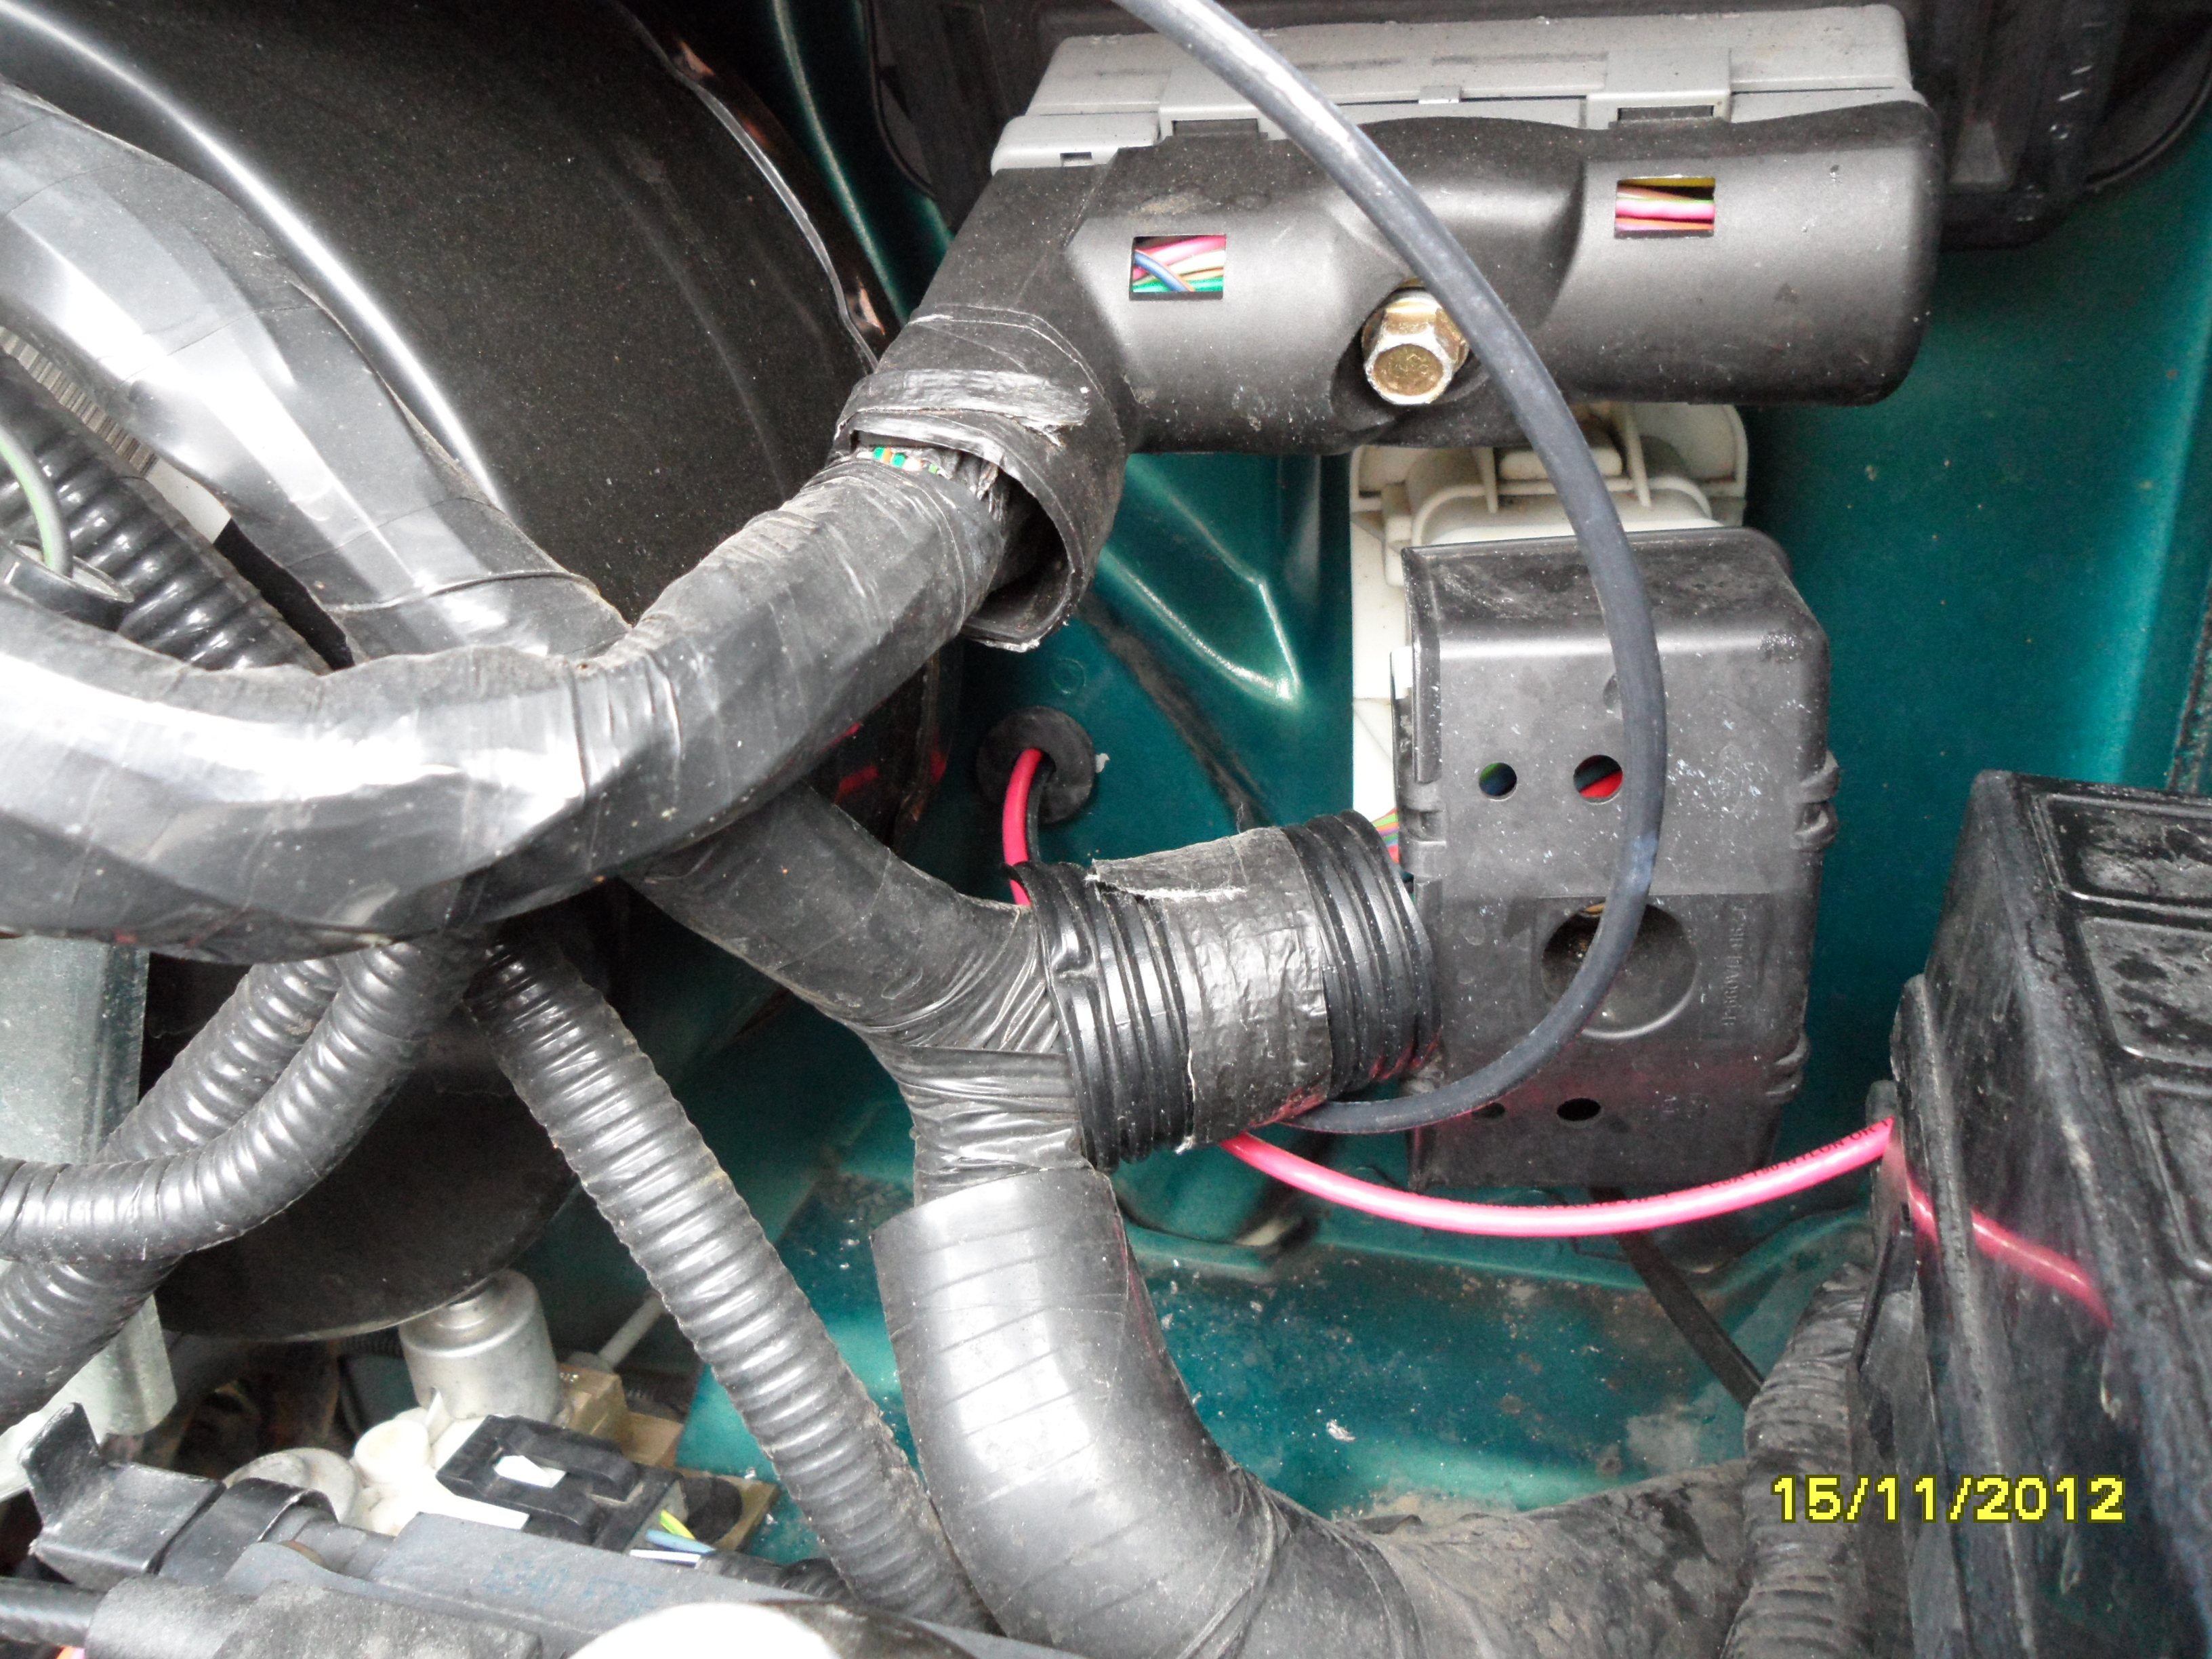

(Hmmm, I'd better go put a dab of RTV on that grommet, now that I think about it.)
But before all that, I was trying to replace this nylon tee with brass:
(click on any image for larger)
Unfortunately, even with a lot of searching, I've been unable to find a Schrader valve with 1/8" MNPT on one end, and fully-threaded exterior on the other. This was as close as I could do, and it doesn't work well. I need more threads on the valve end; the nut that holds it to the body also prevents most fill chucks from being pushed on it far enough to press the valve's pin. Oh, well. Unless I can find one in brass with fully-threaded valve end, I may just buy a 5/16"-32 ENFT die and extend the threads myself. That's not a die you'll find on the shelf just anywhere!
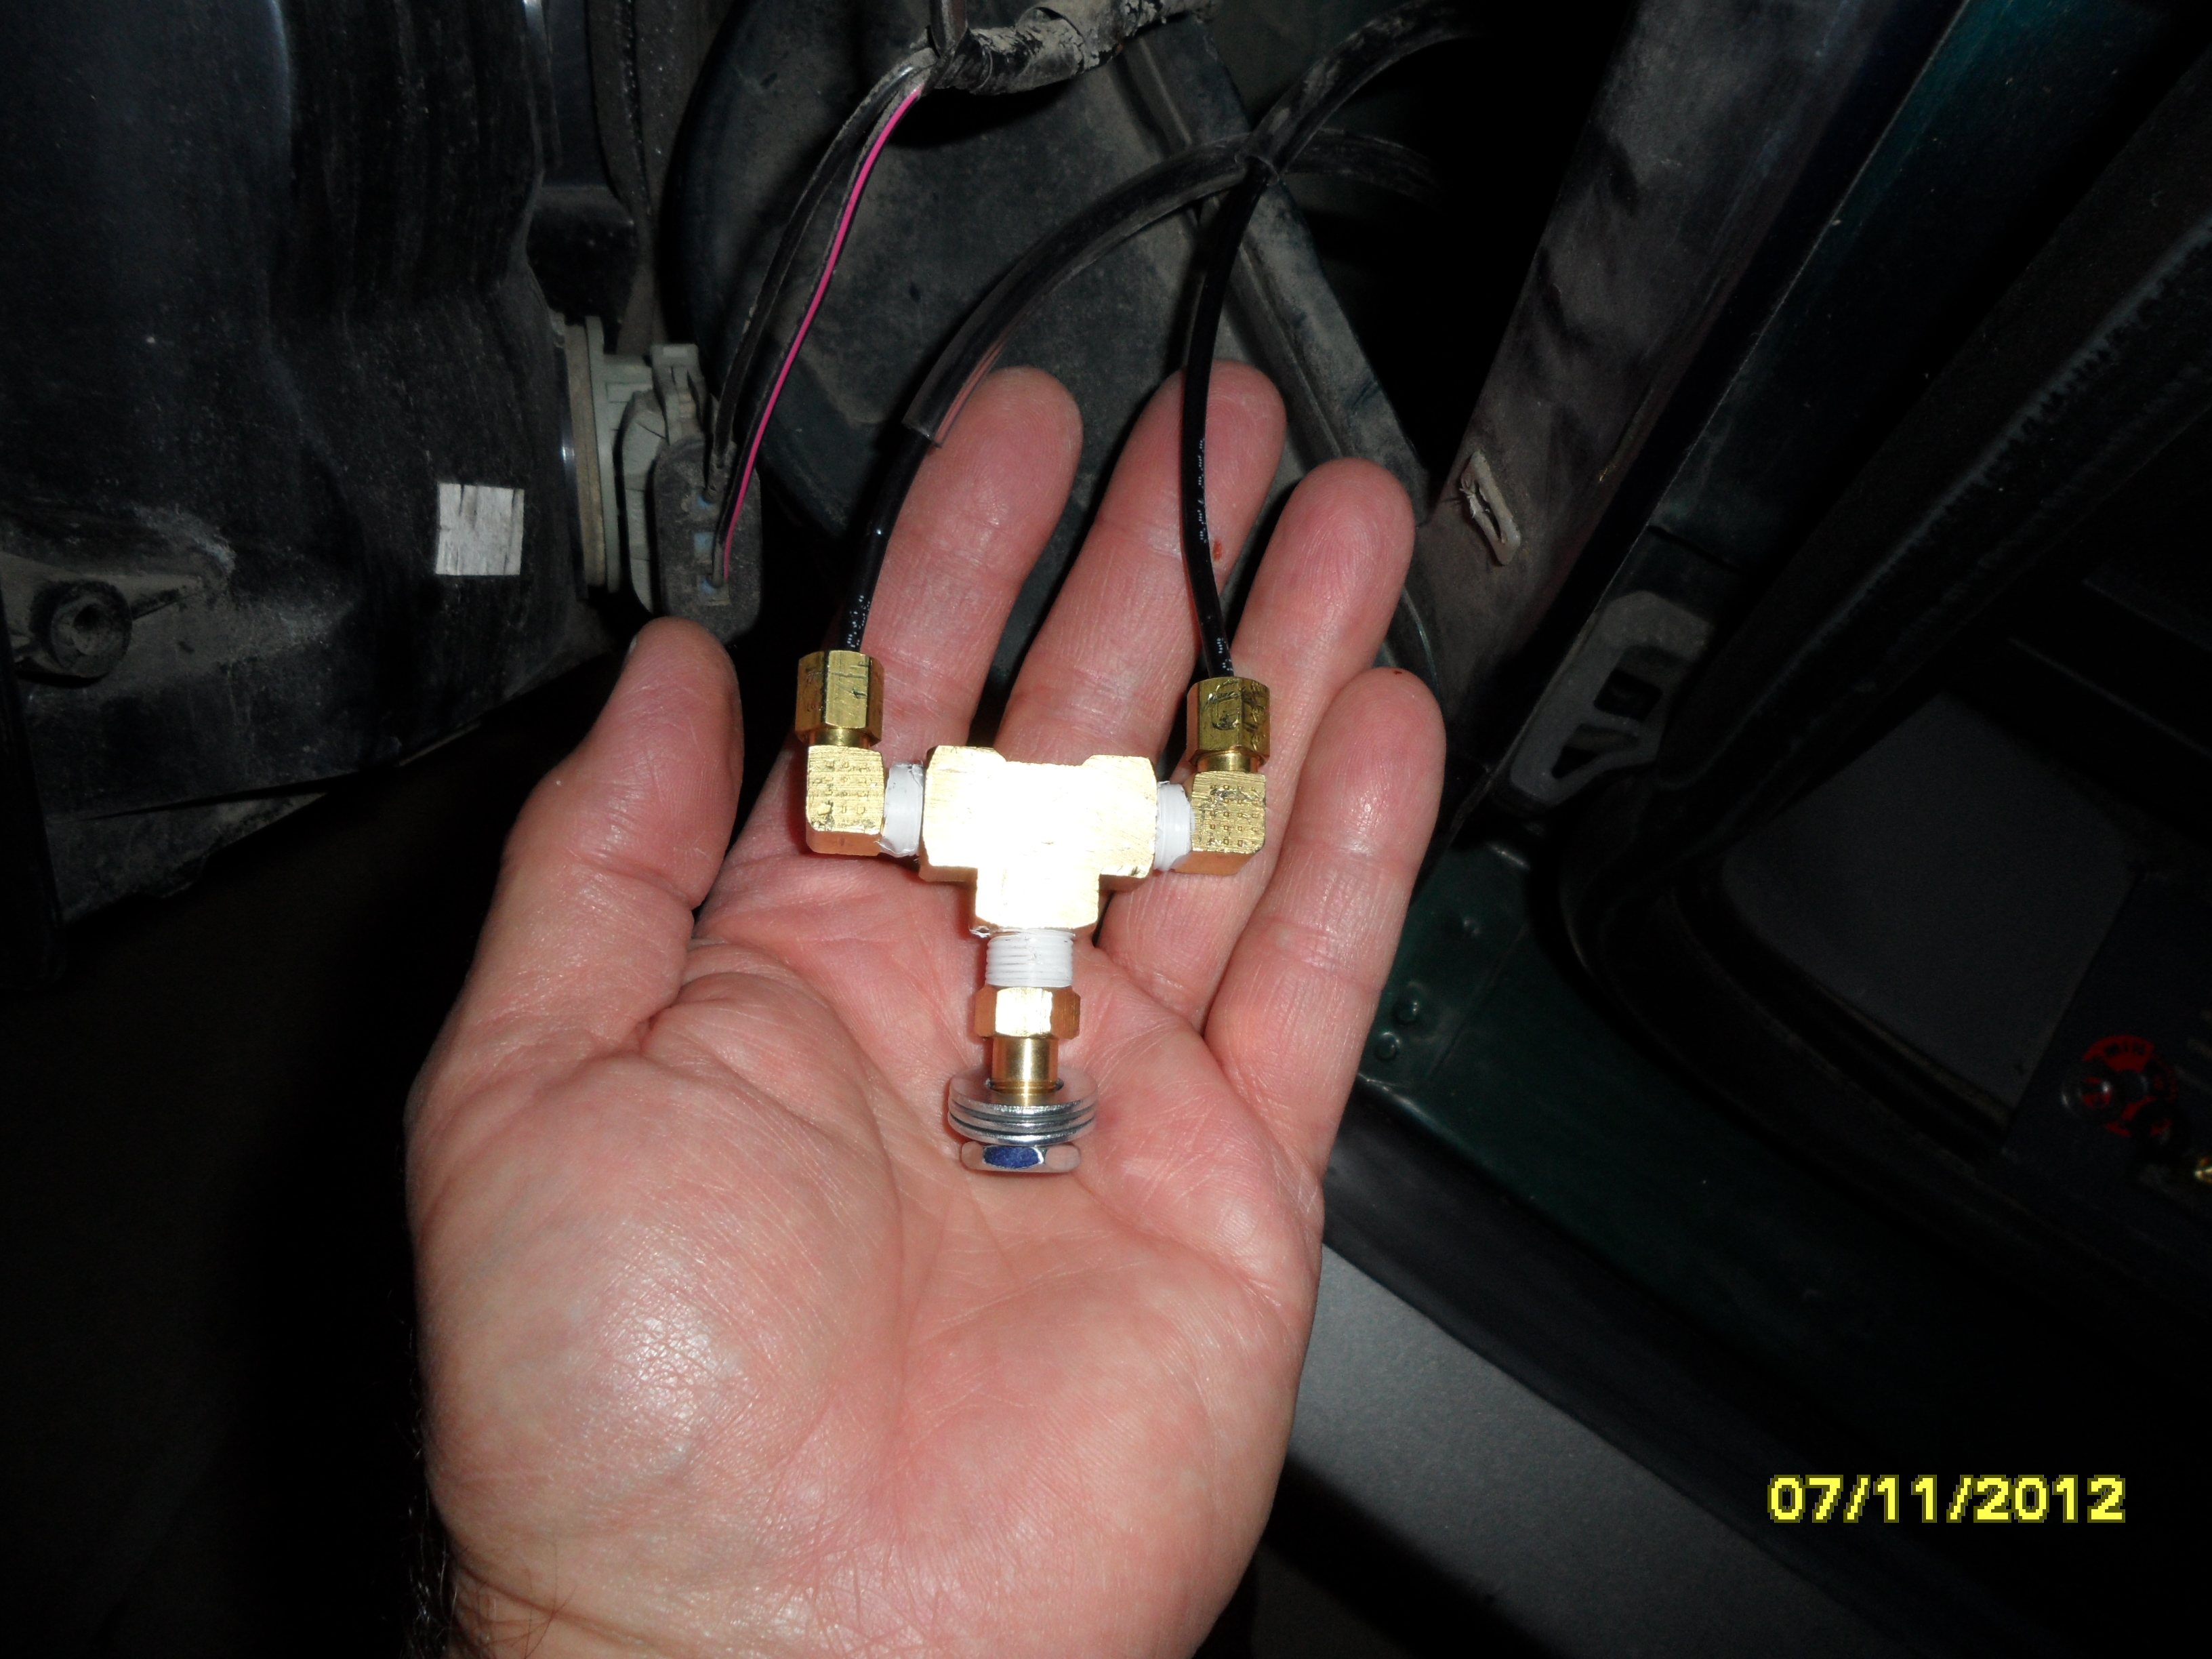
When I decided to go to an onboard compressor, this had to expand for the extra line to the compressor. A lot of messy brass here.
Small grommet behind the taillight for the air line to the stowage compartment and compressor.
More notching and a hole in the side of the stowage lid flange.
The itty-bitty 200 PSI compressor that could. Viair model 444c. It's normally sold as a pair of compressors, but I found an outfit on Amazon that breaks them up and sells them separately. About $180 + shipping.

Fits with lots of room left over. Not bolted down. I don't want to perforate that plastic bin. I might bolt it to a piece of plywood and set it in that way, but for this trip, this will have to do.

Dremel a hole for the pushbutton switch (momentary contact: no leaving the compressor running unattended!).

Surprisingly, a quite decent switch was at Radio Shack, part No. 2751566. Since it runs a relay, it doesn't require hefty contacts.
The Glowshift model GS-T713_DUAL air pressure gauge comes with a sort of hood trim ring. It's probably supposed to reduce surrounding glare. It came in very handy: upside-down, I used it and a pencil as a template, drew a line to the right circle size on the trim panel. I Dremeled the hole to that line. Then I mounted the gauge on the inverted trim ring.
Granted, the gauge is not exactly easy to see down there, but then I'm not going to be adjusting the air pressure while driving, either.

Some quick jigsaw work. The gauge is so shallow, I could almost not cut this panel, but I decided to anyway, to avoid future problems with pressure on the back of the gauge. Duct tape to tame the sharp edges -- I hate putting my hands around sharp edges (ever repair a clothes dryer?).


It hasn't left the driveway yet (it was below 25� when I got to this last pic, and I still had to clean up!), but the 444c brings the pressure up fast, and the gauge works well enough.
A couple of notes on the gauge: this is a dual-pressure gauge. It comes with two pressure transducers. I'm only using one. The lower gauge readout is therefore zero, and it blinks. I'm afraid I'll have to put a piece of tape over that half of the gauge; I cannot abide blinking lights.
And the gauge is wired to dim when the running lights are on. However, it doesn't dim very damned much! Therefor, it's a Good Thing it's at knee-level!
If I had more time, I'd have wired a dump valve for lowering, but I can use a key tip in that Schrader valve to manually lower it when needed. I don't plan on needing to lower it more than two or three times during this trip, when I drop the trailer for a day or two.
[later]
Zero pressure in the system = 10 PSI readout. I've got an email in to GlowShift to see if there's a calibration I can perform to correct this.
Fortunately, even at 10 PSI readout, it doesn't blink the display, so that implies I can put a 12 ohm resistor across the unused channel wires and have the display stop blinking (though probably not with a zero reading).
Last edited by asavage; 11-15-2012 at 11:30 AM. Reason: Added circuit breaker pics. Added more GlowShift info.
#44
11-14-2012, 11:57 PM

#45
11-22-2012, 11:04 PM
I paralleled three 33-ohm resistors I found I had, to make an 11-ohm resistance, & that gave me a nice, non-blinking zero for the unused channel.
The other air shock blew its bag the afternoon I was to go pick up the U-Haul 6x12, so I hurriedly replaced it. That's a failure of two out of four, before I even put a load on them. Not good.
I still have two more new spares.
I've dragged the trailer (around 4,000 lbs total tow load) from Denver to LA so far, and it's working well enough. The system loses about 5 PSI per hour on the road, but the Viair can keep up with that, no problem. Every air shock I've had to deal with had leakage, so I expected that. I just tap the button for a few seconds every hour when driving, & a bit more than that every morning. So far, so good. I'm running 175 PSI indicated (likely 165 real) and the van's almost level. I'm not getting a whole lot of additional carrying capacity at that pressure though. I could have used more.
I'm going to put another half-ton or so in the van & trailer during the next two days, then drag it another 1200 miles to the Seattle area. I'll be running the shocks at 200 PSI for that leg. And swapping the summer tires back on, as there's no snow projected on my route for the next five days.