
dizzy

Thread Starter
|
Senior User

Joined: Jul 2009
Posts: 343
Likes: 1
From: Pincher Creek Alberta
dizzy
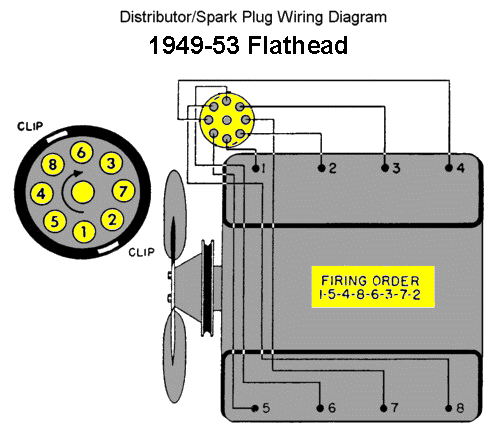
what the heck is the right placement for #1 plug wire on the cap? from any diagrams i could find online it says it should be next to the clip closest to the gen,but any pics i found show they have it 180 degrees the other side of the cap.the first time i took the cap off to check the point it wouldnt go back on.the notch was 180 degrees out so i started to rotate the wires.well you can tell where this is going im sure ,i lost track of where i was,oh when i got all the wires were i thought they should be the #4 wire was to short to reach the other side of the cap.i dont know if the PO had this thing running or not.i have fuel,i have spark,i dont have a running engine.does anyone understand what im saying or did i lose everyone?can anyone help me with this,it sure would be great to hear this little merc flatty back.oh its a 50 merc m-68.
thanks for any help you can give me
roy
thanks for any help you can give me
roy
Senior User
Joined: May 2009
Posts: 382
Likes: 0
From: Chicago
did you try turning the engine until the timing marks line up and seeing where the dizzy is pointing. When I do this it is pointing away from the gen. but I also have a 292 Y-block, I am not sure if the dizzy is even in the same place but the timing markes will probably work for you. Also the dizzy cap should be marked 1 on the top to help you line everything up, again mine might be different then yours but the 1 is just to the left of the rear clip hold down on mine. I do have a 50 flatty out in the garage that I could take a look at if no body else chimes in. Good luck.
Cbass
Cbass


Thread Starter
|
Senior User
Joined: Jul 2009
Posts: 343
Likes: 1
From: Pincher Creek Alberta
thanks everyone. i went early this morning and played with the dizzy.ross this is the diagram that i have,it is the right one for my merc.i even got it to run,way cool to finely hear it go.it idles pretty good,but when i rev it up itbogs first then it picks upwith a little coughing and snorting.i ran out of ajusting so i rotated the wires 1 hole and turned the dizzy,my vac advance is about the same place as the pic that ross posted,this is a great place to start some more playing around and i will get it ,im pretty sure.i was thinking i should maybe move the rotor 1 tooth so i dont touch the belt for the water pump.i think also part of my problem may be in the carb ,i will likely get it rebuilt just to be sure its all good to go.
thanks a bunch for all your help on this ,im sure i will be back with more questions soon
roy
thanks a bunch for all your help on this ,im sure i will be back with more questions soon
roy

Senior User
Joined: Jan 2004
Posts: 298
Likes: 0
From: Albany NY
To setup the distributor I do the following:
1. Position crank so engine is at #1 TDC. Here you need to be sure that you have #1 at the top of the compression stroke and not the exhaust stroke. On an OHV engine it's easy to pull the valve cover and see where you are. On a flathead you need to put your thumb on the #1 spark plug hole and verify that the engine is making compression as you turn it approaching the timing mark.
2. Install the distributor. Leave the vacuum advance line disconnected but position the distributor so the line can be easily connected, the distributor has room to move both directions for timing, and the rotor is positioned at the #1 plug wire. You may need to pop the distributor up and down a few times to select the proper tooth of the drive gear. The rotor will turn a bit as the distributor is seated and the gears mesh.
3. Statically time the ignition. Set the point gap. Position the crank at the timing mark. Connect a test light or volt meter on the wire going from the coil to the distributor. Turn on the ignition and set the timing by turning the distributor opposite the normal direction of rotation of the rotor (turn distributor CCW) until the points just open (test light comes on).
4. Start engine and fine tune timing with timing light. Connect vacuum advance line. You can verify the vacuum advance is working while you have the timing light hooked up by dumping the throttle and watching the timing move.
Craig


