390 Crankshaft install..feels very tight
#1
 08-19-2013, 10:36 PM

390 Crankshaft install..feels very tight
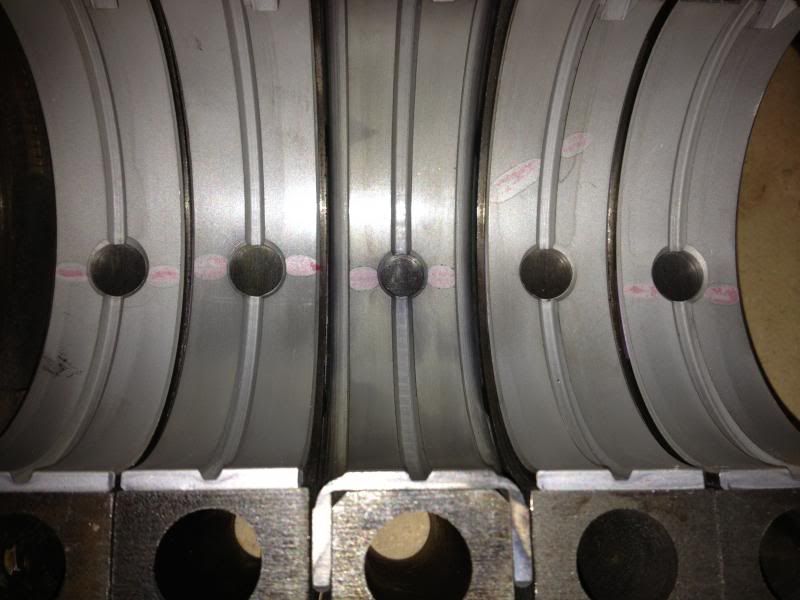
I finally got around to installing my crank and mains. After installing the mains the crank seems very tight. I can still spin it, but takes a lot of effort. If I let it sit for a minute or two, I can't spin it from the end with one hand. I have to use two hands to get it going. Once its going, I can spin it with one hand. But, it stops almost instantly after I let go. See Video below. I checked the clearances with plastiguage (red) as shown in pictures. (Should I have used green?) All were exactly the same just a hair under .002 I used Clevite bearings and Clevite Cam Guard Assembly lube, recommended by my machine shop. I torque the mains down slowly from the middle (thrust bearing) to the outside. Checked them between barely snugging them, firmly snugging them and then torqued to 95 foot pounds. After the final torque to 95 foot pounds is when it got harder to turn. I removed the rear main seal to eliminate that as a possible problem, but still seems tight. Is this acceptable? Should it be this tight?
Here's a video
<iframe src="//www.youtube.com/embed/Jwl0vG8uR2g" allowfullscreen="" frameborder="0" height="315" width="420"></iframe>
Here's pics of Plastiguage check. (Checked them with dry bearings.)
<a href="http://s96.photobucket.com/user/jonezzzman/media/IMG_18991.jpg.html" target="_blank"><img src="http://i96.photobucket.com/albums/l170/jonezzzman/IMG_18991.jpg" border="0" alt=" photo IMG_18991.jpg"/></a>

#2
08-19-2013, 11:23 PM
#3
08-20-2013, 11:29 AM

Well, after watching the video, it doesn't seem to awfully tight. You have to remember you only have .001 per side clearance and the lube is using that up.
If only one main bearing cap makes it noticably tighter, then there might be an issue. Try swapping the bearing shells to another spot(1 or 4) and see if the issue repeats in that spot. If the issue stays with #2 then likely that journal is tighter(bigger) then the rest. Plastic gage is okay, but when you are dealing with the clearance you have, it could be off enough to not show how tight it actually is.
Without the rear seal it should spin freely and coast. If you left the upper half of the rear seal in the block, then it will still be "snug" feeling. It won't coast after spinning.
#4
08-20-2013, 11:57 AM
I took the rear main seal completely out to eliminate that as a possible problem. I also tried swapping the bottom bearing from #2 and number #4. The problem is still with number 2 being noticeably tighter than the rest. The crank only coasts for about half inch to an inch but stops almost instantly after I let go of it.
#5
08-20-2013, 01:23 PM

Reassemble it using STP oil treatment. Cam lube is cam lube. The thick stuff tends to accumulate in the oiling holes in a crank and stays put, limiting oil supply. You might also want to try swapping the 2 & 4 main caps. I've run across one 390 years ago that had the caps mixed up at the factory (numbers didn't work as indicated) It gave me fits until we moved the caps around and found the right combination.
#6
08-20-2013, 03:58 PM
Logistics Pro
#7
08-21-2013, 11:28 AM
Reassemble it using STP oil treatment. Cam lube is cam lube. The thick stuff tends to accumulate in the oiling holes in a crank and stays put, limiting oil supply. You might also want to try swapping the 2 & 4 main caps. I've run across one 390 years ago that had the caps mixed up at the factory (numbers didn't work as indicated) It gave me fits until we moved the caps around and found the right combination.
Ditto on setting the thrust bearing properly. Don't just torque the cap. You need seat the surfaces against the crank thrust face.
Trending Topics
#8
08-21-2013, 02:46 PM
Not something I would recommend. Only unless you know you are going to resize things. Better fit or not, just swapping mains caps is not a reliable thing to do.
Ditto on setting the thrust bearing properly. Don't just torque the cap. You need seat the surfaces against the crank thrust face.
Ditto on setting the thrust bearing properly. Don't just torque the cap. You need seat the surfaces against the crank thrust face.
#9
08-22-2013, 09:27 AM
Thanks again for all the feedback. I took the crank and block back to the machine shop, yesterday. They checked the crank for straightness and said it is straight. They did mention that the main journals are measuring on the full side. They are going to check the block for straightness. And, won't charge me if it is since I had it bored and honed there. They didn't check it originally, because there was no indication of a problem with the main bearings. Had there been a problem, they would have checked it.
Also, I did contact Survival Motorsports again, and they recommended checking it with a dial indicator. They also recommended line boring the block, which I will have done, if it needs it.
Also, baddad457, I asked the machine shop about the assembly lube they gave me. They said it's the same stuff that comes in the big bottle of assembly lube. They just name it differently in the small bottle. And, I'm using Schneider Racing Cam's cam lube for the cam lobes.
This is the second engine I've built and I'm learning a lot this time. I never worried about this stuff on the last engine I built. That was about 20 years ago. And, I drove the crap out that engine and it's still going. If I remember right, I used STP to assemble that one. Only problem I had with it was a lifter went bad and a blown head gasket between 2 cylinders. I won't use Mr Gasket head gaskets anymore.
#10
08-22-2013, 01:28 PM


#11
08-22-2013, 01:50 PM
#12
08-23-2013, 01:23 AM
Well, the results are in. #2 and #4 were a hair high. Had it line bored. All seems pretty good now. Frustrating that they didn't check it when the tanked and bored the cylinders. On the bright side, I've learned a few things. This is only my second rebuild, ever. Last one was about 20 years ago. I don't remember checking all this stuff.
#13
08-23-2013, 08:22 AM
Logistics Pro
 live and learn.. Thankfully my mother is a patient person dealing with my automotive learning curve
#14
08-23-2013, 10:59 AM
#15
08-23-2013, 01:32 PM

Thread
Thread Starter
Forum
Replies
Last Post
53fatfndr
335 Series- 5.8/351M, 6.6/400, 351 Cleveland
13
05-23-2006 08:35 PM
debestuss
FE & FT Big Block V8 (332, 352, 360, 390, 406, 410, 427, 428)
5
10-03-2004 06:55 PM
drew222
FE & FT Big Block V8 (332, 352, 360, 390, 406, 410, 427, 428)
7
04-13-2004 02:38 PM