Started in on my cab corners today...
#16
 03-21-2009, 04:40 PM


Join Date: Feb 2009
Posts: 46
Likes: 0
Received 0 Likes
on
0 Posts
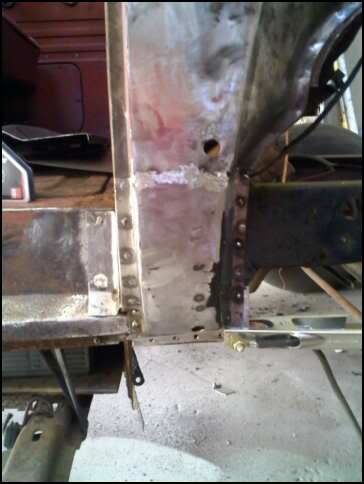
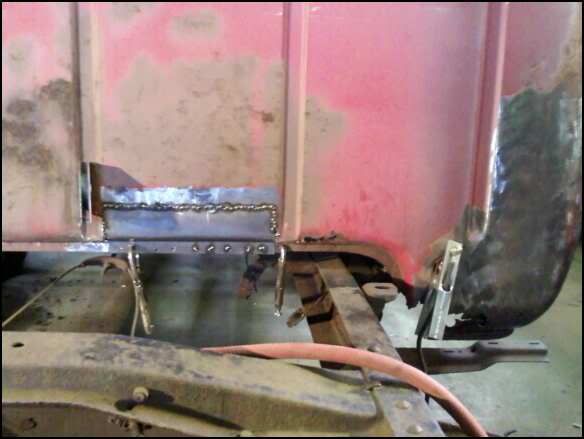
I made some more progress on the cab corner today. I ordered that inner cowl fender support piece from F-100central.com and I got it a few days later. I cut it to fit, then after I got the cab corner to fit up nicely, I clamped the corner in place, put the fender back on, lined up all the holes, and then marked the bottom fender hole on the cab corner and drilled the hole. After that, it was just a matter of fitting the inner support piece inside the cab corner and plug welding it together. When that was done I drilled all my plug welding holes on the cab coner flanges and started tacking it up. I'm really happy the way it's coming out, especially since it's my first sheetmetal repair i've ever done on a car or truck. I plan on finishing the welding up tomorrow. I only have a couple of pics

#17
03-21-2009, 06:12 PM
FTE Legend
Join Date: Oct 2005
Location: northwestern Ontario
Posts: 263,001
Received 4,132 Likes
on
2,656 Posts
#18
03-21-2009, 06:47 PM
Senior User
Join Date: Jul 2004
Location: North Branch, MI
Posts: 216
Likes: 0
Received 0 Likes
on
0 Posts
Sloppy, thanks for the post. I'm about to start the same repair except that I have rust all the way up to the fresh air vent on the passenger side and about half way up on the drivers side. I have been some what hesitant to start but it has to be done before I can put on the new fenders and the other new front end sheet metal.
Good job, keep up the great work..
Bob G
Good job, keep up the great work..
Bob G
#19
03-21-2009, 06:56 PM
Join Date: Feb 2009
Posts: 46
Likes: 0
Received 0 Likes
on
0 Posts
#20
03-22-2009, 08:18 AM

Join Date: May 2003
Location: Burlington, CT
Posts: 1,425
Likes: 0
Received 0 Likes
on
0 Posts
#21
03-22-2009, 04:43 PM
Join Date: Feb 2009
Posts: 46
Likes: 0
Received 0 Likes
on
0 Posts
Just a little side note, the Harbor Freight spot weld drill bits are definately worth buying for anyone doing sheetmetal stuff. They're cheap, they work great and so far it's staying nice and sharp. I usually don't like buying cheap chinese tools, but I've been really impressed with these bits.
#22
04-04-2009, 06:29 PM
Join Date: Feb 2009
Posts: 46
Likes: 0
Received 0 Likes
on
0 Posts
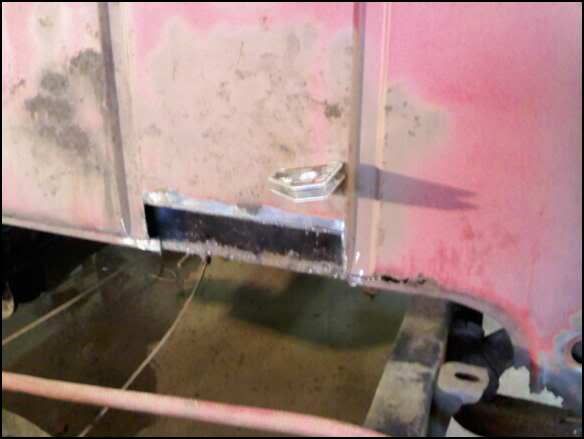
Took a little break from the cab corners and spent some time on the bottom cab edge that has some rust holes. I cut the section out as you can see here in this out of focus photo  :
:
i used a sheet of 20 guage steel and cut it to size (next time I'm going to use 18 gauge). I bent the flange side in my break 90 degrees, then I clamped and sandwiched it between a piece of angle iron to my bench. I then used a piece of 1" steel rod and butted it against the sheet metal and bent it over to get my curve. Hard to explain, but this is what it looked liek after:
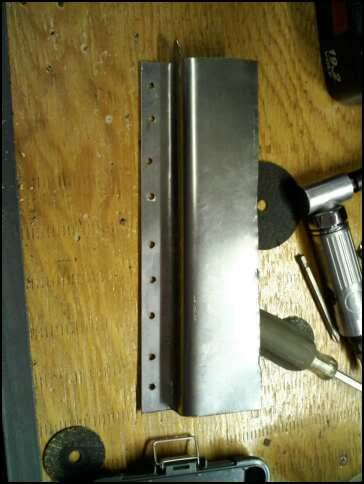
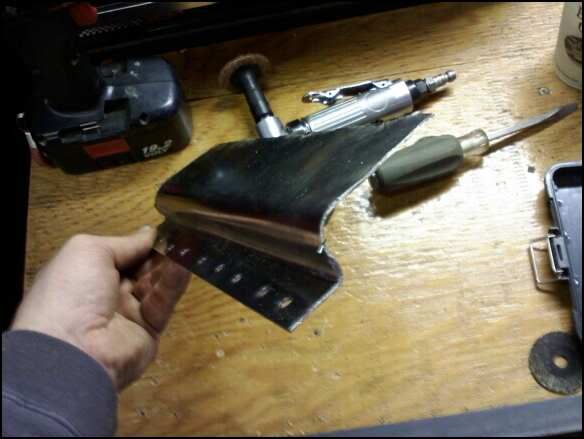
I experimented with a couple of different size rods and pipes and some scap sheet metal to figure out what would give me the best curve to match the rest of the cab and the 1" diamter stuff seemed near perfect.
I've got most of it welded in place today, tomorrow I'll try to finish it up and grind the welds down. Shouldnt' take more than a light skim of body filler to finish it off.
:i used a sheet of 20 guage steel and cut it to size (next time I'm going to use 18 gauge). I bent the flange side in my break 90 degrees, then I clamped and sandwiched it between a piece of angle iron to my bench. I then used a piece of 1" steel rod and butted it against the sheet metal and bent it over to get my curve. Hard to explain, but this is what it looked liek after:
I experimented with a couple of different size rods and pipes and some scap sheet metal to figure out what would give me the best curve to match the rest of the cab and the 1" diamter stuff seemed near perfect.
I've got most of it welded in place today, tomorrow I'll try to finish it up and grind the welds down. Shouldnt' take more than a light skim of body filler to finish it off.
#23
04-04-2009, 07:50 PM
Join Date: May 2003
Location: Burlington, CT
Posts: 1,425
Likes: 0
Received 0 Likes
on
0 Posts
#24
04-05-2009, 12:35 AM

#25
04-05-2009, 06:34 AM
Join Date: Feb 2009
Posts: 46
Likes: 0
Received 0 Likes
on
0 Posts
#26
04-05-2009, 11:32 AM
Mountain Pass
I have allot of pictures in my gallery that my help you out. The undersides of the cab are the real problem areas, starting there and working your way out will make your cab as solid as it can be. Its a project that requires much work and time, but a little more time here can save you from doing it again later. I hope this helps you out.
#27
04-05-2009, 12:03 PM
Join Date: Feb 2009
Posts: 46
Likes: 0
Received 0 Likes
on
0 Posts
I have allot of pictures in my gallery that my help you out. The undersides of the cab are the real problem areas, starting there and working your way out will make your cab as solid as it can be. Its a project that requires much work and time, but a little more time here can save you from doing it again later. I hope this helps you out.
I will def check out your gallery. Does anyone know a decent way of re-creating those "ribbed" sections on the back of the cab?
#28
04-05-2009, 12:32 PM
FTE Legend
Join Date: Oct 2005
Location: northwestern Ontario
Posts: 263,001
Received 4,132 Likes
on
2,656 Posts
http://www.jalopyjournal.com/forum/s...d.php?t=234175
Hope this helps,it's something I'm going to give a try once I get a press.
#29
04-05-2009, 12:58 PM
Join Date: Feb 2009
Posts: 46
Likes: 0
Received 0 Likes
on
0 Posts
If you had access to a bead roller you could do it that way or you could form a jig and use a hydraulic press. On the Hamb there was a thread by a guy who made a recess in a door post this way, I'll try to find the link and post it here.
Body: How to make a recess in sheetmetal - THE H.A.M.B.
Hope this helps,it's something I'm going to give a try once I get a press.
Body: How to make a recess in sheetmetal - THE H.A.M.B.
Hope this helps,it's something I'm going to give a try once I get a press.
#30
04-05-2009, 01:12 PM
Elder User
Join Date: May 2006
Location: Kansas City, Mo
Posts: 907
Likes: 0
Received 0 Likes
on
0 Posts
Panels
For a short thread it was very informative. I wish the threads on welding were all in one spot to ease the search function problems. Maybe write a book on the subject, but publishing cost would prevent doing it. How about a moderator retitling the threads after they end? We could have a thread title list in the search function area. chuck