1974 Ford Cummins Crew cab
#1906
 04-04-2017, 01:07 AM

Apparently it'll be a big day for this thread... 3 posts from me - 2 with pictures!
I could have SWORN I posted this here, but I don't see it above, so here it is. This post hit cumminsforum on 3/22 and should've hit here the same day.
Ok, have a minute so here's another small update showing stuff I've been working on since January. This time it's headlight mounts. This is something that would have been done in one night in the shop in the old days. Currently I've been messing with it on & off for over 2 months. The couch seems to have suction cupped itself to my rear lately so I haven't gone into the garage to just focus & get this done like I should have.
A guy I know & used to hang out with is a lighting guy & suggested these headlight housings. They are off a euro jetta if I remember right. They are for an h4 bulb, a 7" glass lens with a good reflector & have the adjustability like stock ones built into the mounting plate. My thought was always that I would do a few tabs off of the core support to hold them, but when I started messing with it I realized that may be a bit tough. I also realized that my silly, fancy-pantsy custom core support had a plate running RIGHT behind there the bulb access would be for the headlight. This can be seen below & was no good. I walked away from my 1st test fit a little frustrated.
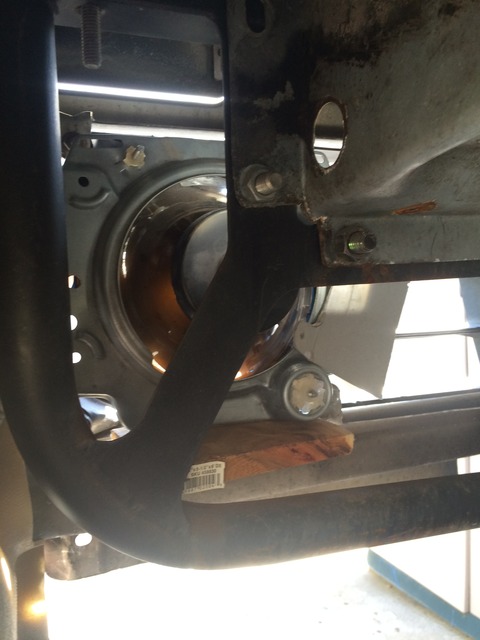
I got the chance about a week later to stand there for 15-20 min looking at this & figured out a plan. I came away from this much happier knowing I had figured out something that could work. I need to move the lights as far forward as possible in the grill (to a point - without looking goofy) to create access to the back of the light for bulb changes/access. I may also cut a hole in the middle of the offending area of the core support plate & dimple die it to use that to run the wiring through. Will have to se what I need to do when I get back to this.
I then realized that these headlight buckets may be easier to just mount to the grill shell/inserts. The stock tabs on the grill shell were fairly close to the mounting holes for these headlight buckets. I thought for a second that the grill shell may be too light to mount these things off of, but after looking at it a little more the whole assembly gets pretty rigid when everything is bolted up & I think these will be fine.
I pulled the grill & took it in the garage to mess with fitment.
Both the grill shells and the headlight buckets would need a little trimming to work, but it didn't look that bad.
Trimmed a tab off the bottom here
Took a little bit off the top too (light on left cut - light on right = stock)
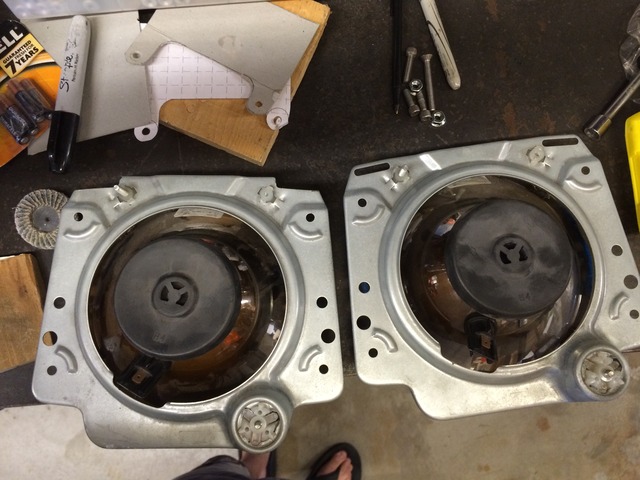
And after a little clean up on the rough edges of the cuts it was test fit time & it was close

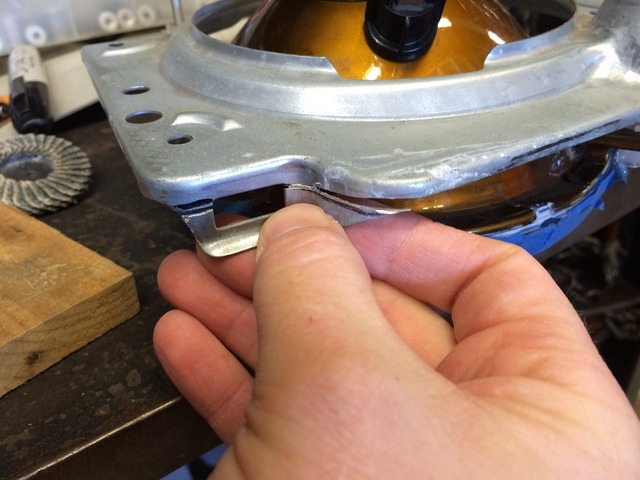
Funny side note here. 1 of the headlight buckets had big, lower tabs on it (see second pic above) & one did not. I thought that was kind of odd, but figured driver vs. pass. side may be different on the jetta or whatever these are for. I didn't mind as it saved me some cutting. Well... today I was looking back through old pics for my previous fuel line routing setup (more on why later) and I came across pics from June 2011 in which it seems I had cut the tabs off one of the headlights already. I have ZERO recollection of doing this, & my cleanup job on the cuts must have been pretty dang good because I could not tell that I had cut one! That's what I get for bouncing around from project to project on this thing & taking forever to do anything.
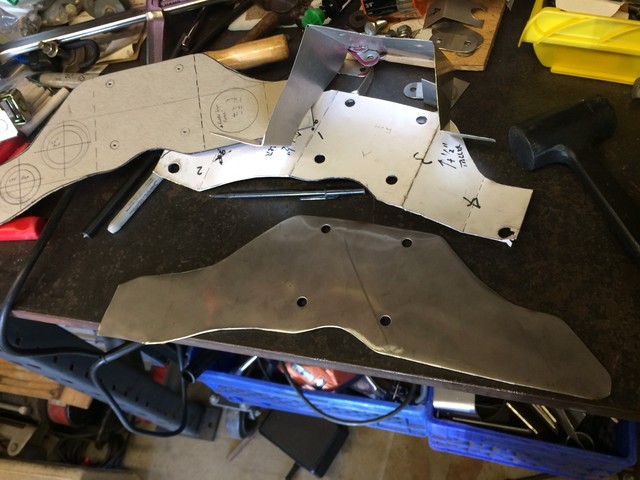
Back on topic... After a little measuring I made cardboard testers of the tabs and did a test fit. They seemed to work.
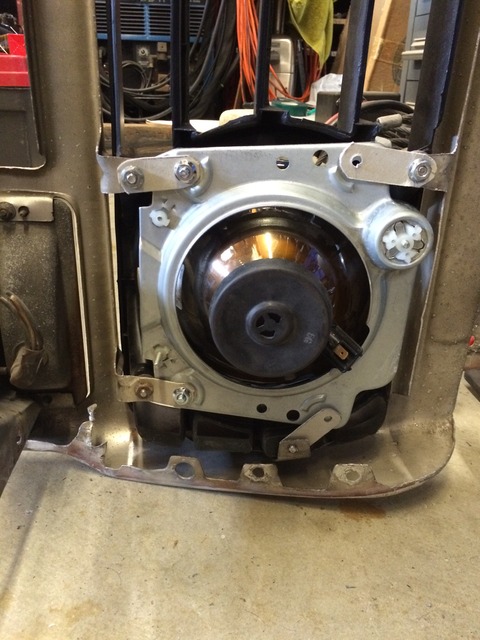
Since then I have made the tabs out of 316 stainless, and just yesterday I trimmed the grill shell & 2nd headlight bucket. I will mount the 1st headlight and use the cardboard templates to verify the same size tabs will work for both sides. I assume they will, but whenever I assume without verifying I am proved wrong, and it's quicker to check than to make another set of stainless tabs all over again.
It shouldn't take me long to bolt up the headlight & pump out a second set of tabs, but that all goes back to the beginning of the post here when I mentioned the couch grabbing me... I've told myself for 4 nights in a row I'd got out & at least get things started, and 4 nights i have failed. I can't completely finish the tabs at night as I can't run the sander while my wife & kids sleep (an aspect from the shop I miss), but I SHOULD be able to get 90% of the way there. Maybe tonight is the night...
I could have SWORN I posted this here, but I don't see it above, so here it is. This post hit cumminsforum on 3/22 and should've hit here the same day.
Ok, have a minute so here's another small update showing stuff I've been working on since January. This time it's headlight mounts. This is something that would have been done in one night in the shop in the old days. Currently I've been messing with it on & off for over 2 months. The couch seems to have suction cupped itself to my rear lately so I haven't gone into the garage to just focus & get this done like I should have.
A guy I know & used to hang out with is a lighting guy & suggested these headlight housings. They are off a euro jetta if I remember right. They are for an h4 bulb, a 7" glass lens with a good reflector & have the adjustability like stock ones built into the mounting plate. My thought was always that I would do a few tabs off of the core support to hold them, but when I started messing with it I realized that may be a bit tough. I also realized that my silly, fancy-pantsy custom core support had a plate running RIGHT behind there the bulb access would be for the headlight. This can be seen below & was no good. I walked away from my 1st test fit a little frustrated.

I got the chance about a week later to stand there for 15-20 min looking at this & figured out a plan. I came away from this much happier knowing I had figured out something that could work. I need to move the lights as far forward as possible in the grill (to a point - without looking goofy) to create access to the back of the light for bulb changes/access. I may also cut a hole in the middle of the offending area of the core support plate & dimple die it to use that to run the wiring through. Will have to se what I need to do when I get back to this.
I then realized that these headlight buckets may be easier to just mount to the grill shell/inserts. The stock tabs on the grill shell were fairly close to the mounting holes for these headlight buckets. I thought for a second that the grill shell may be too light to mount these things off of, but after looking at it a little more the whole assembly gets pretty rigid when everything is bolted up & I think these will be fine.
I pulled the grill & took it in the garage to mess with fitment.
Both the grill shells and the headlight buckets would need a little trimming to work, but it didn't look that bad.
Trimmed a tab off the bottom here

Took a little bit off the top too (light on left cut - light on right = stock)

And after a little clean up on the rough edges of the cuts it was test fit time & it was close

Funny side note here. 1 of the headlight buckets had big, lower tabs on it (see second pic above) & one did not. I thought that was kind of odd, but figured driver vs. pass. side may be different on the jetta or whatever these are for. I didn't mind as it saved me some cutting. Well... today I was looking back through old pics for my previous fuel line routing setup (more on why later) and I came across pics from June 2011 in which it seems I had cut the tabs off one of the headlights already. I have ZERO recollection of doing this, & my cleanup job on the cuts must have been pretty dang good because I could not tell that I had cut one! That's what I get for bouncing around from project to project on this thing & taking forever to do anything.
Back on topic... After a little measuring I made cardboard testers of the tabs and did a test fit. They seemed to work.

Since then I have made the tabs out of 316 stainless, and just yesterday I trimmed the grill shell & 2nd headlight bucket. I will mount the 1st headlight and use the cardboard templates to verify the same size tabs will work for both sides. I assume they will, but whenever I assume without verifying I am proved wrong, and it's quicker to check than to make another set of stainless tabs all over again.
It shouldn't take me long to bolt up the headlight & pump out a second set of tabs, but that all goes back to the beginning of the post here when I mentioned the couch grabbing me... I've told myself for 4 nights in a row I'd got out & at least get things started, and 4 nights i have failed. I can't completely finish the tabs at night as I can't run the sander while my wife & kids sleep (an aspect from the shop I miss), but I SHOULD be able to get 90% of the way there. Maybe tonight is the night...
#1907
04-04-2017, 01:44 AM
Since my last post (what is directly above & should have been posted about 2 weeks ago) I have test fit the headlights & made another set of the mounting brackets out of stainless. Now I just need hardware (going stainless on that as well so need to pick a few bolts up) & I can get those mounted.
Next, here's another delayed post of what I've been messing with since January 2017...
About a year ago (probably more) I had left off on doing the fuel lines. Well, a week or 2 ago now I made the final 2 bends in my hard line for the return line so that is done! Finally!!
I then got back to mocking up a bracket to hang an auxiliary fuel filter. I had purchased a base & filter a while back & was messing with this last January as well. Here we are again a year or more later & I'm finally back at it. I picked up the 1st half of the assembly discussed here:
DIY Fuel/Water/Air Separator/Accumulator - Dodge Cummins Diesel Forum
Well, most of the 1st half... I didn't get the parts for the air bleed off/return one he did.
I was just going to use the filter & dip tube really, for extra filtration & to help combat the possibility of sucking air vs. fuel if my tank got WAY low & I was on a BIG hill. A long shot for sure, but still in the realm of possibility.
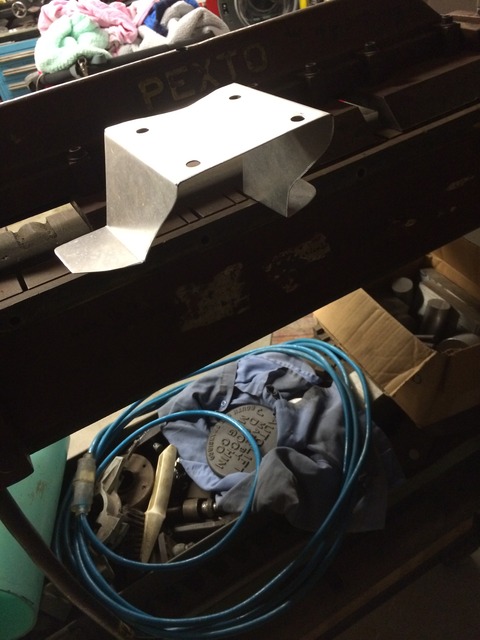
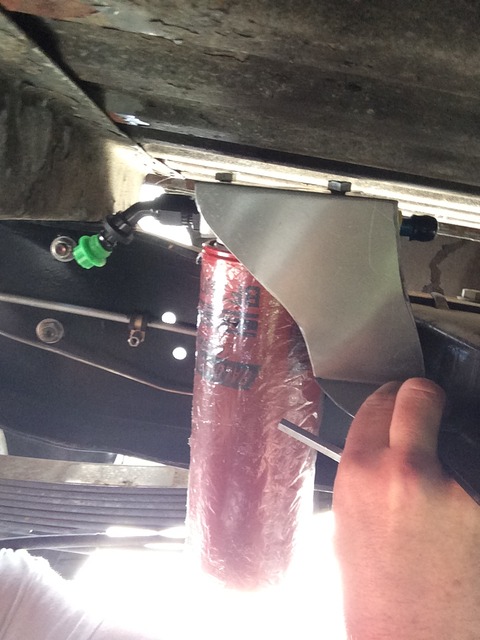
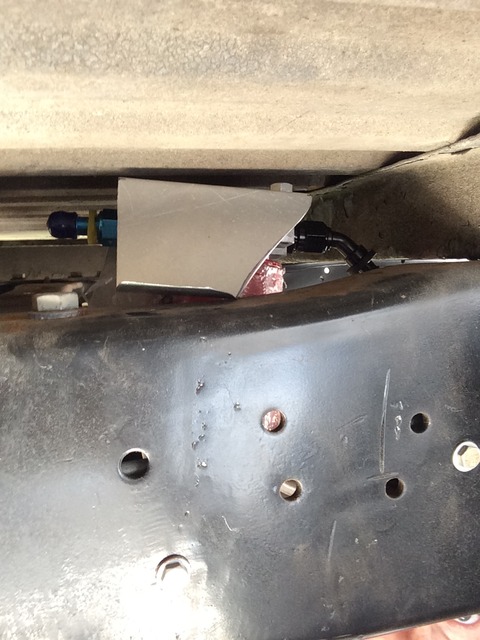
Anyway, I had left off figuring out the last couple bend angles needed to make a bracket for the filter mount. This filter is TALL, so there wasn't a great place for it. I am trying to tuck it way up close to the bed to get it up as high as possible.
I fought the floppy cardboard bracket enough to figure out angles & that it seemed I could still move this thing up a half inch or so more. Notice the clamps - I used small pieces of aluminum that I bent & clamped to the cardboard template to figure out the bend angles & try & keep this thing rigid. It kind of worked, but I want a real look at what this thing will be like so I decided to make a mock up bracket out of thin aluminum before spending time on the real bracket which will be stainless.
Cardboard tester pics. You can see the weight of the filter folded this thing over a bit while I took the pics
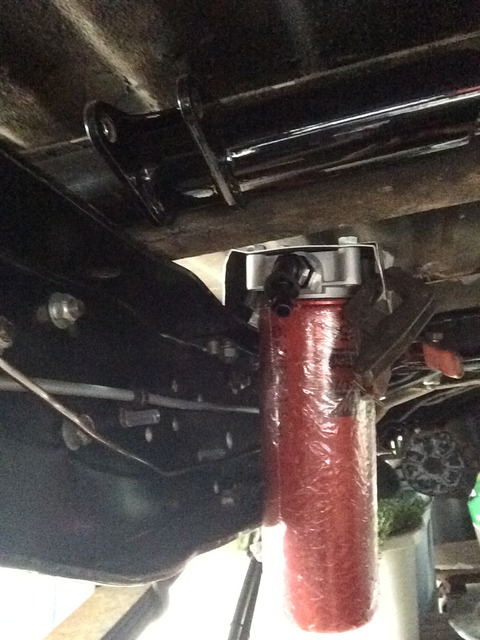
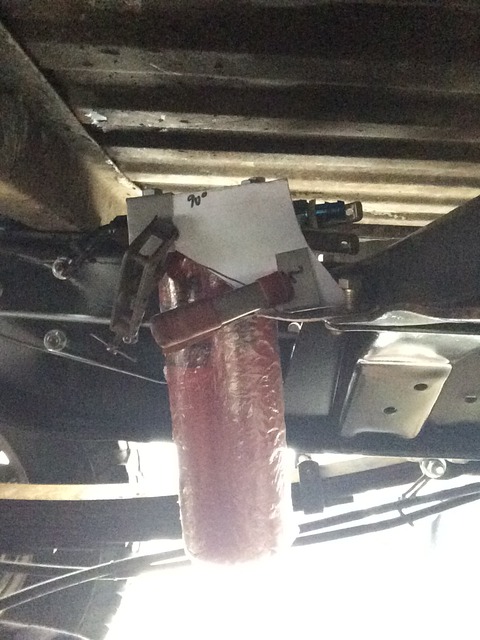
You can also see just how dang low this filter hangs. The filter is 9.5" tall! I placed this where the filter isn't any lower than the leaf hanger, but I'm still worried about the filter getting tagged off road - so I started looking at other filters. That research led me to find some opinions on filter microns, etc. This filter is 2 micron, which sounds great, but will clog a bit faster & may lead to fuel starvation. With the stock filter (which I am keeping) at 14 micron I was trying to find a 7.5" or so tall filter at 10-20 microns. Closest I have come so far is a 7" filter at 6 microns. I think that is what I will end up running. I haven't made the dip tube portion of this yet, so I will just adjust the dip tube (copper pipe) length for the final filter length. This big, 2 micron filter will be used for the 1st tank of fuel or so, so as to catch anything left in the tank from fabrication & then I'll go to the shorter, 6 micron filter I found when I actually start using the truck regularly (in the year 2050 - lol...)
Now fast forward to this week & today even & I have a tester bracket cut, which I hope to bend up in the brake tonight & test fit tomorrow.
Aside from the filter addition I am also re-thinking my fuel line run to the lift pump.
Years ago I removed the fuel heater & added a -8 AN fitting to the strainer inlet with a 1/2 rubber line coming from the frame to it. I had a 90* -8 AN fitting at the frame that was a short/sharp/hard 90 and that was going to go to 1/2" stainless hard line back to the tank. Well I last year decided to dump the 1/2" stainless & go to a 1/2" twistloc hose.
Now in my recent snow-in in January & the reading & conversations with a fellow FTE'er & cummins guy I have decided to redo a bit of what I already had done. I will now be ditching the stock strainer as well as the heater & I have picked up a -8 AN fitting for the lift pump. My 1/2" twistlock line will run straight there & I have a nice, smooth/swooping 90* fitting to get there. This is actually the fitting that went to the top of the fuel heater before, from the short run of soft hose I had, so at least that complete setup wasn't a waste...
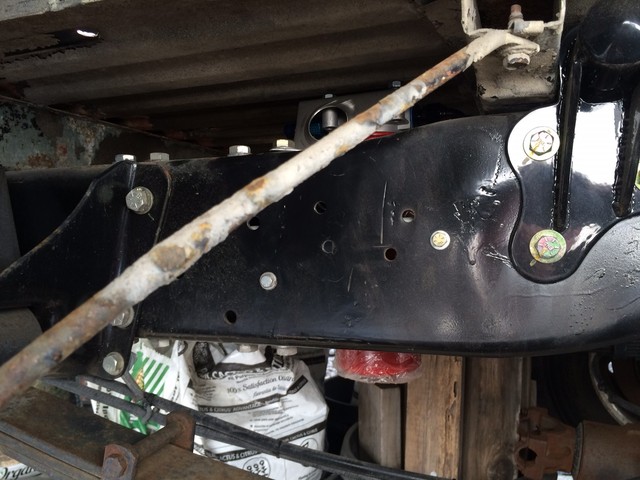
Here's a couple pictures of the previous setup that I will be removing. All the way back from May 2012!!! May this project drags on...
Look how clean & shiny my frame & this stainless bracket are!
You can see the AN fitting I'm keeping at the top of the fuel heater hose here
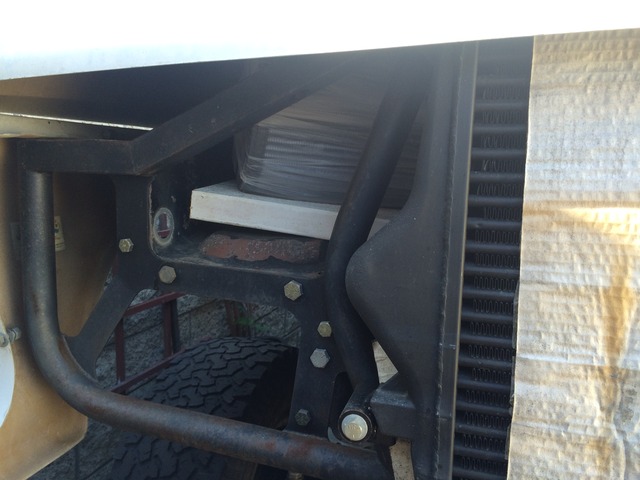
And here is a glorious shot from the other day showing what that stainless tab & the frame, etc. look like after sitting neglected outside for 3-4 years about a mile from the ocean!

Hose removed & capped for now, and stainless bracket that held the 90* AN fitting at the frame removed as it's not needed anymore. New -AN fitting will go on the lift pump when I have time & the stock strainer will get cut off so as to clean things up.

All in all this should be a cleaner setup, with less connections = less area for potential leaks, less hard 90's & turns, etc. So hopefully my little extra time in redoing this is worth it.
And last..., I bit the bullet & ordered my speedo from eBay. A bit miffed as it was advertised as new but paint is missing on bezel so definitely been at least bouncing around in the box forever if never actually out & messed with. I HATE the fact that buyer has to pay shipping on returns for instances like this & since not spending the $15 or so to ship back is important to me because I'm cheap & trying to pinch pennies here for important stuff, I'm just gonna complain to the seller then touch up the bezel. Hopefully my flat black paint matches!
OK, enough rambling - it's almost midnight. Time to go bend up that bracket!
Next, here's another delayed post of what I've been messing with since January 2017...
About a year ago (probably more) I had left off on doing the fuel lines. Well, a week or 2 ago now I made the final 2 bends in my hard line for the return line so that is done! Finally!!
I then got back to mocking up a bracket to hang an auxiliary fuel filter. I had purchased a base & filter a while back & was messing with this last January as well. Here we are again a year or more later & I'm finally back at it. I picked up the 1st half of the assembly discussed here:
DIY Fuel/Water/Air Separator/Accumulator - Dodge Cummins Diesel Forum
Well, most of the 1st half... I didn't get the parts for the air bleed off/return one he did.
I was just going to use the filter & dip tube really, for extra filtration & to help combat the possibility of sucking air vs. fuel if my tank got WAY low & I was on a BIG hill. A long shot for sure, but still in the realm of possibility.
Anyway, I had left off figuring out the last couple bend angles needed to make a bracket for the filter mount. This filter is TALL, so there wasn't a great place for it. I am trying to tuck it way up close to the bed to get it up as high as possible.
I fought the floppy cardboard bracket enough to figure out angles & that it seemed I could still move this thing up a half inch or so more. Notice the clamps - I used small pieces of aluminum that I bent & clamped to the cardboard template to figure out the bend angles & try & keep this thing rigid. It kind of worked, but I want a real look at what this thing will be like so I decided to make a mock up bracket out of thin aluminum before spending time on the real bracket which will be stainless.
Cardboard tester pics. You can see the weight of the filter folded this thing over a bit while I took the pics


You can also see just how dang low this filter hangs. The filter is 9.5" tall! I placed this where the filter isn't any lower than the leaf hanger, but I'm still worried about the filter getting tagged off road - so I started looking at other filters. That research led me to find some opinions on filter microns, etc. This filter is 2 micron, which sounds great, but will clog a bit faster & may lead to fuel starvation. With the stock filter (which I am keeping) at 14 micron I was trying to find a 7.5" or so tall filter at 10-20 microns. Closest I have come so far is a 7" filter at 6 microns. I think that is what I will end up running. I haven't made the dip tube portion of this yet, so I will just adjust the dip tube (copper pipe) length for the final filter length. This big, 2 micron filter will be used for the 1st tank of fuel or so, so as to catch anything left in the tank from fabrication & then I'll go to the shorter, 6 micron filter I found when I actually start using the truck regularly (in the year 2050 - lol...)
Now fast forward to this week & today even & I have a tester bracket cut, which I hope to bend up in the brake tonight & test fit tomorrow.
Aside from the filter addition I am also re-thinking my fuel line run to the lift pump.
Years ago I removed the fuel heater & added a -8 AN fitting to the strainer inlet with a 1/2 rubber line coming from the frame to it. I had a 90* -8 AN fitting at the frame that was a short/sharp/hard 90 and that was going to go to 1/2" stainless hard line back to the tank. Well I last year decided to dump the 1/2" stainless & go to a 1/2" twistloc hose.
Now in my recent snow-in in January & the reading & conversations with a fellow FTE'er & cummins guy I have decided to redo a bit of what I already had done. I will now be ditching the stock strainer as well as the heater & I have picked up a -8 AN fitting for the lift pump. My 1/2" twistlock line will run straight there & I have a nice, smooth/swooping 90* fitting to get there. This is actually the fitting that went to the top of the fuel heater before, from the short run of soft hose I had, so at least that complete setup wasn't a waste...
Here's a couple pictures of the previous setup that I will be removing. All the way back from May 2012!!! May this project drags on...
Look how clean & shiny my frame & this stainless bracket are!

You can see the AN fitting I'm keeping at the top of the fuel heater hose here

And here is a glorious shot from the other day showing what that stainless tab & the frame, etc. look like after sitting neglected outside for 3-4 years about a mile from the ocean!

Hose removed & capped for now, and stainless bracket that held the 90* AN fitting at the frame removed as it's not needed anymore. New -AN fitting will go on the lift pump when I have time & the stock strainer will get cut off so as to clean things up.

All in all this should be a cleaner setup, with less connections = less area for potential leaks, less hard 90's & turns, etc. So hopefully my little extra time in redoing this is worth it.
And last..., I bit the bullet & ordered my speedo from eBay. A bit miffed as it was advertised as new but paint is missing on bezel so definitely been at least bouncing around in the box forever if never actually out & messed with. I HATE the fact that buyer has to pay shipping on returns for instances like this & since not spending the $15 or so to ship back is important to me because I'm cheap & trying to pinch pennies here for important stuff, I'm just gonna complain to the seller then touch up the bezel. Hopefully my flat black paint matches!
OK, enough rambling - it's almost midnight. Time to go bend up that bracket!
#1908
04-12-2017, 02:24 AM
Here's another update of what I've been messing with over the last week or so:
4-3-17 Late night I made up the mock up fuel filter bracket out of aluminum
4-4-17 I test fit the bracket. Seemed to fit well enough to move onto the real bracket = 316 stainless
4-9-17 I "started" the real bracket. Although I didn't get any further than tracing it on the stainless...
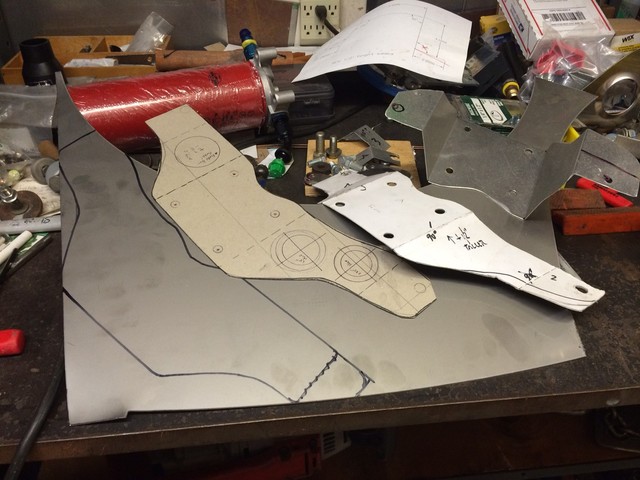
4-10-17 Lunch break got me a little bit of progress, which I also continued today (4-11-17), but it still doesn't look much different than this pic
Aside from the fuel filter mount since I can never just focus on one thing at a time, & since I had some free time at lunch I started looking at my air filter setup. I've had a filter sitting here for years, so why not start now...
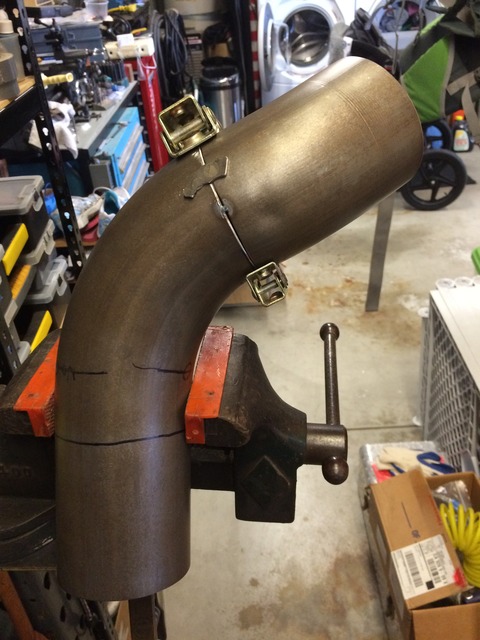
4-5-17 I grabbed a piece of 4" exhaust pipe I had left over with some bends that looked like they might work & I went out to the truck
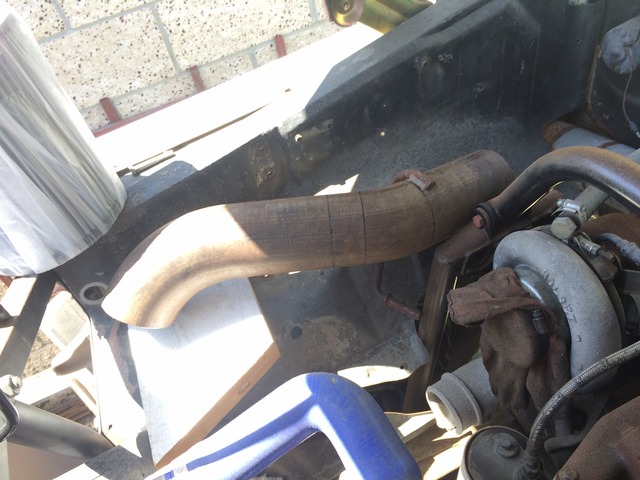
1 hour or so, a few slices of the band saw, a bit of time on the belt sander, and a little time behind the sand blast cabinet (so as to clean the exhaust soot out of the pipe mainly) later and I had something that was looking like it may work
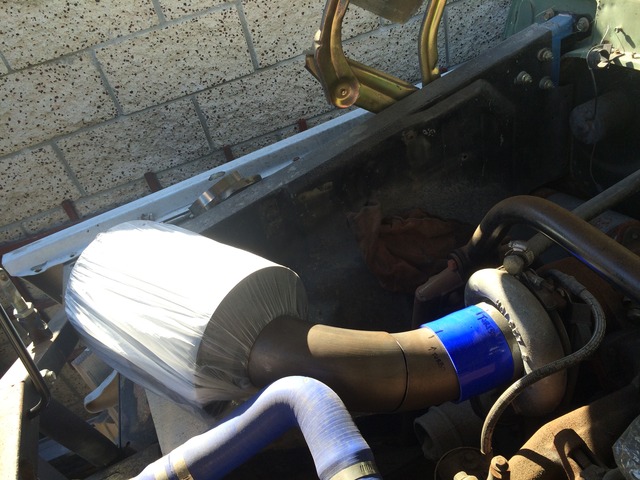
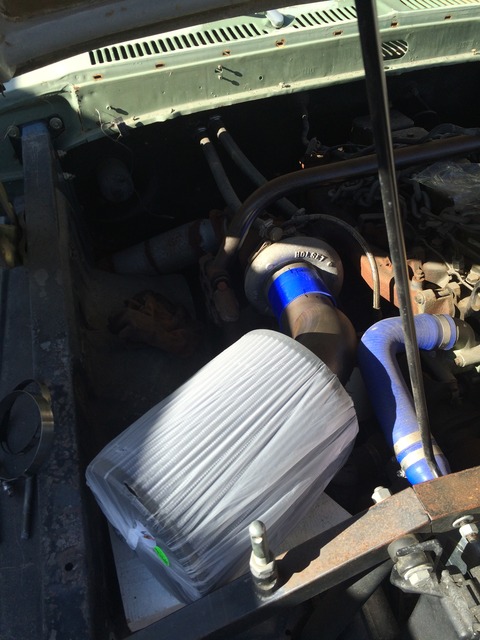
This is a BIG filter but it fit well under the hood, with a bit of space above the inner fender. Seems like it'll get pretty good fresh air flow as well.
4-6-17 I start by tacking up the 2 pieces of intake tube from yesterday
All excited I run out to the truck on lunch again to do a test fit & see if I can weld-er-up. NOPE! This is when panic set in a bit... I'm a bit rusty in working on stuff & REALLY looking around at all the variables to make sure I have all my ducks in order before starting to fab. Well... the danged alternator wasn't in the truck & it looked like it was gonna be close! I moved out of my shop about 4 years ago now & packed parts for this thing & my other projects all over the garage. I try & have things organized to have certain project parts together or in a certain part of the garage, but even with that I often can't find crap! Heck I've even re-ordered parts I already had (u-bolts for my rear axle!) since I had forgotten I had ordered um & didn't see um with my other axle parts...
Anyway, luck was on my side this time & I remembered seeing a box labeled alternator recently. Headed to the box right away & sure enough I was in luck. I'd rather be lucky than good many times. I guess it doesn't hurt that I'm a good pack rat & label things well.
Alternator on, test fit commence with fingers crossed...
Crisis averted - it fits!
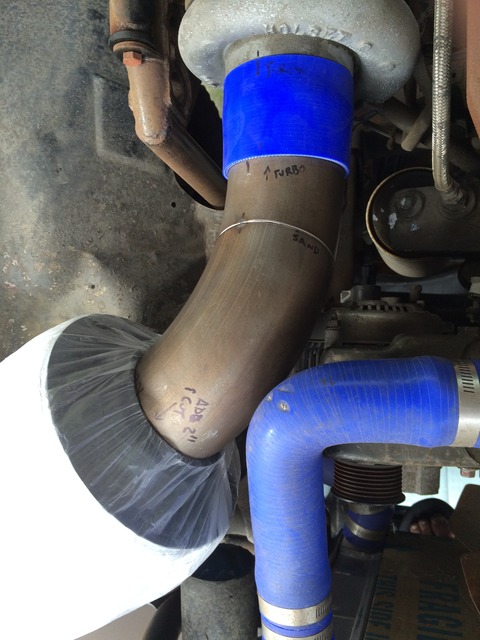
It's a tight fit with everything there, but nothing touches!

I got this welded up the other night. Next I just need to roll the beads in the ends & then fab up a little support bracket for the filter end.
4-3-17 Late night I made up the mock up fuel filter bracket out of aluminum

4-4-17 I test fit the bracket. Seemed to fit well enough to move onto the real bracket = 316 stainless


4-9-17 I "started" the real bracket. Although I didn't get any further than tracing it on the stainless...

4-10-17 Lunch break got me a little bit of progress, which I also continued today (4-11-17), but it still doesn't look much different than this pic

Aside from the fuel filter mount since I can never just focus on one thing at a time, & since I had some free time at lunch I started looking at my air filter setup. I've had a filter sitting here for years, so why not start now...
4-5-17 I grabbed a piece of 4" exhaust pipe I had left over with some bends that looked like they might work & I went out to the truck

1 hour or so, a few slices of the band saw, a bit of time on the belt sander, and a little time behind the sand blast cabinet (so as to clean the exhaust soot out of the pipe mainly) later and I had something that was looking like it may work


This is a BIG filter but it fit well under the hood, with a bit of space above the inner fender. Seems like it'll get pretty good fresh air flow as well.

4-6-17 I start by tacking up the 2 pieces of intake tube from yesterday

All excited I run out to the truck on lunch again to do a test fit & see if I can weld-er-up. NOPE! This is when panic set in a bit... I'm a bit rusty in working on stuff & REALLY looking around at all the variables to make sure I have all my ducks in order before starting to fab. Well... the danged alternator wasn't in the truck & it looked like it was gonna be close! I moved out of my shop about 4 years ago now & packed parts for this thing & my other projects all over the garage. I try & have things organized to have certain project parts together or in a certain part of the garage, but even with that I often can't find crap! Heck I've even re-ordered parts I already had (u-bolts for my rear axle!) since I had forgotten I had ordered um & didn't see um with my other axle parts...
Anyway, luck was on my side this time & I remembered seeing a box labeled alternator recently. Headed to the box right away & sure enough I was in luck. I'd rather be lucky than good many times. I guess it doesn't hurt that I'm a good pack rat & label things well.
Alternator on, test fit commence with fingers crossed...
Crisis averted - it fits!

It's a tight fit with everything there, but nothing touches!

I got this welded up the other night. Next I just need to roll the beads in the ends & then fab up a little support bracket for the filter end.
#1910
04-20-2017, 06:38 PM
Thanks for the compliment. I had hoped by this point this bracket would have been done & I'd be posting pics now, but I haven't touched anything on the truck since this last post. Work & life had been busy. Today was to be the day as workload was lighter & boss out for a bit so some garage hookey was in my sights. Fate killed that & handed me what seems like a 24 hr flu instead. I'm bummed/annoyed right now, but that's life I guess. At least I've stopped puking for the day it seems...
#1911
04-26-2017, 11:22 PM
#1912
05-02-2017, 03:59 PM
Time for another slightly overdue update, with not much progress to show.
After being sick on Thurs the 20th & still recovering a bit on that Fri I didn't get anything done. Come Monday 4-24-17 I got back in the shop on lunch and got the holes drilled fro the dimples. Late at night I got the thing bend up & the dimples flared.
Here's a shot part way through
4-25-17 I test fit the aux. filter bracket on lunch & got the holes finalized there. The big/long filter doesn't stick down past the frame super far, but it does go below it. Due to this I have ordered a shorter filter (found a +/-7" long, 9 Micron donaldson I'll use) and I'll set up the dip tube based on that once the filters get here in a couple days.
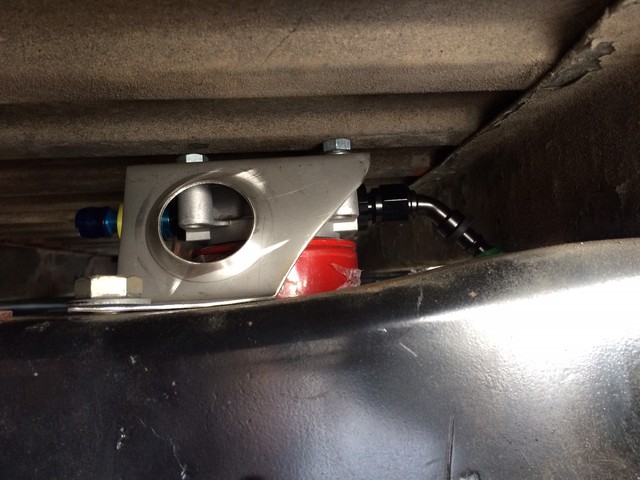
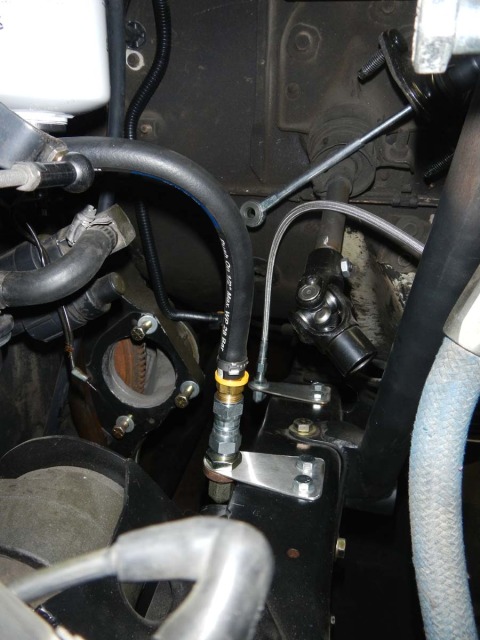
I also pulled the top of the inlet to the lift pump at this time so as to redo the fitting to a -8 AN. Hindsight being 20/20 and knowing what I know now I could have just left the stock 90* fitting in the lift pump that the 90*/elbow hose from the fuel filter connected to. I could have just turned that 180* or so and connected the new 1/2" feed hose to that. I had already purchased the AN fitting though & I convince myself it wasn't a waste as my 90* fitting on the end of the hose is sweeping vs. a hard, 90* turn - better hydraulics... yeah... that's it!
Stock fitting from the lift pump is here with my new -8AN below it
I got the new fitting in & quickly realized I should have not been lazy & just pulled the pump. In about 1/2 hour of trying & cursing I couldn't get the fitting start back on the lift pump while fighting the internal springs. This gave me an excuse to pull the pump like I should have initially & cut off the furl heater assembly completely since I was ditching it.
4-26-17 Lift pump with the fuel heater pulled & inlet fitting successfully re-installed. This was much easier on the bench vs. fighting the tire and my shock hoop to do this one the truck.
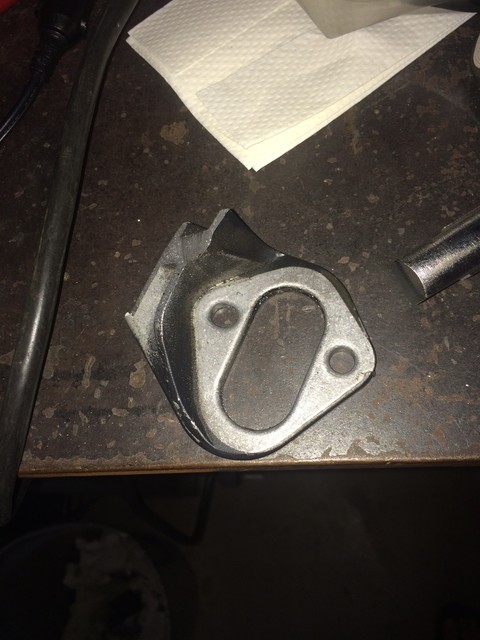
Here's the starting of the cut off of the fuel heater. I'm just going to use the space for the lift pump here so hacked off the heater & then cleaned up the spacer a bit & painted it after this pic was taken.
Side note:
I was looking at changing the hard that goes from the lift pump to the stock fuel filter. Trying to keep the "big line" theme going here. I was looking for -8 parts & 1/2" hose but there is no banjo to -8AN fitting for where this hits the fuel filter. Therefore -6 was as big as I could go with things. In measuring the stock tube and the �6 stuff, they are about the same size, so no sense in changing really.
My -6 fitting ID = .241" & stock metal tube fitting necks down to .250" at flare/connection to LP. That's a little bigger than the -6 AN stuff so why waster the time & $$. So I thought... See below
This brings us to today - 5/2-2-17
I just went out on lunch & bolted the lift pump back on the truck. I fought the stupid hard line coming out the top of the lift pump that goes to the fuel filter though. After 10-15 min. of trying I had to call it & come back in & go back to work. Man I HATE hard lines. They NEVER seem to be easy to get the threads started. If I had gone AN I wouldn't be fighting this POS!! Gonna try & head back out at 5 for a few min to see if taking a break from it makes any difference. Days like this tick me off = something that is supposed to be simple & quick fights you & wastes a bunch of time. Oh wait, that's darn never every day on this truck!!!
After being sick on Thurs the 20th & still recovering a bit on that Fri I didn't get anything done. Come Monday 4-24-17 I got back in the shop on lunch and got the holes drilled fro the dimples. Late at night I got the thing bend up & the dimples flared.
Here's a shot part way through

4-25-17 I test fit the aux. filter bracket on lunch & got the holes finalized there. The big/long filter doesn't stick down past the frame super far, but it does go below it. Due to this I have ordered a shorter filter (found a +/-7" long, 9 Micron donaldson I'll use) and I'll set up the dip tube based on that once the filters get here in a couple days.


I also pulled the top of the inlet to the lift pump at this time so as to redo the fitting to a -8 AN. Hindsight being 20/20 and knowing what I know now I could have just left the stock 90* fitting in the lift pump that the 90*/elbow hose from the fuel filter connected to. I could have just turned that 180* or so and connected the new 1/2" feed hose to that. I had already purchased the AN fitting though & I convince myself it wasn't a waste as my 90* fitting on the end of the hose is sweeping vs. a hard, 90* turn - better hydraulics... yeah... that's it!
Stock fitting from the lift pump is here with my new -8AN below it

I got the new fitting in & quickly realized I should have not been lazy & just pulled the pump. In about 1/2 hour of trying & cursing I couldn't get the fitting start back on the lift pump while fighting the internal springs. This gave me an excuse to pull the pump like I should have initially & cut off the furl heater assembly completely since I was ditching it.
4-26-17 Lift pump with the fuel heater pulled & inlet fitting successfully re-installed. This was much easier on the bench vs. fighting the tire and my shock hoop to do this one the truck.
Here's the starting of the cut off of the fuel heater. I'm just going to use the space for the lift pump here so hacked off the heater & then cleaned up the spacer a bit & painted it after this pic was taken.

Side note:
I was looking at changing the hard that goes from the lift pump to the stock fuel filter. Trying to keep the "big line" theme going here. I was looking for -8 parts & 1/2" hose but there is no banjo to -8AN fitting for where this hits the fuel filter. Therefore -6 was as big as I could go with things. In measuring the stock tube and the �6 stuff, they are about the same size, so no sense in changing really.
My -6 fitting ID = .241" & stock metal tube fitting necks down to .250" at flare/connection to LP. That's a little bigger than the -6 AN stuff so why waster the time & $$. So I thought... See below
This brings us to today - 5/2-2-17
I just went out on lunch & bolted the lift pump back on the truck. I fought the stupid hard line coming out the top of the lift pump that goes to the fuel filter though. After 10-15 min. of trying I had to call it & come back in & go back to work. Man I HATE hard lines. They NEVER seem to be easy to get the threads started. If I had gone AN I wouldn't be fighting this POS!! Gonna try & head back out at 5 for a few min to see if taking a break from it makes any difference. Days like this tick me off = something that is supposed to be simple & quick fights you & wastes a bunch of time. Oh wait, that's darn never every day on this truck!!!
#1913
05-02-2017, 06:17 PM
Warning: Rant coming!
Man I effing hate my truck right now & it seems clear it hates me!
I'm in a bad mood now due to that stupid fitting!
Of course I couldn't wait til 5 to mess with it again & work was slightly quiet, so for 3 or 4 5-20 minute spurts I'd go out to the truck & mess with it. Finally said enough is enough I'm not getting this & cranked it in.
Pretty sure I cross threaded the **** out of that fitting trying to get this to work. The fitting on the top of the lift pump is aluminum where the brass fitting on the hard line screws in & I'm pretty sure I killed it. Will find out when I try & start this thing years from now & it pisses fuel everywhere...
Hopefully that doesn't happen, but who knows. I guess I will find out then.
I'm currently thinking I should have spent the money and gone �AN stuff just for headache factor Have I mentioned I HATE hard lines?). Never figured this thing would be this much of a pain in the a$$ to get back in though.
Oh well, if I have to redo it later I'll spend the $ on the -AN stuff and kick myself for not doing it now...
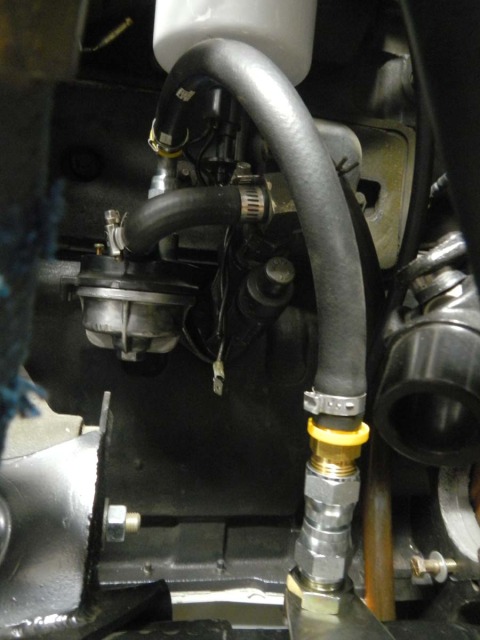
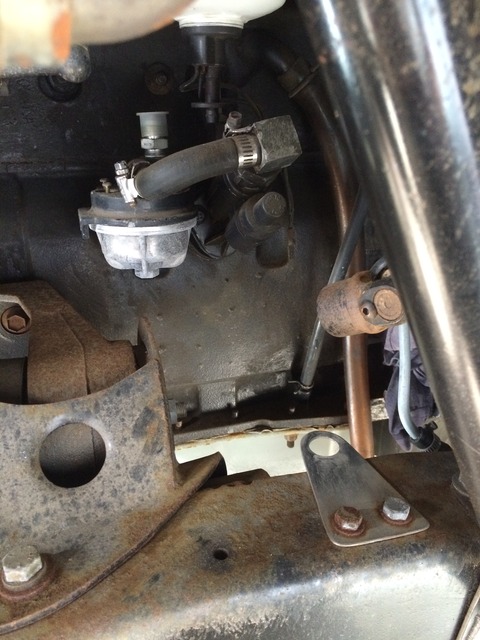
So here it is, in all it's glory... That brass fitting on top with the hard line coming out of it is the one you can thank for my attitude in this post

It looks a lot cleaner overall than before (pic below for comparison), but the pump itself is a bit cleaner too thanks to all the fuel that pissed all over the place from that stupid water separator on the base of the fuel filter that I hit every two seconds trying to fight the fitting in... Hey, doing this prompted me to swear off the water separator. Next filter won't have one.
Pre cleanup assembly:
Man I effing hate my truck right now & it seems clear it hates me!
I'm in a bad mood now due to that stupid fitting!
Of course I couldn't wait til 5 to mess with it again & work was slightly quiet, so for 3 or 4 5-20 minute spurts I'd go out to the truck & mess with it. Finally said enough is enough I'm not getting this & cranked it in.
Pretty sure I cross threaded the **** out of that fitting trying to get this to work. The fitting on the top of the lift pump is aluminum where the brass fitting on the hard line screws in & I'm pretty sure I killed it. Will find out when I try & start this thing years from now & it pisses fuel everywhere...
Hopefully that doesn't happen, but who knows. I guess I will find out then.
I'm currently thinking I should have spent the money and gone �AN stuff just for headache factor Have I mentioned I HATE hard lines?). Never figured this thing would be this much of a pain in the a$$ to get back in though.
Oh well, if I have to redo it later I'll spend the $ on the -AN stuff and kick myself for not doing it now...
So here it is, in all it's glory... That brass fitting on top with the hard line coming out of it is the one you can thank for my attitude in this post

It looks a lot cleaner overall than before (pic below for comparison), but the pump itself is a bit cleaner too thanks to all the fuel that pissed all over the place from that stupid water separator on the base of the fuel filter that I hit every two seconds trying to fight the fitting in... Hey, doing this prompted me to swear off the water separator. Next filter won't have one.
Pre cleanup assembly:
#1914
05-05-2017, 05:23 PM

Posting Guru
#1915
05-07-2017, 11:40 AM
Cargo Master
#1916
05-09-2017, 12:37 PM
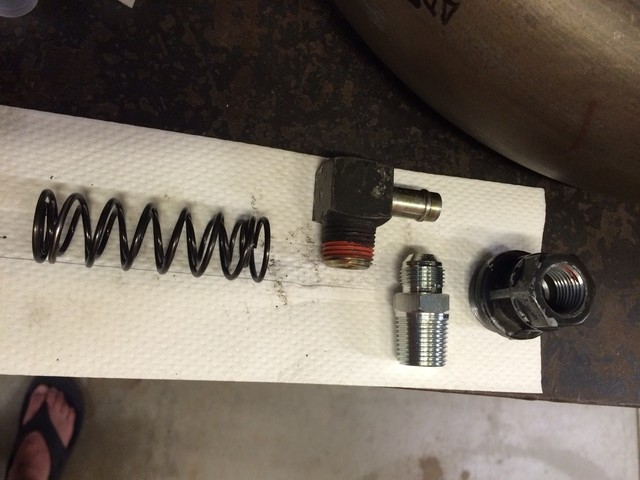
I advise you pull the pump back off, check the threads and install a Comp Cams 975 inner valve spring in place of the stock cummins spring.
Stock lift pumps don't like sucking fuel through a filter, with the stock spring you'll likely have low fuel pressure issues.
Stock lift pumps don't like sucking fuel through a filter, with the stock spring you'll likely have low fuel pressure issues.
On a progress note - not much has been made at all. I did get to the hardware store finally & get a couple of the stainless fasteners I need for the headlights & filter mount. I am then also supposed to be ordering a bit more hardware/materials today for random little bits I need.
#1917
05-09-2017, 01:11 PM
Cargo Master
A stud kit for the lift pump makes pump installs a hole lot easier.
Put the spacer and pump on the studs, start the nuts, connect the hard line while the pumps loose so you can wiggle the pump some to help get the fitting started, then tighten the nuts.
No pushing on the pump while trying to start the bolts.
Put the spacer and pump on the studs, start the nuts, connect the hard line while the pumps loose so you can wiggle the pump some to help get the fitting started, then tighten the nuts.
No pushing on the pump while trying to start the bolts.
#1918
05-09-2017, 01:52 PM
A stud kit for the lift pump makes pump installs a hole lot easier.
Put the spacer and pump on the studs, start the nuts, connect the hard line while the pumps loose so you can wiggle the pump some to help get the fitting started, then tighten the nuts.
No pushing on the pump while trying to start the bolts.
Put the spacer and pump on the studs, start the nuts, connect the hard line while the pumps loose so you can wiggle the pump some to help get the fitting started, then tighten the nuts.
No pushing on the pump while trying to start the bolts.
So yeah, I'm thinking I'm gonna throw those studs in with the order just to have around for if/when I pull this thing back off!
#1919
05-25-2017, 01:46 PM
It's been a few weeks again and not much new here to report at all. Been busy, traveling and also lazy on the couch again so not much more done than a parts order or 2.
Studs for lift pump were ordered & have been here for a week or more.
I also got a wild hair & started reading up on the "big line" kits from Vulcan Diesel, etc. Long story short I've got the parts for mine here. I also picked up the fittings and hose to dump that hard line off the lift pump that annoyed me last time I messed with the truck. I'm now being lazy about getting back out & installing some of this stuff though. House/yard work that needs attention isn't helping my timeline there again though.
#1920
05-29-2017, 01:21 AM

The PO converted to that 2WD steering box to convert the steering to true power steering to replace the original (inferior) ram assist type steering. It was a great mod back in the day. It got rid of all the hoses going down to the axle and really improved the steering on the old trucks. Its worth hanging on to unless you're doing a crossover setup like you mentioned.
FWIW,
Mike
FWIW,
Mike

