99 F150 4x4 failure
#1
 08-27-2008, 01:28 PM


Join Date: Sep 2006
Posts: 239
Likes: 0
Received 0 Likes
on
0 Posts
99 F150 4x4 failure
Hi guys,
Have run into a problem would like to ask for some help with. My 4wd activation system is doing funny things but definitely not engaging the 4wd. At first nothing happened when turning the **** to 4H or 4L but the 4x4 light would come on and stay on. Now it clicks a lot when the switch is turned but no engagement. Have been told the problem is with the vacuum operated engaging motor.
1) Can these be repaired?
2) If yes, can I do it myself if adept at such things?
3) Are there any tricks/tips to removing it and what is the general procedure to do so?
Thanks for any help or advice anyone can give me so I can be done before the winter comes!
Lou
#4
08-29-2008, 06:34 AM

The transfer case shift motor is electric, the front axle shift mechanism is vacuum. The vacuum part of the system will not cause the clicking or the indicator issues you mention. You need to focus on the electric shift motor. They're known to go bad, especially if not used occasionally.
If you'd enable your email option ( in User CP ) I could send you the photos to go with this.
ESoF Motor Replacement
SECTION 308-07B: Transfer Case
1999 F-150/250 Workshop Manual
IN-VEHICLE REPAIR Procedure revision date: 02/03/1999
Transfer Case Shift Motor�Electric Shift
Removal
1. WARNING: The electrical power to the air suspension system must be shut off prior to hoisting, jacking or towing an air suspension vehicle. This can be accomplished by turning off the air suspension switch located in the RH kick panel area. Failure to do so can result in unexpected inflation or deflation of the air springs which can result in shifting of the vehicle during these operations.
Raise and support the vehicle.
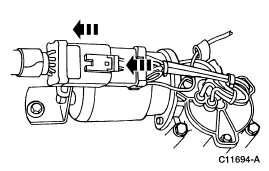
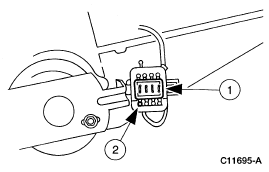
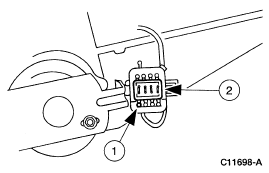
2. Disconnect the shift motor electrical connector.
3. Remove the coil wire from the electric shift motor electrical connector.
1. Remove the wire connector spacer.
2. Remove the coil wire and pin.
Use correct electrical connector pin remover.
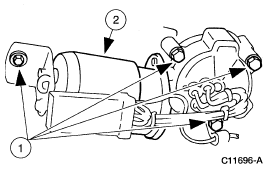
4. Remove the transfer case shift motor (7G360).
1. Remove the bolts.
2. Remove the transfer case shift motor.
Installation
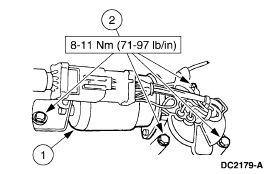
1. Install the transfer case shift motor.
1. Position the transfer case shift motor.
2. Install the bolts.
2. Install the coil wire into the transfer case shift motor electrical connector.
1. Install the coil wire and pin.
2. Install the wire connector spacer.
3. Connect the transfer case shift motor electrical connector.
4. NOTE: If equipped with air suspension, reactivate the system by turning on the air suspension switch.
Lower the vehicle.
If you'd enable your email option ( in User CP ) I could send you the photos to go with this.
ESoF Motor Replacement
SECTION 308-07B: Transfer Case
1999 F-150/250 Workshop Manual
IN-VEHICLE REPAIR Procedure revision date: 02/03/1999
Transfer Case Shift Motor�Electric Shift
Removal
1. WARNING: The electrical power to the air suspension system must be shut off prior to hoisting, jacking or towing an air suspension vehicle. This can be accomplished by turning off the air suspension switch located in the RH kick panel area. Failure to do so can result in unexpected inflation or deflation of the air springs which can result in shifting of the vehicle during these operations.
Raise and support the vehicle.
2. Disconnect the shift motor electrical connector.
3. Remove the coil wire from the electric shift motor electrical connector.
1. Remove the wire connector spacer.
2. Remove the coil wire and pin.
Use correct electrical connector pin remover.
4. Remove the transfer case shift motor (7G360).
1. Remove the bolts.
2. Remove the transfer case shift motor.
Installation
1. Install the transfer case shift motor.
1. Position the transfer case shift motor.
2. Install the bolts.
2. Install the coil wire into the transfer case shift motor electrical connector.
1. Install the coil wire and pin.
2. Install the wire connector spacer.
3. Connect the transfer case shift motor electrical connector.
4. NOTE: If equipped with air suspension, reactivate the system by turning on the air suspension switch.
Lower the vehicle.
#6
08-29-2008, 05:12 PM
 So make 5 more posts, anywhere and say ANYTHING, and you can PM me your email address.
#7
08-29-2008, 08:27 PM

Trending Topics
#8
08-30-2008, 11:31 AM
Join Date: Sep 2006
Posts: 239
Likes: 0
Received 0 Likes
on
0 Posts
Well, oddly enough, this thing has started working again! Maybe a little stuck from months of now use. The only thing is it seems to take a little time to disengage. So, I will:
1) spray/clean the electrical contacts and
2) does anyone know if the motor can be removed and lubed or anything to keep it working?
3) also, when reinstalling, does the motor need a gasket replaced or caulking added to seal it back to the transfer case? It looks like there is caulking from original. Not sure. Thanks for all the help so far!
Lou
#9
09-06-2008, 11:33 AM
Join Date: Sep 2006
Posts: 239
Likes: 0
Received 0 Likes
on
0 Posts
#10
09-06-2008, 04:55 PM
#11
09-06-2008, 05:18 PM
Join Date: Sep 2006
Posts: 239
Likes: 0
Received 0 Likes
on
0 Posts
Yeah, no problems in or out of 4 low. This issue is from 4H to 2H only (2H to 4H no problem). When shifting from 4H to 2H on the fly, say at 30 mph, the indicator lt (4x4) goes out and it sounds like the undercarriage mechanism is disengaging ok. But, yes, I can feel the binding in the turns like it's still engaged. Only seems to disengage when I stop foward movement and then start up again. Or stop and backup. Basically any full stop is needed to disengage. Any other test I can run to isolate the problem? Also, all indicator lights come off and go on with their respective settings no problem. Thanks.
#12
09-06-2008, 05:45 PM
Then it sounds like the actuator on the front axle, or what controls it, is giving you problems. Possibly the internal shift fork .....
You have checked the front differential gear lube?
You need an assistant for this, one that likes you! Crawl under the front end and remove the actuator shield. Have trusted, competent assistant crank truck and switch to 4Hi.
Did you survive? Does the actuator arm move?
a. Yes, make sure it's free from mud/rust ...... possible internal fork problem.
b. No, vacuum lines/solenoids/actuator at fault. Search for my posts on the subject. That thing gave me a fit when I got my 1st 97-up 4x4.


Thread
Thread Starter
Forum
Replies
Last Post
EastSideTriton
1997 - 2003 F150
8
07-23-2013 07:29 PM