When you click on links to various merchants on this site and make a purchase, this can result in this site earning a commission. Affiliate programs and affiliations include, but are not limited to, the eBay Partner Network.
It doesn't look like much done from a picture count perspective, but I managed to get the dana 60 stripped down and applied the KBS Coating. As I went through the steps in the frame, it is a 3 step process which does take longer than the previous method I was using, but there's no questioning the difference. I demonstrated for my dad and wife by banging a 1/2 in ratchet against it today, and there wasn't as much as a scratch. I'm loving the results so far in spite of the extra prep.
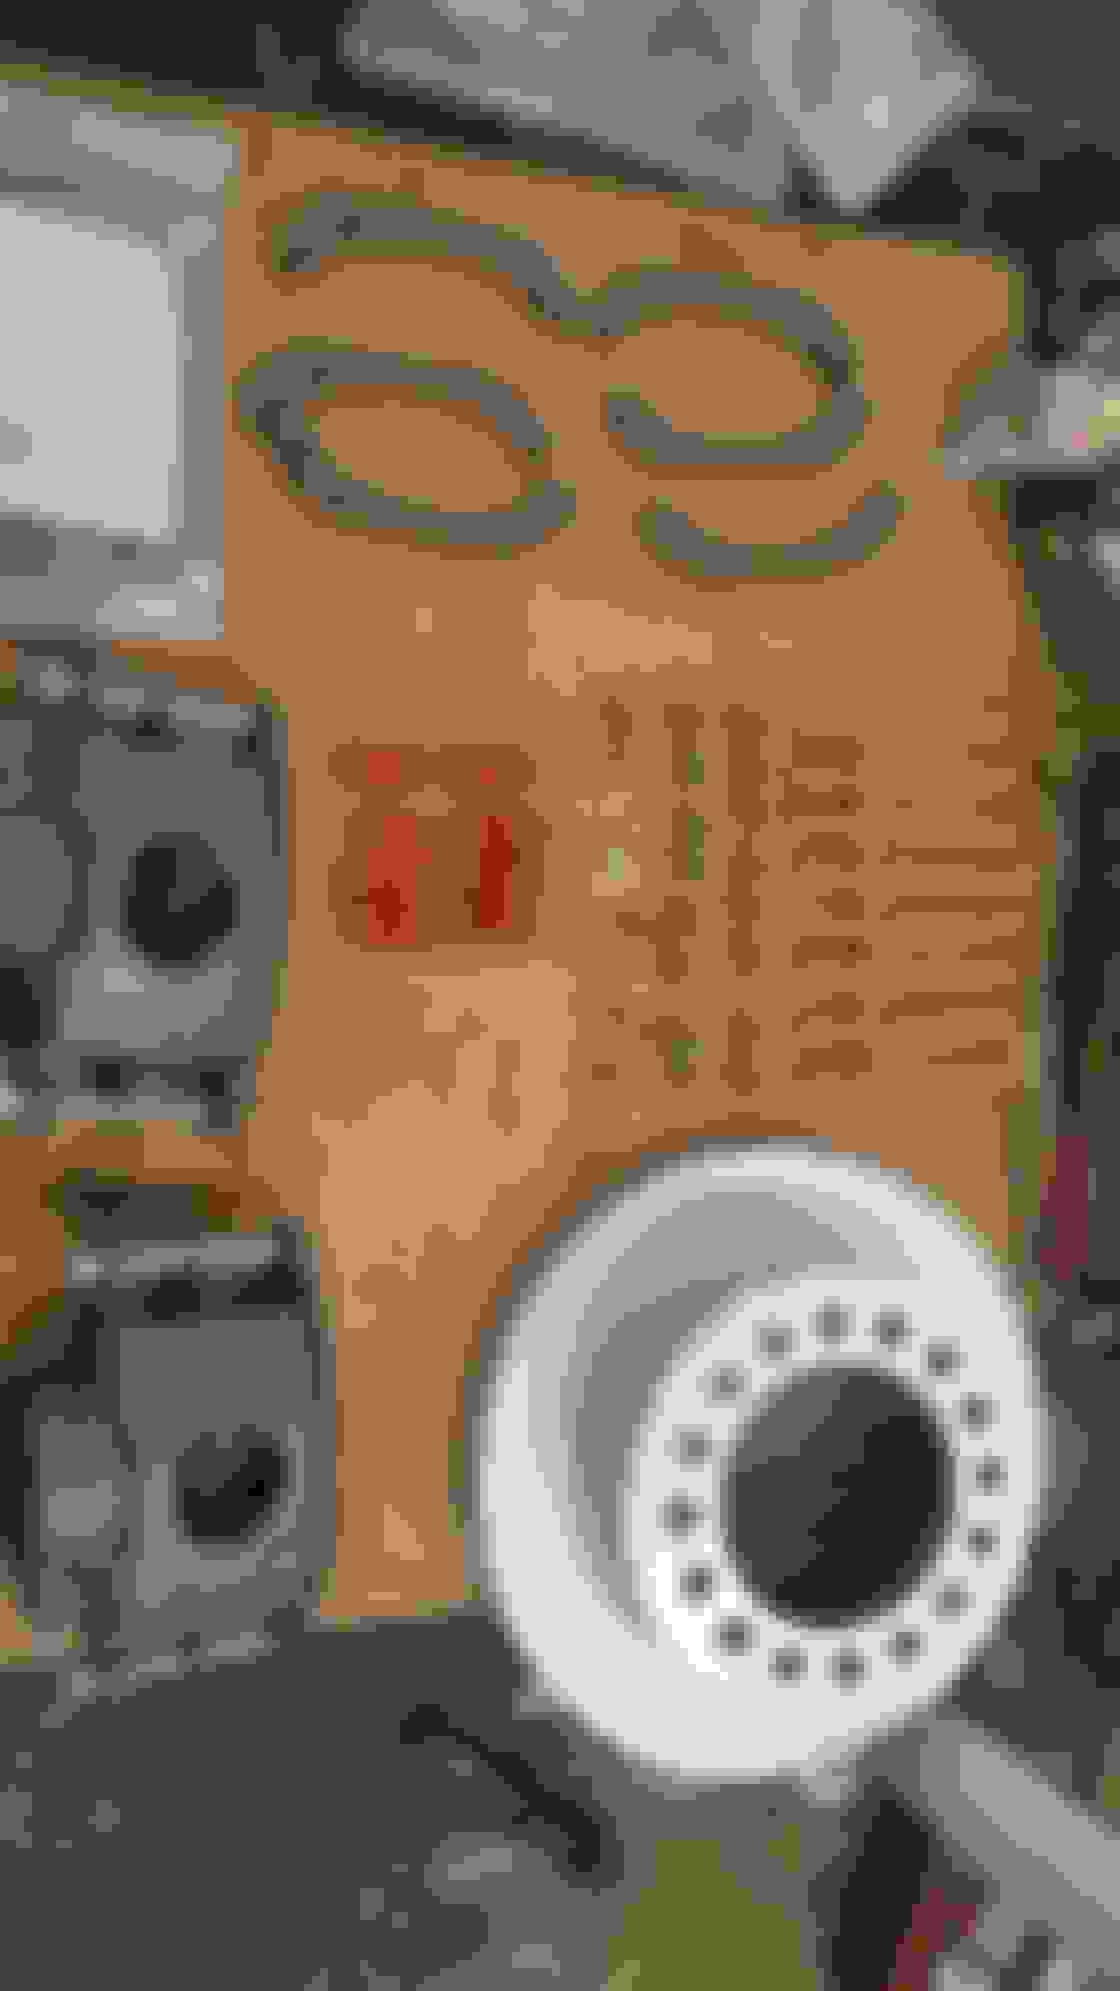
Taking apart the brakes Final coating the Dana 60 final coat different angle THe rear cover final coated. I had to do a little straightening to get the cover back to true level. The scrap pile continues to grow. The old Flat head is near the pile, but until I know for sure it's really trashed, I hesitate to let it go.
It's been a rough week, and losing a day on the truck (got sick sunday) left progress a little lacking. On top of that I have learned that the spindle bushings require reaming in order for the kingpin to fit, which kinda shut me down. It was tough to get stuck when I had a vision of progress that I didn't achieve. as it stands, I haven't found anyone close that can still ream these to size, so I'm not sure what my next steps are, but for now, here's what I did get done. enjoy.
Leaf springs installed with the axle Close up of front axle assembly Front axle front view pressing out the old bushings Close up of bushing removal. Oddly enough, a #17 Honda motor mount bolt is the exact same size. Tapping out the snapped off bolt I inherited. Using the same Honda bolt to draw the new bushing in. Not long after I took this pic did I discover I would not be mounting these to the freshly installed axle.
Just found this thread again, awesome progress, if you close your eyes for to long your foreman will be twenty and full grown, mine is 43.
Enjoy, and thank you very much for sharing.
Talking about your trusses, I have a couple trolly tracks hanging from my trusses(6" top boards) I have picked a mill(over a ton) on mine. trolly track is hanging from top (6" boards)
wish I could post pics......
Greg
mate just found your thread what a great job your doing love the project and ill need to look for that paint stuff i need that for some of my parts
keep up the good work and keep your forman safe
cheers Stuart
Just found this thread again, awesome progress, if you close your eyes for to long your foreman will be twenty and full grown, mine is 43.
Enjoy, and thank you very much for sharing.
Talking about your trusses, I have a couple trolly tracks hanging from my trusses(6" top boards) I have picked a mill(over a ton) on mine. trolly track is hanging from top (6" boards)
wish I could post pics......
Greg
Thanks Greg, everyt time I turn away she gets bigger! If you do have any pics you could share that would be cool to see your setup.
Originally Posted by aussie bl
mate just found your thread what a great job your doing love the project and ill need to look for that paint stuff i need that for some of my parts
keep up the good work and keep your forman safe
cheers Stuart
Hey thanks Stuart, here's the link to where I bought it, I can't say enough about this stuff. KBS Coatings
Keep up the good work. I have a large project I need to finish before I can start on my truck again, most likely in a few months. But I am getting some good ideas on the direction I want to go from your build.
This was quite an effort to get pictures to load, but they finally uploaded, but not all of them, oh well.
Here's the list of things I managed to get done:
1. KBS coated the last remaining parts for the Dana 60 rear
2. Installed the rear inner axle sleeve repair kit
3. Installed the spindles and steering linkage
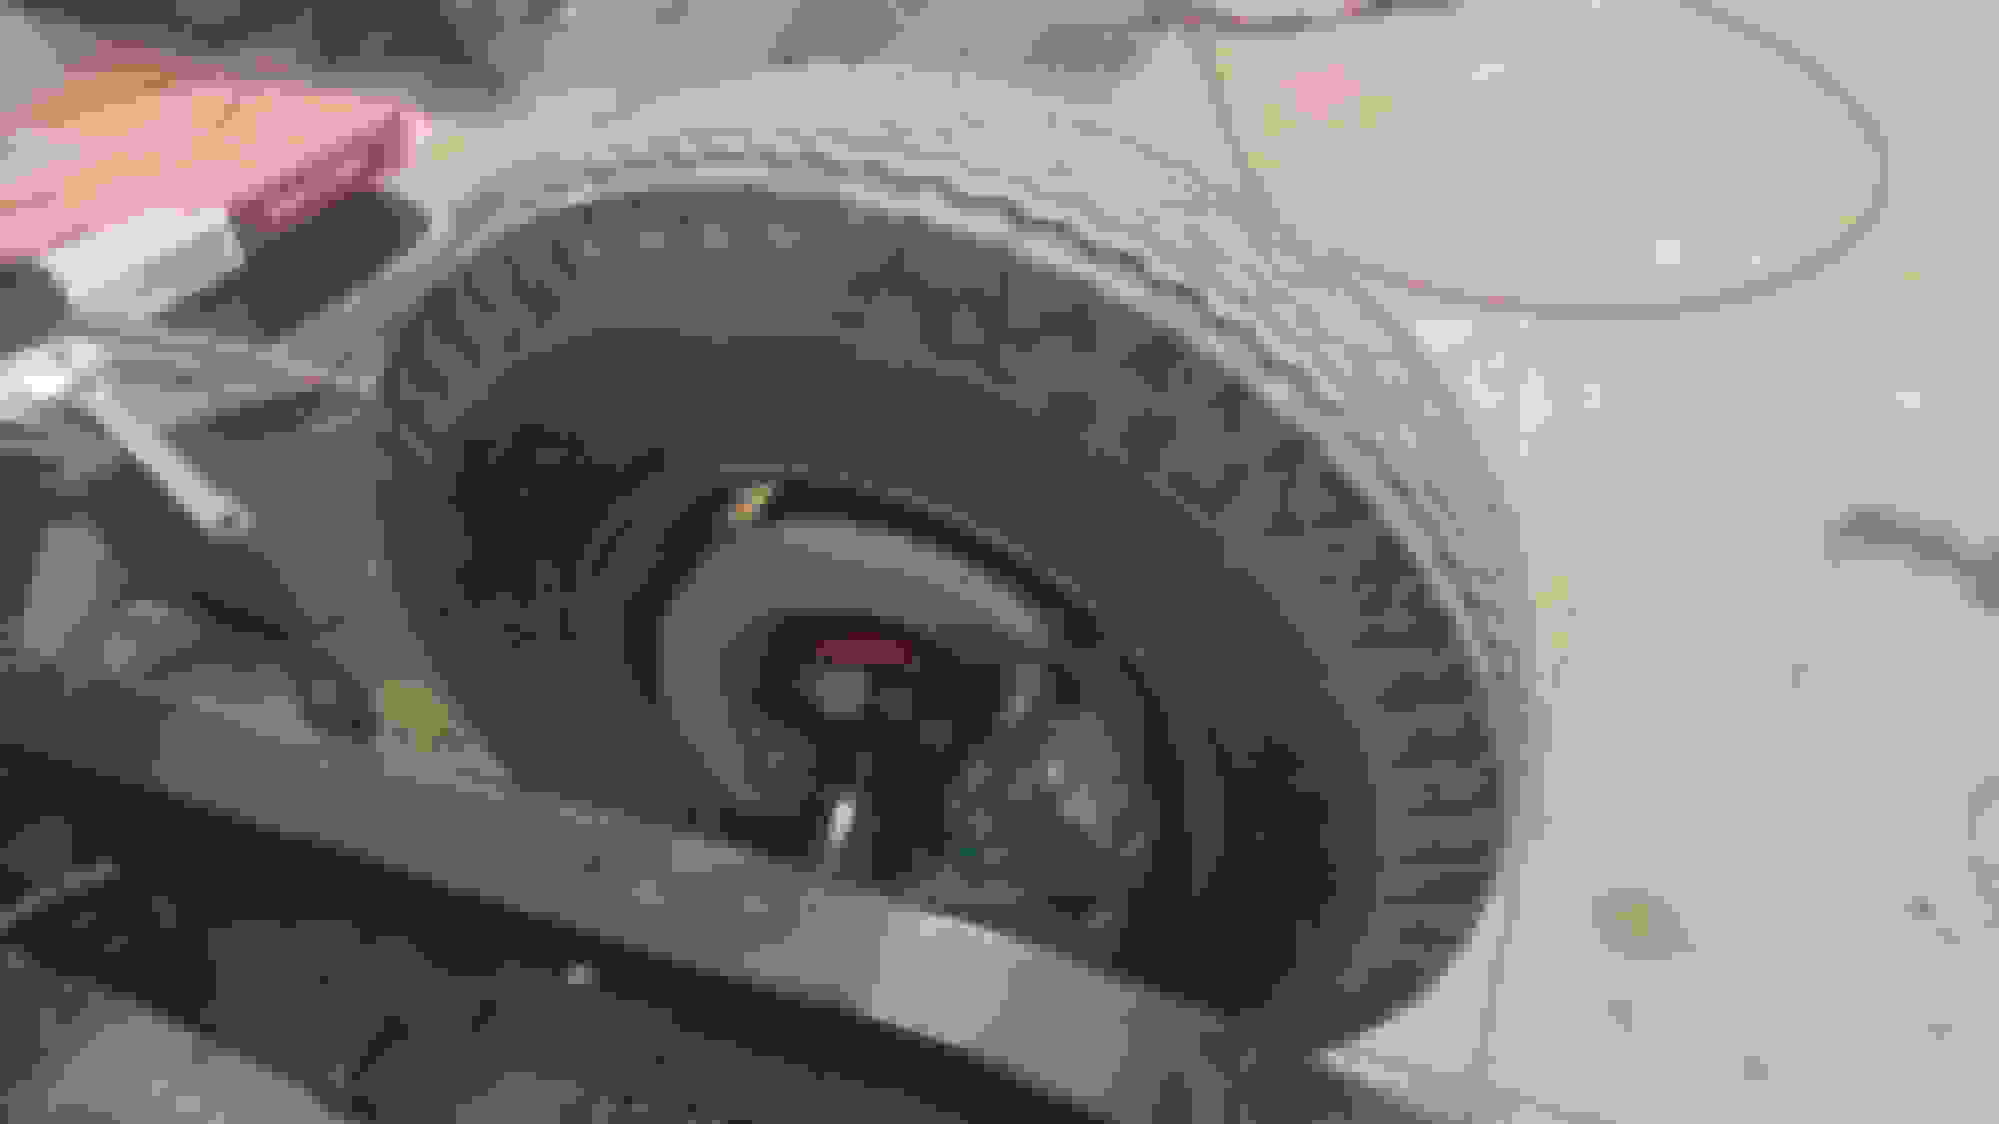
4. installed the TSM mfg Front disc kit
5. Removed the old crash box
6. Mounted the front wheels after verifying they do clear the brakes
7. Steering wheel removed, mine had the tapped holes in it already. FRom the looks of thius truck, I don't think much of anything was ever disassembled since the day it was built.
And as always, thanks to the group of guys that have helped me along the way!
Last edited by tonyguns; 03-02-2019 at 07:15 PM.
Reason: Added content to post.
You're kickin a$$ on this project. Thanks for posting the pics of the stock wheels clearing the disc brakes. I've been waiting to see if they would. I really want to keep my "innies" and stock hub caps.
That is the same disc brake kit I put on my F3 last year. Had to futz with those spacers to get things aligned. (and other modifications...) I haven't had the truck officially on the road yet, so I think I will need to do a few trials and error adjustments before the front brakes are right. They drag too much now and I'm not sure if it is because of the spacer thickness or the Wilwood 10lb residual valve.
Tom
You're kickin a$$ on this project. Thanks for posting the pics of the stock wheels clearing the disc brakes. I've been waiting to see if they would. I really want to keep my "innies" and stock hub caps.
Originally Posted by pineconeford
That is the same disc brake kit I put on my F3 last year. Had to futz with those spacers to get things aligned. (and other modifications...) I haven't had the truck officially on the road yet, so I think I will need to do a few trials and error adjustments before the front brakes are right. They drag too much now and I'm not sure if it is because of the spacer thickness or the Wilwood 10lb residual valve.
Tom
After getting some advice on where the caliper should be positioned in relation to the rotor, I feel like I have the shims setup ok. Only time will tell if they'll end up rubbing though, since the rims are metal and could flex slightly, but I'm hoping they don't. when I get some time, I'll post some pics of how I shimmed mine. Hey Tom, did you check the caliper for drag against the mounting bracket? From what I could tell, these calipers are floating and that could also contribute to your drag. I'm very familiar with modern Honda and Ford passenger brake setups, but haven't really seen these in action once they begin to accumulate some wear.
Ohh yeah, If you've seen my shop foreman in previous pictures, I have to bust a$$ and get this thing done before the conversation about college funding starts...
This was a great weekend for progress on the truck. While preparing the cab for separation, I realized what caused the minimal floor rust(passenger foot panel seam). It was from a minor underside impact with something that must have caused that floor seam to pull apart slightly, creating an area for moisture to collect. This was a lot of fun to get ready, but the hardest and heaviest work was installing the 2X6X20 ceiling trusses. I decided to sister the existing structure for extra support. With the cab off, the next steps will be to remove the remaining dirt and age, completing the chassis refresh.
An affordable electric winch bolted to the 4X4 post above, then 2500 lb ratchet strap added for extra neurotic security Obligatory shot of my amazingly patient wife, holding the assistant shop foreman. You would think I might find more money under the seat, but this lonely penny was all that was there. The truck was last officially on the road in 1972, so a 1971 penny seems to support that story. Cleaned out floor, really not much corrosion to deal with in here. Drivers side floor shoring very little wear for a 70 year old truck The passenger side has some corrosion at the firewall seam, you can see the floor pan is slightly raised from an underside impact. The bench seat sporting the original vinyl, and a farm engineered canvas cover as a repair. The vacated crash box Up close shot of the micro-engineered winch This is my rolling cab rack. It's 35.5 X 8. I know it's longer than other people's setups, but I figured it out that I'll be able to rock the cab back exposing the bottom of the truck so I can execute the cleanup, and rust prevention steps. Here you'll see that the cab is heavier in the front, but in this pic, the cab was stuck slightly in the front as well. Separating the cab, oops, forgot to pull out the rearward wiring from the chassis. Up close of the inner bracing. 72 inches long to prevent the straps from putting too much pressure on the drip rails. Mater says "I'm flying"!! Holy crap this frame looks a mile long Full separation, cab safely on the cab cradle Padded for extra comfort Rear view Front view The 35.5 width of the cradle would just about allow you to run a bolt into the wood if you needed to do a lot of pounding, even though I think this width is well supported underneath. Closeup of the cab cradle where the underside is resting.
As always, thanks to the guys who are keeping an eye on the project and lending advice along the way!
Great work! I was wondering where you got your replacement spring pins & bushings for the rear springs? I am working on a 1950 F2 and having a hard time finding the replacement spring pins and bushings. Also needing rear shackles.
 02-02-2019, 09:42 PM