When you click on links to various merchants on this site and make a purchase, this can result in this site earning a commission. Affiliate programs and affiliations include, but are not limited to, the eBay Partner Network.
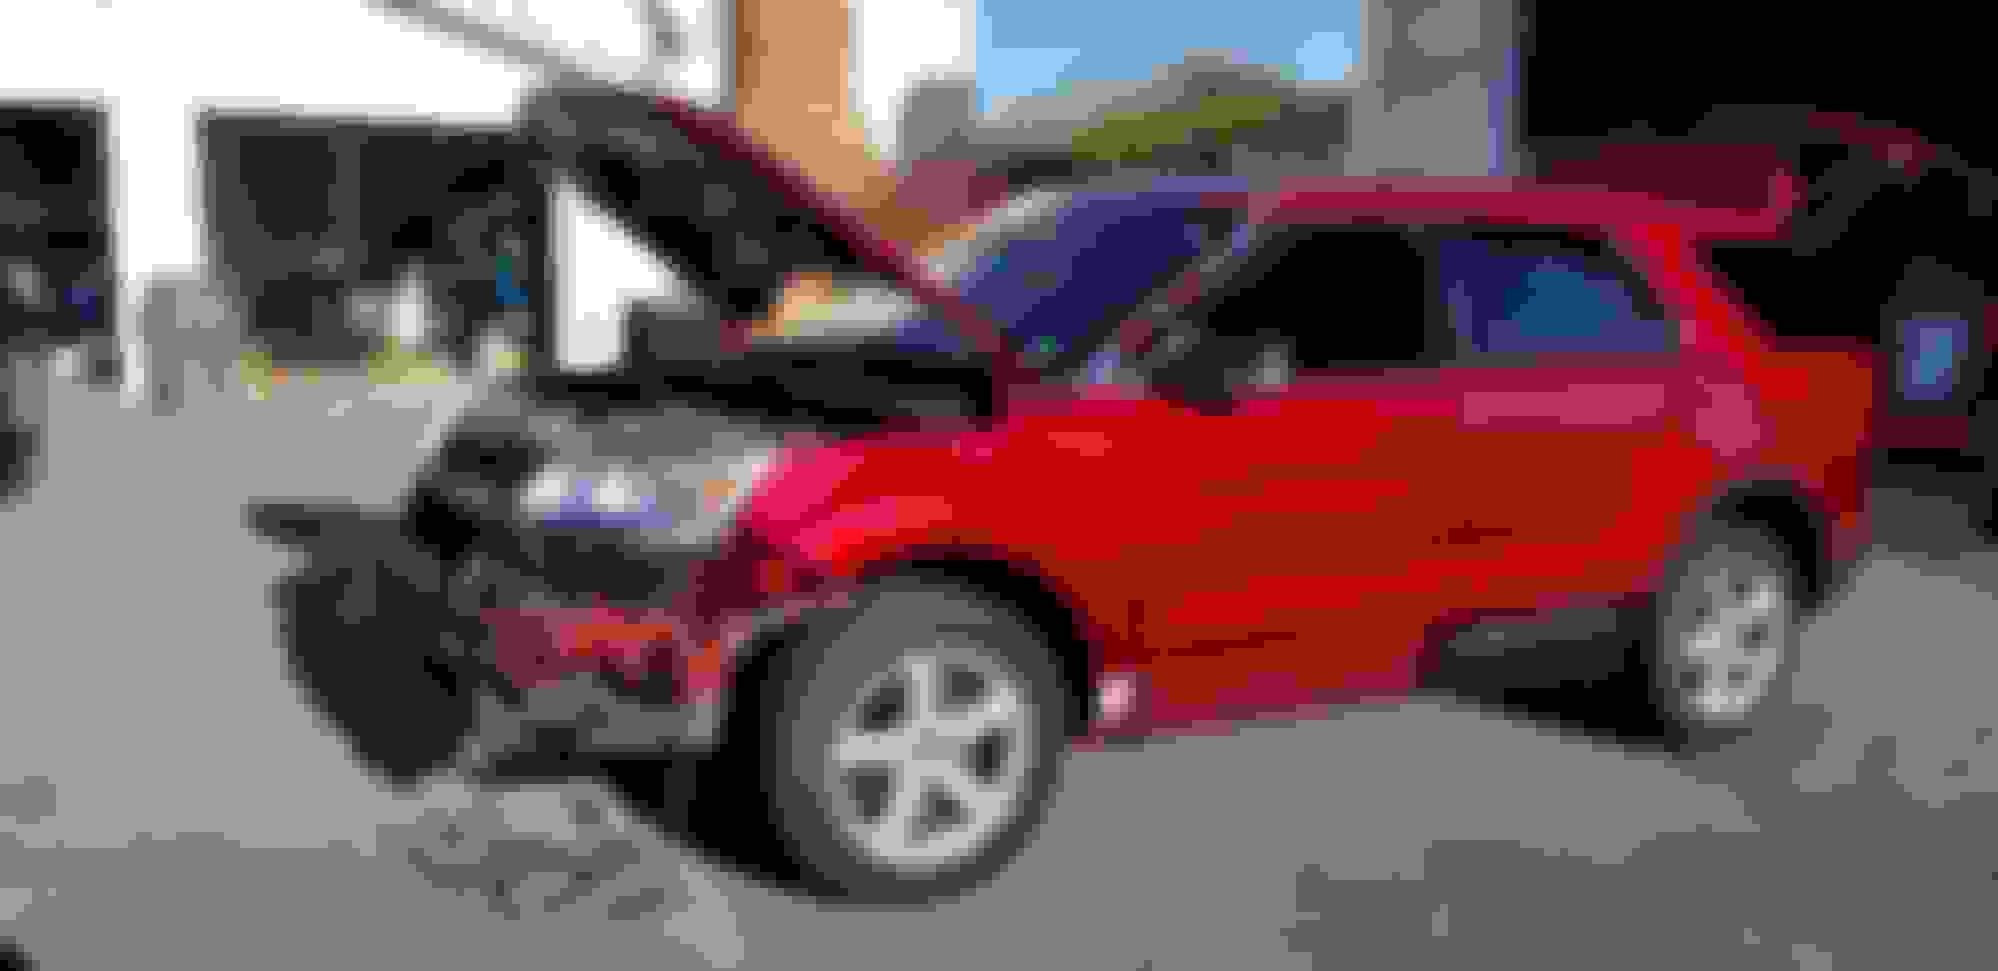
We wanted to get a newer Explorer for my wife since her 2008 was starting to nickle and dime me to death, along with it being on (as of early December 2020) its 8th waterpump and about 7 front hubs. It also has about 188,000 miles on it. So after looking around and not wanting to spend $20K plus on a low milage Explorer, I started searching COPART for a salvaged one. In March of 2020, I found one and brought it home. The following week, I bought another one that was wrecked in the back end for parts. We wound up spending a little more on rebuilding it do to some issues that I will go into detail about later on in this story. It also took longer to get through thanks in part to COVID for numerous reasons.
One with the rebuild.
The red one is a XLT and the white one is an XLT Limited. Both had 3.5 non turbo (my wifes 2008 is a 4.0 and her old sport trac was also a 4.0)
I thought I had more pictures, but I think they got lost. While the red one did not look to bad initially from the pictures, it was a little worse. A deer and the Explorer had a horrible meeting, resulting in the red one being totalled out by insurance. The reason why I bought the white one for parts was due to the red one needing not only the bumper cover, and hood and airbags, but more. All in parts wise, I had to remove and replace the active grill, radiator, A/C condenser, radiator core support, steel bumper reinforcement, air box and the plug that goes into the transmission (this wound up costing more than expected, as I will tell that later), both fenders, hood. Amazingly the lights were all ok except for one small hole in the back of one.(I have pics and repair of that)
After tearing the front end apart, I noticed that there was signs of oil leaking where the oil filter adapter mounts to the block. I talked to someone that used to work for a Ford dealer and he said this seems to be a common problem with these engines. He told me to get a new oil seal, and then add the Ford grey RTV sealant as a back up. So that's what I did. In the first picture, you can see the amount of oil build up, then I power washed after replacing the seal.
I wonder if this is the problem?? Notice to oil seal seems to have a deformation in it.
I had to replace this bracket that the bumper reinforcement bolts (and was welded as well) to. Just stole it from the white one, welded on the frame and painted to match.
While having the front end apart, I also noticed (thankfully) a hairline crack in the transmission pan(cover) Not wanting to totally immobilize the white one, I opted to buy a new one. This took about 3 weeks to get due to COVID. While waiting, I also swapped the transmission plug plastic parts. The one on the red one was smashed a little and missing pieces. I tried my best to make up a chart as I took them both apart to scavenge the pieces I needed. I got them back together (and the white one so I could move it around) or so I thought.
Later down the road when I went to take it to the paint shop, it would not move. Thanks to my Ford tech guy, he got me the diagram I needed and it turned out I messed up two wires that almost the same color. No big deal I thought at the time.............until I just got it inspected and turned out it damaged the solenoid AND computer. Thankfully I could get the solenoid and valve body off the white one for the inspection garage, but I had to buy a computer since the white one was different. Lesson learned here.
In this picture you can notice the hairline crack. Its the dark line going from the fill neck to about 2/3 of the way down.
Now I have to admit, this is where I had the "What the F was I thinking" moment. I used to work on the side in my old neighbors body shop, and we did alot of major repair there. But that was late 90's, early 2000's and we never had to do stuff like this. Back then, air bag replacement was very easy. I was used to tearing dash boards apart for demolition derby cars, but still, I was like WTF. But as I started to remove the old components and then the old dash, it was surprisingly very simple and easy to do. I did cheat and found a video of someone doing it, which was only partly helpful. But all in all, I would rather do this than some of the repairs we did back in the day.
I sanded down the hood and fenders. While sanding the hood, I also found a few areas of corrosion right under the front lip. Forgot to get pics of that. But I removed the corrosion and then treated and primed those areas. Then I took them to the paint shop and had them edged and the underside of the hood painted. In these pictures you will notice the blue painters tape. On the doors, it was just minor dings and dents that a paintless dent repair guy took cars of. But the ones on the roof.....well this is the next area that cost me more money than anticipated. Whats hard to see (and I could not get a good picture no matter what) were three large dents in the roof, all on the body line where the roof changes slope. Those wound up costing me an extra $1000 in body work and paint. If I had gone and saw the vehicle before buying, I do not think I would have gotten this one and just waited. But here we were and I was not going to turn back.
This last picture you can kinda see the roof dents, at least two of them.
I took these to reference back to when I re assembled the front bumper. Its amazing how easy it is to take this stuff apart if you have a little patience and take your time. Way easier than sanding around everything, taping everything off and risking paint lines.
This was the headlight from the red one. Now one might ask why I just did not use the one from the white one. Well that one was damaged as well. And as I was going through this project, I was selling off parts from the white one I did not need to help fund (well replace what I spent) this endeavor. When it came to the headlights, I gave the guy the option of choosing what lights he wanted. He chose both from the white one, even though they were all the same. Guess he could deal with a broken tab rather than a hole. Ok, no big deal for me. So the first thing I did was make a clay mold of the hole. I then used that mold to make up a piece of plastic to go into the hole. I used JB weld plastic bonder. I then made the patch to fit into the hole, then used more JB Weld plastic bonder to glue it in place and covered the whole thing.
Back from paint and body work. You will notice the blue painters tape on the A pillars. That was to cover the holes for the bolts that hole on the plastic trim on the A pillar. Due to the hood getting shoved back, it broke the bottom of the trim off. And believe me, no matter what, you can not take it off and re use it from a donor. At least they were not to expensive to buy.
Also I was a little annoyed with the paint guy. As you can see at the bottom back dog leg of the fenders, he chose not to paint that. Yes its covered by trim, but the amount of time it took to tape those off and probably still covered in paint, probably was more than what he saved in paint and clear.
As a long time Ford dealership technician myself, if you don't mind me asking, how much do you have into it so far? I mean, between having to purchase the two 2017 Explorers (both from Copart I assume), and whatever other extra parts you have into it, over and above the two cars so far? BTW, I went a different route. I have a 2016 F-250 4x4 6.7 XLT CCSB. My wife had a 2010 Focus manual. One day, back in and around 2015 I drove a 2016 Explorer Sport home from work that I was instructed to by my boss. I made the mistake of letting my wife drive it. Since then, she had repeated over and over again, that THAT was to be her next vehicle. Fast forward to April of last year, I scooped up one of salesperson's back 2019 Sport demo for her. Needless to say, she's been beyond ecstatic since then, although she still misses her '10 Focus and shifting gears from time to time. But prior to acquiring the very low mileage demo for her, she had been toying with the idea of looking on Copart for a low mileage wreck to fix as well.
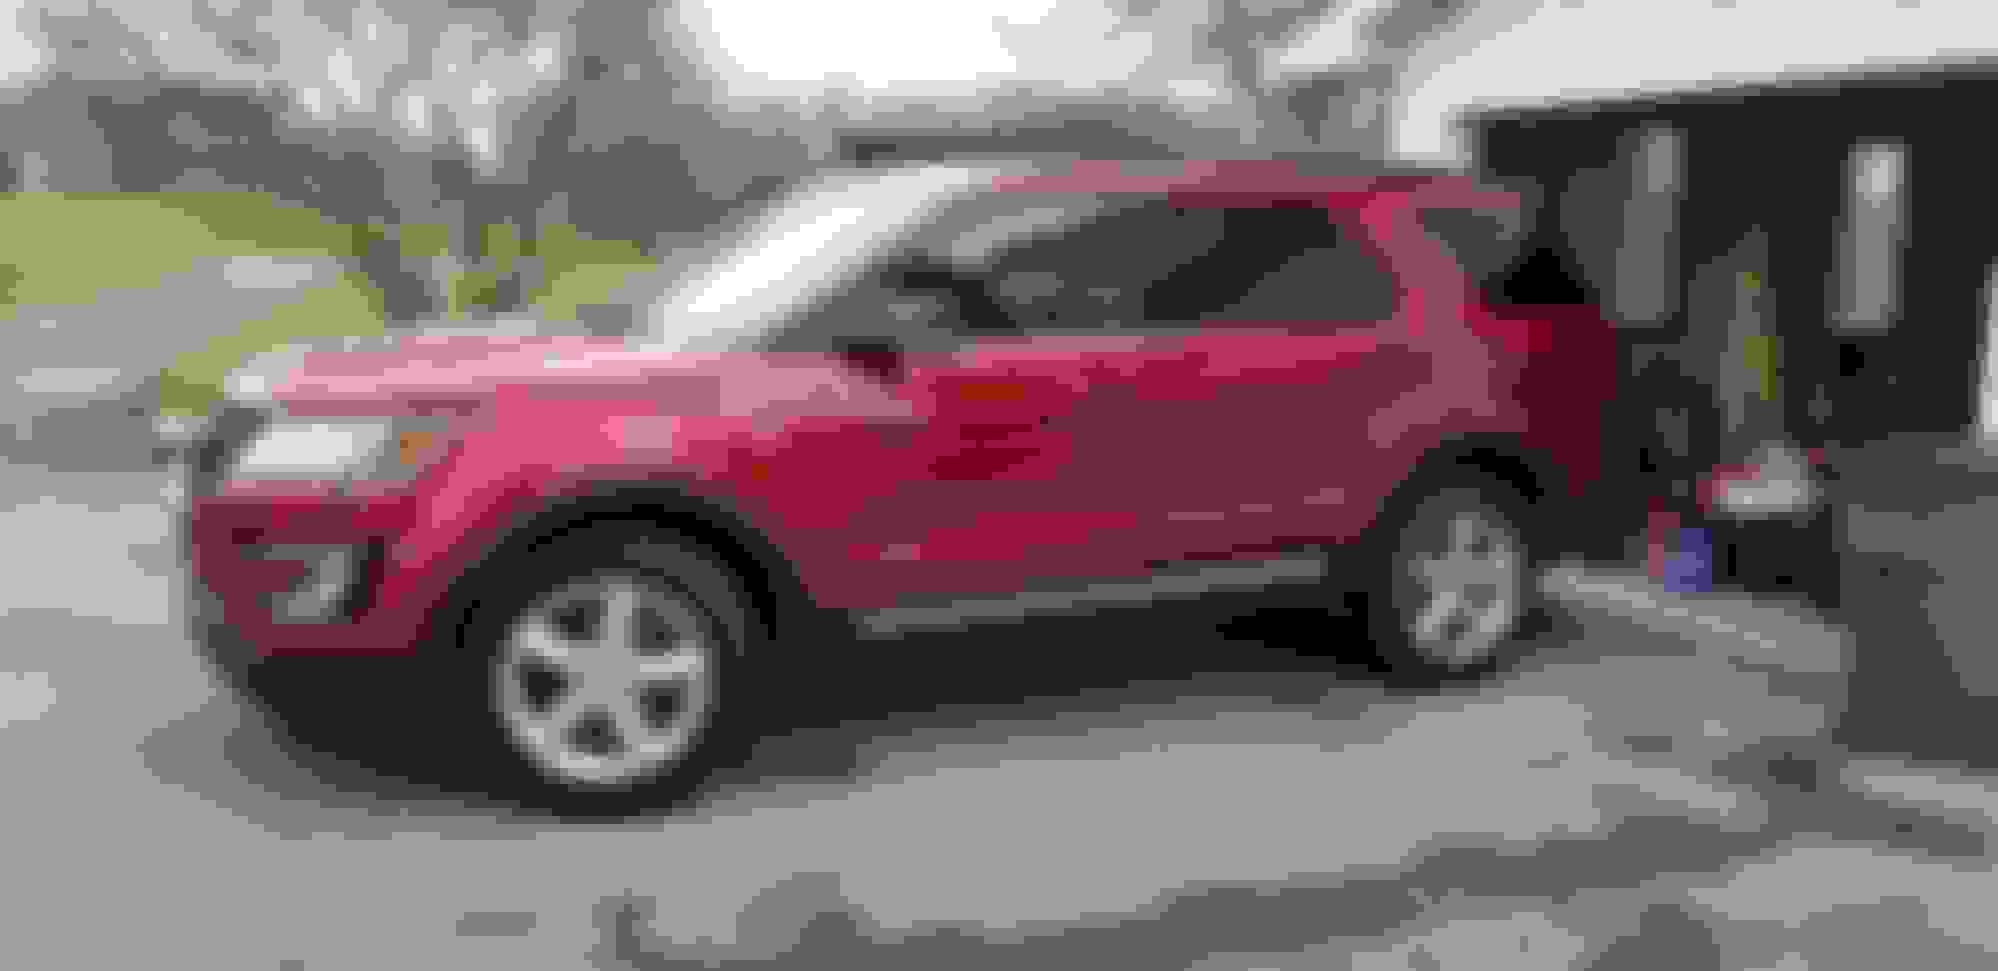
Here is the final (well mostly final, we want to change the wheels to black/machined aluminum) within the year. Notice I blacked out all the gray on the front bumper lower valance and I also did it to the roof rails and the rear bumper lower valance (No pics of that) I really like this look vs the gray.
As a long time Ford dealership technician myself, if you don't mind me asking, how much do you have into it so far? I mean, between having to purchase the two 2017 Explorers (both from Copart I assume), and whatever other extra parts you have into it, over and above the two cars so far? BTW, I went a different route. I have a 2016 F-250 4x4 6.7 XLT CCSB. My wife had a 2010 Focus manual. One day, back in and around 2015 I drove a 2016 Explorer Sport home from work that I was instructed to by my boss. I made the mistake of letting my wife drive it. Since then, she had repeated over and over again, that THAT was to be her next vehicle. Fast forward to April of last year, I scooped up one of salesperson's back 2019 Sport demo for her. Needless to say, she's been beyond ecstatic since then, although she still misses her '10 Focus and shifting gears from time to time. But prior to acquiring the very low mileage demo for her, she had been toying with the idea of looking on Copart for a low mileage wreck to fix as well.
Yes, both came from COPART
Total costs are as follows
Red Explorer $6943.00
Parts Explorer $6368.00
Additional parts (New(Junkyard) Computer, programming, Transfluid, Trans cover, new battery and enhanced inspection required to get title switched to reconstructed) $1100
Paint and body work including roof work $2500
So total cost was around $16,911.00
However I was also able to part out what remained of the parts explorer for a total of around $6000 total (I still have the engine, main body shell and a few misc parts plus scrap materials)
So now I am at around $10,900.00 for a 2017 Ford Explorer with 38,000 miles on it. As said above, if you remove the cost of the roof repair ($1000) and a new computer and associated programming ($800) it would be more around $9100 for it. We opted to do the roof repair right away so it would look as near perfect condition and not wait.
Would I do it again, yes, but also depends on the vehicle.
What would I do different? I would try to be a little more careful with investigating what else is also wrong with the vehicle that will be repaired. You can go to the COPART facility (call ahead and see what they require as each one is a little different) and look at the vehicle. They do not allow you to take photos (unless you have a cool tour guide) You can also pay to have someone go there on your behalf and do an inspection as well. You can find those people through COPART site. I also picked up my vehicles. You can have them delivered, but that would have cost me an extra $500 for both. You also have to pay with a cashiers check from your bank and have a limited amount of time to do so and pick up your vehicle.
The reason why I bought a parts one instead of buying new or used parts. The cost estimate from the previous owners insurance company was around $17,000 to fix this red one. This included almost $10,000 just in parts alone (I later found out that the active grill is around $1000 new, headlights new are around $1000 PER and so on)
 01-02-2021, 09:04 PM