When you click on links to various merchants on this site and make a purchase, this can result in this site earning a commission. Affiliate programs and affiliations include, but are not limited to, the eBay Partner Network.
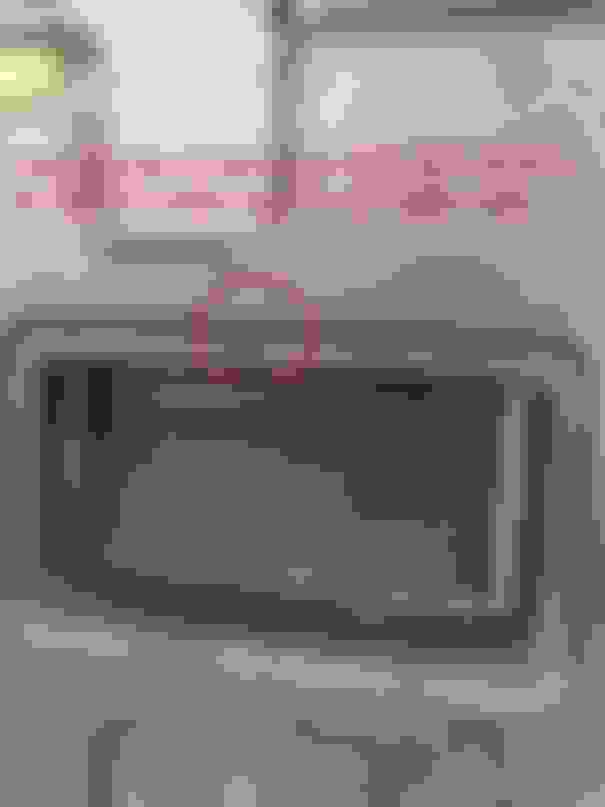
Found this yesterday when I went to take a closer look at the vent openings on the 1999:
This had somehow escaped my powers of observation until now. 'Guess I'll be dragging out the welder again...
Some good news BTW. Austin was pounded earlier in the week with heavy rain that lasted nearly a full day. I had plugged the aft cabin vent openings in preparation for that storm. When I checked the cabin the day after it was dry-as-a-bone.
LOL, I know you're being funny (even without any smileys) but seriously, I'd have the job done with the steel putty before he even got his welder out of the garage.
JB Weld as a glob unto itself will harden like steel and last for years.
However, JB Weld as applied to sheet metal might separate from sheetmetal within a couple of seasons, especially in the south, and especially when the sheet metal is painted, and particularly when that paint is black.
The black paint absorbs, rather than reflects heat, and heat causes the sheetmetal to expand. The modulus of elasticity of the expanding and contracting (at night) sheet metal is greater than the elasticity of the JB Weld glob, and more importantly, greater than the thin layer BOND between the JB Weld and the sheet metal.
It doesn't help that the back panel of the cab is subject to flexion as the long wheel base truck articulates over driveways, drainage swales, and other uneven terrain. The back panel also vibrates when the truck jiggles over washboard roads. All these movements conspire together to undermine the adhesion of an otherwise hard as a rock pellet of epoxy to the sheetmetal.
A professional automotive grade seam seal sealer, correctly applied, would probably be more reliable than the JB Weld that I have had experience with.
Welding ruins the anti corrosion coatings and galvanization in the heat affected zone, so care must be taken to immediately recoat the area before it flashes. I would probably not weld that hole if I could fill it with seam sealer successfully. I have used JB Weld to seal prorosity holes in the plug welds of an axle casting to tubing connection successfully, but JB Weld on bare clean and prepped sheetmetal that was more ductile than a casting did eventually separate from the sheet metal.
I would bet that the hole was put in there in the first place by a previous owner attempting to apply a quick fix to a leaking cab vent by screwing it in with a self tapping sheetmetal screw. A subsequent owner may have replaced that vent since, since the problem obviously never went away.
There are only two kinds of 99-03 trucks... those whose owners realize that their cab vents leak. And those whose owners blissfully have no idea, because every summer, the water eventually evaporates. i suspect the second category eclipses the first category by an overwhelming majority. But one only needs to look at the evolving iterations of cab vent design changes to realize that Ford KNEW there was a problem, even while most owners did/do not.
JB Weld as a glob unto itself will harden like steel and last for years.
However, JB Weld as applied to sheet metal will separate from sheetmetal within a couple of seasons, especially in the south, and especially when the sheet metal is painted, and particularly when that paint is black.
Good to know.
In this case, knowing that, I'd make sure the putty I rolled between my fingers would be thick enough to fill the hole and mushroom on each side like a rivet.
I still wouldn't weld a hole that small, hidden from view. I'd use the putty and forget it.
Hmmmmmm...interesting. Thank you all for the feedback. Always good to hear different POVs. To be clear, while I still consider myself a newbie to diesels (WRT ownership), our trucks and their various idiosyncrasies, their routine maintenance issues, common problems and typical repairs, I am not new to automotive work nor fabrication. Nor automotive forums for that matter. So. In the abstract I would agree with Stewart and bbslider WRT the time associated with a JB Weld related repair and would even concur regarding the relative importance of the work at hand - especially from a contextual application perspective. However, IMHO at the end of the day, this problem and its associated repair involves sheet metal on a vehicle. By definition that is body work. And, again, IMHO, I'd prefer welding over any type of putty or epoxy for its more durable repair. Ergo one that is likely to endure over the long term. From that perspective, I'd have to agree with Y2K and say that the putty/whatever would probably separate over time, leaving you where you started. Having said that, I wouldn't call a foul on any owner for taking such an approach; I mean heck at least they're doing something about it, which is better than one or more of the previous owners of this 1999. All I'm saying is that the putty thing or the JB Weld thing isn't for me in this context.
And besides, as I mentioned previously, it's an opportunity to remind myself just how rusty (no pun intended) my welding has become. I welcome that! Finally, I look at what I'm doing WRT this project as more of a journey; like an endeavor of sorts. If the purpose of all of this was more self-centered and financially driven, I'd take the quicker and simpler approach. However that isn't the case and that isn't me. I intend to pass on the best truck I can to the next owner, not just pass the buck. Nope, from the outset one of the goals of what began as just an interior upgrade was to learn more about our trucks and to perhaps find ways to improve my truck that were/are beyond the scope of my original intent. A crazy-cool resolution to this aft cabin vent thing falls into that category. Finally, another goal was to share both the experience and the lessons learned with others on the forum with the intent that doing so might help someone someday.
I digress. The wife is leaving early in the morning and we had stuff to get done today, so the time to address this issue was scarce to say the least. I had about 20 - 30 minutes to do whatever I was gonna do, which included the prep and cleanup. That limitation coupled with the out-of-sight context of this application, I elected to forego any attempt at "makin' thangs purdy" and once again to focus on functionality. With that in mind, I went with a fill-it and grind-it-back iterative approach (preempted by a weld-through primer layer of course) to closing this mystery hole. It only took about 3 of said iterations to arrive at a repair that passed the light test and that felt "solidly sound." Then I laid on a layer of black and a layer of clear:
Ugly, but no water gets in through that old hole. As I was taking one last verification look, I noticed this:
I've said it before and I'll say it again: you gotta be kidding me!!!! *Another* mystery hole??!?!?!!!?! And how did BOTH of these escape my attention until now?!?!?!!
Eh whatever, the answers weren't important. I literally had 5 minutes to do something about it. Thus there would be no grinding, just a quick-eee build-up type of patch, paint and clear:
It passed both the light and structurally sound test, so with that I loaded up the cart, started the lawn tractor and had everything returned to its place in the outbuilding just as I heard "Daddy!!" So I snapped a final picture to record the progress on the way in and that's it. Whew!
And in case you're wondering, I felt as though I needed to get the welding done today because it'll just be my son and I for 2 weeks and 2 days (we don't have family nearby, so it's just us) and when he's with me he wants to do everything I do, which would include welding. I wouldn't trust him, given his age and natural curiosity, to not watch the welding. And as a conservative parent, that's a risk I'm not willing to take. And I don't want to wait until after my wife returns to resume this work either. I would prefer to button up this 1999 harvesting project as it were and have it sold prior to that point, but we'll see. Time will tell.
Well I've done a few things during the past couple of days, so I thought I would post an update. I suppose that the primary thing I should mention is that the powder coating company had finished the wheels as of this morning. So David and I went to pick them up and see how they turned out. I must confess, I�m not as pleased with them as I want to be WRT color:
The official name is "white aluminum" ... I dunno. I plan on doing the big swap tomorrow, so perhaps it's best to defer judgement until I see them mounted. So I'm going with that for now. And crossing fingers. And toes. One interesting thing to note: the powder coaters told me that it's almost impossible to get powder down into the seam of these wheels and have it come out right. They say that it just bubbles up and there isn't much that can be done. So they added extra powder to the seams to attempt to help them seal better. Anyway it's readily visible thus:
Yesterday while we were out David and I stopped by the local dealership in Georgetown. The last time I had the oil changed I requested that they change the fuel filter too since they claimed to have a Motorcraft OEM filter in stock. I was suspicious that they did not actually perform that service, so I decided to just do it myself. It�s an easy job. Anyway we bought one from the dealership and since I couldn�t remember whether or not my 2000 presently had an aftermarket or an OEM filter, I decided to purchase the OEM filter cap as well, just in case. I could always take it back if I didn�t need it. Here are the part numbers, though anyone can find these via a simple search, I thought I'd include them anyway:
And in keeping with the style of previous thread entries, here's the relevant data.
New Motorcraft OEM 7.3 fuel filter and cap: $122.89
Long story short version is that there was indeed an aftermarket filter on my truck and the service center had not changed the fuel filter as I requested. Poop. I went straight to my file (I keep one on every vehicle) to examine the receipt for that oil change. Fortunately I discovered that I was not charged for it. So I don�t know maybe the tech just spaced it that day. Anyway, that being the case it was overdue to be changed and as you can see was dirty:
I choose not to put together a video for this repair since there are other videos already in existence regarding the subject and since it is such a relatively straightforward job. What I will say is that I am none too pleased with the previous owner of my 2000. He had done some other catywompus stuff to the truck while he had owned it, most of which I�ve straightened out since taking over the reins a few years ago. A couple of minor items still remain that I need to address but they are minor enough that I simply haven�t circled the wagons back around to them yet. I should probably do that. I digress.
So. I thought that this would be a good time to drain whatever water might be present via the water separator while I was there. So I cracked it open a little bit ... nothing happened. Opened it fully. Nothing happened. Oh boy. Yeah I�m not too pleased with that. I seem to recall other posts on the forum in which some owners has stated that they had closed off one of the ports on the fuel bowl, but I don�t think it was the drain port. However I just can�t remember. That said, it doesn�t make any sense to me to close off the drain port. Is that done on our trucks? Why would you do that? I don�t know, but I know that I don�t like it. So what this means is that at some point in the future I need to remove the entire fuel bowl for a closer examination in order to determine exactly what was done. When I do that I�ll replace all the O-rings since I have it out anyway. I just hope that it hasn�t been damaged and I can still use it versus needing to purchase a new fuel bowl. TBD. I feel better now that this job is done and that I'm running an OEM filter.
Finally, I installed the leather seat from the 99 into my 2000 so that David could ride with me while Mama is away. I'll of course need to remove it again soon, but for now it serves a good purpose:
And did y'all know that the little crevice above the radiator, etc. is the perfect size for holding little critters who are interested in our trucks? Well it is:
Ok enough. I'll update once the swap is done tomorrow. Y'all have a good night.
Jerry
Smart move going back to factory fuel filter cap. In the future, money can be saved by getting Racor Par Fit fuel filters. Racor designed and manufactured the fuel bowl, the Ford factory OEM filter, the Ford Service (Blue Box) filter, and the Motocraft (Red Box) filter you put in. So there is no downgrade in filter performance using the Racor brand fuel filter.
It is really hard to get a "factory look" when painting or powder coating steel wheels. Any metallic flake whatsoever can look fake, or not quite factory. since the factory only electro deposition coats the dually wheels with a non metallic gray primer. Unlike the silivery argent single rear wheels, the dually wheels are more of duller darker gray, with a bit of sheen, but no metallic or silver at all. Think machinery grey. Anything else will look non OEM... but that doesn't mean OEM looks better. It just means it will take some getting used to the differentness of a non OEM wheel color.
Since you are getting new tires, you'll probably want to have the tire shop match mount them to your wheels. Most tire shops assume the valve stem hole is the low point of the wheel, because of the material removed to make the valve hole, or the weight of the stem added to the valve hole. However, when the truck was brand new, there were bright fluorescent green stickers on each wheel that matched up with painted dots (usually red or yellow) on each tire. Over time, the bright green stickers wear away and disappear. In anticipation of this, Accuride put a dimple in each wheel that will never wear away with weather, and that dimple sits squarely underneath the bright green label, so even with the label long gone, the dimple remains. And this is the match mounting point of that wheel.
Thought you or your tire shop might find it useful to know what the dimple is for.
And in keeping with the style of previous thread entries, here's the relevant data.
New Motorcraft OEM 7.3 fuel filter and cap: $122.89
Just FYI, I know this is too late, but you can pay a LOT less if you know where to shop. RockAuto, Riffraff, Tousley/Tasca Ford dealerships are where most of us go for OEM parts.
Anyway, that being the case it was overdue to be changed and as you can see was dirty:
You'll find the filter looks dark like that when it's changed. Sure, the longer it's been between changes the darker it gets, but diesel fuel turns everything black after awhile.
Y2K- thank you for the feedback. That was the plan, although I wasn't aware of the dimple in the wheels. I had planned on doing the stem thing. However given the feedback you provided - thanks! - I went with the dimple. Regarding the wheels I wasn't attempting a factory color but rather simply an aluminum silver. Given the limitation of the situation I chose the closest available option. To speak frankly I'm still not happy with them. The color isn't silver obviously, it has a tinge of white which somehow throws things off. David and I are at a restaurant as I write this, waiting on the big swap to finish. I had to get out of there before I did something crazy and put a stop to everything to have the wheels redone. Once they're mounted I'll be less inclined to do that. I digress.
Stewart and bbslider- the filter was just over $50 and the cap was just over $60 for a total of ~$122 with tax. Thank you for the parts references. I'll likely use them in the future. I did call 3 or 4 local auto parts stores BTW, but they only had aftermarket filters in stock, if they had anything at all. I wanted to switch to OEM and so unfortunately that meant a trip to the dealership. It's a premium, yes i realize that, but they had the OEM parts I wanted and they had them in stock. I didn't want to deal with shipping for this repair because I didn't want to drive the truck again until I changed the filter, given the fact that it had been in there longer than it should have. And I needed to get this done today. So I exchanged premium cost for time. My decision, but I want to be clear that I did so knowingly. I didn't just do it blindly because I didn't know any better.
Anyway I'm gonna eat and try to feel better about the new wheels...
Ok we're home. Pictures later tonight. However I need to get this off my chest. I've never been one to mince words and I'm not politically correct so I won't begin now. I hate 'em. I mean I detest the color of these wheels. I want to pull them off with fire, bury them 20' deep, perform a ritualistic burial dance over their grave complete with enough crazed hoopin' and hollerin' and body gyrations that I'm hoarse for two weeks and can't feel my extremities, then dig them up, bury them 100' deeper and resume the wild hysteria, starting at the outset.
To anyone considering this in the future, when it comes to these decisions go with your gut. I didn't and I'm paying the price.
So. What to do now. Hell I dunno. I'm gonna go break something. Just gotta look for something not expensive or my wife will be dancing over my grave.
Jerry
Go get some Rustoleum rattle can in a color you like, and treat it as annual maintenance. The finish you just put on will keep the rust at bay.

 03-30-2018, 12:05 PM