Complete "How To" Halogen to LED Heads & Tails
#1
 11-28-2017, 06:52 PM


Join Date: Sep 2009
Location: Plainville
Posts: 132
Likes: 0
Received 0 Likes
on
0 Posts
Complete "How To" Halogen to LED Heads & Tails
I have successfully converted my 2017 F250 Lariat Ultimate package halogen headlights and taillights to OEM LED version and I wanted to make a how to thread for others to use. There have been a few pioneers before me (FDNY136, EpicCowlick, rwilimo, Livnitup and Ryan B from F150 Forum) and I would like to thank them all for what they have done for us. I simply gathered information from these brilliant people and with their combined help got it working 100% like factory with all OE parts and no aftermarket harness. Here is what I did.
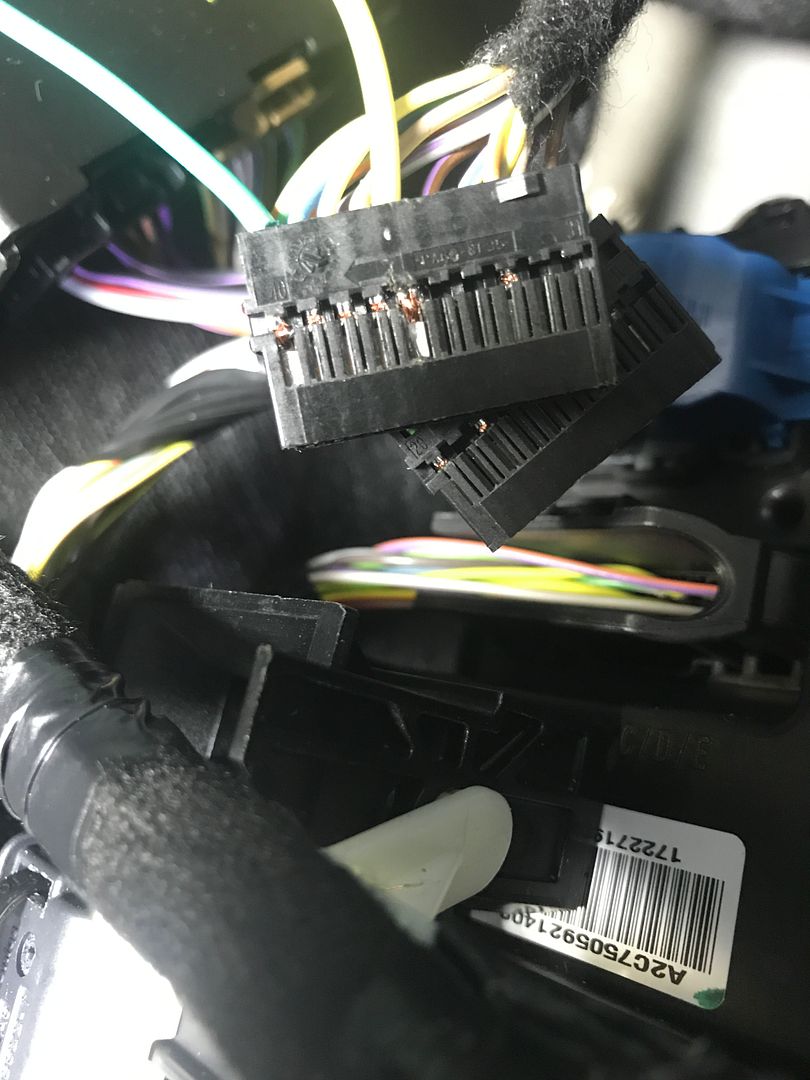
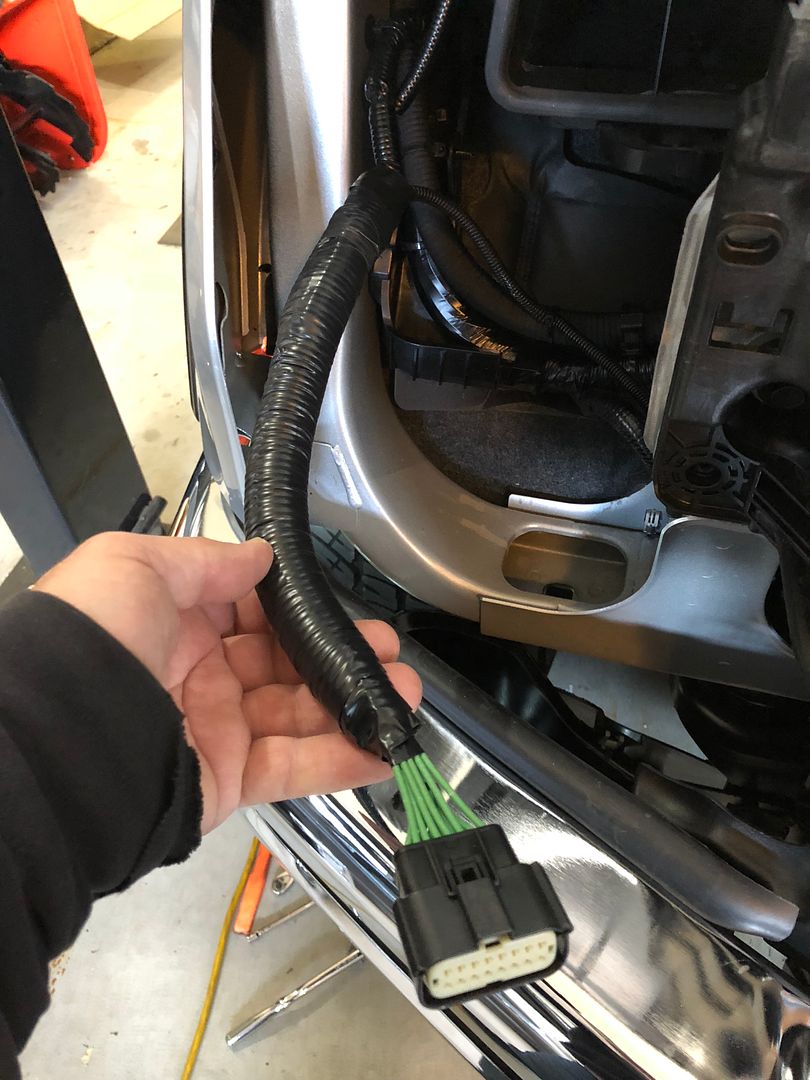
First I added wires to pin 36 & 40 at the BCM plug and ran #36 to the R headlight and #40 to the L.
Here is the plug you want, its located just above the passenger side kick panel fuse box
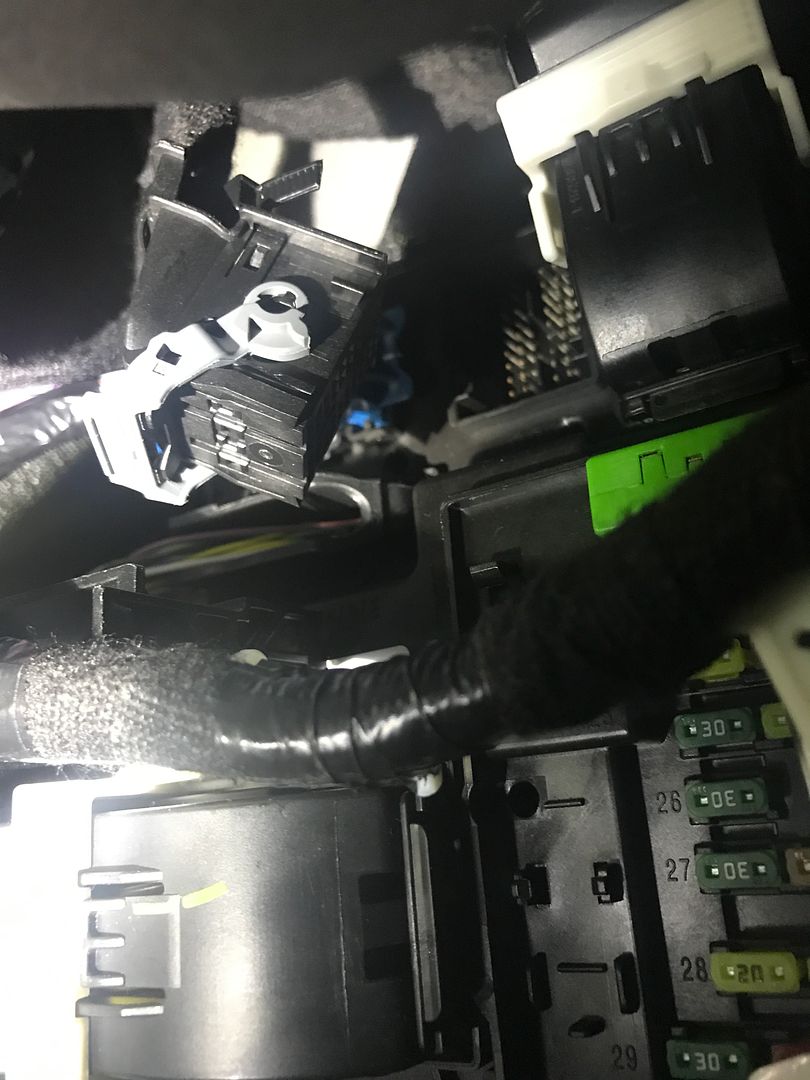
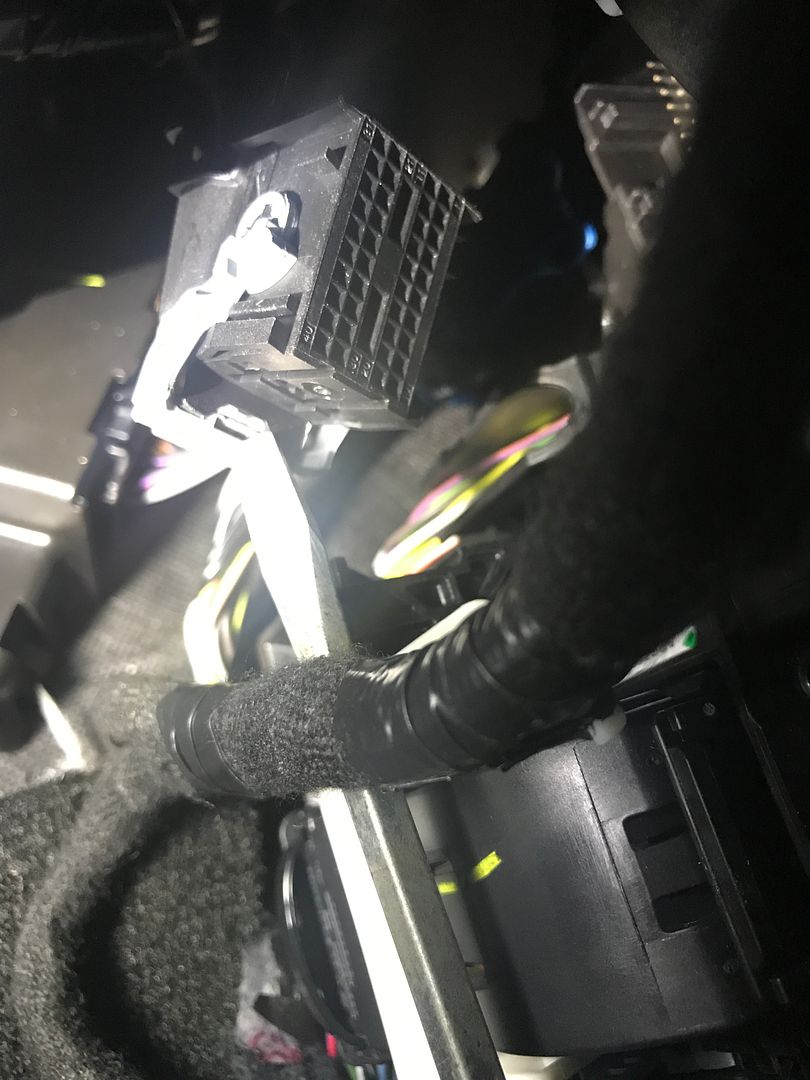
Use a pic to release the two separate plugs which are housed inside
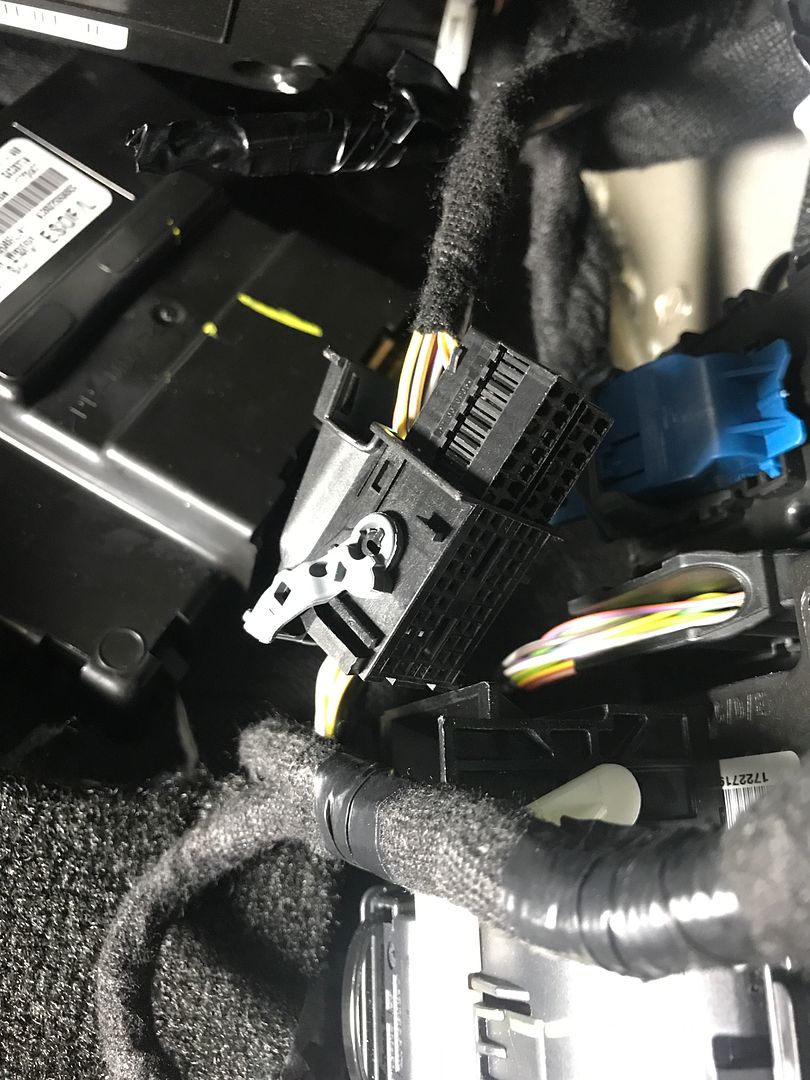
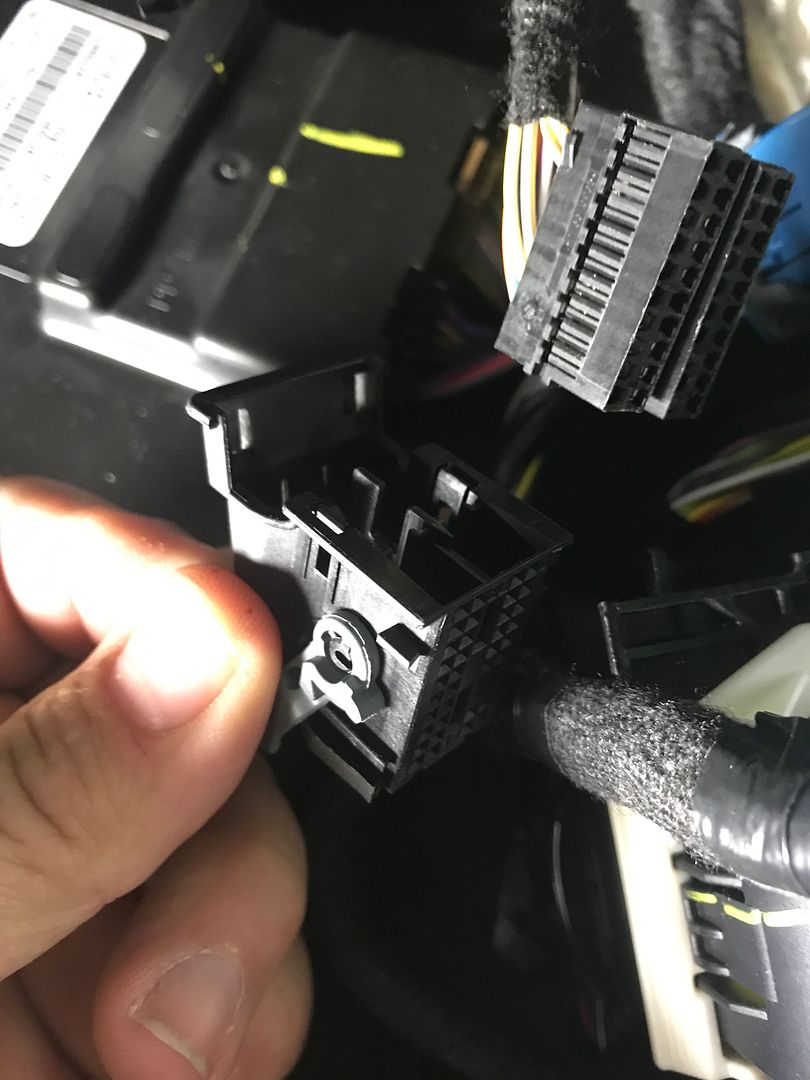
I made my own wires using individual pins but this proved to be a pain in the butt as I do not have the proper crimping tool. I would use the part number I have included for the factory Ford pins which come with 6” of wire already attached as they will slide in perfectly. You can see in the second picture I had to snap off the plastic locking tabs to get these inside the plug because of the misshapen pins from crimping without the proper tool. Definitely buy the OE ones is my advice.

Now, I decided to run the wires behind the center console over to the drivers side and bring them into the engine compartment through the large rubber grommet on the firewall in front of the e-brake assembly. You could go out the passenger side but I found it much harder to do because of the heater blower assembly.
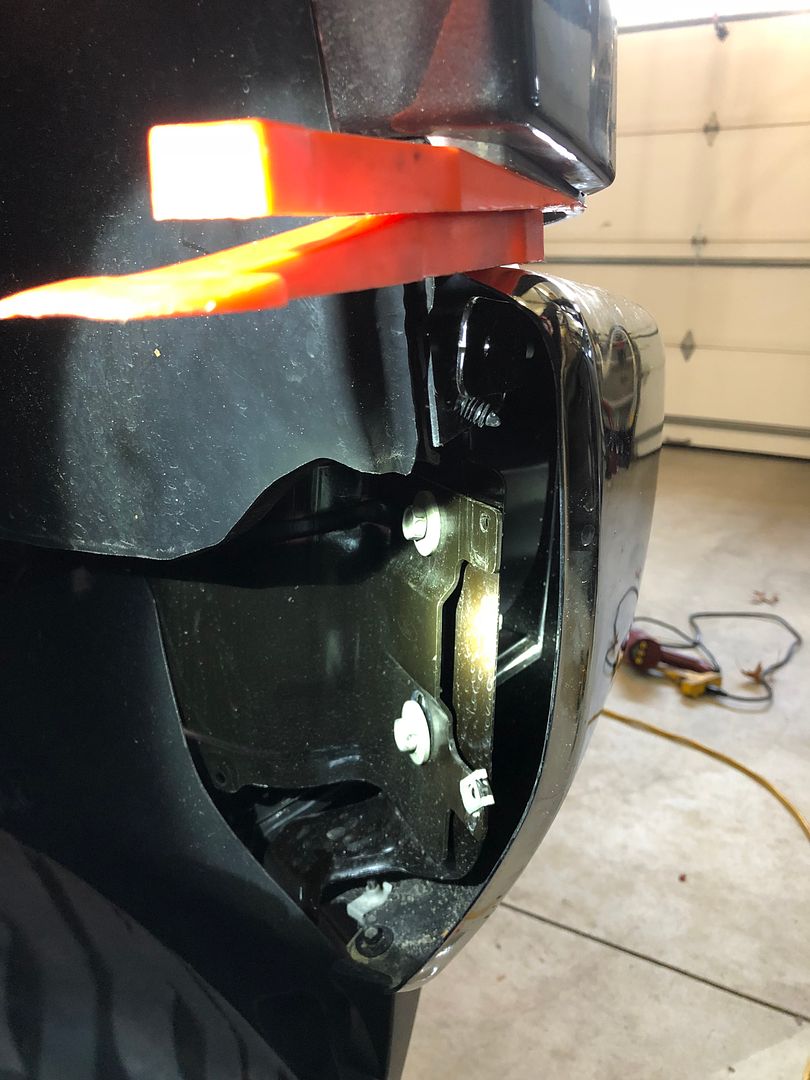
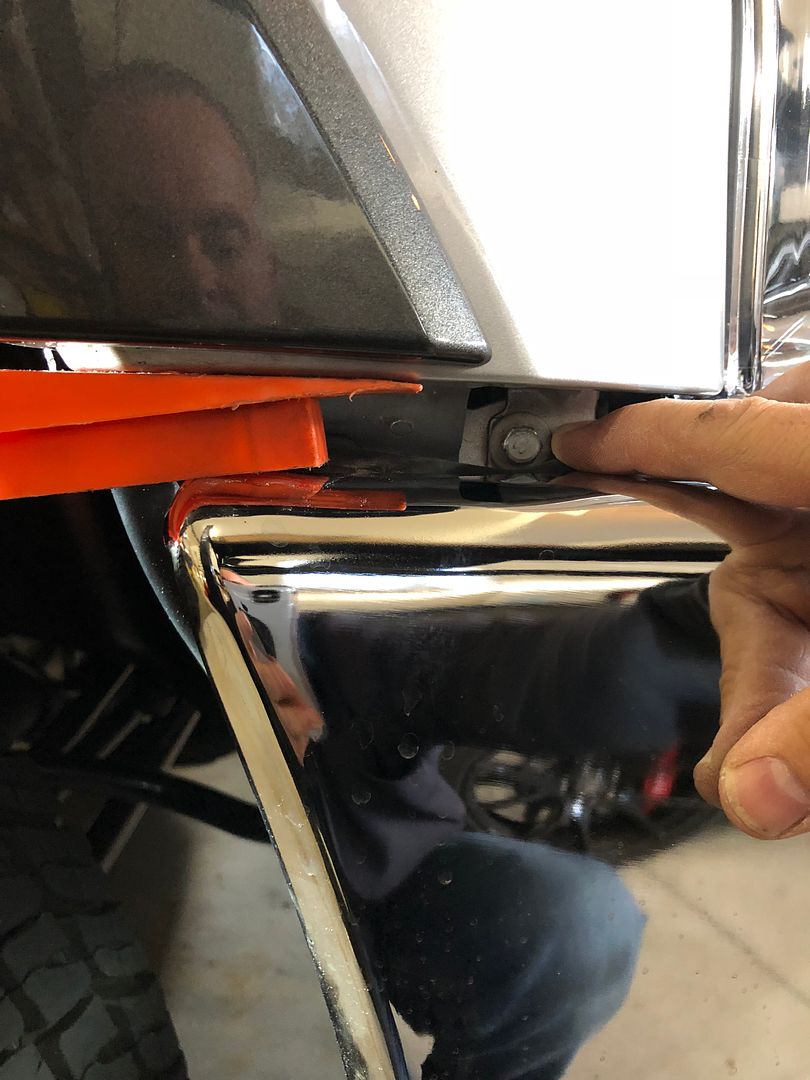
Ok, now as far as getting the headlights out, FDNY136 has a great video how to get them out but I have included a visual of how I got to the lower side bolt on each headlight.
FDNY136 video
The space between the bumper and the headlight on my truck was too tight to get the lower bolt out so here is what I did. Get behind the rubber flap that is in the wheel well directly behind the fog light assembly by releasing two push pins and one 5.5mm screw then slide it out of the way. Behind this cover you will find two 15mm bolts that need to be loosened to allow the space between the bumper and headlight to be opened up. I then used two plastic dash panel removal tools to open the gap enough to get at the bolt and get it out easily. Once you do this you can follow the rest of Jim’s video to get the headlights out.
Using the charts I have include at the end of this post, match the appropriate wire from the appropriate OE plug to the corresponding pin position on the OE LED headlight plug you have purchased. The plug will come with plenty of really nice heat shrink but I picked up some crimp connectors to use as opposed to soldering. I have used them for many years on many wiring jobs and they are a great way to make connections without soldering or using standard “butt connectors”. When you melt the heat shrink be sure to melt each end enough to release the glue as this will seal off the ends of the heat shrink to keep water out once it hardens.
Here is how I crimped the wires together
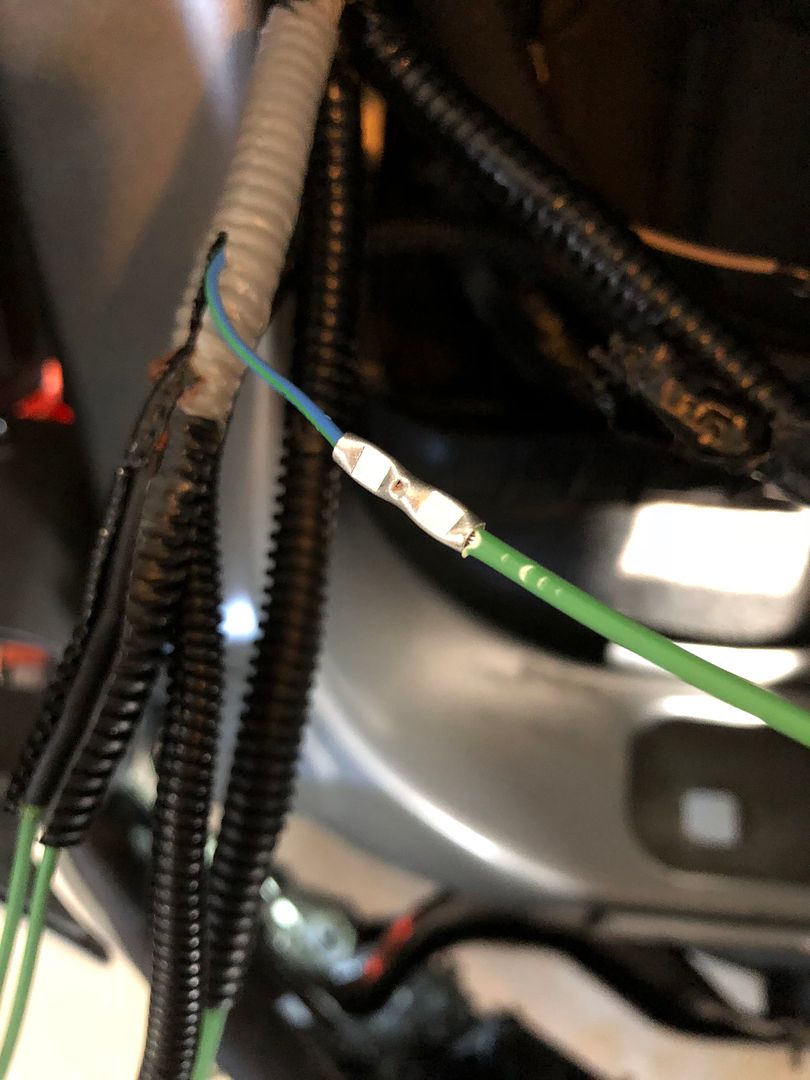
Heat shrink applied
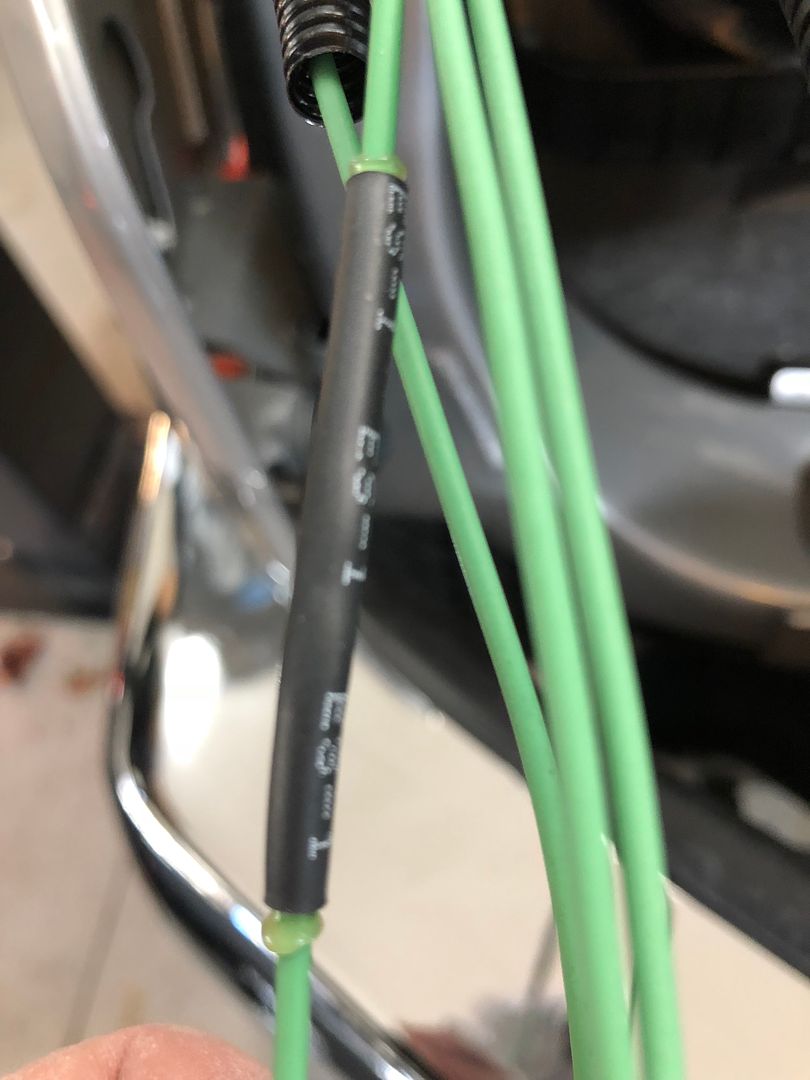
Everything taped up and put inside wire loom
Now, the OE plug will have 16 wires but you will only use 6. I decided to just use plasti dip to coat the ends of the wires I didn’t use on this plug and the one wire left over from the beige blinker plug that wasn’t used. I taped up the stock marker light plug and the high beam (lower black plug) really good and just tucked them away. I found no reason to cut them off and someday I will return the truck to stock and now I will not have to splice them back in.

Here is the parts list for everything you will need. You will also see I included the part number for the 3 LED strip that replaced the blank panel between the tailgate and bumper incase you also want to install this like I did. There are 2 part numbers for the taillight harness because one will have the plug needed for the 3 LED strip and the other will not. I also included the part numbers for the OEM fog lights incase you want to match them to the LED headlights like I did. The halogen fogs look like there is a lit candle behind the lens compared to the LED headlights lol.

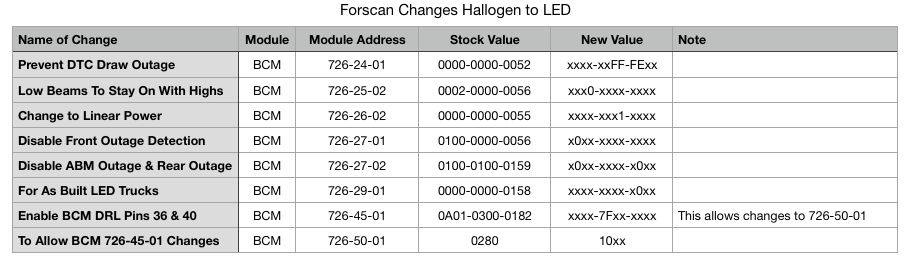
Here are the required ForScan changes needed to get everything working
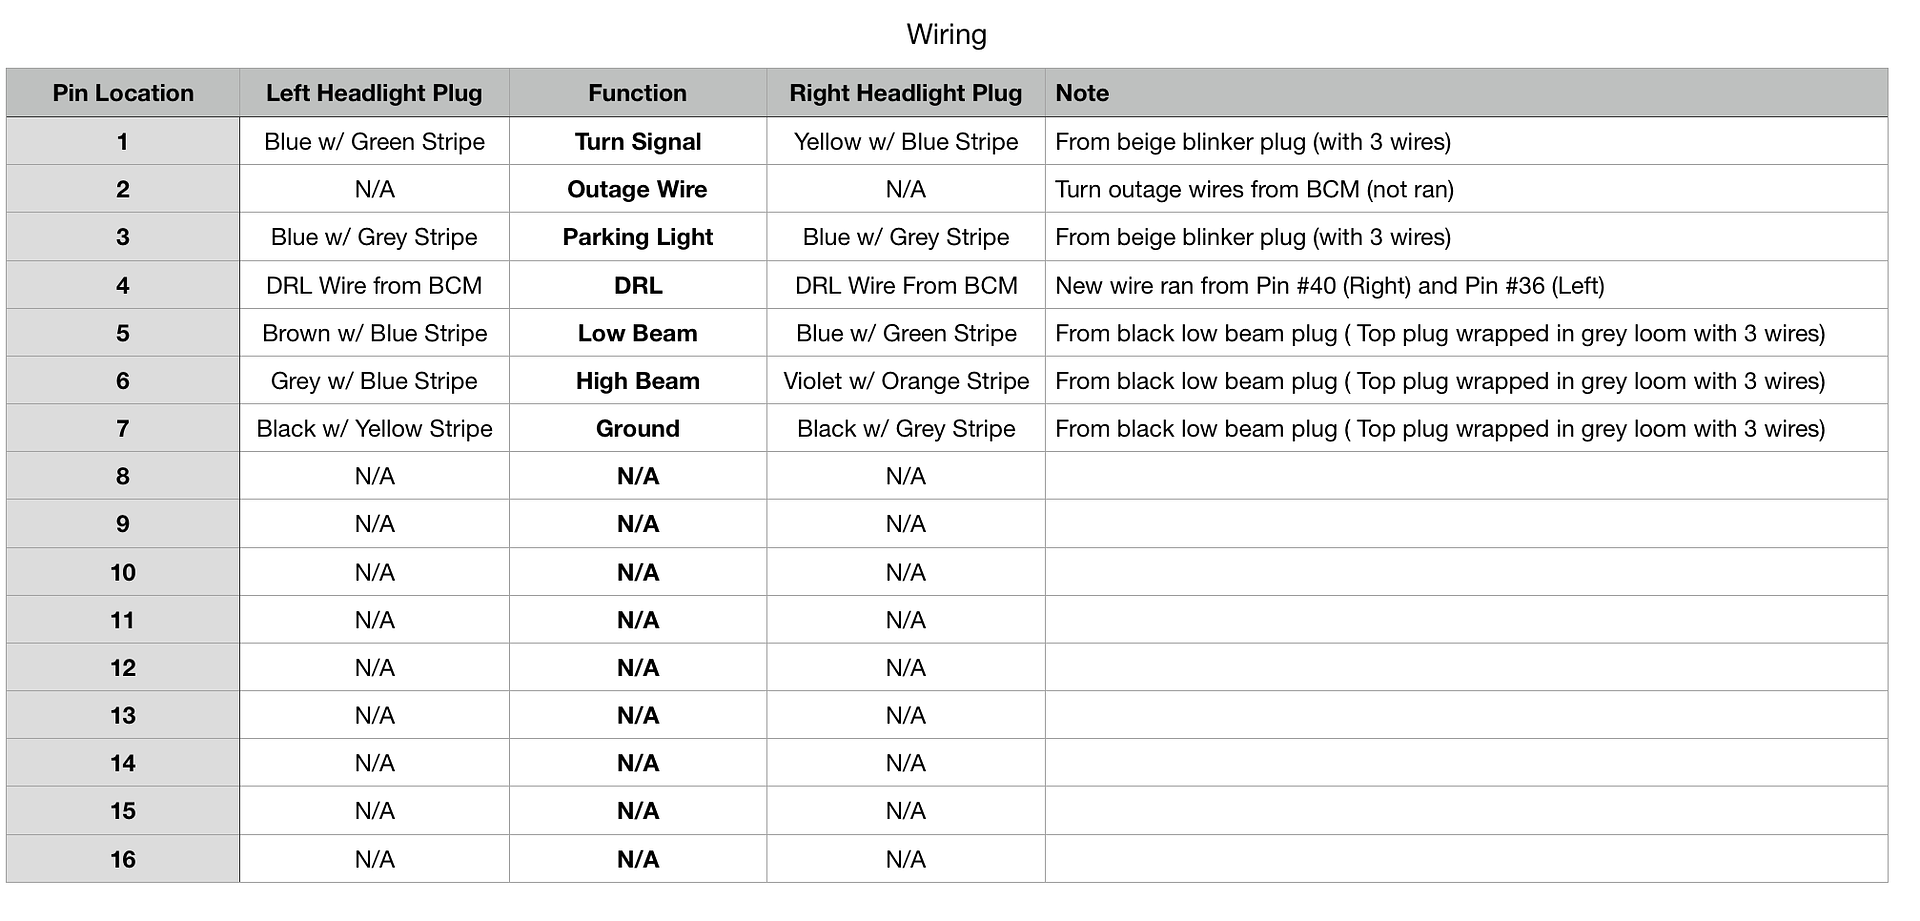
Here is the wiring information
As far as the tailinghts, just check out FDNY136 videos, they are great but here is the technical info about the wires which need to be moved. I didn't take out the factory harness, I left it there and wire tied the new one to it so when I return the truck to stock someday (and sell everything as a kit) I just need to cut the wire ties and pull out the modified harness.

Hopefully this is not confusing to anyone reading it but if so just PM me with suggestions and I will try and make it easy to follow.
EDIT: Here is a link to the non insulated butt connectors I used if you are interested
https://www.ebay.com/itm/20Pcs-BN1-2...kAAOSwXXxZXpQy
Here is what you should search for just incase the link no longer works in the future. Just copy and paste it into the eBay search bar.
Non-insulated-Butt-Connector-Wire-Cable-Adapter-for-AWG22-16
Here is a video I made showing you how everything works perfectly, at night anyway. I will get one during the day showing the DRL's in action soon.
Here is a video I made showing you how the DRL's function. You will see that when the truck is shut off and your still inside there will be no lights on at all. I want to add, once you open and close the door the parking lights (headlights are off) come on as they normally would and will turn off 30-40 seconds later after they time out. I forgot to show this in the video but I think you all know what I mean.
EDIT:
So, if you decide to run the outage wires with the DRL wires this is the Forscan line you would need (Thanks Ryan)
726-27-01 - x0xx xxxx xxxx (no outage wires)
or
726-27-01 - x0x1 xxxx xxxx (outage wires)
Pin #6 would be left headlight outage
Pin #17 would be right headlight outage
First I added wires to pin 36 & 40 at the BCM plug and ran #36 to the R headlight and #40 to the L.
Here is the plug you want, its located just above the passenger side kick panel fuse box


Use a pic to release the two separate plugs which are housed inside


I made my own wires using individual pins but this proved to be a pain in the butt as I do not have the proper crimping tool. I would use the part number I have included for the factory Ford pins which come with 6” of wire already attached as they will slide in perfectly. You can see in the second picture I had to snap off the plastic locking tabs to get these inside the plug because of the misshapen pins from crimping without the proper tool. Definitely buy the OE ones is my advice.


Now, I decided to run the wires behind the center console over to the drivers side and bring them into the engine compartment through the large rubber grommet on the firewall in front of the e-brake assembly. You could go out the passenger side but I found it much harder to do because of the heater blower assembly.
Ok, now as far as getting the headlights out, FDNY136 has a great video how to get them out but I have included a visual of how I got to the lower side bolt on each headlight.
FDNY136 video
The space between the bumper and the headlight on my truck was too tight to get the lower bolt out so here is what I did. Get behind the rubber flap that is in the wheel well directly behind the fog light assembly by releasing two push pins and one 5.5mm screw then slide it out of the way. Behind this cover you will find two 15mm bolts that need to be loosened to allow the space between the bumper and headlight to be opened up. I then used two plastic dash panel removal tools to open the gap enough to get at the bolt and get it out easily. Once you do this you can follow the rest of Jim’s video to get the headlights out.


Using the charts I have include at the end of this post, match the appropriate wire from the appropriate OE plug to the corresponding pin position on the OE LED headlight plug you have purchased. The plug will come with plenty of really nice heat shrink but I picked up some crimp connectors to use as opposed to soldering. I have used them for many years on many wiring jobs and they are a great way to make connections without soldering or using standard “butt connectors”. When you melt the heat shrink be sure to melt each end enough to release the glue as this will seal off the ends of the heat shrink to keep water out once it hardens.
Here is how I crimped the wires together

Heat shrink applied

Everything taped up and put inside wire loom

Now, the OE plug will have 16 wires but you will only use 6. I decided to just use plasti dip to coat the ends of the wires I didn’t use on this plug and the one wire left over from the beige blinker plug that wasn’t used. I taped up the stock marker light plug and the high beam (lower black plug) really good and just tucked them away. I found no reason to cut them off and someday I will return the truck to stock and now I will not have to splice them back in.

Here is the parts list for everything you will need. You will also see I included the part number for the 3 LED strip that replaced the blank panel between the tailgate and bumper incase you also want to install this like I did. There are 2 part numbers for the taillight harness because one will have the plug needed for the 3 LED strip and the other will not. I also included the part numbers for the OEM fog lights incase you want to match them to the LED headlights like I did. The halogen fogs look like there is a lit candle behind the lens compared to the LED headlights lol.

Here are the required ForScan changes needed to get everything working

Here is the wiring information

As far as the tailinghts, just check out FDNY136 videos, they are great but here is the technical info about the wires which need to be moved. I didn't take out the factory harness, I left it there and wire tied the new one to it so when I return the truck to stock someday (and sell everything as a kit) I just need to cut the wire ties and pull out the modified harness.

Hopefully this is not confusing to anyone reading it but if so just PM me with suggestions and I will try and make it easy to follow.
EDIT: Here is a link to the non insulated butt connectors I used if you are interested
https://www.ebay.com/itm/20Pcs-BN1-2...kAAOSwXXxZXpQy
Here is what you should search for just incase the link no longer works in the future. Just copy and paste it into the eBay search bar.
Non-insulated-Butt-Connector-Wire-Cable-Adapter-for-AWG22-16
Here is a video I made showing you how everything works perfectly, at night anyway. I will get one during the day showing the DRL's in action soon.
Here is a video I made showing you how the DRL's function. You will see that when the truck is shut off and your still inside there will be no lights on at all. I want to add, once you open and close the door the parking lights (headlights are off) come on as they normally would and will turn off 30-40 seconds later after they time out. I forgot to show this in the video but I think you all know what I mean.
EDIT:
So, if you decide to run the outage wires with the DRL wires this is the Forscan line you would need (Thanks Ryan)
726-27-01 - x0xx xxxx xxxx (no outage wires)
or
726-27-01 - x0x1 xxxx xxxx (outage wires)
Pin #6 would be left headlight outage
Pin #17 would be right headlight outage
#3
11-28-2017, 07:29 PM
Join Date: Sep 2009
Location: Plainville
Posts: 132
Likes: 0
Received 0 Likes
on
0 Posts
Total cost is going to be based on what exactly you will want to do and where you get the parts from. I have a friend who works at a dealer who helped me out on prices.
All the part numbers are there for you guys to price shop. Outside of my friend I have always used AutoNation White Bear Lake through foreparts.com. Just select them as your dealer from within the site. Their prices are usually better than Tasca and their shipping cost is ridiculously low, like $10 for no matter how many items I bought and also zero sales tax.
All the part numbers are there for you guys to price shop. Outside of my friend I have always used AutoNation White Bear Lake through foreparts.com. Just select them as your dealer from within the site. Their prices are usually better than Tasca and their shipping cost is ridiculously low, like $10 for no matter how many items I bought and also zero sales tax.
#4
11-28-2017, 10:13 PM

#5
11-28-2017, 10:19 PM
Join Date: Sep 2009
Location: Plainville
Posts: 132
Likes: 0
Received 0 Likes
on
0 Posts
Originally Posted by Stroking2017
Wow nice job guys. I wish I would have held off instead of jumping in too soon and using the Retro Customs Harness. Oh well. Thank you for posting this. A little unclear on the finished product but I think you tapped into the factory halogen wires right? From the chart you included.
#6
11-28-2017, 10:22 PM

#7
11-28-2017, 10:26 PM
Thats awsome! Wish you had some photos before it was all taped up. Makes since to snip off the plugs and crimp into them right? Do you have a link to those crimps by chance? I like the look of tjose better than butt connectors. Also to the Drls dim when headlamps turn on? My drls run full brightness with retro customs harness. No biggie but I like this factory set up better and cpuld have saved 3 bills lol. Sure those guys would be pissed at this hack! Kudos again guys!
Trending Topics
#8
11-28-2017, 10:42 PM
Join Date: Sep 2009
Location: Plainville
Posts: 132
Likes: 0
Received 0 Likes
on
0 Posts
Originally Posted by brendanlush
So, do I absolutely have to run wires for the DRL to work or will it just not work when the switch is set to auto?
Also, thank you and everyone else who have done the homework and testing to get this right! I am excited to get these mods done!
Also, thank you and everyone else who have done the homework and testing to get this right! I am excited to get these mods done!
Now, when the headlights are on the C bars are only half bright and I believe this is done with the marker light wire so if you do not run DRL wires I think the C bars will come on (at half bright) with the headlights but you will NOT get DRL (full bright) C bars during the day when in drive.
#9
11-28-2017, 10:47 PM
#10
11-28-2017, 10:47 PM
Join Date: Sep 2009
Location: Plainville
Posts: 132
Likes: 0
Received 0 Likes
on
0 Posts
Originally Posted by Stroking2017
Thats awsome! Wish you had some photos before it was all taped up. Makes since to snip off the plugs and crimp into them right? Do you have a link to those crimps by chance? I like the look of tjose better than butt connectors. Also to the Drls dim when headlamps turn on? My drls run full brightness with retro customs harness. No biggie but I like this factory set up better and cpuld have saved 3 bills lol. Sure those guys would be pissed at this hack! Kudos again guys!
I do not have a link for the crimp connectors but maybe tomorrow I can add it to the post.
Yes, when the headlights switch on the C bars dim to half bright
#12
11-28-2017, 10:57 PM
Join Date: Sep 2009
Location: Plainville
Posts: 132
Likes: 0
Received 0 Likes
on
0 Posts
#13
11-28-2017, 11:02 PM
BLIS research is done. I added it to my base lariat. Search the 17 sd forum. Several others have added it also after doing the tail light upgrade.
#14
11-28-2017, 11:06 PM
Join Date: Sep 2009
Location: Plainville
Posts: 132
Likes: 0
Received 0 Likes
on
0 Posts
