Build: '81/82 F100/150 4.9L 300six
#16
 09-09-2017, 10:31 AM


Engine assembly - it sounds like you're in good hands, thank you for the explanation.  I also consider myself halfway decent mechanically but I learned to not try and assemble an engine myself the very first time I did it without guidance, lots of little things to pay attention to in order to do it correctly. And you should see what some of the snot-nosed teenagers here do, makes you just shake your head and ask "why?"
Emissions stuff - all of what you said is correct. As for what parts & components to try and keep working, my answer is, "it depends." Some of those doodads are for operational ability e.g. kick up the idle speed when the AC is on, prevent run-on on engine shutdown, stuff like that. Lots of gadgets and doodads - many controlled by temperature & vacuum just like they've been used for 100 years on locomotive engines - that all have an intended purpose during certain conditions. This timeframe is the early evolution of computer-controlled engines and everything is pretty basic but not necessarily well-documented.
But there are some people here who are really dang good with this stuff (were even FoMoCo engineers designing this stuff way back when) who can help if they come across your questions and have time/inclination to answer.
The heat riser stuff/flapper valve/whatever, I guess my answer would be yes, make the stuff work that pre-heats the carburetor when it's cold outside, it can really help you. The EGR valve is kind of separate and that decision is yours; if you need to pass emissions, I would try and physically install the thing and make it APPEAR to be working, but block off the exhaust gas passageways inside so that it doesn't actally do anything (which will rob HP & economy from you but reduce NOX emissions).
In the end it's all your decision but you'll get input & advice from guys here.
- posts dumped into the mod queue - ALL the FTE mods have access to that queue and can do the required stuff, the problem is getting one to notice there are posts waiting in there for somebody to do something. It's really pretty rare for stuff to be dumped there and so I don't make it a habit to go look in there unless somebody like you tells me to.
When they're approved, they will appear in the threads as originally submitted, the timestamps determine in which order posts are displayed.
I also consider myself halfway decent mechanically but I learned to not try and assemble an engine myself the very first time I did it without guidance, lots of little things to pay attention to in order to do it correctly. And you should see what some of the snot-nosed teenagers here do, makes you just shake your head and ask "why?"Emissions stuff - all of what you said is correct. As for what parts & components to try and keep working, my answer is, "it depends." Some of those doodads are for operational ability e.g. kick up the idle speed when the AC is on, prevent run-on on engine shutdown, stuff like that. Lots of gadgets and doodads - many controlled by temperature & vacuum just like they've been used for 100 years on locomotive engines - that all have an intended purpose during certain conditions. This timeframe is the early evolution of computer-controlled engines and everything is pretty basic but not necessarily well-documented.
But there are some people here who are really dang good with this stuff (were even FoMoCo engineers designing this stuff way back when) who can help if they come across your questions and have time/inclination to answer.
The heat riser stuff/flapper valve/whatever, I guess my answer would be yes, make the stuff work that pre-heats the carburetor when it's cold outside, it can really help you. The EGR valve is kind of separate and that decision is yours; if you need to pass emissions, I would try and physically install the thing and make it APPEAR to be working, but block off the exhaust gas passageways inside so that it doesn't actally do anything (which will rob HP & economy from you but reduce NOX emissions).
In the end it's all your decision but you'll get input & advice from guys here.
- posts dumped into the mod queue - ALL the FTE mods have access to that queue and can do the required stuff, the problem is getting one to notice there are posts waiting in there for somebody to do something. It's really pretty rare for stuff to be dumped there and so I don't make it a habit to go look in there unless somebody like you tells me to.
When they're approved, they will appear in the threads as originally submitted, the timestamps determine in which order posts are displayed.
#17
09-09-2017, 02:14 PM
Adam, on the exh manifold because you live up north and it gets cold at times the intake needs a little heat but it does not need to be from that flapper valve putting heat right on the intake.
Because your exh manifold valve thingy is bad now would the time to go with EFI exh manifolds.
See the link and how I took care of heating the intake.
https://www.ford-trucks.com/forums/1...questions.html
The company that makes that heat place is no longer on Ebay (ebay wanted too much $$) but I think I have there web site or email to get one from them.
Here is the web site https://www.hollisterroad.com/
They manifolds you can get used thru JY or new thru auto parts store (dorman replacement part)
The Y pipe I got thru Rock Auto - cheapest and you can only et the y pipe with the cat so if you go looking on the web lookup cat also.
Dave ----
#18
09-09-2017, 03:14 PM

Post Fiend
Good Morning!
Thank you for the insight regarding the exhaust "flapper". So, if I understand, you would recommend getting this system functioning?
Regarding the emissions: I read a rather long and heated debate on here about emissions delete. There were basically 2 arguments: 1. The engine was designed and tuned with the emissions systems in mind, and besides the fact that it reduces NOX, the engine won't run correctly without it. 2. The emissions system on this engine was a poorly designed "band-aid" quickly put together to pass new emissions regulations. An engine does not require emissions systems to run properly, and can be tuned without it.
I'm not throwing my hat into this debate, but I understand and appreciate both arguments. Being a Tier 1 automotive supplier, I can definitely appreciate the "band-aid" argument haha! Personally, if I felt confident that I could get all of the emissions systems fixed and working properly, I would certainly do it. But there are many components to this system which are missing or known to be non-functioning. The items which are missing might not be replaceable due to parts no longer being available. I am also of the opinion that this emissions system is an "all or none" type of system. Meaning, it will never work correctly if it is only "half-fixed". So if you can't fix the whole system properly, it's probably better to delete it all and tune the engine without it. Thoughts?
Last - about the messages in "limbo". All of the messages that I wrote are not present on this thread. Nothing is lost. However, I submitted 3 messages between Thursday and Friday, and non appeared on the thread until this morning (Saturday). Each time I submitted a new reply, it redirected me to a page which said "your post will not be visible until it is approved by a moderator", or something like that. I figured that since I was new to the forum, my messages would be proofread by a moderator to make sure I wasn't a troll. Maybe after I am "repped" by a moderator, or whatever, my replies will appear automatically after submission. Oh well, it's not a problem as long as the messages aren't lost. As you can see, I like to write books.
I'll be working on the truck more tomorrow, and I'll take some pictures to post. Here's my current project - cleaning the oil pan......
Attachment 244050
As for getting the flapper working what service is the truck going to be seeing ? Is it going to be driven year round ? Your in MI so not like you are going to see many what one would call severe winter days as opposed to someone in my area where it drops below freezing some time end of October early November and does not really go back above freezing till some time in March.
When the flapper is closed (bypassing heat for the intake) It it still heats the intake as it is not an air tight seal and the intake and exhaust manifolds are bolted together it may just mean a longer warm up when cold out, this can be offset to a degree with making the choke stay on longer.
Ideally if you can, make it operational as it will result in less stress/wear on the engine during warm up. Alternatively try non operational it and if it causing unacceptable operation for you then you can fix it. Like most things you will never know for sure till you try it.
As for the emissions that is entirely your call and what you have to do to keep the truck compliant in your region if it is just a visual inspection the bits can be installed but be non-functional. All carburetor equipped engines will run better and return better fuel economy and power and have higher reliability with the removal of the emissions equipment this is most evident in regards to the the EGR.
But it may require a non emissions calibration carburetor and distributor (or re-curve of the existing dist) to take full advantage of the potential power gains and economy with the removal of the emissions equipment.
#19
09-09-2017, 07:54 PM
One thing not brought up is the air filter housing.
Stock it has a valve out on the end of the "tube" and when cold that valve switches to pull warm air off the exh manifold.
There should be a metal housing around the manifold to trap heat so the filter can pull it up into the carb.
Once the motor is up to temp that filter valve switches to let in cool air thru a hose going to the radiator support.
Now if you go with the EFI exh manifolds they did not have this metal housing from the factory. You can try and make one to fit around the manifold.
For me that is not going to happen but it also does not get that cold for that long down here for me to worry about it.
Besides I do have the water heating the bottom of the intake to replace that flapper valve.
On this flapper valve is there a kit to fix them if not working?
Also IIRC the big truck 300 six exh manifold did not have this flapper valve so is it needed?
Again I would not try and fix it, go with the EFI manifolds and the water heater for the intake and deal with any issues that may come up when cold out.
Dave ----
#20
09-09-2017, 10:19 PM
Post Fiend
One thing not brought up is the air filter housing.
Stock it has a valve out on the end of the "tube" and when cold that valve switches to pull warm air off the exh manifold.
There should be a metal housing around the manifold to trap heat so the filter can pull it up into the carb.
Once the motor is up to temp that filter valve switches to let in cool air thru a hose going to the radiator support.
Now if you go with the EFI exh manifolds they did not have this metal housing from the factory. You can try and make one to fit around the manifold.
For me that is not going to happen but it also does not get that cold for that long down here for me to worry about it.
Besides I do have the water heating the bottom of the intake to replace that flapper valve.
On this flapper valve is there a kit to fix them if not working?
Also IIRC the big truck 300 six exh manifold did not have this flapper valve so is it needed?
Again I would not try and fix it, go with the EFI manifolds and the water heater for the intake and deal with any issues that may come up when cold out.
Dave ----
Stock it has a valve out on the end of the "tube" and when cold that valve switches to pull warm air off the exh manifold.
There should be a metal housing around the manifold to trap heat so the filter can pull it up into the carb.
Once the motor is up to temp that filter valve switches to let in cool air thru a hose going to the radiator support.
Now if you go with the EFI exh manifolds they did not have this metal housing from the factory. You can try and make one to fit around the manifold.
For me that is not going to happen but it also does not get that cold for that long down here for me to worry about it.
Besides I do have the water heating the bottom of the intake to replace that flapper valve.
On this flapper valve is there a kit to fix them if not working?
Also IIRC the big truck 300 six exh manifold did not have this flapper valve so is it needed?
Again I would not try and fix it, go with the EFI manifolds and the water heater for the intake and deal with any issues that may come up when cold out.
Dave ----
And the heat stove on the I6's helps but is not really necessary except in a few specific atmospheric and operating conditions. If running the EFI Exhaust Manifolds then it would be advisable to have for cold weather operation. I've run open elements on all my carbed stuff year round and we see an actual winter, in the 4 decades I've been here in Alberta I have had but one instance of carb icing on an engine and it was an unusual day with with -20C temps and high humidity (fog) a rarity to say the least. And even then the fix was a simple pull over and let it sit for couple mins to melt the ice in the venturi's.
#21
09-10-2017, 07:41 AM
First I have to say I have only been down here (NC) for 2 years, from CT before that so I know winters.
The EFI manifolds do not have the tin for the preheat to the air filter so you would have to make something.
Also the stock manifold tins have rusted away a long time ago so maybe it really is not needed but for the "special days" when weather is just right for carb icing.
Because of that (tins) and the plus you get from the EFI manifold (better flowing) and what you said what may be needed to repair the flapper I would not even try and deal with fixing it.
Just my .02
I should say the reason I went with EFI manifolds is the manifold on my motor, not the one for that truck so I found out, the new front pipe would not fit the manifold so to get a working exh system I had to swap manifolds.
Dave ----
#22
09-10-2017, 01:09 PM
Post Fiend
First I have to say I have only been down here (NC) for 2 years, from CT before that so I know winters.
The EFI manifolds do not have the tin for the preheat to the air filter so you would have to make something.
Also the stock manifold tins have rusted away a long time ago so maybe it really is not needed but for the "special days" when weather is just right for carb icing.
Because of that (tins) and the plus you get from the EFI manifold (better flowing) and what you said what may be needed to repair the flapper I would not even try and deal with fixing it.
Just my .02
I should say the reason I went with EFI manifolds is the manifold on my motor, not the one for that truck so I found out, the new front pipe would not fit the manifold so to get a working exh system I had to swap manifolds.
Dave ----
The EFI manifolds do not have the tin for the preheat to the air filter so you would have to make something.
Also the stock manifold tins have rusted away a long time ago so maybe it really is not needed but for the "special days" when weather is just right for carb icing.
Because of that (tins) and the plus you get from the EFI manifold (better flowing) and what you said what may be needed to repair the flapper I would not even try and deal with fixing it.
Just my .02
I should say the reason I went with EFI manifolds is the manifold on my motor, not the one for that truck so I found out, the new front pipe would not fit the manifold so to get a working exh system I had to swap manifolds.
Dave ----
Relatively speaking not sure I would say CT has winter they get a few weeks of cooler weather and few good dumps of snow on occasion, it is not an ongoing weeks or months on end unrelenting sub freezing experience. I'd gladly swap what we get here for that climate in the winter.
As long as the flapper bore is not elongated the fix is either a spring change or penetrating fluid and patience while working to free it up. Both are many many times easier than an exhaust manifold swap and modifying the exhaust piping to accept the EFI exhaust manifold and fabricating engine plate to circulate coolant to the intake.
And it is not really the exhaust that is the restriction in the carb'd I6's but rather the intake. Swapping the exhaust manifold will yield negligible if any gains with out doing the intake. One of those cases where the pleasure is not really worth the gain in most instances.
#23
09-11-2017, 07:47 AM
Regarding the flapper repair kit - can you tell me where I can purchase this? The flapper is not seized, but the springs are gone and it looks like the shaft which holds the springs is bent. A new exhaust manifold from RockAuto has the flapper and springs already installed, but the cost is about $130. If the kit has everything I need, then maybe I'll try that instead.
Yea, I have the stock air cleaner with heat stove. The "tin" has certainly rusted away, but I did manage to pull off the "remains" of this - and I think I can re-create it to closely match what it used to be.
I haven't read up on the EFI manifolds but I'll look into it. I don't really have a good reason, but my plan was to remain "stock" on this rebuild as much as possible (except perhaps the emissions). I don't know why, nor can I argue that stock is in any way superior. But my 'heart' is telling me to do it... funny thing, the heart.
Yesterday I spent about 4 hours sanding (random orbital and 80 grit) and grinding (wire wheel and disc grinder) the oil pan. What a pain! Under the oil and dirt I found a lot of corrosion. I'm just happy that I didn't find any weak metal. I think everything is thick enough to reuse the pan.
Then I cleaned it and put some 'rust reformer' on it. It needs 24 hours to dry before applying more paint, but that is my plan for this evening. Primer, Base, and Clear. Probably overkill... but I tend to get in my own way as a perfectionist.
Here is the oil pan with 2 light coats of rust reformer. You can see the pitting from the corrosion.
QUESTION: I do not know if I had leakage problems at the seal of the dipstick tube / oil pan. There are 4 rivets with some sealant between. I had oil everywhere, for several reasons. I am thinking it might be a good idea to ADD sealant now, rather than find out I have a leak later. My plan would be to clean up the area on the inside of the pan and put more sealant OVER the existing seal. Good idea? Bad idea? What kind of sealant should I use? Thanks!
-Adam
#24
09-11-2017, 07:52 AM
Emissions stuff - all of what you said is correct. As for what parts & components to try and keep working, my answer is, "it depends." Some of those doodads are for operational ability e.g. kick up the idle speed when the AC is on, prevent run-on on engine shutdown, stuff like that.
But you peaked my interest with your comment on "preventing run-on". I had this issue. My assumption was that I had carbon "hot spots" on one of the valves. You should have seen how bad the valves were when I took off the head! The machine shop also made a point to tell me how bad they were!
But if one of these vacuum lines helps stop that, perhaps that was my issue? There were several vacuum connections which were broke or capped. Do you know which line helps with the "run-on"? Would the Vacuum Field Service Manual explain the function of each line as well?
Thanks!
-Adam
#25
09-11-2017, 08:45 PM
QUESTION: I do not know if I had leakage problems at the seal of the dipstick tube / oil pan. There are 4 rivets with some sealant between. I had oil everywhere, for several reasons. I am thinking it might be a good idea to ADD sealant now, rather than find out I have a leak later. My plan would be to clean up the area on the inside of the pan and put more sealant OVER the existing seal. Good idea? Bad idea? What kind of sealant should I use? Thanks!
-Adam
#26
09-11-2017, 08:50 PM
I have not yet purchased the "Vacuum and Emissions" Ford Service Manual, but it is on my list of "to-dos".
But you peaked my interest with your comment on "preventing run-on". I had this issue. My assumption was that I had carbon "hot spots" on one of the valves. You should have seen how bad the valves were when I took off the head! The machine shop also made a point to tell me how bad they were!
But if one of these vacuum lines helps stop that, perhaps that was my issue? There were several vacuum connections which were broke or capped. Do you know which line helps with the "run-on"? Would the Vacuum Field Service Manual explain the function of each line as well?
Thanks!
-Adam
FoMoCo had a system (on certain configurations) where the carb would totally choke off the intake on engine shutdown, thereby forcing a non-runon situation. These things existed because the engines were so de-tuned to meet EPA regulations.
Now id your chance to fix all of Fpord's de-tuning efforts, and you really shouldn't need haphazard, bandaid-type of "fixes" like they implemented on their detuned engines.
Where, exactly, to look this stuff up in the books? eeegads..... boy, I really can't say for certain. But again, I wouldn't worry about THAT feature right now, worry about it only if runon becomes a problem on your new engine.
#27
09-12-2017, 02:24 AM
Post Fiend
Good morning fellas,
Regarding the flapper repair kit - can you tell me where I can purchase this? The flapper is not seized, but the springs are gone and it looks like the shaft which holds the springs is bent. A new exhaust manifold from RockAuto has the flapper and springs already installed, but the cost is about $130. If the kit has everything I need, then maybe I'll try that instead.
Regarding the flapper repair kit - can you tell me where I can purchase this? The flapper is not seized, but the springs are gone and it looks like the shaft which holds the springs is bent. A new exhaust manifold from RockAuto has the flapper and springs already installed, but the cost is about $130. If the kit has everything I need, then maybe I'll try that instead.
New NOS OEM 1965 Ford Exhaust Spring & Bushing C5AZ-9462-C C5AZ-9449-A | eBay
Spring 2
NOS 1965 - 1972 FORD GALAXIE 240 V8 EXHAUST THERMOSTAT CONTROL VALVE SPRING | eBay
I would try straitening out the shaft first.
#28
09-12-2017, 07:34 AM
Thanks, Matthew, for the part numbers! I have a hard time making a decision on whether is it worth the effort or important enough to worry about. The thought of a "clean" engine bay without all these strange pipes and tubes and whatnot running all over is also kind of nice...
FYI I will be moving to South Carolina around the end of the year (just south of Charlotte, NC). So the cold-weather stuff will become even more of a 'non-issue'.
Regarding the oil-pan dipstick-tube seal: you would recommend RTV black silicone 'gasket maker' for this type of application? Can I just clean all the oil/dirt from the area on the inside of the oil pan and apply the sealant OVER the existing seal? I don't really want to try my hand at drilling out the rivets, removing the existing sealant, and riveting it back together.
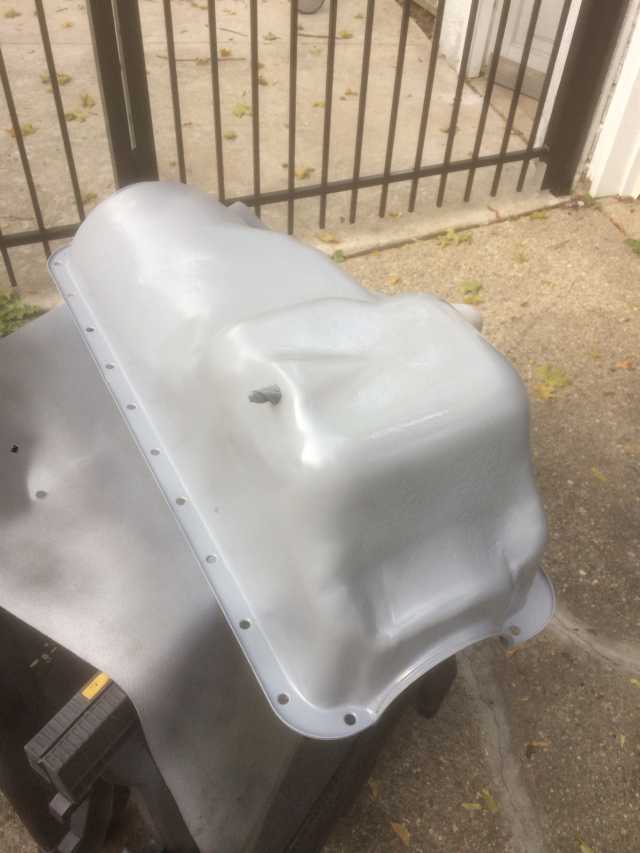
So, last night I wanted to finish painting the oil pain with primer, base, and clear - but I only accomplished the primer. The base and clear have very specific application time restrictions, and I didn't have another 2+ hours to devote to painting last night.
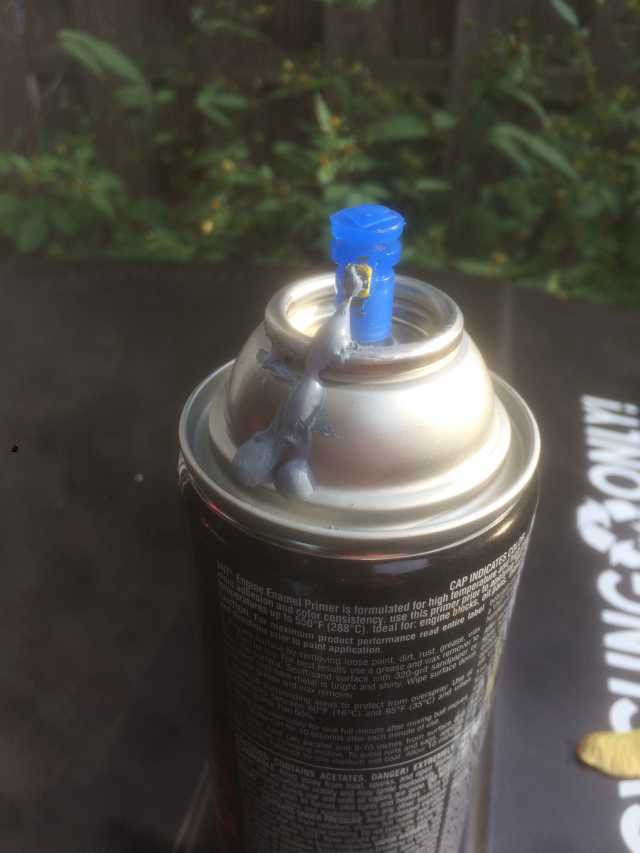
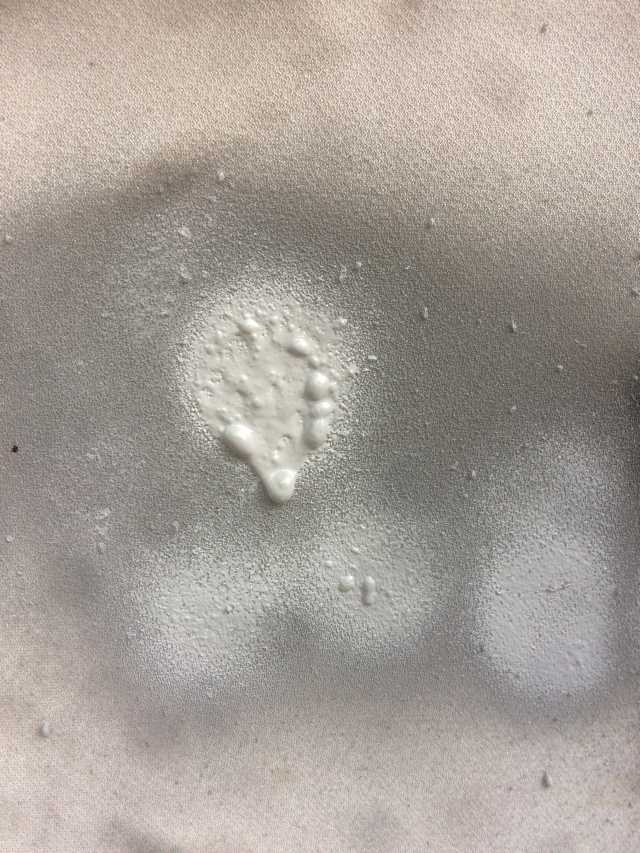
Also, I had an issue with the first can of primer I tried. What came out appeared to polymerizing and expanding... very strange. The second can seemed to be okay.
Pictures of the defective can and result, followed by a picture of the primed oil pan. I spent some time sanding the push-rod cover in-between primer coats. Hopefully I can finish the paint job soon.
FYI I will be moving to South Carolina around the end of the year (just south of Charlotte, NC). So the cold-weather stuff will become even more of a 'non-issue'.
Regarding the oil-pan dipstick-tube seal: you would recommend RTV black silicone 'gasket maker' for this type of application? Can I just clean all the oil/dirt from the area on the inside of the oil pan and apply the sealant OVER the existing seal? I don't really want to try my hand at drilling out the rivets, removing the existing sealant, and riveting it back together.
So, last night I wanted to finish painting the oil pain with primer, base, and clear - but I only accomplished the primer. The base and clear have very specific application time restrictions, and I didn't have another 2+ hours to devote to painting last night.
Also, I had an issue with the first can of primer I tried. What came out appeared to polymerizing and expanding... very strange. The second can seemed to be okay.
Pictures of the defective can and result, followed by a picture of the primed oil pan. I spent some time sanding the push-rod cover in-between primer coats. Hopefully I can finish the paint job soon.
#29
09-12-2017, 08:28 AM
Post Fiend
Thanks, Matthew, for the part numbers! I have a hard time making a decision on whether is it worth the effort or important enough to worry about. The thought of a "clean" engine bay without all these strange pipes and tubes and whatnot running all over is also kind of nice...
FYI I will be moving to South Carolina around the end of the year (just south of Charlotte, NC). So the cold-weather stuff will become even more of a 'non-issue'.
Regarding the oil-pan dipstick-tube seal: you would recommend RTV black silicone 'gasket maker' for this type of application? Can I just clean all the oil/dirt from the area on the inside of the oil pan and apply the sealant OVER the existing seal? I don't really want to try my hand at drilling out the rivets, removing the existing sealant, and riveting it back together.
I would not put any sealant over the joint inside the pan the ultimate result will be it eventually falling off and ending up in the pan and you will back to square one.
Again the proper thing to do is drill the rivets and reseal it. As was stated before it can be bolted back together and then loctite the nut/bolts so there is no chance of them backing off and ending up in the pan. Or even better tap the dip stick tube holder casting and bolt it to the pan as below.
Do the job right and it will never need to be looked at again.
Half *** it and you can gaurentee you will be doing it again.
I would use the threebond 1194/84 to seal it for this application as it will reduce the chances of it ever leaking again to zero.

#30
09-13-2017, 09:48 AM
Just an update: hope to finish the oil pan painting tonight. Was entertaining co-workers from China last night, so couldn't work on anything.
Waiting for a call from the machine shop on the status of my block / head. They are supposed to be finished this week, sometime.
Called a local powder coater about possibly renting time in their oven for some paint-baking.
We all love pictures... no rhyme or reason to the ones I'm sharing now. But try to enjoy them, nonetheless!
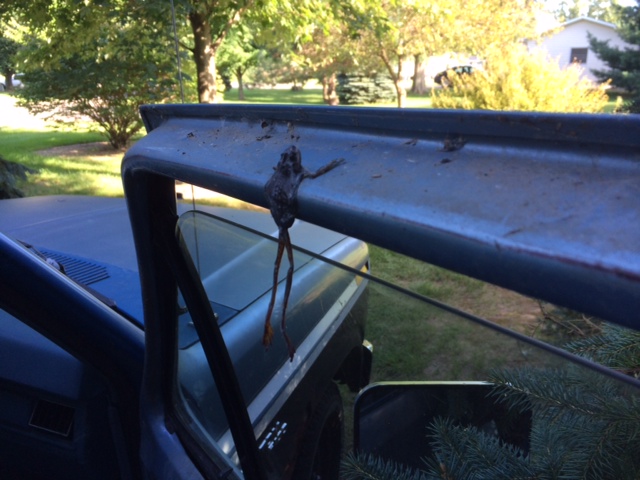
Found this poor little guy in the passenger door... I was driving down the road and could see his little outstretched legs dangling in front of the window. I found it hilarious and sad, simultaneously.
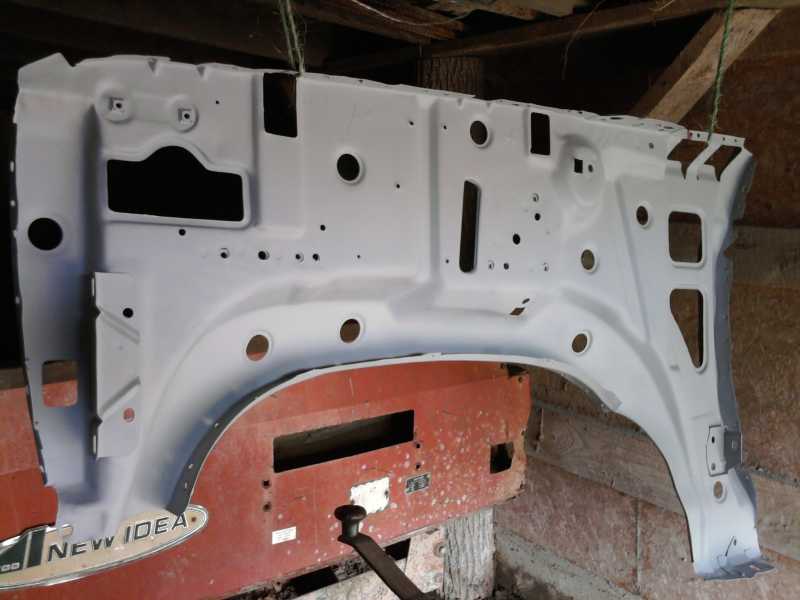
Way back when, I actually drilled out all spot welds on both front fenders to clean up everything, then welded them back together. Am I crazy? (yes, yes I am)
This poor truck has found itself sitting for years several times... my crazy life and his don't always match well.

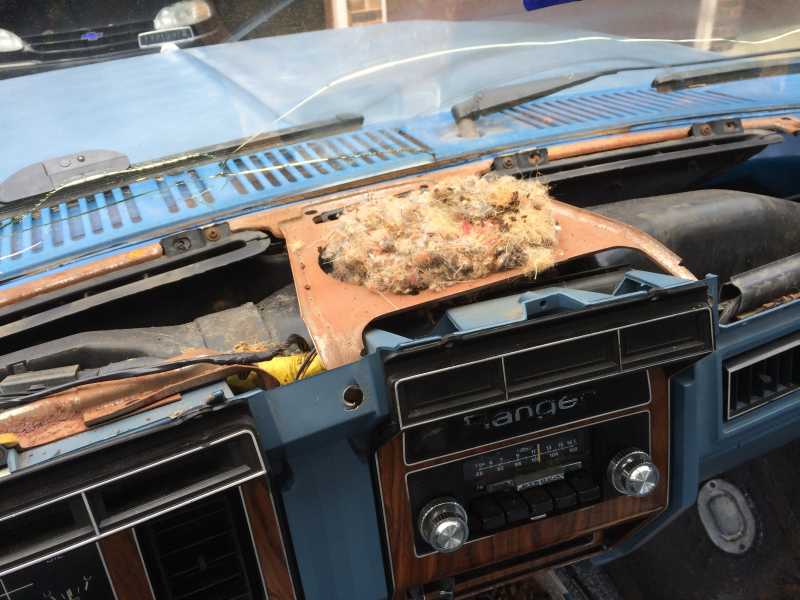
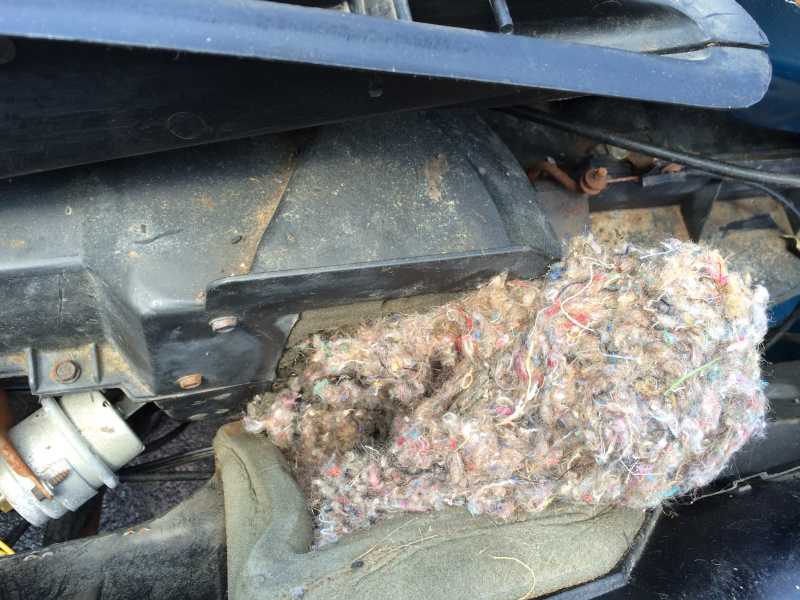
I hate mice! I am surprised I haven't died from Hantavirus yet... dryer sheets and moth ***** work well to deter them, but they get pretty desperate in the winter.
Waiting for a call from the machine shop on the status of my block / head. They are supposed to be finished this week, sometime.
Called a local powder coater about possibly renting time in their oven for some paint-baking.
We all love pictures... no rhyme or reason to the ones I'm sharing now. But try to enjoy them, nonetheless!
Found this poor little guy in the passenger door... I was driving down the road and could see his little outstretched legs dangling in front of the window. I found it hilarious and sad, simultaneously.
Way back when, I actually drilled out all spot welds on both front fenders to clean up everything, then welded them back together. Am I crazy? (yes, yes I am)
This poor truck has found itself sitting for years several times... my crazy life and his don't always match well.
I hate mice! I am surprised I haven't died from Hantavirus yet... dryer sheets and moth ***** work well to deter them, but they get pretty desperate in the winter.