400 Refresh
#121
 02-06-2018, 03:25 PM


I'm very pleased to hear that the missing freeze plugs were intentional !
Please stop mentioning -50 degrees. I moved here from the UK to get away from only +/- 0 degrees, and the thought of -50 keeps me awake at night ! LOL
NO, don't mention the oil insert/bung/adapter !!
When it comes to ''small things'', let's hope he didn't forget to torque every nut 'n bolt to the correct spec !! (There, your turn for sleepless nights ! LOL)
I see you painted the coolant drain plugs on the block.
Ideally you'll drain the block coolant every two years max, but it's a p.i.t.a. messy job, and you just reminded me about that.
Thanks for the homework ! LOL
I've only just started googling, but you might find these useful :
Water jacket drain plug question - The FORDification.com Forums
Scroll down to the bottom picture.
https://www.ford-trucks.com/forums/1...in-valves.html
https://www.ford-trucks.com/forums/1...-question.html
See post 3. This is exactly what I'm after.
For info : I also painted my engine by brush. I used Hammerite (Hammertone in the USA ?) and it's still 100% after 50,000 miles.
Laterz
#122
02-06-2018, 04:07 PM

I'm very pleased to hear that the missing freeze plugs were intentional !
Please stop mentioning -50 degrees. I moved here from the UK to get away from only +/- 0 degrees, and the thought of -50 keeps me awake at night ! LOL
NO, don't mention the oil insert/bung/adapter !!
When it comes to ''small things'', let's hope he didn't forget to torque every nut 'n bolt to the correct spec !! (There, your turn for sleepless nights ! LOL)
I see you painted the coolant drain plugs on the block.
Ideally you'll drain the block coolant every two years max, but it's a p.i.t.a. messy job, and you just reminded me about that.
Thanks for the homework ! LOL
I've only just started googling, but you might find these useful :
Water jacket drain plug question - The FORDification.com Forums
Scroll down to the bottom picture.
https://www.ford-trucks.com/forums/1...in-valves.html
https://www.ford-trucks.com/forums/1...-question.html
See post 3. This is exactly what I'm after.
For info : I also painted my engine by brush. I used Hammerite (Hammertone in the USA ?) and it's still 100% after 50,000 miles.
Laterz
Please stop mentioning -50 degrees. I moved here from the UK to get away from only +/- 0 degrees, and the thought of -50 keeps me awake at night ! LOL
NO, don't mention the oil insert/bung/adapter !!
When it comes to ''small things'', let's hope he didn't forget to torque every nut 'n bolt to the correct spec !! (There, your turn for sleepless nights ! LOL)
I see you painted the coolant drain plugs on the block.
Ideally you'll drain the block coolant every two years max, but it's a p.i.t.a. messy job, and you just reminded me about that.
Thanks for the homework ! LOL
I've only just started googling, but you might find these useful :
Water jacket drain plug question - The FORDification.com Forums
Scroll down to the bottom picture.
https://www.ford-trucks.com/forums/1...in-valves.html
https://www.ford-trucks.com/forums/1...-question.html
See post 3. This is exactly what I'm after.
For info : I also painted my engine by brush. I used Hammerite (Hammertone in the USA ?) and it's still 100% after 50,000 miles.
Laterz
I'll try to stop mentioning it. Its hard not to when I see other fellas complaining on other sub-forums about 0 Fahrenheit LOL.
Coolant drain plugs?? Where??? Is that what the square-headed plug is down at the front/bottom of the block on the passenger side?
#123
02-07-2018, 02:11 AM
#124
02-07-2018, 08:22 AM
I gotta take those out and replace them with a new plug... Guessing there's a TON of crud in the bottom of the block too.
Magnetic drain plug is a solid idea. I should grab one while I have the chance.
#125
02-07-2018, 08:39 AM
Haha ! I like what you've just written !! 
I need to ask a huge favour of you.
When you remove the plugs, can you measure the width and thread pitch and post up the numbers ?
I spent quite a bit of time with Mr Google, and I came up with either 1/4'' NPT or 3/8'' but nothing 'absolute'.
The Fumoto Oil drain valves have good write ups, and I see that one can get locking clips for them also. (As pictured in link below)
I hadn't thought of the oil sump drain plug until now, but the drain valve will make work a whole lot neater. (F101N 1/2''-20 UNF ??)
Can I ask another favour of you.
Would you mind neasuring the width and thread pitch of the oil sump drain plug too, and posting it up ?
I love the idea of using the piping to direct oil or coolant into a container.
This means that you couldn't use a magnetic drain plug.
No worries though !!
I've had a speaker magnet on my oil pan next to the drain plug for years, and they're the Mother of all magnets.
Fumoto Oil Drain Valve - Something good for a change
Looking at the pictures I wasn't entirely convinced that your block was thoroughly cleaned.
Hopefully pressure hosing the block via the thermostat hole and drain plug holes will suffice !!
I need to ask a huge favour of you.
When you remove the plugs, can you measure the width and thread pitch and post up the numbers ?
I spent quite a bit of time with Mr Google, and I came up with either 1/4'' NPT or 3/8'' but nothing 'absolute'.
The Fumoto Oil drain valves have good write ups, and I see that one can get locking clips for them also. (As pictured in link below)
I hadn't thought of the oil sump drain plug until now, but the drain valve will make work a whole lot neater.
(F101N 1/2''-20 UNF ??)Can I ask another favour of you.
Would you mind neasuring the width and thread pitch of the oil sump drain plug too, and posting it up ?
I love the idea of using the piping to direct oil or coolant into a container.
This means that you couldn't use a magnetic drain plug.
No worries though !!
I've had a speaker magnet on my oil pan next to the drain plug for years, and they're the Mother of all magnets.
Fumoto Oil Drain Valve - Something good for a change
Looking at the pictures I wasn't entirely convinced that your block was thoroughly cleaned.
Hopefully pressure hosing the block via the thermostat hole and drain plug holes will suffice !!
#126
02-08-2018, 08:37 AM
Haha ! I like what you've just written !!
I need to ask a huge favour of you.
When you remove the plugs, can you measure the width and thread pitch and post up the numbers ?
I spent quite a bit of time with Mr Google, and I came up with either 1/4'' NPT or 3/8'' but nothing 'absolute'.
I need to ask a huge favour of you.
When you remove the plugs, can you measure the width and thread pitch and post up the numbers ?
I spent quite a bit of time with Mr Google, and I came up with either 1/4'' NPT or 3/8'' but nothing 'absolute'.
When I think about it, I should have tackled the drain plug(s) before I painted. To get those old plugs out it's likely that I'll need a LOT of heat and a lot of patience.
I'm guessing that if I tried to remove them cold right now I'd snap them off in their holes... Don't want to create problems for myself when I'm this far ahead and I have a fresh motor still open.
We'll see though. If I do tackle it, I'll post up my results.
As for the oil drain plug... I'm in luck! I bought a Milodon 17000 1/2-20 magnetic drain plug for my trans pan but never installed it. So it'll go to good use in my oil pan
Wayyyyyy too easy for someone to tamper with my old truck if there's a valve out in the open. Plus the engine bay is already easy enough to access.
^^^ I need to confirm this tonight, but I'm 99% sure it's 1/2-20. Looked up replacement drain plugs for the 400/351M and they all came up 1/2-20.
I love the idea of using the piping to direct oil or coolant into a container.
This means that you couldn't use a magnetic drain plug.
No worries though !!
I've had a speaker magnet on my oil pan next to the drain plug for years, and they're the Mother of all magnets.
Fumoto Oil Drain Valve - Something good for a change
This means that you couldn't use a magnetic drain plug.
No worries though !!
I've had a speaker magnet on my oil pan next to the drain plug for years, and they're the Mother of all magnets.
Fumoto Oil Drain Valve - Something good for a change
To each their own tho - A quick release valve would be awesome for oil changes.
I'm going to go back through several of the bolts on the motor to make sure everything is torqued down properly.
#127
02-08-2018, 10:08 AM
I'm really sorry that you're having upsets with the engine rebuild which certainly reduces the excitement of it all.
When I asked the favour, I'd seen that the USA supplier doesn't ship directly to SA.
So I would have to order it via my local dealer, and wait 3-4 weeks.
But then I found a UK shop.
I decided to remove all the plugs in June, measure them, order them, and pick them up at my Brother's in the UK when I visit him.
With regard to your coolant drain plugs, I would sort them out now if it was my engine.
Yes you might ruin some paint, but that's easy to fix, and you'll be thankful in the future that you did them now !!!
I know what you mean about easy access to the oil pan drain valve. I have a plan for that even though I rarely let the truck out of my sight when I'm out and about with it !
Checking torque settings is a very good idea !!!
Checking the crank bits and oil pump with the oil pan off is easy.
The heads might be a nuisance though.
Sorry that I'm being Mr Negative, but I don't trust your engine builder, and I'd hate to see you have a ton of sh$t in the future.
#128
02-08-2018, 11:27 PM

Those drain plugs can be a real pain! I had one I broke two easy-outs on, finally drilled it out then took my Dremel tool with a small carbide bit and cut most of the rest out. The last bit of it I had to use pliers and pull out of the threads like a piece of wire! Yep - do it now!
I like those little drain valves - I may have to try one out! Thanks for the link FMJ!
I like those little drain valves - I may have to try one out! Thanks for the link FMJ!
#129
02-09-2018, 02:57 AM
@ Aaron-71
Many thanks for confirming the 1/2-20 details on the oil drain thread.
I read your comments in buckin69bronco's poor gas mileage thread.
The SCR and DCR are very useful numbers, but both are pretty meaningless if the squish height is crap.
What's your squish height ?
(If you truly got zero deck clearance, (I.E. you personally checked it) then your squish will be the compressed head gasket height only, which is good.)
Squish was mentioned in this refresh thread last year already.
@ SDDL-UP
You're welcome.
The link below shows exact measurements. Very handy !
Quick Valve UK - supplying Fumoto oil drain valves
In one of the previous links, one can see an L shaped socket which is available.
Could be handy !?
#130
02-09-2018, 09:27 AM
I'm really sorry that you're having upsets with the engine rebuild which certainly reduces the excitement of it all.
With regard to your coolant drain plugs, I would sort them out now if it was my engine.
Yes you might ruin some paint, but that's easy to fix, and you'll be thankful in the future that you did them now !!!
Sorry that I'm being Mr Negative, but I don't trust your engine builder, and I'd hate to see you have a ton of sh$t in the future.
Those drain plugs can be a real pain! I had one I broke two easy-outs on, finally drilled it out then took my Dremel tool with a small carbide bit and cut most of the rest out. The last bit of it I had to use pliers and pull out of the threads like a piece of wire! Yep - do it now!
I like those little drain valves - I may have to try one out! Thanks for the link FMJ!
I like those little drain valves - I may have to try one out! Thanks for the link FMJ!
Yeah you're both probably right - I should deal with the drain plugs now... But I'm thinking I might leave them and save myself the stress of taking them out. We'll see tho. I'm looking into 8-point sockets as I write this lol.
Those 2 block heaters can serve the same function as the block drains, but I would love to have a nice shiny new brass plug sitting there for when I drain the block next time.
I tried giving the block plugs several wacks with a BFH last night - Put a wrench on the plugs and they wouldn't budge at all... my wrench was flexing before anything else would...
Onto the 8-point socket set? Me thinks so. Fingers crossed I don't end up in the same spot as SDDL-UP.
Squish was not measured by me (yet). The block was decked to zero deck height to accommodate the KB2347 pistons, so I should see only the gasket thickness for squish height.
(to be confirmed tho).I wanna pull the heads because I found some crud in a couple of the spark plug holes last night. Not happy about that... You're right, he didn't clean as well as he should have... It's stuff like that that really erks me (not paying attention to the fine details).
Plus I need to check torques on all the bolts... and install those oil keepers on the rocker arms and retorque the rockers.
So at this point, there's no reason why I shouldn't pull the heads, look everything over (before firing it up), clean the spark plug holes, and check all the torque numbers on my way back up to where I am now.
#131
02-12-2018, 08:56 AM
Hats off to you for stopping the project in order to double check things.
Many people would simply say f$$k it, assemble, install, and drive..........only to face the consequences later !!
I have no idea what block heaters look like, but, I'm not sure that they would work as drain plugs, because the exhaust manifold (headers?) might be in the way.
Umm, reading between the lines, it says 'do it properly' !! LOL
I assume you have a decent build manual, like Haynes for example.
Pay attention to torque sequences, and steps up to the final settings, where applicable.
Sorry, but I have to say it !
Remove everything and send the block for a proper clean !!
I called it an acid bath when I had mine done, but the old timer got a bit annoyed and called it by the proper name, which I've since forgotten.
It's not just the coolant passages that need proper cleaning, it's the oil channels too.
With the block properly cleaned, you can install all the parts yourself, checking clearances and torque settings as you go along.
At least you won't f$$k up the oil filter adapter, and 'forget' to put parts back on !!!!!
You can check that the piston rings are facing the right way and are correctly gapped, that the cam and crank turn by hand without resistance, and, and, and.
That way you'll know it's been blue printed properly.
Also, if you have moly top rings, what bore hone grit size was used ?
It's a few days extra work, but I'd do it. (How long will it take if there are problems that only materialise later !?)
If you ban me from your thread I'll understand !! LOL
#132
02-20-2018, 02:09 PM
No need to ban from my thread. I understand what others would do, and I appreciate the advice.
Here's the path I took and where I'm at now. I did end up checking everything over, including all the bottom-end torque values.
Little bit of back-tracking. For a good reason... so bear with me.
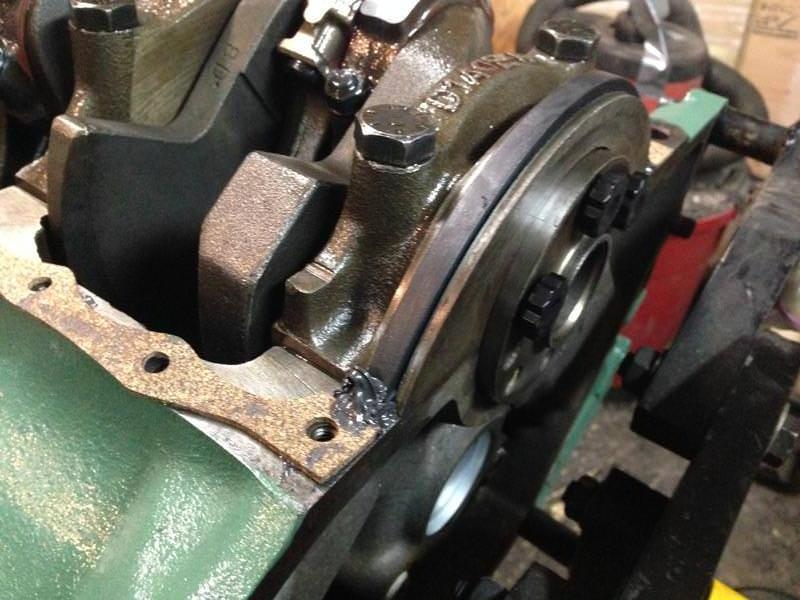
So I caved... I HAD to get those block drain plugs out. May as well.. I'm here aren't I?
Driver side plug removed. PACKED with grit. So glad I did this.
Attachment 286039
Passenger side. Not so packed, but still lots in there. Pulled out the shop vac and my set of dental picks. Went to town.
Attachment 286040
Here's what came out... yeah...
Attachment 286041
So here's the two block coolant drain plugs / or drain bungs (whatever you call them) that came out. They're 3/8" square heads, 3/4" long, and have a 1/4" NPT thread -> That's pipe thread not straight thread like normal automotive stuff.
I got them both out by heating the crap out of the block with my MAP torch, then hammering a 6-point 10mm impact socket onto them. Grab the impact (electric), and let it work its magic. Out they came.
If you round the square head, hammer the next smallest impact socket on (9mm), and continue. Make sure they're still hot.
Attachment 286042
Attachment 286043
After some repainting, here's the finished product. 9/16" hex head, 3/4" long, 1/4NPT threads, just like the old one but with a modern hex head.
Attachment 286044
Threw the block heaters in.
Attachment 286045
Used some Permatex Form-a-gasket or Aviation Gasket (whatever you wanna call it). It's No. #03 on their website.
It's good to around 450 F and - 65 F, and stays tacky. It isn't affected by coolant or motor oils either. Should help that rubber o-ring seal nicely.
Attachment 286046
Quick side-track.
Masked + painted the oil dipstick tube retainer (name? Lol).
Attachment 286047
Tapped for 1/4-20 threads. Stainless hardware used to reinstall onto oil pan.
Attachment 286048
Permatex "The Right Stuff" used as gasket maker between pan and dipstick tube retainer.
Attachment 286049
Gave a pleasant "squish" feeling, with lots of oozing when torqued down.
Attachment 286050
Permatex RED thread locker used for stainless hardware, cleaned up the excess on the outside for looks
Attachment 286051
Moroso 17000 - 1/2-20 magnetic drain plug installed. Torqued to 20 ft-lbs.
Attachment 286052
Permatex High Temp Thread Sealant used on the dipstick. Should work perfectly without leaks!
Attachment 286053
Threaded my block bung / block oil filter adapter on. Allstar 92003.
Attachment 286054
Says it's for a SBF (302-351W) - but it fits both the filter AND the block perfectly. They should update their info so it reads 351W / 351M / 351C / 400 under applications
Attachment 286055
Now the back-tracking... YAY....
See the brown at the bottom of the spark plug hole? Yeah... that's all grit, dirt, and grime left over from when the shop cleaned the heads. Guess where it ended up?
Attachment 286056
In the cylinders of course...
Attachment 286057
Attachment 286058
So as you can tell... I pulled the heads. Cleaned everything up.
Attachment 286059
Here's the worst cylinder. Driver bank, cylinder #6.
Attachment 286057
Worst part... some of it is metallic! Threw a magnet down the cylinder to see if any of it would stick, yup! It does! Oh Joy!
A fresh motor with grit in the cylinders... Just what I ordered...
Attachment 286060
So I cleaned it all up with a clean nozzle on the shop vac. Grabbed lint free rags, and some break-in oil. I wiped down each cylinder until it was CLEAN.
Then re-oiled with BR-30 Break in oil that I'll be using. Made sure to coat all internal surfaces with BR-30 before buttoning back up.
Attachment 286061
On my way back up... noticed that the shops socket "must have slipped??"
Notice the chewed up head? It's the little things that matter to me...
Attachment 286062
Threw these on (which the shop forgot about) on my way back up...
Had to clean them first. They were pretty dirty. Clean (right), dirty (left).
Attachment 286063
Oiled with BR-30 before torquing down.
Attachment 286064
Attachment 286065
Notice on the shop towel? Figuring out exactly how to turn the motor over as little as possible to retorque while the valve is 100% closed.
Attachment 286064
I referenced the Old 1979 Ford shop manuals, and it had a nice detailed write-up in there. Thankful I grabbed those manuals years ago
Installed the fuel pump and the oil pump. Don't want to forget the little things like the oil pump drive shaft either!
Attachment 286066
Oil pump primed by hand with Clevite assembly lube before getting torqued down to 25 ft-lbs.
Attachment 286067
Chased all the other threads on the block to ensure correct torque readings from my wrenches.
Attachment 286068
Got my timing cover all figured out. Paint + seal.
Attachment 286069
Water pump installed on timing cover before the assembly got installed on the block.
Torqued water pump bolts to 16 ft-lbs.
Attachment 286070
High temp thread sealer used where appropriate (water passages). ARP Torque lube used throughout everywhere else (where water/coolant isn't present).
Bought Permatex High Temp Water / Coolant RTV for the water pump passages. You can see the grey oozing out in the photo. Wiped up the excess for looks
Attachment 286071
Flipped back over one last time for the oil pan and seals. A healthy gob of Ultra Black by Permatex used at the corners of the oil pan.
Excess that squished out was cleaned up on the outside of the block.
Triple checked my torque values, and re-torqued at least twice to ensure the pan seats correctly.
Attachment 286073
Tossed the intake on temporarily. Had to do a lot of grinding on the front of the intake to get the Water Neck to fit right. Couldn't get a socket onto the bolt!
Attachment 286037
And that's how it sits for now. More photos coming soon.
Here's the path I took and where I'm at now. I did end up checking everything over, including all the bottom-end torque values.
Little bit of back-tracking. For a good reason... so bear with me.
So I caved... I HAD to get those block drain plugs out. May as well.. I'm here aren't I?
Driver side plug removed. PACKED with grit. So glad I did this.
Attachment 286039
Passenger side. Not so packed, but still lots in there. Pulled out the shop vac and my set of dental picks. Went to town.
Attachment 286040
Here's what came out... yeah...
Attachment 286041
So here's the two block coolant drain plugs / or drain bungs (whatever you call them) that came out. They're 3/8" square heads, 3/4" long, and have a 1/4" NPT thread -> That's pipe thread not straight thread like normal automotive stuff.
I got them both out by heating the crap out of the block with my MAP torch, then hammering a 6-point 10mm impact socket onto them. Grab the impact (electric), and let it work its magic. Out they came.
If you round the square head, hammer the next smallest impact socket on (9mm), and continue. Make sure they're still hot.
Attachment 286042
Attachment 286043
After some repainting, here's the finished product. 9/16" hex head, 3/4" long, 1/4NPT threads, just like the old one but with a modern hex head.
Attachment 286044
Threw the block heaters in.
Attachment 286045
Used some Permatex Form-a-gasket or Aviation Gasket (whatever you wanna call it). It's No. #03 on their website.
It's good to around 450 F and - 65 F, and stays tacky. It isn't affected by coolant or motor oils either. Should help that rubber o-ring seal nicely.
Attachment 286046
Quick side-track.
Masked + painted the oil dipstick tube retainer (name? Lol).
Attachment 286047
Tapped for 1/4-20 threads. Stainless hardware used to reinstall onto oil pan.
Attachment 286048
Permatex "The Right Stuff" used as gasket maker between pan and dipstick tube retainer.
Attachment 286049
Gave a pleasant "squish" feeling, with lots of oozing when torqued down.
Attachment 286050
Permatex RED thread locker used for stainless hardware, cleaned up the excess on the outside for looks
Attachment 286051
Moroso 17000 - 1/2-20 magnetic drain plug installed. Torqued to 20 ft-lbs.
Attachment 286052
Permatex High Temp Thread Sealant used on the dipstick. Should work perfectly
without leaks!Attachment 286053
Threaded my block bung / block oil filter adapter on. Allstar 92003.
Attachment 286054
Says it's for a SBF (302-351W) - but it fits both the filter AND the block perfectly. They should update their info so it reads 351W / 351M / 351C / 400 under applications
Attachment 286055
Now the back-tracking... YAY....
See the brown at the bottom of the spark plug hole? Yeah... that's all grit, dirt, and grime left over from when the shop cleaned the heads. Guess where it ended up?
Attachment 286056
In the cylinders of course...
Attachment 286057
Attachment 286058
So as you can tell... I pulled the heads. Cleaned everything up.
Attachment 286059
Here's the worst cylinder. Driver bank, cylinder #6.
Attachment 286057
Worst part... some of it is metallic! Threw a magnet down the cylinder to see if any of it would stick, yup! It does! Oh Joy!
A fresh motor with grit in the cylinders... Just what I ordered...
Attachment 286060
So I cleaned it all up with a clean nozzle on the shop vac. Grabbed lint free rags, and some break-in oil. I wiped down each cylinder until it was CLEAN.
Then re-oiled with BR-30 Break in oil that I'll be using. Made sure to coat all internal surfaces with BR-30 before buttoning back up.
Attachment 286061
On my way back up... noticed that the shops socket "must have slipped??"
Notice the chewed up head? It's the little things that matter to me...
Attachment 286062
Threw these on (which the shop forgot about) on my way back up...
Had to clean them first. They were pretty dirty. Clean (right), dirty (left).
Attachment 286063
Oiled with BR-30 before torquing down.
Attachment 286064
Attachment 286065
Notice on the shop towel? Figuring out exactly how to turn the motor over as little as possible to retorque while the valve is 100% closed.
Attachment 286064
I referenced the Old 1979 Ford shop manuals, and it had a nice detailed write-up in there. Thankful I grabbed those manuals years ago
Installed the fuel pump and the oil pump. Don't want to forget the little things like the oil pump drive shaft either!
Attachment 286066
Oil pump primed by hand with Clevite assembly lube before getting torqued down to 25 ft-lbs.
Attachment 286067
Chased all the other threads on the block to ensure correct torque readings from my wrenches.
Attachment 286068
Got my timing cover all figured out. Paint + seal.
Attachment 286069
Water pump installed on timing cover before the assembly got installed on the block.
Torqued water pump bolts to 16 ft-lbs.
Attachment 286070
High temp thread sealer used where appropriate (water passages). ARP Torque lube used throughout everywhere else (where water/coolant isn't present).
Bought Permatex High Temp Water / Coolant RTV for the water pump passages. You can see the grey oozing out in the photo. Wiped up the excess for looks
Attachment 286071
Flipped back over one last time for the oil pan and seals. A healthy gob of Ultra Black by Permatex used at the corners of the oil pan.
Excess that squished out was cleaned up on the outside of the block.
Triple checked my torque values, and re-torqued at least twice to ensure the pan seats correctly.
Attachment 286073
Tossed the intake on temporarily. Had to do a lot of grinding on the front of the intake to get the Water Neck to fit right. Couldn't get a socket onto the bolt!
Attachment 286037
And that's how it sits for now. More photos coming soon.
#133
02-20-2018, 04:18 PM
Postmaster
Oh, man! My first thought after looking at the crud in the block was to go down to your "builder's" place and raise holy hell!!
That sloppy cleaning/tanked/acid bath or whatever they didn't do would yank my sack!!! I'm pissed for ya, Aaron....Sheeeit, and these guys are still in business? Sloppy work....no attention to basic cleaning....no thoroughness.....assembly line horsehockey!
What's worse is you don't know what else they might have f497ed up. Bogus.
I'm glad you went the extra mile...not just because it's your own engine, but it says a lot about your attention to detail....and the "stick-to-it ivness" of a conscientious minded motorhead.
Bravo Zulu, Aaron! Nicely done!
#134
02-20-2018, 04:58 PM
Oh, man! My first thought after looking at the crud in the block was to go down to your "builder's" place and raise holy hell!!
That sloppy cleaning/tanked/acid bath or whatever they didn't do would yank my sack!!! I'm pissed for ya, Aaron....Sheeeit, and these guys are still in business? Sloppy work....no attention to basic cleaning....no thoroughness.....assembly line horsehockey!
What's worse is you don't know what else they might have f497ed up. Bogus.
I'm glad you went the extra mile...not just because it's your own engine, but it says a lot about your attention to detail....and the "stick-to-it ivness" of a conscientious minded motorhead.
Bravo Zulu, Aaron! Nicely done!
That sloppy cleaning/tanked/acid bath or whatever they didn't do would yank my sack!!! I'm pissed for ya, Aaron....Sheeeit, and these guys are still in business? Sloppy work....no attention to basic cleaning....no thoroughness.....assembly line horsehockey!
What's worse is you don't know what else they might have f497ed up. Bogus.
I'm glad you went the extra mile...not just because it's your own engine, but it says a lot about your attention to detail....and the "stick-to-it ivness" of a conscientious minded motorhead.
Bravo Zulu, Aaron! Nicely done!
It took A LOT of extra time to get all of these little issues sorted out.
I still haven't visited the shop, and for good reason too. I was probably just about as stressed out as you are right now when I started to see this stuff.
And the last thing I want to do is start compromising my relationship with a "he said, she said" heated debate.
I've got the photos and videos to prove my case if anything ever does come up after break-in... but I've always learnt that confronting someone with a hot head and making demands doesn't go nearly as far as confronting them with a cool head and simply asking:
"what are you going to do for me"?
Don't get me wrong, I'm not disagreeing with you. I said some MUCH MORE colourful words when I pulled the heads. I was not happy. Period.
When I layed the head on a table beside me, a bunch more crud fell out of the water jacket passages... Just kinda showed me how much detail went into cleaning.
In hindsight, I should have looked everything over VERY VERY VERY thoroughly before I took the motor back and drove away. Foolishly, I gave it a once-over and called it a day.
Partially my fault, and I shouldn't have taken it back or paid for it... but realistically it shouldn't have happened in the first place.
So when I do go for a visit, I'll carve out some of my day, load up my phone with photos and at a bare minimum, ask for replacement head bolts (just 2).
Two head bolts were buggered up. Not sure how that happened cause I had ZERO issues tightening them back down without having the socket slip on me...
#135
02-20-2018, 08:25 PM