When you click on links to various merchants on this site and make a purchase, this can result in this site earning a commission. Affiliate programs and affiliations include, but are not limited to, the eBay Partner Network.
Hi everyone,
I need to replace my evaporator. Looks like both the heater core and evaporator are in the same case inside the van.
Has anyone ever done one of theses in an 88-91 E-series van?
1975/91 E100/350:
Factory installed integral A/C is combined with the heater. The A/C controls are located in the same panel as the heater controls.
Dealer installed A/C: A/C is not combined with the heater. The two A/C switches are located in a panel that also contains two registers.
------------------------------------------------------------------------------------------------------------------------------------------------------- 1988/91 E150/350:
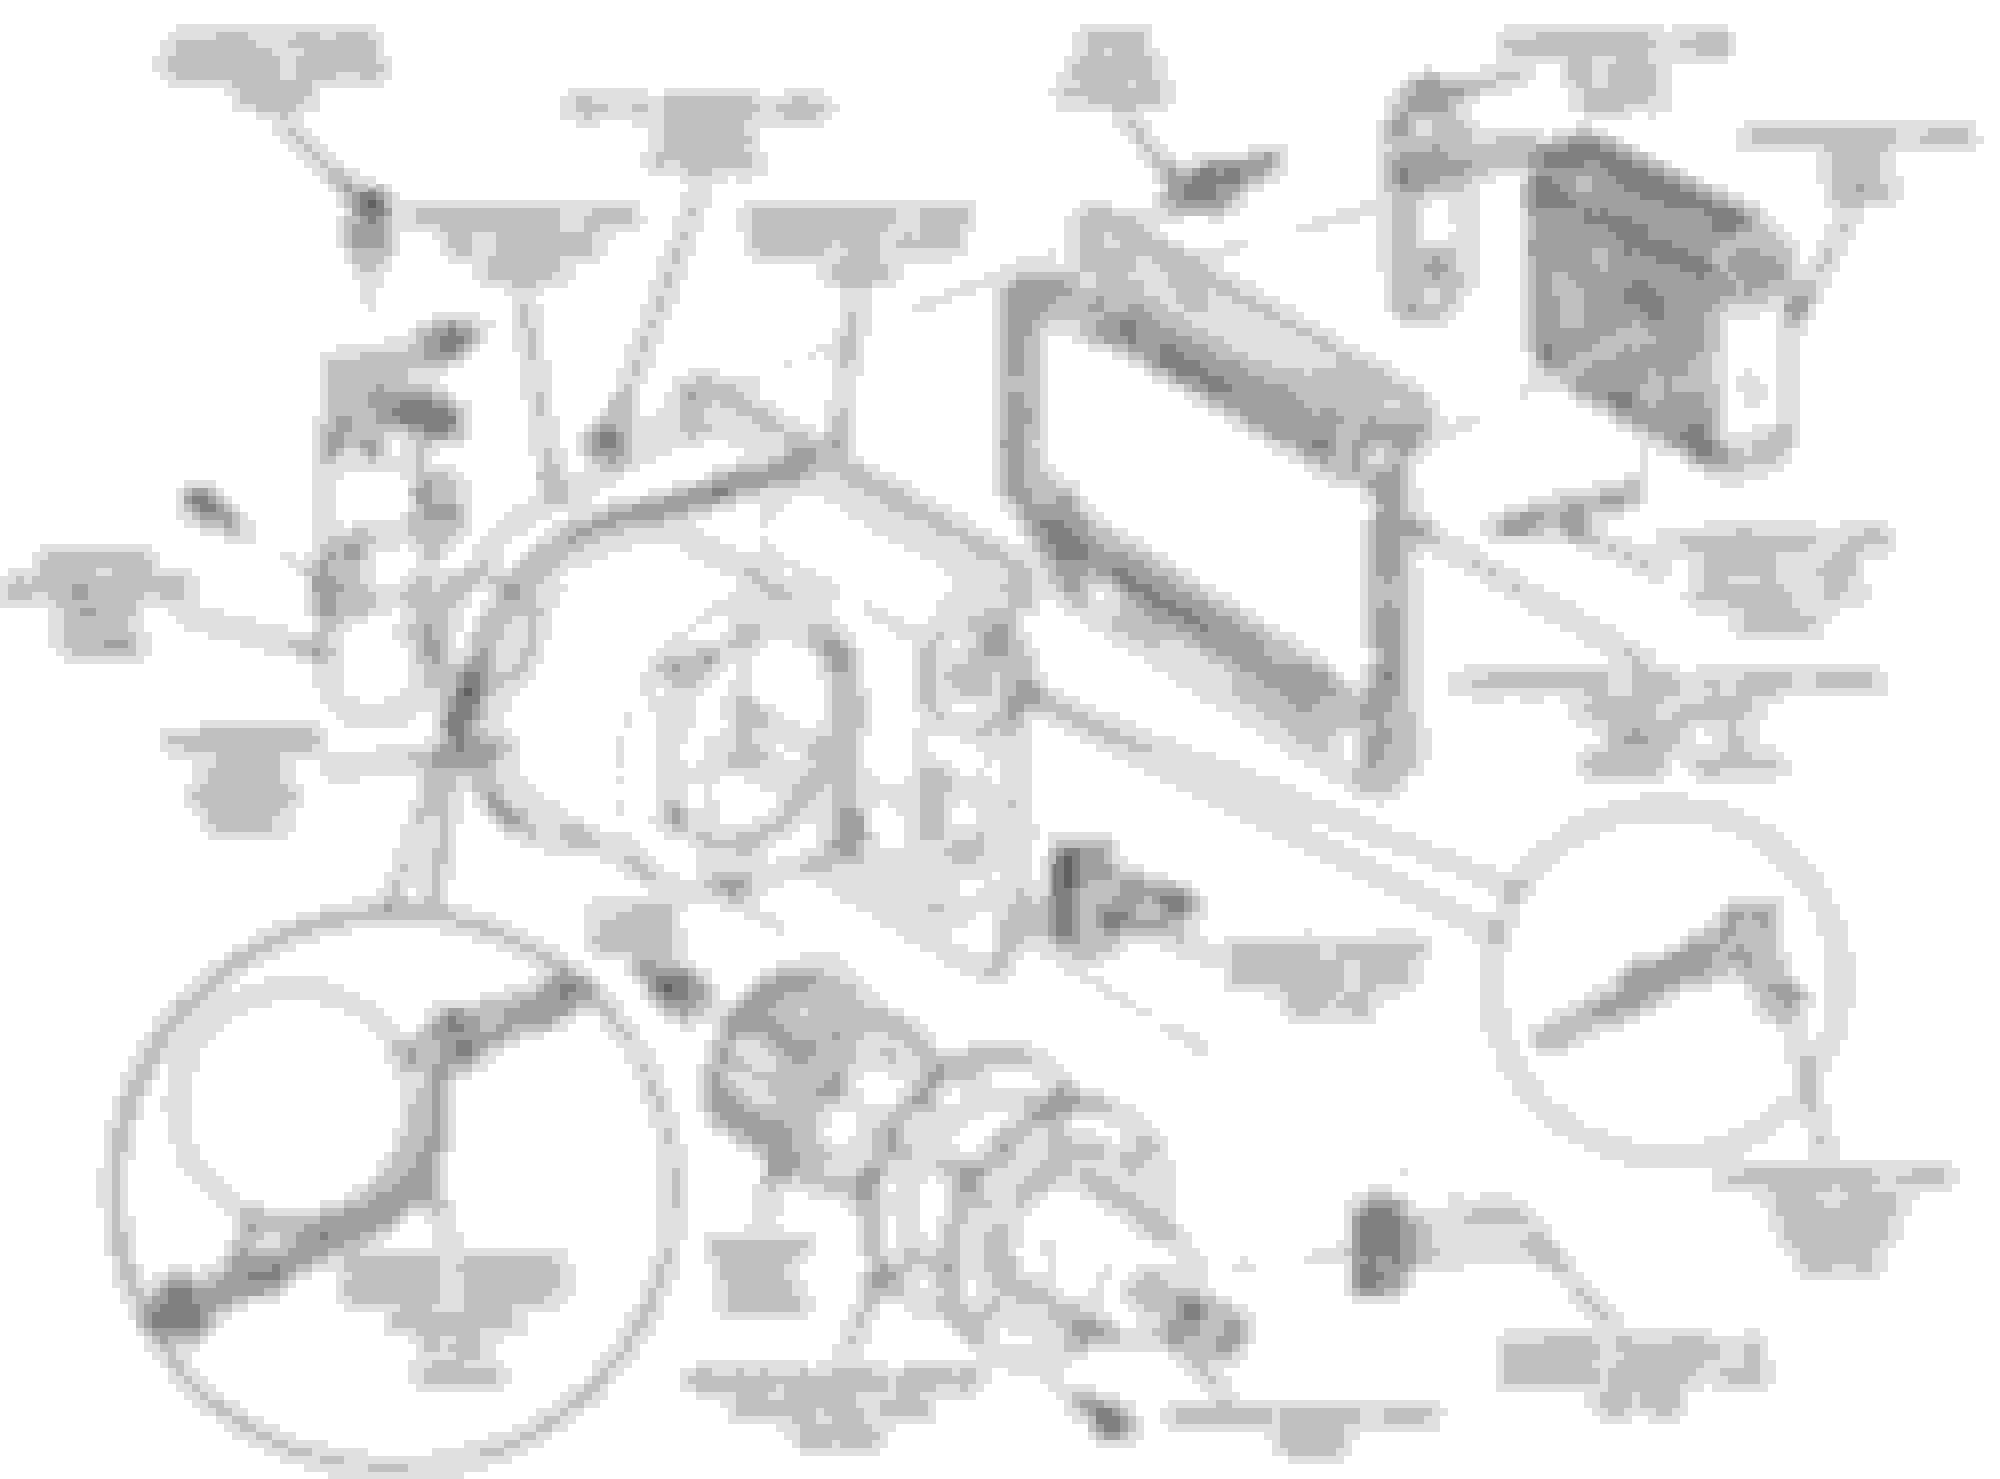
E8UZ-19860-A .. Evaporator-Use with factory installed integral A/C (Motorcraft YK-122) / Obsolete ~ 15+ available NOS
E8UZ-19860-B .. Evaporator-Use with dealer installed A/C (Motorcraft YK-124) / Obsolete ~ No Ford dealer or obsolete parts vendor has any.
Thanks for your reply, Number. I tried to pull one today today on a 1991 Ford E150. It appears that the whole dash has to come out, so I gave up for now as I don't have time at the moment for a job that in depth.
Do you know who has those YK-122's? In case I decide to tackle this in the future.
I changed the evaporator on my 88 last year and the heater core and evaporator core are separate.
I wish I had taken pics and done a write up but was in a hurry. here is what i remember..
NO, All the work is done from under the hood!
Disconnect the line accumulator/dryer. Unbolt the accumulator/dryer mounting bracket from the side of the housing and disconnect it from the evaporator core. Disconnect the small high side line from the other side of the evaporator core. Remove the blower fan motor.
Had to remove the breather housing and battery then the rest of the breather housing that runs under the battery box and out to the grill. had to remove the grill to do that. Had to remove the fuel pump relay bracket mounted to the fender. The housing looks like it might come apart in two pieces but it does not...
So once you get everything out of the way, you can unbolt the housing from the fire wall. I think there were 2 nuts under the housing you have to access. I don’t remember why but I remember removing the ECM harness connector which is under the housing. There is very little space to get the housing out and i remember it had to be turned and twisted a certain way to work it out of the engine compartment. I had even more trouble getting it back in.
The heater core will stay inside the van but the evaporator core will come out with the housing and is held in with a retaining clip.
Once you have the housing off you will see a rubber/foam gasket against the firewall, i would get that too incase you tear yours. Actually i would get as many parts as possible including the cover...
If I remember correctly I used my 1/4 socket set with a swivel and several extensions to remove most all the parts. Be sure to take something to remove the spring lock connectors on the lines. I had to cut the suction line on mine because I could not the the connector loose.
Be sure and flush the old evaporator core out really good and replace the Orifice tube. Calls for an orange tube. I read along the way that if you live in a really hot area, that you can use a red orifice tube but I can not guarantee that will work and if it doesn’t then you will have to evacuate the system again to change it out.
Annaleigh, your instructions were great! I removed the box and evaporator from a 1991 E150 at the junk yard today. Now in the next few days I'll be doing a removal and install on my 1990 E350. Thanks again.
You are very welcome! I am glad to kow my memory isn't as bad as I was thinking it has become..
Be sure and flush/ flush/ flush, out that evaporator core! You don't want to install one that has crap in it from a compressor that went bad or was going bad...
You might find something cheaper and there may be some chemicals out here that are safe to use other then a a flush made just for AC systems but I dont know what they are. It has to be safe for the aluminum, solder, and dry out without leaving a residue. If you have a compressor, you must have a dryer on it to keep from leaving water inside the evaporator.
Advance has a $17 flush.. https://shop.advanceautoparts.com/p/...B&gclsrc=aw.ds
Make sure you get that gasket on correctly between the firewall and evaporator cover box and that it hasn't moved around before you put it back together otherwise it can suck outside air in and the ac wont be as cool as it should be. If the 1990 is as tight as the 1988, have fun figuring out how to get that cover back in,, I did!
Great advice! I did buy the blower motor housing as you suggested, it has a great gasket on it. I got it home, removed the evaporator and gave the housing a good bath. I'm going to try to find some A/C flush here, and clean it real good.
Also, this evaporator had a red orifice tube in it.
I think I'll do well with this used Ford part. A lot of this aftermarket stuff today is just made in China. Evaporators usually never wear out, but someone managed to damage the large port on my old one where it connects to the accumulator.
This is from my 88 manual and is for R12. If you use R134, I don't know how much different if any it would be.
I searched high and wide for 3 months before I gathered all the original ford ac parts to replace my system. Even managed to find a new ford condenser for $50.
The high side line from the condenser to the evaporator was almost $100 and so I ordered one from 4 seasons. When it got here it was very light aluminum tubing and the hose was about 1/2 the size of the original. I returned it and bought the Motorcraft hose...
You can buy a o-ring kit from any auto parts store, I would replace them all while you have it apart. If you do then try to find some Nylog. It is a refrigeration lubricant/gasket sealant. Much better then using refrigerant oil as it will seal around the gaskets and o-rings much better. Blue bottle for R134 and Red bottle for R12. Its like snot and will not dry out.. i found some at the local HVAC supply for around $5..
The correct type and amount of compressor oil is critical too. Too little and you ruin the compressor, too much and it wont cool well.
Are you going to run R12 or R134? Do you know what it had in it? If you use R12, Ford used a paraffin mineral oil part # YN-9
R12 is quite expensive but I found some cans at a decent price and went back with R12. Partly because that is what the system was designed for and partly because R12 runs at a lower pressure and I thought it would help the new compressor to last longer.
My compressor is a Motorcraft #YC-53. The Motorcraft FS-6 is almost the same compressor.
Here is what the FS-6 looks like More Information for VARIOUS MFR 7511435
One more note, change the accumulator/dryer and follow the instructions on the card below about measuring and adding oil to it.
It had the red orifice tube in it... Was it clean or full of crud? That will give you an idea of how much crud might be in the evaporator.
Here is the tag from my new YC-53 compressor and the instructions should apply to your van as well..
Thanks for suggesting Nylog! Seems like a must have, I never knew about it. I am going to try to find some. My system has had R134 in it, so I am just going to leave it with R134.
My current 90 E350 is a diesel, and the compressor is an older style than the YC-53. I like the FS-6 style compressor, the mounting is simple and they work well. I used to own a different 1990 E350 Coachmen class B that had the 460 gas engine. It used the FS-6 style compressor. The A/C in that van always worked well. I miss that van, I probably should have never sold it.
In the long run I probably should have gone back with R134 because as time goes by the R12 will only become more expensive. If I have done my work well enough, with everything new factory ford parts, then I shouldn't have to worry for several years...
Its been a year and it is still working like the day I got it back together. I am worried about a possible leak on the compressor shaft seal. I see dust collecting under the compressor on the front under the pulley. The compressor was a new motorcraft compressor and I was worried about how long it might have sat on the shelf. I thought very seriously about changing the seal just so I would know it would be new,, but I didn't!
I looked at a E350 with a diesel before I bought my 88 but was worried that I had no experience with diesel engines and would wind up over my head..
My 85 e150 has a Yorke compressor on it. I haven't even began to work on the ac on it...
Well good luck with it and keep us updated! I am not a professional AC person but did a lot of research before I tackled mine and that was just last year so its kind of fresh in my mind...
I am trying to remove the evaporator housing for my 1990 Econoline and have been successful in removing 4 of the 5 nuts holding it to the firewall. I just can seem to get to the one in the middle on the bottom. I have NO idea how they would have installed it at the factory. I can feel the nut if I snake my fingers way in. Any help would be appreciated.
Seems to me when I removed the one on my 88, That I used a 1/4" socket with a swivel on the end by the socket and several extensions. My set has the deep and standard sockets but I am not sure which one I used.
I think the 1990 is about the same as the 88. It seems like I had to loosen the ECM connector which is right under the housing. I may not be remembering correctly but if you look at the diagram above, you will see a slot at the bottom, I believe that is where the ECM connector is.. The ECM is inside just under the heater cover inside the van and does not need to be moved.. Just unplugged from outside. The bolt is fairly long and is locked into the ECM connector. As you back the bolt out, the connector pulls away from the ECM till is is almost all the way out.
Here is where the ECM is under the heater cover in the inside. Unless they moved it in 1990 which I don't think they did.. The black plastic cover at the bottom covers the ECM A ;little better shot The bolt with the light shining on it may be the one you are having trouble with. I dont think it will do any good to try to remove it from inside as there may be another nut against the firewall. Also if the ECM connector goes through the slot in the bottom of the evaporator housing, then the connector has to come loose before you can remove the housing.. Then you should be able to access the nut you are having trouble reaching..
Thanks so much for you quick reply annaleigh! I have replace the heater core twice on this old girl, so am familiar with everything inside the cab. I have the full set of shop manuals and they show the 5 studs going through the firewall and every indication is that the nuts must be removed from the area under the hood to remove the housing, so I didn't entertain trying to mess with that pesky stud on the bottom from the inside. My next course will be work with that ECM connector you spoke of. Perhaps with that out of the way, I can get a small ratchet with the 7/16 deep socket on it to go over the nut. There is definitely something blocking the path from the engine side to that nut, so it must be the connector you spoke of. Not sure how to disconnect and remove the connector, so that will be my project this week! I will post my progress later and thanks....what a great resource is this forum! Richard
 06-20-2017, 07:26 PM