
Couldn't find a center console I liked, so made one
#1
 06-13-2017, 03:36 PM

Couldn't find a center console I liked, so made one
I'm on my third and favorite Ford pickup, my '12 F150 with a 5.0. I've had it since 30k miles and have a little over 80k now. This is the best truck I've ever owned, and I want to own it much, much longer.
I've corrected a couple issues I had with it, like the leaky connections in the cooling system that popped up around 70k miles, corrected the horrible reverse lightning by installing Rigid flush mount LEDs, and threw in a Pioneer AVH-4200NEX to get me some GoogleMaps navigation. The only other thing I disliked about it was the factory speakers. It has the basic four door speakers and two tweeter pods. I have a new RF 5 channel amp, Polk components for the front, and Polk two ways for the rear with a RF 10" sub I pulled out of my Focus before selling it a couple years back. I wanted to upgrade the system but had one big problem.
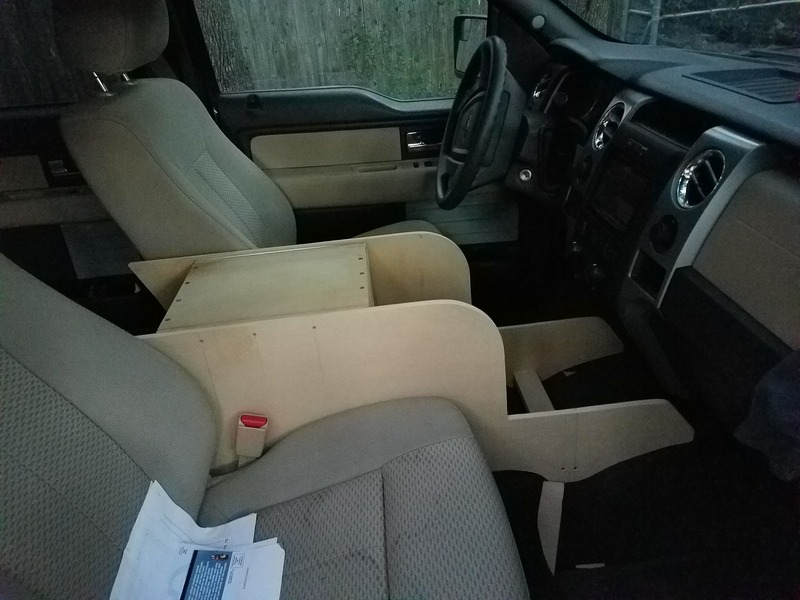
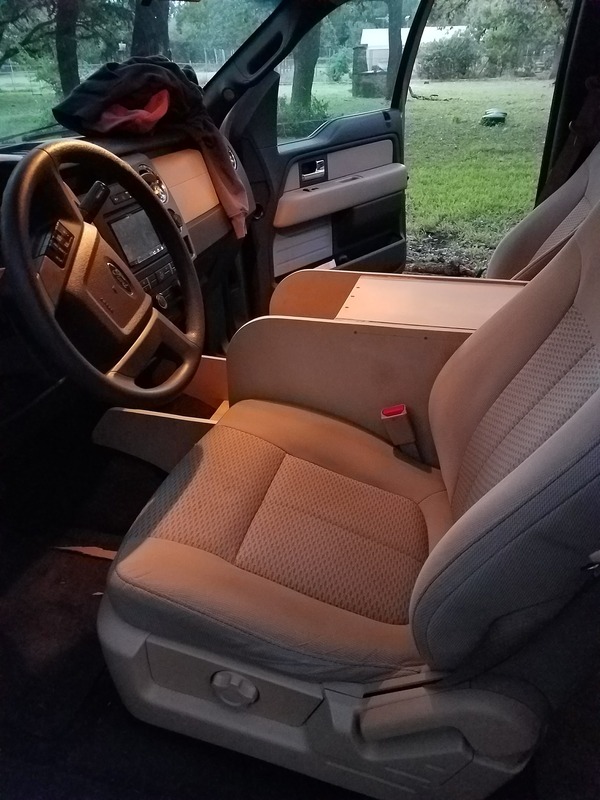
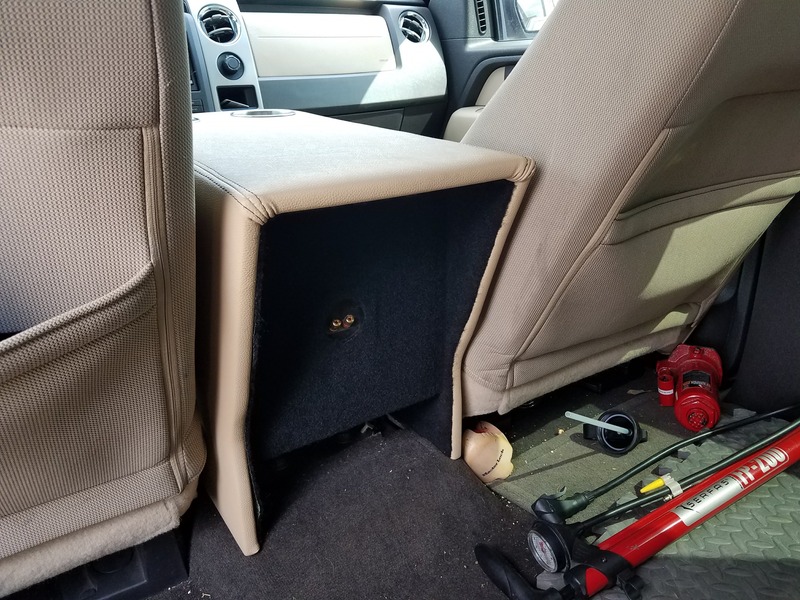
I can't use a box under the rear seat because my Specialized Allez lives in the back; it rarely comes out for reasons other than cycling. I searched to the ends of the internet and couldn't find a console that would fit a 10" sub. I wasn't willing to give up so made my own.
I've corrected a couple issues I had with it, like the leaky connections in the cooling system that popped up around 70k miles, corrected the horrible reverse lightning by installing Rigid flush mount LEDs, and threw in a Pioneer AVH-4200NEX to get me some GoogleMaps navigation. The only other thing I disliked about it was the factory speakers. It has the basic four door speakers and two tweeter pods. I have a new RF 5 channel amp, Polk components for the front, and Polk two ways for the rear with a RF 10" sub I pulled out of my Focus before selling it a couple years back. I wanted to upgrade the system but had one big problem.
I can't use a box under the rear seat because my Specialized Allez lives in the back; it rarely comes out for reasons other than cycling. I searched to the ends of the internet and couldn't find a console that would fit a 10" sub. I wasn't willing to give up so made my own.
#2
06-13-2017, 04:06 PM


#3
06-13-2017, 04:23 PM
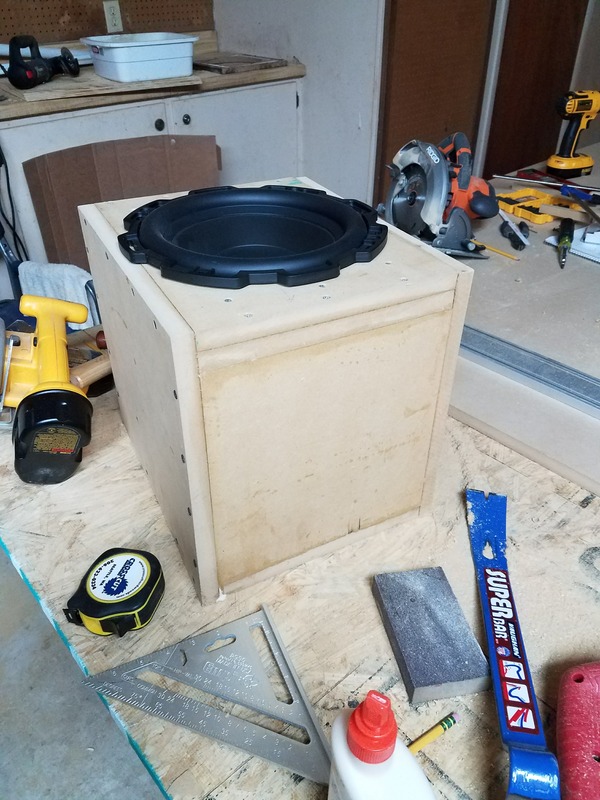
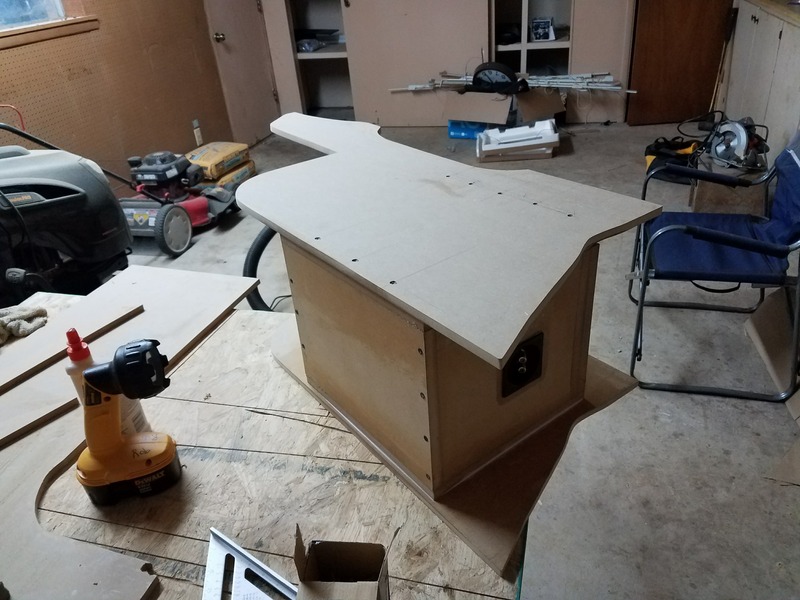
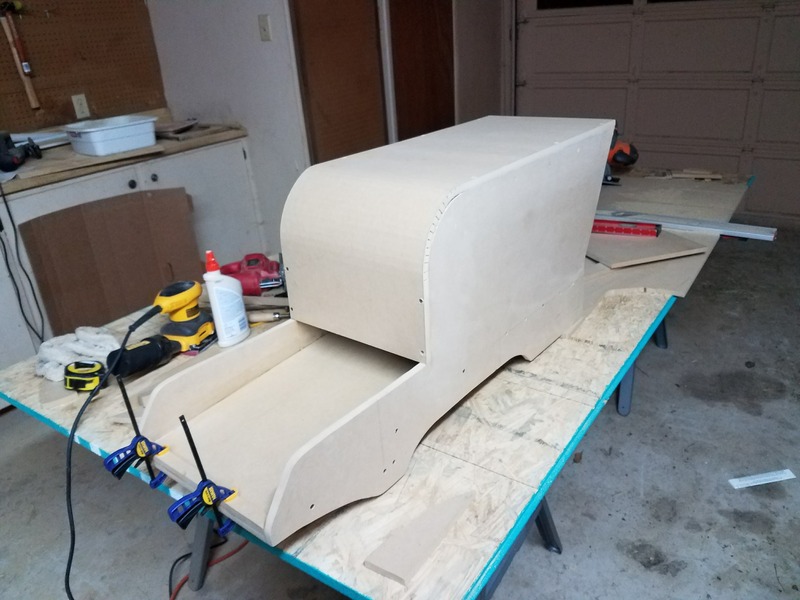
Now I needed somewhere for a sub to live. I don't listen to a whole lot of rap and hip hop so went with a sealed design. After much head scratching, heavy duty math, pencil whipping, and thrown out designs, I settled upon a shape and size I liked that perfectly fit the requirements of the sub.
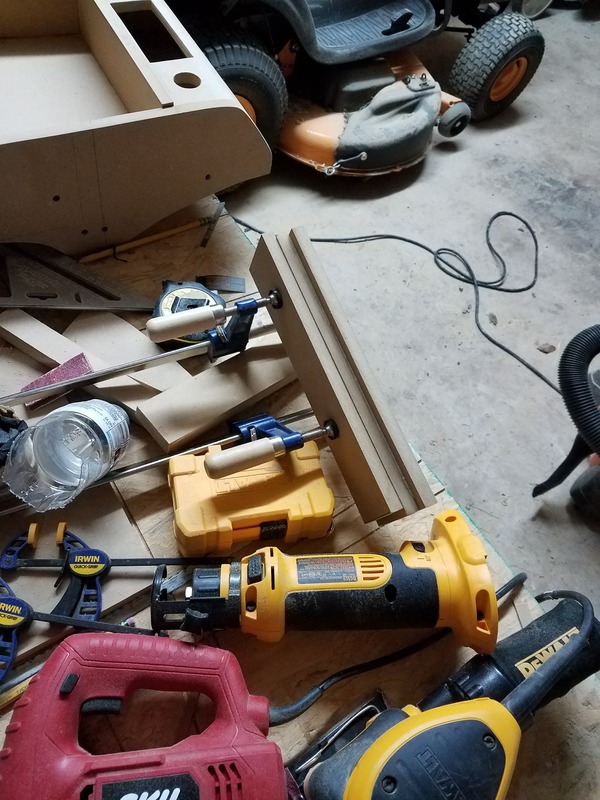
A table saw would have made this part much easier, but I don't have nor do I want a table saw. I used the Kreg rip cut system with my Rigid circular saw to make all my long cuts. They weren't 100% perfect but close enough for me. On a scale of 1-10 with 10 being awesome, I'd give it a good 6.5-7 for performing the task it is named for, performing rip cuts.
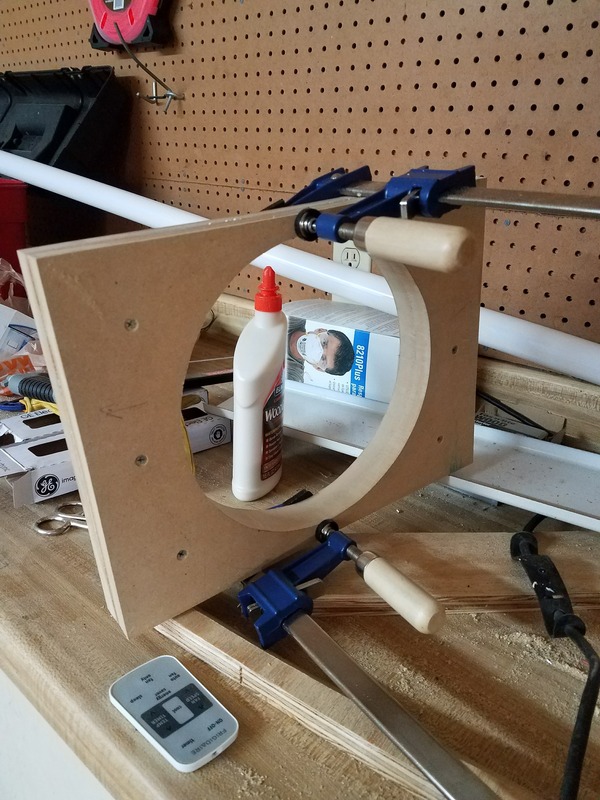
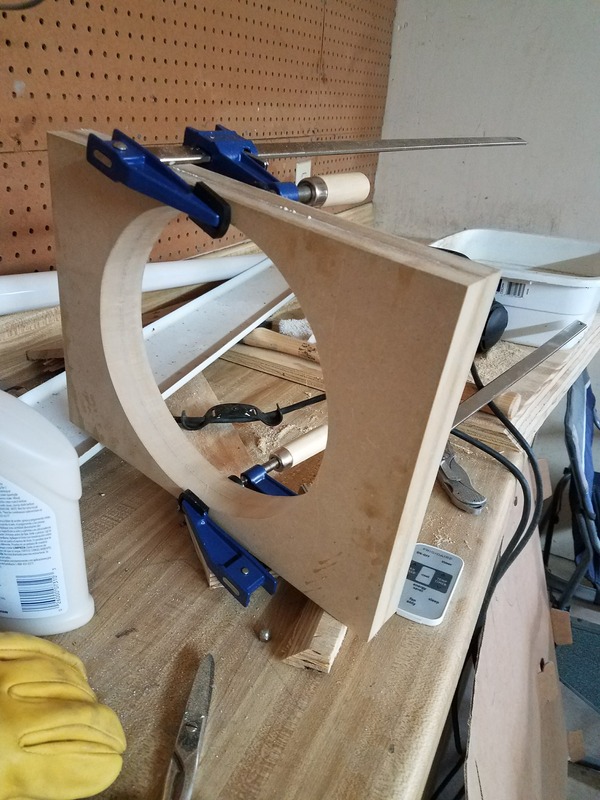
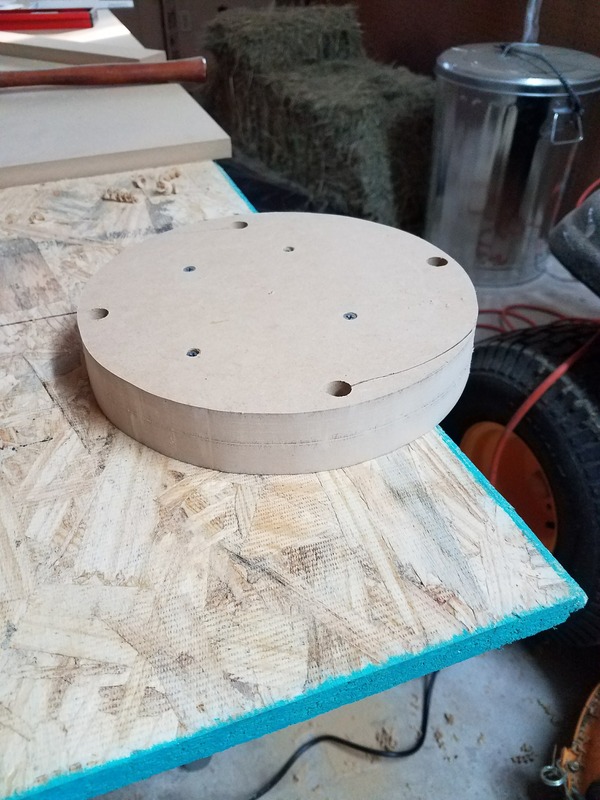
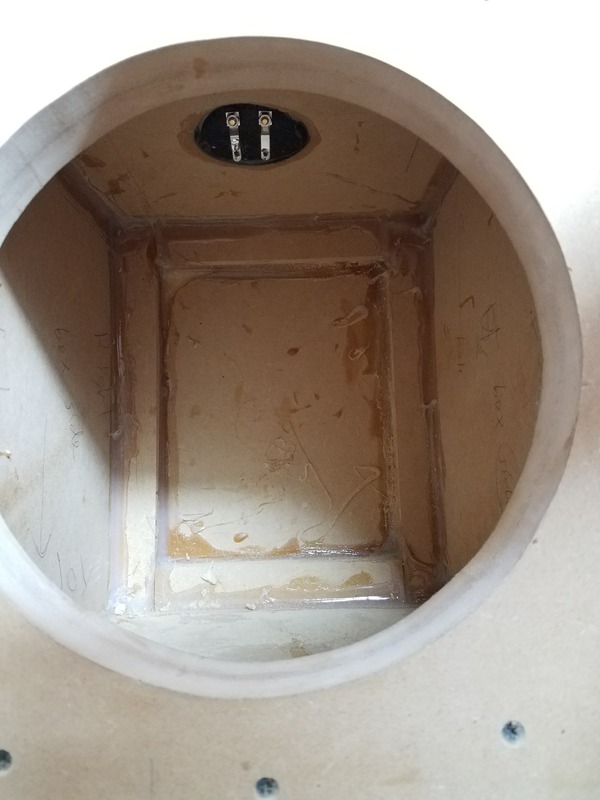
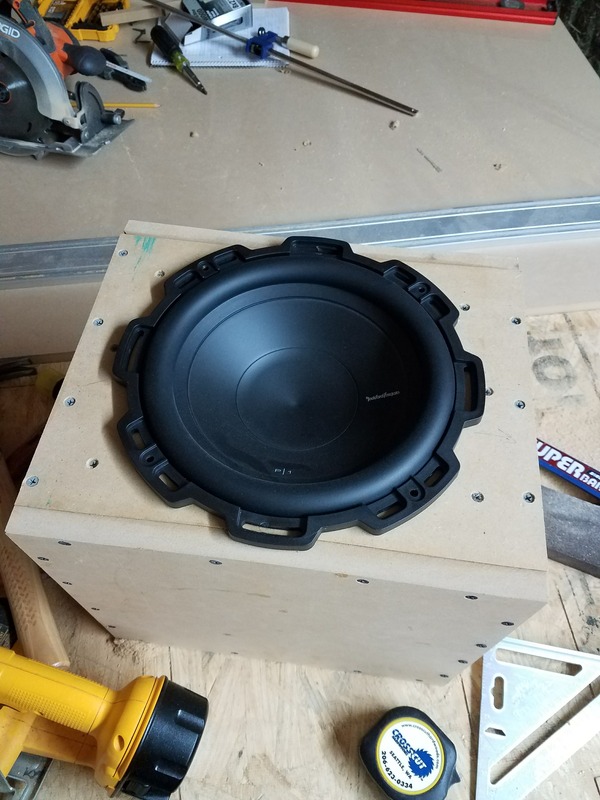
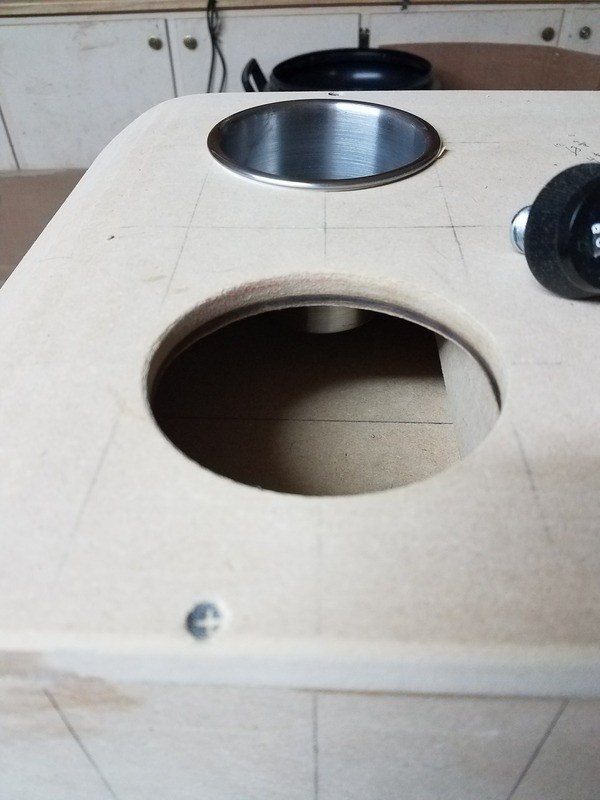
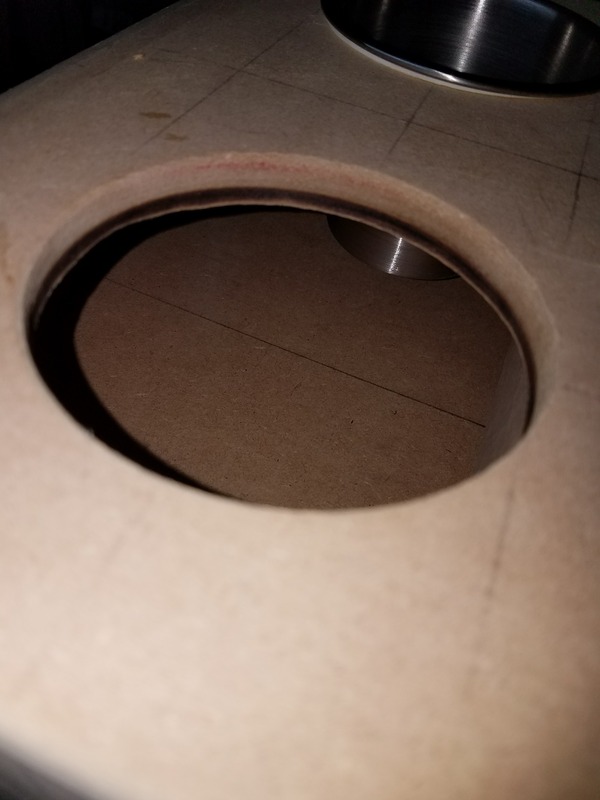
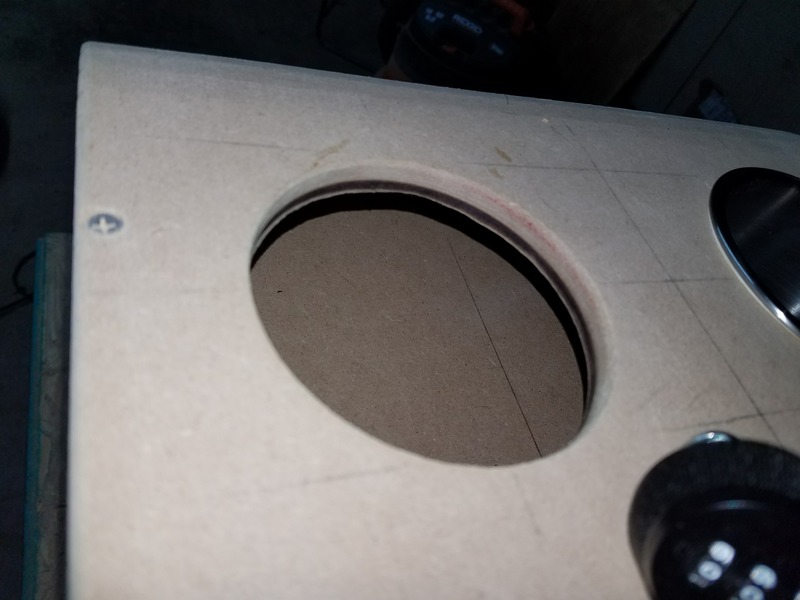
I forgot to mention in the beginning, I used 3/4" mdf for this project. For the sub mounting surface, I doubled up the 3/4" mdf, gluing two pieces solidly together and trimming out the hole. The sub was mounted with non-hardening caulk between it and the mdf. I used a 1/2" drill bit for a pilot hole and a jig saw to make the round cut. A piece of string with a tack in the middle was used to draw the circle. All in all, it went pretty smoothly.
Once the glue was dry and all was well with the world, I glued and screwed all my pieces together and waited for that to try. Much of this project was spent waiting for things to dry haha! The final piece of all this was to cut out thin strips to glue into the inside corners for bracing/sealing and further seal it all with GE 100% silicone.
Anyhow, pics!
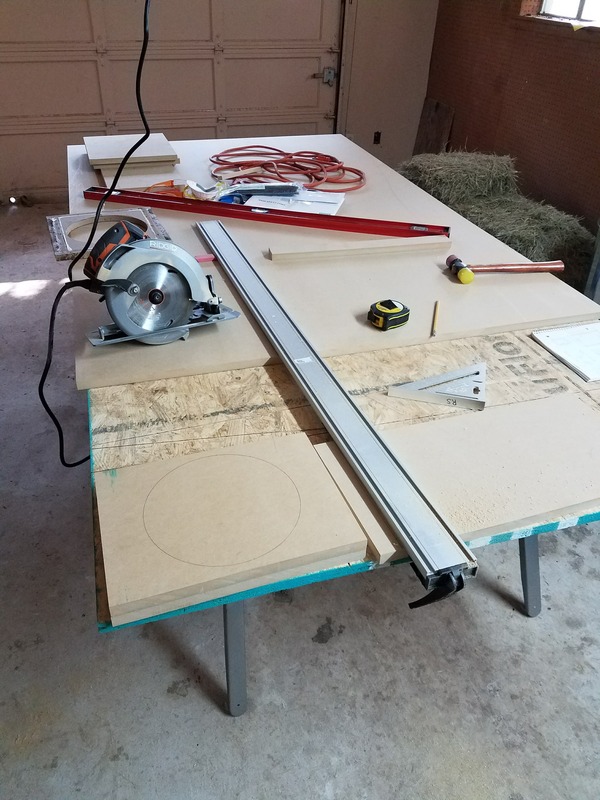
A table saw would have made this part much easier, but I don't have nor do I want a table saw. I used the Kreg rip cut system with my Rigid circular saw to make all my long cuts. They weren't 100% perfect but close enough for me. On a scale of 1-10 with 10 being awesome, I'd give it a good 6.5-7 for performing the task it is named for, performing rip cuts.
I forgot to mention in the beginning, I used 3/4" mdf for this project. For the sub mounting surface, I doubled up the 3/4" mdf, gluing two pieces solidly together and trimming out the hole. The sub was mounted with non-hardening caulk between it and the mdf. I used a 1/2" drill bit for a pilot hole and a jig saw to make the round cut. A piece of string with a tack in the middle was used to draw the circle. All in all, it went pretty smoothly.
Once the glue was dry and all was well with the world, I glued and screwed all my pieces together and waited for that to try. Much of this project was spent waiting for things to dry haha! The final piece of all this was to cut out thin strips to glue into the inside corners for bracing/sealing and further seal it all with GE 100% silicone.
Anyhow, pics!


#4
06-13-2017, 04:35 PM
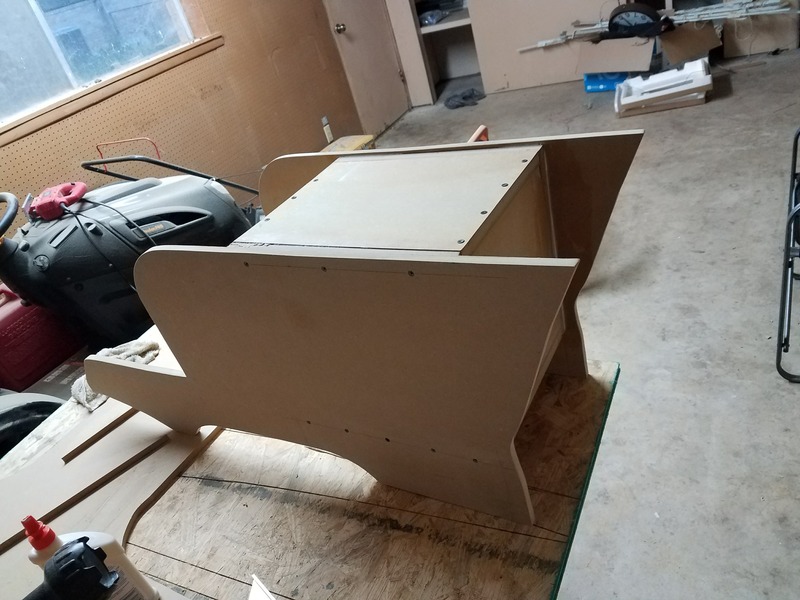
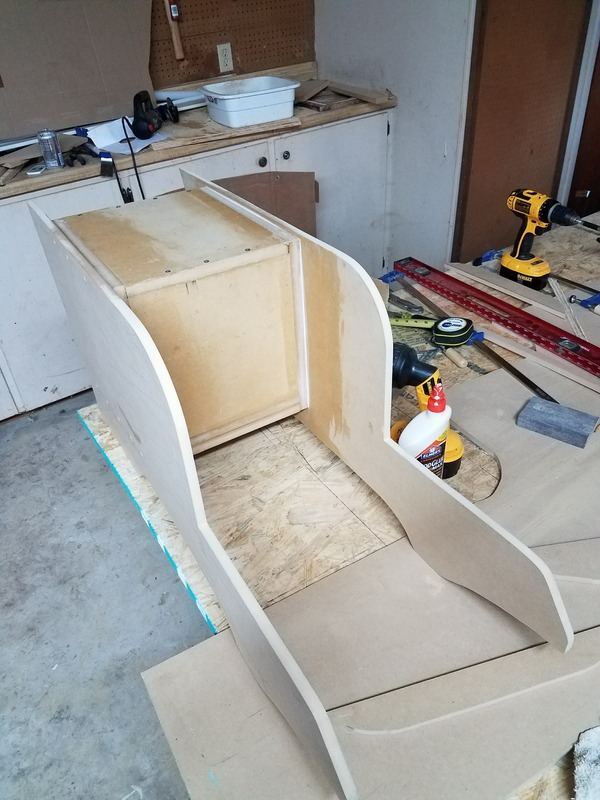
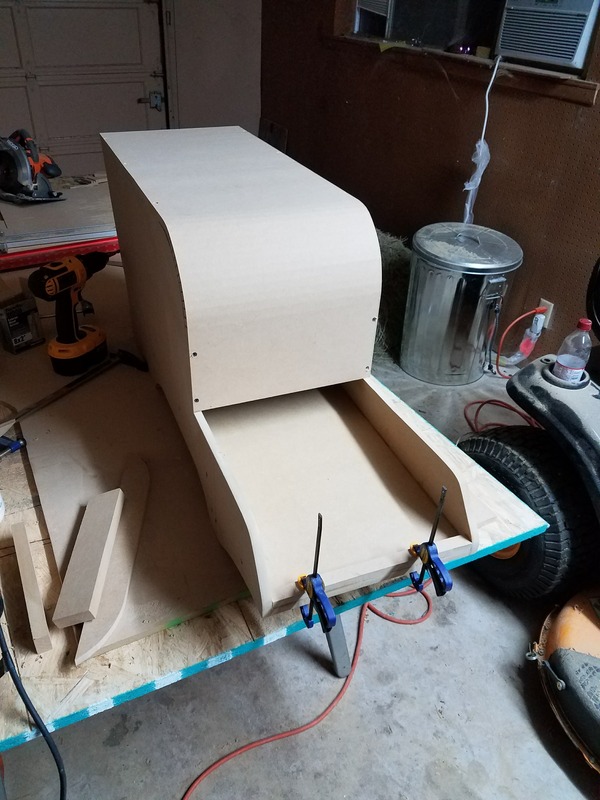
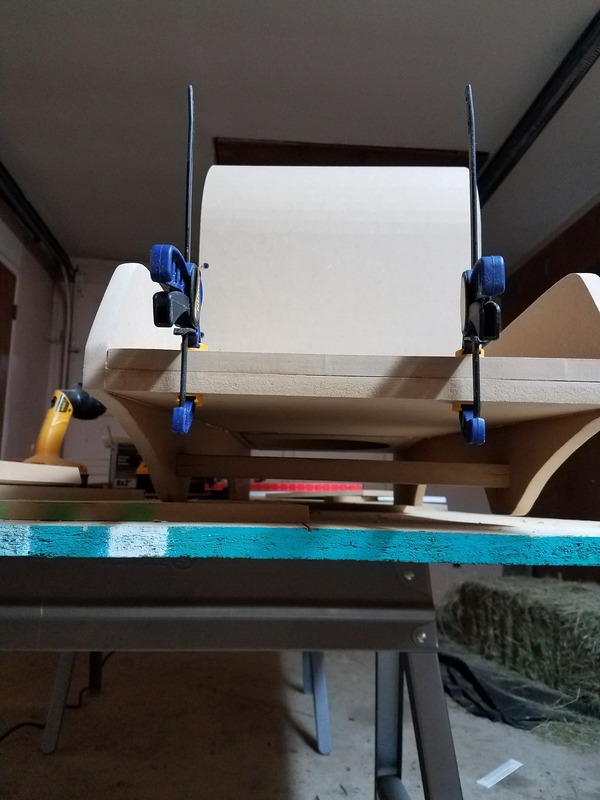
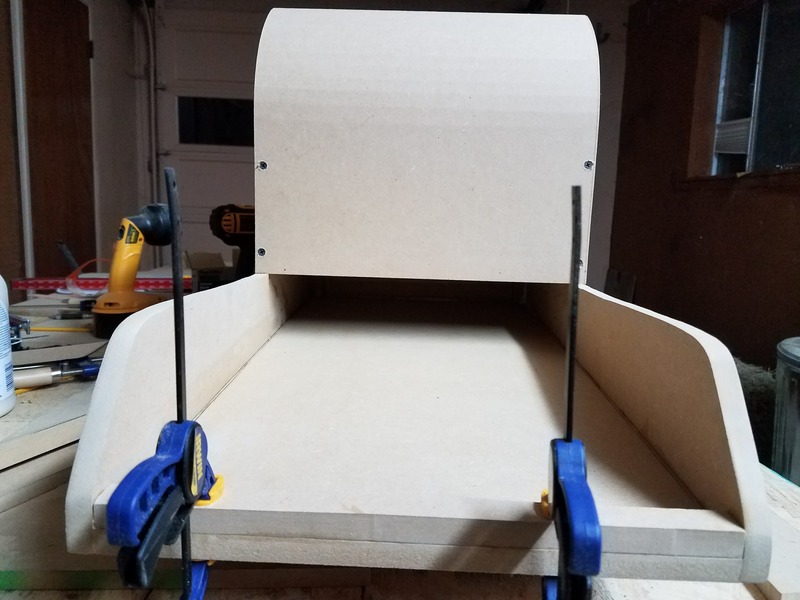
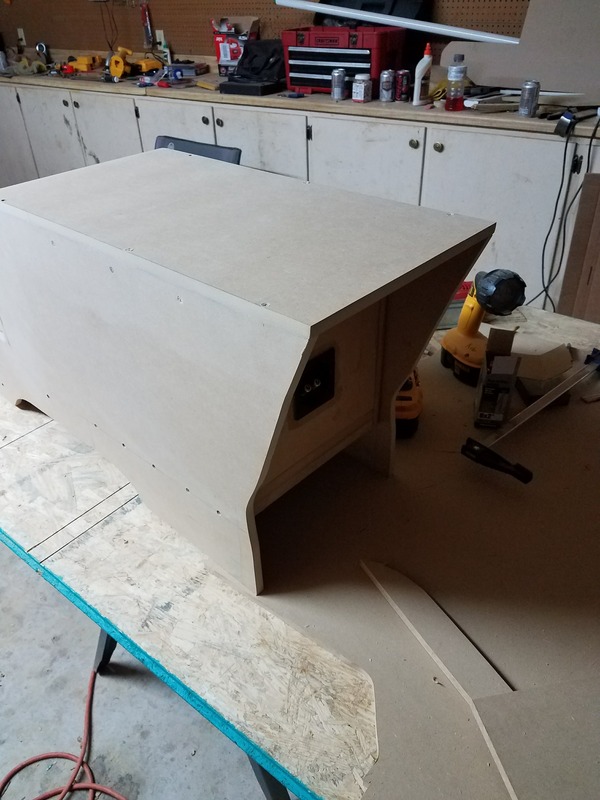
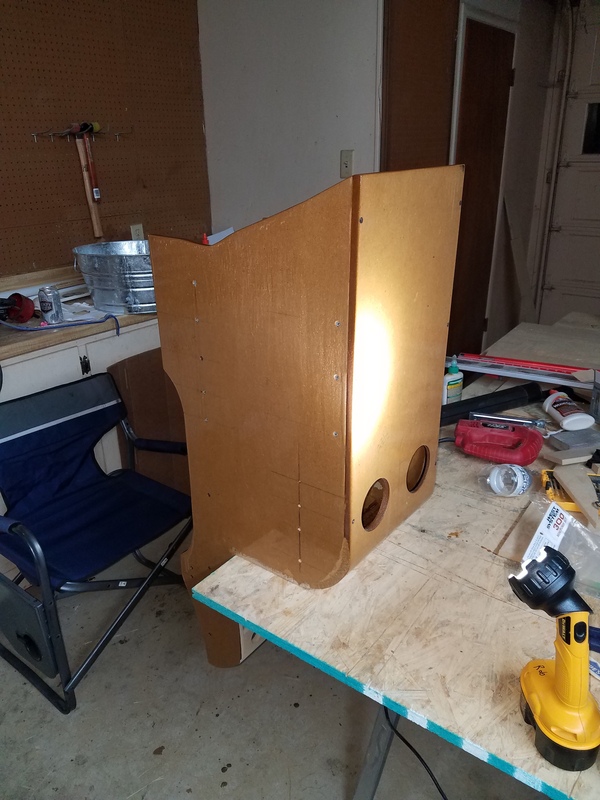
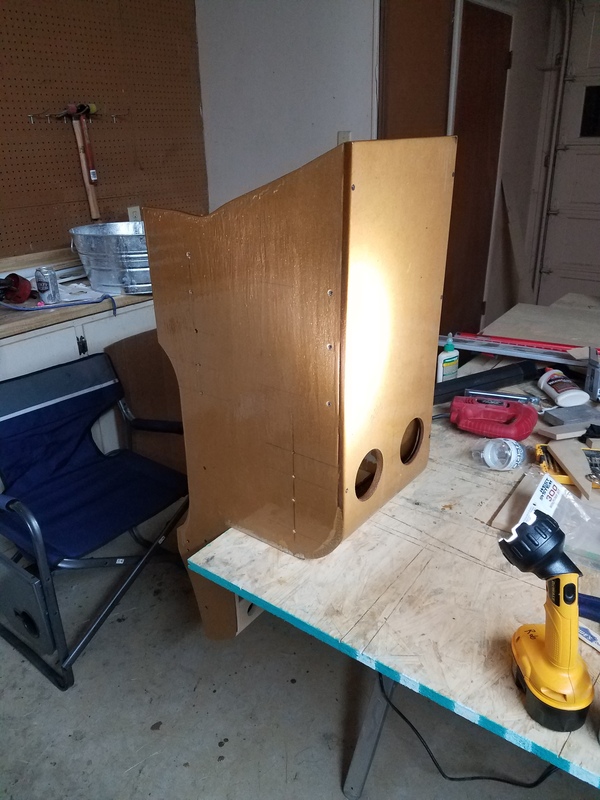
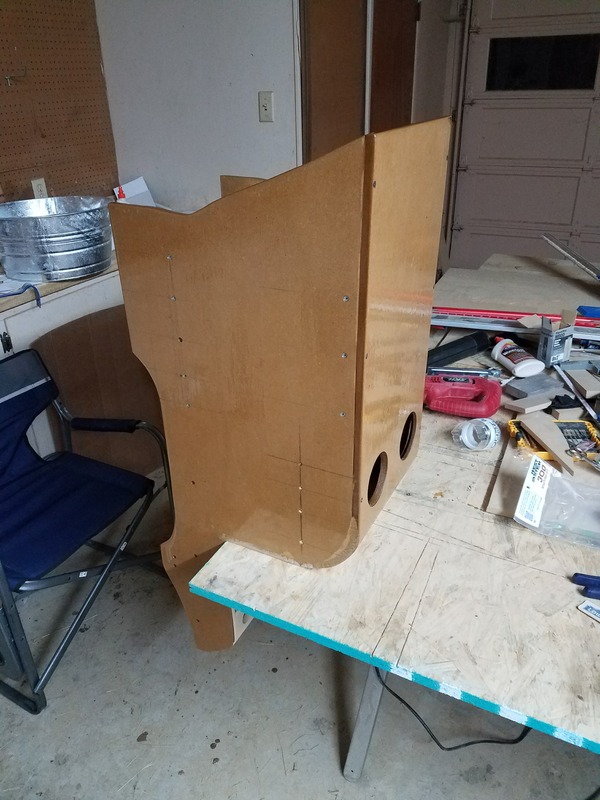
The next step ended up being the most difficult, in my opinion, because it solidly set exactly where the box was in reference to the sides and the sides to each other. There was a lot at play and way more hours were spent making sure it was perfect than most people would agree was necessary. I'm a stickler for perfection in my work though, so screw it. I've got nothing but time! I made and glued in a 3" strip to brace the "legs" of the box.
The box and sides were placed in and out of the truck so many times in the next few steps, I'm surprised I didn't have a hernia. This thing started off kinda heavy and ended up being a danged tank!
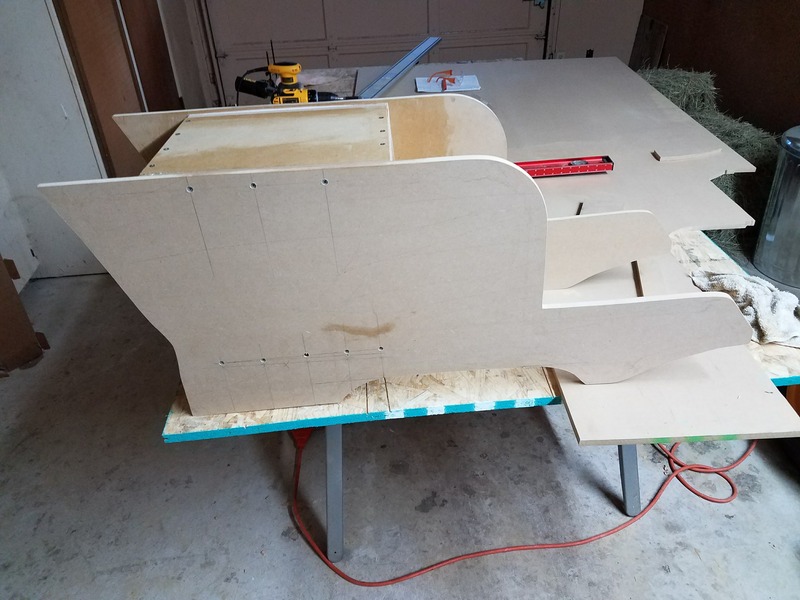

The box and sides were placed in and out of the truck so many times in the next few steps, I'm surprised I didn't have a hernia. This thing started off kinda heavy and ended up being a danged tank!


#5
06-13-2017, 04:52 PM
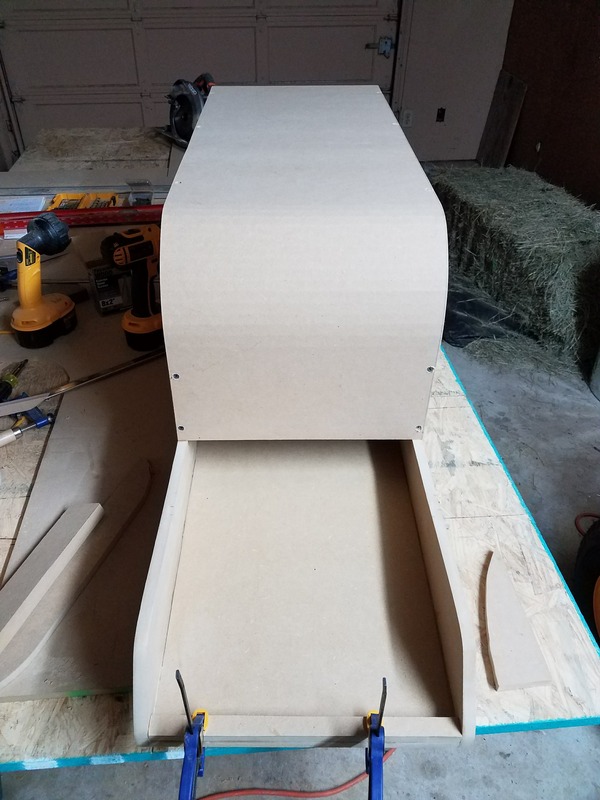
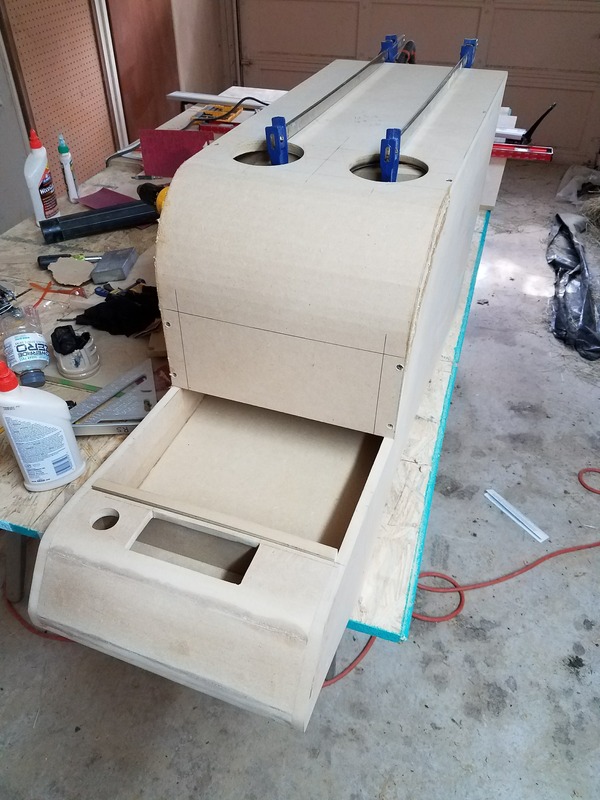
After this, I reached the first milestone of the project that I had never had any experience with, making kerf cuts to bend the mdf. Sadly, I'm having trouble finding pictures of this part which sucks because I think it was the coolest part!
Basically, you measure the length of the curve, add that number to the two straights, and make your cut lengthwise. Make two marks where the curve starts and ends, divide the length by 12? or so, and make cuts at that interval. The cuts should leave about 1/8" of material left at the face. I filled all the cuts up with wood glue, wrapped it over the top, and glued/screwed it into place. I was shocked at how easy it was and how well it works. I did have a slight gap on the sides so mixed some (of the tons) of the mdf sawdust with wood glue until it reaches a thick, overcooked oatmeal consistency and packed that into the gap. It sealed it up tight and is as strong (supposedly) as the material it is replacing. I can attest that I made a clump of it up and hammered the crap out of it to no avail. In the sanding phase of this project, it was also the most difficult to shave down smooth. Like sanding danged metal.
Another step I forgot to document was cutting and laying in the base of what will be my stuff container. You can see it in these pictures though; it's just glued/screwed in.


#6
06-13-2017, 05:06 PM
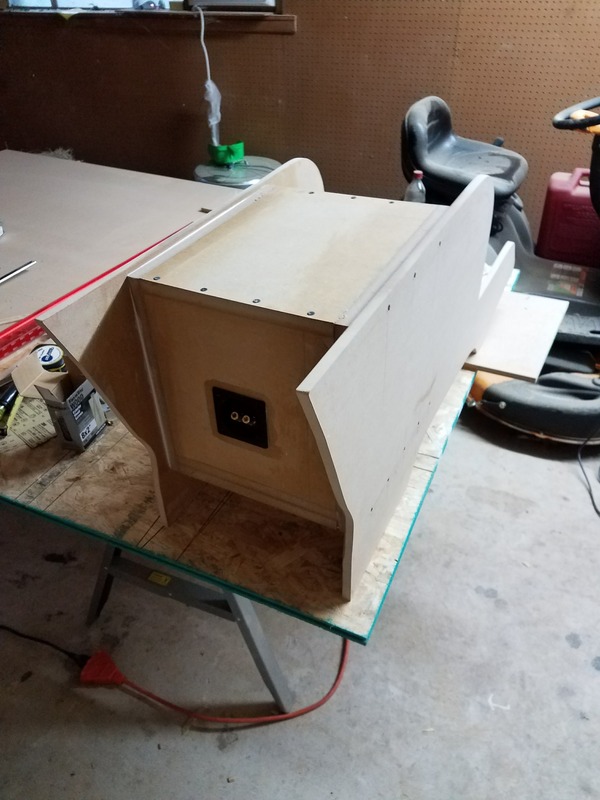
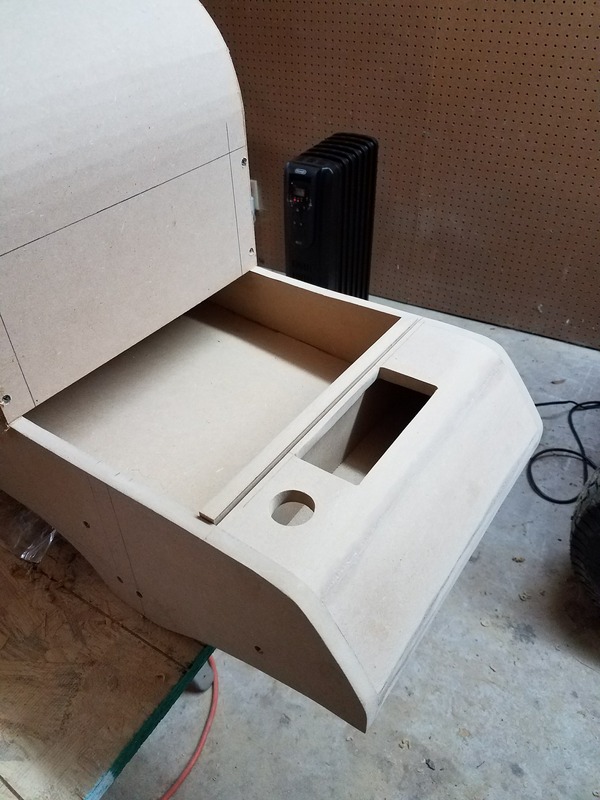
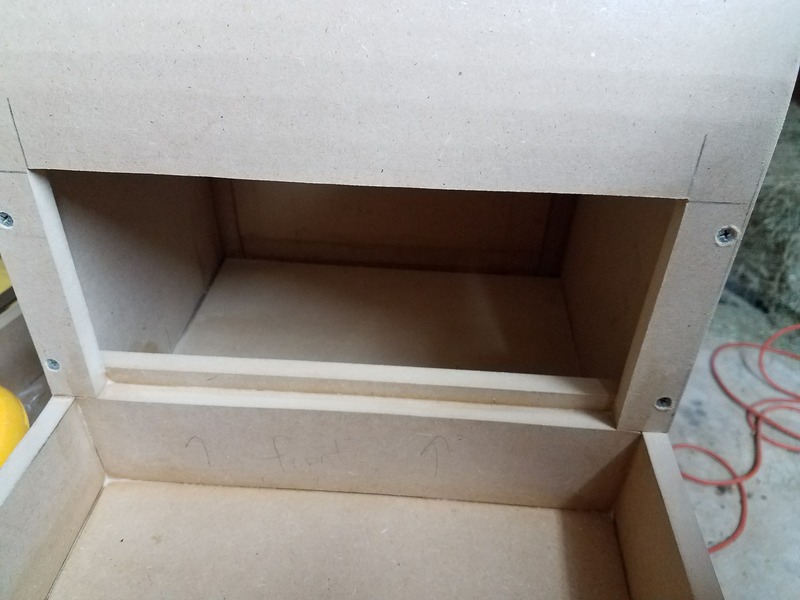
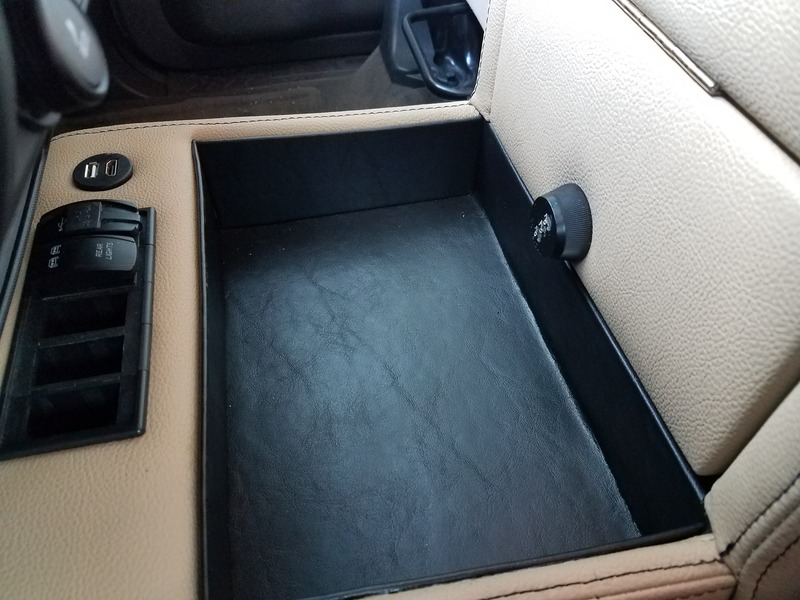
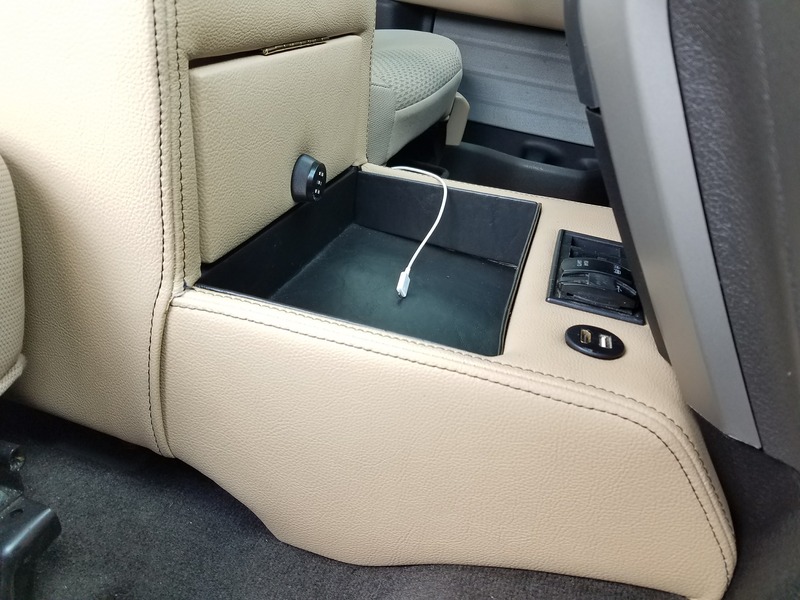
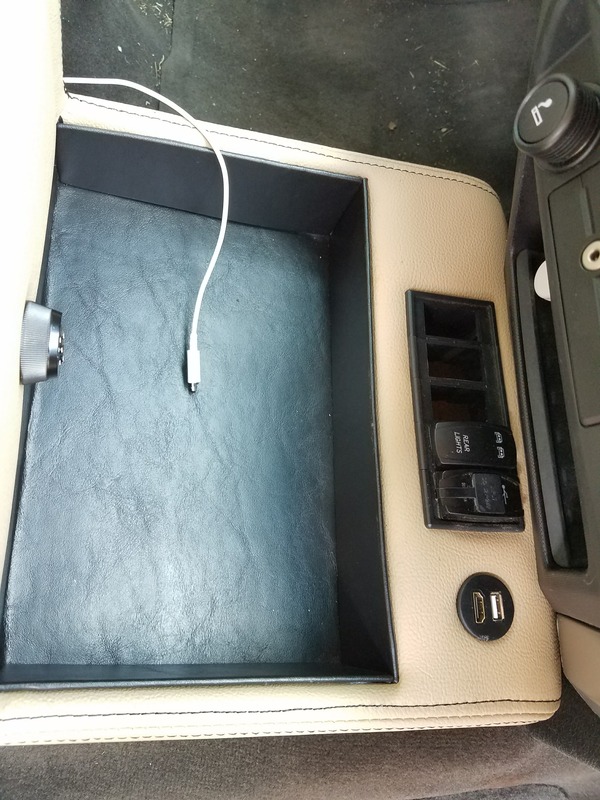
After this, I was simply going to cut some cup holders in the top but thought to myself, there sure is a lot of wasted space under the cups and in the front. That's when the project ratcheted up again; I decided it would be amazing to build a very sturdy, difficult to see and access lock box into this console as well as a switch box and HDMI/USB interface/chargers. It'd give me a great place to lock up stuff while I'm out on my bike and whatnot. It is sealed on the top, giving the cupholders around 1/4" of clearance underneath. I glued/screwed in bracing all around the door/floor and added a combo lock. Not only can you not see it without literally sticking your head nearly in between the console and dash (security through obscurity), but there isn't enough room to get a crowbar in there to do any prying on it if you knew it was there.
The head unit accepts two USB inputs into the rear; one is being used to run Pandora/GoogleMaps, the second is for any other data transfer, pictures etc. There is also an HDMI port for movies. I also have a switch panel for running my backup lights, USB charging ports, and whatever else I decided to add in the future. I made a little box up front, undercut the holes, and hand sanded to fit the parts. Theres a hole in the bottom to run the harness from inside up through the dash. The amp will also live under the console, but it's wiring will take a different route under the floor to make sure it doesn't cause interference with the RCA cables/speaker wires.
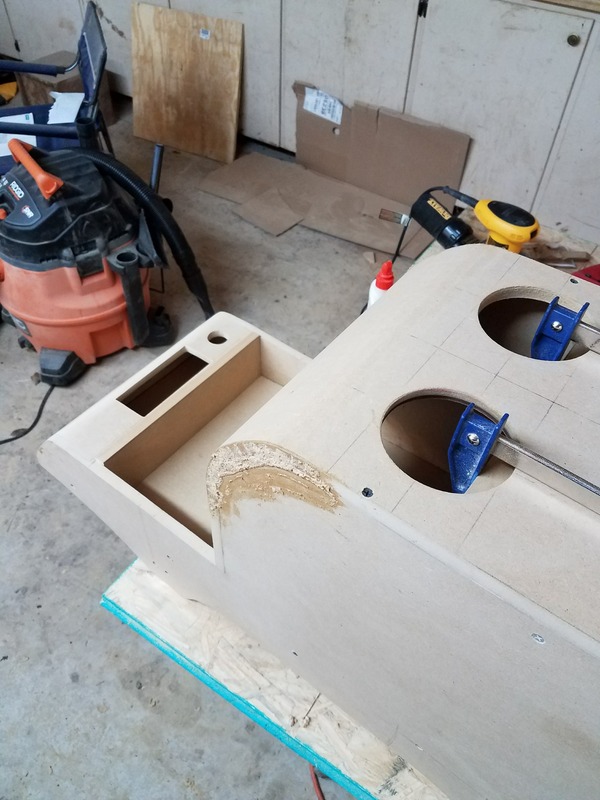
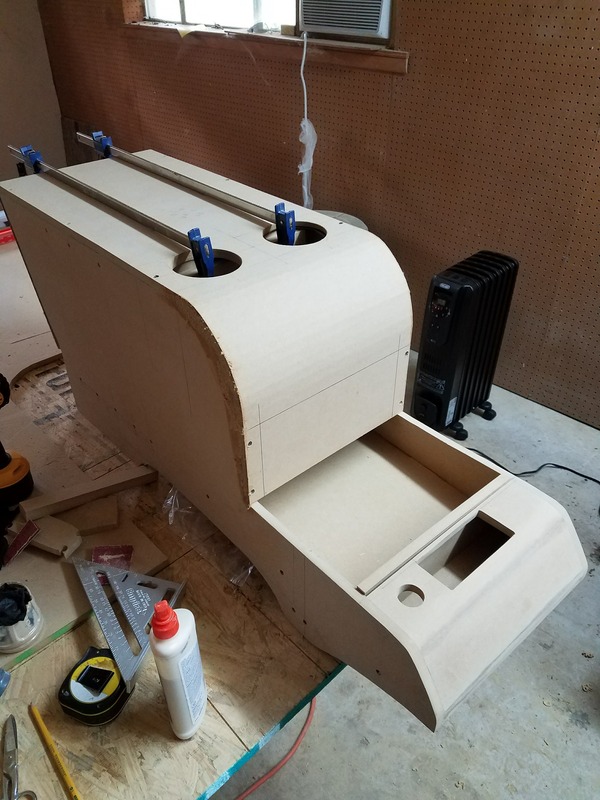
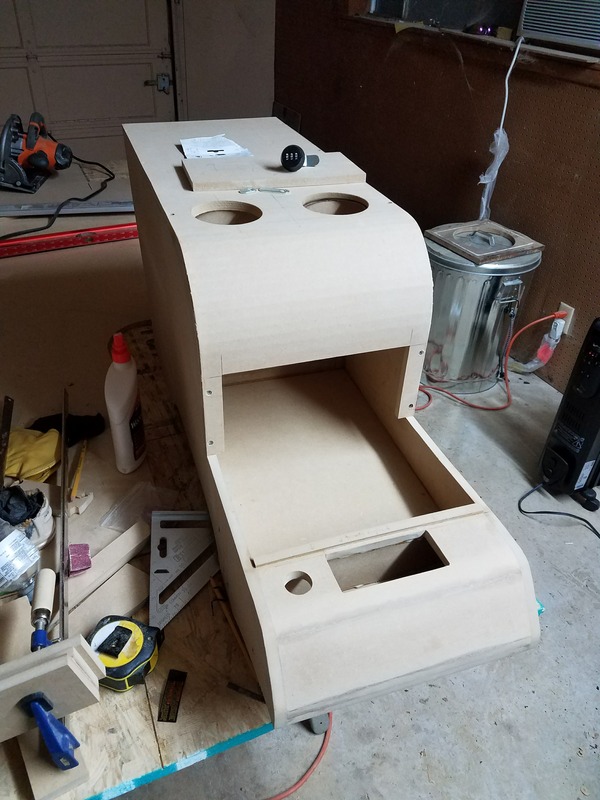
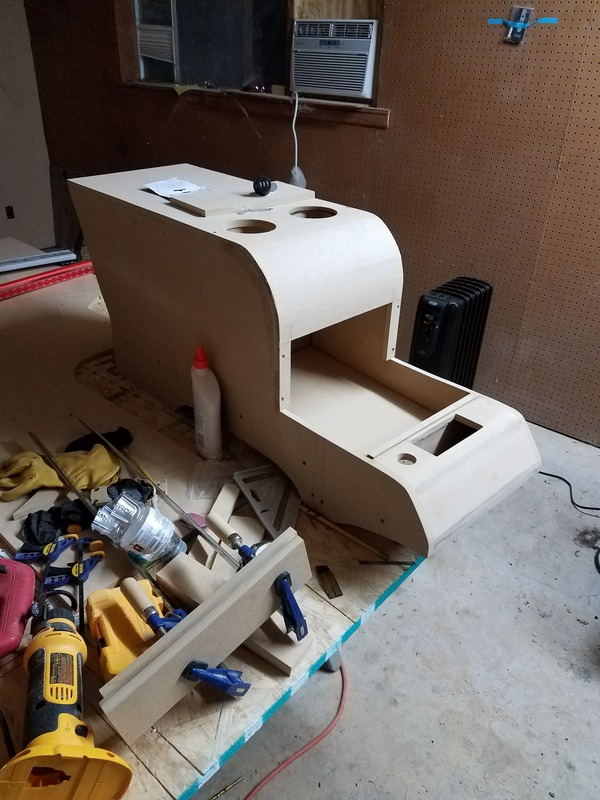
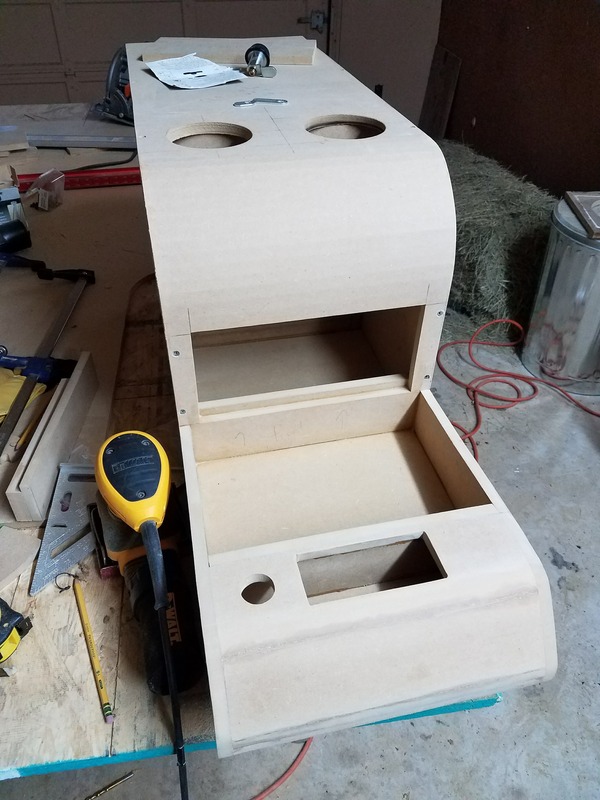
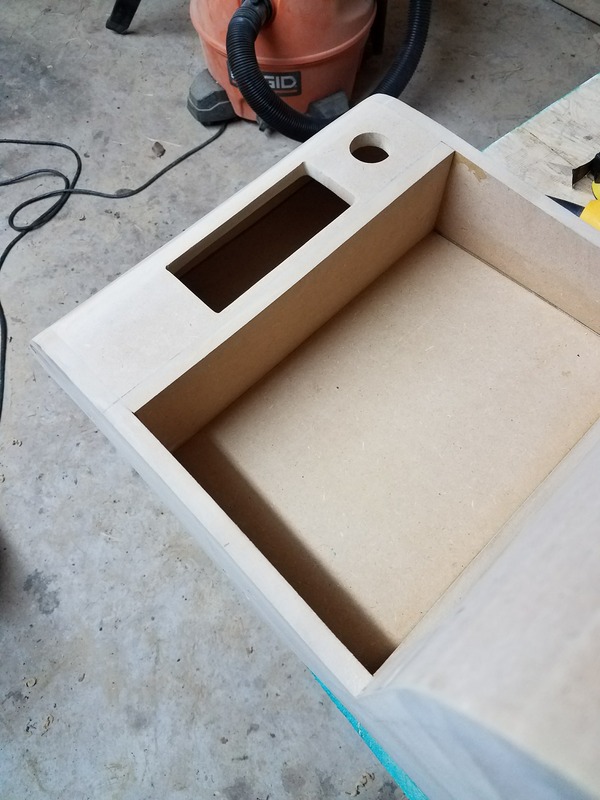
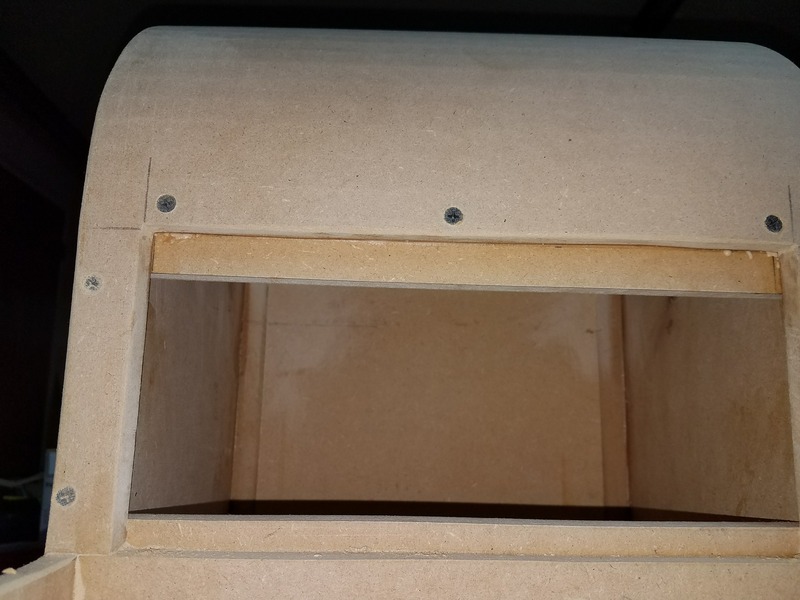
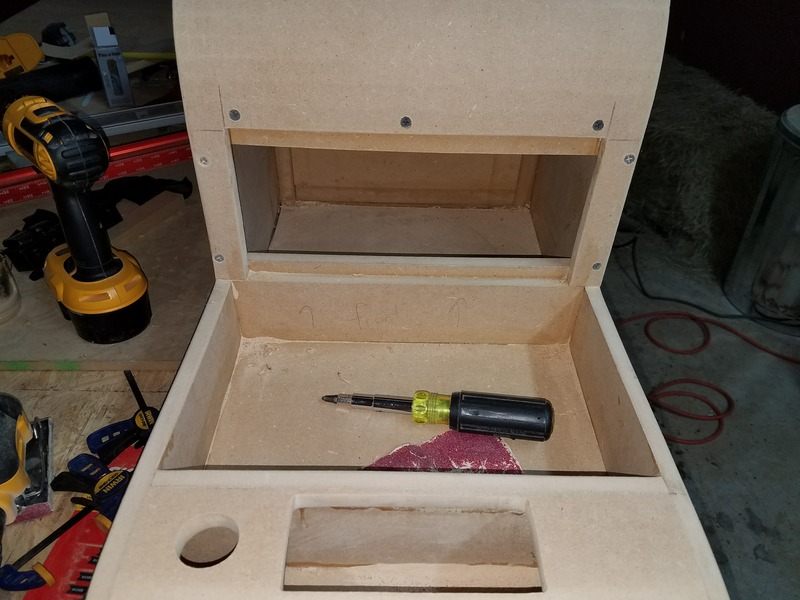
The head unit accepts two USB inputs into the rear; one is being used to run Pandora/GoogleMaps, the second is for any other data transfer, pictures etc. There is also an HDMI port for movies. I also have a switch panel for running my backup lights, USB charging ports, and whatever else I decided to add in the future. I made a little box up front, undercut the holes, and hand sanded to fit the parts. Theres a hole in the bottom to run the harness from inside up through the dash. The amp will also live under the console, but it's wiring will take a different route under the floor to make sure it doesn't cause interference with the RCA cables/speaker wires.


#7
06-13-2017, 05:15 PM
Now what hasn't been talked about yet are the countless hours of sanding by hand and machine, just on and on and on and on and on.......
I'm surprised I didn't end up wearing my fingers down to nubs.
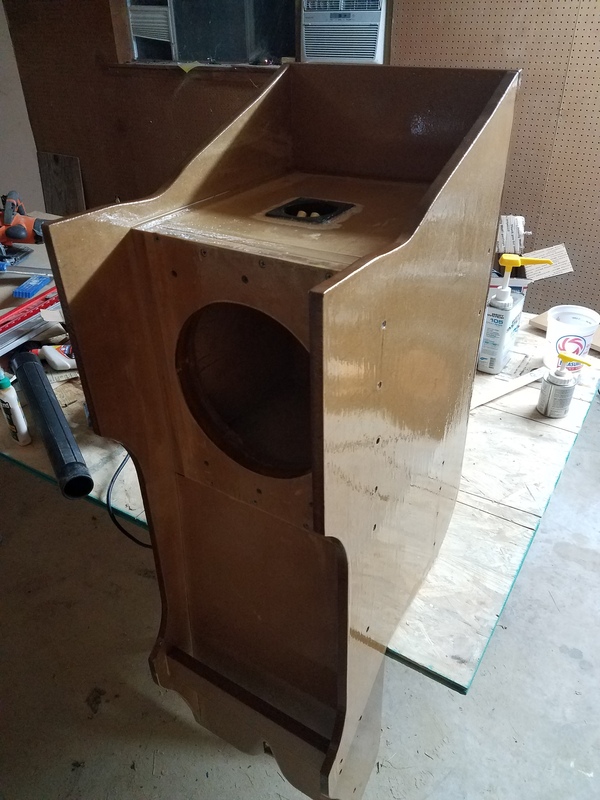
Once the cleanup was done and I was pleased with the result, I coated the entire project in West System 105 epoxy resin for boats. With all the time and money wrapped up in this thing, I wanted to be certain that humidity or an accidental spill wasn't going to ruin it. It was quite expensive, but in my opinion, worth it. My Labradog was impressed.

I'm surprised I didn't end up wearing my fingers down to nubs.
Once the cleanup was done and I was pleased with the result, I coated the entire project in West System 105 epoxy resin for boats. With all the time and money wrapped up in this thing, I wanted to be certain that humidity or an accidental spill wasn't going to ruin it. It was quite expensive, but in my opinion, worth it. My Labradog was impressed.


Trending Topics


#9
06-13-2017, 05:28 PM
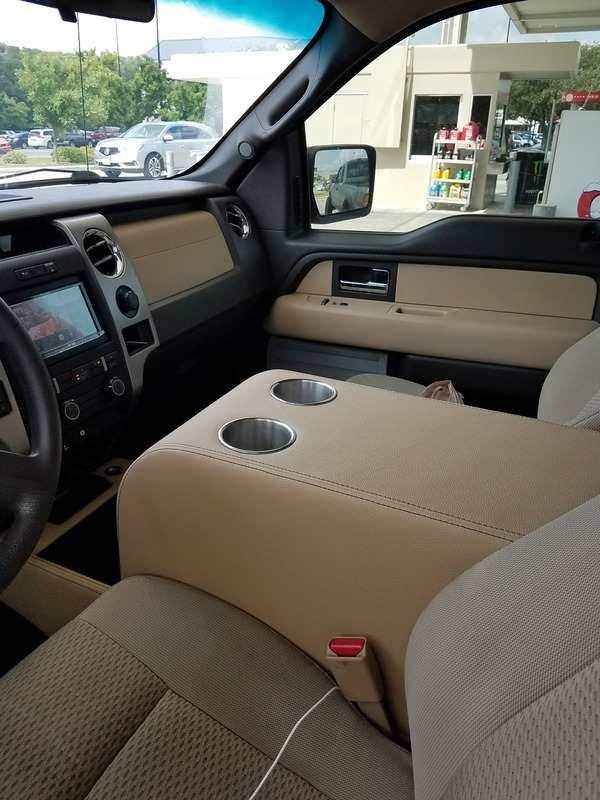
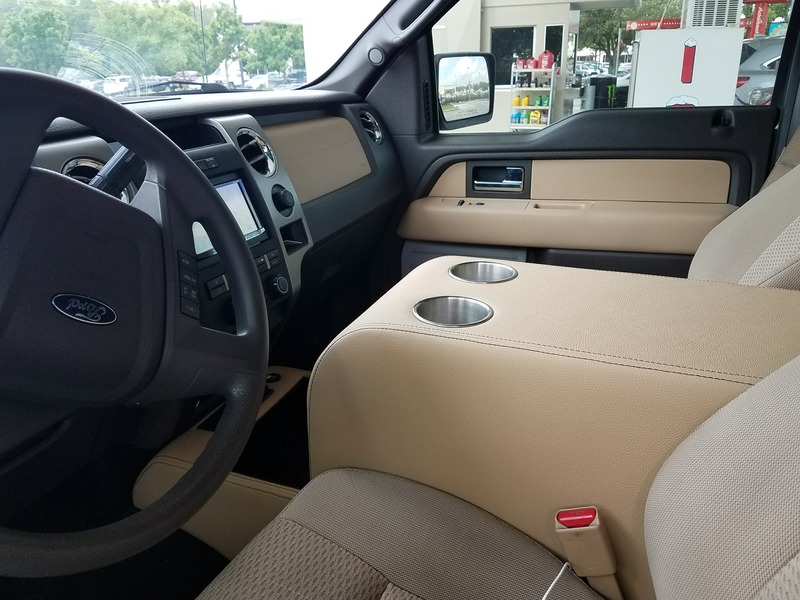
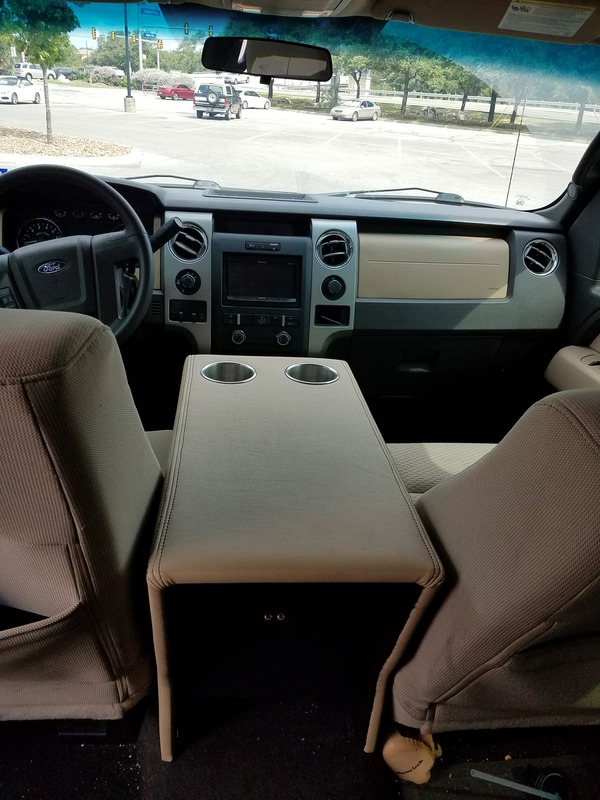
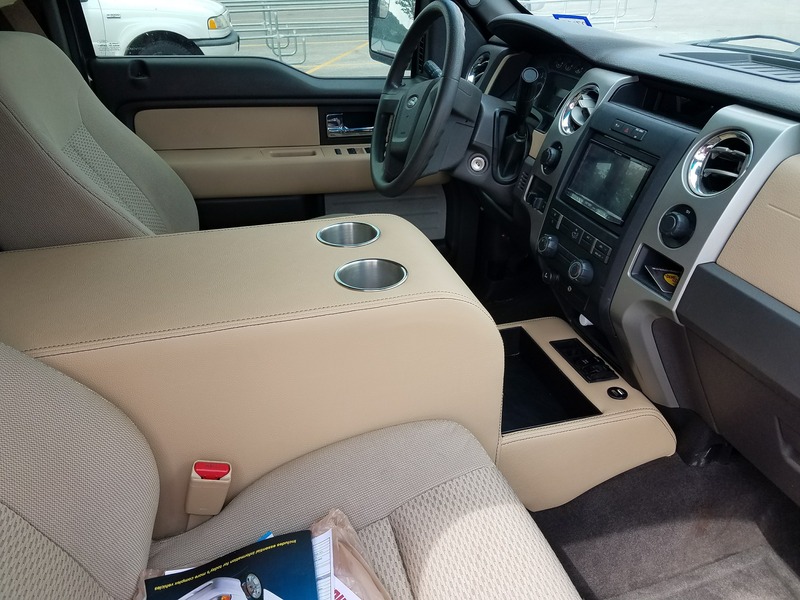
And finally, all finished up with upholstery. The black stitching matches the seat stitching and the color/pattern matches the trim pieces. I still have to run all the wiring for amps, sub, accessories, vacuum, etc, but the hard part is out of the way.
I have so, so many hours of labor into this thing but could not be more pleased with the outcome. The goal was to make it look OEM, and I feel I achieved that. It is everything I had imagined and then some. If you made it this far, thanks for reading!

I have so, so many hours of labor into this thing but could not be more pleased with the outcome. The goal was to make it look OEM, and I feel I achieved that. It is everything I had imagined and then some. If you made it this far, thanks for reading!


#14
06-14-2017, 07:22 PM

#15
06-15-2017, 12:32 AM