HockALoogie fix, how I fixed my cracked rear cover
#1
 05-23-2017, 11:21 PM

Join Date: Apr 2015
Location: Yakistan, WA
Posts: 1,817
Likes: 0
Received 0 Likes
on
0 Posts
HockALoogie fix, how I fixed my cracked rear cover
From my STC fitting fix thread I had started, I had a lot of inquires about how I “fixed” my rear cover when the STC broke my rear cover after failing. This is a little info on what I did. I did not have the time to be down to pull the tranny or money to pay a mechanic to do it.
After much encouragement, others experiences and consultation I decided this would work for me. So here we go………………….
These steps are how I fixed my cracked rear engine cover, this is just an FYI to those who own a 6oh and may encounter a scenario like mine.
When my STC fitting failed, it smashed the branch tube into the rear cover and cracked the cover. The branch tube was also bent.
There were only two scenarios to fix both the bent branch tube, and the cracked rear cover.
Option #1: Take it to my mechanic who is 4 weeks out (because I did not have the time or energy to do it myself) and let him remove the transmission to replace the rear cover and branch tube.
Or (since mine is my daily driver)
Option #2: The “HockALoogie” Fix (I made up the name) I CHOSE OPTION 2
These steps are after the HPOP cover, and HPOP/STC are completely removed.
At this point the ProPoxy is hard and has adhered to the gaps, cracks and rear cover.
Here is the product info and PDF:
ProPoxy.pdf
Here are some pic's with some how to and info:
Another reason I like this product over JB Weld or other products, is :
--It’s a workable putty.
--You can finesse the product with wet fingers to make it spread out in the area your covering.
--Easy to slap on into place in hard to reach places.
--Good up to 300 degrees Fahrenheit.
I thought of using this product for the following reasons:
-- I had seen this exact product used on Deadliest Catch when they had to repair an oil leak from one of the ships diesel engines, and it worked.
-- I sell it at my work, so I had time to really research the product and it was easy for me to obtain.
--The specs on application is exactly what I was needing for my problem with my truck.
I know that there were not a lot of pictures with this thread, like my STC repair thread, but I hope it is still clear and concise on how to use the product in this type of situation.
So far I have over 2,500 miles on the truck since repair. I just did a 220 mile trip where my EOT got up to 220 degrees at some points on the hot drive.
I have NO leaks coming from the rear cover. I would say that my fix has worked.
Thanks - Preston
After much encouragement, others experiences and consultation I decided this would work for me. So here we go………………….
These steps are how I fixed my cracked rear engine cover, this is just an FYI to those who own a 6oh and may encounter a scenario like mine.
When my STC fitting failed, it smashed the branch tube into the rear cover and cracked the cover. The branch tube was also bent.
There were only two scenarios to fix both the bent branch tube, and the cracked rear cover.
Option #1: Take it to my mechanic who is 4 weeks out (because I did not have the time or energy to do it myself) and let him remove the transmission to replace the rear cover and branch tube.
Or (since mine is my daily driver)
Option #2: The “HockALoogie” Fix (I made up the name) I CHOSE OPTION 2
These steps are after the HPOP cover, and HPOP/STC are completely removed.
- Clean the area where the HPOP gasket sits. Ensure no debris it left.
- Wipe the interior of the HPOP housing with a clean rag along the cracked area on the rear cover.
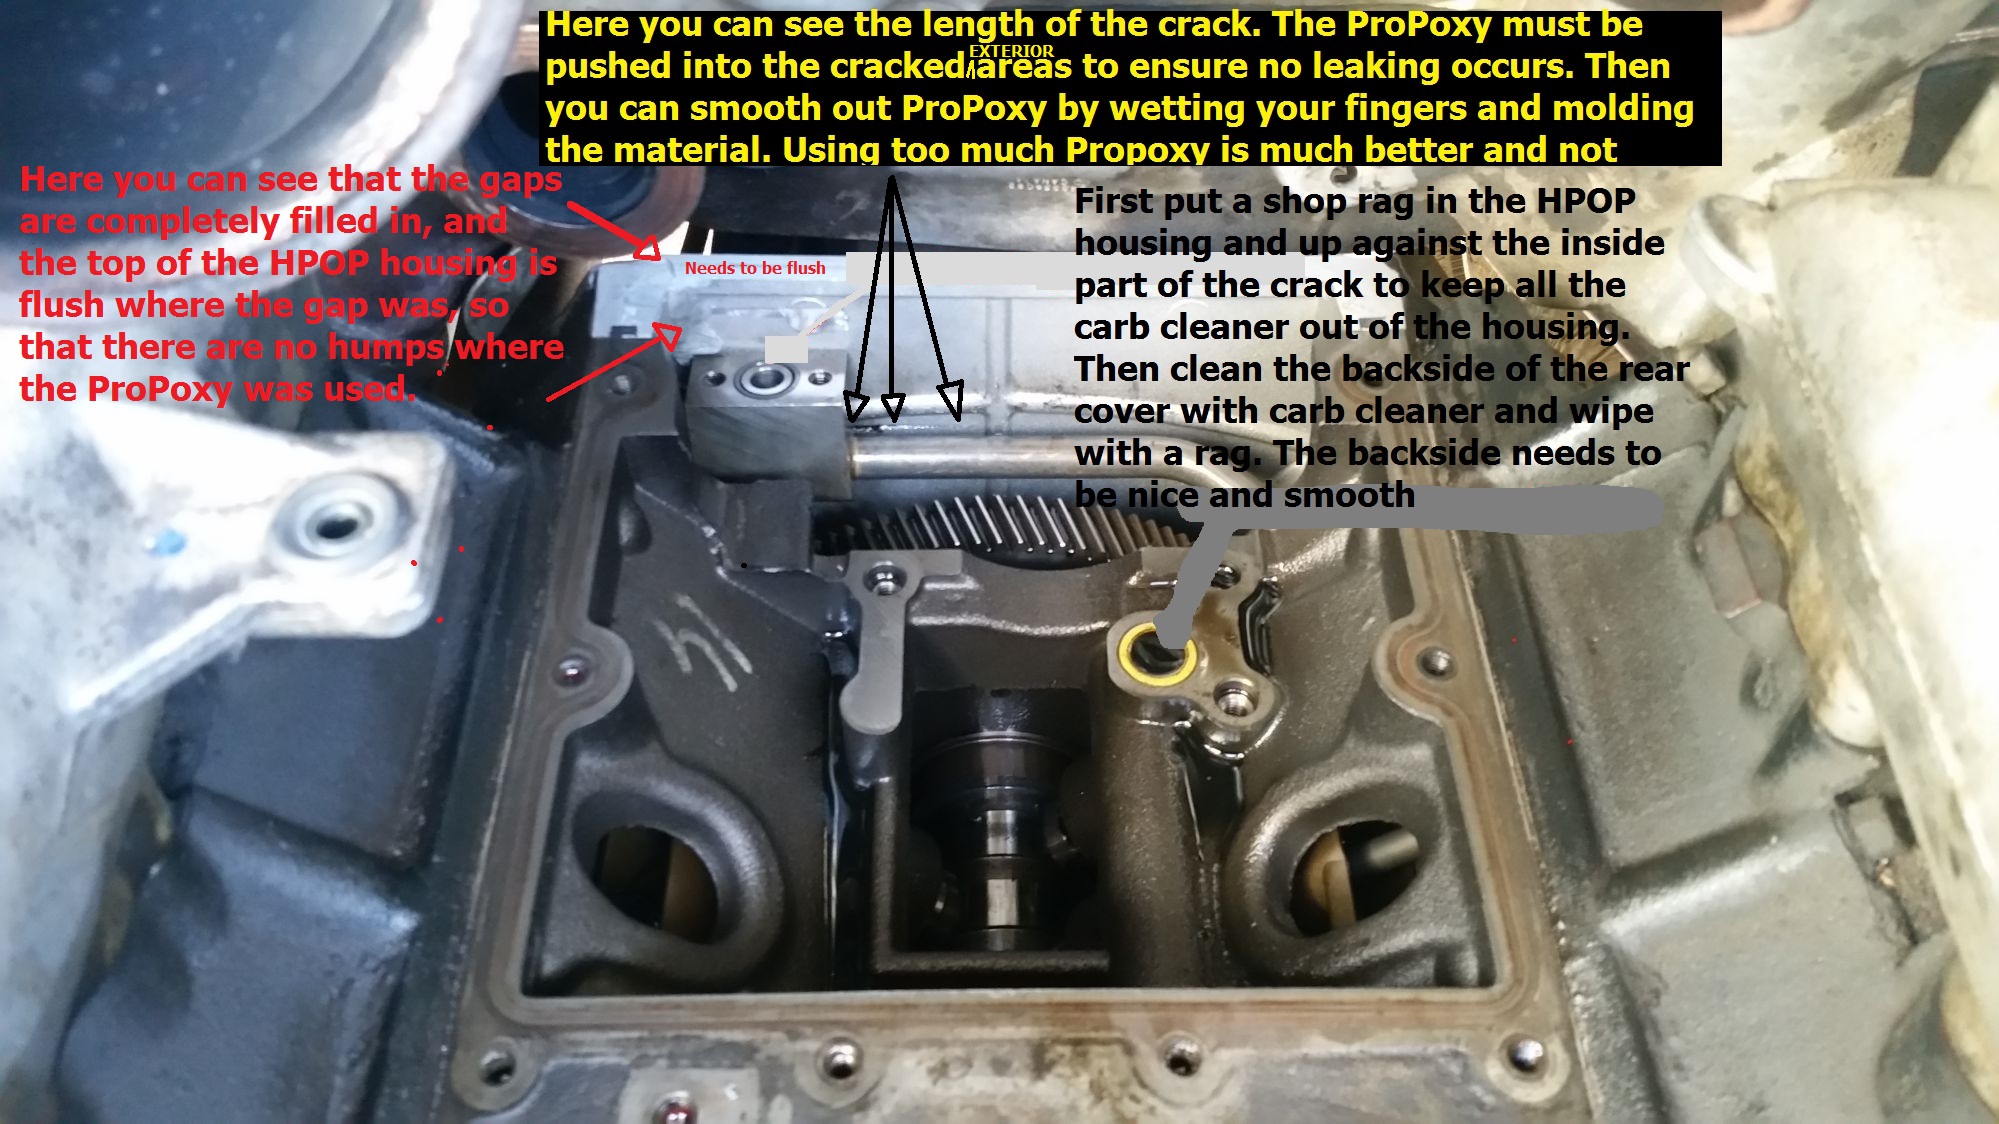
- Put a large rag in the HPOP housing, but up against the crack. This will help avoid any of the carb cleaner seeping through the crack.
- Spray a lot of carb cleaner on the exterior rear cover along with where the crack is and where the ProPoxy will be applied.
- Wipe the exterior of the rear cover, where the ProPoxy will be used, with a clean rag and run your clean finger around the exterior of the rear cover to make sure all the dirt and oil is gone.
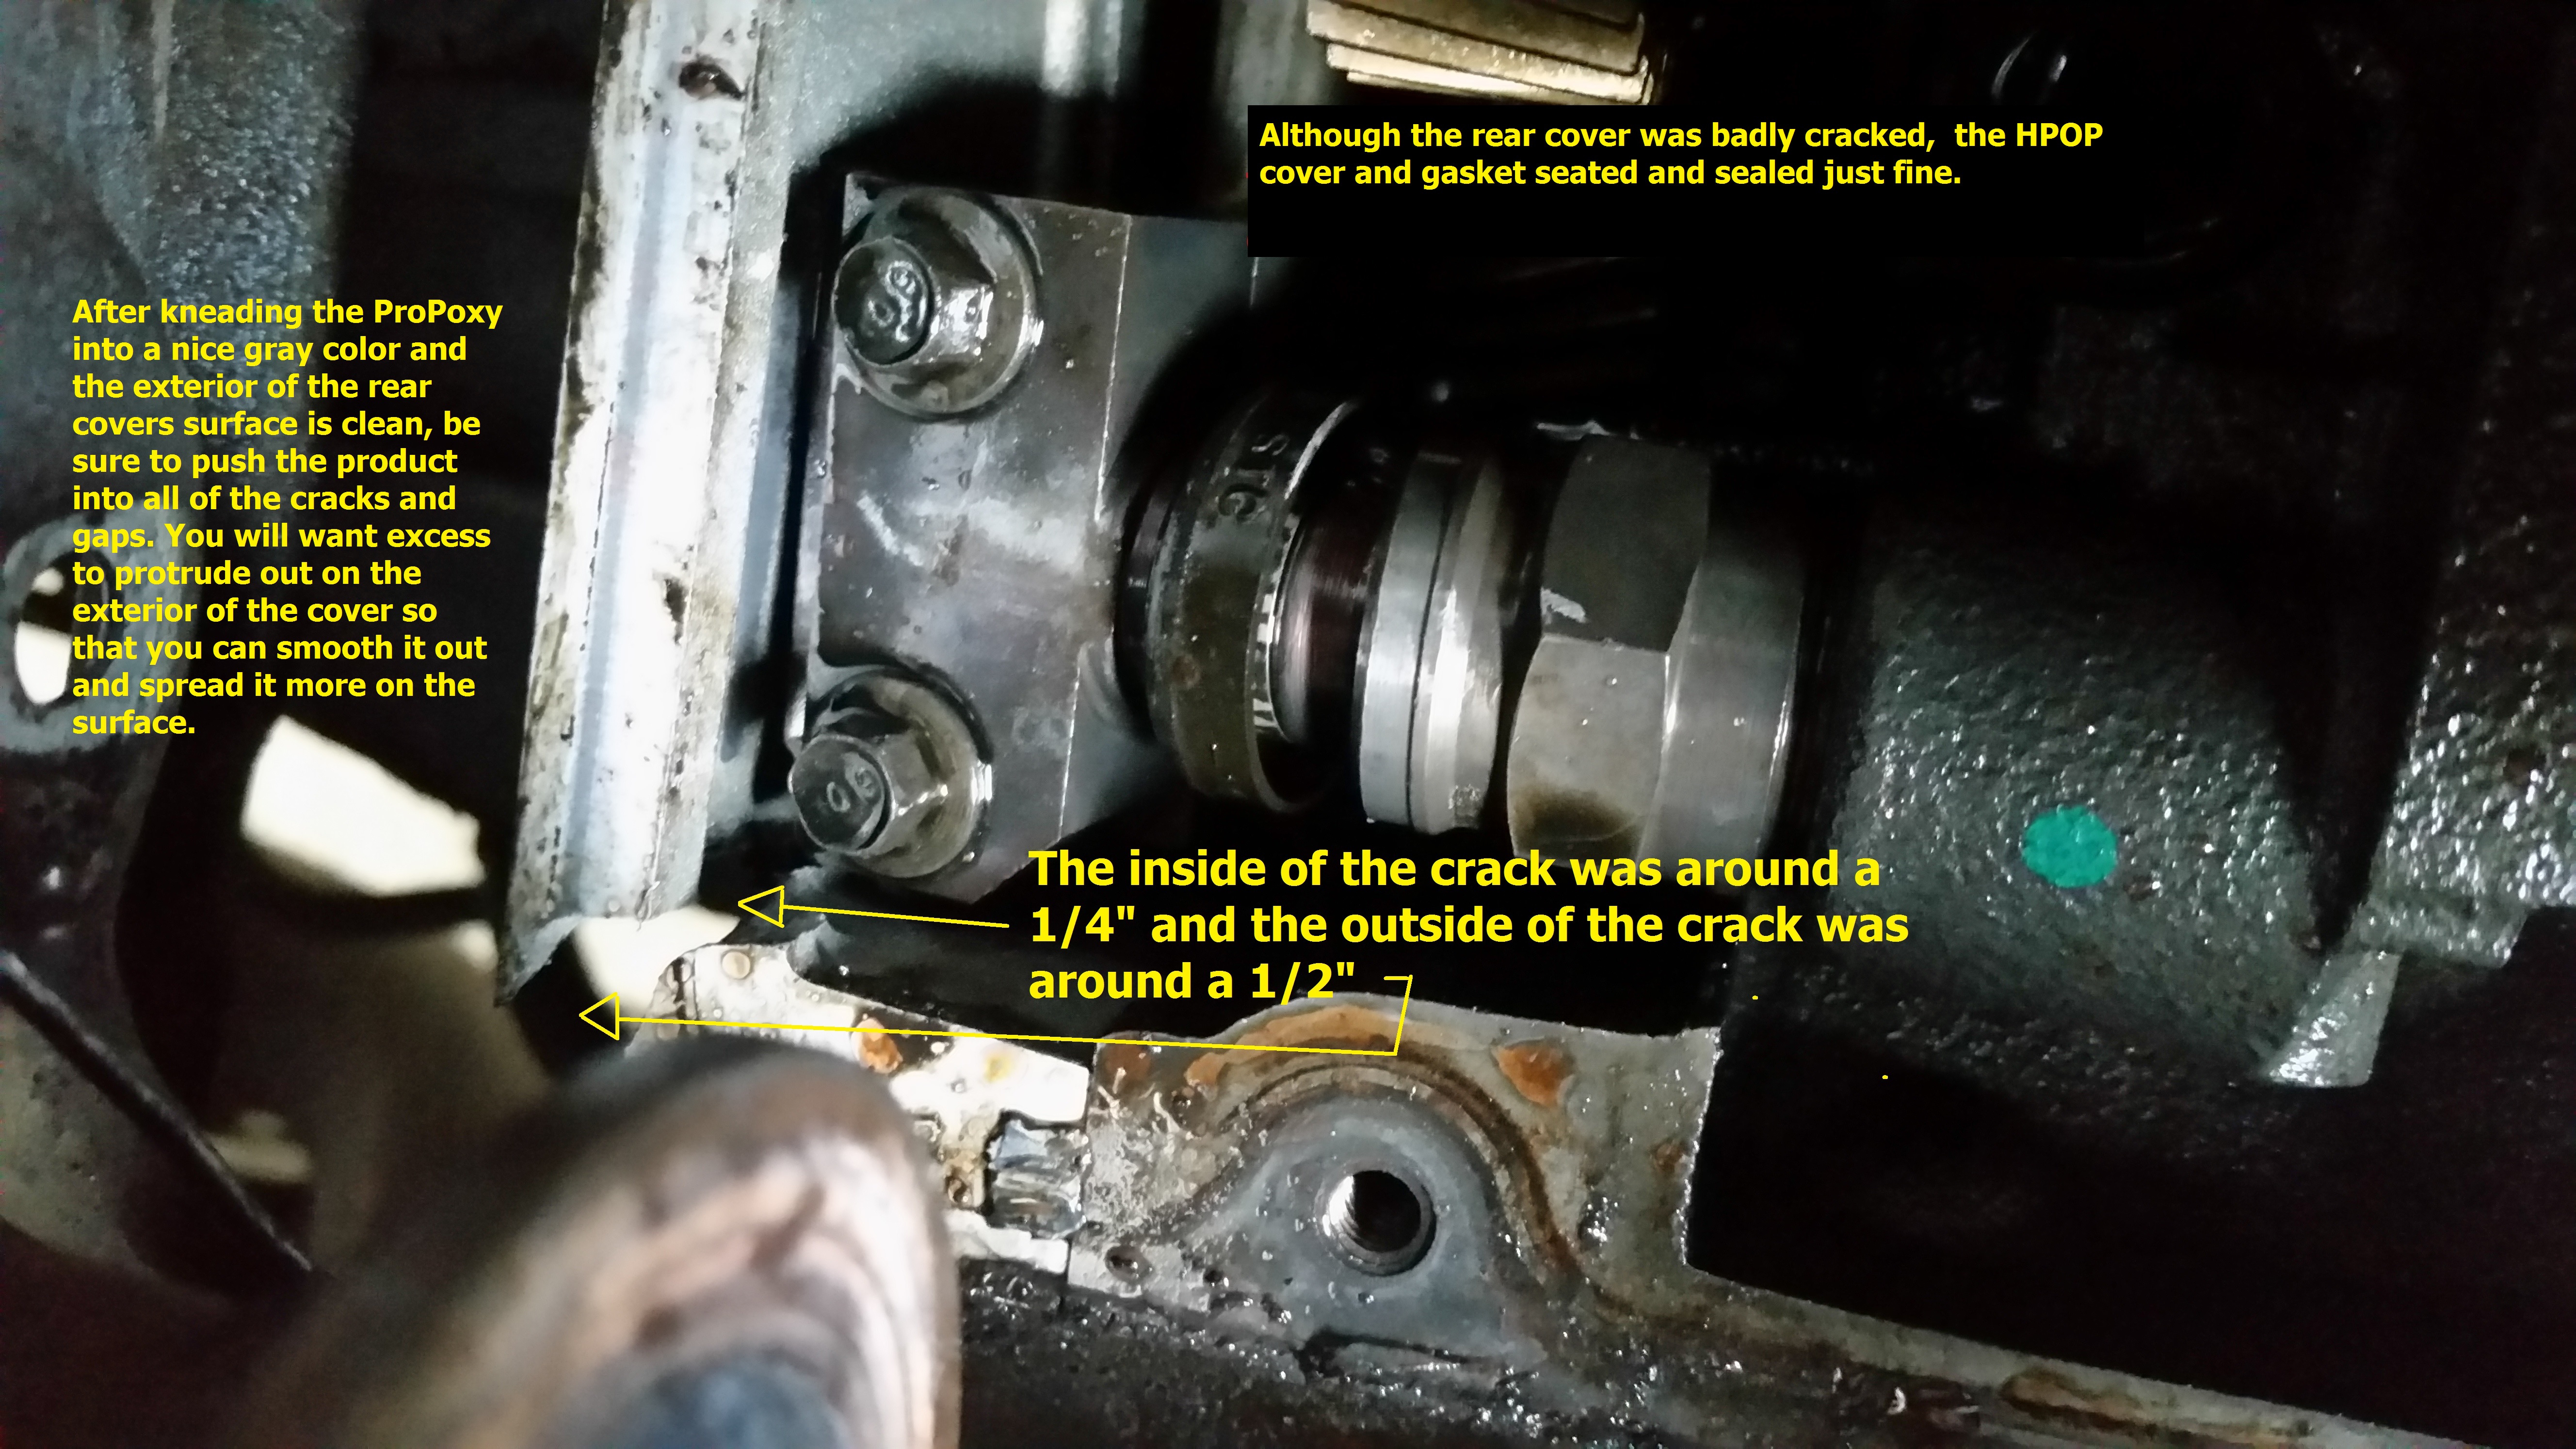
- Follow the directions of the ProPoxy, it tells you how to knead the product and how to push it into the gaps and cracks and hardening time. ( I have attached the product PDF to this thread)
- Re-install all the other parts: HPOP, HPOP Cover, EGR Cooler, Turbo pedestal, Turbo, ect…..
- Make sure to have a hardening period of minimum of 1 hr before starting the truck(This is my own suggestion). This will ensure it has cured.
At this point the ProPoxy is hard and has adhered to the gaps, cracks and rear cover.
Here is the product info and PDF:
ProPoxy.pdf
Here are some pic's with some how to and info:
Another reason I like this product over JB Weld or other products, is :
--It’s a workable putty.
--You can finesse the product with wet fingers to make it spread out in the area your covering.
--Easy to slap on into place in hard to reach places.
--Good up to 300 degrees Fahrenheit.
I thought of using this product for the following reasons:
-- I had seen this exact product used on Deadliest Catch when they had to repair an oil leak from one of the ships diesel engines, and it worked.
-- I sell it at my work, so I had time to really research the product and it was easy for me to obtain.
--The specs on application is exactly what I was needing for my problem with my truck.
I know that there were not a lot of pictures with this thread, like my STC repair thread, but I hope it is still clear and concise on how to use the product in this type of situation.
So far I have over 2,500 miles on the truck since repair. I just did a 220 mile trip where my EOT got up to 220 degrees at some points on the hot drive.
I have NO leaks coming from the rear cover. I would say that my fix has worked.
Thanks - Preston
#2
05-24-2017, 06:18 AM
#3
05-24-2017, 06:26 AM
#4
05-24-2017, 07:44 AM
Postmaster
#5
05-24-2017, 08:36 AM


Mike, coming from a pro friction material life, I've used epoxies to bond segments to shoes as well. So your industry approved. 
Preston, good write up.
Hercules is a very good epoxy company. Not only are there different versions of epoxy for cure time, reinforcement (this uses steel powder), flexibility, compatibility, but strength as well.
As you stated, this is a good one. The other very good aspect for this one other then temperature range is it's strength, well above what JB Weld provides to consumers. There are a few people out there that are allergic to Bisphenol-A from a skin rash and respiratory reaction, so gloves and respirator may be needed.
Epoxy bonds tightly to aluminum with its oxygen bond, so it's REALY good here.
The tech data
https://api.ferguson.com/dar-step-se...ODUCT_ID=22766
It's easy to find the MDS.
https://www.metpipe.com/wp-content/m..._propoxy20.pdf
Again, good job Preston.
#6
05-24-2017, 09:29 AM
Join Date: Apr 2015
Location: Yakistan, WA
Posts: 1,817
Likes: 0
Received 0 Likes
on
0 Posts

#7
05-24-2017, 09:33 AM
Trending Topics
#8
05-24-2017, 10:55 AM

#9
05-24-2017, 04:30 PM
Join Date: Apr 2015
Location: Yakistan, WA
Posts: 1,817
Likes: 0
Received 0 Likes
on
0 Posts
Fabulous addition to your other thread Preston!!! 

Very glad you shared this fix as I bet it will help many folks that end up with the same condition you did...
So the branch tubes just flexed back into position? Or is that another thread how you did that...!? (just Kidding)
Scott
Very glad you shared this fix as I bet it will help many folks that end up with the same condition you did...
So the branch tubes just flexed back into position? Or is that another thread how you did that...!?
(just Kidding)Scott
#11
05-25-2017, 11:13 PM
Join Date: Apr 2015
Location: Yakistan, WA
Posts: 1,817
Likes: 0
Received 0 Likes
on
0 Posts
Funny thing. I have been searching on the Internet for a while now. I can't find much of anything in regards to other people who have done this type of fix.
I was trying to find longivity of the fix like this.
I have found people who have tried it my way, but still have the stc oring blow out every time.
But I learned my lesson on that. That's why tighten the heck outta those bolt on the stc continuously while pulling on the HPOP
I was trying to find longivity of the fix like this.
I have found people who have tried it my way, but still have the stc oring blow out every time.
But I learned my lesson on that. That's why tighten the heck outta those bolt on the stc continuously while pulling on the HPOP
#12
05-26-2017, 07:40 AM
Postmaster
Funny thing. I have been searching on the Internet for a while now. I can't find much of anything in regards to other people who have done this type of fix.
I was trying to find longivity of the fix like this.
I have found people who have tried it my way, but still have the stc oring blow out every time.
But I learned my lesson on that. That's why tighten the heck outta those bolt on the stc continuously while pulling on the HPOP
I was trying to find longivity of the fix like this.
I have found people who have tried it my way, but still have the stc oring blow out every time.
But I learned my lesson on that. That's why tighten the heck outta those bolt on the stc continuously while pulling on the HPOP
A......because they are not sure it's going to work
B......there are always the guys that will say "that won't work, it's goona fail, bla bla bla" so they don't post something on a forum for fear of being called to the carpet.
#13
05-26-2017, 11:05 AM
I would dare bet there are those that do a fix like this and don't post the results.
A......because they are not sure it's going to work
B......there are always the guys that will say "that won't work, it's goona fail, bla bla bla" so they don't post something on a forum for fear of being called to the carpet.
A......because they are not sure it's going to work
B......there are always the guys that will say "that won't work, it's goona fail, bla bla bla" so they don't post something on a forum for fear of being called to the carpet.
 .
.Hi, my name is Scott, and I have used epoxy fixes on automotive and motorcycle applications (with success)...

And the group sitting in the fold up chairs in front say: "welcome Scott"...
#15
05-26-2017, 02:53 PM
Join Date: Apr 2015
Location: Yakistan, WA
Posts: 1,817
Likes: 0
Received 0 Likes
on
0 Posts
I would dare bet there are those that do a fix like this and don't post the results.
A......because they are not sure it's going to work
B......there are always the guys that will say "that won't work, it's goona fail, bla bla bla" so they don't post something on a forum for fear of being called to the carpet.
A......because they are not sure it's going to work
B......there are always the guys that will say "that won't work, it's goona fail, bla bla bla" so they don't post something on a forum for fear of being called to the carpet.
This is reason I didn't say anything at first.
And that is too bad... I wonder if there is a wrench even out there that can honestly say they have never fab'd up a fix, even if just a temporary one. So what if Preston's repair lasts only 5 thousand miles? He can pull the trans or engine and do the cover then, and do what these naysayers would say is: "the proper repair" -- or hey, maybe he'll use some more epoxy! .
Hi, my name is Scott, and I have used epoxy fixes on automotive and motorcycle applications (with success)...
And the group sitting in the fold up chairs in front say: "welcome Scott"...
.Hi, my name is Scott, and I have used epoxy fixes on automotive and motorcycle applications (with success)...
And the group sitting in the fold up chairs in front say: "welcome Scott"...
LOLThanks for the support guys.