80s 138WB interior framing measurement?
#1
 04-25-2017, 11:45 PM

80s 138WB interior framing measurement?
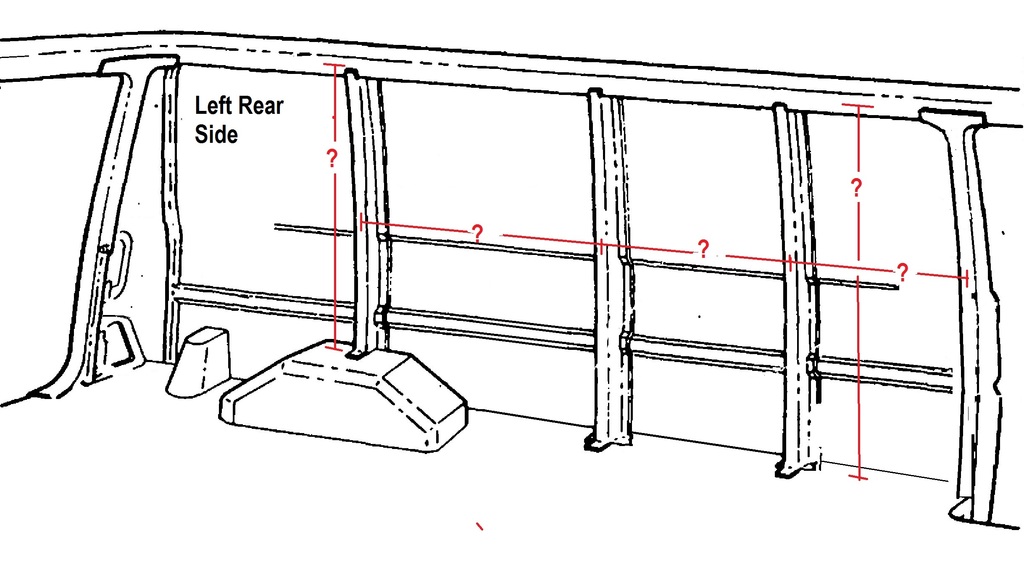
I want to add some overhead storage and don't want to have to remove the finished interior on my 1988 e150 138WB conversion van. If anyone has a cargo van or knows what the measurements between the vertical supports and would share that information,,, that would be wonderful!
This is a pic from a 86 I found. If I knew the measurements from the center of the rear wheel box brace forward I could find the others
Thanks

here is where I need the measurements

This is a pic from a 86 I found. If I knew the measurements from the center of the rear wheel box brace forward I could find the others
Thanks

here is where I need the measurements


#2
04-28-2017, 12:17 AM

Senior User
Join Date: Aug 2013
Location: Bay Area
Posts: 212
Likes: 0
Received 0 Likes
on
0 Posts
I can get those for you tomorrow after I verify my '89 is 138wb. That is the standard van right? Either way I'll check it out.
P.S. I wish I had your skills locating pics/info on the web. I literally waste hours looking for stuff, mostly unsuccessfully.
I'm working on my son's '90 E150 and can't even see where the computer is and how to match it up when I do find/pull it. I've read a hundred pages of posts going back years, lol.
Anyway, making myself a note for the a.m.
#3
04-28-2017, 05:20 AM
Thanks VannerDude!
Well I have had little success in finding information on removing the EEC. The connector is under the blower fan motor housing. Specifically the AC evaporator housing. I took my connector off last summer when I was replacing the evaporator. I forgot just why I had to remove the connector.. I wish I would have taken some pics...
I can tell you that it is mounted horizontal and the there is a bolt in the middle of the connector and it does not come out of the connector. As you loosen the bolt, it backs the connector off of the eec. Maybe a better way to say is is that it pulls the connector off of the eec pins as you back the bolt out.
The actual eec is inside the cab on the passenger side under the heater housing. I have never actually seen mine as I haven't been in there yet. I do remember with the connector off from the outside, the eec was still firmly mounted to the firewall. I am guessing it is bolted on from the inside.
I don't know if you found this thread but it says you can get to it without removing the blower housing. The bolt is circled in green. I was thinking one might be able to reach it if they had the dog house cover off but again I don't know for sure... Removing the eec on our vans seems to be a well guarded secrete.. I could not find anything in my manual about removing it
https://www.ford-trucks.com/forums/1...l#post13319527
Here is something else that might help though the blower housing seems to be a bit different from my 88 but the connector is in the general location. Maybe one of those inspection mirrors and a good light will help you find the connector.?

#4
04-28-2017, 10:30 AM
Senior User
Join Date: Aug 2013
Location: Bay Area
Posts: 212
Likes: 0
Received 0 Likes
on
0 Posts
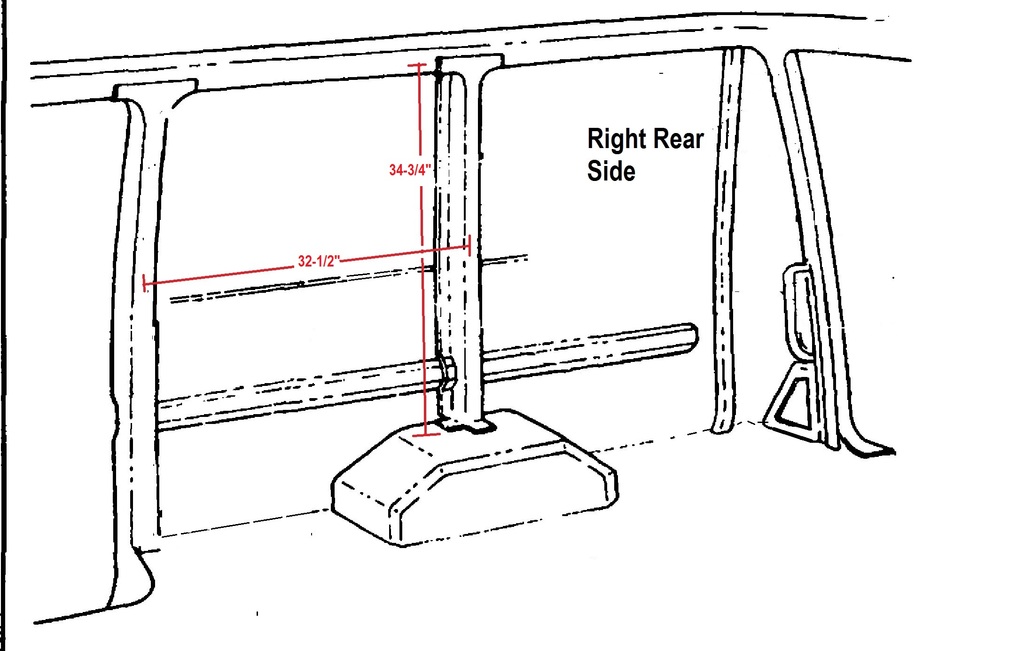
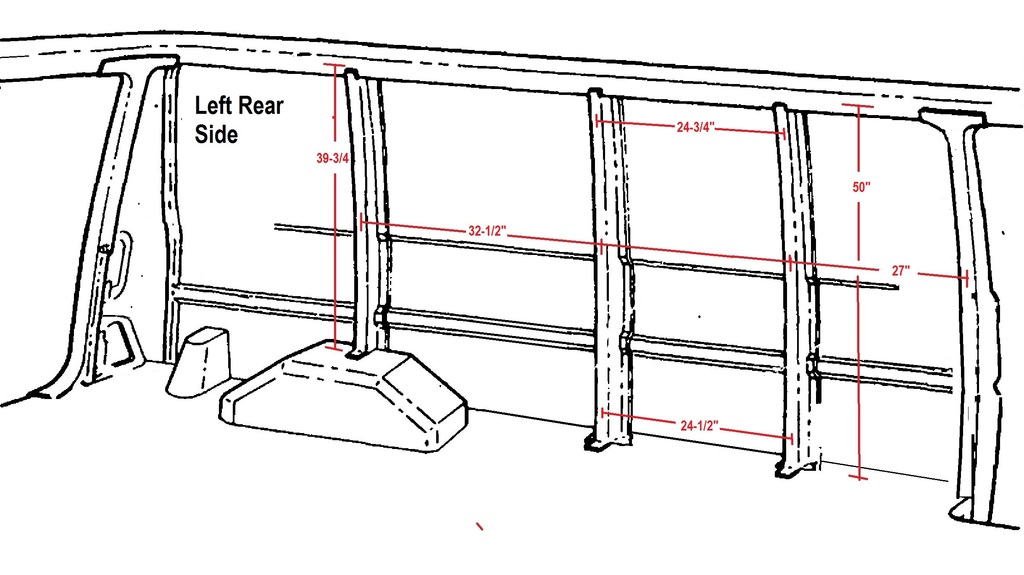
Ok. Per your drawing. Verticals were measured exactly as the arrows represent, above the spot welds at top edge of rib. Horizontals, center to center. From confirmed 138" wheelbase.
Right Rear vertical is 39-3/4"
R.R. Horizontal is 32-1/2"
Left, from back, forward:
L.R. Vertical is 39-3/4"
L.R. 1st space is 32-1/2" Center to center.
L.R. 2nd space is 24-1/2" @ bottom, 24-3/4" @ top
L.R 3rd space is 27" The last pillar I measured from center of pillar forward to where original screws are installed for trim/seatbelt reel cover.
Edit 9:00 a.m. Oops, just went back... last Left vertical at front is 50", I pulled my old paneling and insulation to be sure, lol.
Hope that helps. And thanks, you confirmed the computer location.
#5
04-28-2017, 11:49 AM
Thank you so much for taking the time to do the measurements VannerDude.
Now I just need to figure out a good way to support the cabinets. Since I have a raised roof, I don't know what is above the headliner. I know most all or the interior panels are 1/4 paneling with wrapped with cloth or vinyl and much of the trim is just screwed through the 1/4 paneling. I will work that out though!
Your description of the measurements are great but just to make sure I got it right, here they are on the drawing. If you didn't give me the vertical height on the pillar right behind the drivers seat, that is ok because I can just add the wheel box height from the floor. I have carpet over plywood on the floor so the height would not be the same anyway.
Again thanks!
The cabinets will be above the window valance and that wasted drop down space at the rear of the van. There is also a drop down area over the front seats I will turn into storage.
Now I just need to figure out a good way to support the cabinets. Since I have a raised roof, I don't know what is above the headliner. I know most all or the interior panels are 1/4 paneling with wrapped with cloth or vinyl and much of the trim is just screwed through the 1/4 paneling. I will work that out though!
Your description of the measurements are great but just to make sure I got it right, here they are on the drawing. If you didn't give me the vertical height on the pillar right behind the drivers seat, that is ok because I can just add the wheel box height from the floor. I have carpet over plywood on the floor so the height would not be the same anyway.
Again thanks!


The cabinets will be above the window valance and that wasted drop down space at the rear of the van. There is also a drop down area over the front seats I will turn into storage.

#6
04-28-2017, 02:32 PM
Senior User
Join Date: Aug 2013
Location: Bay Area
Posts: 212
Likes: 0
Received 0 Likes
on
0 Posts
#7
04-28-2017, 08:44 PM
I hope the sagging gate wasn't too involved. We have a couple out in the pasture fence that are in need of repair..
One good turn deserves another...
I think the 1990 is the same as the 88 so here are pics of where the EEC is from the inside.
This is the passenger side foot area at the front seat.
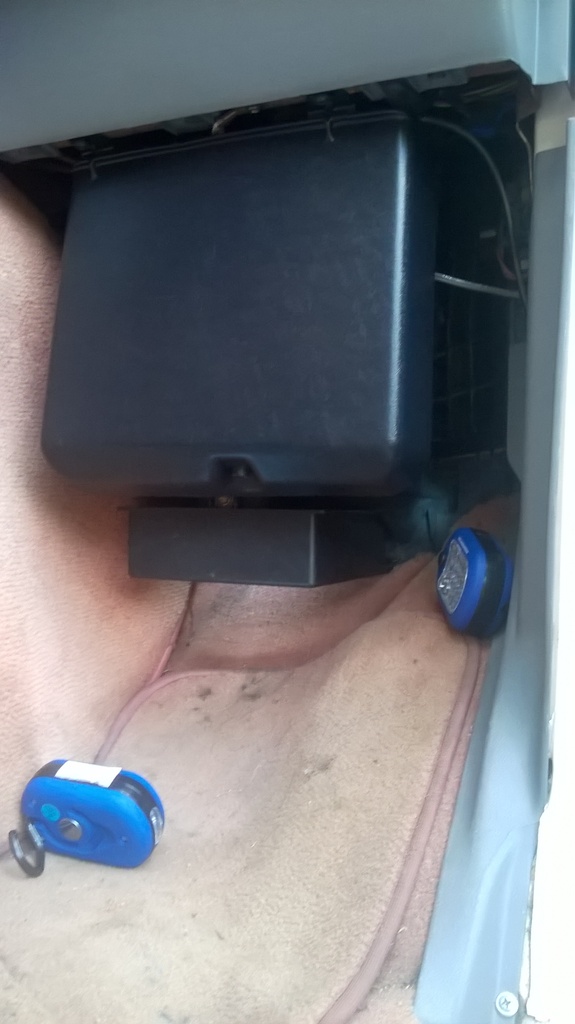
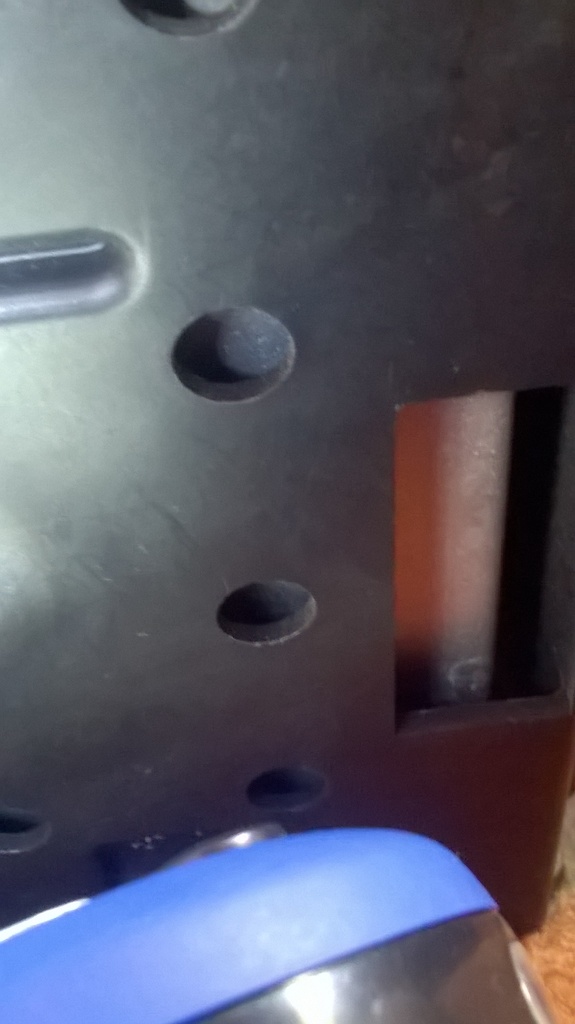
The upper plastic trim cover comes off but the one you are concerned with is the small lower one that covers the EEC. That shiny terminal is probably the ground screw for the EEC
This is the bottom side of that smaller cover and I believe the nut/bolt on the rt side holds the cover on. The again it may not but I didn't dig into it. that cover may just clip on or have a smaller screw. I was able to pull down on the front but didnt want to pull too hard and break soemething . Because of the carpet I could not see the nut/bolt on the lft side but I would bet there is another one there...
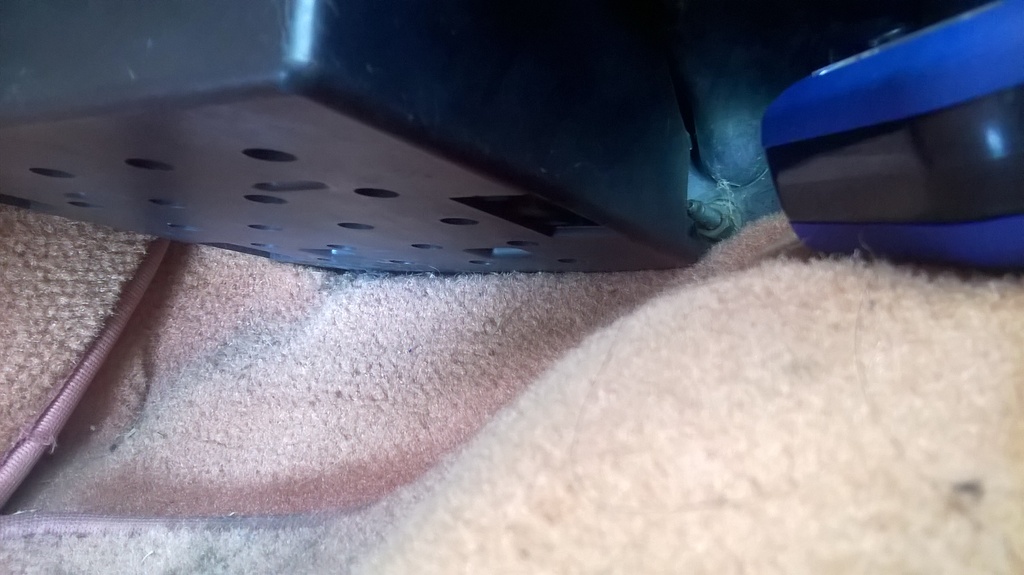
And through the little holes in the bottom of the plastic cover you can see part of the EEC
Now in my earlier post I mentioned that I took the EEC connector off when I changed out the AC evaporator. I also gave you a link that showed how to access the bolt that holds the connector on... BUT I am thinking now,,, when you remove the two bolts on each side of the eec,,, maybe, just maybe there would be enough space and slack on the EEC connector harness to pull it inside the cab and unbolt it... This I am not sure about because I don't remember how the harness went into the connector... I wasn't removing the EEC, only the connector. Worse case you would have to bolt it back and loosen the harness connector from outside under the blower fan then come back in and unbolt it again.. When you do take it out,, take a couple of pics or at least let us know the secrete to this job!!!!
Hope the pics help...
One good turn deserves another...
I think the 1990 is the same as the 88 so here are pics of where the EEC is from the inside.
This is the passenger side foot area at the front seat.

The upper plastic trim cover comes off but the one you are concerned with is the small lower one that covers the EEC. That shiny terminal is probably the ground screw for the EEC
This is the bottom side of that smaller cover and I believe the nut/bolt on the rt side holds the cover on. The again it may not but I didn't dig into it. that cover may just clip on or have a smaller screw. I was able to pull down on the front but didnt want to pull too hard and break soemething . Because of the carpet I could not see the nut/bolt on the lft side but I would bet there is another one there...

And through the little holes in the bottom of the plastic cover you can see part of the EEC

Now in my earlier post I mentioned that I took the EEC connector off when I changed out the AC evaporator. I also gave you a link that showed how to access the bolt that holds the connector on... BUT I am thinking now,,, when you remove the two bolts on each side of the eec,,, maybe, just maybe there would be enough space and slack on the EEC connector harness to pull it inside the cab and unbolt it... This I am not sure about because I don't remember how the harness went into the connector... I wasn't removing the EEC, only the connector. Worse case you would have to bolt it back and loosen the harness connector from outside under the blower fan then come back in and unbolt it again.. When you do take it out,, take a couple of pics or at least let us know the secrete to this job!!!!
Hope the pics help...
Trending Topics
#8
04-29-2017, 09:47 AM
Senior User
Join Date: Aug 2013
Location: Bay Area
Posts: 212
Likes: 0
Received 0 Likes
on
0 Posts
#9
04-30-2017, 02:06 PM
Senior User
Join Date: Aug 2013
Location: Bay Area
Posts: 212
Likes: 0
Received 0 Likes
on
0 Posts
OK Mom went home and we only had one minor incident, lol. She suddenly jumped up off the couch choking on her own saliva apparently? I applied the Heimlich several times and she recovered.
Anyway, ALeigh, as it turns out a 10mm socket on a long extension and a swivel head turns it right out. I had already pulled one screw only from inside the cab. After loosening the 10mm, I went back inside, gave a little wiggle and the computer casing plopped right into my hand.
It has a plastic case cover that you just pry off to get at the metal computer case. It has 4 #10 star screws on top & 4 more #10 stars on the bottom. At the front of the case it has 2 #15 star screws. Once open, the circuit board has six #10 star screws to remove. When that is done, lift the circuit board straight off, grasping it near the plug in end.
It's kind of comical that the case has a tape seal on the front & bottom that reads, 'Warranty item, do not open'. Comical because after you remove all the screws the top just flips off and open, still connected to the tape seal. Ford has a better idea, lol. There are none of the typical painted over screws to show it's been opened.
Now I need to find the thread about capacitor replacement before I get into it. I find three round blue capacitors. I don't see any obvious swelling but do see some syrup at the bottom of each capacitor. I pushed a Qtip against the pins and it came away with a small spot each time. I guess that would be considered leaking?
#10
04-30-2017, 03:53 PM
Elder User
Join Date: Nov 2015
Location: Bedford, Va
Posts: 545
Likes: 0
Received 0 Likes
on
0 Posts

Thread
Thread Starter
Forum
Replies
Last Post
dziwei
1968-Present E-Series Van/Cutaway/Chassis
2
06-28-2017 11:43 AM
pjlandry
1968-Present E-Series Van/Cutaway/Chassis
2
06-17-2007 04:50 PM