When you click on links to various merchants on this site and make a purchase, this can result in this site earning a commission. Affiliate programs and affiliations include, but are not limited to, the eBay Partner Network.
I agree - nicely done & I like it FrankGRUN. I didn't know that level of customization was available through Speed Hut - but then again I had never looked to be honest. Sounds like some great capabilities though!
Where did you find the "idiot" lights for the fan symbol, etc.? I've been able to find some versions, but not all of the ones I really want.
ChaseTruck 754, I too was amazed by the customization support at Speedhut. In fact, to illustrate the point, in 2010, I purchased one of their 2-1/16" clocks with a basic black/white face, and unlit pointer. Later for this project in 2017, I had purchased the gauges you see in the photos but now with yellow on black faces, illuminated racer red pointers, etc. I decided to reuse the clock in this gauge setup and contacted Speedhut to see if they could convert the gauge of the clock to match the newly purchased set. The answer was $15 and 1 week please!
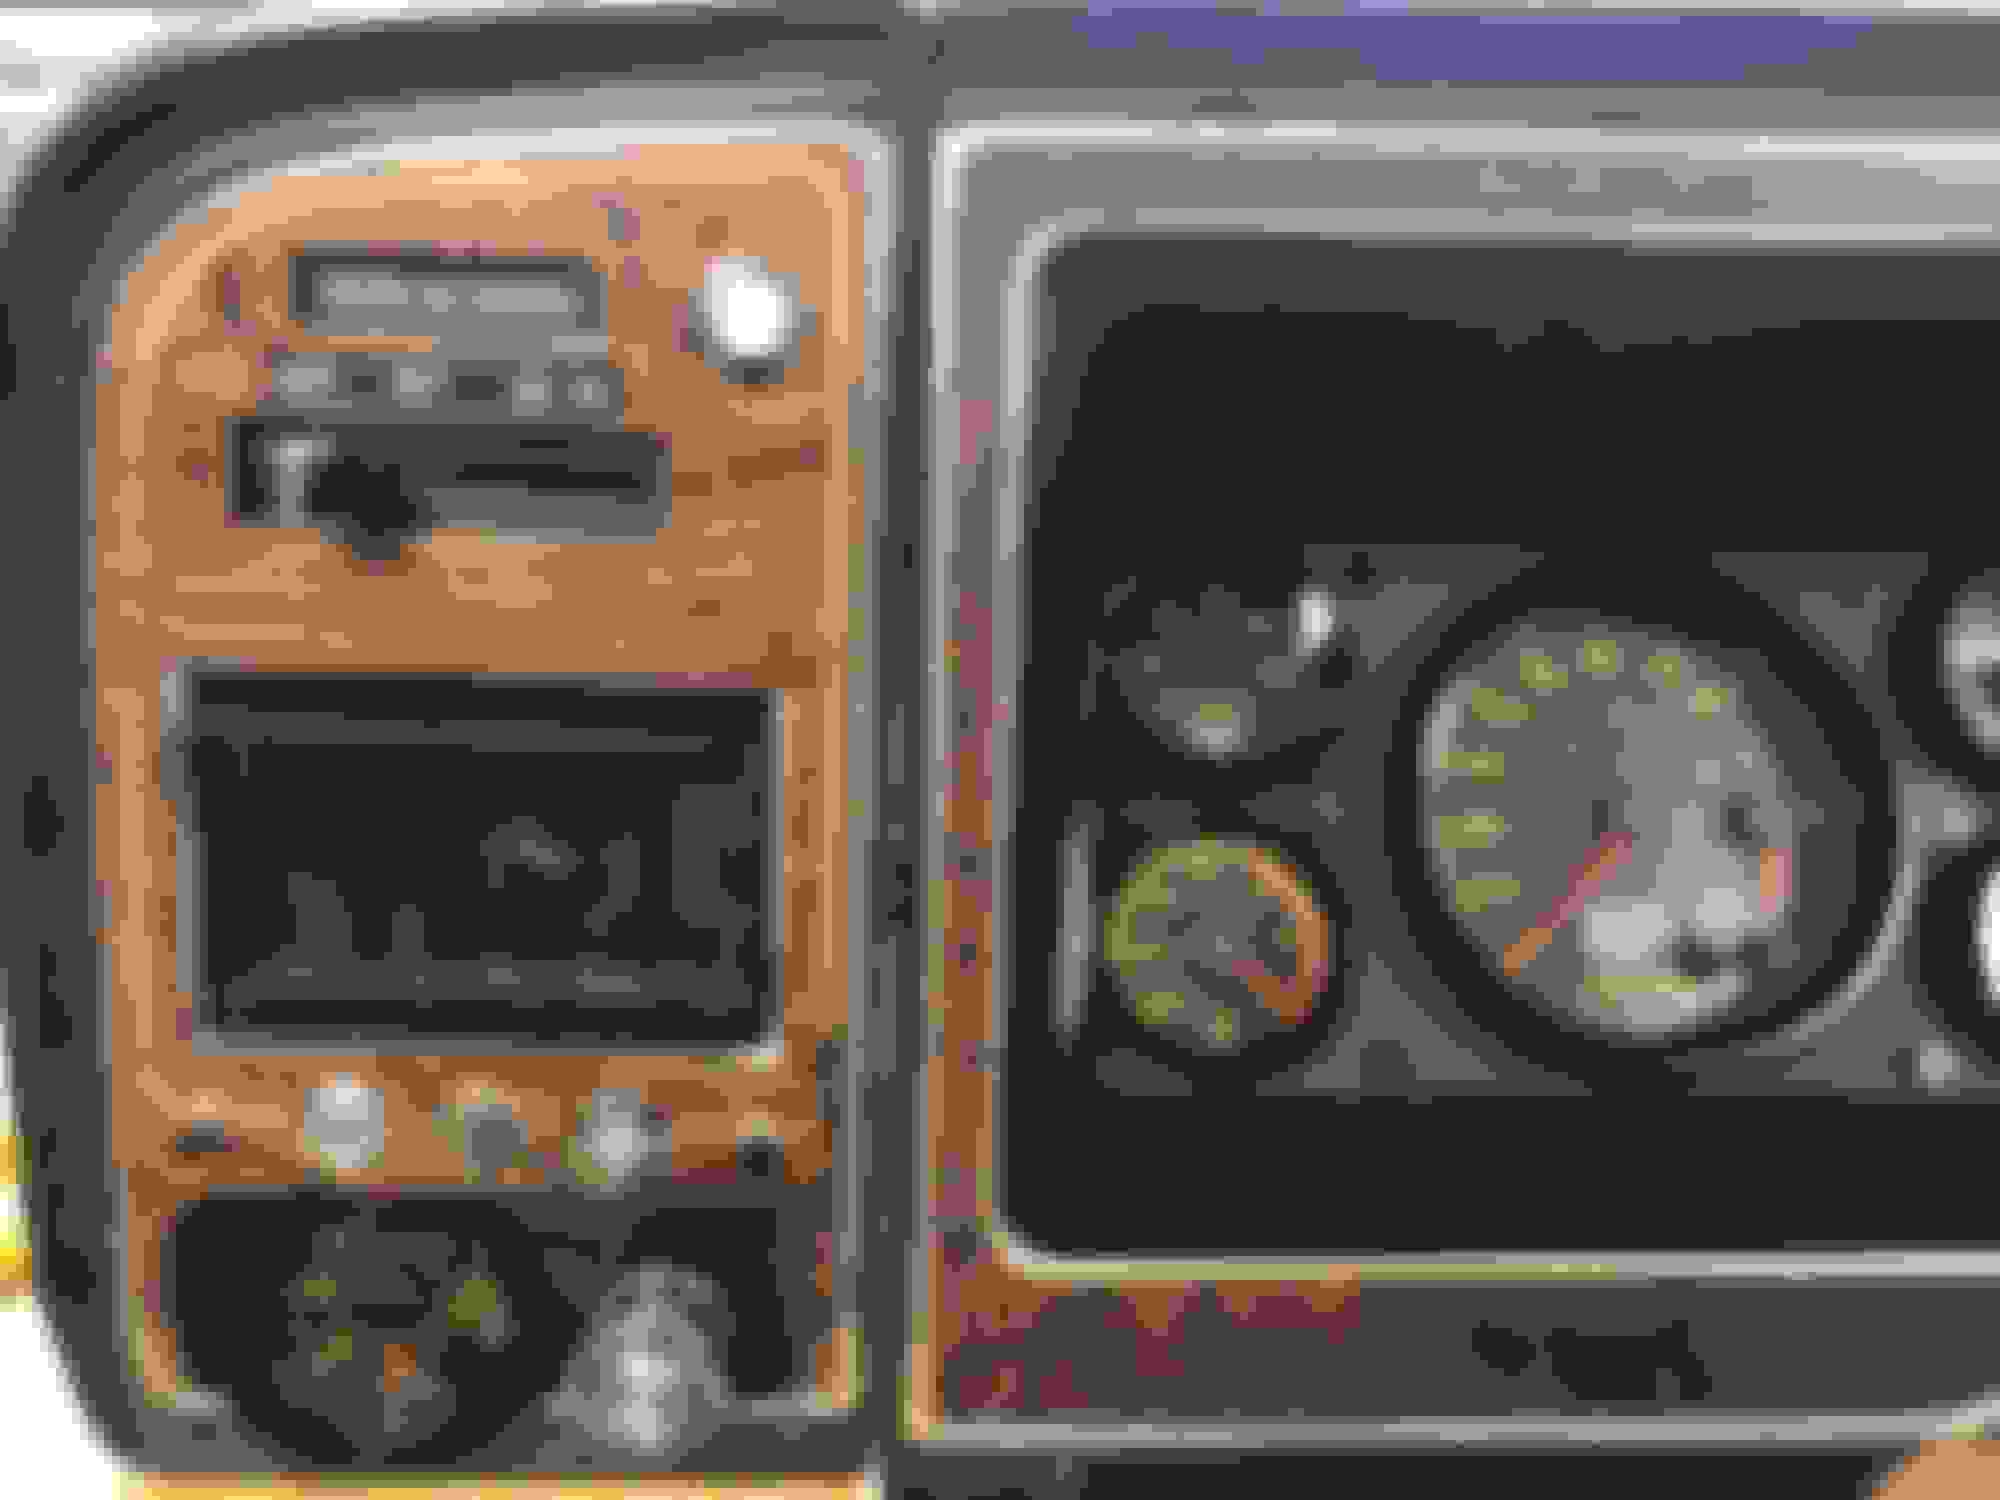
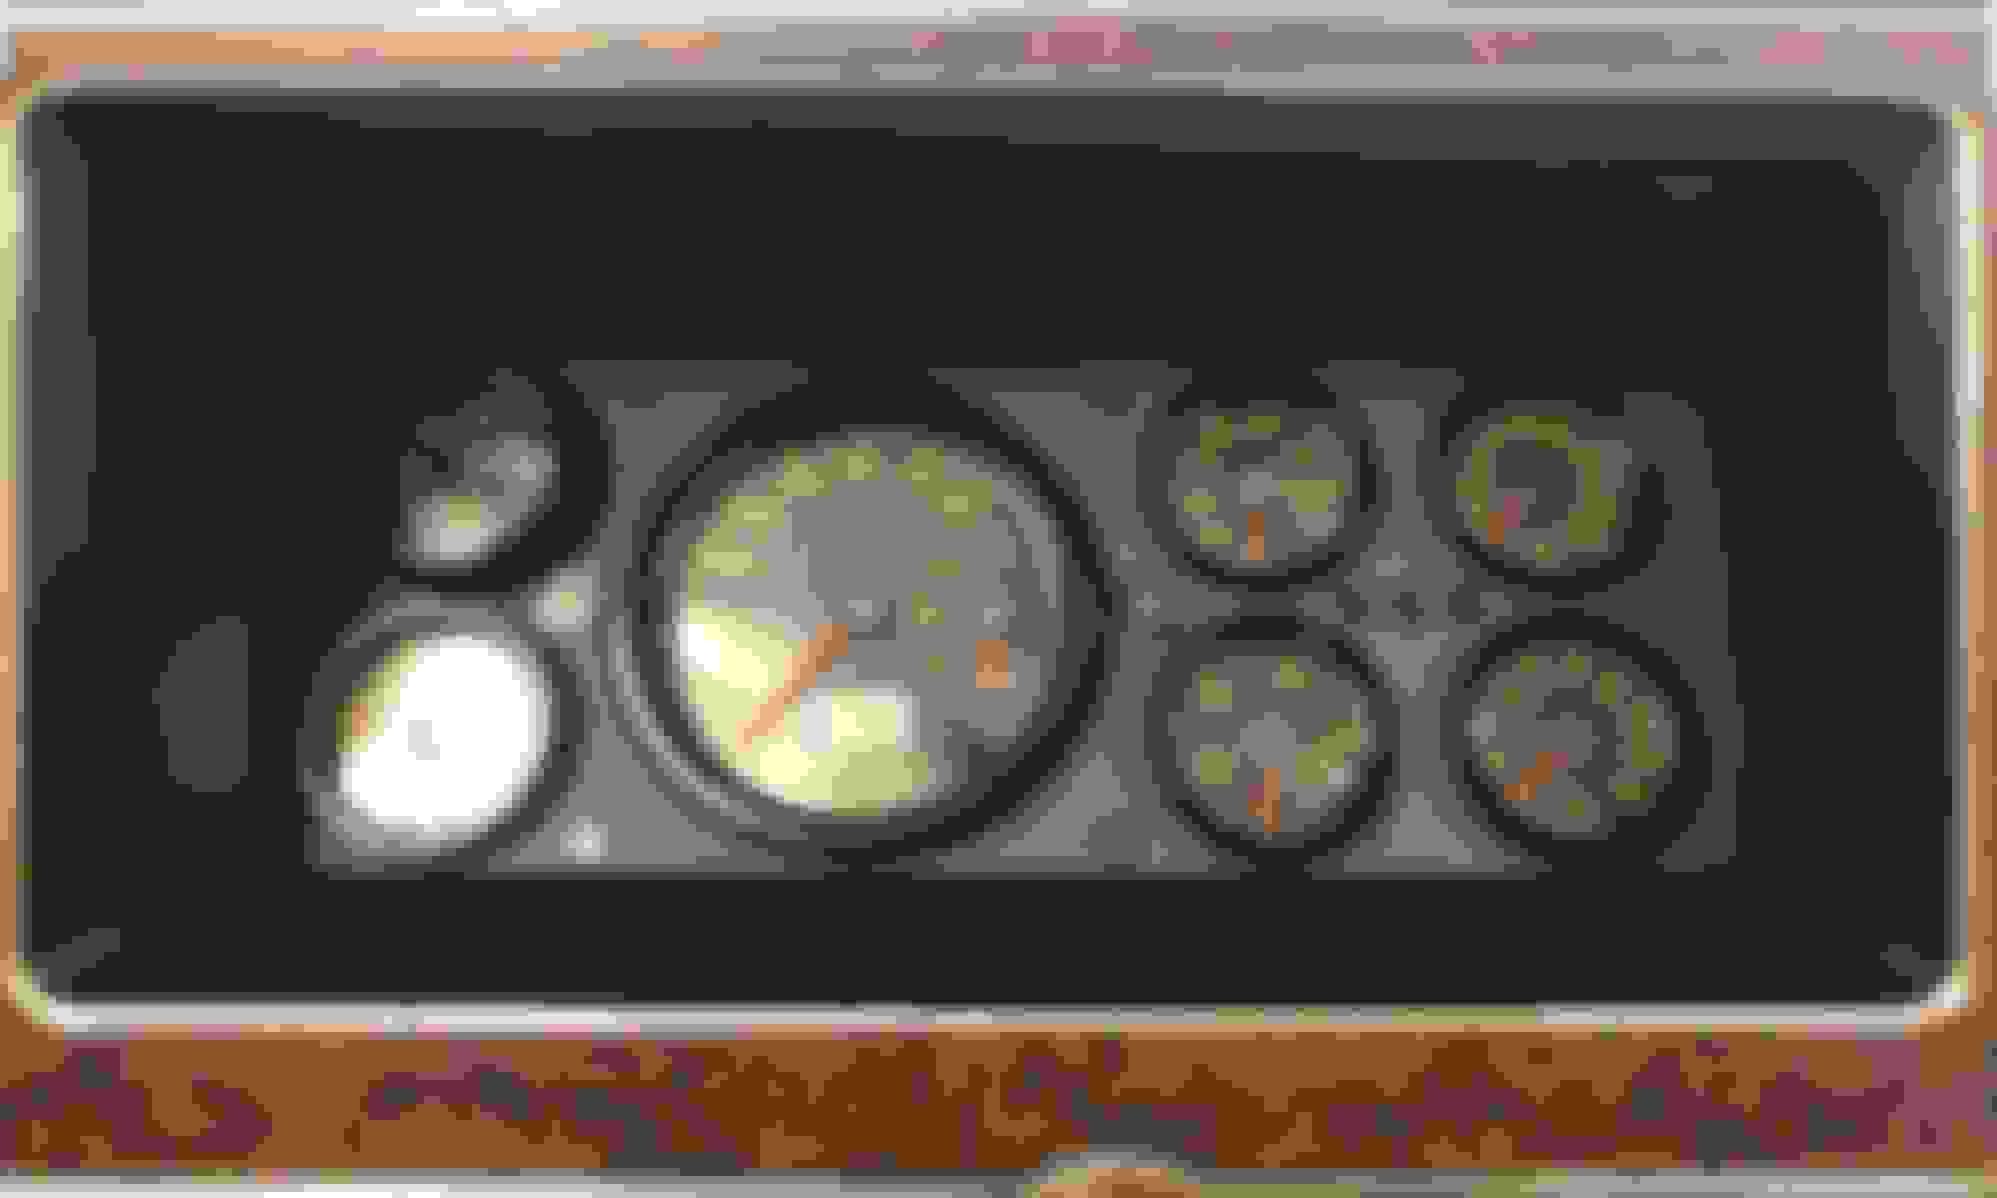
As per your question about the faces of the 8 mm LED dash pilot lights, I found them all on eBay! I'm posting two more photos to show the final build that gets installed at the end of the month. Here you see that on the main instrument cluster, I've actually added 7-8mm dash pilot lights and two 14mm pilot lights. Searching through eBay, I found several suppliers all selling the 8mm LED pilot lights with up to 20 different symbols. It turns out that these black 8mm pilot lights consisted of two parts - a face unit with a particular symbol (i've used the bulb, front fog light, driving light, fan or blower, battery, O/D Off, and an exclamation point) and a colored LED that screwed into the rear of the face unit. To get the colors I wanted, I ordered along with the face units I wanted, several other lights that had the color I wanted. But to understand my scheme, you have to examine the accompanying picture of the left side bezel of the dash which originally held the windshield wiper switch, the fresh air vent and headlight switch. Using one momentary lighted pushbutton switch (with the horn symbol) and three latching LED lighted push button switches ( the bulb symbol, the front fog light symbol and the power on/off symbol) I have a tight but very accessible control array. To either side of the set of three lighted switches I added a black unlighted momentary switch, and I also added a Speedhut fuel level gauge to monitor the LPG level in the motorhome's propane tank.
Headlight/wiper control bezel with switch array and custom instrument cluster.
As to functionality, going from left to right on the set of 5 switches in a horizontal line, the first black pushbutton switch controls the calibration of the Speedhut LPG gauge; the bulb symboled switch (glows blue when on) controls my driving lights, the power symbol switch (glows red when on), controls the emergency thermal override capability of the radiator electric fan controller turning the fans on at full speed until the switch is turned off; the front fog light symbol switch (glows green), controls my fog lights on the front of the motorhome. The rightmost black pushbutton switch controls the mute function for my Uniden DFR7 radar detector. Lastly, the lighted momentary switch on the upper right corner of this bezel (horn symbol - glows red when on) controls my vacuum operated air horns for intermittent audio comments about other road denizens and their possible stupidity!
On the main instrument cluster, above the speedo/tach on the left is an 8mm bulb symbol LED light that gets lit when I have triggered the driving lights. On the right side on the top, there is a green LED and front fog light symbol that gets triggered on as long as the fog lights are on. The parking break 14.. light (middle of speedo and on the left) triggers on with any brake problems as well as when parking brake is left on. To the right of middle is the 14mm red LED battery light which is wired as an idiot light to indicated when the alternator is to charging. On the bottom left of the speedo, I have a 8mm LED light reading O/D OFF, which I turn on whenever my Gear Vendors overdrive is locked in the normal or non-overdrive mode. On the right bottom, the LED face shows an exclamation point and the LED is bright orange. This pilot light triggers on with any radar signal detection. It blinks with a frequency and intensity that is related to the strength of the radar signal. A slight modification to the Uniden DFR7 radar detector, I already explained the three blower symbol faced lights. All together, with the headlight indicator and the turn signal lights in the speedo/tach cluster and the warning lights embedded the Speedhut Fuel and Temperature gauges, there are 14 signal lights to grab your attention while cruising along!
Sorry for the length, but I wanted to explain the whole package.
Thank you for the info. No need to apologize for being thorough! My post have been known to get pretty long for the same reason. Do you happen to have a link to the idiot lights on ebay, or some info on what you searched to find them? I have done a bit of searching there & come up a bit short on what I wanted. There is a picture of the dash I was doing for my crew cab project a few posts up showing the layout I was doing for that (sadly the truck is for sale so that one will never come to light), which included a bunch of warning lights. I was looking at just using generic, colored lights for some of the symbols I couldn't find but wanted. While this project won't come to light I do have other projects I am looking at this for and the info would be great to have for the future. Plus I'd love to eventually build another dentside & actually do the dash pictured above since I figured most of it out 7 have it all saved in cad!
ChaseTruck754, to find them on eBay, just search on 8mm led dash lights 12V. In any case here is a link to the seller that I have purchased most of these from. As you go through the list of symbols available, you will see that he is sold out of several. With the search you will find other suppliers and often they will have different ones to be sold out and you will find the ones you need. Only one major problem though... These all ship from China or Hong Kong so shipping time is about 4 weeks on average.
Has anybody done a Bumpside into Dentside instrument cluster swap? I tried searching the forum and this is the closest thread i could find. I love the older instruments and they are not too expensive. would love to put one in my 79
Sorry for dragging up an old thread(again) but I found this while searching for new ideas and I thought someone might like to see what I did for our '79 bronco a couple years ago. I wanted to retain more of a stock appearing cluster but with a little more accuracy than the old ones. Cheap ebay lcds with newer Mustang senders for the coolant temp and oil pressure. The pictures don't really do it justice but I was pretty happy with how it turned out. If I was to do it again I would replace the whole cluster with a single panel. The current LCD's aren't bright enough in direct daylight and have too much glare.
Sorry for dragging up an old thread(again) but I found this while searching for new ideas and I thought someone might like to see what I did for our '79 bronco a couple years ago. I wanted to retain more of a stock appearing cluster but with a little more accuracy than the old ones. Cheap ebay lcds with newer Mustang senders for the coolant temp and oil pressure. The pictures don't really do it justice but I was pretty happy with how it turned out. If I was to do it again I would replace the whole cluster with a single panel. The current LCD's aren't bright enough in direct daylight and have too much glare.
I know this is an old thread, but I really like your idea here. I feel like OLEDs would probably fix all the glare issues too...
Considering the fact that this is likely going to need a lot of custom work, would you mind sharing your code and schematics?
I know this is an old thread, but I really like your idea here. I feel like OLEDs would probably fix all the glare issues too...
Considering the fact that this is likely going to need a lot of custom work, would you mind sharing your code and schematics?
I did that a bunch of years ago, the code and schematics are long gone. I used a teensy to drive the display which pulled images from the SD card but I don't remember which one. I designed a daughter board to marry the Teensy with the display. I think all it had a simple voltage divider circuit, a voltage regulator to step VBatt down and the circuits to bridge the two. OLEDs probably would be a better option but at the time I couldn't find any that would cover the whole gauge opening. If you wanted to duplicate it, I used a display similar to this one:
Full panels are so cheap now I wouldn't bother doing individual gauges again. I think it cost me around $40 per gauge, you could buy a cheap hdmi display and use an rpi for less.
Very impressive nonetheless. Teensy is my go to platform of choice, and i like the look of individual gauges. I think the pi and HDMI approach is a little risky because getting a full OS to boot up quickly is a bitch (i worked on infotainment software...)
Hopefully the basic teensy ammeter measurements won't be too much of an RF nightmare
I wish I could be more help but I sold the Bronco shortly after I posted that and I believe the new owner threw all of it away in favor of autometers. I can't blame him, the digital versions were almost useless in direct sunlight. I'm terrible with Inkscape so I rendered each gauge in Blender and copied those files onto the SD card for each Teensy. I think the oil pressure gauge went from 0-100 psi so I rendered 101 pictures, each one with the needle in the appropriate position and the program just called on whichever image corresponded to the pressure read from the sensor. Not the most elegant way but the Teensy had the horsepower and it saved me from figuring out the angles to do just a partial screen refresh. It is fast enough for low refresh gauges but I don't recommend it for something like a tachometer. The Teensy libraries for that display work out of the box so there really isn't that much code to figure out.
Boot time is a concern with RPI but I think they have QT working on it so if you can strip down the kernel to the bare essentials for a project like this then it might not be too bad. If you don't have experience with QT then it probably isn't a good option. I haven't seen another way to do a semi-photo realistic cluster on RPI. Pygame could act as a cluster but I've never seen one that didn't look like an old video game.
If I ever do another one I will probably go with a full panel and run torque or realdash driven by an android source. I like the individual gauges but if you reuse the cluster mask, you can render a background image that is close to the original faces and then have unlimited possibilities. You could have one version that was original and another with all 4 gauges on one side with a map, audio, tach...etc on the other side of the speedo.
If you are sticking with an ammeter, you can use something like below. 5v in, a ground and either analog or pwm out(can't remember which but either one is easy to deal with). The link calls it a battery temperature sensor but it is an inductive current sensor. It has been a while since I researched this but I think Ford made two different ones. One was like 0-250A and the other was -100 to +100A. I'm probably wrong on the values but one was positive only and the other went positive and negative. https://www.tascaparts.com/oem-parts...or-bt4z14b357c
I actually have extensive experience in QT (I worked on SYNC which uses it for the entire front end).
I'll have to refresh my brain on using it with bare metal. I know the Qt folks have it booting quick for cluster applications that they regularly shop around to various OEMs, but I'm lazy and IIRC it requires a static build of Qt which is harder than it looks (and also not kosher with the free license).
Ive never done raw GL but that might be the move here.
QT is beyond my skill level(and budget) so I can't speak to the RPI implementation. There were demos floating around that seemed fluid enough but I never really pursued it. I looked at GL and tizen too but all of those options were too much work to learn or weren't available at the time. If you have the skill then this is a rabbit hole that is easy to fall into. The iteration I posted is probably the most cost/time effective but once you start changing the displays to OLED the costs go up quickly. On the other hand, full panel + software licenses can get out of hand too. I like the Android solution because you can do a soft shutdown and the boot time on restart is pretty low(battery monitoring is a must if you go that route). All the hard work on the frontend has already been done, all you have to do is design the screen and get the input information to the device. If you are sure all you ever want the cluster to be is original appearing then Teensy+OLEDs will probably do it. As soon as I had it done I started thinking about how I could improve it and I quickly realized I couldn't do much more with the limited screen real estate.
I put these in. They are the 1.125" Equus from AZ. Cut a piece of .125" plexi to fit then drilled the holes for the gauges and check engine light. And no I didnt hack up a dash to do it. I had a spare that someone had cut up to add a digital clock to. I can see them just fine at night.
I use my 76 highboy for a plow truck. My battery draw is always a concern. I bought a digital volt gauge for under 14 bucks on the web. 1-1/4” diam. Placed above the headlight switch. Now I always know where my batteries are at. Particularly when our son borrows to plow out. He has a tight spot so has to maneuver a lot with the plow motor working hard. Pulling amps. Was the best thing I’ve done for the the ol girl in a while. As in the guy who has to keep everything running perspective .

 06-07-2018, 04:21 PM