When you click on links to various merchants on this site and make a purchase, this can result in this site earning a commission. Affiliate programs and affiliations include, but are not limited to, the eBay Partner Network.
I will have to look up the exact sizes, but they were some different sizes than what I first thought they were. IIRC the Pos. between batteries is 1 gauge, along with the negatives. There is a 4 gauge, 6 or 8 gauge, and a 2/0 in there somewhere IIRC.
I will check to verify for you, but I want to say those are mighty close to the sizes in there.
Just posting to let you know that you haven't been ignored. I spent over an hour trying to find out following your first post, and came up empty handed for a '99.5 model year that you have.
The problem is, Ford didn't start notating wire gauge size on the circuit diagrams that Ford released to the servicing public until around 2004 or so. And Ford radically changed the wiring in 2002, and changed the engine and transmission in 2003. So while I have three different resources for the charging system on 2000 model years, which would probably be identical to your '99.5, none of those diagrams have any wire gauge notations, like later model year diagrams do.
And it really is hard to tell by looking at the outside of a cable jacket what the actual copper cross section is. Under hood wiring, especially high current carrying battery to starter wiring that passes directly under the exhaust manifold to get to the starter, may have thicker wire jacketing.
You may have to cut whatever original lugs you are trying to replace off in advance, strip the insulation back just a bit, and measure the copper with a drill index, micrometer, or dial caliper... but a drill index would avoid squeezing the stranding into an oval that might betray the actual diameter the copper will snugly fit into.
When you obtain that diameter, cross reference the data you gathered for each connection you are trying to make with a few wire gauge size charts. Compare several, as there is a variance in the reliability of data on the internet, and in the multiple of counselors there might be some wisdom. Once you feel assured that your measured diameters cross to a reliably known given diameter for a gauge size... you're in business.
And please let us know your findings. I've been quite curious what the OEM battery cable gauge size is myself. If I had to guess, I'd say that I don't think there is any 2/0 (two aught, or 00) wiring in the vehicle. The largest I would estimate would be 1/0, but my guess on the battery to battery paralleling connection is actually 2 AWG, based on a 2005 Ford wiring diagram that identifies gauge sizes.
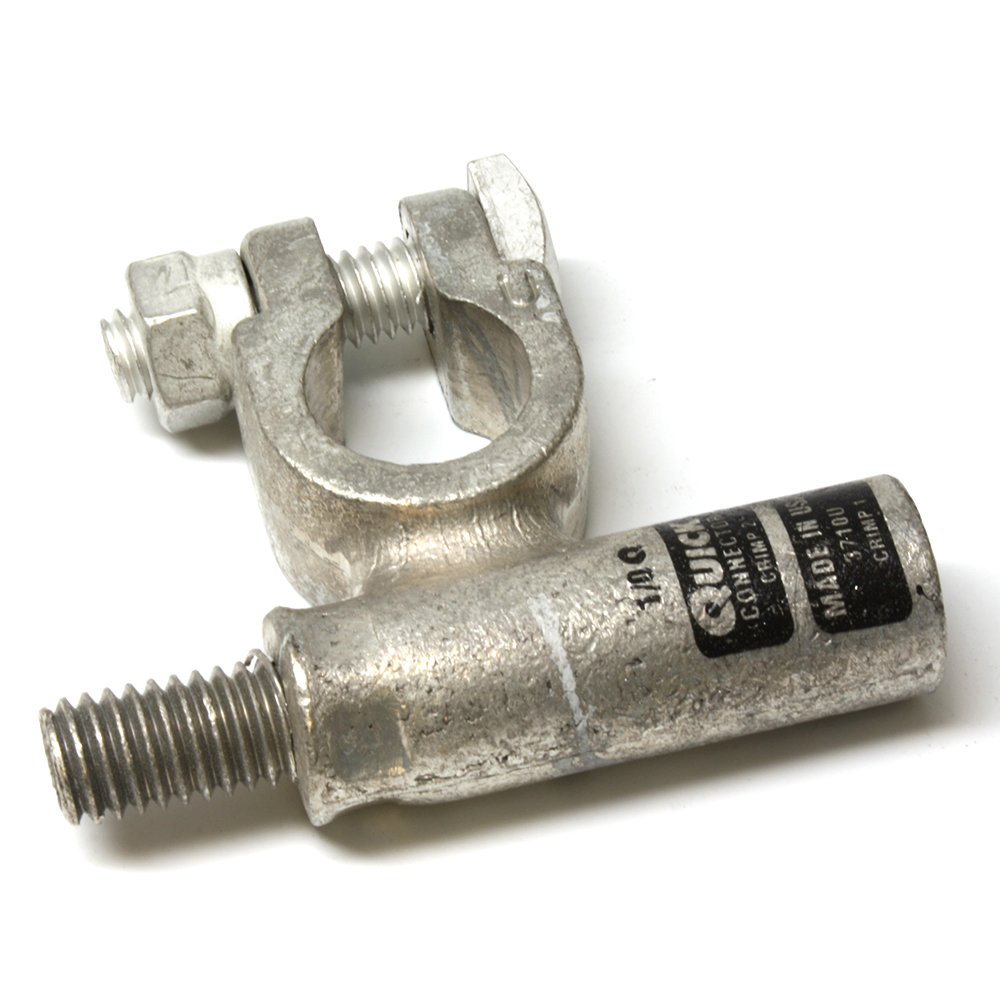
Bakerbuilttracks, here is a pic of the type battery terminal I used,
I ordered them through Remy Battery Company, they are tinned copper alloy with a threaded add on side. Worked out great for me. I went with 4/0 cable from battery to battery and 2/0 Grounds. I had to cut the starter wire battery terminal and trim it down to fit on the 3/8 threaded add-on.
Ed
Knottyrope... thanks for the link to the Deka option.
There must be something going wrong with Ford truck battery cables, because there are so many aftermarket battery cable replacement options specifically for Ford trucks, where the same battery cable vendors do not offer an application specific battery cable for other truck manufacturers like GM or Ram. Just Ford. In fact, the positive battery cable ensemble for Ford Super Duty trucks is among the top three results on my recent eBay search for Ford truck parts, bested only by glow plugs. So replacing the positive battery cable is quite popular... which is no wonder why companys like East Penn (Deka) make them for us.
For those lucky enough to find nothing wrong with the existing stock battery cables, the option to simply add another cable without replacing the existing is always available. I felt the need to do this to assure better current balance between batteries, after upgrading my alternator.
If replacing the entire stock positive battery cable harness anyway, due to corrosion, abrasion, or whatever is making them fali, then I'd recommend a single 2/0 cable over what I've done in the photos above. However, if there is nothing wrong with the current (ha ha) harness, then additional balancing ampacity in the cables can be likewise achieved by doubling them up.
Bakerbuilttracks, here is a pic of the type battery terminal I used,
I ordered them through Remy Battery Company, they are tinned copper alloy with a threaded add on side. Worked out great for me. I went with 4/0 cable from battery to battery and 2/0 Grounds. I had to cut the starter wire battery terminal and trim it down to fit on the 3/8 threaded add-on.
Ed
Those are the ones to use IMO, when replacing battery cables. I am planning to use 4/0 grounds since electrical flow, flows from the negative post to the positive post. I was thinking on using 2/0 to connect battery to battery. For now, I added an additional wire to connect the pos to pos posts on my batteries. It made a difference.
Battery Cables for these systems (Parallel - 800 CCA @ 32*F / 12v) is 2/0.
Are you saying the factory Ford battery cable that parallels the two stock batteries is 2/0?
Or are you trying to say that it should be 2/0, based on the math you posted?
I would like to know what wire gauge the Ford stock cable is, as it doesn't appear to be 2/0 to me, based on my cutting the cable and stripping back the insulation to attach a new eyelet type of lug to it. (I made due with a selection of lugs on hand, and so wasn't faced with having to make a decision about what size lug to buy).
Doing the Math, a 2/0, no longer than 4 feet from final battery to Starter is "required" using the AWG Formula (and 2/0 between the batteries no longer than 4 feet).
I have a Wire Disc from 0/0 to 22/0 but have never thought to size a Ford Cable on one of our Trucks.
I guess you could use a Caliper in Metric and convert it to Imperial Units and find the wire size used if you have an old wire lying round.
I like the Blade Disconnect you have installed on the (-) side. Most put them on the (+).... WRONG!
I like the Blade Disconnect you have installed on the (-) side. Most put them on the (+).... WRONG!
Thanks. What you are seeing there is Version 2 of my negative battery disconnects. I recently retired Version 1, and am already planning Version 3, which will use remote high amp (600A cont./2,000A inrush) solenoid disconnects (yes, still on the negative side) that will be coordinated with security enhancements.
In the meantime, my truck truly lives up to it's name "Fix Or Repair Daily", and disconnecting the batteries is more often than not the first step in undertaking most repairs. If I'm going to be disconnecting the batteries on a daily basis, then it's going to have to be easier than mucking around with 1/2" wrenches with the shoulders shorn down in order to fit under the square bolt, while embedding (toxic) lead on my skin and weakening the terminal's grip on the post due to too many removal cycles. Then having to tuck or tape the cables off, or find caps for the posts, so the thick cables don't inadvertently fall back on their "memory" and recontact the post. Fudge that. I will always have some sort of battery disconnect system in place. Hopefully, I'll keep getting better and better at each iteration.
Version 1: The Green ****. Nothing obvious forced me to retire the Green *****, other than the knowledge that the connections were only rated to 125 amps. Not good enough, but I needed something, these were handy at the time, and they remained in service for 7 years.
However, I do NOT recommend them, not only because of their limited ampacity rating, but because the diameter of the negative extension post is WAY TOO SMALL for a standard negative battery post cable clamp. How Wirthco (and all the Chinese knock offs of the same product, including the ones sold at Harbor Freight) could get this wrong in the first place, and then KEEP it wrong throughout all the years and copies of this product ever made... is baffling. I loved the convenience and the partial "security" of being able to take the green ***** with me... but if there is a weak link in the ground connections, the undersized negative extension post, and the limited contact area of the 1/4x20 **** post, would compete for a D grade. Definitely needs improvement.
Version 2: The Knife. Rated at twice the amperage of the Green **** (250A continuous), I wanted to install the knife in the first place, but all the knife switches I found for post terminal batteries closed vertically. Which meant the hood wouldn't close. Then it occurred to me to use the Knife switches for GM side terminal batteries. I could then disassemble the knife switches, reassemble them to operate in a horizontal swing toward the direction needed, and couple them with marine grade battery post terminals on the battery itself. This works very nicely.
Of course, after hybridizing these, I find that Wirthco makes a horizontally closing version of top post battery knife switches, but it must be special ordered online, as no parts store stocks it. So if anyone is interested in horizontally closing knife switches for top post batteries, know that they can be had online. Don't buy the vertically closing ones seen in auto parts stores.
Great post. I'd like to borrow a photo from it, which helps answer the question that the OP had about the OEM battery cable size:
In the photo above, we see the original red (skinnier) OEM battery cross over paralleling positive cable, and just below it, we see SRBF150's new replacement cable, which he states is 1/0. Looking at the photo, if the new cable is 1/0, then there is no way that the OEM cable can be 2/0, no matter what variances there may be in the native wire insulation jacket.
SRBF150 estimated the OEM wire gauge to be 4AWG, but said he wasn't sure. I estimate the OEM cable to be 2AWG, but I didn't take the time to precisely measure, I simply added another parallel 1AWG cable, because I didn't want cut up the passenger side of the factory cable, which was still good.
Should the OE cable ever fail, I would probably replace both redundant parallel cables with a single larger 2/0, if there was room to sufficiently shield the cable from heat, abrasion, and jacket penetration in a collision.

 12-11-2016, 09:14 PM