NashvegasMatt's build journey 72'
#46
 09-02-2016, 08:52 PM

Post Fiend
#47
09-04-2016, 05:35 PM
Join Date: Aug 2016
Posts: 504
Likes: 0
Received 0 Likes
on
0 Posts
9/3
So today I felt like cleaning the interior more...ultimately I will be replacing most of it, but until those funds become available I will have to leave it as is.
After I discovered days ago that the moisture barrier on the doors was gone under the panels I found some thick mil plastic and cut my own...
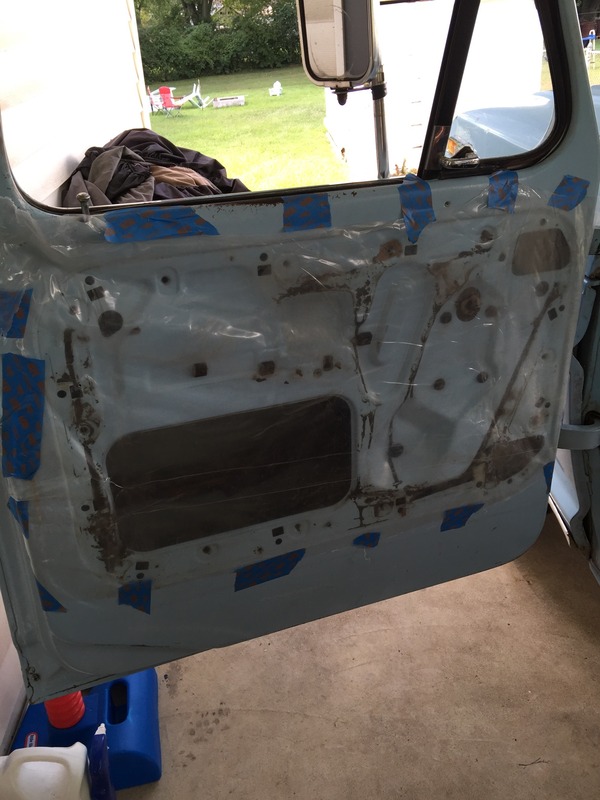
After I cut down the general shape with a blade, I then used a generic outdoor caulking to run some strips so it would hold. Not the prettiest but it will serve the purpose.
I also removed that stupid pcv input on the passenger valve cover and put in a breather until I long term determine what I'm gonna do.
Oh yea. Also tightened up the adjuster on the front passenger brake that I changed the springs on and now we are braking well again.
Still having a mental fart on where this oil is coming from that seems to spatter everywhere. I zip tied down the dipstick to at least rule out one spot.
#48
09-05-2016, 10:11 AM

BTW when talking left & right on a car or truck it is always when in the seat.
Cant say passenger or driver side because of our down under and across the pond friends who drive on the other side of the road.
With that said the PCV you pointed to on the right rear valve cover gets hooked up to a port on the base of the carb or carb adaptor port if it has one. Not to one of the intake runner port fittings.
The cap with the hose on the left front valve cover gets hooked up to the air filter housing. Think you said the after market filter base has a knock out that a fitting gets installed to. That fitting is a black plastic 90* and uses 2 screws to hold it to the filter base.
That hose from the cap gets hooked up to that fitting to pull in fresh air into the motor.
I think once you have a working PCV system the crankcase will not have positive psi and the oil spots will be gone.
Dave ----
#49
09-05-2016, 10:23 AM
Post Fiend
This oil is coming from not having a working PCV system.
With that said the PCV you pointed to on the right rear valve cover gets hooked up to a port on the base of the carb or carb adaptor port if it has one. Not to one of the intake runner port fittings.
The cap with the hose on the left front valve cover gets hooked up to the air filter housing. Think you said the after market filter base has a knock out that a fitting gets installed to. That fitting is a black plastic 90* and uses 2 screws to hold it to the filter base.
That hose from the cap gets hooked up to that fitting to pull in fresh air into the motor.
I think once you have a working PCV system the crankcase will not have positive psi and the oil spots will be gone.
Dave ----
#50
09-05-2016, 12:48 PM
Join Date: Aug 2016
Posts: 504
Likes: 0
Received 0 Likes
on
0 Posts
#51
09-06-2016, 12:46 PM
Hotshot
#52
09-06-2016, 04:00 PM
Join Date: Aug 2016
Posts: 504
Likes: 0
Received 0 Likes
on
0 Posts
So now that it's venting.... I haven't driven it a whole bunch, but let's just say that I see more oil after another degrease and spray. Where should be my next go to
#53
09-06-2016, 04:03 PM
Posting Guru
#54
09-06-2016, 04:14 PM
Join Date: Aug 2016
Posts: 504
Likes: 0
Received 0 Likes
on
0 Posts
Not yet. Out of funds for this month.. Lol. But I was going to do that and refinish the covers at the same time.
Anyone recommend a good rattle can spray that will get the job done and last for a while. Obviously powdercoating is the preferred method, but not in my budget at the moment. As someone mentioned earlier I may have to check the rails to make sure they are in good shape when I pull the covers before reinstalling.
Anyone recommend a good rattle can spray that will get the job done and last for a while. Obviously powdercoating is the preferred method, but not in my budget at the moment. As someone mentioned earlier I may have to check the rails to make sure they are in good shape when I pull the covers before reinstalling.
#55
09-07-2016, 02:39 AM
#56
09-07-2016, 11:03 AM

IMHO, if you're going to use money on powder coating use it where you'll get the most bang for your buck. Valve covers ain't it. Just my.02.
#57
09-08-2016, 02:32 PM
Join Date: Aug 2016
Posts: 504
Likes: 0
Received 0 Likes
on
0 Posts

#58
09-08-2016, 04:58 PM
Otherwise looks like you truck is coming along nicely...just keep conquering the problems one at a time and before long it'll be dependable. And since you're in Nashvegas, go have some Hattie B's for me!
#59
09-09-2016, 09:44 AM
Join Date: Aug 2016
Posts: 504
Likes: 0
Received 0 Likes
on
0 Posts
I advise against buying V belts at discount parts stores like the ones you mentioned. The V shaped belts are cut out of a wide piece of laminated rubber. The premium belts have the reinforcement layer near the outer side of the belt. The opposite V shape is sold to econo vendors and ends up with the reinforcement layer near the inside of the belt. You can buy soap, wax, wipers, etc, at a discount store but stick to something like a Napa for belts.
Otherwise looks like you truck is coming along nicely...just keep conquering the problems one at a time and before long it'll be dependable. And since you're in Nashvegas, go have some Hattie B's for me!
Otherwise looks like you truck is coming along nicely...just keep conquering the problems one at a time and before long it'll be dependable. And since you're in Nashvegas, go have some Hattie B's for me!
Had to stop going to Hattie b's now that it's all famous and whatnot. Not gonna wait for an hour...
#60
09-09-2016, 09:48 AM
Join Date: Aug 2016
Posts: 504
Likes: 0
Received 0 Likes
on
0 Posts
9/9
So last night I had like 3 hours to kill so I figured what the heck. Let's tackle this leaky vc. Started with pulling, degreasing, and de-muckin this cover... Good grief.
Since I already decided I won't be keeping these VC's, that I would do the quick version and not the OCD version of prep.

Gonna have to pause this post my son just fell off the porch here... Lol
Since I already decided I won't be keeping these VC's, that I would do the quick version and not the OCD version of prep.

Gonna have to pause this post my son just fell off the porch here... Lol

