Toyota Power Steering Install (1956 F100)
#1
 05-17-2016, 12:03 PM

Toyota Power Steering Install (1956 F100)
I decided to do a thread on my power steering install that someone in the future can reference.
Here is what I bought (Mid Fifty items bought during 10% off sale):
Used Toyota power steering box: $125
New pitman arm, CPP on ebay: $55
New sector nut: $7
Bracket from Mid Fifty: $85
Column drop (Ididit) Mid Fifty: $70
U Joint Mid Fifty (CPP): $72
floor plate Mid Fifty: $32
floor plate bolts Mid Fifty: $6.75
Hose Kit CPP (called them direct): $75
Ididit column, tilt only black powder coated (Mid Fifty): $445
Wheel Vintique '40 steering wheel from Speedway: $275
(shipping) $28
Already had:
HD tie rod
new (extended) drag link
Other (not included in cost):
bit to open up holes in frame $5
pitman arm puller $12 (useless)
Justification: Wanted a tilt column. Also, so my wife and other friends can drive it one day...when it actually runs. Everyone is scared of driving my '65 because of no power steering, even though it's not that big of a deal...
Approx Total Cost in parts/shipping so far: $1,275
#2
05-17-2016, 02:03 PM
I have my truck pretty much stripped apart, so instal shouldn't be very difficult.
Obviously not much to say about removing the old box/column. I removed the floor plate, unbolted everything, the three bolts on the box/frame, the two on the steering column mount, and brought it out from inside the cab.
I attached the new column drop (the recommended 4.5" drop) under the dash in the same slotted holes as the old mount. I don't know if it will be necessary to stiffen that area up at all, but seems fine to me.
#5
05-17-2016, 02:17 PM
#7
05-17-2016, 10:29 PM
Trending Topics
#8
05-18-2016, 12:21 AM

More Turbo
#9
05-18-2016, 08:35 AM
Looks like they supplied the same bolts in this article for classic trucks.
http://www.hotrod.com/how-to/engine/1311-ford-f-100s-power-steering/
That article has been the only resource/instructions I could really find. It's a pretty straightforward install, I think maybe that's why people don't have pics and "instructions" in their build threads. For something we talk about so much, I figure who doesn't like pictures of someone actually doing it!
#10
05-18-2016, 08:40 PM
Got the holes opened up and all fits well. Mocked up the column, floor plate (pre made from mid fifty), drop, and steering wheel.
I am really happy that the floor plate lines up and the drop seems a perfect length. Very happy with the way it is all fitting. Now have to get the brake arm to come through the hole just right.
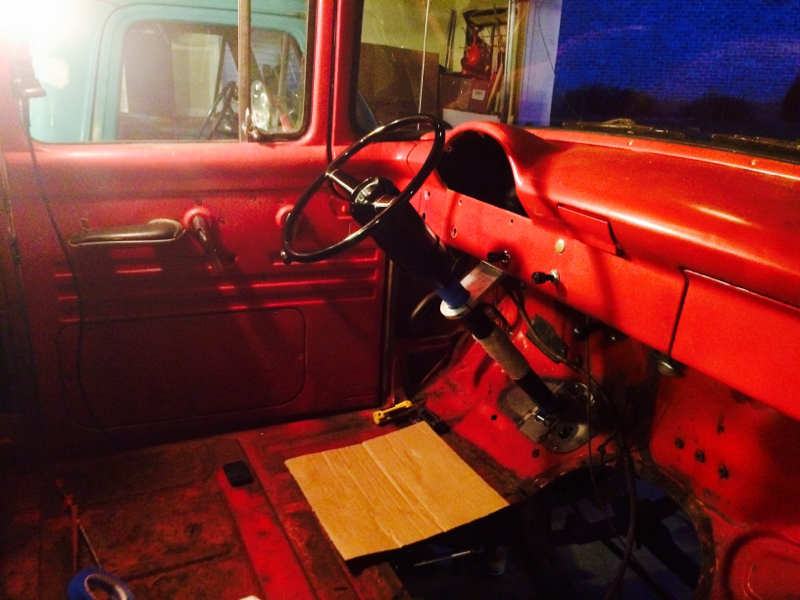
I am really happy that the floor plate lines up and the drop seems a perfect length. Very happy with the way it is all fitting. Now have to get the brake arm to come through the hole just right.
#11
05-18-2016, 10:57 PM
#12
05-19-2016, 08:11 PM
Since it's part of the brake upgrade I have to ask what length the steering column is and how you decided on that length? I am 5'9'' and with my worn out seat can barely see over the hood. Going to repair the seat and may have to raise it. Don't know if that type of information factored into your decision or anyone elses. Maybe even 5'8'', short enough to buy a Corvette anyways.
Last edited by filthy6; 05-19-2016 at 08:23 PM. Reason: left stuff out
#13
05-19-2016, 08:22 PM
Hi. I used the method of sitting on the seat and using a long rod of sorts (I used an old curtain rod) and treating it as the column shaft since that's what the length represents when buying an idiot or others. Still some guesswork regarding the steering wheel dish and stuff, but it had measurements as well. it seemed like 30" was good. I was nervous when i finally pulled the trigger! It was between 30" and 32".
#15
05-20-2016, 05:47 PM
Article on Toyota box install: Toyota Steering Box Swap For 1948-1960 Trucks - Ford-Trucks.com It is somewhat outdated but most of the info is good. Note: you do not need the extended drag link unless you plan to move the axle forward with new springs. i.e. Mid Fifty's down and forward springs.