Project at Work - '82 F150 Style side w/2012 5.0L Coyote
#1
 03-05-2016, 08:47 PM

Project at Work - '82 F150 Style side w/2012 5.0L Coyote
Currently at work this has been 2 years in the making. I am just now posting this with hopes that it might help others in the future that want to install a 5.0L Coyote engine in their '80-'86 trucks.
First off I will list the parts that was used off the top of my head.
1. 2012 Mustang 5.0L Coyote V8
2. Ford Motorsport wiring harness (stand alone with PCM)
3. 2003 Ford 4R70W Automatic transmission
4. US1 stand alone transmission controller with wiring harness
5. Electronic to Mechanical Speedometer converter
6. Vintage Air P/S kit
7. Factory '85-'87 Fuel tank (used one for a '87)
8. Factory '85-'86 Fuel tank sending unit ('87 used a reverse sending unit with incorrect ohms, '85 and '86 used the same ohms as the older trucks)
9. '93 Mustang fuel pump, was a performance pump rated at 230 LPH
10. Holley pressure regulator w/vacuum
11. '97 Ford F150 Accumulator - Had proper R134a fittings and did not have the bulky ugly pipe for running the AC hose behind the motor along the firewall.
The above will be updated with more precise information.
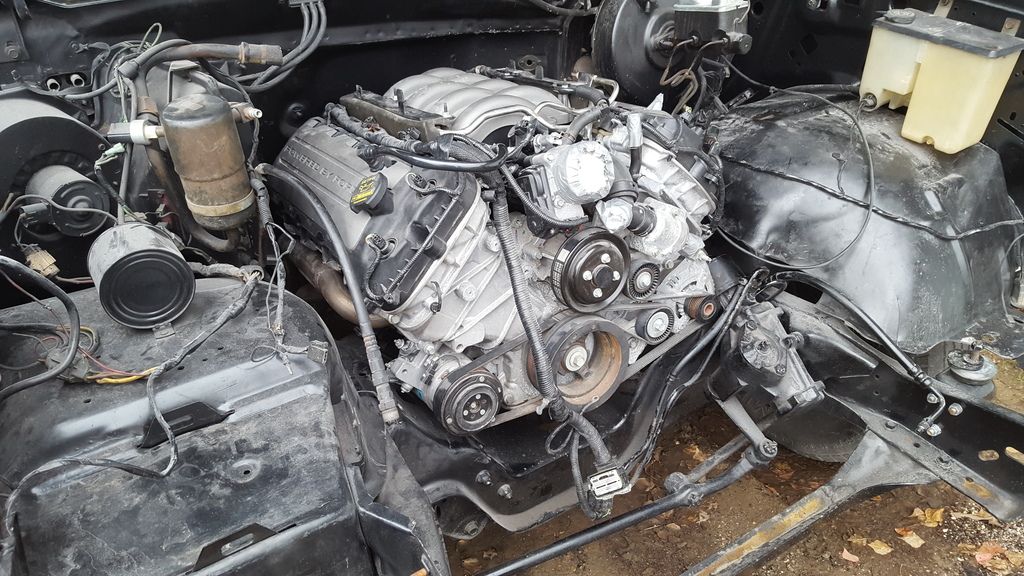
First off the frame of these trucks will have to be modified to allow the engine to fit under the hood. Simple cutting down of the top of the cross member and relocation of the engine mount pads will be required. The engine can be mounted to the truck using simple conversion mounts for a mounting a 5.0 Coyote in a Fox body Mustang using the factory K-member.
With the frame modified and the use of conversion mounts for a Fox body mustang you will find the engine fits real nice in the engine bay. One thing to note, the Fox body conversion mounts have a locating nub on the bottom side that has to be ground off to sit flush on the factory mount perch.
This photo shows how the crossmember will have to be cut down and plated in for the engine to sit down enough. The clearance is for the A/C compressor and the Alternator on the driver side.
After the motor is mounted in the truck the very first thing you will noticed is the shift lever on the column will have to be tweaked out of the way. Tweaked just right it will still function and with the fabrication of a bracket you can reuse your original Ford column shift linkages with your 4R70W transmission. The next thing you will noticed is the lack of a power steering pump. These engines are installed in vehicles with electronic steering assist. Which we did not use this on this build.
Vintage Air makes a kit that comes with a Sanden A/C compressor that is smaller than the OEM compressor along with brackets to mount a P/S pump backwards on the front of the engine. This system over others was not only cheaper but was also more compact reducing the amount of material removed from the cross member for clearance. Like wise this new setup now has a belt tensioner where the OEM A/C belt was a stretch fit.
The photo below shows the Vintage Air P/S pump kit installed

The factory design of the 5.0 Coyote is a returnless system and it was stressed that the PCM was calibrated with a return system with a regulated pressure of 55 PSI at the fuel rail with the engine off. This was achieved using a fuel tank out of a '85-'87 truck to have the in tank fuel pump for a clean proper build. These trucks how ever had a lift pump in the tank and a frame mounted pressure pump. So the purchase of a '85-'86 sending unit bare without pump allowed the use of a performance in tank fuel pump capable of putting out 100 PSI at over 200 LPH which is well over enough for a stock 5.0 Coyote. With the use of this tank the original '82 sending unit connector had to be cut and a proper pig tail was obtained from LMC to fit the '85-'87 style sending unit. The Ford Motorsport harness has a large gauge green wire for the fuel pump hot which was connected to the second from the front pin on the new connector. The first connector was the ground wire for the fuel pump which using a 12 gauge black wire I ran to a bed brace above the tank for ground. The third pin I attached the hot wire for the sending unit and the final black wire was attached to the final pin for grounding of the sending unit.
The next problem we an into was the speedometer. This 4R70W transmission does not have a speedometer gear only a reluctor wheel for the speed sensor. We could have just simply attached a replacement electronic gauge in the factory dash but the owner was very adamant about having the OEM cluster functional. So a quick search gave me the name of a company that I will list above on Monday, but this company makes a stand alone box that has three wires, a 12v ignition hot, a ground, and a signal wire. You wire the signal wire into the speed sensor or in this case the stand alone transmission controller had a speed sensor wire that can function in two ways, it can function in replicated mode which replicates the speed sensor wave or in corrected mode for speedometer calibration. I have it currently set for replicated mode, this is a square box about the size of the DSII ignition module and inside it has a circuit board with 12 dipswitches and a electric motor that spins your new speedometer cable. The dipswitches allows you to calibrate your speedometer based off the number of pulses in a mile your speed sensor gives. This allows the use of your mechanical speedometer while using a newer electronic transmission.
Next problem that is faced in this conversion was making the oil pressure and temp gauges work. This engine does not really have the places to drill and tap new ports for sensors so the following is what we did for the individual sensors.
First off the oil pressure sending unit. On the 5.0 Coyote the sending unit is in the same location as on the older 302 engines right above and behind the oil filter. To remedy this we took the original Ford sending unit extension and found it had the same pipe thread as on the new 5.0 Coyote. So we unscrewed the OEM bell sending unit and clamped the tube in the vice. This is when we drilled inboard of the bell sending unit a hole and tapped it in pipe thread to accept the 5.0 Coyote sensor for the PCM. Once this was installed on the engine this allowed the OEM gauge to function while allowing the PCM to still receive a oil pressure signal.
Secondly the coolant temp sensor on these engines are located on the rear passenger side head. It is impossible to drill this area for the OEM sensor as it would be in the way of the transmission dipstick later on. The only other option was in the heater hoses as these trucks do not have a hot water valve. Sad to say they do not make a 5/8" adapter with the proper size for the coolant temp sender. So our final option was to install it in a 1 1/2" adapter and install it into the upper radiator hose.
Below is a photo showing the 1 1/2" radiator hose adapter with the proper opening for use with the OEM '82 Ford sending unit.

Now that I touched on the sensors I need to touch on the hoses for this engine, both heater hoses and radiator hoses.
First the heater hoses, they are nothing more than long lengths of 90* molded hoses in 5/8" size. This size is smaller than the quick connect fittings for the OEM heater hoses but if you use a razor to bevel the inside and use something like zep or wd40 to coat the hose you can get it to slide over past the lock to make use of a screw clamp. Now you are left with one bypass tube on the pressure side just above the water pump. Use of a 5/8" rubber cap and clamp will work at sealing this port off. Same can be used on the vacuum port on the back side of the intake manifold. While still on the subject of heater hoses there is a small 1/4" or so nipple on the top for a air bleed to the expansion bottle. Since we are using a '85-'86 washer/coolant jug, this nipple is pointless. This simply presses in and with pliers can easily be pulled out. The use of a 1/4" pipe tap will allow you to install a 1/4" pipe plug in this location as a air purge for coolant fills.
Now on the radiator hoses, the OEM 2012 Mustang 5.0 upper radiator hose with the quick disconnect fits perfectly, it is 1 1/2" on the radiator size with a clamp that fits the OEM radiator perfectly. The lower hose uses clamps on both sides but is 1 1/2" as well while these trucks use as 1 3/4" lower hose. The OEM hose was discarded and a flex hose in 1 1/2" to 1 3/4" was used to make this connection between the engine and the radiator.
To quickly touch on the subject of the radiator, since this engine does not have a mechanical fan the use of electric fans are required, also since this is more engine than factory the use of a 3 core all aluminum radiator was used as precaution. This one was obtained off ebay and came with two electric fans which I believe was rated at 1300 CFM.
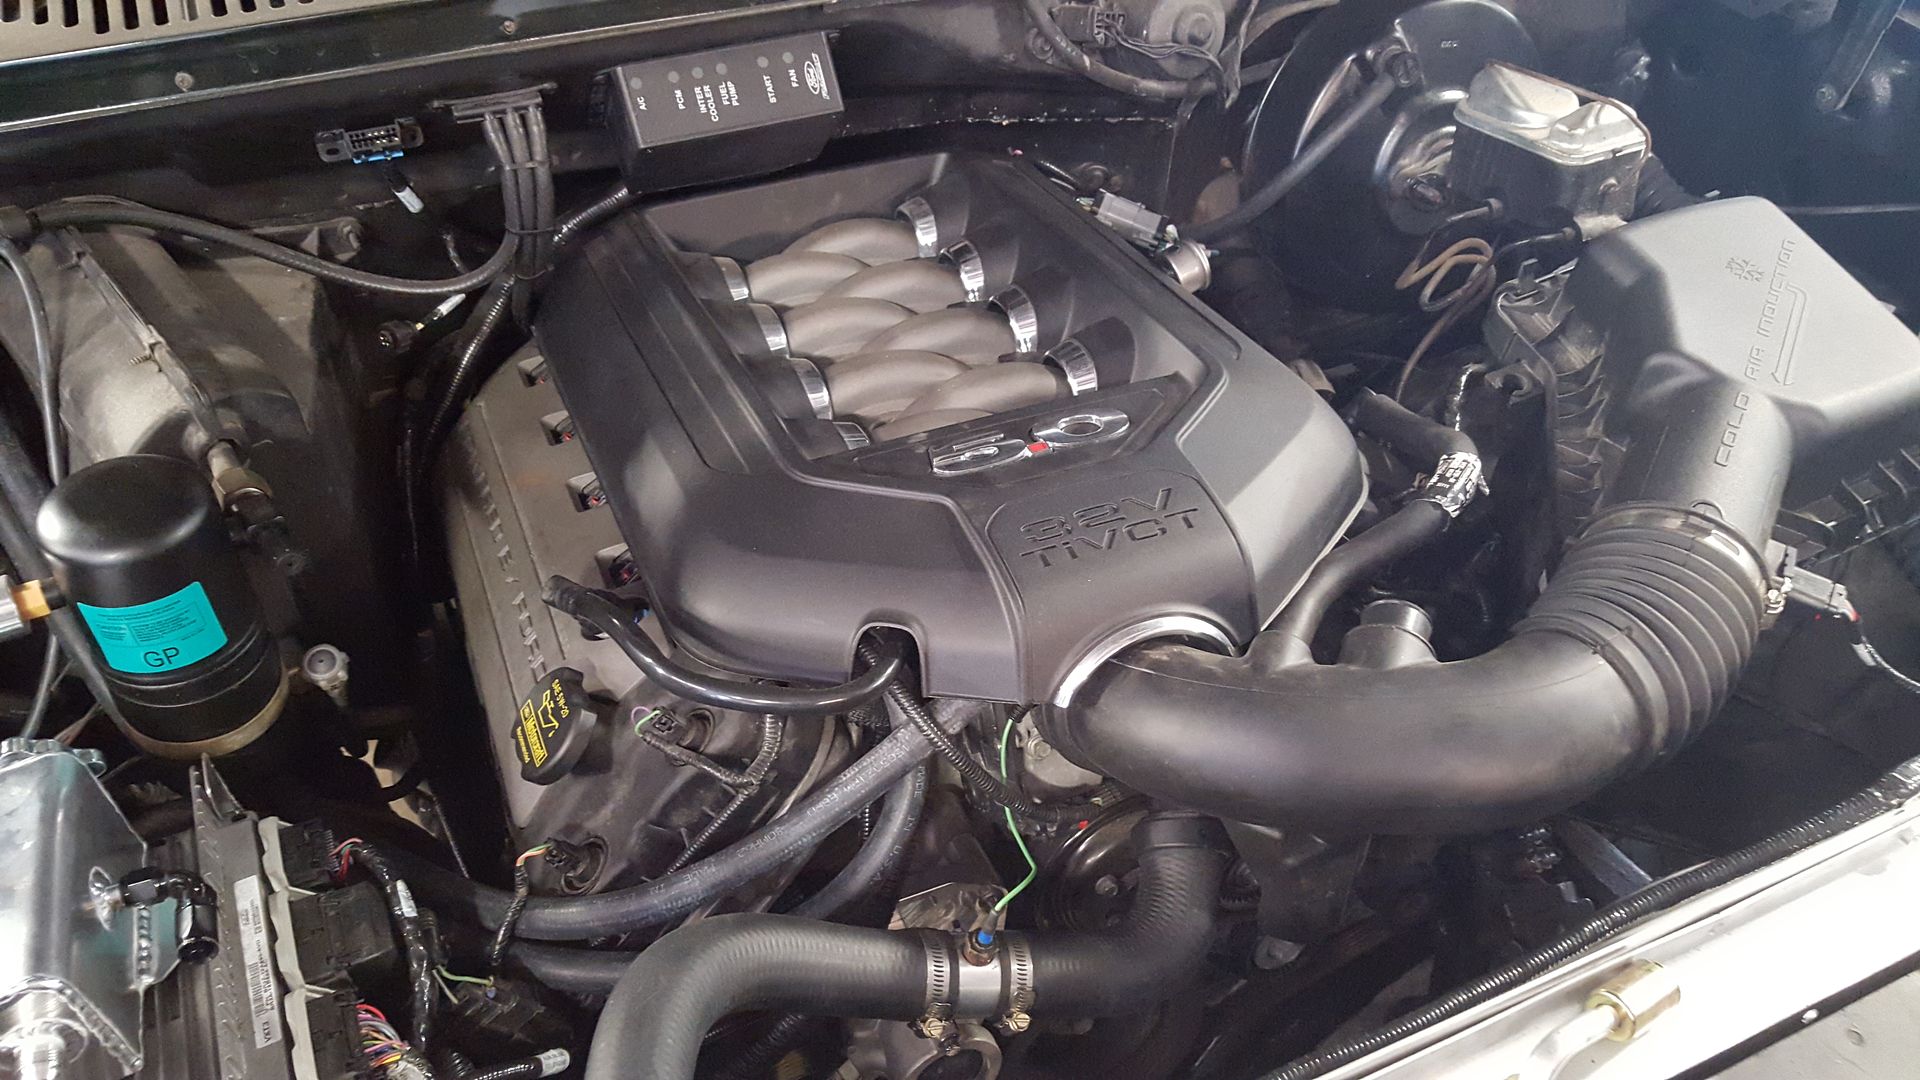
Below is a current picture of the install as of Wed. By Friday the A/C lines were all made up.
This so far is all that I can think of off the top of my head as far as problem areas on this conversion that I am still working on at work. I have put a lot of hours in this truck and I have done quite a bit of wiring even created from scratch a harness for power door and power windows for this truck. I also have pictures on my phone but I am trying to load them up on photo bucket so I can share them on this link to show some of what I talked about above. I will update this page with pictures and any other problems I run into on this build. So far Thursday was the first attempt at starting this engine and it fired off on the second hit of the key. No problems either besides a leaky AN fitting at the fuel pressure regulator but that was no real big deal.
First off I will list the parts that was used off the top of my head.
1. 2012 Mustang 5.0L Coyote V8
2. Ford Motorsport wiring harness (stand alone with PCM)
3. 2003 Ford 4R70W Automatic transmission
4. US1 stand alone transmission controller with wiring harness
5. Electronic to Mechanical Speedometer converter
6. Vintage Air P/S kit
7. Factory '85-'87 Fuel tank (used one for a '87)
8. Factory '85-'86 Fuel tank sending unit ('87 used a reverse sending unit with incorrect ohms, '85 and '86 used the same ohms as the older trucks)
9. '93 Mustang fuel pump, was a performance pump rated at 230 LPH
10. Holley pressure regulator w/vacuum
11. '97 Ford F150 Accumulator - Had proper R134a fittings and did not have the bulky ugly pipe for running the AC hose behind the motor along the firewall.
The above will be updated with more precise information.
First off the frame of these trucks will have to be modified to allow the engine to fit under the hood. Simple cutting down of the top of the cross member and relocation of the engine mount pads will be required. The engine can be mounted to the truck using simple conversion mounts for a mounting a 5.0 Coyote in a Fox body Mustang using the factory K-member.
With the frame modified and the use of conversion mounts for a Fox body mustang you will find the engine fits real nice in the engine bay. One thing to note, the Fox body conversion mounts have a locating nub on the bottom side that has to be ground off to sit flush on the factory mount perch.
This photo shows how the crossmember will have to be cut down and plated in for the engine to sit down enough. The clearance is for the A/C compressor and the Alternator on the driver side.
After the motor is mounted in the truck the very first thing you will noticed is the shift lever on the column will have to be tweaked out of the way. Tweaked just right it will still function and with the fabrication of a bracket you can reuse your original Ford column shift linkages with your 4R70W transmission. The next thing you will noticed is the lack of a power steering pump. These engines are installed in vehicles with electronic steering assist. Which we did not use this on this build.
Vintage Air makes a kit that comes with a Sanden A/C compressor that is smaller than the OEM compressor along with brackets to mount a P/S pump backwards on the front of the engine. This system over others was not only cheaper but was also more compact reducing the amount of material removed from the cross member for clearance. Like wise this new setup now has a belt tensioner where the OEM A/C belt was a stretch fit.
The photo below shows the Vintage Air P/S pump kit installed
The factory design of the 5.0 Coyote is a returnless system and it was stressed that the PCM was calibrated with a return system with a regulated pressure of 55 PSI at the fuel rail with the engine off. This was achieved using a fuel tank out of a '85-'87 truck to have the in tank fuel pump for a clean proper build. These trucks how ever had a lift pump in the tank and a frame mounted pressure pump. So the purchase of a '85-'86 sending unit bare without pump allowed the use of a performance in tank fuel pump capable of putting out 100 PSI at over 200 LPH which is well over enough for a stock 5.0 Coyote. With the use of this tank the original '82 sending unit connector had to be cut and a proper pig tail was obtained from LMC to fit the '85-'87 style sending unit. The Ford Motorsport harness has a large gauge green wire for the fuel pump hot which was connected to the second from the front pin on the new connector. The first connector was the ground wire for the fuel pump which using a 12 gauge black wire I ran to a bed brace above the tank for ground. The third pin I attached the hot wire for the sending unit and the final black wire was attached to the final pin for grounding of the sending unit.
The next problem we an into was the speedometer. This 4R70W transmission does not have a speedometer gear only a reluctor wheel for the speed sensor. We could have just simply attached a replacement electronic gauge in the factory dash but the owner was very adamant about having the OEM cluster functional. So a quick search gave me the name of a company that I will list above on Monday, but this company makes a stand alone box that has three wires, a 12v ignition hot, a ground, and a signal wire. You wire the signal wire into the speed sensor or in this case the stand alone transmission controller had a speed sensor wire that can function in two ways, it can function in replicated mode which replicates the speed sensor wave or in corrected mode for speedometer calibration. I have it currently set for replicated mode, this is a square box about the size of the DSII ignition module and inside it has a circuit board with 12 dipswitches and a electric motor that spins your new speedometer cable. The dipswitches allows you to calibrate your speedometer based off the number of pulses in a mile your speed sensor gives. This allows the use of your mechanical speedometer while using a newer electronic transmission.
Next problem that is faced in this conversion was making the oil pressure and temp gauges work. This engine does not really have the places to drill and tap new ports for sensors so the following is what we did for the individual sensors.
First off the oil pressure sending unit. On the 5.0 Coyote the sending unit is in the same location as on the older 302 engines right above and behind the oil filter. To remedy this we took the original Ford sending unit extension and found it had the same pipe thread as on the new 5.0 Coyote. So we unscrewed the OEM bell sending unit and clamped the tube in the vice. This is when we drilled inboard of the bell sending unit a hole and tapped it in pipe thread to accept the 5.0 Coyote sensor for the PCM. Once this was installed on the engine this allowed the OEM gauge to function while allowing the PCM to still receive a oil pressure signal.
Secondly the coolant temp sensor on these engines are located on the rear passenger side head. It is impossible to drill this area for the OEM sensor as it would be in the way of the transmission dipstick later on. The only other option was in the heater hoses as these trucks do not have a hot water valve. Sad to say they do not make a 5/8" adapter with the proper size for the coolant temp sender. So our final option was to install it in a 1 1/2" adapter and install it into the upper radiator hose.
Below is a photo showing the 1 1/2" radiator hose adapter with the proper opening for use with the OEM '82 Ford sending unit.
Now that I touched on the sensors I need to touch on the hoses for this engine, both heater hoses and radiator hoses.
First the heater hoses, they are nothing more than long lengths of 90* molded hoses in 5/8" size. This size is smaller than the quick connect fittings for the OEM heater hoses but if you use a razor to bevel the inside and use something like zep or wd40 to coat the hose you can get it to slide over past the lock to make use of a screw clamp. Now you are left with one bypass tube on the pressure side just above the water pump. Use of a 5/8" rubber cap and clamp will work at sealing this port off. Same can be used on the vacuum port on the back side of the intake manifold. While still on the subject of heater hoses there is a small 1/4" or so nipple on the top for a air bleed to the expansion bottle. Since we are using a '85-'86 washer/coolant jug, this nipple is pointless. This simply presses in and with pliers can easily be pulled out. The use of a 1/4" pipe tap will allow you to install a 1/4" pipe plug in this location as a air purge for coolant fills.
Now on the radiator hoses, the OEM 2012 Mustang 5.0 upper radiator hose with the quick disconnect fits perfectly, it is 1 1/2" on the radiator size with a clamp that fits the OEM radiator perfectly. The lower hose uses clamps on both sides but is 1 1/2" as well while these trucks use as 1 3/4" lower hose. The OEM hose was discarded and a flex hose in 1 1/2" to 1 3/4" was used to make this connection between the engine and the radiator.
To quickly touch on the subject of the radiator, since this engine does not have a mechanical fan the use of electric fans are required, also since this is more engine than factory the use of a 3 core all aluminum radiator was used as precaution. This one was obtained off ebay and came with two electric fans which I believe was rated at 1300 CFM.
Below is a current picture of the install as of Wed. By Friday the A/C lines were all made up.
This so far is all that I can think of off the top of my head as far as problem areas on this conversion that I am still working on at work. I have put a lot of hours in this truck and I have done quite a bit of wiring even created from scratch a harness for power door and power windows for this truck. I also have pictures on my phone but I am trying to load them up on photo bucket so I can share them on this link to show some of what I talked about above. I will update this page with pictures and any other problems I run into on this build. So far Thursday was the first attempt at starting this engine and it fired off on the second hit of the key. No problems either besides a leaky AN fitting at the fuel pressure regulator but that was no real big deal.
#2
03-05-2016, 09:27 PM
Ok, I have updated my original post with some photos. I made a note and on Monday will take more photos mainly of the following areas.
1. Speedometer controller - Electric to Mechanical
2. Oil Pressure sending unit - OEM '82 Ford and OEM '12 Ford installation
3. Fuel Pressure Regulator installation.
~Update~
I forgot to mention this in my original post but this small update will cover the transmission calibration.
So far the stand alone transmission controller has the capability of being tuned without laptop interface required. Below is some of the specs.
Shift points WOT
1 to 2 upshift : 5,100 RPM
2 to 3 upshift : 5,350 RPM
3 to 4 upshift : 5,800 RPM
Torque converter clutch engagement : 48 MPH / I adjusted this to 55 MPH as ideally I believe the converter should lock up when you are on the freeway, some frontage roads here along the free way are 50 MPH and they have red lights so at 48 or 50 mph the converter would constantly be locking and unlocking. So I bumped it up to 55 MPH so it will lock up only on the freeway.
The shift points were presets because it says in faster cars 1 to 2 upshift could be 1,000 RPM or more higher, the 2 to 3 could be 800 RPM or more higher, and the 3 to 4 could be 300 RPM or more higher. It seems they are staggered the way they are now to shift roughly at the same time accounting for the specs they listed above. I will do final adjustment after some test drives. Might also tone it down for the customers safety.
#3
03-06-2016, 07:37 AM

#4
03-06-2016, 04:01 PM
It is, the customer wanted to do this vs what we recommended. He still believes we need to hotrod the engine as he believes 415-430 HP that these 5.0 Coyotes are rated at is not enough.
But when we started this project two years ago, no one did this on a truck like this before so it was a learning experience and all this work has been done in less than a three months. Most of the time the truck was at the paint and body shop for nearly 6 months then we spent the rest waiting on parts coming in.
This I decided to post to hopefully help others and not cause a loss of hair and sleep like it did me trying to figure out the best way to approach what was wanted.
#5
03-10-2016, 09:55 AM

Elder User
Join Date: Dec 2010
Location: Liberty Hill, Tx
Posts: 618
Likes: 0
Received 0 Likes
on
0 Posts
#6
03-13-2016, 08:03 AM

#7
03-13-2016, 11:04 AM
Havent done much to the truck at work still waiting on parts. Waiting on a lower kit built custom by airbag it I believe is the company. No one has a '82 lowering kit all they are is 83 and up and they claim '82 had a different size ball joint but checking with our parts house looking in a moog catalog it states F150s had the same ball joints 81 and up as they made the switch to ball joints half ways through in 81 and that F100s had two different sized ball joints. Guess the companies are trying to cover their rear with that but the place we ordered it from they make it custom but it comes with ball joints which is cheaper than buying them elsewhere.
Trending Topics

#9
03-22-2016, 12:28 PM
I might have some I need to check, couldn't get connected to the internet last night but I will take a few photos though.
Havent worked on it as I am still waiting for lowering kit to come in, a new problem came up in that the stupid vacuum switch on the blend doors went out no vacuum at dash but vacuum at the defroster and the floor.
Another thing I charged the A/C up put 40 oz in it and it runs at 30 psi low side 150 psi highside putting out at idle a good 40* air temps.
#10
04-01-2016, 11:17 PM
Elder User
Havent done much to the truck at work still waiting on parts. Waiting on a lower kit built custom by airbag it I believe is the company. No one has a '82 lowering kit all they are is 83 and up and they claim '82 had a different size ball joint but checking with our parts house looking in a moog catalog it states F150s had the same ball joints 81 and up as they made the switch to ball joints half ways through in 81 and that F100s had two different sized ball joints. Guess the companies are trying to cover their rear with that but the place we ordered it from they make it custom but it comes with ball joints which is cheaper than buying them elsewhere.
#12
04-02-2016, 07:45 AM
It may be too late since you ordered the I beams already but you can use the more common 87-96 dropped I beams as long as you change the spindles as well. I just did a swap using the newer djm beams along with spindles, rotors, and calipers for a 95 f150. Awesome build keep the pics coming.
#13
04-02-2016, 10:04 AM
Elder User
#14
04-02-2016, 10:40 AM
fljab, I also have an 81 and looked into the beams too.
From what I found on their site they no longer make the beams for the kingpin trucks. I also think I saw a post saying the same thing.
I think that is the reason why to go with the newer ball joint beams. Because they use a different brake system is why they say 87-96 setup.
That is want I found but could be all wrong too.
Dave ----
made link clickable https://www.ford-trucks.com/forums/1...l#post16174824
#15
04-02-2016, 11:46 AM
Elder User
fljab, I also have an 81 and looked into the beams too.
From what I found on their site they no longer make the beams for the kingpin trucks. I also think I saw a post saying the same thing.
I think that is the reason why to go with the newer ball joint beams. Because they use a different brake system is why they say 87-96 setup.
That is want I found but could be all wrong too.
Dave ----
made link clickable https://www.ford-trucks.com/forums/1...l#post16174824
From what I found on their site they no longer make the beams for the kingpin trucks. I also think I saw a post saying the same thing.
I think that is the reason why to go with the newer ball joint beams. Because they use a different brake system is why they say 87-96 setup.
That is want I found but could be all wrong too.
Dave ----
made link clickable https://www.ford-trucks.com/forums/1...l#post16174824