
Re-wiring the dentside... My choice
#1
 03-02-2016, 10:28 AM

Re-wiring the dentside... My choice
Men of FTE...
If you're like me you have had to deal with cobbled wiring,, cut...spliced ..broken.. rat nested.. 3m scotch-locks (which I personally despise).. no solder.. electrical tape ..no tape.. duct tape.. wire nuts... essentially a mess...
Even if you haven't had to deal with the above (and my 79 F350 tow truck project-"Son of Mater" and my 73 F250 "I hate FTE" project both have pretty pristine wiring) all our wire systems are approaching 40 years old.. the wiring gets hard and brittle, especially in the engine bay where its exposed to heat and oil,, and the connectors, headlights, etc have started to show signs of corrosion,, even here in sunny Kalifornia.
If the prior owner has cut into the wiring it can be a nightmare trying to chase what someone else did. In the case of my service truck "Lil Bit_- a 74 F600 dent... The Caterpillar dealer that owned it had cut into the wiring in many places for god knows why.. After spending hours re-splicing splices and soldering everything I just couldn't get happy.. especially after the hundreds of hours I had invested in the restoration. The only real "extra" circuit this F-600 has compared to a light duty dent is the two speed.. and now that will have it's own dedicated circuit...
To that end I have decided to share my rewiring journey.. it will be repeated on the "Oregon oakie" 77 F250 4 x 4 supercab resto as well as The "I hate FTE" shop truck.
The reasons are simple.. the problems listed above and to update the harness to new wire and getting away from old glass fuses.
I looked at Painless, Ron Francis, Summit, Speedway.. all the kits out there. They ranged from 129.00 Chinese wire kits to 799.00 Painless kits. I wanted to see if the high dollar kit was really worth the money.. and for me,, it definitely wasn't. I spoke to Painless at length and while I only spoke to one employee I wasn't all warm and fuzzy they cared at all. He said that they didn't include all the Ford switches as some were no longer available.
I, like many of you, will have modified engines and electrical systems. In my case Ill be using HEI aftermarket ignitions, custom gauges, one wire hi-amp alternators as well as other things that need updated wiring and electronics.
I read all the reviews.. looked at all the costs and settled on Rebel Wire.. in my case their 9+3 kit.. American Made mom and pop company (and hell yes this was important to me). They have excellent customer service.. I dont think Ill need it but its nice to know its there...
Rebel Wire .:. Wire kits .:. Wiring Harness .:. Connectors and Accessories for Real Rods
Their 9+3 kit is more than sufficient for dent (in my case "lil bit" is equipped with more than 20 aftermarket Led lights ( interior lights, exterior floods ,spots, backup, driving, scene lights, even a dedicated winch light) and I used a separate 10 switch Whalen fused box.. giving me numerous options for add-ons) I also have an additional Blue Sea 6 lead fuse panel but after the Rebel kit Ill probably never plug into it.
I ordered my kit off of StealBay.. 189.00 delivered
It arrived quickly and I with baited breath opened the well packed box..
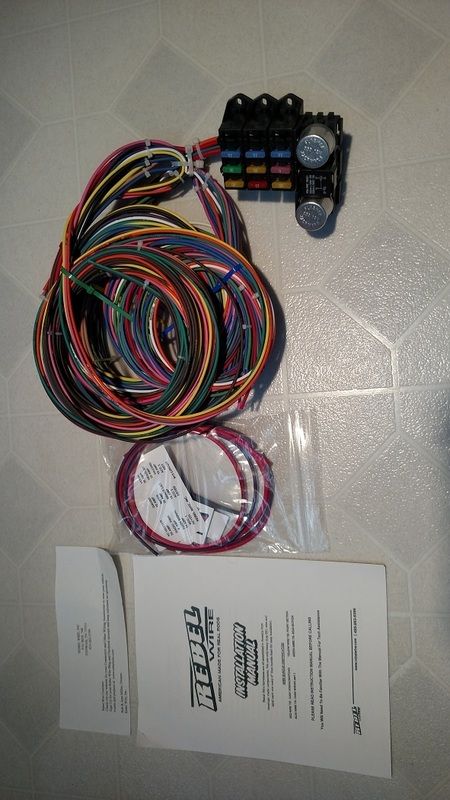
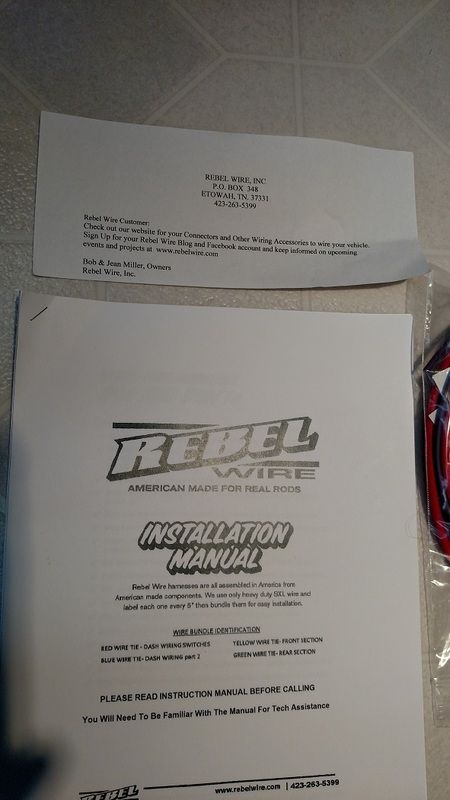
The 16 pages of directions are excellent.. easy to understand and clear. Even the paper its printed on is heavy stock which is nice to have thumbing through it a zillion times.. the copy was clear and didnt look like something that was made from 50 years ago... The directions have some Ford specific pages as well as tips for universal.. and yes chebby stuff too. The fuse panel is very compact and appears to be of good quality. The wire bundles are clearly marked into three sections.. Interior/gauges, Exterior/rear including fuel sender, Exterior/engine compartment. Read... read... and read it again.. its not hard and re-wiring should not be intimidating.. and that's one thing that comes through clearly when reading Rebel's directions. The wires are clearly marked every six inches( just like the high dollar kits spout off about) and it's AMERICAN made automotive wire.
I noted the turn signal flashers that came with the kit are standard duty so Ill be upgrading those to HD electronic versions,,, which will also work well with my LED taillights. There are provisions in the instructions to wire into the stock ford headlight, ignition, and wiper switches but in my case I think I will be using some aftermarket stuff.. 1) For sake of ease 2) to update my switches to later model designs. late model switches will add somewhere around $60.00 to the cost.. more if I replace every signal connector.. in my case all the turn signal ones are excellent but I think Ill put in new headlight connectors (Dorman etc has them)
Ill update this thread as I make mounting and routing decisions. I will be soldering and heat shrinking all my connections.. where easy Ill retain the stock ford switches.. heater for example...
I hope you all find this helpful in your wiring decisions. Ill do my best to give a good critical analysis of this task.. and I will welcome any critique. This is NOT meant to be a factory restoration.. this is meant to be a quality update to something we have all dealt with in our builds... P.O. idiots who just plain didn't care or didn't know
The kit.. very compact...
The instructions... very thorough.. I liked the note from the owners
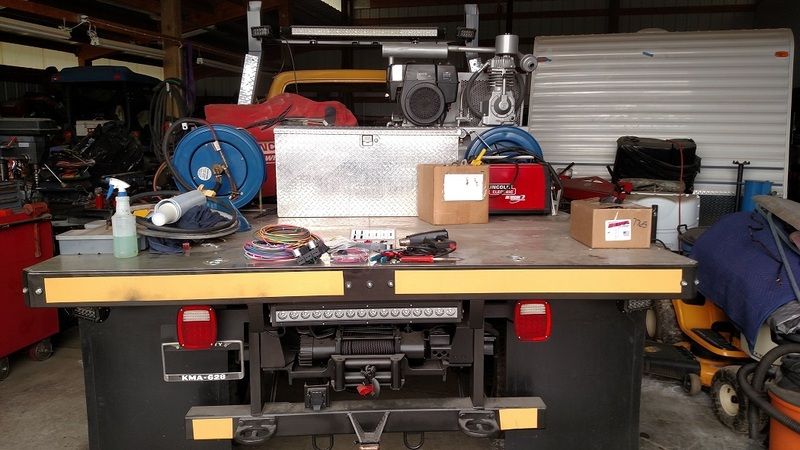
My quality control technicians decided they needed a closer examination

Today's task..
1) Locate the mounting point for the fuseblock
2) Route wires to engine compartment using appropriate holes and grommets (The kits specs a 1 1/4" hole in the firewall.. removing the factory for grommet leaves a much larger hole..but i have an idea for that.. more later)
If you're like me you have had to deal with cobbled wiring,, cut...spliced ..broken.. rat nested.. 3m scotch-locks (which I personally despise).. no solder.. electrical tape ..no tape.. duct tape.. wire nuts... essentially a mess...
Even if you haven't had to deal with the above (and my 79 F350 tow truck project-"Son of Mater" and my 73 F250 "I hate FTE" project both have pretty pristine wiring) all our wire systems are approaching 40 years old.. the wiring gets hard and brittle, especially in the engine bay where its exposed to heat and oil,, and the connectors, headlights, etc have started to show signs of corrosion,, even here in sunny Kalifornia.
If the prior owner has cut into the wiring it can be a nightmare trying to chase what someone else did. In the case of my service truck "Lil Bit_- a 74 F600 dent... The Caterpillar dealer that owned it had cut into the wiring in many places for god knows why.. After spending hours re-splicing splices and soldering everything I just couldn't get happy.. especially after the hundreds of hours I had invested in the restoration. The only real "extra" circuit this F-600 has compared to a light duty dent is the two speed.. and now that will have it's own dedicated circuit...
To that end I have decided to share my rewiring journey.. it will be repeated on the "Oregon oakie" 77 F250 4 x 4 supercab resto as well as The "I hate FTE" shop truck.
The reasons are simple.. the problems listed above and to update the harness to new wire and getting away from old glass fuses.
I looked at Painless, Ron Francis, Summit, Speedway.. all the kits out there. They ranged from 129.00 Chinese wire kits to 799.00 Painless kits. I wanted to see if the high dollar kit was really worth the money.. and for me,, it definitely wasn't. I spoke to Painless at length and while I only spoke to one employee I wasn't all warm and fuzzy they cared at all. He said that they didn't include all the Ford switches as some were no longer available.
I, like many of you, will have modified engines and electrical systems. In my case Ill be using HEI aftermarket ignitions, custom gauges, one wire hi-amp alternators as well as other things that need updated wiring and electronics.
I read all the reviews.. looked at all the costs and settled on Rebel Wire.. in my case their 9+3 kit.. American Made mom and pop company (and hell yes this was important to me). They have excellent customer service.. I dont think Ill need it but its nice to know its there...
Rebel Wire .:. Wire kits .:. Wiring Harness .:. Connectors and Accessories for Real Rods
Their 9+3 kit is more than sufficient for dent (in my case "lil bit" is equipped with more than 20 aftermarket Led lights ( interior lights, exterior floods ,spots, backup, driving, scene lights, even a dedicated winch light) and I used a separate 10 switch Whalen fused box.. giving me numerous options for add-ons) I also have an additional Blue Sea 6 lead fuse panel but after the Rebel kit Ill probably never plug into it.
I ordered my kit off of StealBay.. 189.00 delivered
It arrived quickly and I with baited breath opened the well packed box..
The 16 pages of directions are excellent.. easy to understand and clear. Even the paper its printed on is heavy stock which is nice to have thumbing through it a zillion times.. the copy was clear and didnt look like something that was made from 50 years ago... The directions have some Ford specific pages as well as tips for universal.. and yes chebby stuff too. The fuse panel is very compact and appears to be of good quality. The wire bundles are clearly marked into three sections.. Interior/gauges, Exterior/rear including fuel sender, Exterior/engine compartment. Read... read... and read it again.. its not hard and re-wiring should not be intimidating.. and that's one thing that comes through clearly when reading Rebel's directions. The wires are clearly marked every six inches( just like the high dollar kits spout off about) and it's AMERICAN made automotive wire.
I noted the turn signal flashers that came with the kit are standard duty so Ill be upgrading those to HD electronic versions,,, which will also work well with my LED taillights. There are provisions in the instructions to wire into the stock ford headlight, ignition, and wiper switches but in my case I think I will be using some aftermarket stuff.. 1) For sake of ease 2) to update my switches to later model designs. late model switches will add somewhere around $60.00 to the cost.. more if I replace every signal connector.. in my case all the turn signal ones are excellent but I think Ill put in new headlight connectors (Dorman etc has them)
Ill update this thread as I make mounting and routing decisions. I will be soldering and heat shrinking all my connections.. where easy Ill retain the stock ford switches.. heater for example...
I hope you all find this helpful in your wiring decisions. Ill do my best to give a good critical analysis of this task.. and I will welcome any critique. This is NOT meant to be a factory restoration.. this is meant to be a quality update to something we have all dealt with in our builds... P.O. idiots who just plain didn't care or didn't know
The kit.. very compact...

The instructions... very thorough.. I liked the note from the owners

My quality control technicians decided they needed a closer examination

Today's task..
1) Locate the mounting point for the fuseblock
2) Route wires to engine compartment using appropriate holes and grommets (The kits specs a 1 1/4" hole in the firewall.. removing the factory for grommet leaves a much larger hole..but i have an idea for that.. more later)
#3
03-02-2016, 10:51 AM
Yes... although you may not have provisions for AC... and any additional options that an XLT might have had.. interior courtesy lights etc...AFAIK
#5
03-02-2016, 11:16 AM
Originally Posted by Notmeofficer
Men of FTE...
If you're like me you have had to deal with cobbled wiring,, cut...spliced ..broken.. rat nested.. 3m scotch-locks (which I personally despise).. no solder.. electrical tape ..no tape.. duct tape.. wire nuts... essentially a mess...
Even if you haven't had to deal with the above (and my 79 F350 tow truck project-"Son of Mater" and my 73 F250 "I hate FTE" project both have pretty pristine wiring) all our wire systems are approaching 40 years old.. the wiring gets hard and brittle, especially in the engine bay where its exposed to heat and oil,, and the connectors, headlights, etc have started to show signs of corrosion,, even here in sunny Kalifornia.
If the prior owner has cut into the wiring it can be a nightmare trying to chase what someone else did. In the case of my service truck "Lil Bit_- a 74 F600 dent... The Caterpillar dealer that owned it had cut into the wiring in many places for god knows why.. After spending hours re-splicing splices and soldering everything I just couldn't get happy.. especially after the hundreds of hours I had invested in the restoration. The only real "extra" circuit this F-600 has compared to a light duty dent is the two speed.. and now that will have it's own dedicated circuit...
To that end I have decided to share my rewiring journey.. it will be repeated on the "Oregon oakie" 77 F250 4 x 4 supercab resto as well as The "I hate FTE" shop truck.
The reasons are simple.. the problems listed above and to update the harness to new wire and getting away from old glass fuses.
I looked at Painless, Ron Francis, Summit, Speedway.. all the kits out there. They ranged from 129.00 Chinese wire kits to 799.00 Painless kits. I wanted to see if the high dollar kit was really worth the money.. and for me,, it definitely wasn't. I spoke to Painless at length and while I only spoke to one employee I wasn't all warm and fuzzy they cared at all. He said that they didn't include all the Ford switches as some were no longer available.
I, like many of you, will have modified engines and electrical systems. In my case Ill be using HEI aftermarket ignitions, custom gauges, one wire hi-amp alternators as well as other things that need updated wiring and electronics.
I read all the reviews.. looked at all the costs and settled on Rebel Wire.. in my case their 9+3 kit.. American Made mom and pop company (and hell yes this was important to me). They have excellent customer service.. I dont think Ill need it but its nice to know its there...
Rebel Wire .:. Wire kits .:. Wiring Harness .:. Connectors and Accessories for Real Rods
Their 9+3 kit is more than sufficient for dent (in my case "lil bit" is equipped with more than 20 aftermarket Led lights ( interior lights, exterior floods ,spots, backup, driving, scene lights, even a dedicated winch light) and I used a separate 10 switch Whalen fused box.. giving me numerous options for add-ons) I also have an additional Blue Sea 6 lead fuse panel but after the Rebel kit Ill probably never plug into it.
I ordered my kit off of StealBay.. 189.00 delivered
It arrived quickly and I with baited breath opened the well packed box..
The 16 pages of directions are excellent.. easy to understand and clear. Even the paper its printed on is heavy stock which is nice to have thumbing through it a zillion times.. the copy was clear and didnt look like something that was made from 50 years ago... The directions have some Ford specific pages as well as tips for universal.. and yes chebby stuff too. The fuse panel is very compact and appears to be of good quality. The wire bundles are clearly marked into three sections.. Interior/gauges, Exterior/rear including fuel sender, Exterior/engine compartment. Read... read... and read it again.. its not hard and re-wiring should not be intimidating.. and that's one thing that comes through clearly when reading Rebel's directions. The wires are clearly marked every six inches( just like the high dollar kits spout off about) and it's AMERICAN made automotive wire.
I noted the turn signal flashers that came with the kit are standard duty so Ill be upgrading those to HD electronic versions,,, which will also work well with my LED taillights. There are provisions in the instructions to wire into the stock ford headlight, ignition, and wiper switches but in my case I think I will be using some aftermarket stuff.. 1) For sake of ease 2) to update my switches to later model designs. late model switches will add somewhere around $60.00 to the cost.. more if I replace every signal connector.. in my case all the turn signal ones are excellent but I think Ill put in new headlight connectors (Dorman etc has them)
Ill update this thread as I make mounting and routing decisions. I will be soldering and heat shrinking all my connections.. where easy Ill retain the stock ford switches.. heater for example...
I hope you all find this helpful in your wiring decisions. Ill do my best to give a good critical analysis of this task.. and I will welcome any critique. This is NOT meant to be a factory restoration.. this is meant to be a quality update to something we have all dealt with in our builds... P.O. idiots who just plain didn't care or didn't know
The kit.. very compact...
The instructions... very thorough.. I liked the note from the owners
My quality control technicians decided they needed a closer examination
Today's task..
1) Locate the mounting point for the fuseblock
2) Route wires to engine compartment using appropriate holes and grommets (The kits specs a 1 1/4" hole in the firewall.. removing the factory for grommet leaves a much larger hole..but i have an idea for that.. more later)
#6
03-02-2016, 11:44 AM
Postmaster
#7
03-02-2016, 03:04 PM
Trending Topics
#8
03-02-2016, 03:52 PM
Originally Posted by Notmeofficer
No... they have more stuff attached and it is more expensive.. the fuse block is different too
#9
03-02-2016, 04:49 PM
Senior User
I am curious to see how it is!
Looks like a great harness. And you cannot beat the price for sure! I went with the American Autowire. I was very pleased with it. But for the money you paid, I'd take a few less bells and whistles.
I will answer the question from the other member. The AAW harness from Bronco Graveyard is different. Not necessarily better but different. You should know ahead of time that the AAW harness does NOT support your duraspark and older alternator. Just an FYI there.
I will answer the question from the other member. The AAW harness from Bronco Graveyard is different. Not necessarily better but different. You should know ahead of time that the AAW harness does NOT support your duraspark and older alternator. Just an FYI there.
#10
03-02-2016, 04:49 PM
I went with Rebel because making ends.. figuring out switches... is no problem for me.. a little more work.. a little more sourcing
American autowire was my second choice.. they have good support for additional items you may need.. someone will need to chime in who has actually used their kit
Investigate what will work best for you... the more expensive kits AREN'T necessarily easier OR plug and play
#11
03-02-2016, 04:59 PM
Originally Posted by Notmeofficer
It is best to talk to them.. no kit covers "every" wire,,, meaning the ends.. some switches... some kits use aftermarket switches ..some use repos.. some dont include them (like Rebel).. I was careful to save all my factory OEM ends.. some are still available.. some are not
I went with Rebel because making ends.. figuring out switches... is no problem for me.. a little more work.. a little more sourcing
American autowire was my second choice.. they have good support for additional items you may need.. someone will need to chime in who has actually used their kit
Investigate what will work best for you... the more expensive kits AREN'T necessarily easier OR plug and play
#12
03-02-2016, 05:01 PM

Senior User
Join Date: Jul 2007
Location: Birmingham AL
Posts: 104
Likes: 0
Received 0 Likes
on
0 Posts
#13
03-02-2016, 05:39 PM
Good info Beedub.. and sharing whats it is all about on FTE.. no dumb questions... knowledge is power.. not secret
Ok...
So... I got the fusebox mounted and Ill go through the steps,,simple one by one.. repetition for most but maybe a road map for those who aren't skilled at wiring.
There is a great how to book on wiring
"Automotive Electrical Wiring" by Jim Horner... a couple of bucks found online.. and good for your library.. picture heavy which suits me fine.. see monkey do...
First.. use good quality tools and parts... Harbor Freight is good for some stuff but using Channel Lock cutters and Klein electrical tools really makes the job easier
lay your stuff out so its easy to access.... and make sure you have everything
Heat gun for shrink... solder gun,, my Weller 20.00 pencil tip solders as well as $200.00 commercial guns that break when dropped.. double wall heat shrink in various sizes,, heat shrink ends in various gauges, solder, tip cleaner, wire ties in various sizes, pliers in various sizes, a probe for poking holes

Lil bit has a lot of lights..on top..underneath.. and the sides,, its my toolbox on wheels.. Lincoln ranger 10 Welder, 12 hp air compressor, ln7 suitcase welder, sp-140 welder.. the side boxes havent been mounted yet (I know its not a light duty dent so I wont go into it much further here.. its just the platform for the current wiring job)
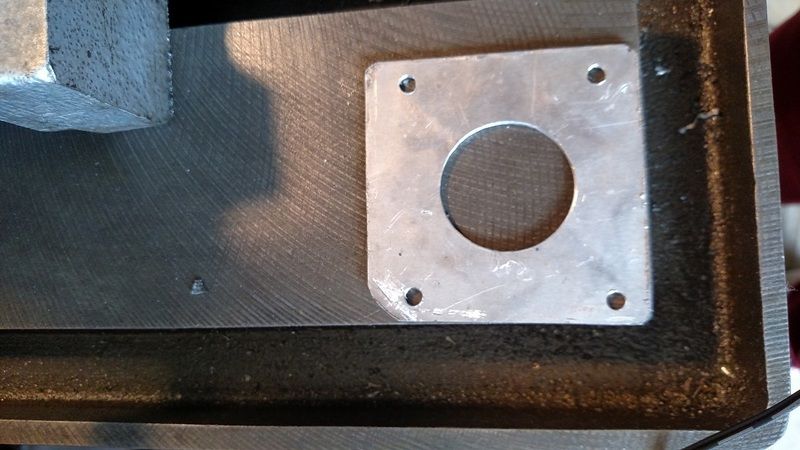
The dents have factory wiring coming out the drivers side from a 2 1/2 inch hole (this is a pic of Oregon Oakie in blast form) . If you are sharp you noticed the OEM hole is dimpled outward... so making a plate to cover it means on the inside where the firewall is flat
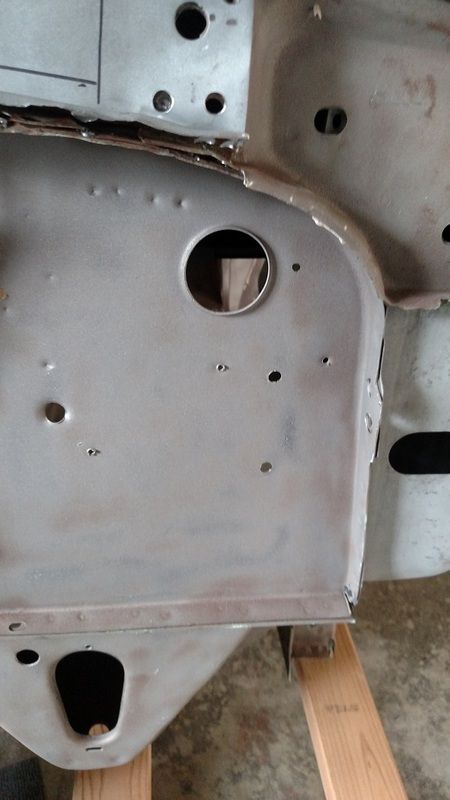
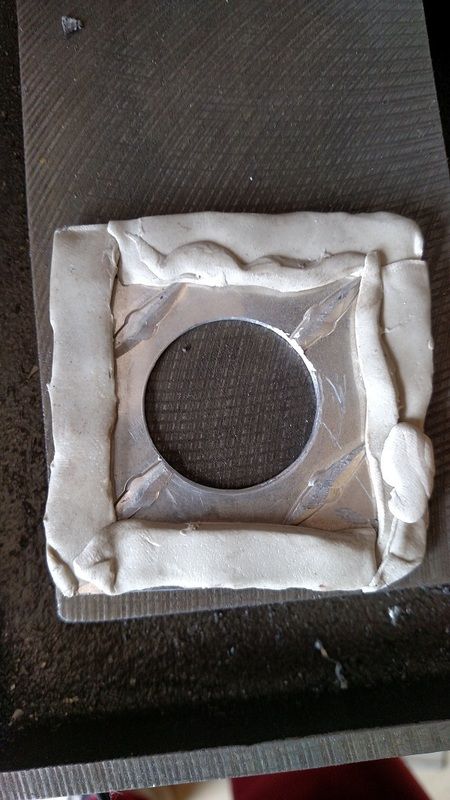
The Rebel calls for an 1 1/4 inch hole... I could have waited and gotten another factory rubber plug.. x cut it and put the rebel wires through but I HATE waiting so I made a plate in the configuration I wanted out of aluminum... 1 1/4 inch hole in the center.. 3/16" mounting holes on the corners... secured with stainless allen head screw with washers and lock nuts... I put some non hardening RV gasket material for installing windows etc... on the backside making an excellent gasket. Once it was bolted down and squished I cut off any protruding gasket material
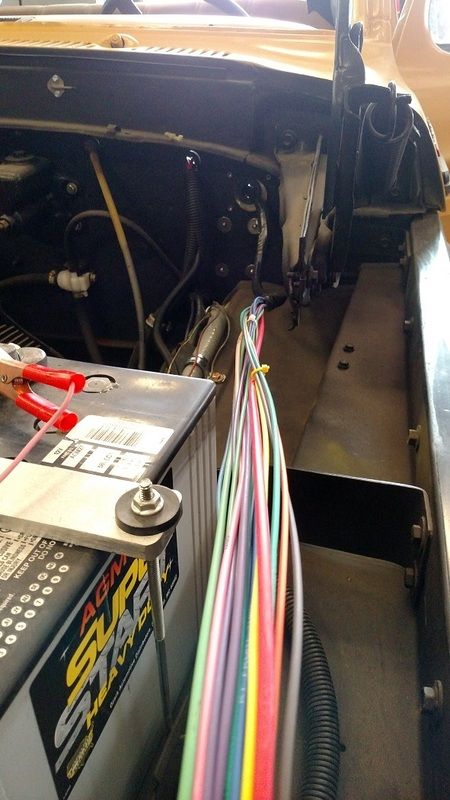
Then according to my pre-plan and following the directions attached the fusebox to the firewall.. again using stainless 3/16 allen heads with washers. The fusebox was plenty flexible and contoured to the body perfectly. On light duty dents it went where the original fuseboxes are located ( on the HD trucks its on the right kickpanel)
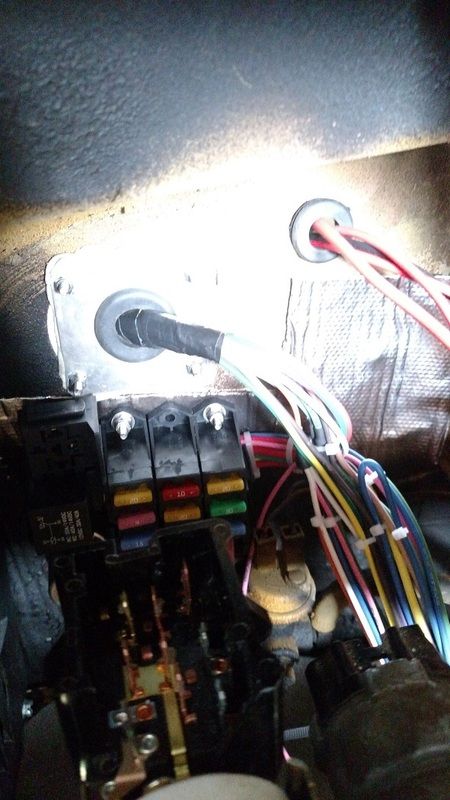
I had already tape wrapped the wires that were marked for the outside... the only change I made was to pull the fuel tank sender wire (pink) from the outside loom because my tank in the HD version is behind the seat.
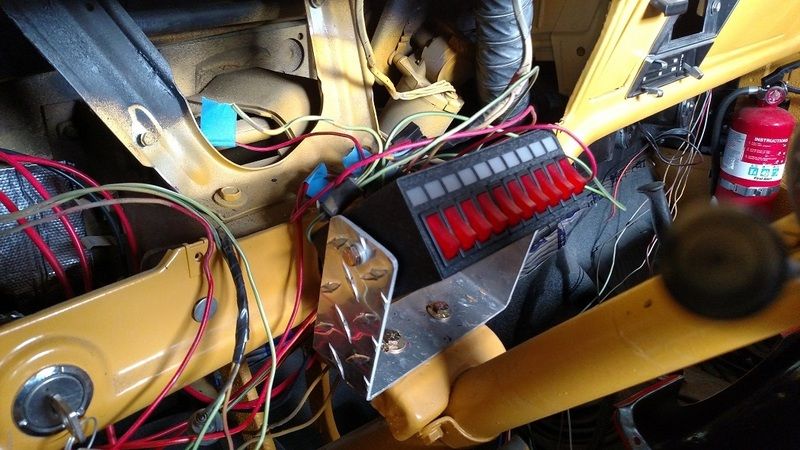
Then all that was left was to pull the wires through the grommet and seat it in its new home (Ill be removing some of the tape from the outside loom as I decide best routing and then re-tape and cover with a secondary sheath when they are finalized) The 1 1/4" hole was plenty large enough for the loom pull with room left over if you are pulling additional wire. In my case the truck had various holes in it in the firewall for a plethora of runs so I used one for the Whalen switch box for all the additional lights this truck has... as well as trailer brakes.
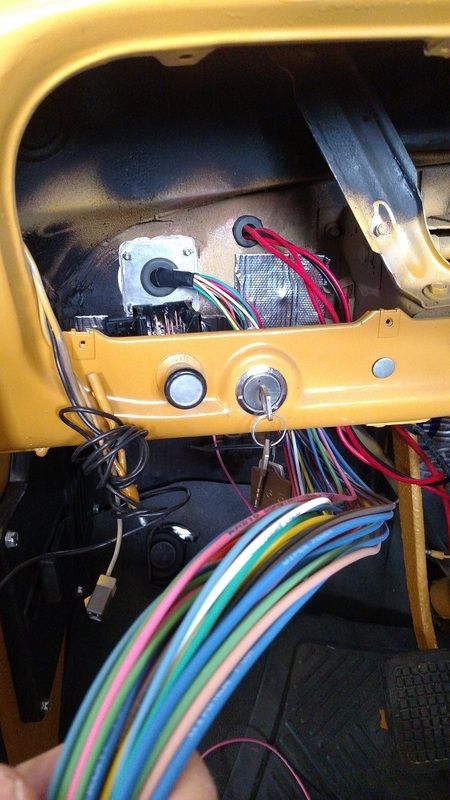
I already have a new headlight switch and ignition so Im going to adapt it if possible using the saved OEM plugs... Ill also make some jumpers to connect some OEM leads in case I want to...
Time invested so far.. about two hours.. actual work.. maybe an hour.. setup, head scratching and planning about an hour...
It all looks like spaghetti right now but will clean up nicely when tape wrapped and loomed
Ok...
So... I got the fusebox mounted and Ill go through the steps,,simple one by one.. repetition for most but maybe a road map for those who aren't skilled at wiring.
There is a great how to book on wiring
"Automotive Electrical Wiring" by Jim Horner... a couple of bucks found online.. and good for your library.. picture heavy which suits me fine.. see monkey do...
First.. use good quality tools and parts... Harbor Freight is good for some stuff but using Channel Lock cutters and Klein electrical tools really makes the job easier
lay your stuff out so its easy to access.... and make sure you have everything
Heat gun for shrink... solder gun,, my Weller 20.00 pencil tip solders as well as $200.00 commercial guns that break when dropped.. double wall heat shrink in various sizes,, heat shrink ends in various gauges, solder, tip cleaner, wire ties in various sizes, pliers in various sizes, a probe for poking holes

Lil bit has a lot of lights..on top..underneath.. and the sides,, its my toolbox on wheels.. Lincoln ranger 10 Welder, 12 hp air compressor, ln7 suitcase welder, sp-140 welder.. the side boxes havent been mounted yet (I know its not a light duty dent so I wont go into it much further here.. its just the platform for the current wiring job)

The dents have factory wiring coming out the drivers side from a 2 1/2 inch hole (this is a pic of Oregon Oakie in blast form) . If you are sharp you noticed the OEM hole is dimpled outward... so making a plate to cover it means on the inside where the firewall is flat

The Rebel calls for an 1 1/4 inch hole... I could have waited and gotten another factory rubber plug.. x cut it and put the rebel wires through but I HATE waiting so I made a plate in the configuration I wanted out of aluminum... 1 1/4 inch hole in the center.. 3/16" mounting holes on the corners... secured with stainless allen head screw with washers and lock nuts... I put some non hardening RV gasket material for installing windows etc... on the backside making an excellent gasket. Once it was bolted down and squished I cut off any protruding gasket material


Then according to my pre-plan and following the directions attached the fusebox to the firewall.. again using stainless 3/16 allen heads with washers. The fusebox was plenty flexible and contoured to the body perfectly. On light duty dents it went where the original fuseboxes are located ( on the HD trucks its on the right kickpanel)

I had already tape wrapped the wires that were marked for the outside... the only change I made was to pull the fuel tank sender wire (pink) from the outside loom because my tank in the HD version is behind the seat.
Then all that was left was to pull the wires through the grommet and seat it in its new home (Ill be removing some of the tape from the outside loom as I decide best routing and then re-tape and cover with a secondary sheath when they are finalized) The 1 1/4" hole was plenty large enough for the loom pull with room left over if you are pulling additional wire. In my case the truck had various holes in it in the firewall for a plethora of runs so I used one for the Whalen switch box for all the additional lights this truck has... as well as trailer brakes.


I already have a new headlight switch and ignition so Im going to adapt it if possible using the saved OEM plugs... Ill also make some jumpers to connect some OEM leads in case I want to...
Time invested so far.. about two hours.. actual work.. maybe an hour.. setup, head scratching and planning about an hour...
It all looks like spaghetti right now but will clean up nicely when tape wrapped and loomed
#14
03-02-2016, 05:46 PM
Postmaster
#15
03-02-2016, 06:19 PM