
It's (Vin) Diesel Time
#76
 03-24-2016, 12:44 PM

I did check the play and there seemed to be a little side to side movement, but not much. I looked on google and came up with that a LITTLE play (especially when the turbo is empty of oil which mine is since it's been off the motor for a while) is normal but not much. Also, any in and out play is bad no matter what.
I didn't have any in and out play and the side to side play was very small so I'm just going to run the turbo for now! Hopefully it still is okay.
I didn't have any in and out play and the side to side play was very small so I'm just going to run the turbo for now! Hopefully it still is okay.

#78
03-28-2016, 11:31 PM
Well I painted my brother's truck this weekend so I got almost nothing done on mine. I think I'm finally done with working on other peoples stuff so I can have all the time on my Bronco now! (Okay that AND school work as well.)
As far as everything sits, I believe I have everything I need to get the Bronco running with the power stroke except:
- Need to alter drivesahfts (after motor/transmission installed though)
- Adapt diesel fuel lines to fit Bronco frame (maybe use rubber hosing on old F250 lines with clamps?)
- Buy new rubber for the motor mounts
- One new bolt for the turbo exhaust housing (one was missing!)
Besides that, I should have all the parts I need. I still need to pull everything from my Bronco though.. but that should take less time that pulling the power stroke stuff from the F250 which wasn't too bad.
Parts I still want to get are:
- Eddie Bauer bumper (the one with the cutouts... I've wanted this for so long but I can't find them locally )
)
- New rear bumper (mine is bent from an offroading mishap years ago)
- New shocks/coil spring spacer for extra weight/ball joints.
Today, I started messing around with prepping the Bronco for paint. When I pull the motor, I want to be able to paint almost immediately so that I can throw the power stroke in shortly after. So as of now, I'm prepping the whole Bronco for the paint. I pulled all the trim, the mirrors, emblems (except the ford one on the tailgate, I have yet to look into how to remove that) grill and lights. I have to figure out how to pull the windshield trim off, and then I'm also going to pull the door vent windows.
With how much I've painted, I've learned I HATE masking things off. Masking takes so much time, costs more on materials, and on top of that, more masking means more areas for clear to peel at the edges.
I started sanding today, but didn't do too much. There was a bunch of old pin-striping stuff halfway down on the doors and near the top of the doors that actually ATE through the clearcoat, so I have to spend extra time sanding those large areas down somewhat smooth. I went over it with an orbital sander, but I'm going to have to take a block and hand sand them down as well if I want it too look nice and flat when I paint over it....
I don't think I'll ever allow pin-striping on any of my vehicles after this.
As far as everything sits, I believe I have everything I need to get the Bronco running with the power stroke except:
- Need to alter drivesahfts (after motor/transmission installed though)
- Adapt diesel fuel lines to fit Bronco frame (maybe use rubber hosing on old F250 lines with clamps?)
- Buy new rubber for the motor mounts
- One new bolt for the turbo exhaust housing (one was missing!)
Besides that, I should have all the parts I need. I still need to pull everything from my Bronco though.. but that should take less time that pulling the power stroke stuff from the F250 which wasn't too bad.
Parts I still want to get are:
- Eddie Bauer bumper (the one with the cutouts... I've wanted this for so long but I can't find them locally
)- New rear bumper (mine is bent from an offroading mishap years ago)
- New shocks/coil spring spacer for extra weight/ball joints.
Today, I started messing around with prepping the Bronco for paint. When I pull the motor, I want to be able to paint almost immediately so that I can throw the power stroke in shortly after. So as of now, I'm prepping the whole Bronco for the paint. I pulled all the trim, the mirrors, emblems (except the ford one on the tailgate, I have yet to look into how to remove that) grill and lights. I have to figure out how to pull the windshield trim off, and then I'm also going to pull the door vent windows.
With how much I've painted, I've learned I HATE masking things off. Masking takes so much time, costs more on materials, and on top of that, more masking means more areas for clear to peel at the edges.
I started sanding today, but didn't do too much. There was a bunch of old pin-striping stuff halfway down on the doors and near the top of the doors that actually ATE through the clearcoat, so I have to spend extra time sanding those large areas down somewhat smooth. I went over it with an orbital sander, but I'm going to have to take a block and hand sand them down as well if I want it too look nice and flat when I paint over it....
I don't think I'll ever allow pin-striping on any of my vehicles after this.
#80
03-30-2016, 09:31 PM
Well the paint prep is still underway. I was hoping I could finish by today but that won't be the case. I originally planned to sand the removable top flat, but I think I'll just scuff it because that will be way more work than I want to spend. I am going to shoot clear over it though so the paint will be protected.
I think I have almost everything ready except for the engine bay. I ended up scuffing the door jambs/tailgate area with a red scotch brite pad so I hope that works well enough for the paint to stick. Once I get the engine bay prepped, I'll wash the whole truck down again with the red scotch brite pad and start masking the things left that still will need masking.
Here's the progress I made today:
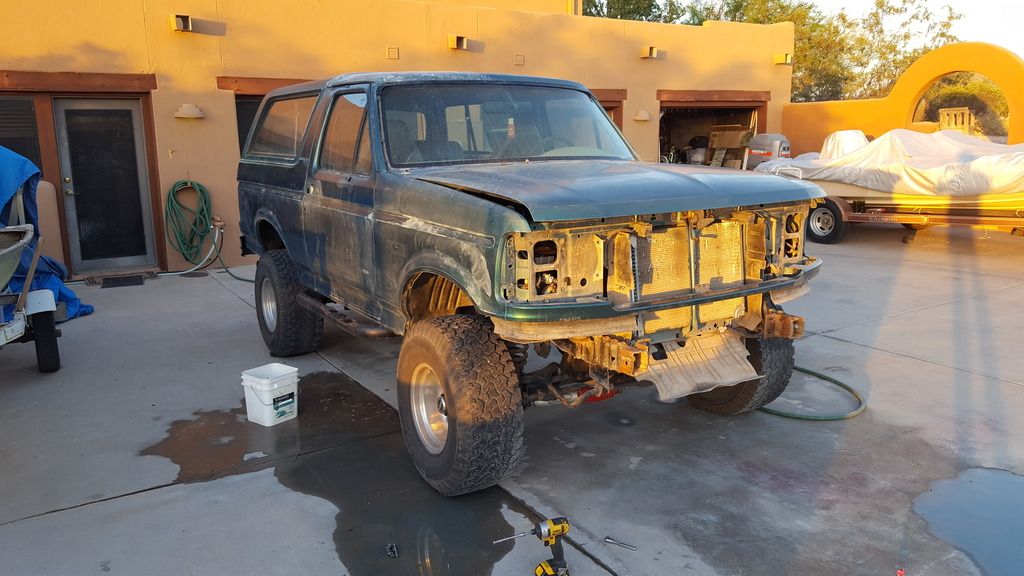
My poor green color is going away! But I'll have a color I've always wanted now. I hope I can get the engine pulled fairly quickly so that I can prep the engine bay for paint! I'll need to find a place to set the powerstroke down and put all my old truck components though before I can pull my engine! My dad's garage is already filled with my transmission/dash/radiator etc so there is no room left in there.
#82
03-31-2016, 02:43 PM
Well I've always like black. I know it's a terrible color in AZ, but I've thought black on trucks has looked good. Plus the AC will be working so it shouldn't be as bad!
So I'm doing a two tone black and red now which I think will look better than just plain black.
I was thinking of doing a metallic vibrant blue because I really like that as well, or even an amber type color, but I figured black is more of a truck color than those other two.
So I'm doing a two tone black and red now which I think will look better than just plain black.
I was thinking of doing a metallic vibrant blue because I really like that as well, or even an amber type color, but I figured black is more of a truck color than those other two.
#83
03-31-2016, 05:20 PM
Tuned
Join Date: Jul 2013
Location: Camp Pendleton/Oceanside
Posts: 250
Likes: 0
Received 4 Likes
on
2 Posts
Yeah cant go wrong with black, and its a Bronco so just take the top off if its too hot (or use your AC if you are into that sort of thing lol) Though the right orange would be awesome. Ive seen some fords with a cool orange and after looking it up i think it is called "dark copper metallic" looks kind of brown sometimes and nice orange in bright light. not to flashy for a truck either.
These pictures are the same truck in two different lights/angles. I bet it would look even better without the two tone and on a Bronco! I guess its probably not what you mean by amber but ya know...
These pictures are the same truck in two different lights/angles. I bet it would look even better without the two tone and on a Bronco! I guess its probably not what you mean by amber but ya know...
#84
03-31-2016, 10:24 PM
That's actually a good color as well! There were a few different options for colors I was thinking, but I figured since I wanted black first, I'd go with that. Then I figured I'd make it a little flashier with the red two tone. I hope I can get the paint to come out nicely!
I just saw an add on craigslist for a guy selling a 96 Bronco with no engine or tranny..... I'm super tempted to try and pick it up for cheaper than drop my Bronco's stuff in it once it comes out.
I don't think that would work well though at my parent's place. I'd have to get my Bronco up and running 100% before I can think about bringing home another vehicle.
#86
04-02-2016, 01:53 AM
Well my plans for painting tomorrow morning wont' happen... but at least I got a bit of work done. I should be able to paint Sunday or MAYBE tomorrow evening. However, there seems to be more weather problems near the evening, and if it gets too late and I have to bust out lights, then bugs will make the unwelcome way in and try and make clearcoat angels all over my truck.
I dawdled a little too much in the morning today when taking things out, and the stupid transmission crossmember took WAY too long to get out. The passenger side crossmember brace.... whoever designed the way that fastens down should be punched in the face.
Anyways, here's my progress:
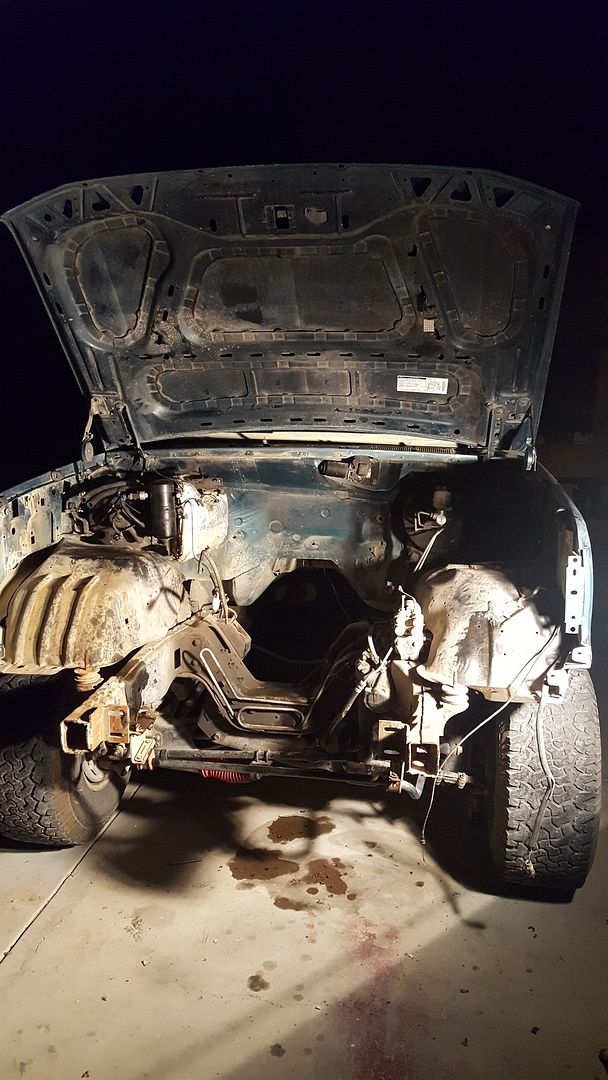
Just need to scuff and clean the engine bay (maybe scrape off that old sticker on the hood for the vacuum routing) and then I think I'll be ready for paint. I may go ahead and take the dash out while I'm this far if I'm not painting tomorrow. Maybe the seats as well, that way I'll have almost nothing I need to mask except a few windows (yes I'm going to paint over the power steering box/evap box/brake booster, I don't feel like masking those off or taking them out.)
Here's my old baby:
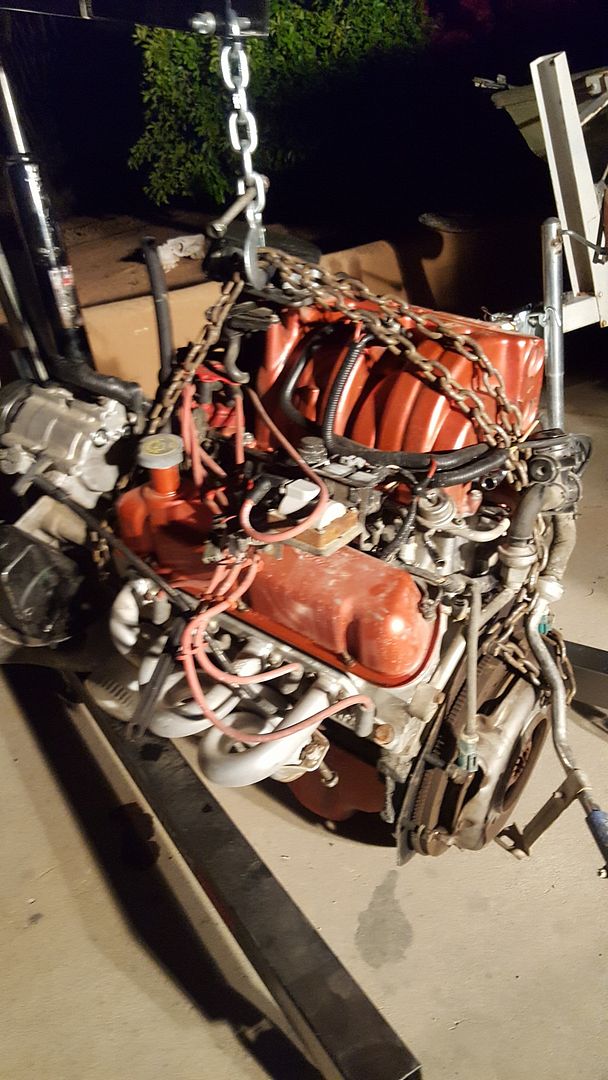
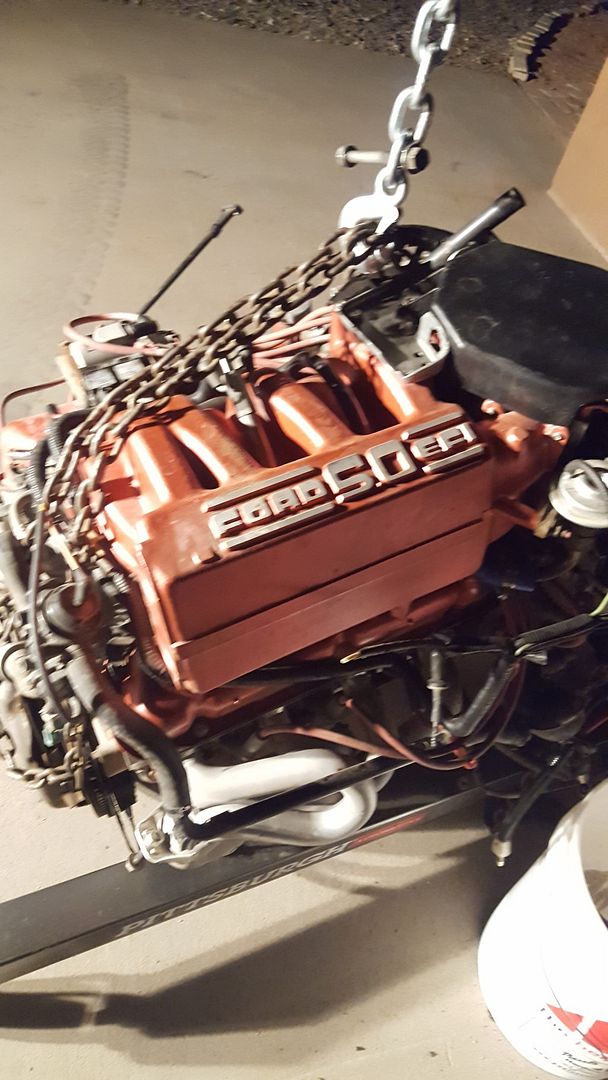
I feel kinda bad taking it out! It served me so well. I never had any real issues with the motor, just small things like spark wires burning up on the headers or some sensors getting old. The worst thing that happened to the engine was the pickup coil in the distributor going out, and that's no big deal. I have to figure out what my plans for this motor are now. When taking stuff down today, I realized just how much time/money I put into this setup. I have cermaic coated bassani headers with a nice y-pipe, full 3" exhaust, nice AFR heads, MSD ignition components....
It would be really nice selling some things to recoup some money on my project, but I know I will find another project someday where this setup would be perfect. If I sell... I don't think I'll price it too low because I won't be in any hurry like I usually am to sell.
#87
04-02-2016, 09:34 PM
I've commited! Well kinda, I'm going to paint tomorrow morning when I wake up and try to get up early (as long as it isn't too cold.)
Today, even though it was only like 80, the air felt way too hot for paint during mid day when I was planning on it. The metal on the Bronco definitely felt hotter than it should be when painting also, despite it apparently only being about 70 when I checked the temps at that time.
Anyways, I'm currently waiting to throw on my last coat or two of clear coat on the accessories I pulled off. I decided to paint the tire rack and mounts, side view mirrors (none chrome portion) rear tailgate access panel, headlight/hood latch mounting brace, and radiator support mounting brackets all the metallic black that I have.
I also polished up all the lights (except the third brake light) and they looked freaking delicious! So I am taking the extra step and clearcoating over them as well. After I threw on the first coat of clear, the lights looked every better! I'm excited to see how magical it's going to look when it's all back together.
I guess my plans of dropping in the 7.3 tomorrow will have to wait, but at least the paint will be done! Honestly, I think this is the most time consuming/hardest part of this entire swap, and it wasn't even 100% necessary!
#89
04-06-2016, 01:25 PM
The lower ball joint went in without much fuss, but the upper was a complete pain! I had to drive back into town and rent a 4x4 ball joint press adapter to get the top one in. However, because the control arm is angled below the upper ball joint, you can't use the press to get it in because it will slowly slide off due to the angle, so I have to use the adapter to hammer it in.
On the passenger side, I haven't gotten the new joints in yet, but it took about 50 minutes to get the control arm off and ball joints pressed out instead of the 6-7 hours it took to get to that point on the drivers side.
For the paint, the drivers side clear coat came out a bit orange peely due to the sun being on that side, but it looks pretty good still. The passanger side (while still with orange peel) came out quite nice. I might buff out or lightly sand and re clear that side since that won't be too bad. I definitely need to reclear the top because I couldn't reach well enough to spray with the sides being wet with fresh paint. The hood also came out poorly on the clearcoat because I couldn't reach as well. However, I took the hood off, sanded it very quickly with 600, then resprayed the clear and it came out really nice. So I know I can easily fix the clear on the top the same way and maybe even tackle doing the whole driver side as well, but I think the driver side still looks good so I might not reclear it yet at least.
Here's what it looks like currently:


Its got orange peel, but it doesn't look too bad. You can tell the reflections are a little blurry because of the orange peel but I'm not super depressed about it as of now.


This side came out better for sure, but overall the basecoat came out very well, and the two tone lines came out super crisp so I'm happy with that. Fixing the clear on the top and buffing the driver side is nothing compared to trying to fix a basecoat or repaint something!
For the actual diesel swap progress, it took me way too long to get out the stock 302 frame to motor mount brackets. The passenger side out came out quite easily. It was just 4 bolts so it wasn't too bad. The driver side one had 4 bolts, but also two very large rivets I had to grind out. Then I had to whack it with a sledge as hard as I could until it finally popped off! The diesel frame to motor mount brackets went on fairly easily. Again, the passenger side one was super easy, it just bolted straight in. The drivers side one can only use three bolts out of the four because the oil filter cutout is where one of the bolt holes would be. I read that it's no big deal to leave that one out, so that's what I'm going to do. However, the driver side only have one of the three available bolt holes ready to use on the frame. I had to drill the bottom two. When drilling, the first hole wasn't too bad to drill. I broke one drill bit when making the hole larger, but I was able to drill it pretty quickly. When trying to drill the second lower bolt hole, it seemed like the drill bits were completely worn out. I spent about an hour pressing and oiling the bits, swapping between different bits, and also swapping to a different drill! It seemed like I couldn't drill the hole at all. Well, apparently SOMEONE was being an IDIOT and had BOTH drill on reverse when trying to drill the second hole.......
 I don't know why I didn't check that and how I managed to have both drills on reverse, but once I switch it to the proper way, the hole was drilled very easily.
Here's the old mounts still in:

And here is the new mount in place:

Also, for some other progress pictures, here's what the inside looks like and the ball joint progress I'm doing currently:


Well that's it for this large post, I have a big lab report due tonight that I better work on so this project will be on hold until later on in the week!