When you click on links to various merchants on this site and make a purchase, this can result in this site earning a commission. Affiliate programs and affiliations include, but are not limited to, the eBay Partner Network.
OK, I'm back at least for a short while. (have another "date" on Mon before she goes back to FL on Tues.)
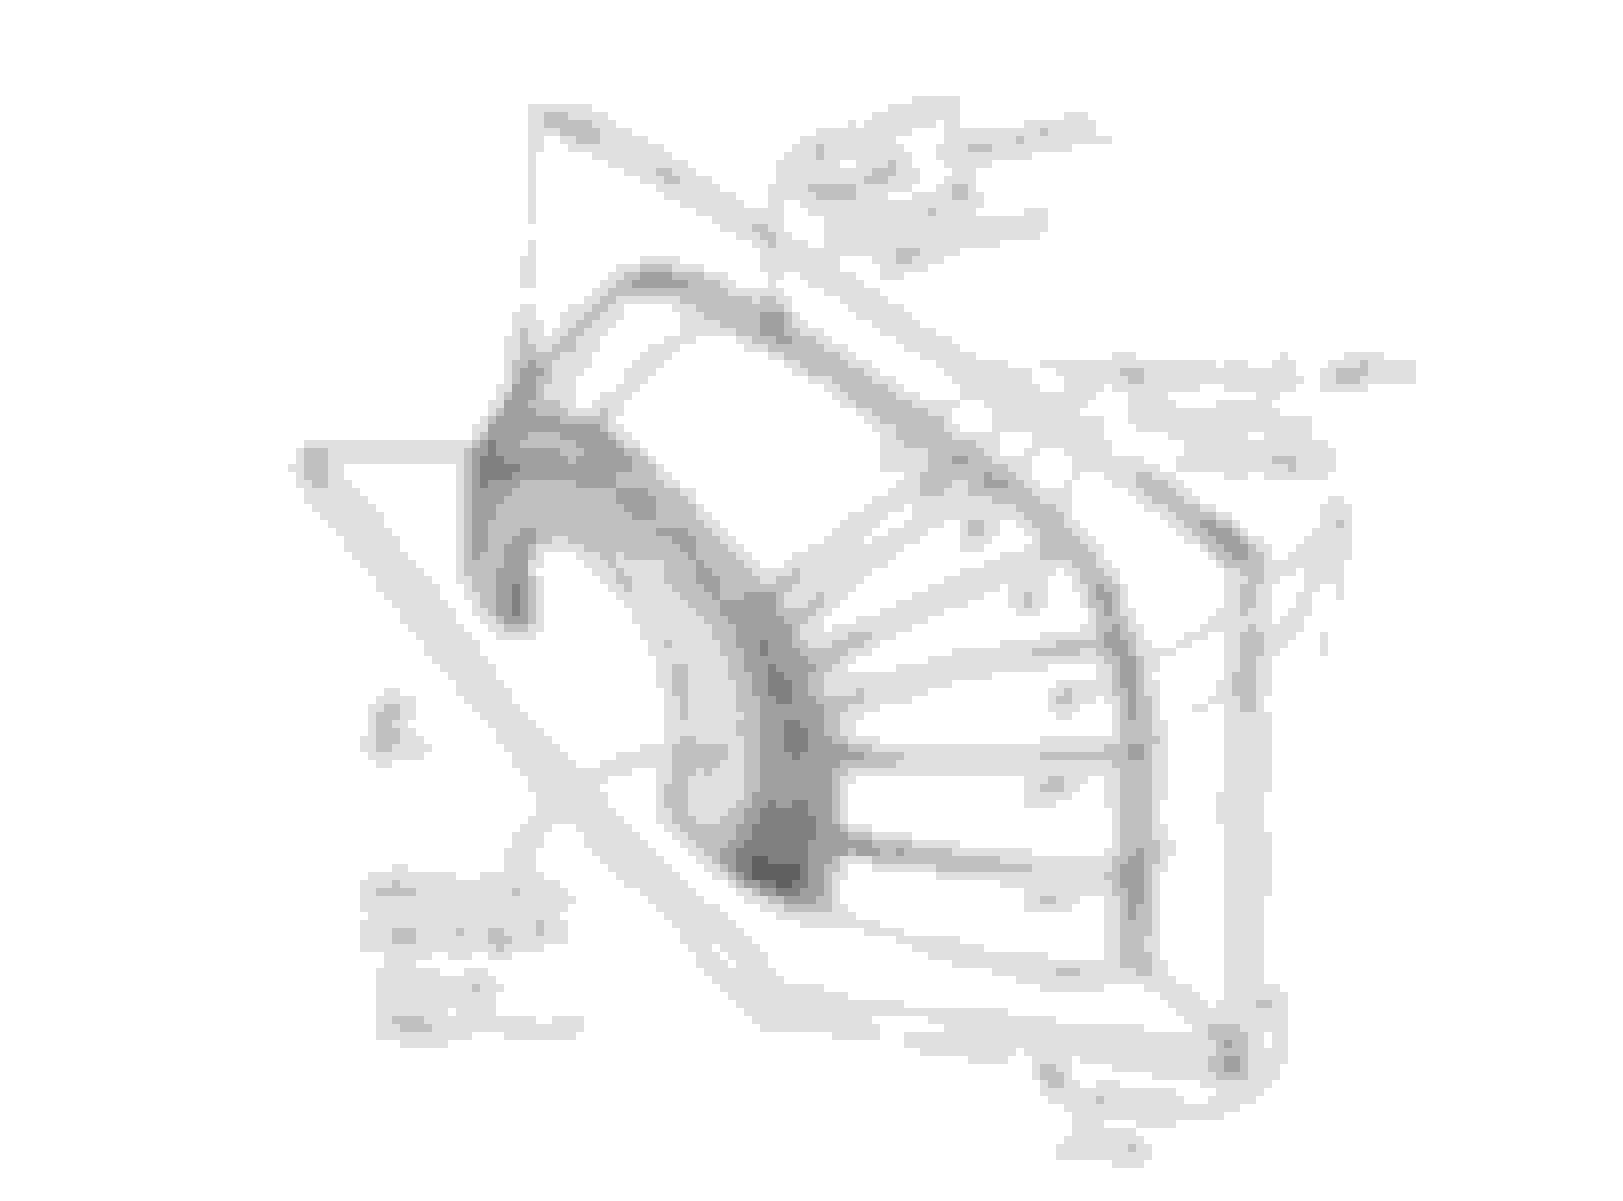
Here is the issue (simplified diagram)
The fenders are basically a section of a 1/2 cone (or 1/2 a bowl). fig 1.
If you cut a cone (XY anywhere between the face and box flange) and move the two sections apart to widen the edges C and D will not line up or fall on a "fair" line (the desired smooth outside line. = red dotted line AB). Fig 2.
Using a filler strip the width of the widening, you end up with a z step in the outside surface line like the light green in Fig 3. the greater the taper the more the issue, as you have already discovered, the fact that the actual fender taper is a squared cone and the taper changes as it progresses towards the upper corners complicates it even more. If you cut a filler strip from another fender, it actually makes it worse (extended dotted lines from C or from D depending on which fender section you cut it from and attach it to) Fig 3.
What is the answer you ask???
Well for the home builder without major metal working equipment and skills to use it, The practical method would be to cut the box flange off in narrow strip (~ 3/4" of the fender surface from the flange) , and the face of the fender off about 4" or so from the outside surface, and attach them to a 2 sided plywood or MDF fixture jig the desired width apart. then join the two back together with multiple pieces of rectangular and trapezoidal shaped metal fillers, with hand formed shallow compound curves, like in figure 4 (still diagrammatic drawing but shows that it is much closer to the "fair" line). and in perspective drawing 5.
As you see it will require a fair amount of metal shaping and welding/finishing. I can explain how to form the compound curves, and determine the patch pieces shape and dimensions, but it is going to require quite a lot of words, I will cover a lot of this in my upcoming CD, but meanwhile you can buy a sheet of 19 ga cold rolled "aluminum killed"/"deep drawing" sheet steel, a shot bag and plastic forming mallets, good body hammers and dollys and watch a bunch of metal shaping U tube videos, then go pound on some metal!
If you don't want to learn/do that much work, them you might want to seriously consider buying a set of the FG wide fenders.
If you are still having difficulty understanding the problem, buy a large simple shape plastic, thin wood or metal mixing or punch bowl, saw the bowl vertically in 1/2, then lay one 1/2 cut edge down. This is a scale representation of a fender, rim of bowl goes against bed. Draw wheel arch on the bottom of the bowl. Now saw the 1/2 bowl into 2 pieces by cutting parallel to bowl rim. Move the two parts away from each other and tape to the table to hold in place. Now try to join the two pieces of the bowl back together into a new smooth shape by gluing or taping thin cardboard strip or pieces in the opening between the bowl sections. Have much luck?
OK, I'm back at least for a short while. (have another "date" on Mon before she goes back to FL on Tues.)
Here is the issue (simplified diagram)
The fenders are basically a section of a 1/2 cone (or 1/2 a bowl). fig 1.
If you cut a cone (XY anywhere between the face and box flange) and move the two sections apart to widen the edges C and D will not line up or fall on a "fair" line (the desired smooth outside line. = red dotted line AB). Fig 2.
Using a filler strip the width of the widening, you end up with a z step in the outside surface line like the light green in Fig 3. the greater the taper the more the issue, as you have already discovered, the fact that the actual fender taper is a squared cone and the taper changes as it progresses towards the upper corners complicates it even more. If you cut a filler strip from another fender, it actually makes it worse (extended dotted lines from C or from D depending on which fender section you cut it from and attach it to) Fig 3.
What is the answer you ask???
Well for the home builder without major metal working equipment and skills to use it, The practical method would be to cut the box flange off in narrow strip (~ 3/4" of the fender surface from the flange) , and the face of the fender off about 4" or so from the outside surface, and attach them to a 2 sided plywood or MDF fixture jig the desired width apart. then join the two back together with multiple pieces of rectangular and trapezoidal shaped metal fillers, with hand formed shallow compound curves, like in figure 4 (still diagrammatic drawing but shows that it is much closer to the "fair" line). and in perspective drawing 5.
As you see it will require a fair amount of metal shaping and welding/finishing. I can explain how to form the compound curves, and determine the patch pieces shape and dimensions, but it is going to require quite a lot of words, I will cover a lot of this in my upcoming CD, but meanwhile you can buy a sheet of 19 ga cold rolled "aluminum killed"/"deep drawing" sheet steel, a shot bag and plastic forming mallets, good body hammers and dollys and watch a bunch of metal shaping U tube videos, then go pound on some metal!
If you don't want to learn/do that much work, them you might want to seriously consider buying a set of the FG wide fenders.
If you are still having difficulty understanding the problem, buy a large simple shape plastic, thin wood or metal mixing or punch bowl, saw the bowl vertically in 1/2, then lay one 1/2 cut edge down. This is a scale representation of a fender, rim of bowl goes against bed. Draw wheel arch on the bottom of the bowl. Now saw the 1/2 bowl into 2 pieces by cutting parallel to bowl rim. Move the two parts away from each other and tape to the table to hold in place. Now try to join the two pieces of the bowl back together into a new smooth shape by gluing or taping thin cardboard strip or pieces in the opening between the bowl sections. Have much luck?
I like the idea. Definitely looks like more work. I think I might give it a try for my other fenders.. How do u suggest to get the new patch pieces to bend correctly? Beginning metal shaper
Man that seems like a lot of work . On power nation truck tech they widened them with just a strip and they looked like a smooth transition. I'd rather hammer and dolly a 5" section than make a whole fender.
I found this post regarding widening the rear fenders. Maybe he can help.
from imlowr2
I did my own. I just cut the fender down the middle, then I got a piece of 18GA steel sheet 1.5" wide and welded them to the fender in between the cut I made. Then grind the welds smooth, body filler, prime and paint. The 1.5" is just right. It's my opinion, but I think the 3" fiberglass make the rear of the truck look like an airplane. Check out my gallery and you can see what 1.5" wider fenders look like. I'm running 10 inch rims on the rear and still have some room between the tires/ fender. <!-- / message -->
<!-- sig --> __________________
Here is a few videos on using the shot bag and mallets.
I have always taken the approach here is until you do hands on, the videos and lessons are just confusing but they do show you the tools and the technique of others. When I was learning the sheet metal trade my journeyman was always telling to hit this way with that awkward sheet metal hammer it wasn't until I used it enought to feel the pressure of each blow of the hammer, the angle I held it while swinging it and the feel of it actually hitting the metal. Eastwood sells some moderately priced items. Make sure you use at least cold rolled steel and of equal gauge of the pc you are applying it to.
Form-fit, form again fit again this action takes awhile depending on the experience of the fabricator. Patience and persistence are key here.
Good luck and start pounding metal
There are as many different ways to make a shape in metal as there are craftsmen doing it. Each has a favorite way based on how they learned, the equipment they have available and the quality of the finished product desired. All are valid, and most use similar underlying principles of metal shaping:, bending, shrinking, stretching. The problem I find in most videos is that they don't cover those underlying principles first, (I honestly think many don't totally understand those principles themselves, but rather work by trial and error "wrote" i.e. they've learned/been taught that if they want to make a certain shape, they use this certain machine and/or tool combination this way... without knowing why. That is all well and good if you have the budget to buy and a place to store and use these massive and expensive tools, have a "master" demonstrating how to use them and then critiquing your attempts, as well as plenty of time and materials to use up learning to duplicate what they did, but then if faced with a different project to make have no idea how to attack it. If you learn the underlying basic principles and have learned several ways to perform them, you can then analyze the new piece and break it down into combinations of those basic principles. Sometimes the result have been accomplished by using a "crutch". I am not trying to disparage anyone else's work or suggestions, but only using it as an at hand example for explanation/teaching purposes. I'm not at all saying what anyone else did is "wrong". For example: imlower2's widening was brought up. His crutch was to only widening the fender 1.5" rather than the more typical 3". The narrower the space that is between the two pieces the less offset the edges will have and the closer it will come to being on the "fair" line. I'm sure he did some hammer and dolly work to blend that transition. Hammer and dolly is another method of producing bending, shrinking and stretching, but the downside is that H&D requires a lot of understanding and practice to do properly compared to shotbag and forming hammer, use of shrinker/stretcher machines, shrinking disk, etc. My intent is to teach the underlying principles and applications using basic tools and equipment available to the non-pro novice metal worker that are easy to operate and control. If you can afford and have the need and/or space for a $10K english wheel, power planishing hammer, pullmax etc by all means go for it, but similar results can be done with far cheaper and simpler tools, just may take longer.
One of the biggest errors I see novices make is to try to "beat the metal into submission" when using a hammer. You are NOT driving nails! A lot more can be accomplished with a series of repeated light taps than with pounding the metal like you are trying to kill it!
After 2,000 spot welds, a lot of cutting, then re-welding, hammering, I have the fender 3" wider. Is it perfect? By no means. Does my tire for under it? Yes.
After 2,000 spot welds, a lot of cutting, then re-welding, hammering, I have the fender 3" wider. Is it perfect? By no means. Does my tire for under it? Yes.
You should be very proud of that what you achieved. I think you did a outstanding job without access to all the tools in a big shop
 04-11-2015, 05:42 PM