When you click on links to various merchants on this site and make a purchase, this can result in this site earning a commission. Affiliate programs and affiliations include, but are not limited to, the eBay Partner Network.
I currently have several other "rebuild" threads open, so why not start another one?
in truth, i'm out of shielding gas on my welder, so my T4 up-pipe fab is on hold and that's the last major step on the engine rebuild.
...so, i tore into the truck itself this weekend and made it deeper into both ends than i expected to in one weekend by myself.
The plan for the whole project is:
1. Get everything down to a bare rolling frame, blast it clean and paint the whole frame.
2. Gut the cab down to the dash – doors off, windshields out (they’re both busted now anyway), headliner, seats and floor out.
3. Paint everything! the inside of the bed, cab floor, grill, bumpers, and everything below the bend in the bodyline all around the truck will get Al’s bedliner. Then, rat-rod flat black goes on top of that an everything else. She’ll be all black in the end
4. Add overhead console to cab with gauges and lots of switches
5. Add LOTS of lights to the outside of the truck - or at least wiring for lots of lights to be added once i get the bumpers and headache rack made.
6. Oh yeah, and she’ll get that new 400-500 hp I’m buiding.
So, here’s the “before,” as it sat parked in front of the barn for a month after inspection expired at the end of July:
I’ll be curious to see how much taller my son is next to it when its done maybe I’ll put a lift kit on it to hide all the delays! On a side note, the truck fired right up after a month of sitting untouched. I was quite impressed with that old 360k mile engine. Almost [ALMOST] made me not want to rip her up. …halting the growing body rust is the main motivation for the project though. …that and more engine power!
I yanked the bed off on Friday night:
I wound up crunching the front left corner of it while lifting with straps, which sucked, but the wheel wells are all rusted out anyway, so at least I learned to be more careful with the good bed when I swap it over. I also came up with a method to remove the bed completely from above without having to drop the fuel tanks and mess with the rusty nuts below. I’ll post a separate thread and link it here shortly.
After removing the bed and driving the half-naked truck up to the house to annoy my wife, I tore into the front end. here’s a view of the core support:
Rusty in the corners, but the mounts are still intact unlike the 96 250 with half the miles on it that I parted out last year. I have some questions on this, but I’ll list them all at the end.
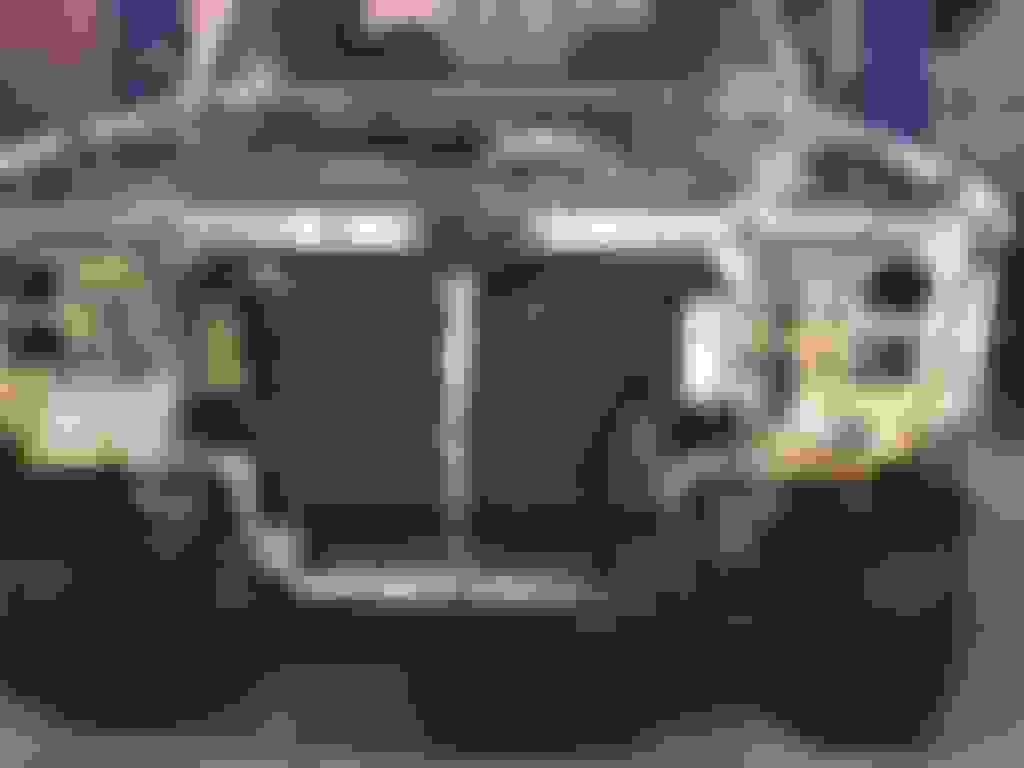
Here’s how she sits after a weekend of disassembly and plastic baggy labelling…
Notice my other little helper next to the red rolling toolbox?
Also – I started mocking up the IC on the front end as I’d like to get all the cutting and drilling done now prior to the full paint job. I moved the bottom of the AC evaporator back and cut for the inlet/outlet of the IC. I’m working on the mounts this week at work.
And here’s what the outside of the barn looks like now – my wife is going to be pissed!!!
Ok, now for questions for you all:
1. What the heck is that wire harness to nowhere under the driver’s side headlight opening on the core support. I don’t remember that on my 96 F250?
2. When adding an IC to our trucks, do you (who have done it) mod that center strap and run it up around the front of the IC, or do you just lose it altogether? I can’t see how it would work between the IC and the AC evaporator.
well, i'm stick as well, so no trans cooler for me so i can essentially put the IC right up against the evaporator. did you leave your trans cooler in the stock location and put the IC in front? didnt look like there'd be room enough for that.
and by "flat" do you mean, like a pancake, removing the u-shape to it, or just straightening it out so it didnt bow forward anymore?
also, do you cut that little stand off the back side of the black plastic nose/grill support? i'll try to get a picture of that if that description doesnt make sense....
well, i'm stick as well, so no trans cooler for me so i can essentially put the IC right up against the evaporator. did you leave your trans cooler in the stock location and put the IC in front? didnt look like there'd be room enough for that.
and by "flat" do you mean, like a pancake, removing the u-shape to it, or just straightening it out so it didn't bow forward anymore?
also, do you cut that little stand off the back side of the black plastic nose/grill support? i'll try to get a picture of that if that description doesnt make sense....
Well we both have sticks then...that being said it all depends how close you mount the IC. Flat as in I removed the bow. I used a 6.0 IC and it fit in there without issue.
The answer to question umber one is Daytime Running Lamps. The DRL module plugs in there and gets mounted to the core support.
Looks good, keep up the good work.
thanks! and DRL's were just a Canadian thing at the time, right? what is the "module"? just a photosensor?
Originally Posted by nossliw
Well we both have sticks then...that being said it all depends how close you mount the IC. Flat as in I removed the bow. I used a 6.0 IC and it fit in there without issue.
i'll be running a 6.0 IC as well. thanks for the info. i'll have to look at it closer to night and choose a direction.
always nice to know what someone else has done (successfully or not :-)), though!
thanks! and DRL's were just a Canadian thing at the time, right? what is the "module"? just a photosensor?
No photocell on this one. The DRLs came on with the ignition, ran at a lower output than the low beam headlights and only shut off when you set the parking brake. I thought they were only on the Canuk trucks as well, but my old (green/white) truck had them. That's why I called it Bullwinkle. Big, Canadian, and kinda slow, lol. This is a bad picture but you get the idea.
thanks guys - yeah, this disassembly stuff is easy when the rust isn't too bad!
and that's 2 votes for straightening that center strap and one for running without it. I think i'll prob straighten it, redrill the hole, paint everything up, then if it doesn't fit, just throw it in the scrap pile... :-)
and good picture nate. I stared at that for about 10 minutes last night before I noticed the little dongle (I just wanted to say dongle) on the end of that harness. now I get it! but why put it all the way up there? there's plenty of room under the dash. weird.
ha! she hasnt seen the mess, but she was just looking over my shoulder when i was reading your comment and is now on to me!!!
luckily she is very reasonable and lets me get away with this sort of thing on a regular basis.
in truck news, i got my upper IC mounts made at work, so i'm ready for some more tear down work this weekend and some more IC fitup.
hopefully i get the cab off, engine and tranny out and start prepping for blasting the frame.
one question for you all - how bad is the steering gear to change on a truck that is fully assembled? i plan to replace it, but i wont be touching the suspensions/steering on this rebuild and hope to do an RSK next summer. it'd make more sense to do the drop pitman arm on the new steering gear right away, as long as i'm not making [much] more work for myself on the install and removal than if i were to do it now.
 09-08-2014, 02:12 PM