1948 - 1956 F1, F100 & Larger F-Series Trucks Discuss the Fat Fendered and Classic Ford Trucks

1949 F4 V8 to Mercedes diesel build thread

Thread Tools
 
Search this Thread
 
  #151  
Old 09-24-2015, 12:52 PM
49fordv8f4's Avatar
49fordv8f4
49fordv8f4 is offline
Cargo Master
Thread Starter
Join Date: Aug 2014
Location: North Central Arkansas
Posts: 2,594
Received 69 Likes on 40 Posts


The fitting sticking out of the front of the stainless elbow with the blue towel stuffed in it, is the suction line for the crankcase vent on top of the valve cover. It will pull thru an oil catch can to separate the oil before it is sucked into the engine.
 
  #152  
Old 09-24-2015, 01:59 PM
nsboyd1210's Avatar
nsboyd1210
nsboyd1210 is offline
Mountain Pass
Join Date: Apr 2014
Location: Tampa Bay Area
Posts: 171
Likes: 0
Received 0 Likes on 0 Posts
Mark,

The fit and finish is nice, nice. It is enjoyable to see the progress. Thank you for sharing.

Nelson
 
  #153  
Old 09-24-2015, 04:25 PM
38 coupe's Avatar
38 coupe
38 coupe is offline
Cargo Master
Join Date: Aug 2010
Location: Houston
Posts: 2,903
Likes: 0
Received 109 Likes on 57 Posts
Nice update. Hopefully soon we will see a first drive video!
 
  #154  
Old 09-24-2015, 08:01 PM
topmoo's Avatar
topmoo
topmoo is offline
Postmaster
Join Date: Aug 2003
Location: Houston
Posts: 3,222
Likes: 0
Received 3 Likes on 3 Posts
Beautiful work! That engine looks really good in there, nice fitting. Looking forward to the first drive video.
 
  #155  
Old 09-25-2015, 12:51 PM
49fordv8f4's Avatar
49fordv8f4
49fordv8f4 is offline
Cargo Master
Thread Starter
Join Date: Aug 2014
Location: North Central Arkansas
Posts: 2,594
Received 69 Likes on 40 Posts
Thanks fellas for the kind words. It will be a while before I can do a first drive video. I have to modify and plumb the fuel tank for a return line and install the feed line. The brakes will be the biggest hurdle to driving. I have to machine all the brackets for the front disc brake mod and build a master cylinder mount, then run all new brake lines. I do hope to hear the engine run soon though. With all the help and encouragement from this board, I may be able to get this truck finished and drive it
Thanks again, Mark
 
  #156  
Old 10-02-2015, 10:16 AM
49fordv8f4's Avatar
49fordv8f4
49fordv8f4 is offline
Cargo Master
Thread Starter
Join Date: Aug 2014
Location: North Central Arkansas
Posts: 2,594
Received 69 Likes on 40 Posts
I will try to upload a photo from photobucket to see if it works.
I installed the rebuilt alternator and had a friend TIG weld the PCV fitting in the stainless ell and the tubing for the rest of the cold air intake.


  #157  
Old 11-18-2015, 05:49 PM
49fordv8f4's Avatar
49fordv8f4
49fordv8f4 is offline
Cargo Master
Thread Starter
Join Date: Aug 2014
Location: North Central Arkansas
Posts: 2,594
Received 69 Likes on 40 Posts
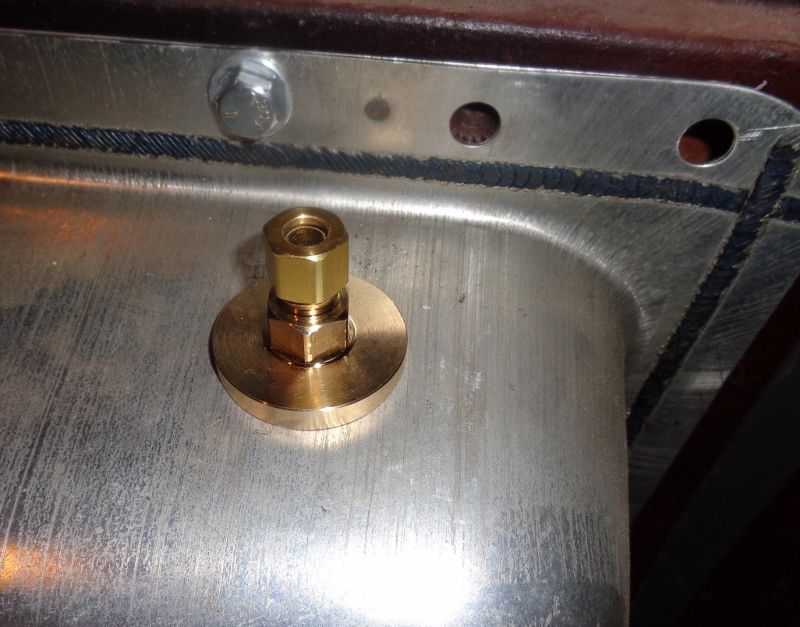
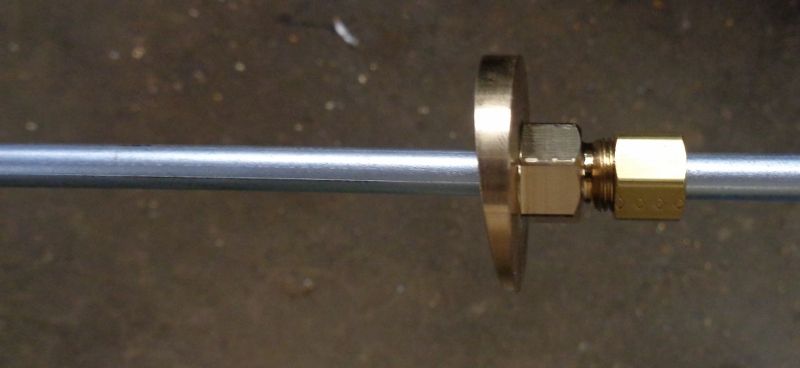
I machined a fitting to solder to the top of my fuel tank for the diesel fuel return line from the injection pump. I used a nut and ferrule from a 5/16" compression coupling and machined the fitting to solder to the tank. I will slide the tube thru the fitting to where it is just off of the bottom of the tank and tighten the nut to hold it in place and to seal it.


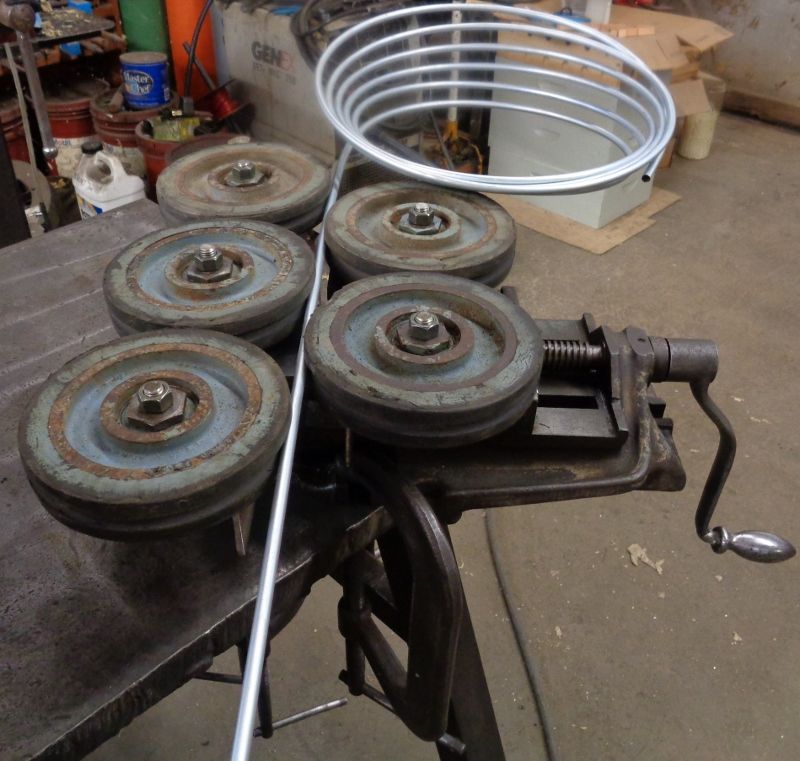
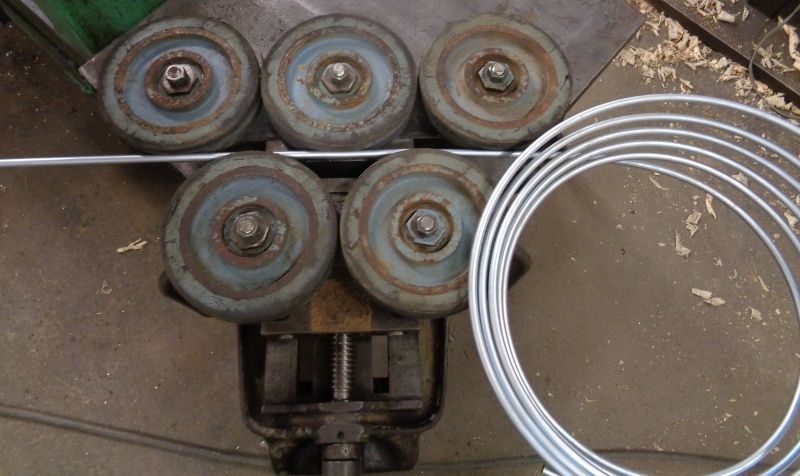
I also made a tubing straightener from an old mill vise and some rollers that I have. I will use it on the 5/16" steel tube for my fuel lines and the 1/4" steel for my brake lines. It does a pretty decent job of straightening the tube from a coil.
 
  #158  
Old 11-18-2015, 08:02 PM
ALBUQ F-1's Avatar
ALBUQ F-1
ALBUQ F-1 is online now
Fleet Owner
Join Date: Jul 2004
Location: NM
Posts: 26,801
Received 607 Likes on 377 Posts
Nice straightener! Are those sheaves or do they have a round groove? I've wondered if sheaves would work.
 
  #159  
Old 11-18-2015, 09:26 PM
49fordv8f4's Avatar
49fordv8f4
49fordv8f4 is offline
Cargo Master
Thread Starter
Join Date: Aug 2014
Location: North Central Arkansas
Posts: 2,594
Received 69 Likes on 40 Posts
Thanks, Ross. They are actually rubber guide wheels from a elevator cylinder drill rig I repaired for a customer. I turned a radius groove in the face. I wasn't sure the rubber rollers would work, but they do a nice job. I thought about sheaves also. I do think they would work well.
 
  #160  
Old 12-23-2015, 08:03 PM
Daves78crew's Avatar
Daves78crew
Daves78crew is offline
New User
Join Date: Aug 2013
Posts: 7
Likes: 0
Received 0 Likes on 0 Posts
You have an amazing attention to detail as most machinest do. When you are finished with your truck it will be very a useful, one of a kind vehicle. I really like what you have done.

Is your fuel tank galvanized inside? If it is the diesel fuel will cause the galv to turn loose and cause problems.
 
  #161  
Old 12-23-2015, 09:42 PM
49fordv8f4's Avatar
49fordv8f4
49fordv8f4 is offline
Cargo Master
Thread Starter
Join Date: Aug 2014
Location: North Central Arkansas
Posts: 2,594
Received 69 Likes on 40 Posts
Daves78crew, Welcome to FTE! Thank you for the kind words. My goal is for the engine to look like it belongs in the truck. I hope I'm succeeding. I believe the fuel tank is tin plated. When I attempted to solder the fitting on that you see in the above post, the fitting wouldn't tin so, I wiped off the excess solder from the tank and the plating wiped off just like the solder. It actually pooled up where the tank was cooler and solidified like solder does. Thanks for the heads up about galvanizing and diesel, I wasn't aware of that.
 
  #162  
Old 12-24-2015, 06:13 PM
49fordv8f4's Avatar
49fordv8f4
49fordv8f4 is offline
Cargo Master
Thread Starter
Join Date: Aug 2014
Location: North Central Arkansas
Posts: 2,594
Received 69 Likes on 40 Posts
I have been working on running the fuel supply and return lines this week. I have a filter with a water drain that I want to mount on the rear crossmember for the Brownie. I thought before I mount it I should check to make sure that I have the Brownie setting at the correct angle. As it turned out I had it at too steep an angle. I have the engine setting at 3 degrees, it should be the same as the flathead, if I measured correctly. The rear axle is between 3 3/4 and 4 degrees. I had the Brownie at 7 degrees. I removed the front mount from the Brownie and shortened it about 5/8", now the Brownie is setting at 3 degrees. I will leave the axle alone as I think 3/4-1 degree difference shouldn't be enough to cause any vibration in the driveline. It probably changes some as the truck is loaded anyways. Now I can mount the filter and finish running my fuel lines to the engine. I will post photos next week when I get them finished.
 
  #163  
Old 12-25-2015, 12:20 PM
ALBUQ F-1's Avatar
ALBUQ F-1
ALBUQ F-1 is online now
Fleet Owner
Join Date: Jul 2004
Location: NM
Posts: 26,801
Received 607 Likes on 377 Posts
Gas tanks are usually coated with "terne", not galvanized. I think it's a lead/tin mix.
 
  #164  
Old 12-25-2015, 06:04 PM
Jolly Roger Joe's Avatar
Jolly Roger Joe
Jolly Roger Joe is offline
Lead Driver
Join Date: Jul 2011
Location: Rockingham, VA
Posts: 6,599
Received 27 Likes on 23 Posts
Originally Posted by ALBUQ F-1
Gas tanks are usually coated with "terne", not galvanized. I think it's a lead/tin mix.
Same as the terne roof, right? Just not green or red...
 
  #165  
Old 12-28-2015, 07:44 PM
CBeav's Avatar
CBeav
CBeav is offline
Elder User
Join Date: Jun 2015
Location: Louisville
Posts: 791
Likes: 0
Received 6 Likes on 6 Posts
You'll want 3/4-1 (1.5 o.k. but pushing it) degree difference in order for the u-joints to 'work'. At 0 degrees the rollers stay in one spot and quickly build ridges in the cups.


Quick Reply: 1949 F4 V8 to Mercedes diesel build thread


All times are GMT -5. The time now is 01:11 PM.