1949 F4 V8 to Mercedes diesel build thread


#182
 02-01-2016, 10:44 PM
Thanks Guys! I'm tickled to say the least. This has been a long time coming. Nicholas, I made the die. It is made out of mild steel scraps I had and a couple of 5/16" dowels. I cut the strip for the clamp and eyeball it centered over the notches. Then I set the top half on the strip and press it in my hydraulic press.
#186
02-10-2016, 06:13 PM
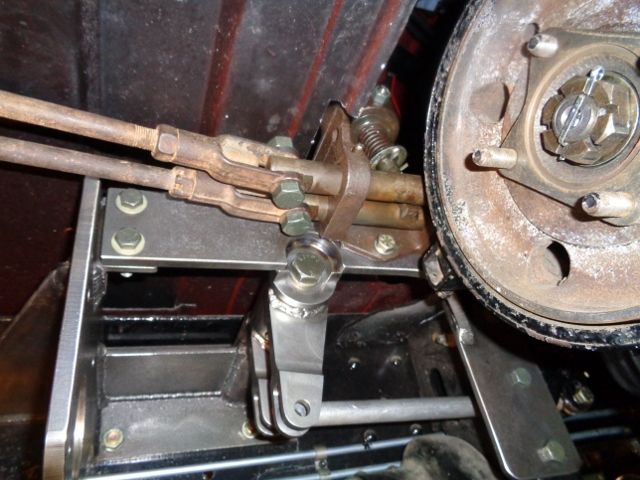
Since I have the Fuel system done and the engine running I thought, that while I was waiting on funds to get my inner fenders and radiator frame powder coated, I would work on the front disc brake mod. I mounted my mock up caliper mount and rotor on the drivers side to see if it fit ok like it did on the passenger side. As it turned out, the steering arm on the spindle is different and the tie rod nut is in the way to put the lower bolt in the caliper. I mocked it up with the calipers mounted to the rear of the axle at about 10 o'clock. So, I rotated my caliper bracket to move the caliper to the front of the axle at about the 2 o'clock position. That solved all of my clearance issues and actually routes the brake hose to a better position. I am glad I checked it on the other side before machining the actual brackets.
Mark
Mark
#187
02-12-2016, 06:07 PM
I realized today that the steering arm wasn't the issue. Swapping the bracket to the drivers side rotated the bracket farther down toward the steering arm because of the way the bolt pattern on the spindle is orientated. I believe will still mount the calipers to the front as it does route the hose better.
Mark
Mark
#188
04-04-2016, 07:55 PM

#189
04-04-2016, 08:45 PM
Thanks for the interest, Dave. I have been working on the disc brake conversion for the front axle. My drums were not serviceable so, I decided to convert to discs. I have started another thread for the disc brake conversion as there a quite a few bigger trucks on the board. I thought a thread for big truck brakes would be more visible than having it on my build thread. When the brakes are done I will probably add a post here also to keep the build thread up to date.
Thanks again, Mark
Thanks again, Mark
#190
04-21-2016, 01:48 PM
Now that I have the front brakes done and the MC bracket made, I wanted to do some work on the rear brakes. I had originally intended to use DOT 5 silicone fluid in the drums brakes, but since I converted the front to discs I am going back to DOT 3 fluid. I had assembled the wheel cylinders with DOT 5 when I rebuilt them, so I pulled the rear drums and cleaned out the cylinders and reassembled them with DOT 3. I reassembled the drivers side first and used the proper feeler gauges to adjust the brake shoes. Everything went well, the shoes adjusted perfectly. The passenger side was another matter. The thin steel center of the drum is warped from being pounded on with a hammer. I tried to straighten it and did help it some, but I couldn't get it straight enough to adjust the shoes with a feeler gauge. So, I adjusted the anchor points and the cams until I had a very slight drag on each. Hopefully it will work fine, if not I may have to convert the rear to discs also. I hope not. I also made new brake lines for the rear axle and installed them along with a new brake hose to the frame. The Eastwood flaring tool worked flawlessly, I am very impressed.
#191
04-21-2016, 06:58 PM
Fleet Owner
#192
04-29-2016, 02:21 PM
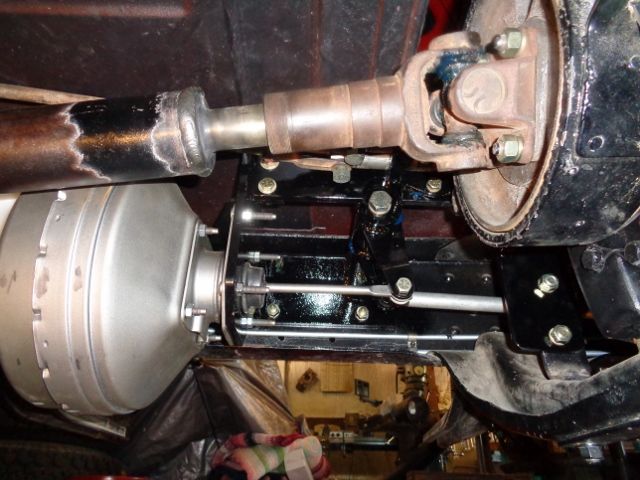
I mentioned in an earlier post of my build thread that I installed a Brown Lipe 3 speed auxiliary transmission in my truck. This transmission is 2:1 underdrive, 1:1 and .72:1 overdrive. I have worked the last couple of days building a shifter mount. Here are a few photos.
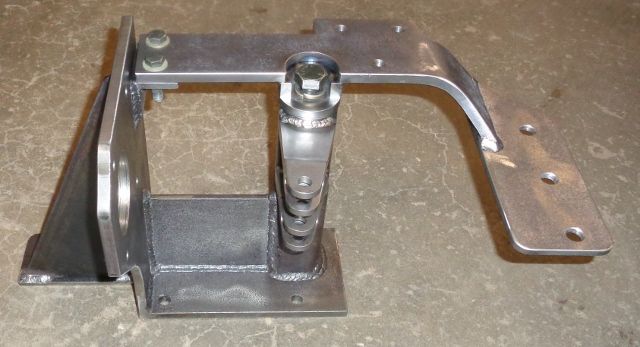
I built the shifter mount as part of the MC mount that I posted previously.

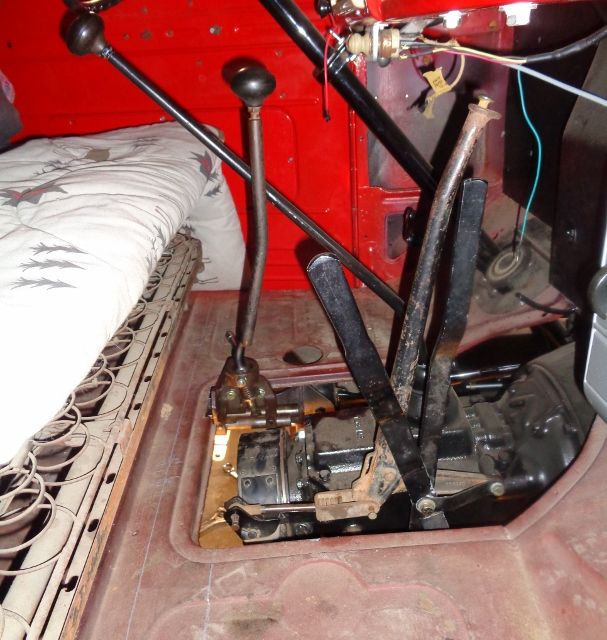
The two silver lines on the floor are the fore and aft positions of the seat. The shifter will clear the seat with it moved all the way forward, although I am too fat to use the seat anywhere than all the way back.
I notched the crossmember that the carrier bearing was mounted to for the shift rails. I will bolt a plate on the bottom to bridge the notch.
Thanks, Mark

I built the shifter mount as part of the MC mount that I posted previously.


The two silver lines on the floor are the fore and aft positions of the seat. The shifter will clear the seat with it moved all the way forward, although I am too fat to use the seat anywhere than all the way back.


I notched the crossmember that the carrier bearing was mounted to for the shift rails. I will bolt a plate on the bottom to bridge the notch.
Thanks, Mark
#194
04-29-2016, 07:03 PM
Thanks Ross! No, I probably won't use the underdrive. The T98 already has about the lowest 1st gear of any 4 speed. I have 5.83 rear axle ratio and I'll be running 225 70R 19.5 tires, I think the overdrive will be really nice. BTW, thanks for the heads up on the brake fluid. I will use dot 4.
Mark
Mark
#195
05-06-2016, 07:02 PM
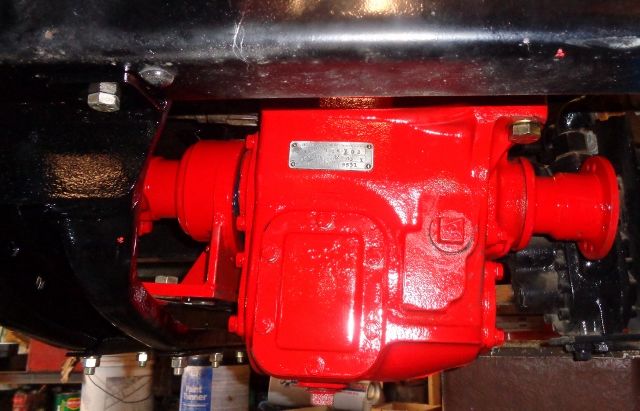
Yesterday I painted the MC mount, crossmembers for the brownie and the brownie itself. I reinstalled everything today. I installed the driveshaft between the 4 speed and the brownie so I could run the brownie to see how it sounds. It doesn't sound good, so it looks like I will be pulling it back out and opening it back up to check it out. I installed all new bearings in it several years ago and had to get a drawing from Spicer to machine a new thrust washer for it. The noise I am hearing sounds like gear noise, maybe the thrust washer is not thick enough and there is gear movement on the mainshaft. Anyway here is some pics.
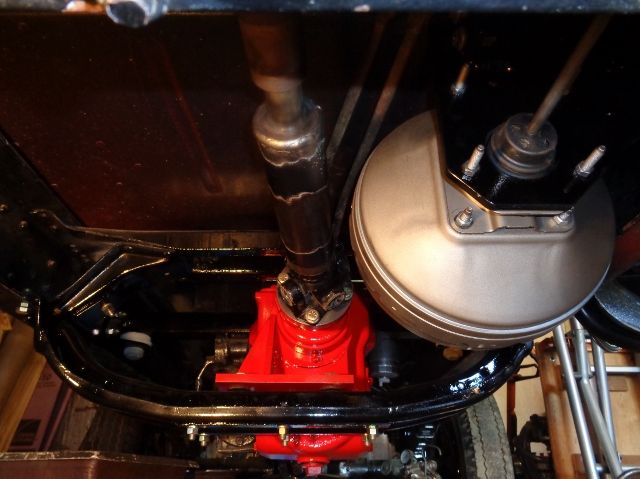
I still have to make new shift rods and replace the u-joints in the driveshaft and paint it. I will probably paint the booster also, I'm assuming that it will rust as is.
Thanks, Mark


I still have to make new shift rods and replace the u-joints in the driveshaft and paint it. I will probably paint the booster also, I'm assuming that it will rust as is.
Thanks, Mark