Hypermax Turbo Van Kit Install (7.3 IDI)
#1
 06-27-2014, 04:21 AM

Hypermax Turbo Van Kit Install (7.3 IDI)
This thread is based on a bigger post on my website for the Hypermax Van Installation.
After two years of searching, I was not able to find a used van turbo kit for my 7.3 IDI. I assumed that even if I found a used IDI van turbo kit, it would cost me at least $750-$1000. I waited long enough, saved up a little, and decided to buy a new Hypermax van turbo kit. Overall, I think it was a better decision to buy new, rather than re-appropriate a truck turbo kit or keep searching for a used van turbo kit.
Here�s why:
1.) No need to fab up missing parts. I was able to find lots of truck turbo kits and lots of solo turbos. The problem is, not every seller has all the parts. They might have the up- and down-pipes, but not many of the little things like the valve cover, necessary brackets, linkages, etc. By the time you figure in the cost of either fabricating your own brackets or paying someone else to make the missing components, it�s cheaper to install a new kit.
2.) Easy to install. The kit comes with instructions that are very legible. Since I purchased directly from the seller, they are more than welcome to help out.
3.) Truck kits are very different from van kits. Even if you get a complete truck kit, maybe 20% of the parts can be used for the van. The van kit�s components differ as follows: Air intake housing, CDR location and mounting, glowplug relay and wiring locations, Diesel filter head location, Turbo mounting bracketing, Intake hat, up-pipes, down-pipe, oil feed line, kickdown linkage, transmission dipstick housing, transmission vacuum line, and most of the hardware.
This write up isn�t designed to be an installation tutorial, but it will probably read like one. Hypermax posts their instructions online, and they should be followed precisely. If my write-up helps you out, you are welcome. Disclaimer: I will not be held liable for anything that happens to your vehicle or any occupants or anyone based on the information in this text or the images. You are responsible for your own vehicle.
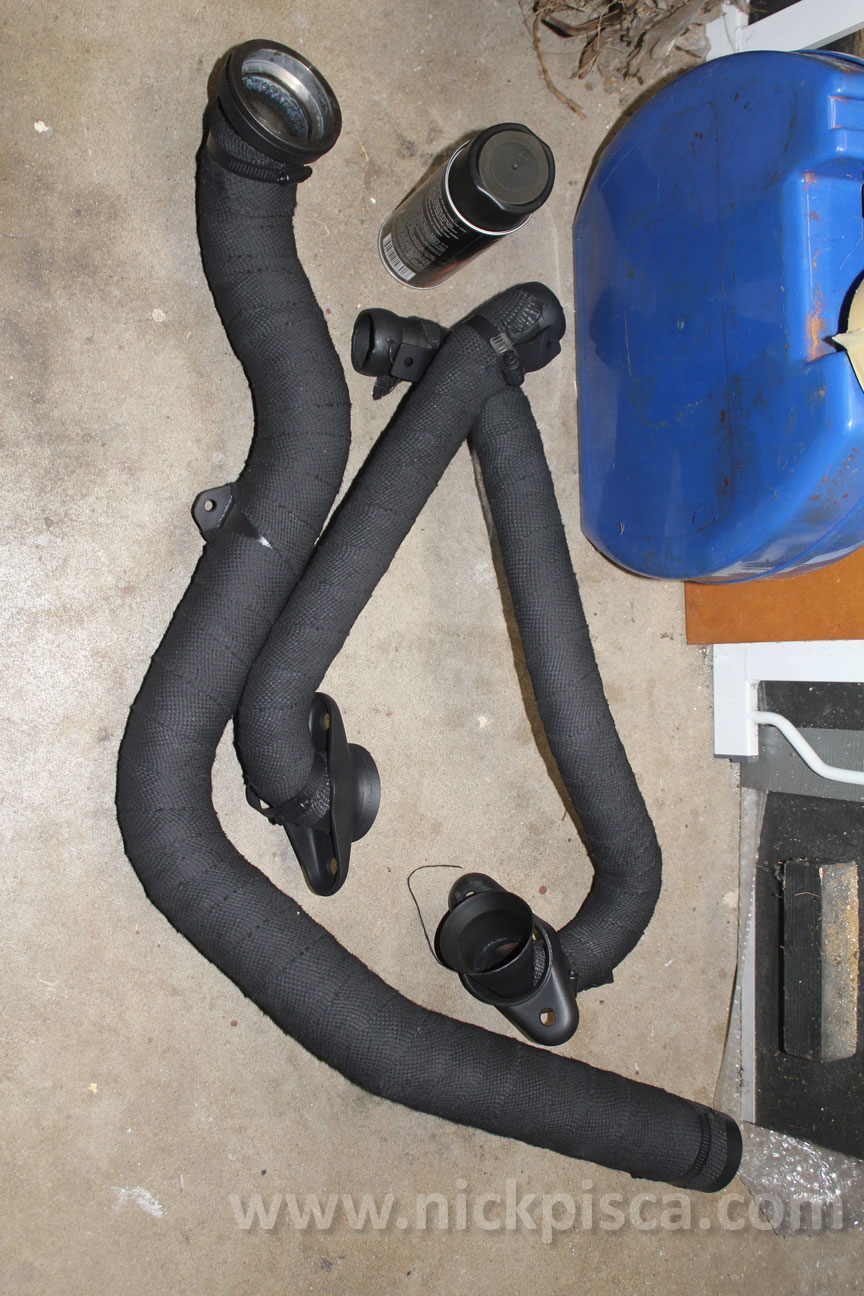
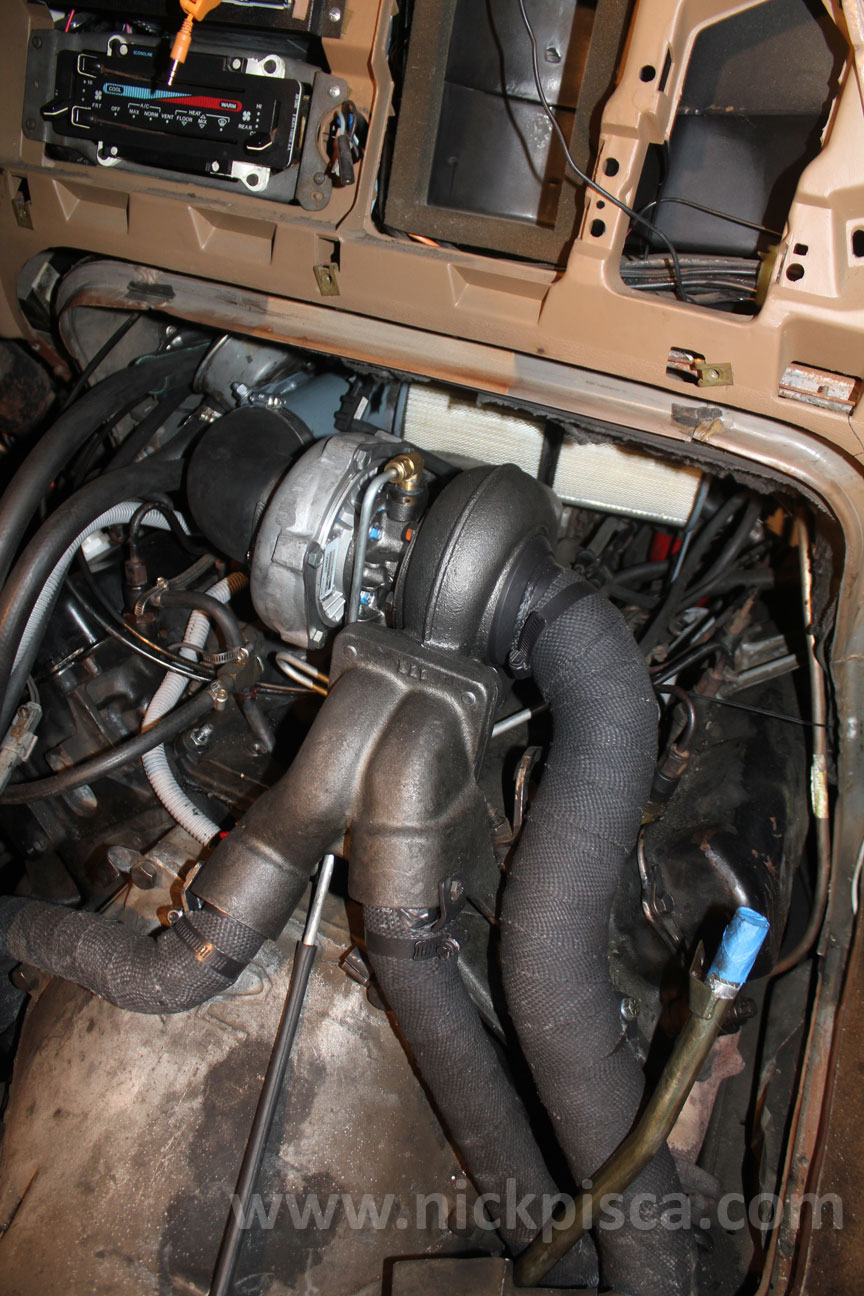
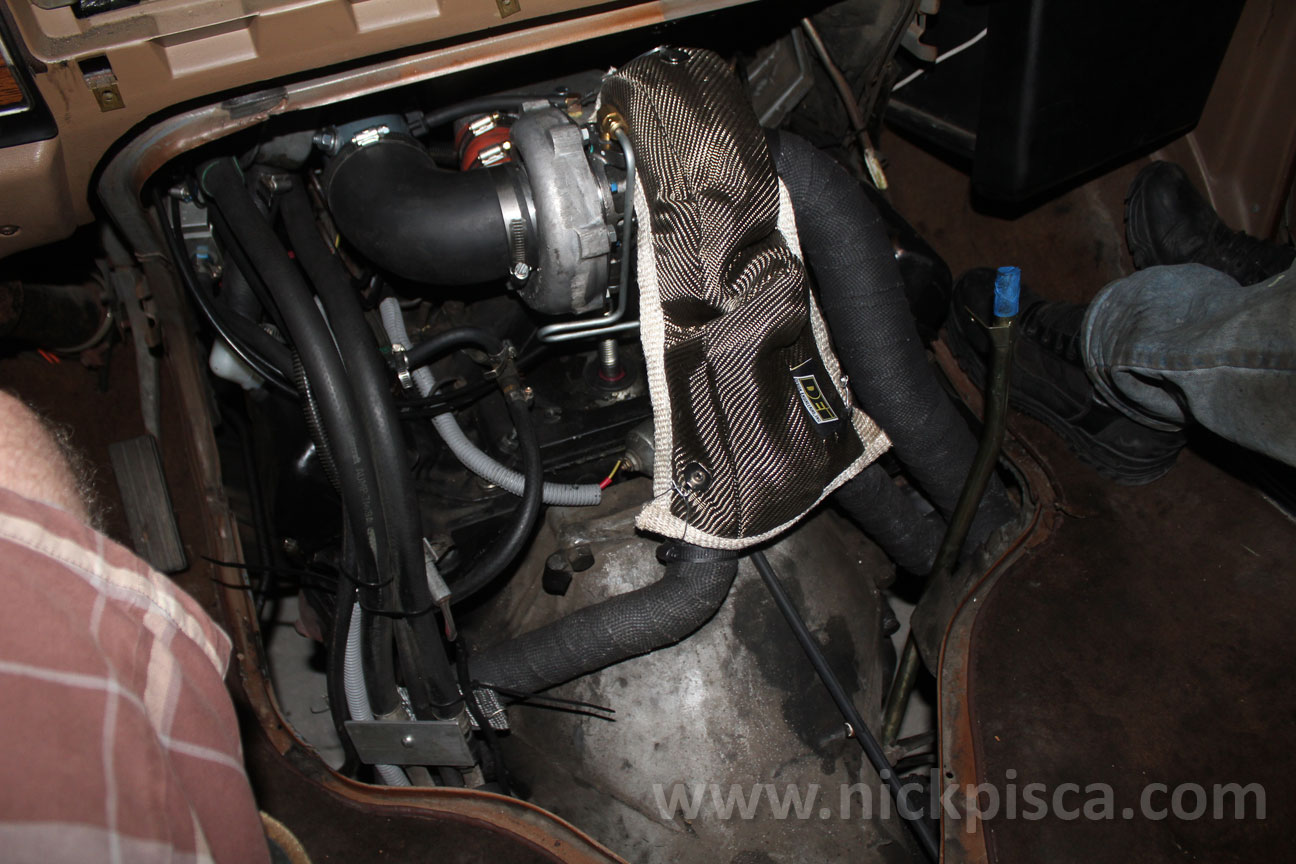
I wrapped and painted the up- and down-pipes in the hopes to keep my EGT from melting my doghouse.
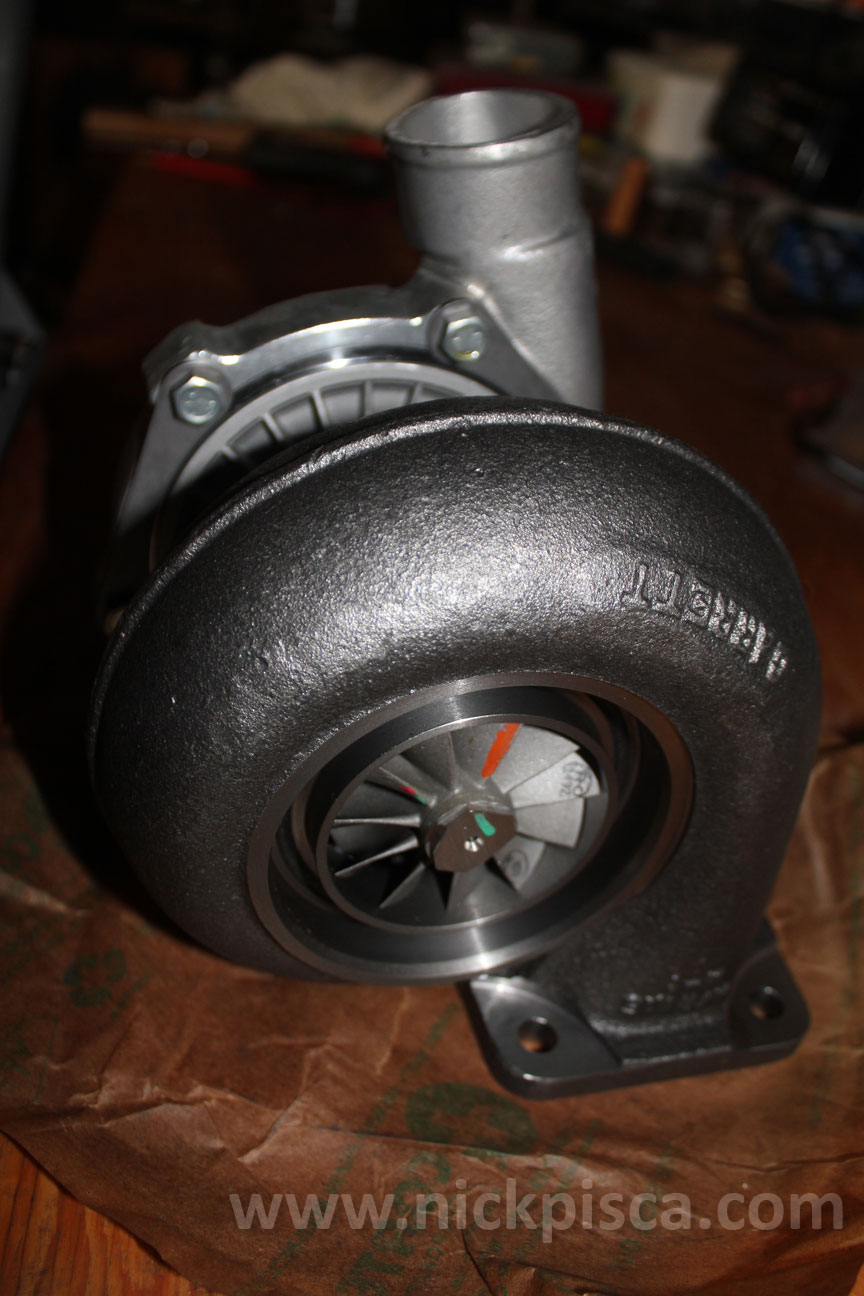
The turbo is a Garrett Model T04B69.
One of the most time consuming tasks was re-routing the glowplug harness assembly. Hypermax has a diagram that they consider a good plan for this. I read it, and figured I could enhance the design a little. Instead of one main glowplug harness bundle, I made two secondary branches that isolate the glowplug sockets for each side of the engine. Also, the driver�s-side secondary branch contains an extension wire for the oil pressure sensor. Here�s a drawing of what I came up with: (Note, I�m not posting Hypermax�s diagram because it�s their IP and they didn�t include it in their online instructions, but it does appear in the purchased kit. That leads me to believe that they don�t want it out on the net, so if you want to see a copy, you should contact them directly.)

Test fitting the up-pipes
Test fitting the Turbo.
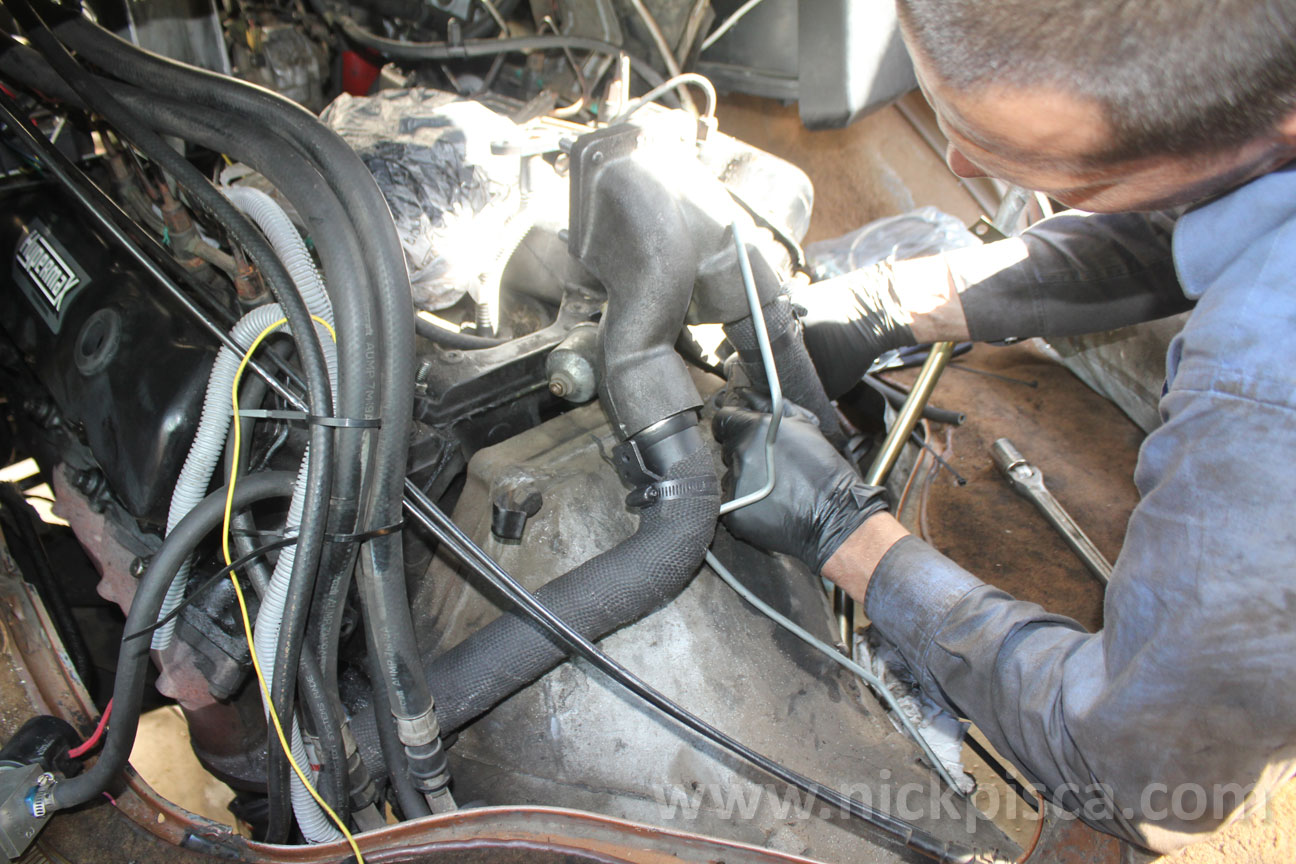
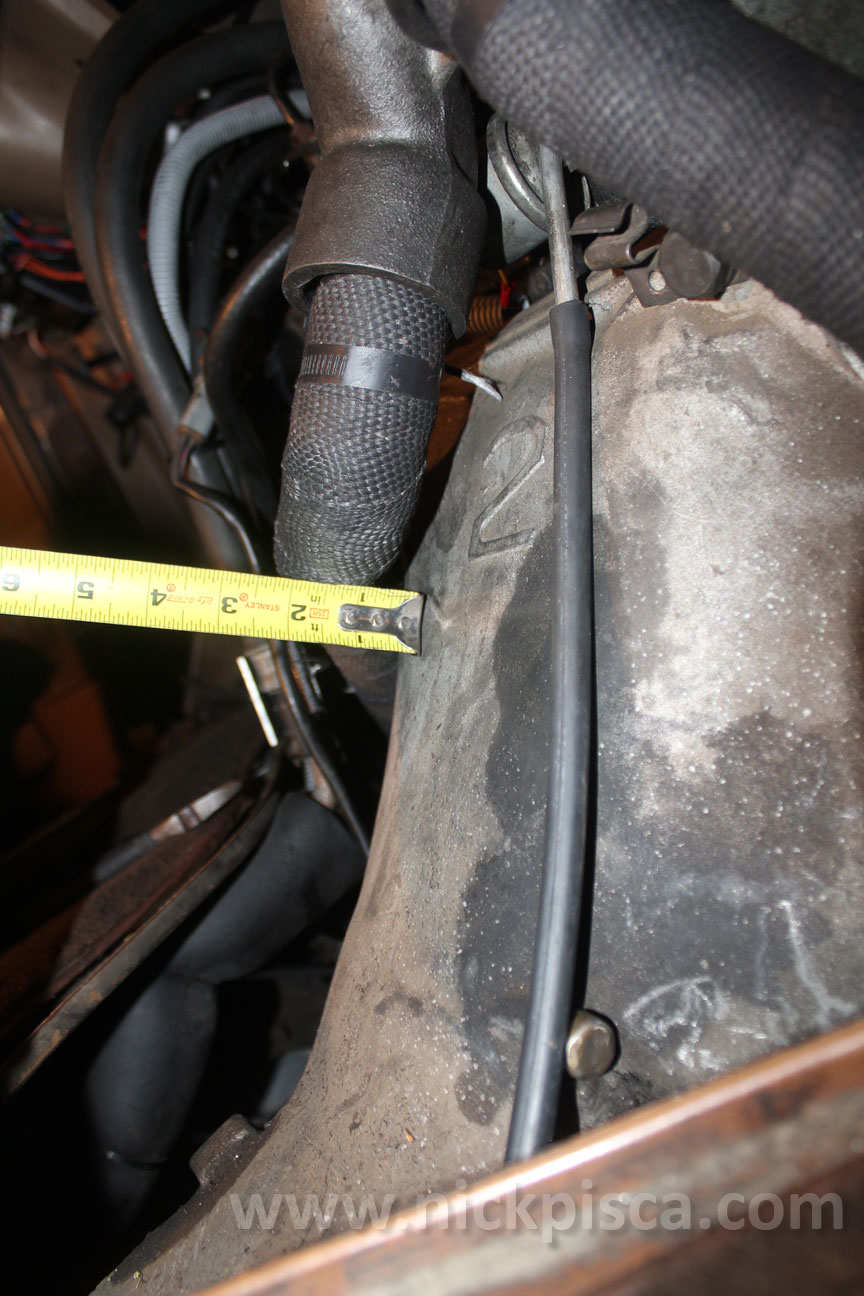
Here�s where we started running into problems. Almost all the tranny stuff we received from Hypermax didn�t fit. When we tried to test fit the up-pipes and kick-down linkage, it never seemed to work. If the kickdown linkage was under the up-pipe, the exhaust would push down on it until the throttle was fully depressed. If we tried to install the kickdown linkage above the up-pipe, we could never get the ends to connect to the IP or tranny. We contacted Hypermax, and after some investigation, they claimed most people with vans didn�t run the kickdown linkage. They also said we could do whatever it took to �make it work.� Here�s a picture of the driver�s side up-pipe and it�s less than a quarter inch from the tranny, so there�s no way it could ever fit underneath.
IMG_8163.JPG
The tranny dipstick housing sent to us was wrong. They ascertained from our description that we got the truck housing, instead of the van housing. They had to fab one up, which delayed us for at least a week. Luckily, the doghouse actually closed around the truck housing, but kind of pressed into my insulation. For now, it�ll be a temporary plug to keep my tranny fluid in.
The tranny vacuum hose needed to be metal, so that the extremes of temperature from the exhaust don�t melt the rubber hoses. The Hypermax vacuum line didn�t work in any kind configuration we tried, so in the end, we just made a simple 3-bend aluminum line connected by rubber hoses at a safe distance from any exhaust heat.
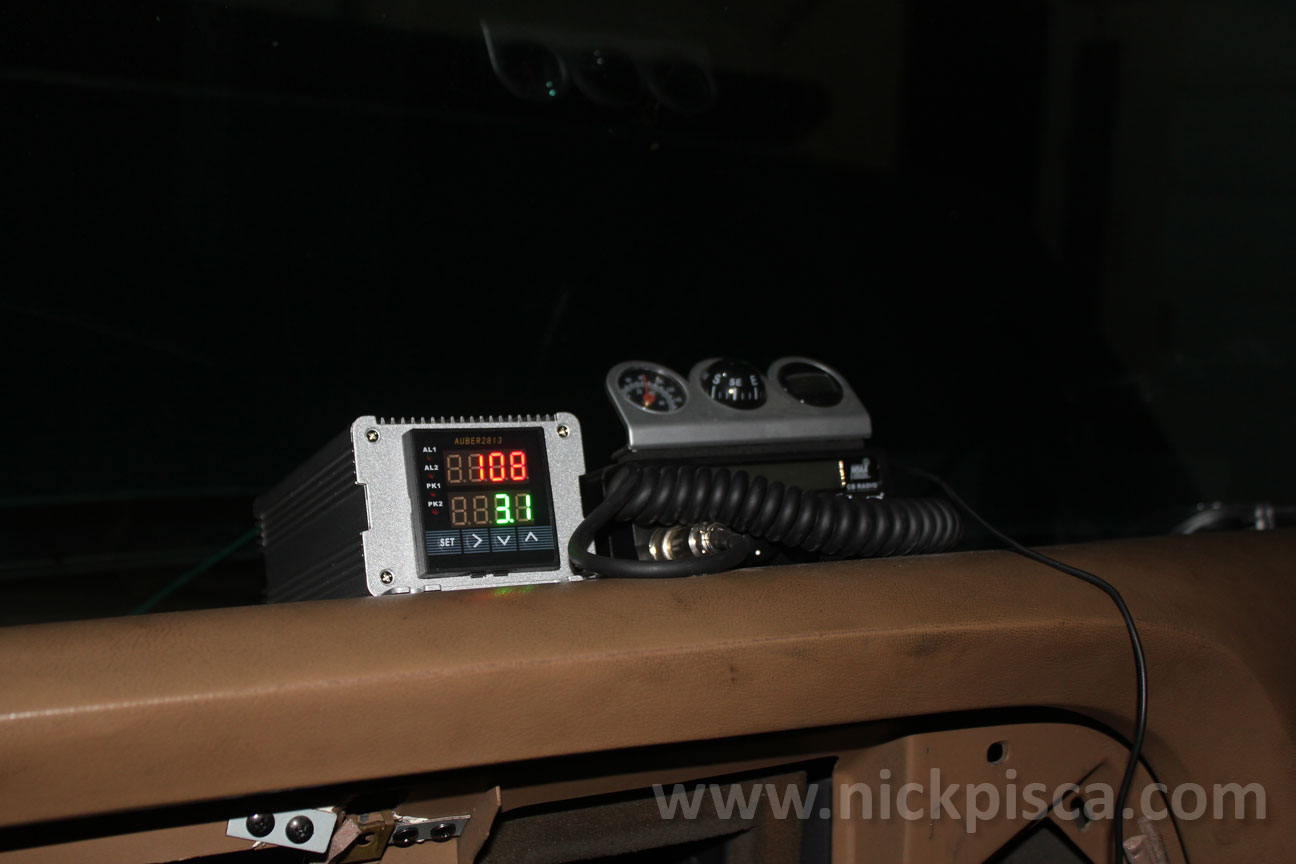
We are using the Auber gauge system to measure EGT and boost. It was affordable, programmable, and very comprehensive. I hope they are durable.
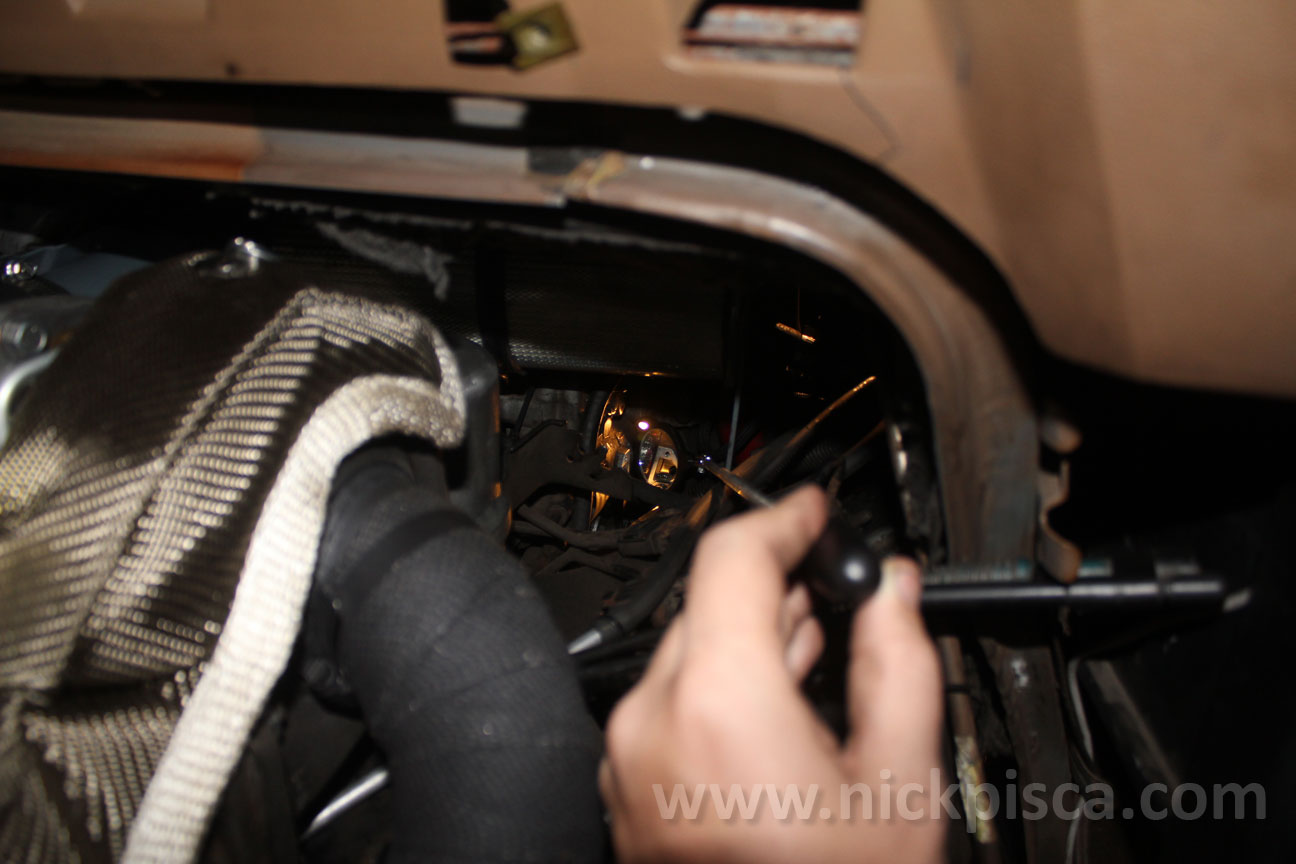
Adjusting the fuel screw on the IP wasn�t too bad. I had to buy an extended mirror with some lights on it, but it was worth it. Looking from the inside of the cab toward the front of the van, unplug and move the throttle linkage and cruise control. Hypermax designed the air filter housing to sit in the middle of the compartment, so it leaves just enough room for a mirror and an arm holding a 5/32� allen. Then all you need is Heman strength to turn the screw.
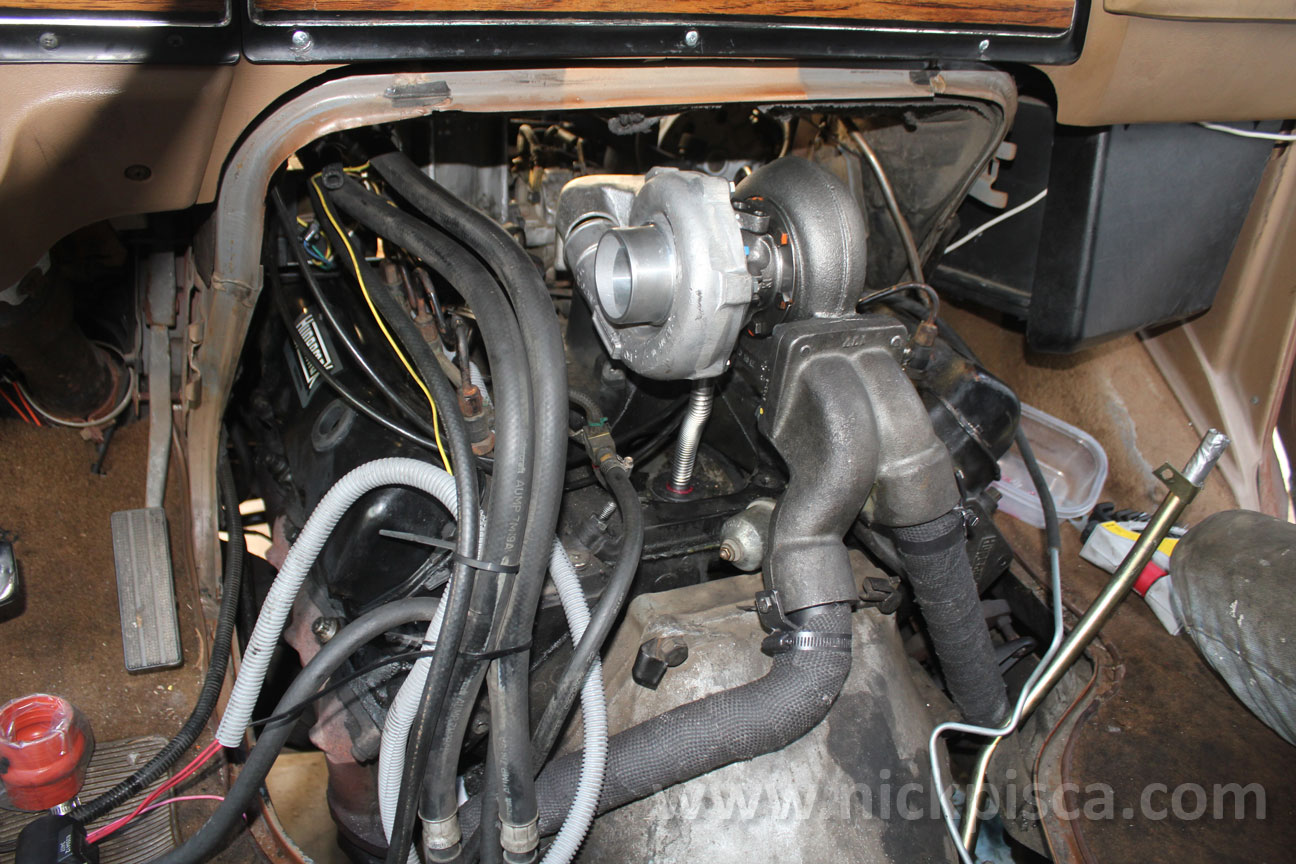
Here�s the final product: (Note, I�m still waiting for Hypermax to send me a new tranny dipstick housing so the build is 95% complete.)
The results so far�.
We still have a lot more driving to do, but so far we have seen boost pressures of up to 8-9psi. Currently I have the IP turned up to 2.5 flats, and I get a little black smoke initially when I give the throttle a good stomp from a stop. Once the boost spools up, the black smoke dissipates. I read up on the Puff Limiter which might allow me to turn up the IP to 3 or 3.5 flats. Being in California, I don�t want to get stopped by the cops for billowing black smoke so I�m comfortable with the 2.5 flats for now. Currently I�ve maxed out my EGT up to 1100 degrees F, so I have room to turn up the fuel if I can mitigate the black smoke.
Acceleration, hauling, and maintaining highway speeds feel much better compared to my non-turbo. I wish I had previously recorded times so that I could compare the results.
You can read a lot more about this 7.3 IDI Van Turbo Kit Installation at my site.
After two years of searching, I was not able to find a used van turbo kit for my 7.3 IDI. I assumed that even if I found a used IDI van turbo kit, it would cost me at least $750-$1000. I waited long enough, saved up a little, and decided to buy a new Hypermax van turbo kit. Overall, I think it was a better decision to buy new, rather than re-appropriate a truck turbo kit or keep searching for a used van turbo kit.
Here�s why:
1.) No need to fab up missing parts. I was able to find lots of truck turbo kits and lots of solo turbos. The problem is, not every seller has all the parts. They might have the up- and down-pipes, but not many of the little things like the valve cover, necessary brackets, linkages, etc. By the time you figure in the cost of either fabricating your own brackets or paying someone else to make the missing components, it�s cheaper to install a new kit.
2.) Easy to install. The kit comes with instructions that are very legible. Since I purchased directly from the seller, they are more than welcome to help out.
3.) Truck kits are very different from van kits. Even if you get a complete truck kit, maybe 20% of the parts can be used for the van. The van kit�s components differ as follows: Air intake housing, CDR location and mounting, glowplug relay and wiring locations, Diesel filter head location, Turbo mounting bracketing, Intake hat, up-pipes, down-pipe, oil feed line, kickdown linkage, transmission dipstick housing, transmission vacuum line, and most of the hardware.
This write up isn�t designed to be an installation tutorial, but it will probably read like one. Hypermax posts their instructions online, and they should be followed precisely. If my write-up helps you out, you are welcome. Disclaimer: I will not be held liable for anything that happens to your vehicle or any occupants or anyone based on the information in this text or the images. You are responsible for your own vehicle.
I wrapped and painted the up- and down-pipes in the hopes to keep my EGT from melting my doghouse.
The turbo is a Garrett Model T04B69.
One of the most time consuming tasks was re-routing the glowplug harness assembly. Hypermax has a diagram that they consider a good plan for this. I read it, and figured I could enhance the design a little. Instead of one main glowplug harness bundle, I made two secondary branches that isolate the glowplug sockets for each side of the engine. Also, the driver�s-side secondary branch contains an extension wire for the oil pressure sensor. Here�s a drawing of what I came up with: (Note, I�m not posting Hypermax�s diagram because it�s their IP and they didn�t include it in their online instructions, but it does appear in the purchased kit. That leads me to believe that they don�t want it out on the net, so if you want to see a copy, you should contact them directly.)
Test fitting the up-pipes
Test fitting the Turbo.
Here�s where we started running into problems. Almost all the tranny stuff we received from Hypermax didn�t fit. When we tried to test fit the up-pipes and kick-down linkage, it never seemed to work. If the kickdown linkage was under the up-pipe, the exhaust would push down on it until the throttle was fully depressed. If we tried to install the kickdown linkage above the up-pipe, we could never get the ends to connect to the IP or tranny. We contacted Hypermax, and after some investigation, they claimed most people with vans didn�t run the kickdown linkage. They also said we could do whatever it took to �make it work.� Here�s a picture of the driver�s side up-pipe and it�s less than a quarter inch from the tranny, so there�s no way it could ever fit underneath.
IMG_8163.JPG
The tranny dipstick housing sent to us was wrong. They ascertained from our description that we got the truck housing, instead of the van housing. They had to fab one up, which delayed us for at least a week. Luckily, the doghouse actually closed around the truck housing, but kind of pressed into my insulation. For now, it�ll be a temporary plug to keep my tranny fluid in.
The tranny vacuum hose needed to be metal, so that the extremes of temperature from the exhaust don�t melt the rubber hoses. The Hypermax vacuum line didn�t work in any kind configuration we tried, so in the end, we just made a simple 3-bend aluminum line connected by rubber hoses at a safe distance from any exhaust heat.
We are using the Auber gauge system to measure EGT and boost. It was affordable, programmable, and very comprehensive. I hope they are durable.
Adjusting the fuel screw on the IP wasn�t too bad. I had to buy an extended mirror with some lights on it, but it was worth it. Looking from the inside of the cab toward the front of the van, unplug and move the throttle linkage and cruise control. Hypermax designed the air filter housing to sit in the middle of the compartment, so it leaves just enough room for a mirror and an arm holding a 5/32� allen. Then all you need is Heman strength to turn the screw.
Here�s the final product: (Note, I�m still waiting for Hypermax to send me a new tranny dipstick housing so the build is 95% complete.)
The results so far�.
We still have a lot more driving to do, but so far we have seen boost pressures of up to 8-9psi. Currently I have the IP turned up to 2.5 flats, and I get a little black smoke initially when I give the throttle a good stomp from a stop. Once the boost spools up, the black smoke dissipates. I read up on the Puff Limiter which might allow me to turn up the IP to 3 or 3.5 flats. Being in California, I don�t want to get stopped by the cops for billowing black smoke so I�m comfortable with the 2.5 flats for now. Currently I�ve maxed out my EGT up to 1100 degrees F, so I have room to turn up the fuel if I can mitigate the black smoke.
Acceleration, hauling, and maintaining highway speeds feel much better compared to my non-turbo. I wish I had previously recorded times so that I could compare the results.
You can read a lot more about this 7.3 IDI Van Turbo Kit Installation at my site.
#3
06-27-2014, 12:45 PM
So far, I don't have a solution for the kickdown linkage. Hypermax told me that lots of van conversions ended up not using it. I don't see how it'll be possible. I have 1/8" to 1/4" of room between the driver's side up-pipe and the tranny, and between the pillowing of the doghouse insulation and the up-pipe is no room either. If I had to bend somethign, I think it'd have to be an "S" shape and go down by the driver's side exhaust manifold, but that sounds dicey. My friend suggested just running a cable thru the floor board, connect it to the tranny linkage, and pull it whenever i wanted a kickdown. but then I just said, why not just shift it on the tree then?
I'm 99% sure i'll leave the kick down linkage out.
I used some wire to mount the blanket to the mounting tabs on the up-pipes. I like it's configuration, even though it's supposed to be more on the turbo. The way I laid it out, it blocks almost all the heat to the doghouse from the turbo and turbo mounting inlets. I don't know how these kits were installed without bold-type-face warnings from Hypermax demanding some sort of new insulation to protect the doghouse and interior of the van..... It's already very hot on the doghouse with my install, and I've added $200 of wrap and insulation!
I'm using the remainder of my wrap to cover my exhaust manifolds. In hindsight, i should have done that before hooking up the kit. My mistake, maybe a tip for the rest of y'all.


#5
06-27-2014, 01:35 PM
No burn out vids. I'm done taking pictures for a while. Even though we basically installed the whole kit in one day (8am-2am Saturday) and did minor callibrations on Sunday, we probably ate up an accumulative hour of our time dinking around with the camera.
I thought I remember reading that I wouldn't hear the hypermax turbo whistle, but actually it's very loud. I insulated my van so to eliminate a lot of the van engine noise (it can be crazy loud in a poorly insulated van) but now the whistle permeates the interior fairly well.
#6
07-05-2014, 05:28 PM
Took the van out for a longer drive for the first time. Drove about 100 miles to test out the turbo at highway speeds (kinda hard to do in Los Angeles during the week due to traffic). So far so good. Still hovering around 1100 degrees F even under load on inclines. Still obtaining 8-9 max psi so far, but without a puff limiter, I'm kind of peaked on the number of flats I can push. Acceleration is greatly increased when punching it on the on-ramp. Also maintaining 65+ mph speeds is much easier with the boost. Inclines maintain 65+ speeds where usually I would be reduced to a 45mph crawl. So far I'm pretty happy with the setup. I plan to do a much longer trip (2000 miles) in three weeks, so that'll be the true test.
Now to figure out how to install this van C6 tranny dipstick tube. Hypermax reassured me that it would fit easily over the up- and down-pipes, but when I got it, it didn't fit. So I took pics and posted them to Hypermax. They changed their tune and said it had to go under the down-pipe. That would mean I'd need to pull the pipe and I'm not about to do that with my upcoming trip fast approaching.
So, I'm thinking of cutting it, and making a splice. I didn't want to do that, cuz I'll probably use heater hose as the splice, and that would mean two things:
1.) the dipstip will probably catch on the tube every time I try to insert it, and that'll **** me off.
2.) The turbo is crazy hot, so I'd have to move the splice closer to the tranny or closer to the IP, and that'd defeat the purpose of cutting the tube so I could fit it in easier.
So, anyone have any suggestions on a 1200-degree-resistant metal splice that is 5/8" diameter that could connect two segments of a tranny dipstick tube housing next to each other? It'd have to seal well (so I don't have any splashed up tranny fluid seeping from the splice) and hold up to the vibrations of the engine.
Also, just as a consideration, I'm not liking the design of the tranny tube. In my photos, there's a shot of us adjusting the fuel screw on the IP with a long lighted mirror. With the dipstick tube they are proposing, it gets in the way of that, and probably would make it nearly impossible to adjust easily. It might be time to get a good pipe bender and start making my own designs...
#7
07-05-2014, 05:35 PM
Trending Topics
#8
07-05-2014, 07:00 PM


#10
07-05-2014, 11:31 PM
Inglewood. With the trip coming up, I'm in a pinch. I'm debating on attempting the first leg of the trip without a new tranny dipstick housing. But it sure would be nice to bend up a new tube.
The California passes have some decent grades, so yeah, 45mph is a good uphill speed for a semi- or fully-loaded IDI non-turbo.
No attempts to figure out the fuel economy yet. I need to put on some decent miles first. And i need to overcome the urge to slam the accelerator to the floor.
The California passes have some decent grades, so yeah, 45mph is a good uphill speed for a semi- or fully-loaded IDI non-turbo.
No attempts to figure out the fuel economy yet. I need to put on some decent miles first. And i need to overcome the urge to slam the accelerator to the floor.
#11
07-06-2014, 09:05 AM
Inglewood. With the trip coming up, I'm in a pinch. I'm debating on attempting the first leg of the trip without a new tranny dipstick housing. But it sure would be nice to bend up a new tube.
The California passes have some decent grades, so yeah, 45mph is a good uphill speed for a semi- or fully-loaded IDI non-turbo.
No attempts to figure out the fuel economy yet. I need to put on some decent miles first. And i need to overcome the urge to slam the accelerator to the floor.
The California passes have some decent grades, so yeah, 45mph is a good uphill speed for a semi- or fully-loaded IDI non-turbo.
No attempts to figure out the fuel economy yet. I need to put on some decent miles first. And i need to overcome the urge to slam the accelerator to the floor.
I must not have hit any real grades yet....never had an issue holding 65mph. There were 1 or 2 hills where it would drop speed and kick it out of CC when I was trailing my car, but giving some more throttle would keep it there.
It is tough to not stick your foot in it, especially when the power is new. So do you get any funny looks cause your hot rodding an 80's 3/4 ton van?
#12
07-06-2014, 11:24 AM
Postmaster
Nice detailed write-up.
I haven't seen a nice new Hypermax kit like that ever, I've only seen the old rusted out ones in the junkyard.
I wish I would have caught you before you put everything together so you could measure the wheel diameters and we could figure out exactly what turbo it is and map it for the Turbocharger thread. Being a 69 trim (T04B69), It looks to be the same compressor as the ATS 088 and 093.
Anyway, nice info.
#13
07-07-2014, 12:56 AM
Nice detailed write-up.
I haven't seen a nice new Hypermax kit like that ever, I've only seen the old rusted out ones in the junkyard.
I wish I would have caught you before you put everything together so you could measure the wheel diameters and we could figure out exactly what turbo it is and map it for the Turbocharger thread. Being a 69 trim (T04B69), It looks to be the same compressor as the ATS 088 and 093.
Anyway, nice info.
I haven't seen a nice new Hypermax kit like that ever, I've only seen the old rusted out ones in the junkyard.
I wish I would have caught you before you put everything together so you could measure the wheel diameters and we could figure out exactly what turbo it is and map it for the Turbocharger thread. Being a 69 trim (T04B69), It looks to be the same compressor as the ATS 088 and 093.
Anyway, nice info.
I took a decent amount of high resolution photos of the turbo before I put it in. I know a lot of CAD, so maybe I can import the jpg into CAD and try to scale the photo and take an accurate measurement. It's a long shot, but worth a try. From where to where should I measure on the wheel diameters?
#14
07-07-2014, 01:45 AM
I have done it before to transfer cardboard cutouts to CAD for watercutting steel.
#15
07-07-2014, 02:06 AM
That should work but you would need to have had a ruler visible next to the part in the photos for proper scaling. And the camera needs to be far away enough to make the perspective negligible.
I have done it before to transfer cardboard cutouts to CAD for watercutting steel.
I have done it before to transfer cardboard cutouts to CAD for watercutting steel.
I can measure an object in the same plane of the diameter on the turbo in the engine compartment, then i don't have to worry about the image perspective. Then use that dimension to scale the jpg. Also, the ruler wouldn't need to be in the picture.