
1979 F100 Rebuild
#1
 02-19-2014, 03:55 AM

Join Date: Oct 2013
Location: Metro Detroit
Posts: 130
Likes: 0
Received 0 Likes
on
0 Posts
1979 F100 Rebuild
Hello to all,
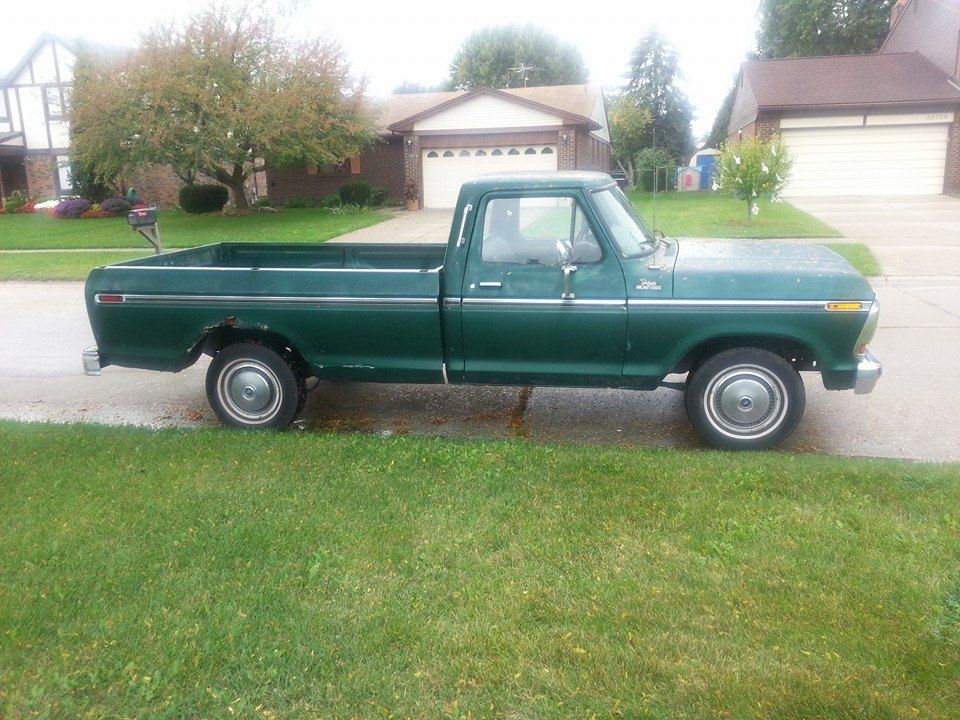
Back in September I bought the truck I have always wanted since I was a little kid. On of my first memory's is riding in my dads Silver 1978 single cab long bed F250 4wd rolling on 35's. while I was looking to buy one I had no luck coming across one, instead I opted out and bought this plain Jane 1979 F100 that was used in filming a movie here in Detroit. There is nothing special about this truck, it has no power options on it at all. I knew this was not going to be a easy task to do but it has been really fun to work on. every time I have been stuck with something I always look it up here and seem to find what I need to know, so I thank you all for all the info you people post. The pics below are of when I brought the truck home and before I started to tear it down. I have taken 100's of pics while tearing apart but I will just post a few of them at a time. They were mainly take for future reference.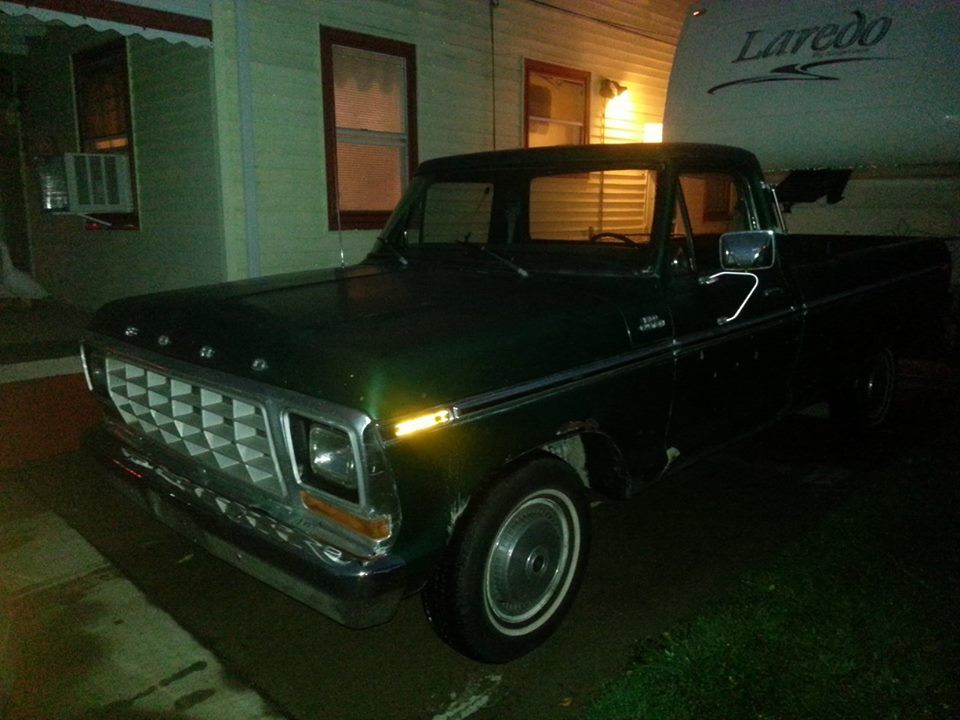
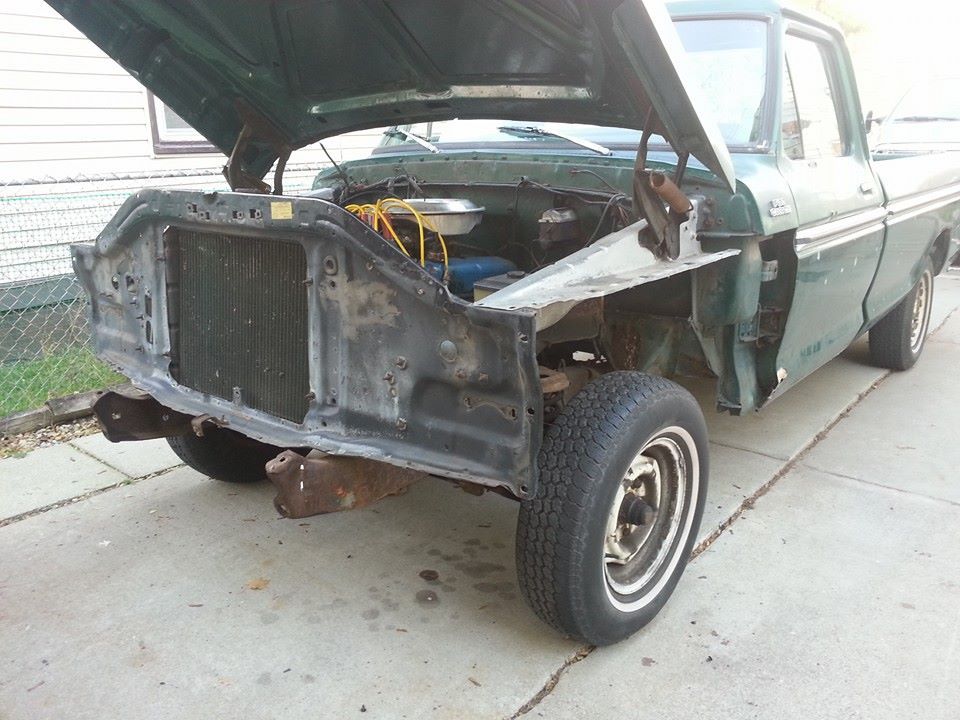
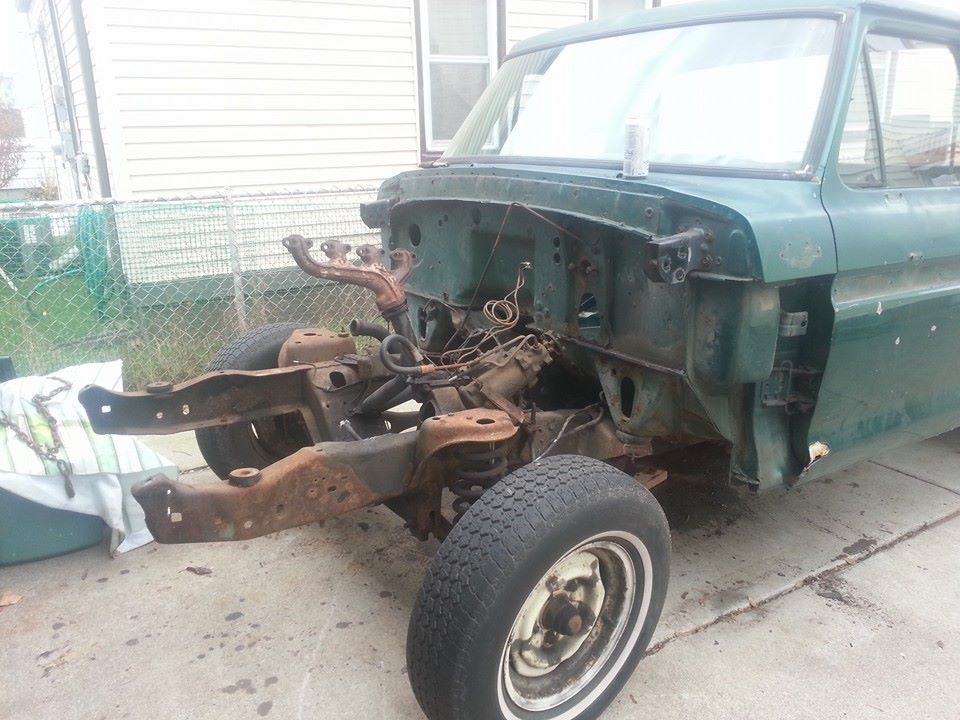
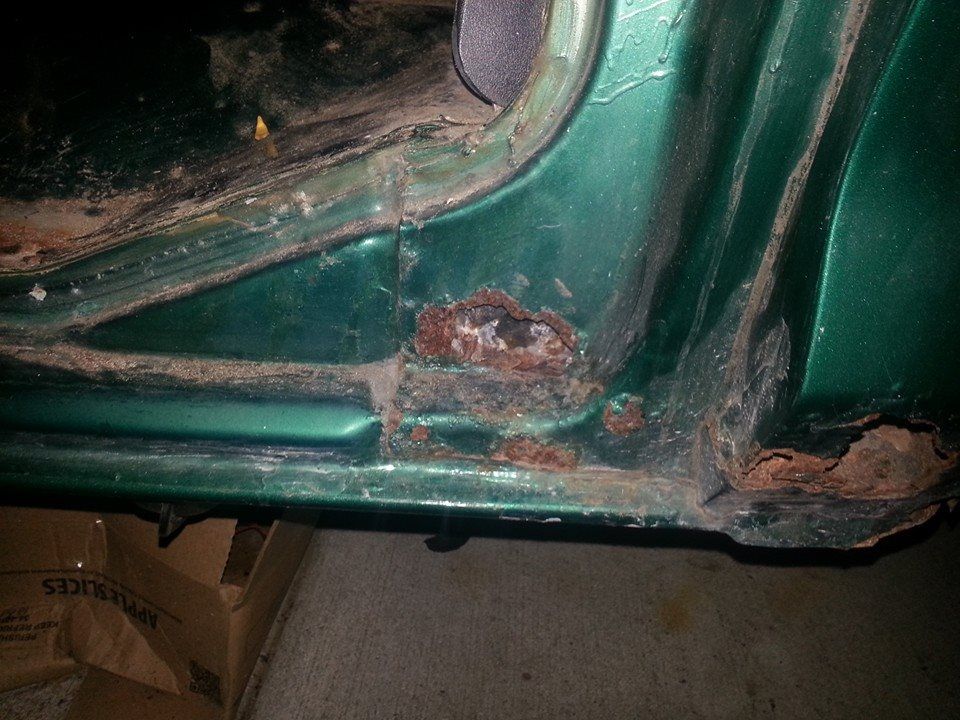
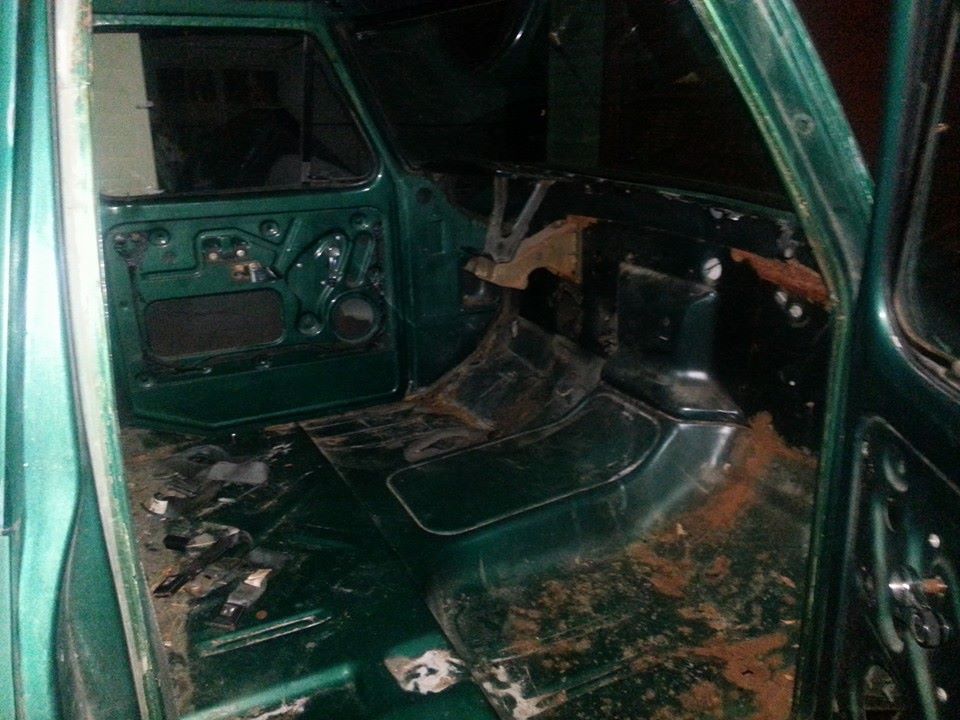
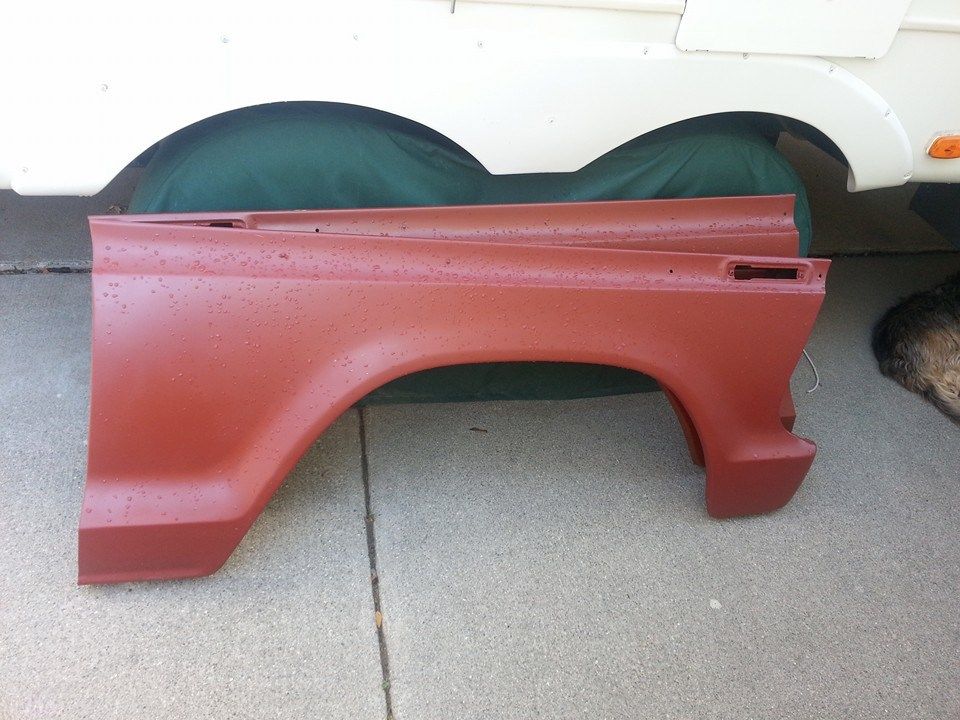
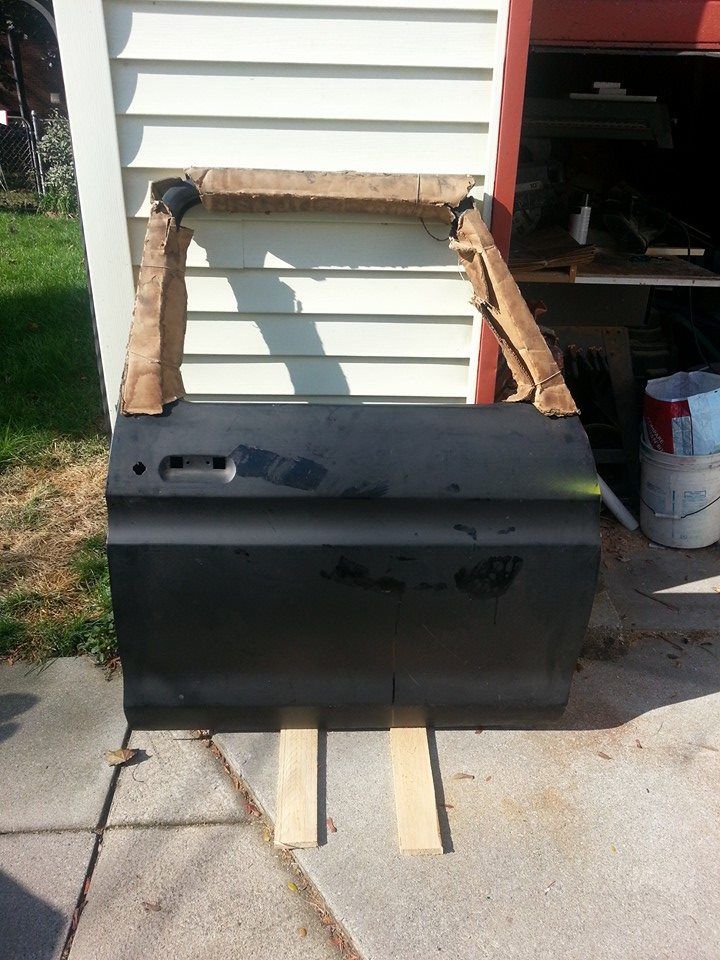
I stripped the truck down right before the winter hit hard here in Michigan. while doing this I found a lot more cancer spots on the truck then originaly thought there was. First thing I did was go out and buy OEM doors, OEM fenders, cab corners, inner door jam and floor boards. The bed needs more work then im willing to spend on it due to the fact the filming company cut spots out on the bed floor to mount cameras to the frame so im shopping for one. The motor was then ripped out as I was planning on building a newer 5.0 H.O. roller motor with a little more power then what this truck came with stock. when snow started to fall here in Michigan I started into restoring and stripping bolts and brackets. I was able to get what I think was everything needed done in just a few weeks time. I then moved onto the engine build after having some bad luck with buying what I was told was a rebuilt motor that turned out to be crap. That's a hole nother story for some other time.
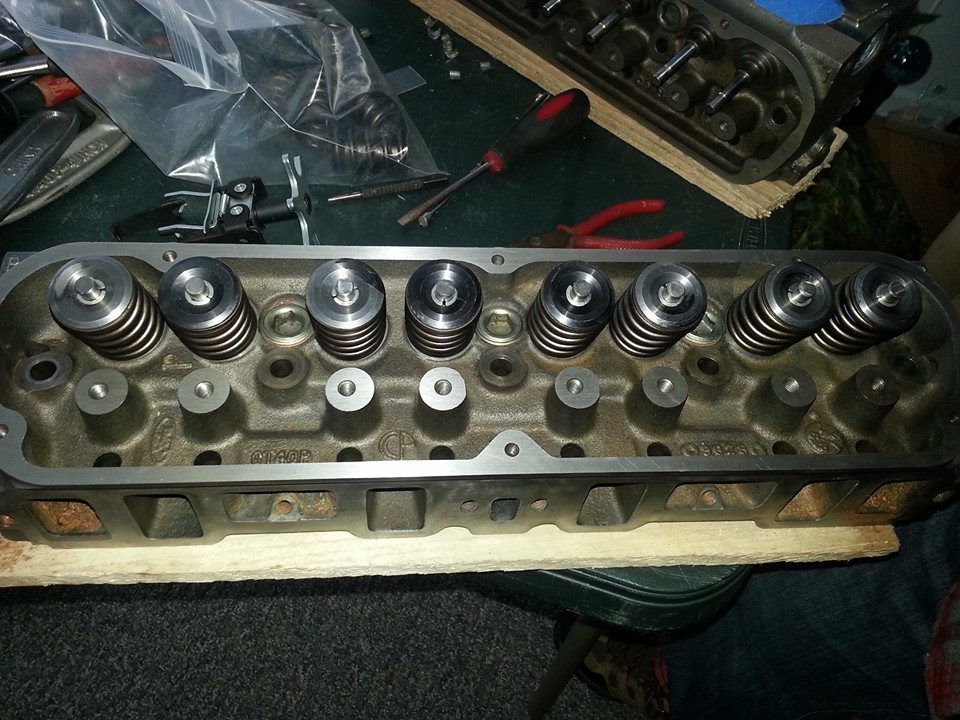
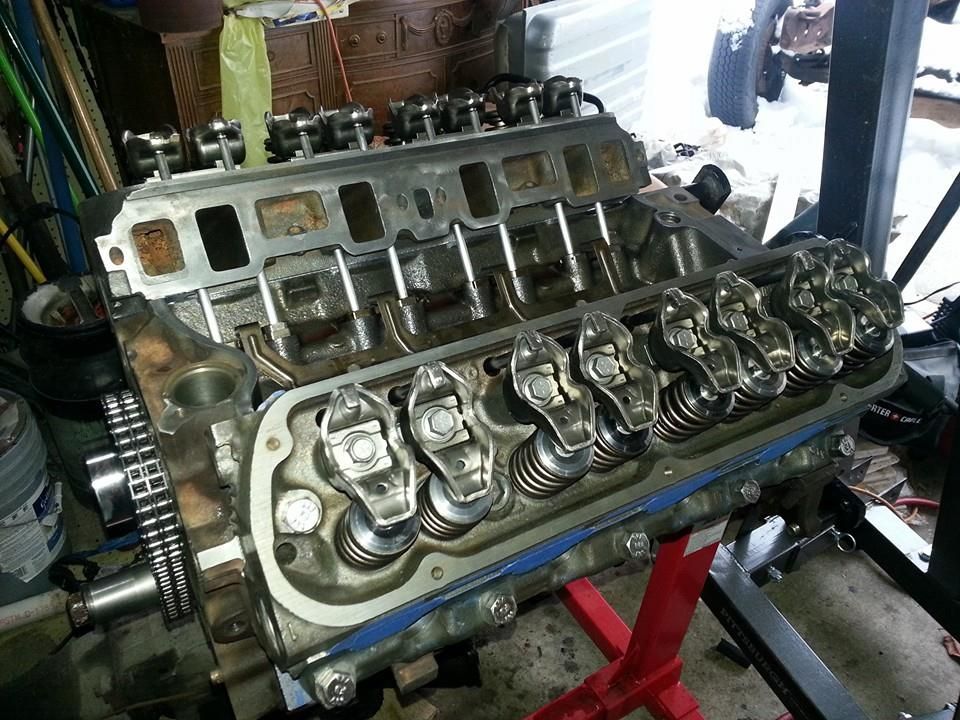
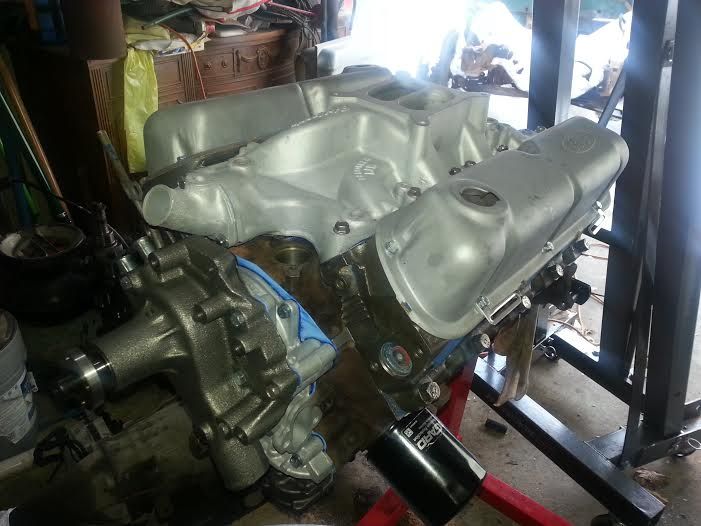
After dealing with the bad bought motor situation, I bought and built a 1991 5.0 H.O. I had the block cleaned and then when on to install new pistons, new rings, new bearings, reman crank, new connecting rods, new freeze plugs, new Ford Racing E303 cam, new Ford racing 9 key way timing chain set, new one piece fuel pump eccentric, timing chain cover, new seals, new water pump, new oil pump rod, new oil pump, new push rods, roller lifters and spider bracket. I rebuilt a set of GT40P heads with bigger valves, new Viton seals and Ford racing A50 springs. after the heads were done I cleaned and rebuilt my original distributor and holley 4160. The valve covers and edelbrock performer rpm intake manifold were bead blasted before installing on to the block. This is how the motor sits as of right now waiting to be painted with POR-15 FOMOCO Corp Blue.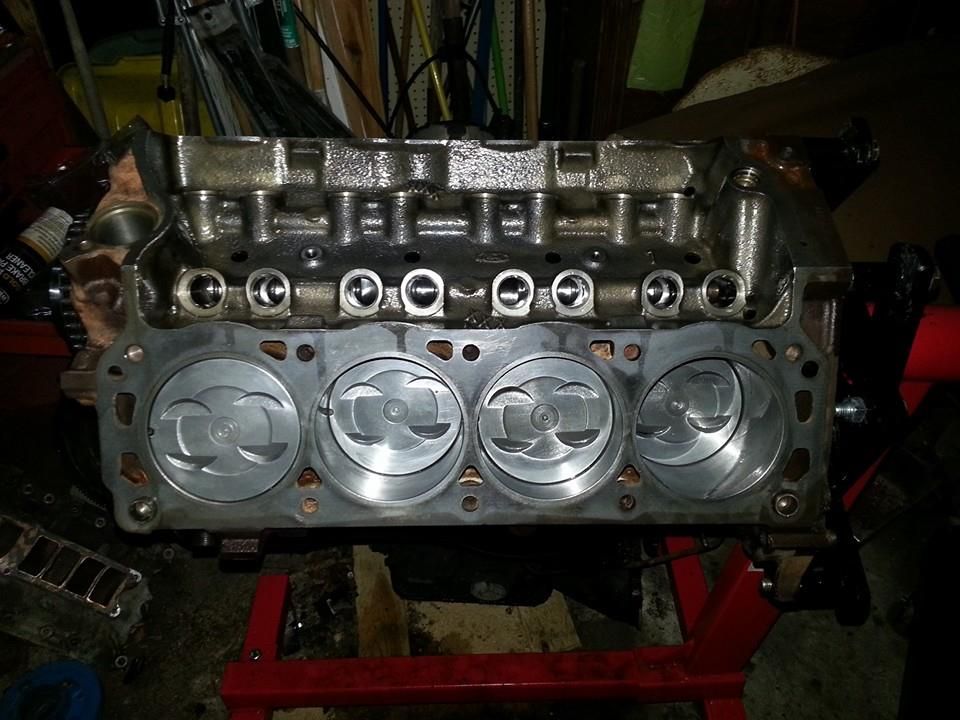
Right now im just playing the waiting game for some of the snow to melt so I can take the cab off the chassis and send it north to have the metal work done. The chassis has to be sent down the street to my brothers shop to be cleaned and painted. after those two things are done I can start painting what needs to be painted and reassembly of the truck. The original plan was to repaint the hole truck but plans have changed do to funds getting low. So I plan on wet sanding the truck down and giving it that old shop truck/rat rod look with it being lowered.
Any suggestions, thoughts or questions any one may have are welcomed. I will be posting more info and pictures as the build moves on further.
Back in September I bought the truck I have always wanted since I was a little kid. On of my first memory's is riding in my dads Silver 1978 single cab long bed F250 4wd rolling on 35's. while I was looking to buy one I had no luck coming across one, instead I opted out and bought this plain Jane 1979 F100 that was used in filming a movie here in Detroit. There is nothing special about this truck, it has no power options on it at all. I knew this was not going to be a easy task to do but it has been really fun to work on. every time I have been stuck with something I always look it up here and seem to find what I need to know, so I thank you all for all the info you people post. The pics below are of when I brought the truck home and before I started to tear it down. I have taken 100's of pics while tearing apart but I will just post a few of them at a time. They were mainly take for future reference.


I stripped the truck down right before the winter hit hard here in Michigan. while doing this I found a lot more cancer spots on the truck then originaly thought there was. First thing I did was go out and buy OEM doors, OEM fenders, cab corners, inner door jam and floor boards. The bed needs more work then im willing to spend on it due to the fact the filming company cut spots out on the bed floor to mount cameras to the frame so im shopping for one. The motor was then ripped out as I was planning on building a newer 5.0 H.O. roller motor with a little more power then what this truck came with stock. when snow started to fall here in Michigan I started into restoring and stripping bolts and brackets. I was able to get what I think was everything needed done in just a few weeks time. I then moved onto the engine build after having some bad luck with buying what I was told was a rebuilt motor that turned out to be crap. That's a hole nother story for some other time.


After dealing with the bad bought motor situation, I bought and built a 1991 5.0 H.O. I had the block cleaned and then when on to install new pistons, new rings, new bearings, reman crank, new connecting rods, new freeze plugs, new Ford Racing E303 cam, new Ford racing 9 key way timing chain set, new one piece fuel pump eccentric, timing chain cover, new seals, new water pump, new oil pump rod, new oil pump, new push rods, roller lifters and spider bracket. I rebuilt a set of GT40P heads with bigger valves, new Viton seals and Ford racing A50 springs. after the heads were done I cleaned and rebuilt my original distributor and holley 4160. The valve covers and edelbrock performer rpm intake manifold were bead blasted before installing on to the block. This is how the motor sits as of right now waiting to be painted with POR-15 FOMOCO Corp Blue.


Right now im just playing the waiting game for some of the snow to melt so I can take the cab off the chassis and send it north to have the metal work done. The chassis has to be sent down the street to my brothers shop to be cleaned and painted. after those two things are done I can start painting what needs to be painted and reassembly of the truck. The original plan was to repaint the hole truck but plans have changed do to funds getting low. So I plan on wet sanding the truck down and giving it that old shop truck/rat rod look with it being lowered.
Any suggestions, thoughts or questions any one may have are welcomed. I will be posting more info and pictures as the build moves on further.
#2
02-19-2014, 04:38 AM

#4
02-19-2014, 12:56 PM
Join Date: Oct 2013
Location: Metro Detroit
Posts: 130
Likes: 0
Received 0 Likes
on
0 Posts
#6
03-14-2014, 12:49 AM
Post Fiend
#7
03-28-2014, 07:33 PM
Join Date: Oct 2013
Location: Metro Detroit
Posts: 130
Likes: 0
Received 0 Likes
on
0 Posts
Thanks HIO, have read through some of your build thread, very informative.
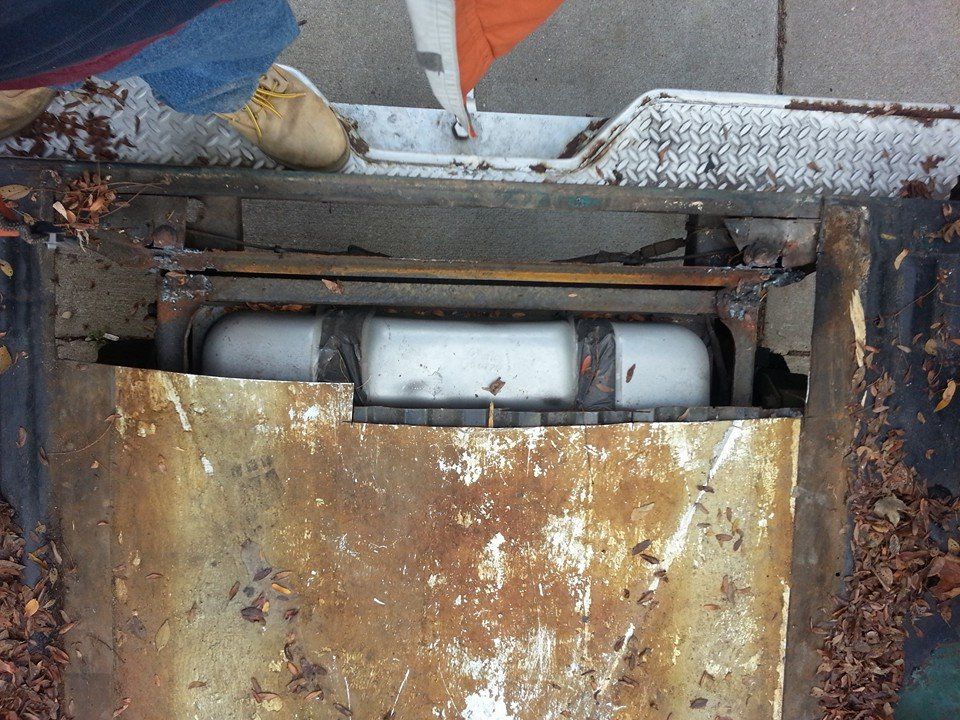
Here's a little up date on the truck. Took the floor covering off to find this.
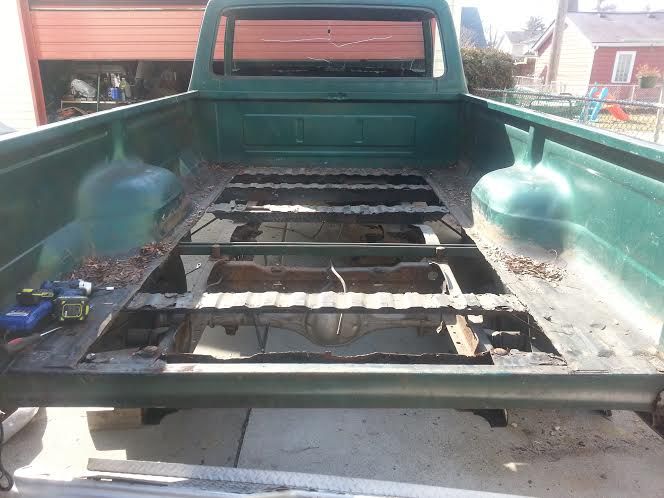
We knew the bed was rotted but my god it was worse then we thought so we went ahead and took the bed off and began to cut it up, keeping some of the sheet metal that was still good and putting the rest in the scrap yard pile (still have yet to make a trip). We went ahead striped the doors for all hard wear and pulled them off along with pulling the front windshield and the rear window.

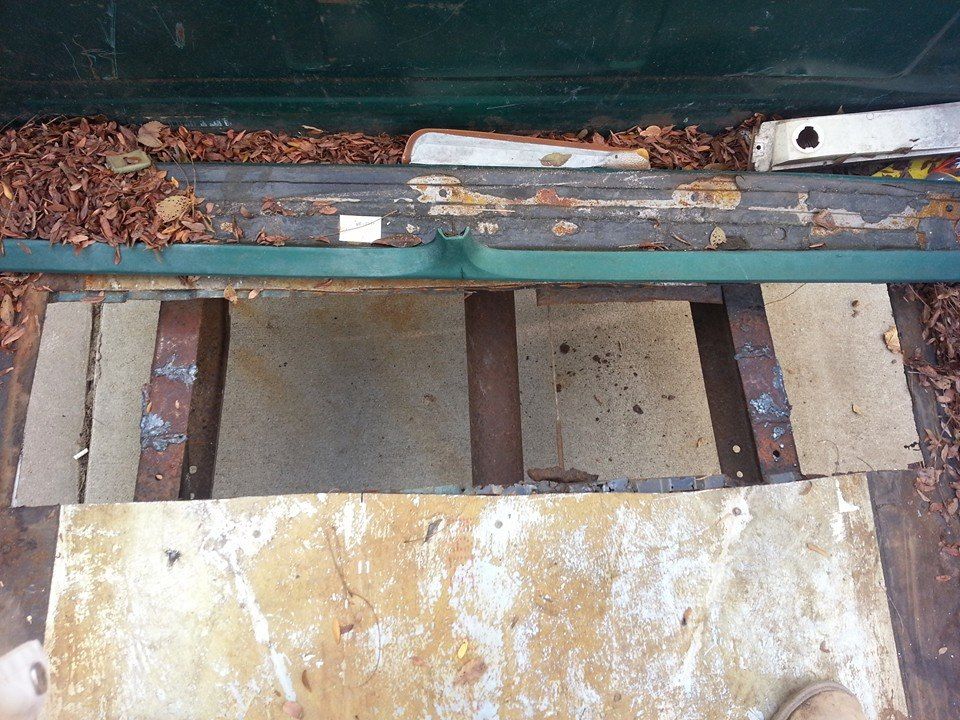
Today we pulled fuel lines, brake lines, what was left of the wiring and clips. Moved onto drilling and grinding off studs holding on the rotted rear shock towers and removed them for replacement, removed shocks all around, cut off a bunch of other rotted brackets and bolts. since there was daylight left I went ahead and grinded off the studs holding on the leaf spring hangers to do the flip tomorrow.
not to much left to do besides start body work and paint, im getting excited!
Here's a little up date on the truck. Took the floor covering off to find this.

We knew the bed was rotted but my god it was worse then we thought so we went ahead and took the bed off and began to cut it up, keeping some of the sheet metal that was still good and putting the rest in the scrap yard pile (still have yet to make a trip). We went ahead striped the doors for all hard wear and pulled them off along with pulling the front windshield and the rear window.

Today we pulled fuel lines, brake lines, what was left of the wiring and clips. Moved onto drilling and grinding off studs holding on the rotted rear shock towers and removed them for replacement, removed shocks all around, cut off a bunch of other rotted brackets and bolts. since there was daylight left I went ahead and grinded off the studs holding on the leaf spring hangers to do the flip tomorrow.
not to much left to do besides start body work and paint, im getting excited!
Trending Topics
#8
03-28-2014, 09:38 PM


#9
03-28-2014, 10:04 PM
Post Fiend
Today we pulled fuel lines, brake lines, what was left of the wiring and clips. Moved onto drilling and grinding off studs holding on the rotted rear shock towers and removed them for replacement, removed shocks all around, cut off a bunch of other rotted brackets and bolts. since there was daylight left I went ahead and grinded off the studs holding on the leaf spring hangers to do the flip tomorrow.
not to much left to do besides start body work and paint, im getting excited!
not to much left to do besides start body work and paint, im getting excited!
Btw, watch out if yer doing a full flip. I'm gonna undo mine cuz of 10� of nose-up pinion angle and go with an axle flip.
I'm of the kind to keep old stuff around for pattern-making. Sometimes pics don't help in replicating brake lines and stuff. $0.05.
#10
03-29-2014, 08:15 PM
Join Date: Oct 2013
Location: Metro Detroit
Posts: 130
Likes: 0
Received 0 Likes
on
0 Posts
Cool. Glad you found the info useful.
Btw, watch out if yer doing a full flip. I'm gonna undo mine cuz of 10� of nose-up pinion angle and go with an axle flip.
I'm of the kind to keep old stuff around for pattern-making. Sometimes pics don't help in replicating brake lines and stuff. $0.05.
Btw, watch out if yer doing a full flip. I'm gonna undo mine cuz of 10� of nose-up pinion angle and go with an axle flip.
I'm of the kind to keep old stuff around for pattern-making. Sometimes pics don't help in replicating brake lines and stuff. $0.05.
AHHH, wish I would of read this earlier is the 10� of nose-up pinion angle not good. what about adding the shims to correct the angle? The funny thing is my angle finder said my truck pinion sitting in its stock form was 10�. I made sure to check it before we started working on it.
#11
03-29-2014, 08:38 PM
Join Date: Oct 2013
Location: Metro Detroit
Posts: 130
Likes: 0
Received 0 Likes
on
0 Posts
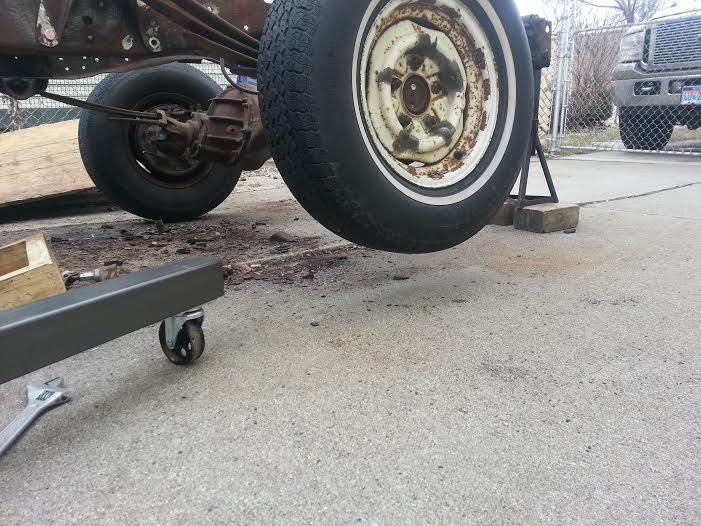
Update.
After work I got my motor into the shop for painting even know I was not able to paint it due to its been sitting in the cold all winter and needed to be in the shop for a day or two to warm up before we could start painting it. hope to have it done by next weekend.
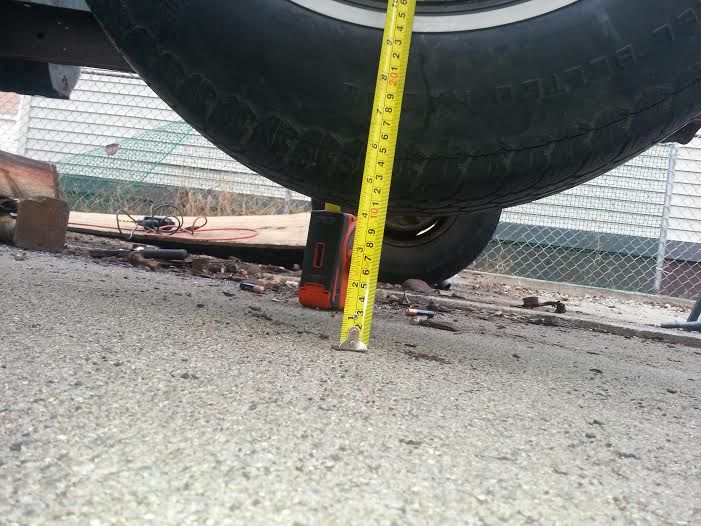
The truck is on jack stands and the tire was sitting 4" in the air when the hanger flip was all said and done. The drop might be more with the trucks own weight sitting on the ground have to wait and find out tomorrow.
After work I got my motor into the shop for painting even know I was not able to paint it due to its been sitting in the cold all winter and needed to be in the shop for a day or two to warm up before we could start painting it. hope to have it done by next weekend.
The truck is on jack stands and the tire was sitting 4" in the air when the hanger flip was all said and done. The drop might be more with the trucks own weight sitting on the ground have to wait and find out tomorrow.


#12
03-30-2014, 08:11 AM
Join Date: Oct 2013
Location: Metro Detroit
Posts: 130
Likes: 0
Received 0 Likes
on
0 Posts
Hio,
I talked to my old man and he said your bumpside springs should be different from mine due to the springs length are not the same from the dentside to the bumpside. Ford used certain frame widths and lengths in these trucks from gen to gen for some reason and depending on the frame and model the springs were not the same. This is coming from a guy who built all the truck and some of the cars rear ends at Ford Sterling axle plant from 1976-2006. Just by looking at the build tags on the axles he can tell you if he built it, if not him he can tell you who did. every truck any one in my family/friends have had his day code has been on every one of them.
I talked to my old man and he said your bumpside springs should be different from mine due to the springs length are not the same from the dentside to the bumpside. Ford used certain frame widths and lengths in these trucks from gen to gen for some reason and depending on the frame and model the springs were not the same. This is coming from a guy who built all the truck and some of the cars rear ends at Ford Sterling axle plant from 1976-2006. Just by looking at the build tags on the axles he can tell you if he built it, if not him he can tell you who did. every truck any one in my family/friends have had his day code has been on every one of them.


#14
04-04-2014, 03:53 PM
Join Date: Oct 2013
Location: Metro Detroit
Posts: 130
Likes: 0
Received 0 Likes
on
0 Posts
UPDATE:
parts showed up from bronco grave yard to fix the cab to frame mounts. Wish I would of know how close they were. its only a 15 min drive down the e-way, think I will be making a trip to the BGY here soon to look around.
Tomorrow morning hickory1991 will be dropping by with a bed, hood and tailgate he had left over from his project. I cant wait to start mocking things back up and get painting.
