When you click on links to various merchants on this site and make a purchase, this can result in this site earning a commission. Affiliate programs and affiliations include, but are not limited to, the eBay Partner Network.
first off, this is an awesome website
I am sure this is my problem, I share all the symptoms. But my vacuum hose is definitely not where this gentleman's is. I have looked everywhere that is visible off my manifold, have the bulkhead and air filter removed, and cannot find a hose that is even remotely similar.
I live in the Palm springs area(120 degrees) and really need to get this fixed. I would even settle for a temporary way to force the flow valve in the vent position until summer is over and I can spend more than 2 hours outside.
So any help in either area would be greatly appreciated.
Find the appropriate line
or
temporarily, manually hold in vent position
2001 Ford E-150 4.6 V8
Thank you
Look top center of the dash board for a easily removable cover, like this:
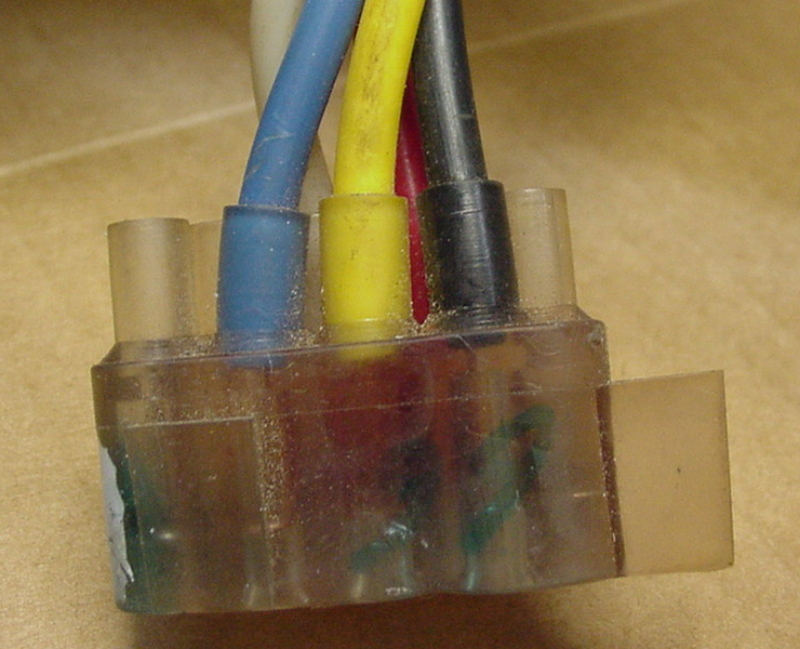
You'll find these connections under there:
(Above is same connection block, showing both front and back sides)
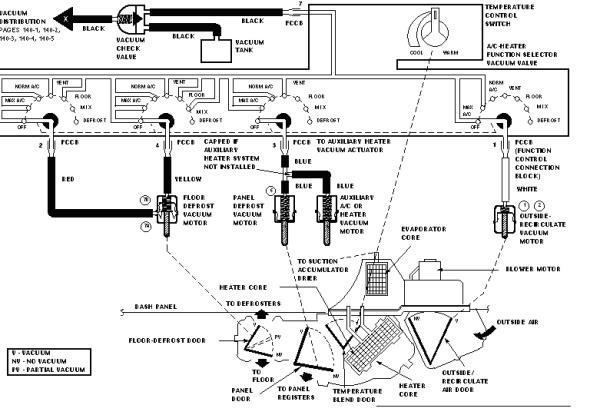
This schematic or drawing shows the function of the color coded lines.
The best way to achieve "cold air vents" is completely removing the front inside heater core from coolant flow, most easily accomplished with some sort valve bypassing the core. The downside to that is when/if "defrost" is called for you'll not be able to temper the air flow, it would be 100% cold all the time with that valve closed. Living in a 4 season climate makes this a bit problematic, perhaps not for you.
I'm working on what's an unnecessarily complex system of valves and vacuum controlling 12 VDC solenoids that will allow me to manually direct coolant flow to/from my rear aftermarket heater as well as stop all flow through the front core at the flip of a switch.
I have a similar system working now but took my vacuum signal from the same place I show here---running the hose where needed wasn't too much of a hassle.
This is a great post/explanation!! Thanks for taking the time to post it. I'm having the same issue with my 2005 E350 and will trying this out. will report back results.
JWA, I'm having the same acceleration loss of A/C to the defrost when accelerating and have seen several posts of folks working around the impossible to get to check valve and reserve tank. Well not impossible, but need to cut and re seal things or bypass...It's hot here in soCal in the summer and in our trips so am trying to get this issue solved. Any advice on whether easier to bypass or cut inside the fender to replace the factory parts?
JWA, I'm having the same acceleration loss of A/C to the defrost when accelerating and have seen several posts of folks working around the impossible to get to check valve and reserve tank. Well not impossible, but need to cut and re seal things or bypass...It's hot here in soCal in the summer and in our trips so am trying to get this issue solved. Any advice on whether easier to bypass or cut inside the fender to replace the factory parts?
Does your van lose A/C totally or does the air flow switch from the dash vents to the floor then return afterward? If its the latter only then my recommendation would be NOT cutting into the body sheet metal, simply follow the ideas in this thread. Its far easier to do, eliminates that pesky factory hidden part and adds an easy-to-service feature.
IF your A/C cuts off completely then seems to come back on after acceleration has stabilized that's another issue altogether. Let us know please.
So the air continues blowing, but it completely cuts out of the front facing vents and you can feel it coming from the glass defroster vents and the vents under the dash. The air to the back of the van also cuts out as I suspect it is connected to the forward facing vents being activated by the vacuum coming from the check valve/reservoir tank.
I'm liking the idea of bypassing these parts inside the van as opposed to mounting in the engine bay as suggested by one of the other long-time posters. Inside mounting seems much more accessible than in the engine bay under the battery. I guess I was hoping to get a little more specific images of where the new supply vacuum line is drilled through the engine cowel so I can evaluate getting it done on my van.
Also, is there any confirmation that the check valve and the reservoir tank live in the impossible to reach area behind the fender well on the 2005 E350 vans?
Oh, I have gone to the main Van forum page and see there are couple folks who have presented a couple not super painful repair methods (auric and ydaveitsu) but tyring to get some clearer images from Auric's less on plan.
Last edited by fddjr1; 04-11-2018 at 02:22 PM.
Reason: additional information
So the air continues blowing, but it completely cuts out of the front facing vents and you can feel it coming from the glass defroster vents and the vents under the dash. The air to the back of the van also cuts out as I suspect it is connected to the forward facing vents being activated by the vacuum coming from the check valve/reservoir tank.
I'm liking the idea of bypassing these parts inside the van as opposed to mounting in the engine bay as suggested by one of the other long-time posters. Inside mounting seems much more accessible than in the engine bay under the battery. I guess I was hoping to get a little more specific images of where the new supply vacuum line is drilled through the engine cowel so I can evaluate getting it done on my van.
Also, is there any confirmation that the check valve and the reservoir tank live in the impossible to reach area behind the fender well on the 2005 E350 vans?
Okay your situation is indeed the reservoir/check valve nonsense----bypass the factory bits for what's suggested here. If your rear air is also defaulting to the rear floor vents that's just more evidence you're not maintaining sufficient vacuum to properly operate the air flow system.
Locating the replacement vacuum reservoir/check valve isn't important as long as its plumbed in correctly. If you feel its easier installing and potentially servicing the new parts from inside tha's 100% your call.
I don't have any photos of the line leading into the cabin, the one that feeds the Function Control switch: Max A/C, A/C, Vent, Off, Heat, Mix & Defrost.
I want to thank you for the great post you made about this vent problem. I know it took some time to write it up and include the pictures and diagrams which helped me fix my van.
I have a 2012 E-250 van- (a service truck). In fact I do HVAC work - but that is work on homes and businesses. I never work on A/C's on vehicles - that is a completely different world.
Anyway hopefully I can add something useful after doing the repair myself.
The AC/Delco Part Number: 15-50568 seem to work better then the Dorman check valve- I tested both by blowing through it in all directions.
The main thing I did differently then your instructions was to route the vacuum tube from the Red to Black hose connection under the hood (just below the passenger side windshield wiper) thru the right side quarter panel above the wheel well toward the door panel and drilled thru a rubber plug in front of the passenger door hinge and into the passenger side footwell area. The total length of the new larger vacuum hose using this route is about 4' and this hose fits into the large port of the Delco check valve.
The vacuum reservoir also helps if you run the fan with the engine off so it can blow through the front vents. After removing the glove box with it's 5 or 6 screws and clips the main air tube connector plug with all the colored air tubes was clearly visible. The black vacuum hose is very small and I made sure the tubing I bought would fit snugly over it. I used about 3ft. of this size tubing which fit tightly onto the 2 small outlet ports of the Delco check valve. I clipped the black hose about 4" from the connector plug. That black hose loops over the big black plastic shroud along with the other hoses then heads to the firewall the other side of the connector with all the colored hoses heads toward the dashboard A/C controls.
The PVC pipe I used was 1" thick wall (schedule 40) I drilled a 1/2" hole using slow speed on the drill not to crack the pipe. I used a piece about 12" long. Used regular PVC glue and primer to glue on caps.I screwed the brass fitting directly into the drilled hole and slowly screwed it in it barely made any threads (probably should have used a slightly smaller drill bit for the 1/4" pipe threads to bite better, so I backed it up with some epoxy around the fitting. Stuffed it up in the passenger side foot well area near the damper door.
It works! It works!
Thanks again for making this summer more enjoyable
Doug G.
Thank you all !!!
This fixed my 2001 E350 EXT Super Duty (V10, on LPG) , no drilling required !
I bought a new check valve for $ 4, and a used vacuum reservoir ($10, from a wrecked European Ford Galaxy TDI , part is identical to a VW Sharan TDI & Audi A8 diesel)
I pulled the original vacuum hose trough the firewall into the passenger footwell, and poked a piece of copper wire though that hole until i saw it in the engine bay, connected a new piece of vac hose to the copper wire, and pulled back .. attached the check valve to the red line connector , and the new hose to the other end .. and managed to fit the Vacuum reservoir into the metal bracket underneath the passenger airbag .. thank you for this quick and easy fix ! (it took me less then 30 minutes after finding the parts)
(pictures were taken during a test run, everything is better connected now, and tucked away)
Axel ( located in the Netherlands )
location of the check valve
check valve , pushed directly into the connector at the end of the vac hose from the engine
Ford Galaxy vacuum reservoir
view of vacuum reservoir in place (upwards in passenger footwell )
top line : from check valve , right line to the dashboard , Left line to the "new" reservoir
I found aquarium tubing at Wally World was the right size to fit into the rubber connection on the red hose where the black hose had attached above the blower motor under the hood. Then stuck the tubing through the hole into the fender and routed it back to the passenger door hinge and went through the rubber grommet for the door wiring into the kick panel. Cut off the factory black hose inside the cab where it went thru the firewall and attached that black hose to the tubing behind the kick panel. It worked. I had blown cigarette smoke through the vacuum lines first and saw the smoke coming from the heater box under the hood. If your leak is there this is an easy fix.
Here is the check valve plumbed in. I drew a thin red line to make seeing where the connection to the black soft hose went, and a thin green line for where the connection to the reservoir went. The white diagonal lines show the length of the 7/64" hose where connected to the soft black selector switch hose.
You can see the loose end of the black soft hose that leads to the disconnected reservoir.
Hope this makes it simple to understand,
if you decide to do this.
That was a great post. I bought my 2015 ford coachman leprechaun and was loving it until my dash vents didn�t work. Needless to say I followed your instructions and now it works great! The only thing I did different was I
buying a ford vacuum reservoir and check valve instead of building one. Thanks for the advice.
 07-15-2017, 10:44 AM