1951 Ford F1 resurrection, jag IFS LT1, EFI, T56, etc
#286
 04-22-2014, 04:39 PM

Senior User
Join Date: Sep 2013
Location: Florida
Posts: 477
Likes: 0
Received 0 Likes
on
0 Posts
 and strap it down... Like this...
#287
04-22-2014, 05:38 PM
Trying to avoid that if I can, possibly I can cut it into the passenger side inner fender. Underneath would be better but not sure I want it under a running board or not, would be a pain to get to.
Anyone have a picture of a 51-52 with only the inner fenders mouned and no outer fenders? I dont remember how much room there was in the engine compartment related to where the front wheels are.
Anyone have a picture of a 51-52 with only the inner fenders mouned and no outer fenders? I dont remember how much room there was in the engine compartment related to where the front wheels are.
#288
04-22-2014, 05:49 PM

Fleet Owner
See below, not a lot of room, depends on tires and ride height too
#289
04-22-2014, 06:03 PM
Thanks Ross, do you have any other "in progress" build pics or an album? My truck was missing so much stuff I am not sure how some of the stuff in the nose went together.
From the looks of that pic I am going to have to wait until the cab comes back and I can mock up the nose to see if there is room to notch the inner fender. My tires are pretty big and the truck will be lower than stock.
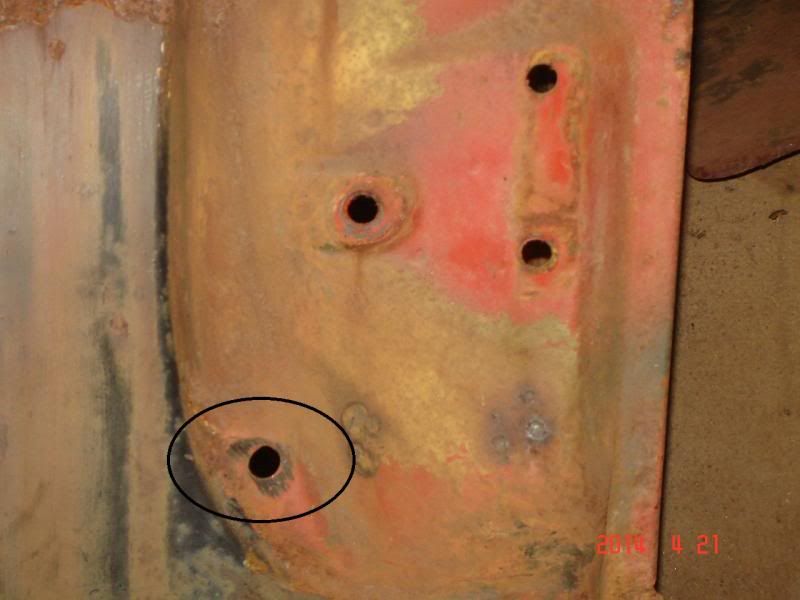
also what goes in this hole, is it a hood bumper?
From the looks of that pic I am going to have to wait until the cab comes back and I can mock up the nose to see if there is room to notch the inner fender. My tires are pretty big and the truck will be lower than stock.
also what goes in this hole, is it a hood bumper?


#291
04-22-2014, 07:20 PM
#292
04-22-2014, 08:52 PM
Dave, in a word yes. The design is to drop the battery down to the low stop, disconnect the cables and then drop the case and battery completely down to the ground or shop floor. I think that you will find that the battery will be too low if you have it under the running board since there is insufficient width for the battery outside the frame rail without dropping below the running board. As you can see, make sure that you plan or better still run your exhaust before fixing the location for the battery. Having the crossover X in my exhaust created the space for the battery. Straight dual exhaust would have been a problem.
#294
04-22-2014, 10:30 PM
Hey Dave,
What color are you going with? That's a sense of accomplishment - just getting the cab done is a ton of work. Why are you painting this one while you left the Buick with patina?
Nice that the weather has finally turned up there in New York.
Ben in Austin
1950 F1
What color are you going with? That's a sense of accomplishment - just getting the cab done is a ton of work. Why are you painting this one while you left the Buick with patina?
Nice that the weather has finally turned up there in New York.
Ben in Austin
1950 F1
I have built many "painted" cars, mostly muscle cars, over the years. The 37 Buick build and then the 47 Caddy build were done as "patina" cars just to do something different and not be so paranoid about driving them and worrying about damage. Last car I did before the Buick was this 65 442. Fuel injected LT1, T56 6 speed trans. Loved it but I was scared to death of getting a door ding in the thing! So I sold it.

This truck build has really gone off on a tangent from my original thoughts. This truck was obviously super rough and was not even going to be really restored at all, it was going to be more of a "patina" build to drive to swap meets. Well then my buddy, who is a great body man and savior of beaten panels, wants one of my cars (1952 cadillac 2dr) bad enough to offer to do bodywork on the truck and save me a ton of time. So now everything has been getting straightened nice enough that the truck is actually going to be nicer than planned. No show truck but should be nice. I am still going to use it for swap meet shopping but now I gotta worry about door dings and such again.
Color as of now will be bright red but until the paint is bought it may change, may go similar to your truck as my wifes car is a similar color and she loves it. Who knows. I just know all the additional stuff now planned will be pushing the completion date further into the summer, which is fine with me.
#295
04-22-2014, 10:33 PM
Dave, in a word yes. The design is to drop the battery down to the low stop, disconnect the cables and then drop the case and battery completely down to the ground or shop floor. I think that you will find that the battery will be too low if you have it under the running board since there is insufficient width for the battery outside the frame rail without dropping below the running board. As you can see, make sure that you plan or better still run your exhaust before fixing the location for the battery. Having the crossover X in my exhaust created the space for the battery. Straight dual exhaust would have been a problem.
Your setup looks great, but I am running straight duals so no room for the battery on the inside. Probably end up with it somewhere in the engine compartment if possible, wont know until body mock up once everything is in primer.
#296
04-23-2014, 05:40 AM
Others have located the battery behind the front seat. IIRC you put the gas tank in the rear, which opens up that area and provides good access to the battery. Placement of the battery will not restrict the full travel back of the front seat. I would have done that if I went with a rear mounted gas tank (I stayed stock on tank/tank location). The rear mounted gas tanks do crowd space for rear exit dual exhaust which I wanted for sound reasons since I am running ss "cherry bombs". There just is no free lunch!

#298
04-29-2014, 02:04 PM
Started cleaning up the frame for paint.
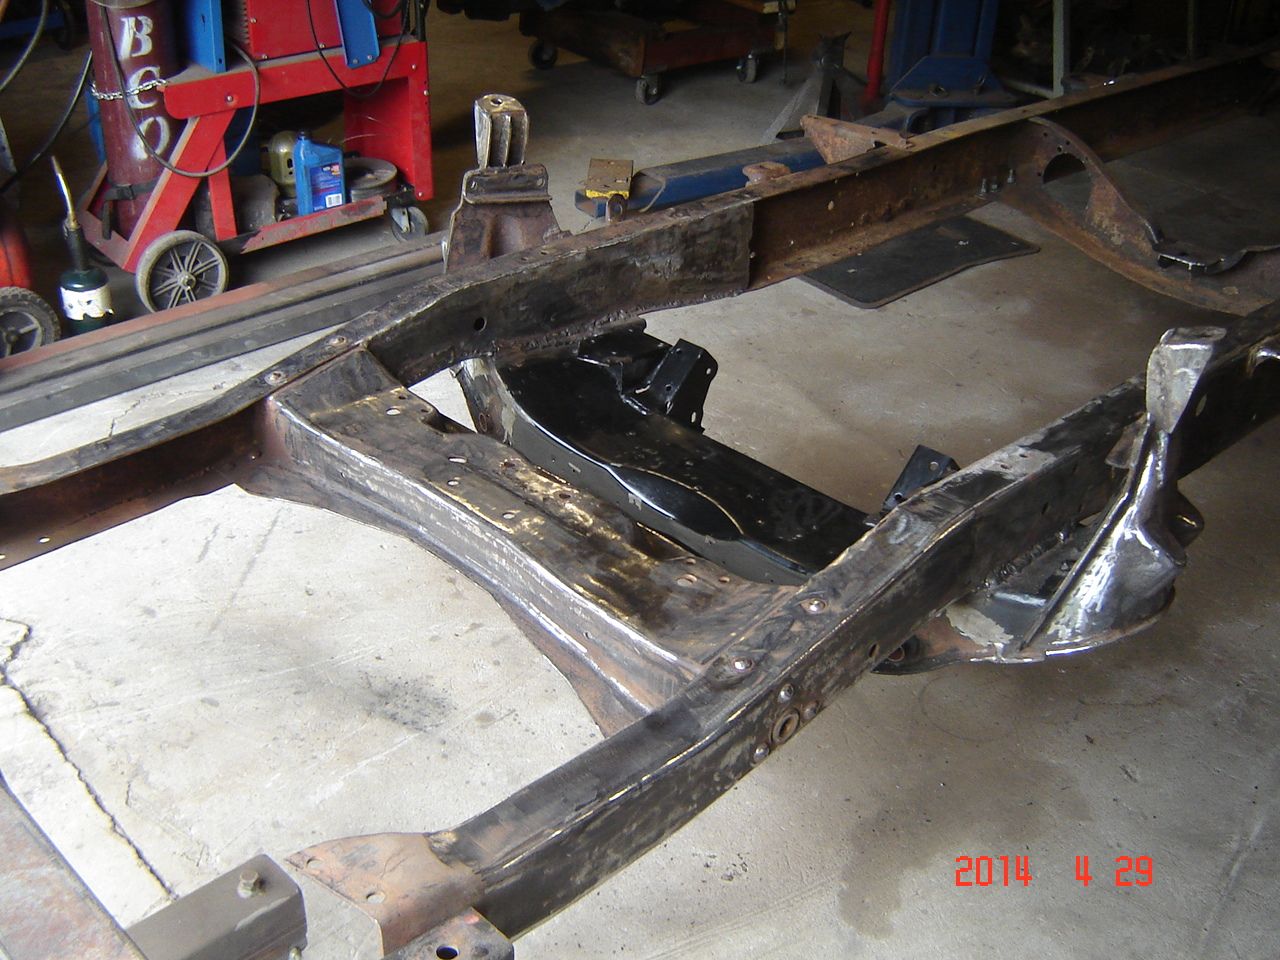
Some jag IFS information for those who are considering doing one. I highly suggest taking the IFS apart after marking the mounting locations and before final install. Reason being is there a common issue with the lower control arm mounting bolts getting rusted into either the crossmember or the control arm bushings. My left side lower control arm came apart no problem but the right side was a major PITA and I had to sacrifice the bolt to get it out.
The bolt is supposed to be driven out towards the steering rack by removing the castle nut on the front side of the bolt and then driving it out the back. The rear side of the bolt has a large hex head on it which is NOT a bolt head, it is actually a hex threaded on the backside of the bolt. Remove it and the bolt is pretty much junk as the hex head is installed at the factory and then swaged on.
In my case the bolt was siezed to the front control arm bushing making it impossible to drive the bolt out the back. I had to burn out the bushing, remove the large hex head which trashed the bolt, and the drive the bolt out towards the front. I got lucky in the case that the bolt was not siezed inside the crossmember. You can see the large hex head removed in the picture below.
I started a thread over on the HAMB about this and there are some pretty bad pictures posted of guys having to just about destroy the crossmember to get these bolts out. So before you do final mounting, especially if you are welding the jag in like I did, I suggest taking the unit apart just to make sure you can!
Bolts are availble new and bushings are cheap so do whatever it takes to get it apart without hurting the crossmember even if you have to trash the bolt and / or bushings.

#300
04-29-2014, 11:30 PM
