1953 F100 Deluxe Cab Flat-V8
#46
 11-19-2013, 04:49 PM


Ken's old truck 3.5 Radiator woes
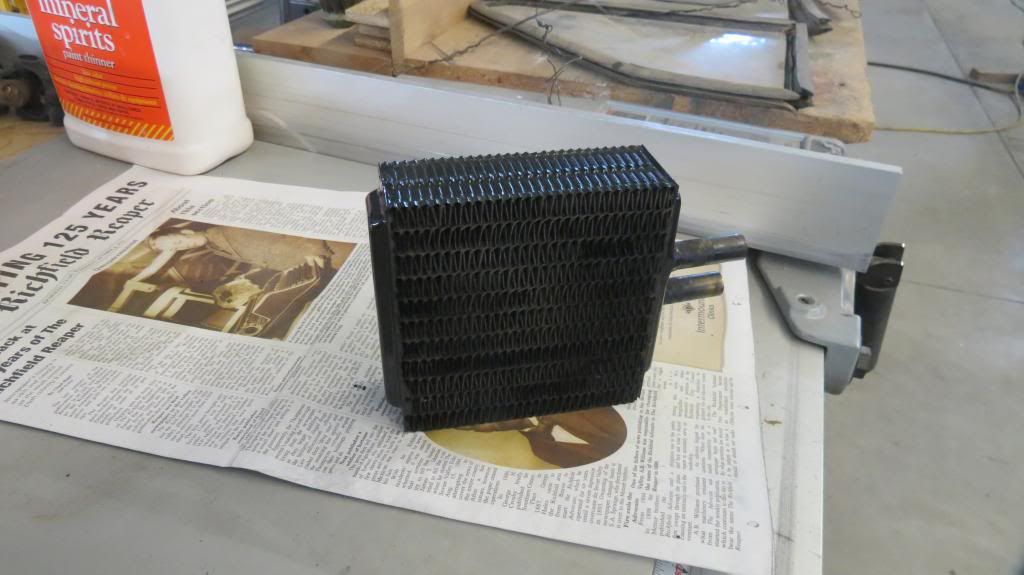
I took the radiator and heater core to the shop last week. It took them a week to get to it, and it isn't good. I knew, but didn't want to admit, the dark spots in the picture below are all pin-hole leaks.
$425 to re-core the radiator
$180 to re-core the heater core
I looked at the shiny new aluminum radiators on eBay, but I've decided to just get mine re-cored. The price is about the same, and it will keep it original.
This heater core is not reproduced as far as I know. At least it doesn't look like any of the pictures. So I'm going to get it re-cored as well.
It's only money, right?
Pictures:


#52
03-01-2016, 08:44 PM
Ken's old truck 3.5 Radiator Recore
Not as much as I would like, but thanks for asking.
I did get the radiator and the heater core re-cored. I went with four rows on the radiator to have as much cooling capacity as possible.
They dented the top tank on the radiator, which was disappointing, but other than that they did a great job. I'm not going to hold it against them because as another member here pointed out in another radiator thread, these small town shops are more about repairing radiators, not restoring to show quality.
I'm not saying the dents don't bother me, they do. They are going to be right in the front and the first thing you see when you open the hood. I'm going to see if I can make a taller top seal and hide the dents. If it looks too bad I may order the reproduction Mid Fifty now sells, for the same price as my re-core, and keep my original as a backup.
That said, here are a couple of pictures:
(The dents look much worse in the picture than in real life)
#53
03-02-2016, 12:02 AM
Ken's old truck 3.5 Fuel System
I picked the best two of my stack of old carburetors and two tops with the straight necks to accommodate after market breathers.
Out of 5 carburetors there were only 2 that had matching jets. The other 3 were mismatched. There were a total of 4 #50 jets, but not 4 of any other size, so that's what I went with.
I disassembled the carbs and soaked the parts overnight in Chem-Dip. Then I spent a lot of time drying them with a lot of compressed air. After glass beading, and a lot more air, I painted the steel parts with VHT gloss black engine enamel.
I reassembled the 2 with rebuild kits and stainless steel screw kits from Vintage Speed. I installed the original size 7.5 power valves that came with the kits, just in case of a hard backfire. (I know, I know, it's super rare for a hard intake backfire to blow the PV on a Holley 94.) I also ordered sets of 3.5 and 4.5. As soon as it is running I'll install the 4.5s and see how it runs.
While coating the inside of the original fuel tank my thumb went through the corner. I purchased a "Tanks" replacement. It is a nearly perfect reproduction. I installed it with the original straps using bicycle inner tubes for protection between the tank and straps, and the tank and running board supports.
I'm using an Offenhauser original style mechanical fuel pump and an in-line see-through filter.
The pictures:
#54
03-02-2016, 01:17 AM
Ken's old truck 3.5 Beginning Body Work
The reason the project seems to have stalled is body work. The cab and cab components (doors, cowl vent, etc.) have been at the body guys shop for over a year. Before you jump on him, it's more or less my fault. Long story.
Anyway, after installing new floor pans, rockers, front cab corners, and cab mounts, and having the whole cab hot-tanked around 25 years ago, I found rust in the windshield frame before taking it to the body shop. This started the hunt for a patch panel.
https://www.ford-trucks.com/forums/1...eld-frame.html
Joe (Harrier) and Dennis (pintoplumber) both offered what I needed. A big thanks to them both. I went with Dennis because he could get it cut out and sent right away. I was in a hurry to get the body work started. (Which is ironic when you consider that was a year and a half ago and the body work is still not finished.)
The body guy got the patch panel in and it worked out pretty well. It was actually smoother than it looks in the picture. He had to use a dremel tool to clean up the welds in the reveal at the edge of the windshield seal.
The inside of the windshield frame (it forms a box beam) has been sprayed with Eastwood rust converter to slow recurrence of the rust damage.
I don't have a current picture, but it is pretty much ready for primer. The bottom three inches of both rear cab corners have been replaced, one front cab corner has been repaired, a strip of floorboard at the back of the seat has been repaired, and the joints where I replaced the top half of the cab have been cleaned up.
The wood inside the cab in the last picture is the frame I built for lifting it. He liked it for holding the cab high while working on the rear corners. He added a brace to keep the cab from swinging and put a block on his hoist so it could not fall in the event of hydraulic failure. Safety first!
#56
03-02-2016, 08:48 AM
Tank looks great, sorry to hear about the rad though, but at least you still have the option for original with it now if you want. Just had enjoyed reading this build and figured I would see how things were coming along with you.
Good luck with the body work, looking forward to seeing it finished
Good luck with the body work, looking forward to seeing it finished
#57
03-02-2016, 10:17 AM
Senior User
Join Date: Oct 2014
Location: Natchez, MS
Posts: 112
Likes: 0
Received 0 Likes
on
0 Posts