67 "Falcon" Econoline (longest post ever + pics)
#1
 07-17-2013, 10:30 AM

Join Date: Aug 2005
Location: Columbia, MD
Posts: 52
Likes: 0
Received 0 Likes
on
0 Posts
67 "Falcon" Econoline (longest post ever + pics)
Good Morning Fellow Enthusiasts!
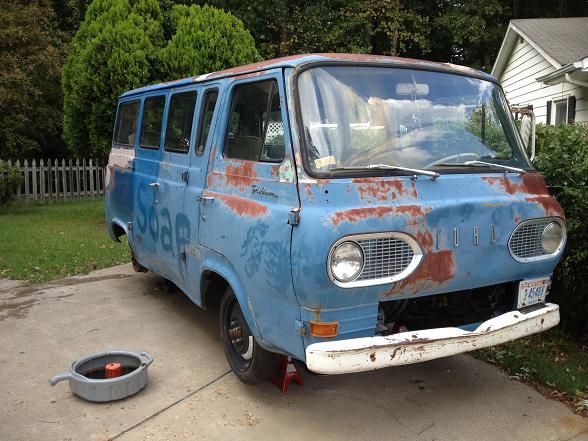
As you may notice, i've been a member on this fine forum for quite some time. it started back when i had a 2004 F150 FX4 that i absolutely loved, but that pickup is long gone... But keen on not giving up on my love for the blue oval, i decided to go get my van from years, and years ago.
Currently, I am stationed in MD, and my van was "enjoying retirement" in a field in MT, my home state. And recently, i made the long haul in my Titan (i know, i know... i can already hear the boos and hissing...) back to MT, rented a tandem axle trailer, and pulled that old bugger all the way back to my buddy's driveway in MD. And that's where she's been sitting on jackstands for a few months.
A couple days ago, the same friend who owns the driveway casually mentioned via email that i should "consider selling my van." This would be his subtle way of saying he doesnt want it on his secondary slab of driveway anymore. This is a problem because the project is stuck in a holding pattern due to a baby being on the way. But the van has got to be moved. And it couldnt have come at a more interesting time in my "build."
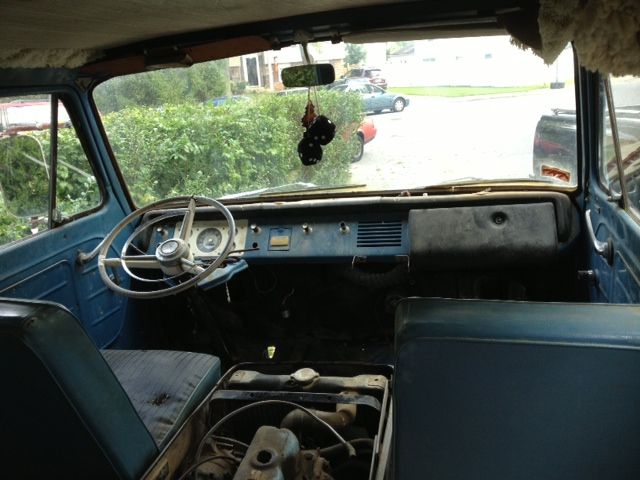
The brakes need rebuilding and lines prolly need replacing (the rare 67 model year master cylinder had been professionally rebuilt), the exhaust, cooling system, starter, alternator, driveshaft, doghouse and anything else that is connected to the engine had been removed in preparation of engine/transmission removal and the interior is basically gone.
basically, what it boils down to is i want the van to move and stop under her own power, rather than putting it back on a trailer, before i move it off his driveway. And since budget is an issue, i'm going to try and rewire the factory 240 engine, clean up the fuel system and tank, and see if the tired 65 yr old engine can be forced out of retirement(may forgo the reinstalling of the exhaust system, header is still on it, and that should be good enough haha). oh, and the cooling system of course. I remember i had it running one time back in 2004 with only the help of a bit of gas in the carb and a fresh battery! on the factory plugs!!
but that's only half the major issue, the other being the brakes. Something i will not cut corners on. I will need to re install the rebuilt brake master cylinder, run new lines, and rebuild all 4 corners.
anyone have any good recommendations for rebuild kits? i plan on doing a disc conversion at some point down the road, but i can do alright with drums on all corners until my budget improves.
sorry for the lengthy story, but i get carried away sometimes.
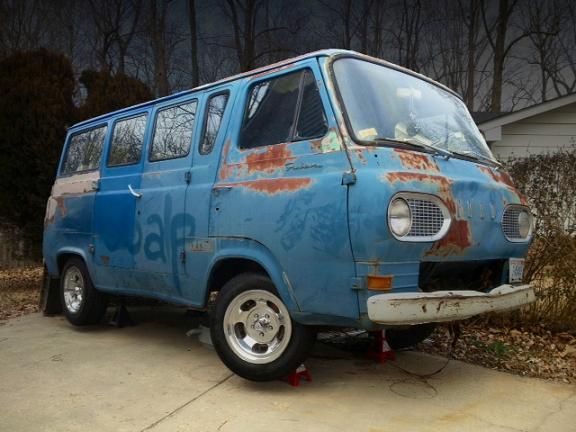
oh, thought i'd include some pics while im at it;
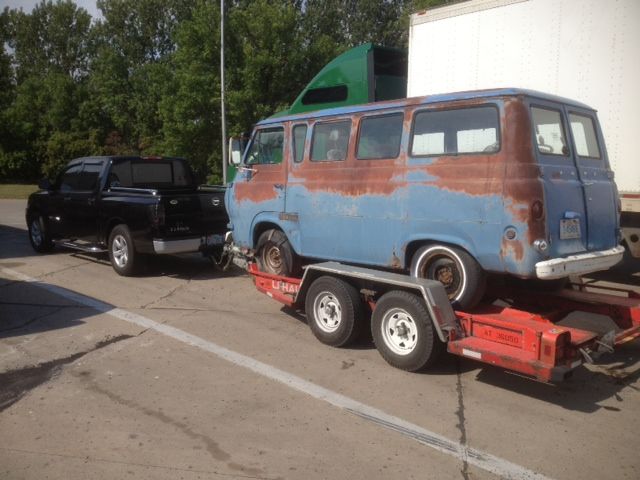
here are a few of the drive back from MT.
1. just after the van was loaded
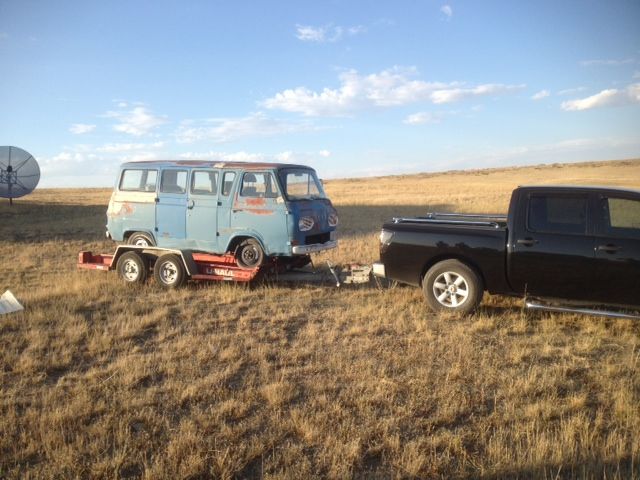
2. My brother standing stupidly proud of his contribution (nothing)

3. a better look on the trailer (1 of 2)
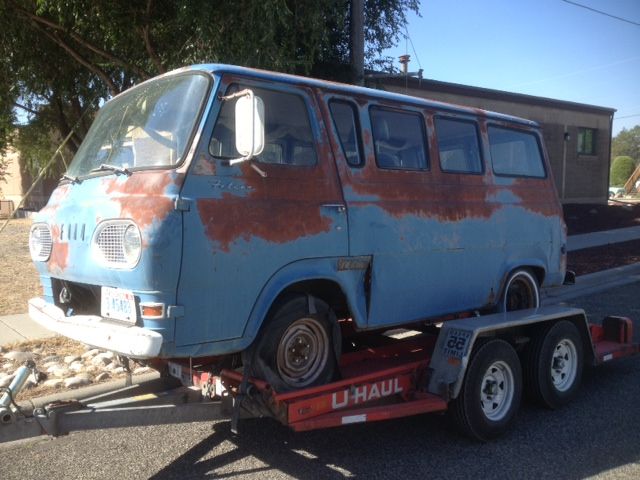
4. (2 of 2)
5. Just a random stop at a rest area. Always had guys come up to
me and talk to me about it.
6. At some point, i noticed something leaking out of the back of the van, which struck me as odd seeing as it had been sitting in a field for so long. Turns out it was gasoline coming through the old rotted filler neck hose. even stranger still, it didnt smell like varnished fuel... odd.
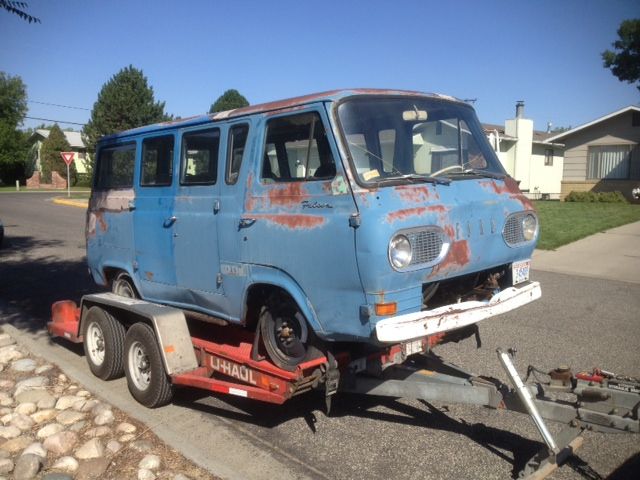
7. Here it is, in it's current resting place. all 4 tires/wheels that were on it do not hold air, nor do any of them match...
8. same guy who let me keep my van here bought a paint buffer for his car, but had no experience with it. i told him he had free reign to practice on my van. you can see the part on the rear panel he buffed, looks great! this old paint can still shine!
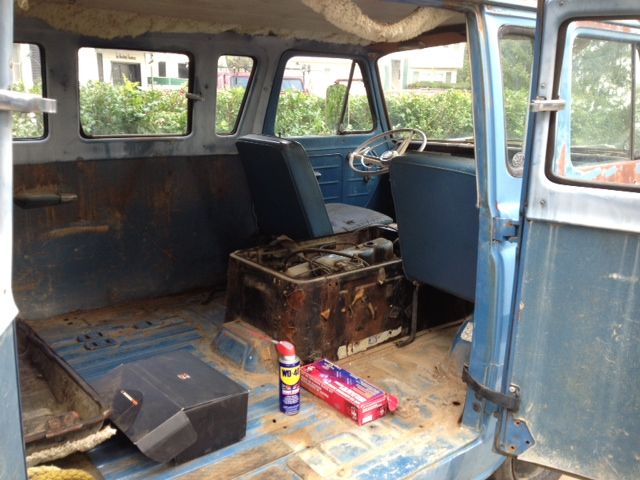
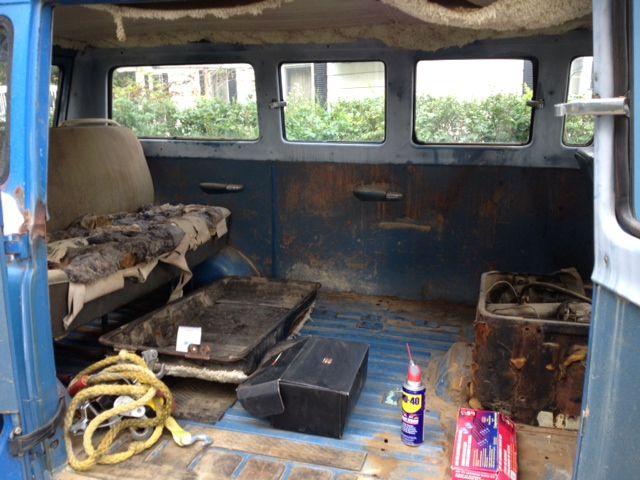
9. interior (1 of 3) dice added for picture... air freshner to fight the smell of rodent poo...
10 and 11. interior (2 & 3 of 3) there were to rear facing "captains chairs" directly behind the fron seats bolted to the deck, but they were rotted and easily removed. that rear bench... well its welded to the wheel wells....
12. Here is a mock up/joke for wheels. these just so happen to be the stock wheels from my friend's 2011 mustang gt (seen in the reflection of the paint in picture 8)
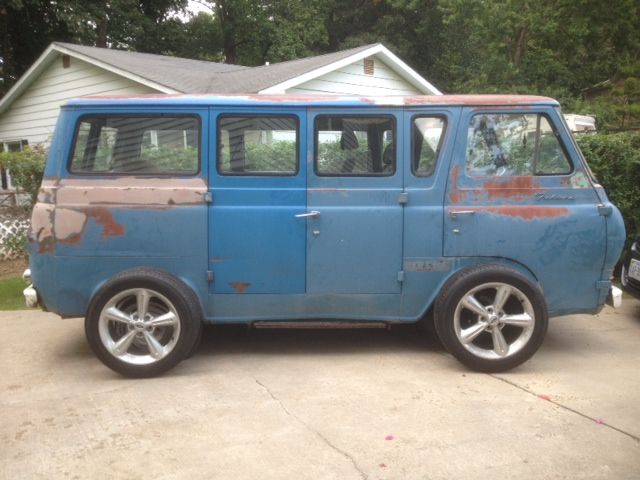
13. these are the wheels i decided on. both of the wheels that you see loosely fitted are actually for just the front axle; if memory serves, the front wheels are 15x7, and the rear wheels are 15x9 and are of the same design. I havent had a chance to do some proper searching/measuring/purchasing of rear tires; however i know i'll have to slightly modify the fender wells to achieve the wide tire and look i want on the rear. the front tires are rather close to the factory wheel/tire dimensions, although just a bit wider. they don't rub, although i don't recall the sizes right now and im not going to drive 20mins to go check right now
14. and finally, just a little bit of fun with photoshop
As you may notice, i've been a member on this fine forum for quite some time. it started back when i had a 2004 F150 FX4 that i absolutely loved, but that pickup is long gone... But keen on not giving up on my love for the blue oval, i decided to go get my van from years, and years ago.
Currently, I am stationed in MD, and my van was "enjoying retirement" in a field in MT, my home state. And recently, i made the long haul in my Titan (i know, i know... i can already hear the boos and hissing...) back to MT, rented a tandem axle trailer, and pulled that old bugger all the way back to my buddy's driveway in MD. And that's where she's been sitting on jackstands for a few months.
A couple days ago, the same friend who owns the driveway casually mentioned via email that i should "consider selling my van." This would be his subtle way of saying he doesnt want it on his secondary slab of driveway anymore. This is a problem because the project is stuck in a holding pattern due to a baby being on the way. But the van has got to be moved. And it couldnt have come at a more interesting time in my "build."
The brakes need rebuilding and lines prolly need replacing (the rare 67 model year master cylinder had been professionally rebuilt), the exhaust, cooling system, starter, alternator, driveshaft, doghouse and anything else that is connected to the engine had been removed in preparation of engine/transmission removal and the interior is basically gone.
basically, what it boils down to is i want the van to move and stop under her own power, rather than putting it back on a trailer, before i move it off his driveway. And since budget is an issue, i'm going to try and rewire the factory 240 engine, clean up the fuel system and tank, and see if the tired 65 yr old engine can be forced out of retirement(may forgo the reinstalling of the exhaust system, header is still on it, and that should be good enough haha). oh, and the cooling system of course. I remember i had it running one time back in 2004 with only the help of a bit of gas in the carb and a fresh battery! on the factory plugs!!
but that's only half the major issue, the other being the brakes. Something i will not cut corners on. I will need to re install the rebuilt brake master cylinder, run new lines, and rebuild all 4 corners.
anyone have any good recommendations for rebuild kits? i plan on doing a disc conversion at some point down the road, but i can do alright with drums on all corners until my budget improves.
sorry for the lengthy story, but i get carried away sometimes.
oh, thought i'd include some pics while im at it;
here are a few of the drive back from MT.
1. just after the van was loaded
2. My brother standing stupidly proud of his contribution (nothing)
3. a better look on the trailer (1 of 2)
4. (2 of 2)
5. Just a random stop at a rest area. Always had guys come up to
me and talk to me about it.
6. At some point, i noticed something leaking out of the back of the van, which struck me as odd seeing as it had been sitting in a field for so long. Turns out it was gasoline coming through the old rotted filler neck hose. even stranger still, it didnt smell like varnished fuel... odd.
7. Here it is, in it's current resting place. all 4 tires/wheels that were on it do not hold air, nor do any of them match...
8. same guy who let me keep my van here bought a paint buffer for his car, but had no experience with it. i told him he had free reign to practice on my van. you can see the part on the rear panel he buffed, looks great! this old paint can still shine!
9. interior (1 of 3) dice added for picture... air freshner to fight the smell of rodent poo...
10 and 11. interior (2 & 3 of 3) there were to rear facing "captains chairs" directly behind the fron seats bolted to the deck, but they were rotted and easily removed. that rear bench... well its welded to the wheel wells....
12. Here is a mock up/joke for wheels. these just so happen to be the stock wheels from my friend's 2011 mustang gt (seen in the reflection of the paint in picture 8)
13. these are the wheels i decided on. both of the wheels that you see loosely fitted are actually for just the front axle; if memory serves, the front wheels are 15x7, and the rear wheels are 15x9 and are of the same design. I havent had a chance to do some proper searching/measuring/purchasing of rear tires; however i know i'll have to slightly modify the fender wells to achieve the wide tire and look i want on the rear. the front tires are rather close to the factory wheel/tire dimensions, although just a bit wider. they don't rub, although i don't recall the sizes right now and im not going to drive 20mins to go check right now
14. and finally, just a little bit of fun with photoshop
#2
07-17-2013, 05:26 PM


Drum brakes.......
A little FYI......To start with, the replacement linings at most parts houses have a braking co-efficient of around .25, that is about 50% less than what the oem called for in the 60's (which was .32 or better, most offered .38 replacement linings). Going back to the 70's and through today, linings rated at .49 or better are common and typically sell for around $140-$200 a set. longevity, typically 50k to 100k (miles) depends on your foot. Braking capability, every bit as good as oem grade disc brakes (noticed I said oem grade) as I have demonstrated to numerous "experts"........and remember, the 3/4 scale dirt track Jalopy cars that are running today are required to have drum brakes!
It really all boils down to the friction co-efficient....anything greater than .49 will be better than oem in terms of its ability to bite. I would avoid Wagner, Raybestos & any drum (and rotor for that matter) from the chain stores...as they are all made at the same foundry in China (rotors/drums)
With regards to brake linings in general,
(aftermarket) Ceramics: They are good but do not develop any more friction than good quality OEM linings
Performance Friction & Hawk: Good braking, increased friction but very dirty compared to OEM.
Wagner & Raybestos: a line of products that is 100% marketing and mfg from very low quality/inexpensive and/or imported products with the mfg's not providing any back-up or support on product failures (and I mean real ugly spontaneous, catestropihic failures)
Bendix- TitaniuMetallic™ II, a newer lining (semi-metallic) and although I have not personally used this, I have always been impressed with Bendix brake linings and this particular lining IIMHO would be a low dust, excellent oem upgrade/mild performance type brake lining.....I don't know if its available for shoes...you will have to check.
CarboTech Engineering lining, which I have used for about 20+ years and been very happy on multiple full size (V8) cars and trucks. This particular lining has a high friction co-efficient, excellent pedal feel, wears (typically 50,000 to 75,000 miles before replacement is required) and produces less dust than OEM linings.
I highly recommend speaking to them by phone for linings that would be best for your application. With regards to drums (& rotors for that also) I run drums (and rotors) OEM replacement that are cryogenically treated at Diversified Cryogenics, making them almost as hard as stainless steel- Applied Rotor Technology in California provides the same product- but I would not rely on their delivery as it is essentially a 1 person shop owned/run by a Boeing engineer who works back east, travels alot and works at ART on weekends the last of my phone conversations with him). Unfortunately, all the drums (aftermarket) come from the same foundary in China, an alloy, some with the steel liners installed here so they claim they are mfg in the US.
Both companies purchase the highest grade drums made, laser mic them for quality, scrap the ones that are out of spec and cryogenically treat the good ones. DC's service, price and quality are excellent as well.
For wheel cylinders, master cylinders may I recommend......
for hydraulic part rebuilding-
White Post Restorations
One Old Car Drive PO D
White Post, Virginia
540-837-1140
for outright purchase & rebuild kits....all US made products
Brake Performance
9424 Eton Ave. #I,J,K
Chatsworth, CA 91311
866-756-5536 818-772-5540
Rebuilder; Brake reliner
#3
07-18-2013, 11:46 AM
Join Date: Aug 2005
Location: Columbia, MD
Posts: 52
Likes: 0
Received 0 Likes
on
0 Posts
Beechkid,
You've given me quite abit to think about in regards to brakes. I certainly will not purchase shoes with a drag co-efficient of less than .32, although the shoes that you mentioned that have a drag of .49 would be ideal, the cost of such a product is out of my limits at this time.
I looked at the wheel cylinders on brakeperformance.com, and have asked them a few questions via email about the specifications of the shoes they offer, and am awaiting a response.
I believe the first theing to do, when i have the time, is take some basic measurments of the shoes that are already on it so i can be sure i'm buying the proper shoes. next, i'll remove and replace the brake lines, and install the master cylinder. After that, inspect the wheel cylinders (possible rebuild depending on the condition), refit the old shoes, and test the system for leaks.
No leaks = install new shoes, adjust accordingly, and carefully test brakes.
Anyone have anything different to suggest? anything to look out for? or better still, detailed pictures of the best way to go about anything i've talked about? brakes are something that have always kinda spooked me due to their importance... can't hurt to %110 positive they work properly.
#5
07-18-2013, 02:54 PM

More Turbo
Rear brakes are different depending on which axle you have. See the two options here at the bottom the page.
Econoline Axles
Econoline Axles
#6
08-01-2013, 10:49 AM
Join Date: Aug 2005
Location: Columbia, MD
Posts: 52
Likes: 0
Received 0 Likes
on
0 Posts
as it turns out, my 1967 econo has an axle code of "11" meaning it has the 9" rear end. I'm very, very pleased knowing that 
anyhow, the most recent development;
last weekend i spent putting the egnine comaprtment back together. this includes all the wiring, and replacing the lead wire and rotor on the distributor. re bolted the transmission back to the engine, and re attached the shifting linkage and clutch linkage as well as the throttle linkage (but not the choke linkage as i cannot seem to remember how it was affixed to the carburetor...)
Keep in mind, the engine was prepped for removal last summer, meaning it had no fluids and the only thing keeping it mated to the van was the two motor mounts. everything else was disconnected/removed.
well after a bit of oil in each spark plug hole and a couple of revolutions to coat the cylinder walls and prime the oil pump; i put the plugs and wires (likely the same plugs and wires from 1967) back on the engine, poured a bit of fresh gas in the carb, and the dang thing fired up! and with only the exhaust headers bolted on, it was quite a wake up call!
so next on my list to make it a bit more road worthy (apart from the still obvious brakes) is to clean out the fuel lines and tank, and flush the cooling system and re attach it back to the van.
so out of curiosity, what are some of the ways any of you have used to clean 25year old fuel out of the tank? acetone?
i'm going to spray a couple of cans of carb cleaner in the lines and flush with water and denatured alcohol, so hopefully that does the trick. do you think i should even bother with the current fuel pump? or just replace it?
and lastly, best way to flush and clean out this old, old cooling system?
Thanks for your continued support fellas!
#7
11-16-2013, 08:49 PM
Trending Topics
#8
11-18-2013, 08:36 AM
Join Date: Aug 2005
Location: Columbia, MD
Posts: 52
Likes: 0
Received 0 Likes
on
0 Posts
Oh man, i hadnt updated this in awhile!
i had the brake MC rebuilt and installed. after inspecting the brake lines and all the braking components, i bled the system. pretty gross stuff had come out of it haha! But the stoppers work well
never had gotten around to blowing the fuel lines free of debris and draining the fuel tank. but a temporary bypass was to attach a rubber fuel line to the inlet side of the fuel pump and put the other end in a little 2gal fuel tank that i placed in the cab. fuel pump seems to be working well!
as for the coolant system, i ran distilled water in it all the way up to temperature, drained it, and repeated that process about 3 times until the rust color had subsided.
not entirely sure if the temp guage is functioning %100, but the needle moves... so i can only assume the engine got hot enough to pop the new thermostat open.
so i have the engine running well, and it keeps cool with only a ver minor drip of coolant from the lower radiator hose fitting. so next would be to lube the shifting mechanism and adjust the clutch linkage accordingly. after i was pleased with how these were operating, i replaced the driveshaft u-joints with new ones and filled the transmission with new gear oil. Let's go for a drive.....
well that was scary, but everything seemed to be working like it should. engine pulls like a freight train and the brakes bring everything to a halt in slightly violent, but effective way.
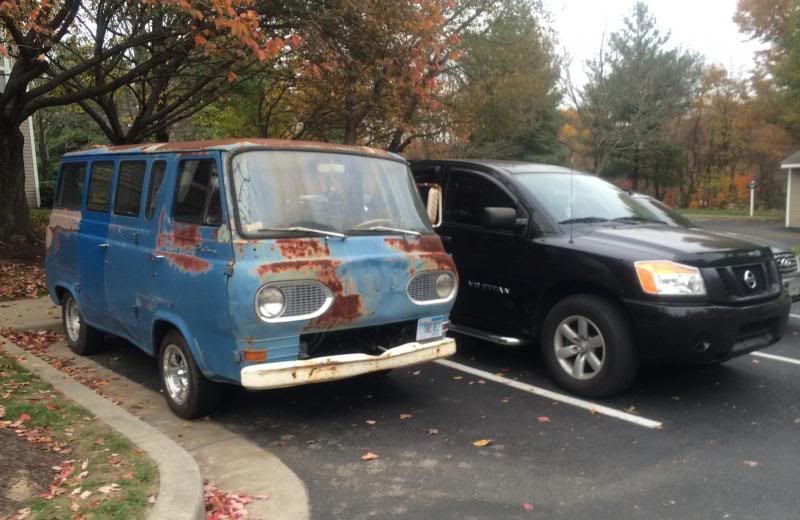
i gutted the interior out, all that's left is the front seats. so i loaded up my all my tools and my motorcycle (1997 Triumph T595) in the van and set out for my apartment parking lot. I need the van and bike there closer to me and more accesible because my wife is 3 weeks from giving birth and i want to be close by.
had my buddy following me the whole way (about a 30 min drive) in my pickup.
van drove well! i mean, the steering had quite a bit of play in it and the lack of an exhaust system created some pretty powerful fumes and backfires when engine braking.... but it made it all the way there.
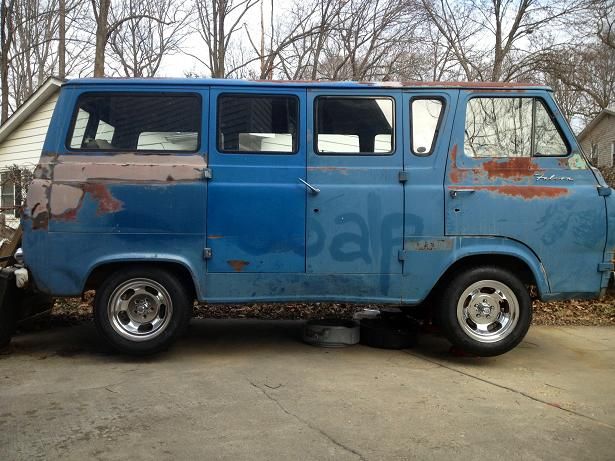
here is where it sits now;
as you can see, i washed the passenger side of it. took me 45 mins to scrub 40+ years of oxidation off.. and it still needs a bit more love. then i hope to clean the rest of it and possible just slap a coat of clear on it and call it good on exterior "color" haha! saves me a boat load in paint and body work... and it'll look alot better with the matching rear wheels on it. and someday, some polished side pipes and maybe a set of chrome bumpers. i need to tint the back windows... don't need anyone seeing all the stuff i have in it...
i came outside a couple days ago to discover a rather large "puddle" of something under the rear end of the van.
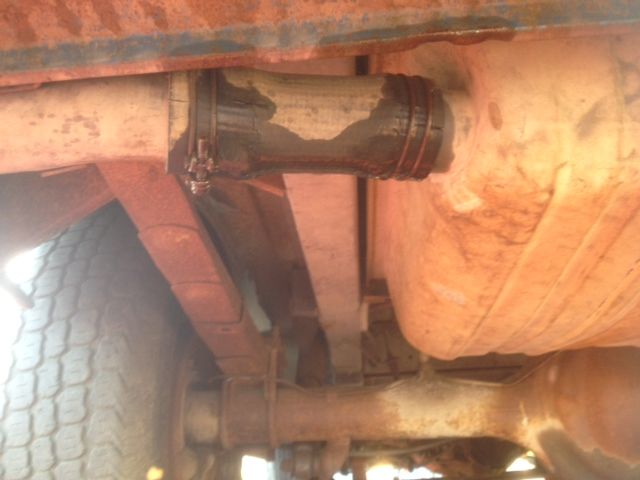
turns out that 25min "maiden voyage" showed me its 46 year old weak points. the pinion shaft seal gave up and puked all the rear diff oil on the ground. i just hope it's the only the seal and not the pinion bearing.... ugh...
i had the brake MC rebuilt and installed. after inspecting the brake lines and all the braking components, i bled the system. pretty gross stuff had come out of it haha! But the stoppers work well
never had gotten around to blowing the fuel lines free of debris and draining the fuel tank. but a temporary bypass was to attach a rubber fuel line to the inlet side of the fuel pump and put the other end in a little 2gal fuel tank that i placed in the cab. fuel pump seems to be working well!
as for the coolant system, i ran distilled water in it all the way up to temperature, drained it, and repeated that process about 3 times until the rust color had subsided.
not entirely sure if the temp guage is functioning %100, but the needle moves... so i can only assume the engine got hot enough to pop the new thermostat open.
so i have the engine running well, and it keeps cool with only a ver minor drip of coolant from the lower radiator hose fitting. so next would be to lube the shifting mechanism and adjust the clutch linkage accordingly. after i was pleased with how these were operating, i replaced the driveshaft u-joints with new ones and filled the transmission with new gear oil. Let's go for a drive.....
well that was scary, but everything seemed to be working like it should. engine pulls like a freight train and the brakes bring everything to a halt in slightly violent, but effective way.
i gutted the interior out, all that's left is the front seats. so i loaded up my all my tools and my motorcycle (1997 Triumph T595) in the van and set out for my apartment parking lot. I need the van and bike there closer to me and more accesible because my wife is 3 weeks from giving birth and i want to be close by.
had my buddy following me the whole way (about a 30 min drive) in my pickup.
van drove well! i mean, the steering had quite a bit of play in it and the lack of an exhaust system created some pretty powerful fumes and backfires when engine braking.... but it made it all the way there.
here is where it sits now;
as you can see, i washed the passenger side of it. took me 45 mins to scrub 40+ years of oxidation off.. and it still needs a bit more love. then i hope to clean the rest of it and possible just slap a coat of clear on it and call it good on exterior "color" haha! saves me a boat load in paint and body work... and it'll look alot better with the matching rear wheels on it. and someday, some polished side pipes and maybe a set of chrome bumpers. i need to tint the back windows... don't need anyone seeing all the stuff i have in it...
i came outside a couple days ago to discover a rather large "puddle" of something under the rear end of the van.
turns out that 25min "maiden voyage" showed me its 46 year old weak points. the pinion shaft seal gave up and puked all the rear diff oil on the ground. i just hope it's the only the seal and not the pinion bearing.... ugh...
#9
11-18-2013, 09:48 PM

Senior User
longest quick post
sheet metal looks solid, be mindful of the goop that came out of the brakes. it may have been sealing the wheel cylinder seals. In a short while roll back the dust caps and look for moisture at the wheel cylinders. also inspect the rubber lines for small cracks in the out casing. it's a tell that the hoses are ballooning up under load. Bendix made the brakes for these, true enough a lot of chain store parts are junk. But don't bust your budget on it either. Put the bucks into a good 4 wheel disc conversion (a lot of them are junk too.) that 2 stage master is a great part to work from. My '66 is single stage and i'm not to impressed with the conversion kits. saw a rough 2 stage when i first got the van and blew it off thinking i'd find a better one (silly me). you mentioned the van is a '67. one of the more knowledgeable members can correct me on this but I think the round tail lights were '65 and older. I think the 240" 1st came out in '65. My '66 had a bone yard motor from what I'm guess'n was Maybe a van or larger truck '65 motor. it had no pcv valve just a scavenge pipe and an oil bath air cleaner.
I like the chrome slotted rims you have on it. Who was source. how tall how wide? i'm trying to keep the body as stock as possible. the original rims on these were tiny. 13x5.5J or 14x5.5J. I was going for staggered smoothies with baby moons and trim rings. 15x8 rear and 14x6 or maybe 7 on the front. Too wide and i'll beat the daylights out of a most spendie steering box. to tall and you have to recalculate the size of the brakes or reduce the aspect ratio of the tires or both. If you don't mind let me know about the slotted wheels looks good but still old school. also if the door was replaced n the past you may have the vin plate from another year. snoop around the engine hole in the floor the vin may also be stamped into the floor pan left front by the driver on the hump at the rear. scrape back the caulking. if it's different i'd let sleeping dogs lay you don't need to get into title crapola in MD it will be an epic adventure.
svj
#10
11-18-2013, 10:12 PM
#11
11-19-2013, 10:41 AM
Join Date: Aug 2005
Location: Columbia, MD
Posts: 52
Likes: 0
Received 0 Likes
on
0 Posts
glad to see im not the only odd one who has interest in these things!
SVJ, i see you're in MD too! this one's parked out in Columbia (where i live), any good van groups in the area? I'm in the Navy and my home of record is in MT, so thats where the clean title is out of and where the van is registered. no safety insp in MT haha! my pickup and bike both have MT plates on them too. no fuss
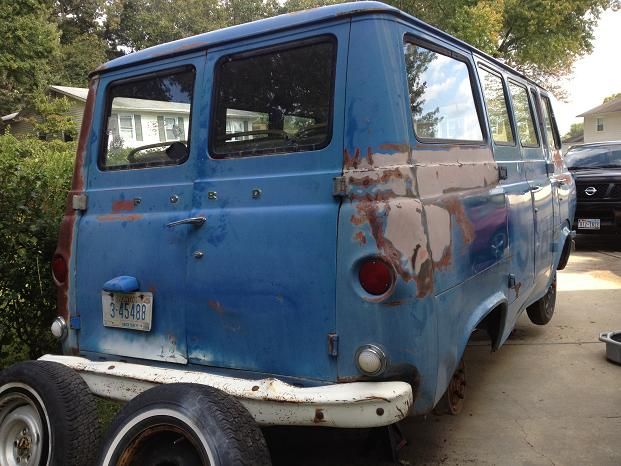
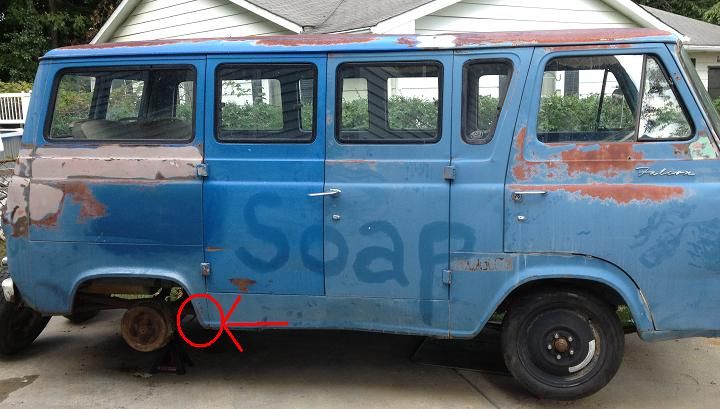
the sheet metal on it is in decent shape in most areas. just a few dents that can be banged mostly flat and filled in. there is a small amount of rust just forward of the rear driver side wheel well. there is quite a bit of bondo just above the rear quarter (seen in pics) and i'm scared of what's beneath it, who knows. it also has a good sized dent just under the driver door. oh, and most of the body lines don't match up quite as well as they used to (IE the back passenger side door is bowed in such a manner that if you give it a good tug, it'll pop open even when locked...)
as for the vin plate, i can't %100 confirm that this is a 67, but i don't have any reason to disbelieve it either. it has the 67's rare dual Brake Master Cylinder that i had to have rebuilt. as for the drums, i had thought that i would get a disc conversion for the front axle. i had heard rumors that a 1st gen mustang front disc conversion fits on these vans well, and seeing that i already have the dual MC, should be a breeze to fit. The rubber brake lines are in fairly good shape for their age and i check them often (until i get them replaced); not hairline cracks or brittle sections. it almost looks like they may have been replaced before it was parked in the 80's. i mean, it was parked for the brake MC failing and parts couldnt be found to repair it in MT (before the internet..) so maybe the original owner had tried replacing other brake components before resorting to abandoning the van. who really knows.
now the wheels and tires; i used this very, very useful website tool (Custom rims, wheel tire packages for your ride - RIMSnTIRES.com) to make the front wheels/tires approx the same dimensions as what would be fitted to it originally, except maybe about an inch wider tread. the front wheels are 15x7's, and i have a set of matching ones for the back that are 15x9's. right now its just the steelies that were found on it when i got the van with a set of used tires for $50 just to get it on the road.. I have the size of GF Goodrich Radial T/As i plan on fitting to the rear written down at home, i'll post that and the size for the front wheel/tires when i get home. i have spent a couple hours meticulously measuring the clearances of the front and rear wheel wells before deciding on the tire sizes so i was confident they would fit before ordering them. worst case scenario, i may have to fit a small spacer to the rear wheels and create about a 1/2" more clearance (see below picture for location im talking about)
but yea, i'll get the tire sizes i decided on and the sourcing for the wheels this evening and post them for all who are interested. i highly recommend that website tool i posted too, makes life real easy.
67 Ford 67, I'd love to see some pictures of what your supervan looks like! always like to see these vans on the road!
SVJ, i see you're in MD too! this one's parked out in Columbia (where i live), any good van groups in the area? I'm in the Navy and my home of record is in MT, so thats where the clean title is out of and where the van is registered. no safety insp in MT haha! my pickup and bike both have MT plates on them too. no fuss
the sheet metal on it is in decent shape in most areas. just a few dents that can be banged mostly flat and filled in. there is a small amount of rust just forward of the rear driver side wheel well. there is quite a bit of bondo just above the rear quarter (seen in pics) and i'm scared of what's beneath it, who knows. it also has a good sized dent just under the driver door. oh, and most of the body lines don't match up quite as well as they used to (IE the back passenger side door is bowed in such a manner that if you give it a good tug, it'll pop open even when locked...)
as for the vin plate, i can't %100 confirm that this is a 67, but i don't have any reason to disbelieve it either. it has the 67's rare dual Brake Master Cylinder that i had to have rebuilt. as for the drums, i had thought that i would get a disc conversion for the front axle. i had heard rumors that a 1st gen mustang front disc conversion fits on these vans well, and seeing that i already have the dual MC, should be a breeze to fit. The rubber brake lines are in fairly good shape for their age and i check them often (until i get them replaced); not hairline cracks or brittle sections. it almost looks like they may have been replaced before it was parked in the 80's. i mean, it was parked for the brake MC failing and parts couldnt be found to repair it in MT (before the internet..) so maybe the original owner had tried replacing other brake components before resorting to abandoning the van. who really knows.
now the wheels and tires; i used this very, very useful website tool (Custom rims, wheel tire packages for your ride - RIMSnTIRES.com) to make the front wheels/tires approx the same dimensions as what would be fitted to it originally, except maybe about an inch wider tread. the front wheels are 15x7's, and i have a set of matching ones for the back that are 15x9's. right now its just the steelies that were found on it when i got the van with a set of used tires for $50 just to get it on the road.. I have the size of GF Goodrich Radial T/As i plan on fitting to the rear written down at home, i'll post that and the size for the front wheel/tires when i get home. i have spent a couple hours meticulously measuring the clearances of the front and rear wheel wells before deciding on the tire sizes so i was confident they would fit before ordering them. worst case scenario, i may have to fit a small spacer to the rear wheels and create about a 1/2" more clearance (see below picture for location im talking about)
but yea, i'll get the tire sizes i decided on and the sourcing for the wheels this evening and post them for all who are interested. i highly recommend that website tool i posted too, makes life real easy.
67 Ford 67, I'd love to see some pictures of what your supervan looks like! always like to see these vans on the road!
#12
11-19-2013, 12:18 PM
Hi!
Join Date: Sep 2007
Location: Central NJ
Posts: 1,268
Likes: 0
Received 0 Likes
on
0 Posts
#13
11-19-2013, 08:24 PM
Senior User
hey jippah
Were over in Rockville. talked to few folks at random but haven't had time to check for any groups. there are pics on page 12 down around 13th tread down the page, some later stuff on pg 1 or 2 named new pics these are close up repair pics if you enter one of the pics you can scroll through some have been deleted (got a bit carried away). The tail lights are the tell on the year but who cares. it's just that much cooler. The 240" is a real stump puller. Mine had yellow writing on it suggesting a bone yard. I got lucky and found a 300 from a 76 with very low mileage. they'er the same except the crank and rods. I used the old head on the newer block.
thanks for the rim info i'll check them out
svj
thanks for the rim info i'll check them out
svj
#14
11-24-2013, 08:51 PM
Senior User
hey jippah
That s a cool detail that the short beds had the round tail lights. I know '67 had reverse lights I assumed yours were add on's I don't have any and will be doing an add on or seek '67 lights and lens' from macs. I need check that my '66 3.03 trans has a place for the switch. I was thinking about your fuel leak. When you replace the filler hose take a look inside the tank for rust. Your outside looked pretty good from the picture. If it's rusty inside their are a few pretty good tank relining kits on the market. My original tank was a wreck and had been relined a long time ago but not so well. I tried various chemical strippers and home made flails to clean it. none really worked for me. I was lucky to find another tank in OK shape to clean up and reline. After, one of my old techs suggested to use BB's as an abrasive but I don't know how I would go about agitating it and had already replace it. Don't run any chemicals or crap gas through your fuel pump. If you need a place to dump a few gallons of gas let me know. I can recycle a few gallons of gas at my shop. It's down the road piece in Silver Spring. If next weekend is warmer I'll finish reassembling my fuel system the can start to dial in the monster carb and recurving my distributor.
svj
svj
#15
02-01-2014, 06:09 PM

Hi JIPPAH
I had to look twice to see if it was MY van you are restoring !
Lucky you! you got the right diff, must go with the 240?
I have a 170 with the rear access diff. My old 67 that I sold 33 years ago had the right diff with a 170. Were there issues with the diff I am running?
I tried to find some 15" rims but could only find 14's (you have good taste in rims :-) so I bought them.
I got 2 front sets of seats with it but wanted something more comfortable, was hard to find seats that fit into a 21" gap! The seats out of a 2001 Honda CRV are excellent. Drivers side is adjustable but passengers is fixed. Took some work to get them down low enough.
I am going to do the D+D disc conversion but am using a dual brake master from a Lotus Elan +2 that will (just) fit under the dash with its reservoir----topping up fluids will probably be through the ashtray opening !
Not having any luck trying to load some pics. Keep in touch !