226 I6 oil pan gaskets and packing ??
#16
 07-23-2013, 09:13 AM


Pilot bolts are very useful for getting things in place, and are cheap and easy to make. They are re-usable of course and come in handy on lots of jobs. Slot the ends so you can use a screwdriver to get them out. It really helps on oil pans to keep the gasket in place, too.
Did you make those from bar stock, or did you buy them already threaded? I have a die set, but have never used them except to "fix" buggered threads, never to cut new threads.
Should I make more than 4 of them to do the oil pan?
#17
07-23-2013, 09:35 AM
interesting timing on this topic, I literally just finished doing this job to mine last week - took all day sat and sun to drop the pan, unhook the trans, and remove part of the clutch, loosen the crank (almost to the point of falling out), and then all day tuesday to get everything reassembled and the valve timing back correct. (note it will start with the crank off by 1,2, but not 3 teeth)
Long story short if I had it to do again I would NOT do the uppers unless I was rebuilding the engine.
I cut new gaskets out of the thicker 1/8" roll-o-gasket material that all the parts stores sell (I also have 1/16" but didn't use that on this project).
The cleanout I glued in with permetex above and below the gasket so it was thuroughly glued to everything. I let that set overnight at an absolute minimum before reassembly and getting it wet with oil.
Be sure to "glue down" the rear portion of the pan seal with permetex and let it set before you try to hoist the pan in place, if not I guarantee the seal will roll down into the pan and leak like a seive at the back.
The cleanout screen can definitely be cleaned it is heavy duty metal wire mesh.
To make the pilot bolts I just bought 2 long long bolts - something over 1 1/2" so they have an unthreaded neck. chop em off, clean em up and put a slot in em. lot less work than cutting new stuff from round stock. 2 is sufficient, with 2 lined up everything else must line up, I did it without them though, big *** 6 cyl pan is heavy though.
I removed and reinstalled mine several times (trying to get the valve timing right before I sat down and thought it through) without removing the starter. You can do it, you just have to go really slow and careful not to ding your gaskets and move them around as Ross said.
[EDIT] - this applies to the F1 for sure, as you say on the F2+, only a slight lift or removing 1 tie rod then...
You have to take all the weight off the front axle so it is lowered completely out of the way (i.e. jack stands under frame) otherwise you will never get the 6's pan out - it just doesn't clear.
It makes it easier to reinstall the pan if you lift the trans/rear of the engine up about 1/2" - this gives you clearance at the front so you can get past the frame crossmember.
FWIW, I just put in my homade roll-o-gasket everywhere except the front main and rear main - for those I used best gasket graphtite. I glued down the gasket to the pan with permetex. I have no leaks that I can see so far.
Be sure to re-torque (15-18#) the pan bolts after a couple hundred miles, the gasket relaxes as it works into home and they need a torque after a while.
If you got it out already I am sure you figured it out.... but for clarity and posterity, use a 3/8 drive and for the bolts around the starter use a long wobbly extension, 1/2 drive you can't squeeze between the pan and starter - 3/8 just barely squeezes in there like it was designed for it.
#18
07-23-2013, 10:01 AM
Thanks Brian. I'll buy some bolts and make those pilot bolts.
Yes, I have the pan out already. I couldn't get a socket on the last two bolts without removing the starter. So now I have work to do on the starter... should have left it alone.
Because the F4 is so far off the ground, I didn't have to jack it up. I did have to lower one side of the tie rod, but that was easy since I just put on new tie rod ends. I may try slightly jacking up the tranny though if that will give me better clearance for installing the pan. It really didn't want to come off even after it was loose, and I'm sure fighting it back into place will mess up the gasket.
So, I'll get some Permatex and secure the gasket to the pan. How did you put pressure on it for a good seal without installing the pan?
Are you saying you sealed the lower packing with Permatex too?
Good idea about sealing both sides of the cleanout gasket. I think that was leaking the worst. Surprisingly, the screen was not very dirty. I pulled it and cleaned it, but it wasn't as bad as I had expected.
Yes, I was already advised to leave the upper seals alone. They'll probably leak still, but I don't want to loosen the crank. In all honesty, I had so much oil leaking, I can't say if it was coming from the upper seals too. It looked like it was coming from just about everywhere.
Thanks again guys for all your help. I'm headed out of town again today, so this will all have to wait for next weekend.
#19
07-23-2013, 10:31 AM
I cleaned the shop floor really well, permetexed the pan, set the gaskets on the pan, let it sit for about 3 minutes, then turned the whole lot upside down onto the floor (nice smooth flat area that I cleaned well), put all the bolts in (so the gasket is glued into the RIGHT place - all the holes lined up), set a brick on the pan to put a little weight on it, let the whole mess sit for 8 hours.
As you have seen, the distance from the front pulley to the starter plate is about 1/16" longer than the pan is... so you have to go in perfectly straight, **** it one iota and it wedges in, beastly task to say the least - take a beer and a break if it isn't going well it's just a patience task.
Yes, I put permatex under the rope seal, just don't use so much that it gets all squirted out all over the place... And of course do NOT put any on the crankshaft side of the seal. I took that tip directly from a youtube video on how to install graphtite rope seal.
#20
07-23-2013, 10:33 AM

Fleet Owner
I made the pilot bolts same way as Bryan. I don't advise letting RTV cure without the pan torqued down. It will not conform after it cures. The less you use the better, just go completely around all bolt holes with a 1/16" or less bead.
Bryan, I agree doing the upper rope is 50-50 chance of making things worse with the crank in the vehicle. You really need to roll it into the groove with a lot of force to get it seated.
Bryan, I agree doing the upper rope is 50-50 chance of making things worse with the crank in the vehicle. You really need to roll it into the groove with a lot of force to get it seated.
#21
07-23-2013, 11:37 AM
Thanks much Ross for reminding me.... I should add that the particular RTV I was using with that 3 minute and 8 hour figures was 24 hour cure RTV. The stuff that says "fully cures in 24 hours" and "do not subject to pressure for 24 hours" As Ross cautions, yes it will never seal right if you let it mostly/fully cure before assembly.
#22
07-27-2013, 07:26 PM
Too much!
I just crawled under the truck to test fit the pilot bolts I'll use for lining up the oil pan. And that's just to say why I was under the truck...
When I first pulled the pan, I scraped the old gasket off the pan with a putty knife. So, there was a gasket on the pan, or at least a layer of a gasket.
I just found the gasket that's stuck on the bottom of the engine. I'm wondering if somebody put two gaskets on the oil pan. If that's true, it's no wonder it was leaking so badly. But I recall thinking the first time I checked the tightness of the pan bolts that they were not "tight". However, 15-18 ft pounds is not really cranked tight anyway... so I probably overtightened them trying to stop the leak. I certainly did not torque them.
I expect that gasket will be a little harder to remove.
I also found what the pan was getting stuck on once I had it loose. There's something like rubber on the back of what I guess is the crankshaft vibration damper. So, I assume this is normal, but I don't understand what it's for. Yeah, I know, to dampen vibration of the crankshaft. But what's it really for?
#23
07-27-2013, 08:28 PM

http://en.wikipedia.org/wiki/Torsional_vibration
Not an engineering level explanation, but basics. Lots of good write ups out there if you want to do some reading.
#24
07-27-2013, 09:09 PM

#25
07-27-2013, 09:18 PM
Fleet Owner
#26
07-27-2013, 09:28 PM
#27
07-28-2013, 08:40 AM
The vibration damper on my '49 does not appear to be any two piece, rubber bonded damper. It is unlike the picture shown above. First appearance, dirt cakes and all, it looks the size and shape of what I would expect a two piece bonded damper to look like but there is no visible two piece or bonding. The engine from mine does have a "rebuilt tag" so who knows.
#28
07-28-2013, 07:00 PM
Mine doesn't look like that one Ray.
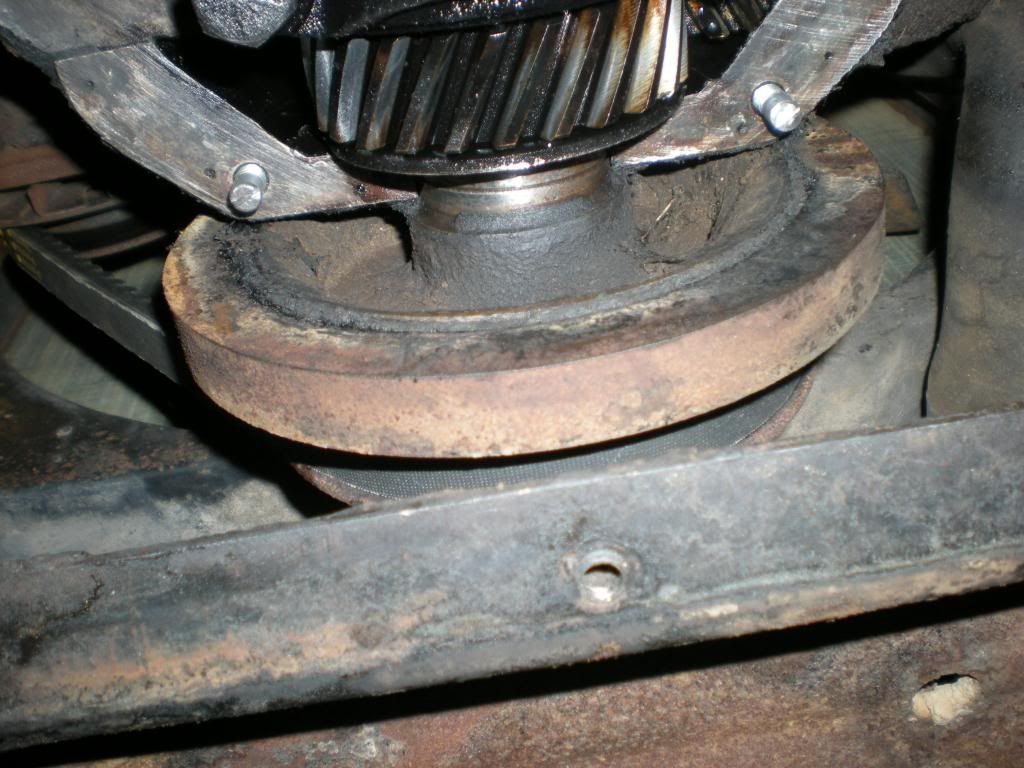
But as I was removing the remaining oil pan gasket material from the motor this afternoon, I also removed the "overrun" of rubber from the back of my damper. It wasn't much material, but just enough to interfere with the oil pan.
I figure the oil pan was on the engine before that damper piece was installed at the factory.
And I now think it was the original oil pan gasket that simply separated when I was removing it, leaving one layer on the oil pan and the majority on the motor.
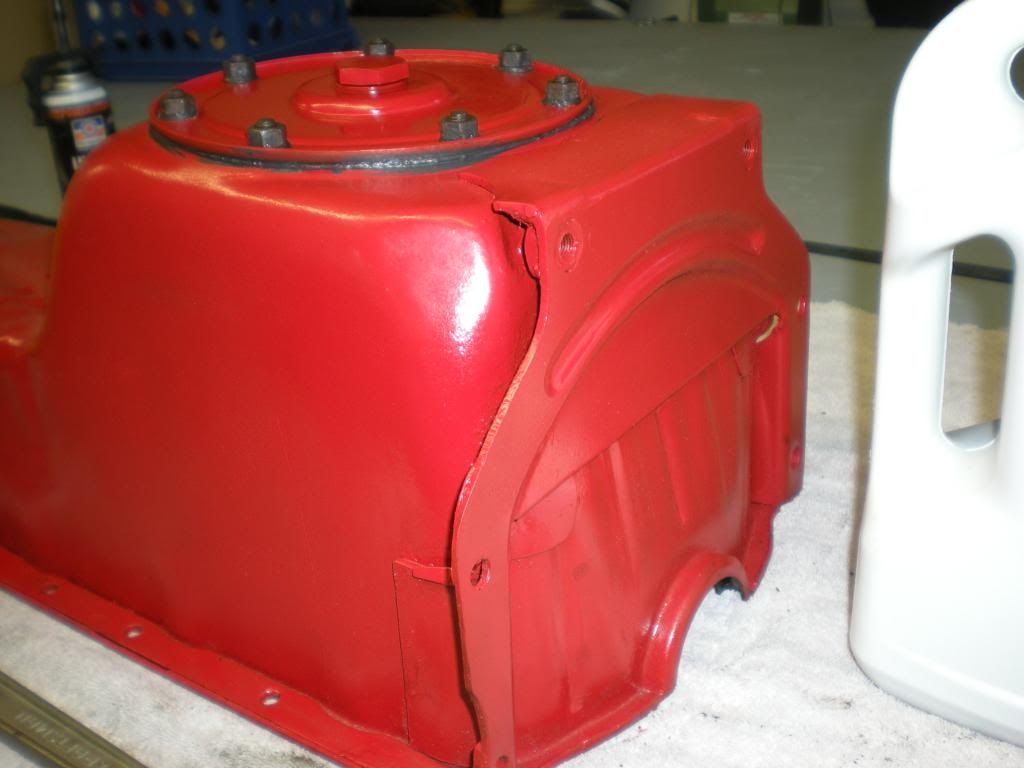
I also got some Permatex today and reinstalled the cleanout plate.
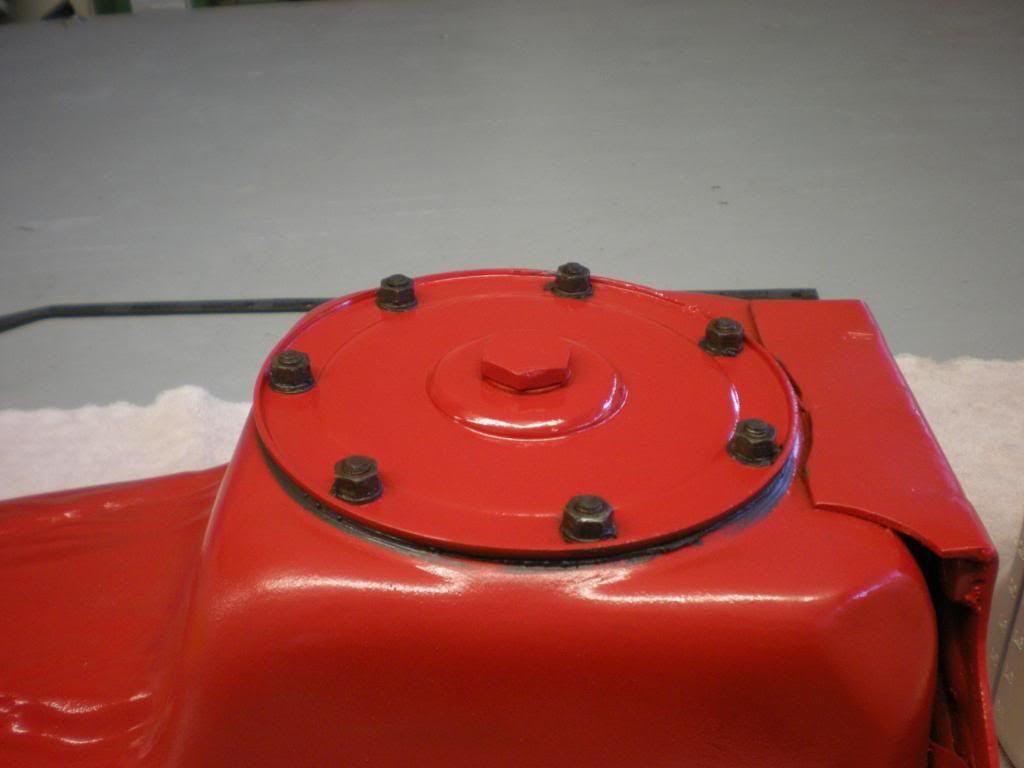
And Ross, here's the plate welded onto the back of the 226 pan I was telling you about.
But as I was removing the remaining oil pan gasket material from the motor this afternoon, I also removed the "overrun" of rubber from the back of my damper. It wasn't much material, but just enough to interfere with the oil pan.
I figure the oil pan was on the engine before that damper piece was installed at the factory.
And I now think it was the original oil pan gasket that simply separated when I was removing it, leaving one layer on the oil pan and the majority on the motor.
I also got some Permatex today and reinstalled the cleanout plate.
And Ross, here's the plate welded onto the back of the 226 pan I was telling you about.
#29
07-30-2013, 09:04 AM
After work yesterday, I got the pan installed again. If I ever do this again, it will be with the motor out of the truck. I had to get the floor jack under it to move the back into place after I got the front past the damper.
The pilot bolts were a great idea. And I found it necessary to re-torque all the bolts 4 times before they remained at 16 lbs ft without slightly moving. I thought that was odd, but maybe it was just the seals mating?
The pilot bolts were a great idea. And I found it necessary to re-torque all the bolts 4 times before they remained at 16 lbs ft without slightly moving. I thought that was odd, but maybe it was just the seals mating?
#30
07-30-2013, 09:29 AM
Fleet Owner
One concern with a rubber-bonded damper is that the outer rim can shift relative to the inner, and the timing marks are on the outer. So you can end up setting your timing to an incorrect mark. Well worth the time to verify TDC (I'd assume the bump on the damper is actually at BTDC like on the V8's).