
Ugly Betty: Frame-Up Rebuild w/ a Donor


#62
 12-28-2012, 05:46 PM
Join Date: Dec 2010
Location: Carlisle
Posts: 221
Likes: 0
Received 0 Likes
on
0 Posts
The most important thing for me is to keep this FUN! My issue with the transfer case was the first time I really got, well, pissed enough to throw stuff and walk out. Turns out that's just what I needed- step back and take some time and the solution came up.
For those keeping tabs, as of right now (see pending posts with pictures) I've got about 24-30 working hours in the tear-down. That includes time getting new tools ([insert favorite expletive here] STAR wrenches). In other words, two guys in a weekend can easily get down to the frame with only a few 'special' things (small tractor with a bucket) and the general tools I've mentioned here.
Off to the update with pictures...
#63
12-28-2012, 06:57 PM
Join Date: Dec 2010
Location: Carlisle
Posts: 221
Likes: 0
Received 0 Likes
on
0 Posts
Today ended up being more of a general “let’s get the frame ready” day than I originally intended. I got the transfer case off (see previous post and declaration of victory). I have to get my buddies tractor to get the engine and tranny out, which is set for the weekend. So in the mean time I want lookin at the frame and pulling general, unexciting stuff like pulling out the rest of the wiring harness leading to the back of the truck (fuel tanks, RABS valve, tail lights, and trailer hitch).
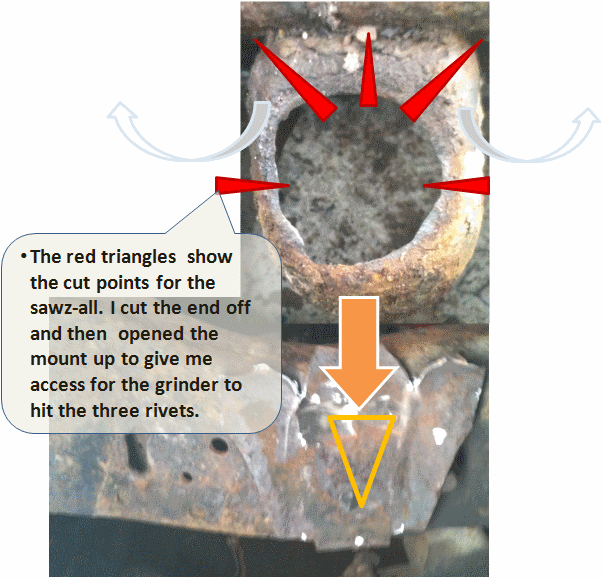
One thing that was kinda cool- I ground off the factory rivets holding on the front radiator mount and got that ready for a replacement. After I had the mount off I noticed that the same rivets that hold the mount on also hold the back of the spring perch. Once I saw that I didn’t hammer out the rivets so they would continue holding up the perch and frame. Here’s a pic showing what went down:
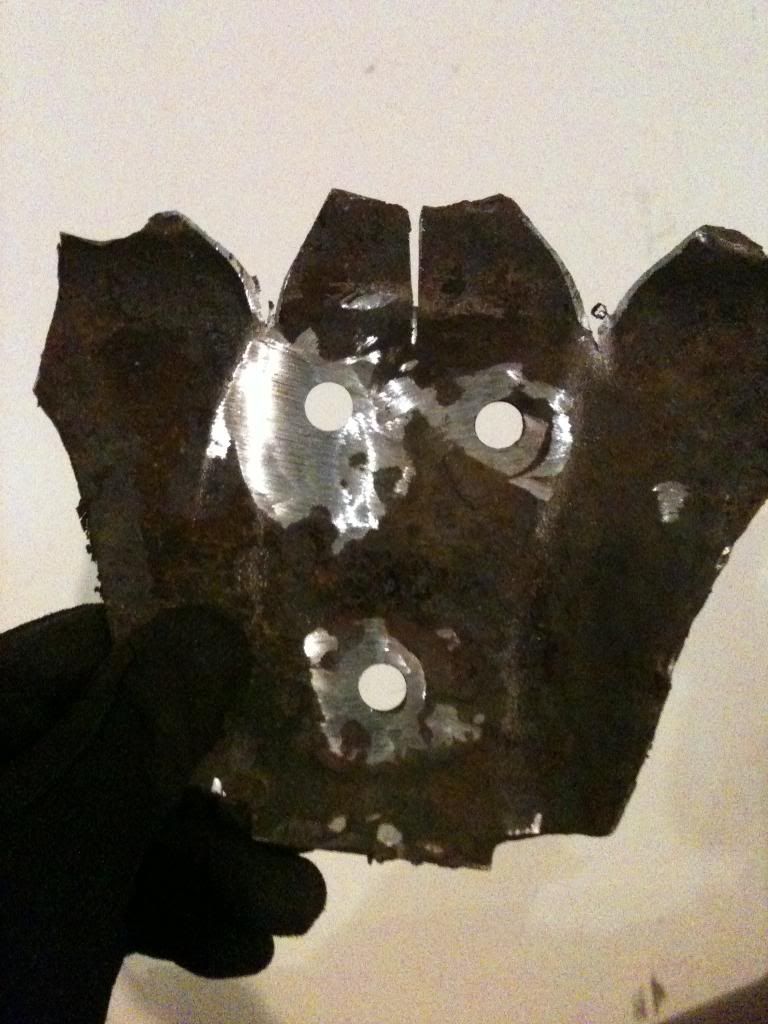
The result:
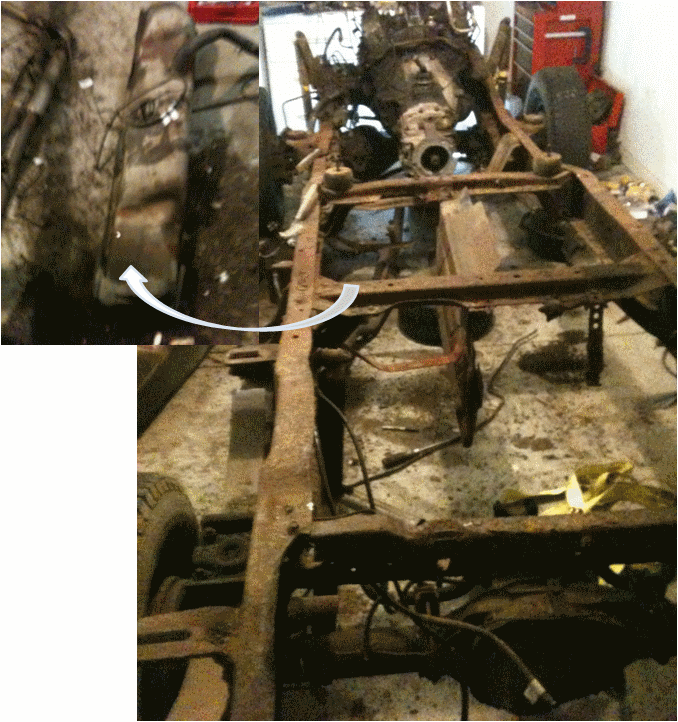
I also got the gas tank off. For those of you not familiar with the truck, it used to have two tanks, but at some point someone creatively remove the rear tank (probably because the valve stopped working, which is a pretty common problem). It was a bit of work to get the tank out; first I had to drain it, then I had to get the bolts off and then get it outside so it wouldn’t stink up the garage.
1) To drain the tank I used a small hand pump that was for oil (not a good idea for anyone looking for ways to do this). I used the pump once to fill the transfer case a few months back, so it had some traces of ATF in it. I’ll use the gas for my weedwacker and the kids go cart, so I’m not really worried about the quality of the gas). Anyhow, I tried to run the truck down before I started the tear-down, but apparently I still had about 7 gallons left. I used a 5 gallon can, a one gallon can and still had a little left in the tank (not thrilled about that).
2) Once I drained all that I could I started working on the two bolts that hold the metal straps that keep the tank in place. My luck wasn’t holding though and I couldn’t get either of the bolts to budge with wrenches. Uh, so the alternative (think ‘GrinderKing’) wasn’t exactly something I was looking forward to given that I used a cheesy little hand pump to empty the gas tank that wasn’t exactly ‘gasoline’ tight. The garage was full of fumes and there were drops of gas here and there- the thought of grinding the bolts off and the ‘torch’ of sparks didn’t exactly comfort me. So, I opened the garage door and then moved to the front radiator mount described above to get a little confidence that the garage wouldn’t explode!
Long story short, I covered the gas tank and fittings in a heavy painters-cloth blanket and a tarp and then made sure the sparks were pointed away from the tank. Good news- I didn’t explode…
3) Last step was to get the stinking mess out of the garage and into my utility/storage shed. I don’t really care if that explodes since it’s about 100’ from my house. I’m not trying to blow it up mind you, but if I have to pick, well, bu-by shed…
Here’s a pic:
One thing that was kinda cool- I ground off the factory rivets holding on the front radiator mount and got that ready for a replacement. After I had the mount off I noticed that the same rivets that hold the mount on also hold the back of the spring perch. Once I saw that I didn’t hammer out the rivets so they would continue holding up the perch and frame. Here’s a pic showing what went down:
The result:
I also got the gas tank off. For those of you not familiar with the truck, it used to have two tanks, but at some point someone creatively remove the rear tank (probably because the valve stopped working, which is a pretty common problem). It was a bit of work to get the tank out; first I had to drain it, then I had to get the bolts off and then get it outside so it wouldn’t stink up the garage.
1) To drain the tank I used a small hand pump that was for oil (not a good idea for anyone looking for ways to do this). I used the pump once to fill the transfer case a few months back, so it had some traces of ATF in it. I’ll use the gas for my weedwacker and the kids go cart, so I’m not really worried about the quality of the gas). Anyhow, I tried to run the truck down before I started the tear-down, but apparently I still had about 7 gallons left. I used a 5 gallon can, a one gallon can and still had a little left in the tank (not thrilled about that).
2) Once I drained all that I could I started working on the two bolts that hold the metal straps that keep the tank in place. My luck wasn’t holding though and I couldn’t get either of the bolts to budge with wrenches. Uh, so the alternative (think ‘GrinderKing’) wasn’t exactly something I was looking forward to given that I used a cheesy little hand pump to empty the gas tank that wasn’t exactly ‘gasoline’ tight. The garage was full of fumes and there were drops of gas here and there- the thought of grinding the bolts off and the ‘torch’ of sparks didn’t exactly comfort me. So, I opened the garage door and then moved to the front radiator mount described above to get a little confidence that the garage wouldn’t explode!
Long story short, I covered the gas tank and fittings in a heavy painters-cloth blanket and a tarp and then made sure the sparks were pointed away from the tank. Good news- I didn’t explode…
3) Last step was to get the stinking mess out of the garage and into my utility/storage shed. I don’t really care if that explodes since it’s about 100’ from my house. I’m not trying to blow it up mind you, but if I have to pick, well, bu-by shed…
Here’s a pic:
#64
12-28-2012, 07:20 PM
#66
12-28-2012, 09:47 PM
Posting Guru
#67
12-29-2012, 08:06 AM
Join Date: Dec 2010
Location: Carlisle
Posts: 221
Likes: 0
Received 0 Likes
on
0 Posts

Yeah, I don't like messing with the gas lines and the inevitable spillage and "table spoon here and 2 table spoons there..." way it all seemed to go down. Second to actually exploding or setting my house on fire was being one of the story lines in the "1,000 Stupid Ways to Die" show.

On a final passing note- I just became a Senior User with this, my 100th, post on the site! Look Ma' no hands even!
#68
12-29-2012, 02:33 PM
Join Date: Dec 2010
Location: Carlisle
Posts: 221
Likes: 0
Received 0 Likes
on
0 Posts
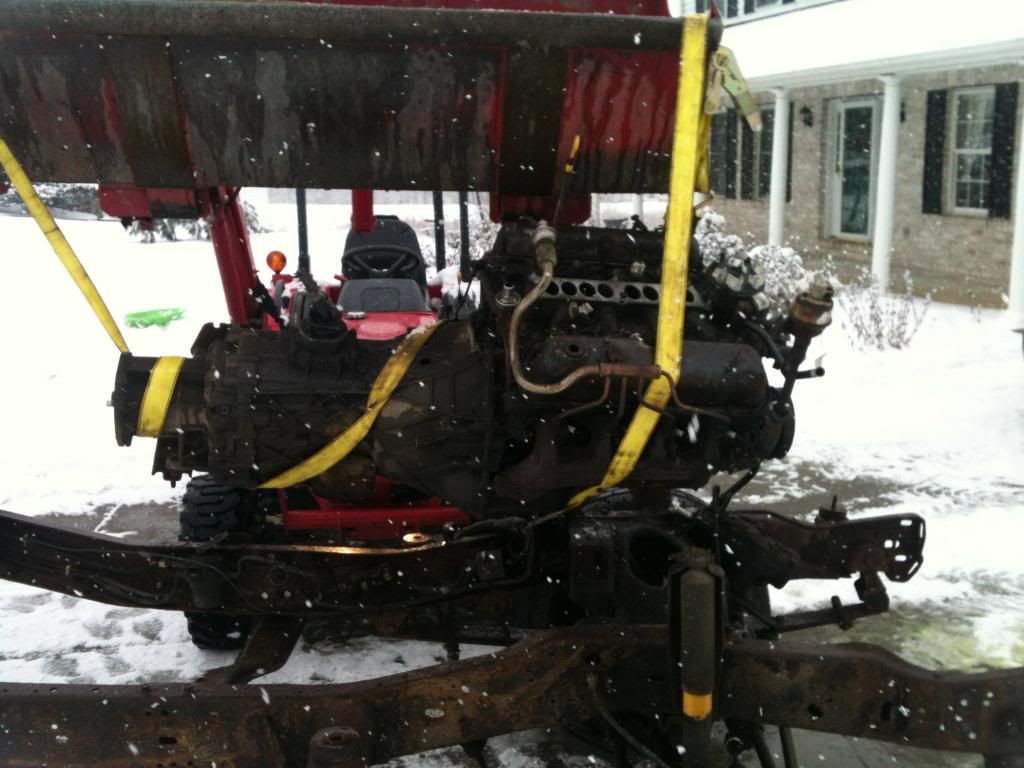
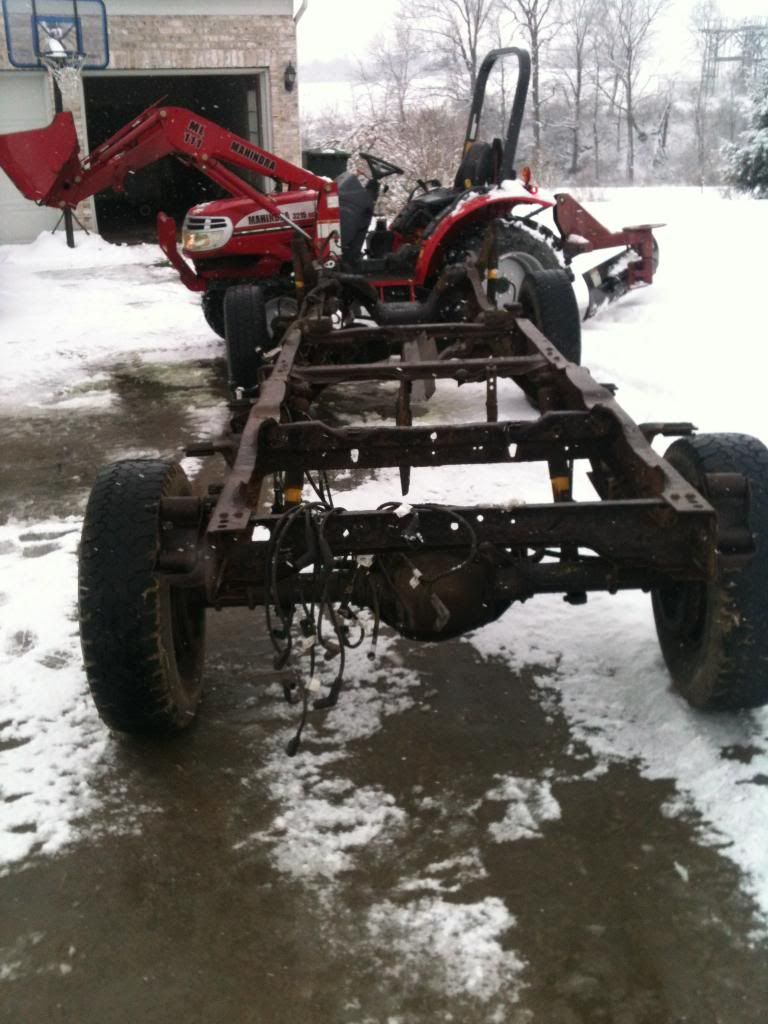
Big milestone today- the engine and tranny are finally off the frame! It wasn't the most glamorous lift and carry in the universe since I didn't have the right lift, but the tractor worked like a charm. I'll need to separate the engine and tranny next so I can get the transmission to the shop, but that little adventure we'll save a few weeks out.
It took my time getting the engine hoisted since the load wasn't exactly uniform and my straps weren't, er, uh, as secure as I would have liked. Basically I took some weight on the tractor (bucket up and smidge) and then check the straps and engine for things that might be hooked or moving. My main concern was the engine rotating in the strapps. Lift a little more, check again. Lift more, check again. Life again and *pop*, the engine came out of the mounts and I had the full weight on the bucket...
Here are the pics of the extraction:
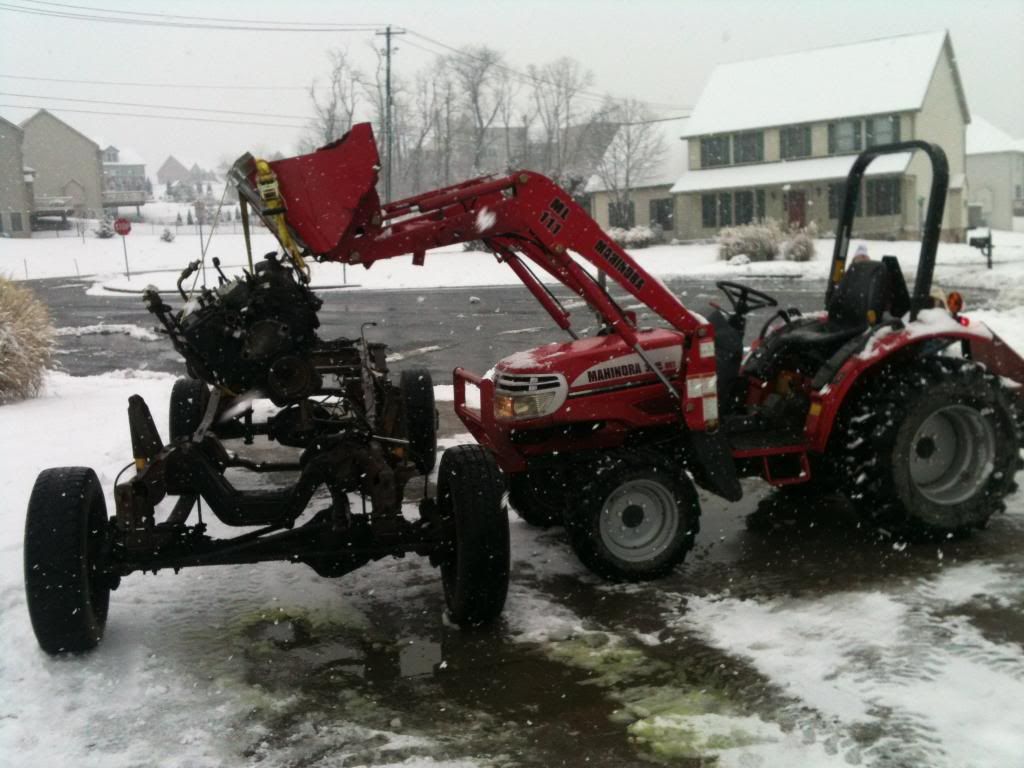
All the weight on the tractor and up she goes...
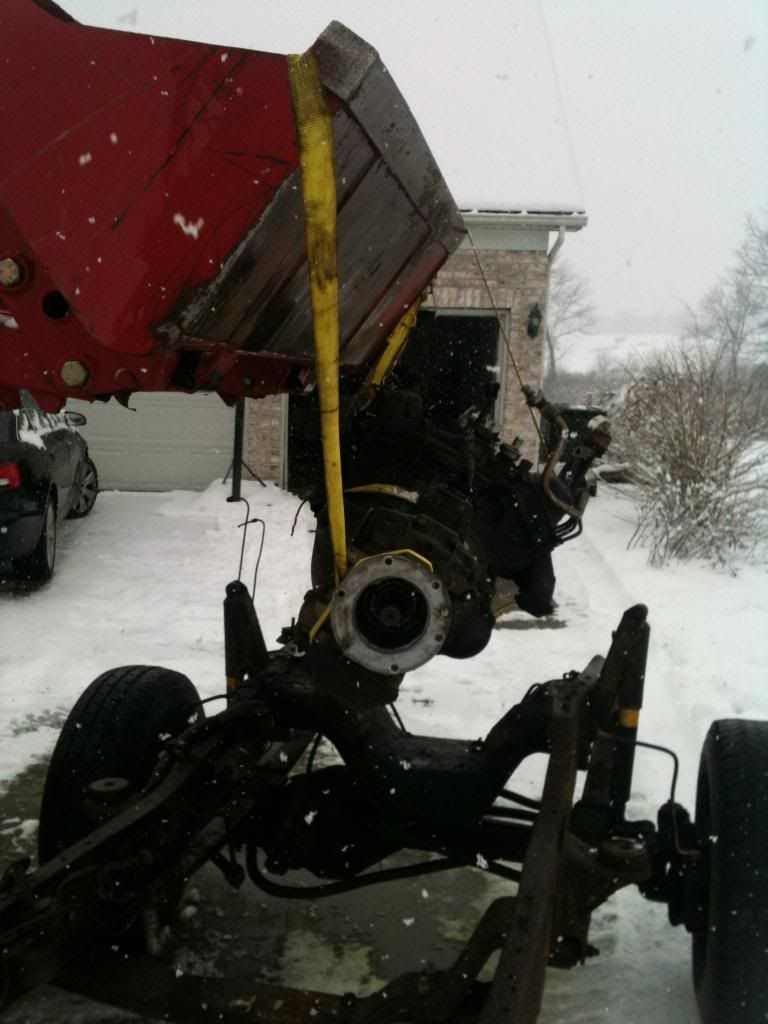
It was a tight squeeze getting into the garage. I couldn't place the engine right where I wanted it and had to wiggle it back a few feet.
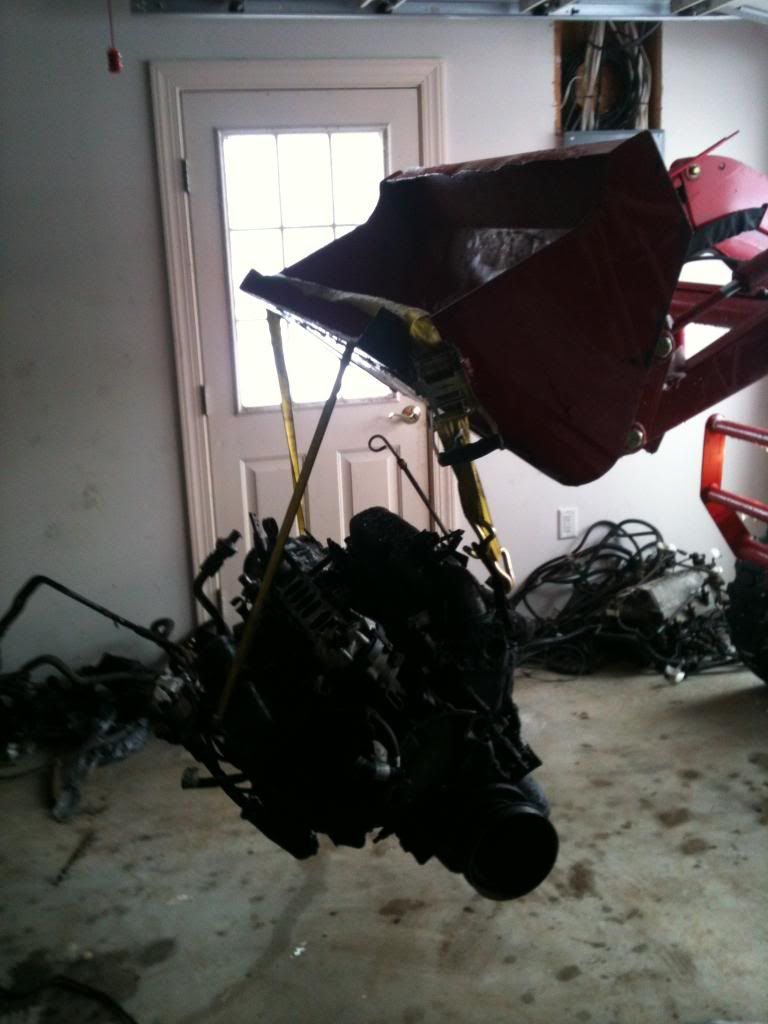
That spare garden tractor tire came in super handy- I put it under the exhaust header and laid the ending on it's side (since the oil pan can't take the weight of the engine. Once down I started wiggling. I was surprised how easy it was to move several hundred points on the ground. A good thing!
Once the engine was in it's temporary resting spot, it was off the get the frame back into the garage. Of course I took the opportunity go get a few pics along the way...
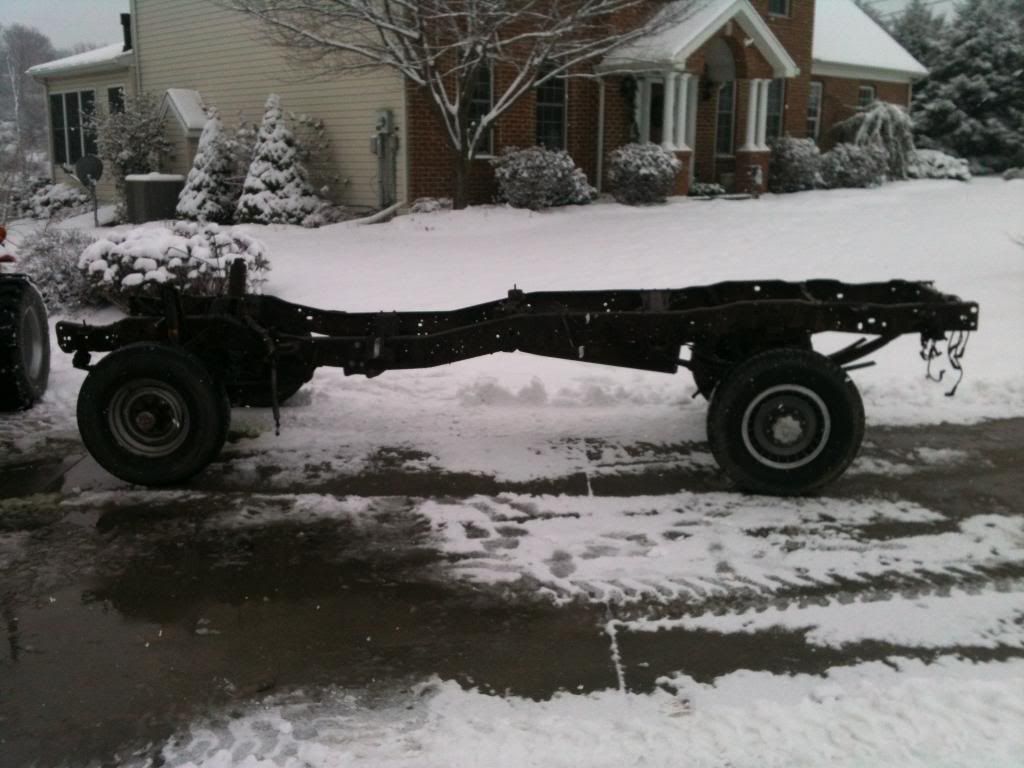
I'll take the rest of today and tomorrow to clean the garage after some pretty intense days of tear-down. I also have to move the spare parts to the shed to get them out of the way. After the organization and cleaning are done I'm going to finish prepping the frame for sandblasting. I've got to get the rest of the fuel supply lines off and a few other minor things like brake lines and such. Then I'll cart it off to the drive through car wash to get the two decades of oil, grime and grease off as well as any loose rust and scale.
I'm seriously considering having the frame professionally blasted following the mini-discussion earlier in the thread. It's not that I don't think I can do it, but rather I don't think I want to take the time to do it. Besides, being away from home most weeks for work means that I need to take advantage of opportunities to have other people do work for me, like sandblasting.
So far I exceeded my goals in getting down to the frame... Keep an eye out for updates next weekend!
It took my time getting the engine hoisted since the load wasn't exactly uniform and my straps weren't, er, uh, as secure as I would have liked. Basically I took some weight on the tractor (bucket up and smidge) and then check the straps and engine for things that might be hooked or moving. My main concern was the engine rotating in the strapps. Lift a little more, check again. Lift more, check again. Life again and *pop*, the engine came out of the mounts and I had the full weight on the bucket...
Here are the pics of the extraction:
All the weight on the tractor and up she goes...
It was a tight squeeze getting into the garage. I couldn't place the engine right where I wanted it and had to wiggle it back a few feet.
That spare garden tractor tire came in super handy- I put it under the exhaust header and laid the ending on it's side (since the oil pan can't take the weight of the engine. Once down I started wiggling. I was surprised how easy it was to move several hundred points on the ground. A good thing!
Once the engine was in it's temporary resting spot, it was off the get the frame back into the garage. Of course I took the opportunity go get a few pics along the way...
I'll take the rest of today and tomorrow to clean the garage after some pretty intense days of tear-down. I also have to move the spare parts to the shed to get them out of the way. After the organization and cleaning are done I'm going to finish prepping the frame for sandblasting. I've got to get the rest of the fuel supply lines off and a few other minor things like brake lines and such. Then I'll cart it off to the drive through car wash to get the two decades of oil, grime and grease off as well as any loose rust and scale.
I'm seriously considering having the frame professionally blasted following the mini-discussion earlier in the thread. It's not that I don't think I can do it, but rather I don't think I want to take the time to do it. Besides, being away from home most weeks for work means that I need to take advantage of opportunities to have other people do work for me, like sandblasting.
So far I exceeded my goals in getting down to the frame... Keep an eye out for updates next weekend!
#69
12-29-2012, 09:06 PM

Junior User
Join Date: Dec 2011
Location: River Falls
Posts: 74
Likes: 0
Received 0 Likes
on
0 Posts
#70
01-03-2013, 09:43 PM
Senior User
Join Date: Apr 2008
Location: Cleveland,OH
Posts: 406
Likes: 0
Received 0 Likes
on
0 Posts
#71
01-03-2013, 11:25 PM

#73
01-06-2013, 10:27 AM
Join Date: Dec 2010
Location: Carlisle
Posts: 221
Likes: 0
Received 0 Likes
on
0 Posts
Take the 4WD conversion as an example: with the right pitman arm ($15 or so?), a Dana 60 front axle (I've seen $300) and some common shop tools, you can install the axle and drive the truck around and be 1/2 way there...
Along those lines, I stopped by a sand blasting shop yesterday. The guy charges $90 an hour and he says he can usually do it in about 2 hours. It all depends on prep and how much oil, grease and dirt are on the frame. My goal is to have the frame, axles and associated miscellaneous parts blasted by the end of January. I'll need to get my POR15 and other paint supplies before the frame is ready anyhow.
I sure hope it will be cool when it's done. Oddly I have really enjoyed reading back over my own thread- seems funny to look back on it already and think, "Man, can't even believe I had a fully working truck 1.5 months ago!
#74
01-06-2013, 11:20 AM
#75
01-06-2013, 12:43 PM
Join Date: Dec 2010
Location: Carlisle
Posts: 221
Likes: 0
Received 0 Likes
on
0 Posts
I’ve been doing some digging and research about rebuilding the front axle and suspension over the past few days. Specifically I need to figure out what parts and tools I need to buy to get the Dana 60 rebuilt and the front springs in a useable state. Anyone who’s getting ready to work on your Dana60 should go through the following site- it’s an amazing resource for all things relating to these axles
Pirate4x4.Com - Extreme Four Wheel Drive
Rather than trying to figure out and rebuild the entire axle all at once, since this is the first time I'm rebuilding an axle, I wanted to break the job down into small projects. I've done some work on the spindles before (new U-joints and bearings on the drivers side). I've never done any work on the knuckels outside of pushing them out of the way while changing the U-joint on the driver's side. The pumpkin- never been in there... Anyhow, here’s a quick summary of the jobs as I see them…
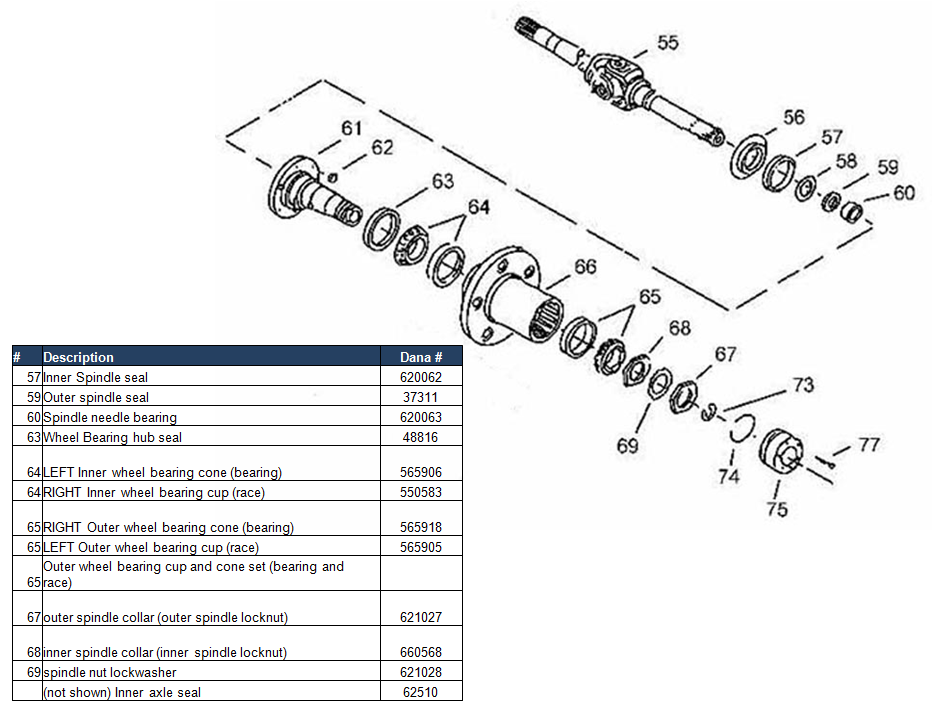
Spindles (both sides)- I’m having a bit of a tough time figuring out what parts I need since the kits I’ve looked at don’t have detailed Ford or Dana part numbers included. Any how I do know I’m getting a set of Warn Premium hubs and the hub socket and I guess ordering individual bearings.
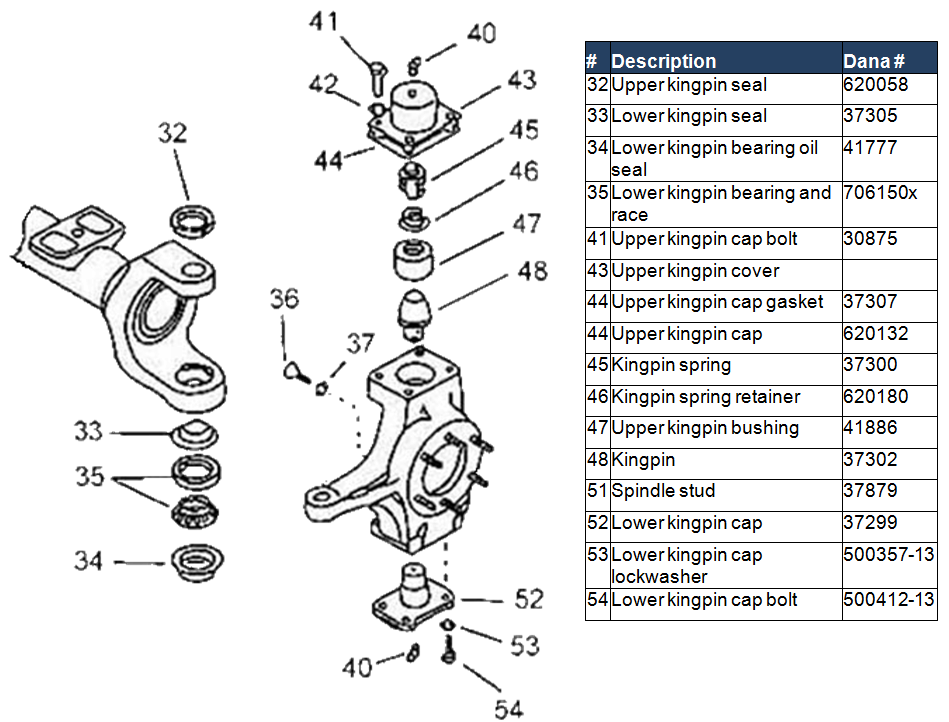
Knuckles/Kingpins (both sides)- the parts are straight forward, but the 7/8” allen wrench is a bit odd and I need to find a place that rents or loans torque wrenches that can get 600 ft lbs of torque. This write-up has been invaluable!
http://www.pirate4x4.com/tech/billav...pin/index.html
I think I’ll be pretty set using a kit from Yukon…
https://www.4wdfactory.com/store/pro...t-for-Dana-60-
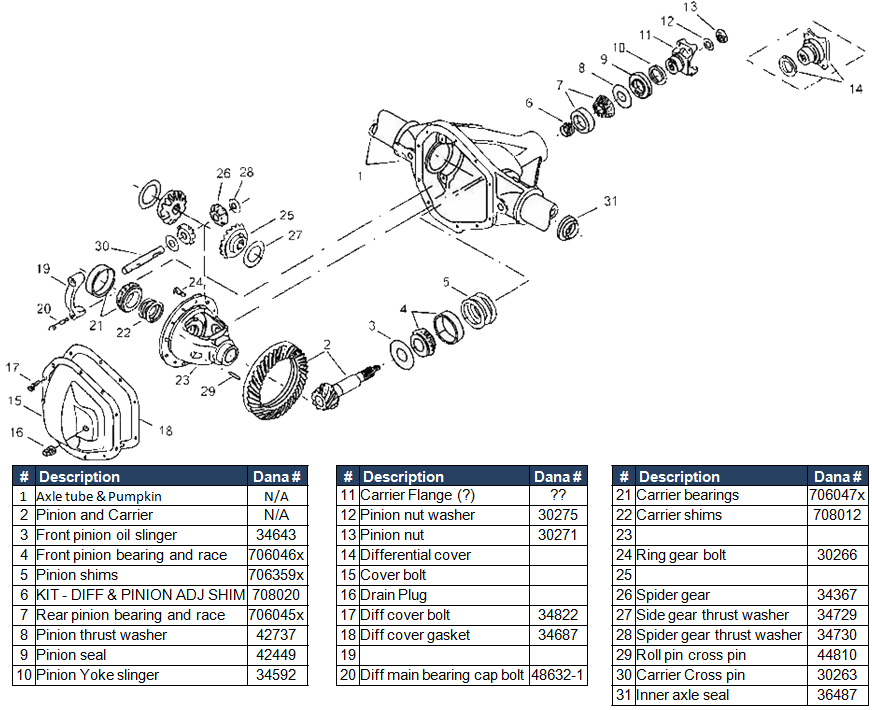
Differential (only one pumpkin in the front)- I’m not sure what I’ll need here. I know there are kits that include bearings and seals, but I honestly don’t know how to tell if I need it. I greatly appreciate any suggestions you have on the subject- are there any things that you "just do" on the pumpkin when rebuilding an axle?
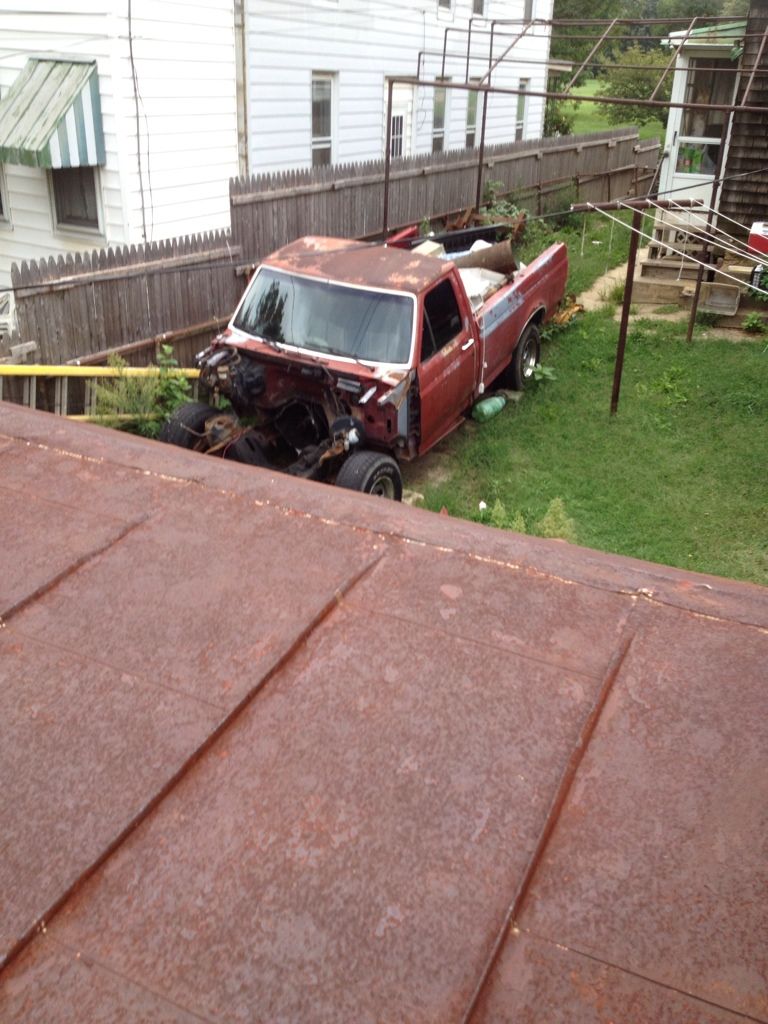
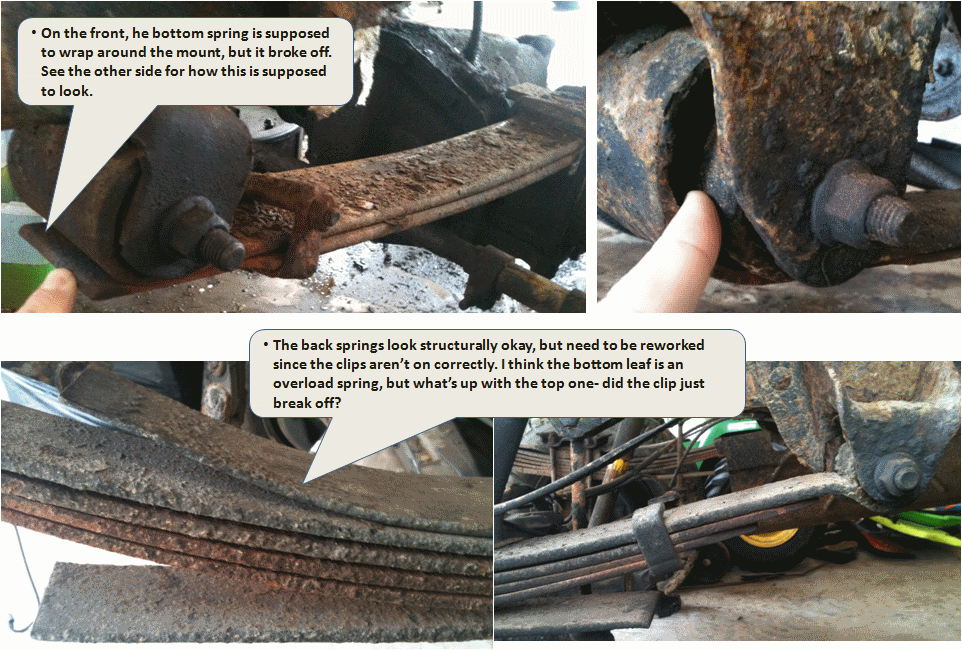
Springs (both sides)- Last on this round is the suspension. I want a little suspension lift in the front to level the truck out a bit and the front springs are pretty beat (see pic below). I’m not sure if I should just do the front springs and have the back springs rebuilt or get a complete set of springs. The backs look okay, but need the brackets in the least. I’m also not sure what the load rating is on the set of springs- I don’t want to reduce my capacity unnecessarily…
In poking around I found the following kits, one for the front only and one that includes both front and back springs... What do you guys think? I couldn't find load ratings on these and I'm concerned that these are lighter capacity springs... The info on Summit does say "They're constructed as multi-leaf packs, so their GVW rating and load-carrying capacity will be equal to or greater than those of the vehicle's original equipment."
Here's a link to a Skyjacker kit for both front and back on Summit that seemed to fit...
Skyjacker Suspension Lift Kits F840MKS - SummitRacing.com
They also have a front only kit...
http://www.summitracing.com/parts/sja-f840
Pirate4x4.Com - Extreme Four Wheel Drive
Rather than trying to figure out and rebuild the entire axle all at once, since this is the first time I'm rebuilding an axle, I wanted to break the job down into small projects. I've done some work on the spindles before (new U-joints and bearings on the drivers side). I've never done any work on the knuckels outside of pushing them out of the way while changing the U-joint on the driver's side. The pumpkin- never been in there... Anyhow, here’s a quick summary of the jobs as I see them…
Spindles (both sides)- I’m having a bit of a tough time figuring out what parts I need since the kits I’ve looked at don’t have detailed Ford or Dana part numbers included. Any how I do know I’m getting a set of Warn Premium hubs and the hub socket and I guess ordering individual bearings.
Knuckles/Kingpins (both sides)- the parts are straight forward, but the 7/8” allen wrench is a bit odd and I need to find a place that rents or loans torque wrenches that can get 600 ft lbs of torque. This write-up has been invaluable!
http://www.pirate4x4.com/tech/billav...pin/index.html
I think I’ll be pretty set using a kit from Yukon…
https://www.4wdfactory.com/store/pro...t-for-Dana-60-
Differential (only one pumpkin in the front)- I’m not sure what I’ll need here. I know there are kits that include bearings and seals, but I honestly don’t know how to tell if I need it. I greatly appreciate any suggestions you have on the subject- are there any things that you "just do" on the pumpkin when rebuilding an axle?
Springs (both sides)- Last on this round is the suspension. I want a little suspension lift in the front to level the truck out a bit and the front springs are pretty beat (see pic below). I’m not sure if I should just do the front springs and have the back springs rebuilt or get a complete set of springs. The backs look okay, but need the brackets in the least. I’m also not sure what the load rating is on the set of springs- I don’t want to reduce my capacity unnecessarily…
In poking around I found the following kits, one for the front only and one that includes both front and back springs... What do you guys think? I couldn't find load ratings on these and I'm concerned that these are lighter capacity springs... The info on Summit does say "They're constructed as multi-leaf packs, so their GVW rating and load-carrying capacity will be equal to or greater than those of the vehicle's original equipment."
Here's a link to a Skyjacker kit for both front and back on Summit that seemed to fit...
Skyjacker Suspension Lift Kits F840MKS - SummitRacing.com
They also have a front only kit...
http://www.summitracing.com/parts/sja-f840