When you click on links to various merchants on this site and make a purchase, this can result in this site earning a commission. Affiliate programs and affiliations include, but are not limited to, the eBay Partner Network.
I have done a number of searches on this subject, and I did not come up with a clear how-to thread, so I am trying to put one together. If someone knows of a better one, feel free to add a link. I know that stolenandrecovered.com has a lot of info and sells a step by step guide for 22 bucks, but here is what I can offer for free.
I have a 93 F250 XLT with an auto tranny and a tilt column, and the steering wheel has been getting looser and looser since I got it, not to mention that it would start without a key, and recently, the shift position indicator broke, so you cannot tell which gear you are in. Time for some attention. After collecting as much information as I could here is what worked for me.
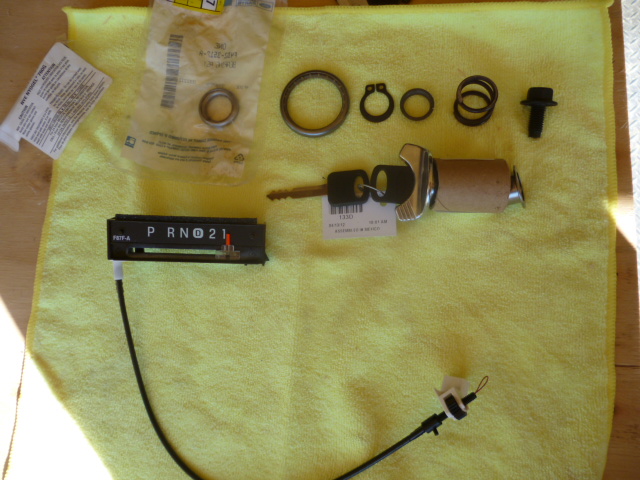
What I needed to get were a combination of three things.
The upper and lower bearings and a hardware kit for the steering column wobble. Although there were a few places I found them the good old Ford dealer was about the same price and more convenient for me. I will try to add the part numbers later. Expect to pay about 70 to 80 bucks for these parts
An ignition key cylinder, I got mine at Autozone for about 17 bucks for just for the ignition key. You can get a 3 lock combo and change your door cylinders too, so that one key opens all three, but I did not bother.
A shift position indicator, which I found at uhaultruckparts.com pretty cheap. You could probably JY this part, but the one you get is still going to be 20 year old plastic. For this thread I am going to forgo this process, because it does not seem to be a common problem. Note: If you can find one at the JY, you can just swap the plastic part at the back side of the indicator and not need to remove the whole thing.
I started with this set of instructions with pictures which was a little confusing at times, but for the most part accurate.
This thread, and my instructions and pics are of a 93 column. I am doing this from memory, so I could have a thing or two wrong, but I know how you guys will set me straight!
Start by removing the front steering wheel cover. NOTE: there are wires attached to this part. be careful when removing not to pull it too far! It is a clip on fit. Grab it from the top back of the cover and tug on it. It should come off fairly easily.
Next remove the steering wheel. You will need a puller for this. Mine was a BEECH! I actually pulled the threads out of the holes and had to drill them out to through bolt it, but that is a macgyver story for another time.
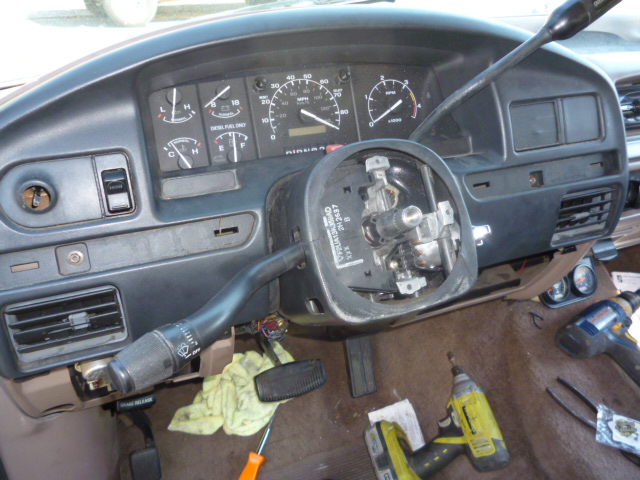
Yank all the plastic around the column. Note: There are three screws at the bottom of the column cover, and a fourth at the back right side behind the knee skirt. If your column has been removed before, most people don't put this screw back in. it is behind the knee skirt which also needs to be removed for this process.
Next pull the blinker switch, this takes a torqs bit.
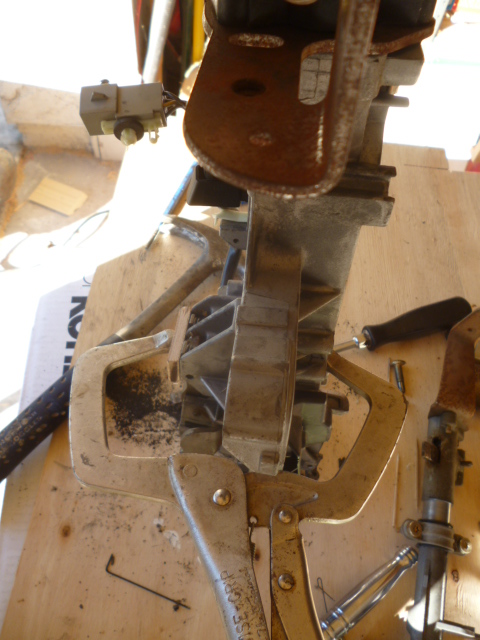
O.K. So now you need to pull the entire steering column and bench it. This is not a difficult process. It seems a little daunting, but I was surprised at how easy it was. There are four bolts that hold the column in, a number of electrical connections which are easily disconnected, and just as easily re-connected later, and a shift lever connection at the back of the column which comes off pretty easily. The ball joint is a press fit which you should be able to manhandle off, and the clip to the left has a retainer button on the back, which need to be disengaged to slip it up and off of the metal bracket. Lastly there is a u-joint at the base of the steering column. You must remove the bolt completely from the u-joint and it will slip off.
To the bench!
Here is where the above instructions come in handy.
You should be able to get through steps 4-7 pretty easily. NOTE: step 4 was not necessary for me in this process.
To pull the ignition switch, turn the ignition to the run position (not start), you will need the key for this. At the bottom of the key cylinder there is a small button that will depress. Push it in and pull on the key to remove the cylinder. Note: I had a difficult time later getting all of these parts to line up correctly. I finally got things figured out and it kind of fell together.
9 10 and 11 are simple, you are just unbolting things that will go back together later easily.
12, was not a simple task. I ended up using a right angle pick and a pair of needle nose pliers to get the little ******* out of there, after that 13 and 14 are a piece of cake. NOTE: I paid particular attention to how these parts came out, but it didn't do me a yits worth of good during re-assembly!
a little patience and common sense went a long way here.
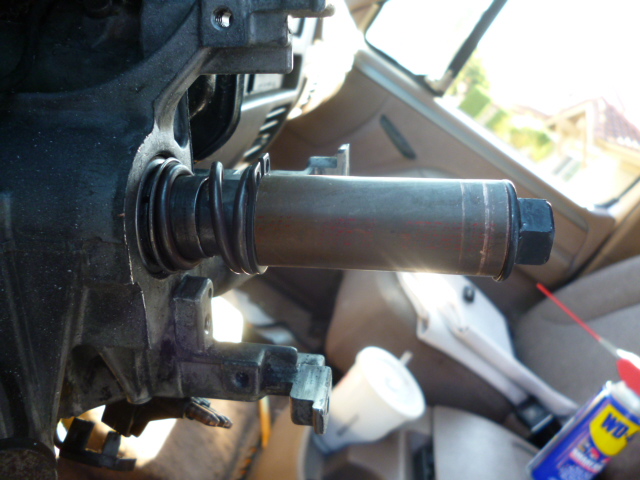
O.K. 15 sounds so simple, but the tilt spring is under a lot of pressure. It eventually came apart for me. I slipped it as far as it would go and then pried the spring out with a screw driver.
16 is simple.
17 is not as easy as it sounds. Tap the pin to the outside of the column until you can get a pair of pliers on the end of it and wiggle it out. NOTE: this pin and the next one only come out in one direction. They have a knurled head on one end, make sure you identify it.
18 is simple, but 19,
What a joke! They make it sound like eating cake, but it is more like a monkey f#$%ing a football!
Here is how I made it happen and re-assembly was pretty smooth once I got everything aligned, but GEEZUS!
Using a pair of large reach around Vise-Grips,and a small block of wood, I compressed both springs on the tilt lock levers, and tapped the pin out with a 3/16ths punch. Again this pin will only come out in one direction. Release the Vise-Grips and the two parts will come apart exposing the lower bearing.
So now you are supposed to be dis-assembled! Here is what I learned:
If you are in need of this repair it is because your bearings are disentegrated! be prepared for a lot of ball bearings and metal falling out of the column that you can�t identify and no longer need. I think we all know how it feels when you hear something hit the floor that you didn't feel or see come out. There will be a lot of shrapnel from this project.
1.6 hours my white a%^. For the first timer, shade tree guy, you can expect about 4 to 6 easy. I could do it again in about two, but I doubt that will ever happen.
Make sure that you get all of your old bearing waste out before you try to put in the new ones. It took some punches from the back side to tap the old skeleton out of the race.
Take your time. Straight up looking at these parts will explain to you how they come out and go back together. Nothing here needs to be forced until the end where it is explained in the instructions clearly.
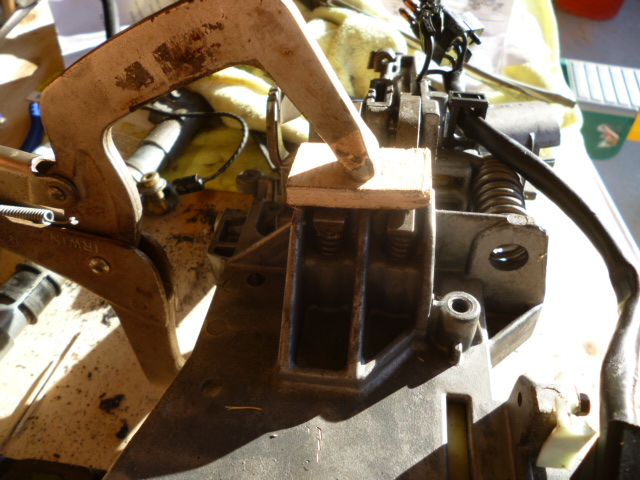
Re-assembly is pretty straight forward. Once you have cleaned up the parts, install the large lower bearing in the race. The bearing goes in with the cup towards the race and the ball bearings out so you can see them. Getting the tilt lock levers back in is a PITA. Use the Vise-Grips and block of wood again to compress the springs, and tap the levers around until you can get the pin back in. Reinstall the transmission column shift selector tube and transmission shift selector position insert. At this point I installed the column back in the truck, and finished the upper bearing installation in the truck. This picture shows the correct order and orientation of the remaining parts.
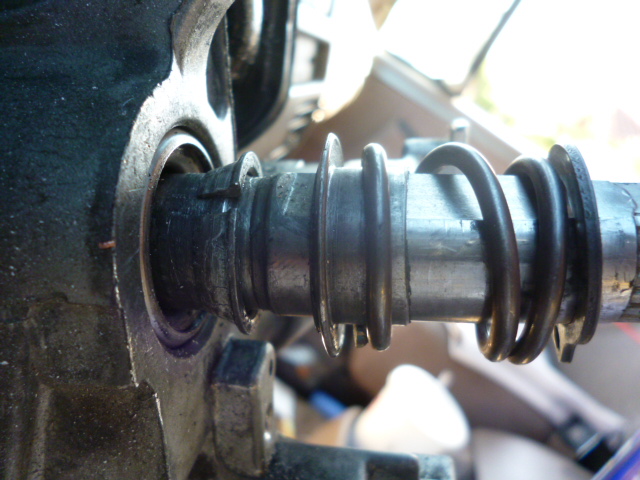
The instructions say to use a piece of pvc to press the upper bearing into position, I used 2 pieces of �� copper pipe in succession the first about 2� and the second about 2 � � place the first piece of copper pipe over the steering shaft, and use the steering wheel bolt to press the parts towards the race. Once you bottom out the threads , switch to the second piece of pipe and continue pressing the parts on until the snap ring seats.
Re-install the turn signal cam and the turn signal switch. Replace the plastic column shroud.
Re-install the steering wheel and the ignition key cylinder. Note: It took me a while playing with the key cylinder to get it back together. Remember to start with the key in the �on position�.
You should now have a nice tight steering column, hopefully without too many F-bombs!
I changed the bearings in my column, upper and lower, all back together, but where the hell do you plug the wires in? I had to replace the three prong piece in the pic, but can't figure out what it plugs back into!!!
The bearings are out of mine too. After reading this, pretty sure ill be looking for a column in a junkyard. Might even get a good blinker switch too. Seems most columns are auto though.
I changed the bearings in my column, upper and lower, all back together, but where the hell do you plug the wires in? I had to replace the three prong piece in the pic, but can't figure out what it plugs back into!!!
It's under the dash, somewhere loose under there. That's for the cruise control and horn(buttons on the steering wheel).
If you find a different shaped connector under there that could fit with the same 3 wires, take a picture.
My '93 came with a 'replaced' steering column from the JY with this same issue; turns out the connectors are different across different years?
Anyway, I compared the old and new wires, figured out which was which and spliced in the old connector on the steering wheel side.
Well Macrobb, please say it ain't so! My brain is toast from 3 days of these horse apples.
There is another set of wires there, but when I bought the wires in the picture, they matched the one that I took out of the truck. How could this be? UGH.... Here's a pic of what else is there.....
I had to use the one I bought online because it had the three prongs for the horn and cruise. I tried what you suggested and checked the color on the old wires. It was a match.
I twisted and I tied and I twisted and I turned! BINGO!
I also had to take out the gear for the ignition and get it aligned right before I could put the key cylinder back in. But I WIN! Drives as good as new!
Thanks man.
 07-12-2012, 10:46 PM