A/C/Heat only comes out defrost. Dont think its vacuum leak.
#1
 04-21-2012, 10:26 PM


Join Date: Apr 2012
Posts: 26
Likes: 0
Received 0 Likes
on
0 Posts
A/C/Heat only comes out defrost. Dont think its vacuum leak.
I just purchased a 1989 Ford AeroStar XLT model. It has 3000 miles on it! (well, that's what the lovely 5 digit odometer says!) This is the model with rear vents (don't know if it has rear A/C or if its just heat). Here's the problem. Regardless of what setting the levers are on (AC, Heat, Vent, Defrost etc), air only comes out the defrost vents. None of the dash vents work at all. As for the rear vents, only the 2 rear FLOOR vents work. None of the other rear vents work. I had a Jeep Cherokee with the same problem and everyone said it was a vacuum leak. Cruise control also did not work on my Jeep. I never did find that vacuum leak (tranny went and I sold the Jeep). But, the Jeep did not have two working vents in the back or anywhere else, ONLY the defrost worked. This vehicle actually has two working vents, but they're floor vents in the back, so they're not very useful. So I was thinking it may be some other kind of issue, such as blower motor or fuse. As with the Jeep, the cruise control in my AeroStar also does not work.
Thanks!
Thanks!
#2
04-22-2012, 02:50 AM


It is a vacuum leak in the AC control. Look under the hood on the passenger side around the blower motor. There are some very thin plastic lines that provide vacuum to the AC controls. Check them to see if they're cracked or leaking. There is a bulb like device, which is a vacuum reservoir. If you pull the line fitting from it, you should hear the vacuum hissing. They're plastic lines that do get brittle with age and underhood heat, so it's very easy for them to crack and leak.
If you have a rear vent system, you have heat and cool back there, assuming both are working. In heater mode, the hot air comes out of the floor vents at the base of the heater box on the driver's side of the rear seats. In AC mode, the cold air comes out of the vents in the overhead plenum behind the front seats.
If you have a rear vent system, you have heat and cool back there, assuming both are working. In heater mode, the hot air comes out of the floor vents at the base of the heater box on the driver's side of the rear seats. In AC mode, the cold air comes out of the vents in the overhead plenum behind the front seats.
#3
04-22-2012, 03:28 AM
It is a vacuum leak in the AC control. Look under the hood on the passenger side around the blower motor. There are some very thin plastic lines that provide vacuum to the AC controls. Check them to see if they're cracked or leaking. There is a bulb like device, which is a vacuum reservoir. If you pull the line fitting from it, you should hear the vacuum hissing. They're plastic lines that do get brittle with age and underhood heat, so it's very easy for them to crack and leak.
If you have a rear vent system, you have heat and cool back there, assuming both are working. In heater mode, the hot air comes out of the floor vents at the base of the heater box on the driver's side of the rear seats. In AC mode, the cold air comes out of the vents in the overhead plenum behind the front seats.
If you have a rear vent system, you have heat and cool back there, assuming both are working. In heater mode, the hot air comes out of the floor vents at the base of the heater box on the driver's side of the rear seats. In AC mode, the cold air comes out of the vents in the overhead plenum behind the front seats.
Definitely vacuum.
#4
04-22-2012, 06:57 PM
Join Date: Apr 2012
Posts: 26
Likes: 0
Received 0 Likes
on
0 Posts
You were right, it was vacuum. There was a red line out under the hood. Didn't think it was a vacuum line. Reconnected it and all vents work properly. Now I just have to work on getting the actual A/C working (Cool air), but that's another story. I don't think it's been retrofitted with R134A. Looks like I best start saving up my $. Anyway. my cruise control is STILL not working. Obviously its not a vacuum issue. Does anyone have any clue what it might be? I have a long drive to work in the morning and it would be nice if I could use cruise control on the highway.

#6
04-22-2012, 08:52 PM
Join Date: Apr 2012
Posts: 26
Likes: 0
Received 0 Likes
on
0 Posts
#7
04-22-2012, 08:54 PM
Trending Topics
#8
04-24-2012, 11:30 PM
Join Date: Apr 2012
Posts: 26
Likes: 0
Received 0 Likes
on
0 Posts
#9
04-25-2012, 04:16 AM
It's for running the AC controls; vacuum is used to divert the air to one of the floor, dash vents, or windshield defroster. Those plastic lines are subject to underhood heat making them brittle, and they crack. You can replace them with rubber hoses of the smallest diameter you can find.
#10
05-02-2012, 04:16 PM
I just purchased a 1989 Ford AeroStar XLT model . . .
The '89 has a vacuum servo. There's a very good troubleshooting procedure for that year (I used to own an '89, and had to repair the CC when I bought it in '99). I'll see if I can find it. I might have even posted it here before.
First, though, make certain that you actually do have vacuum to the servo behind the battery.
[later]
Well, darn. I don't have the old Alldata CD for the '89 here, it's back in Duvall, and I'm in the Denver area for the next six months. And I don't seem to have posted the CC troubleshooting data online anywhere.
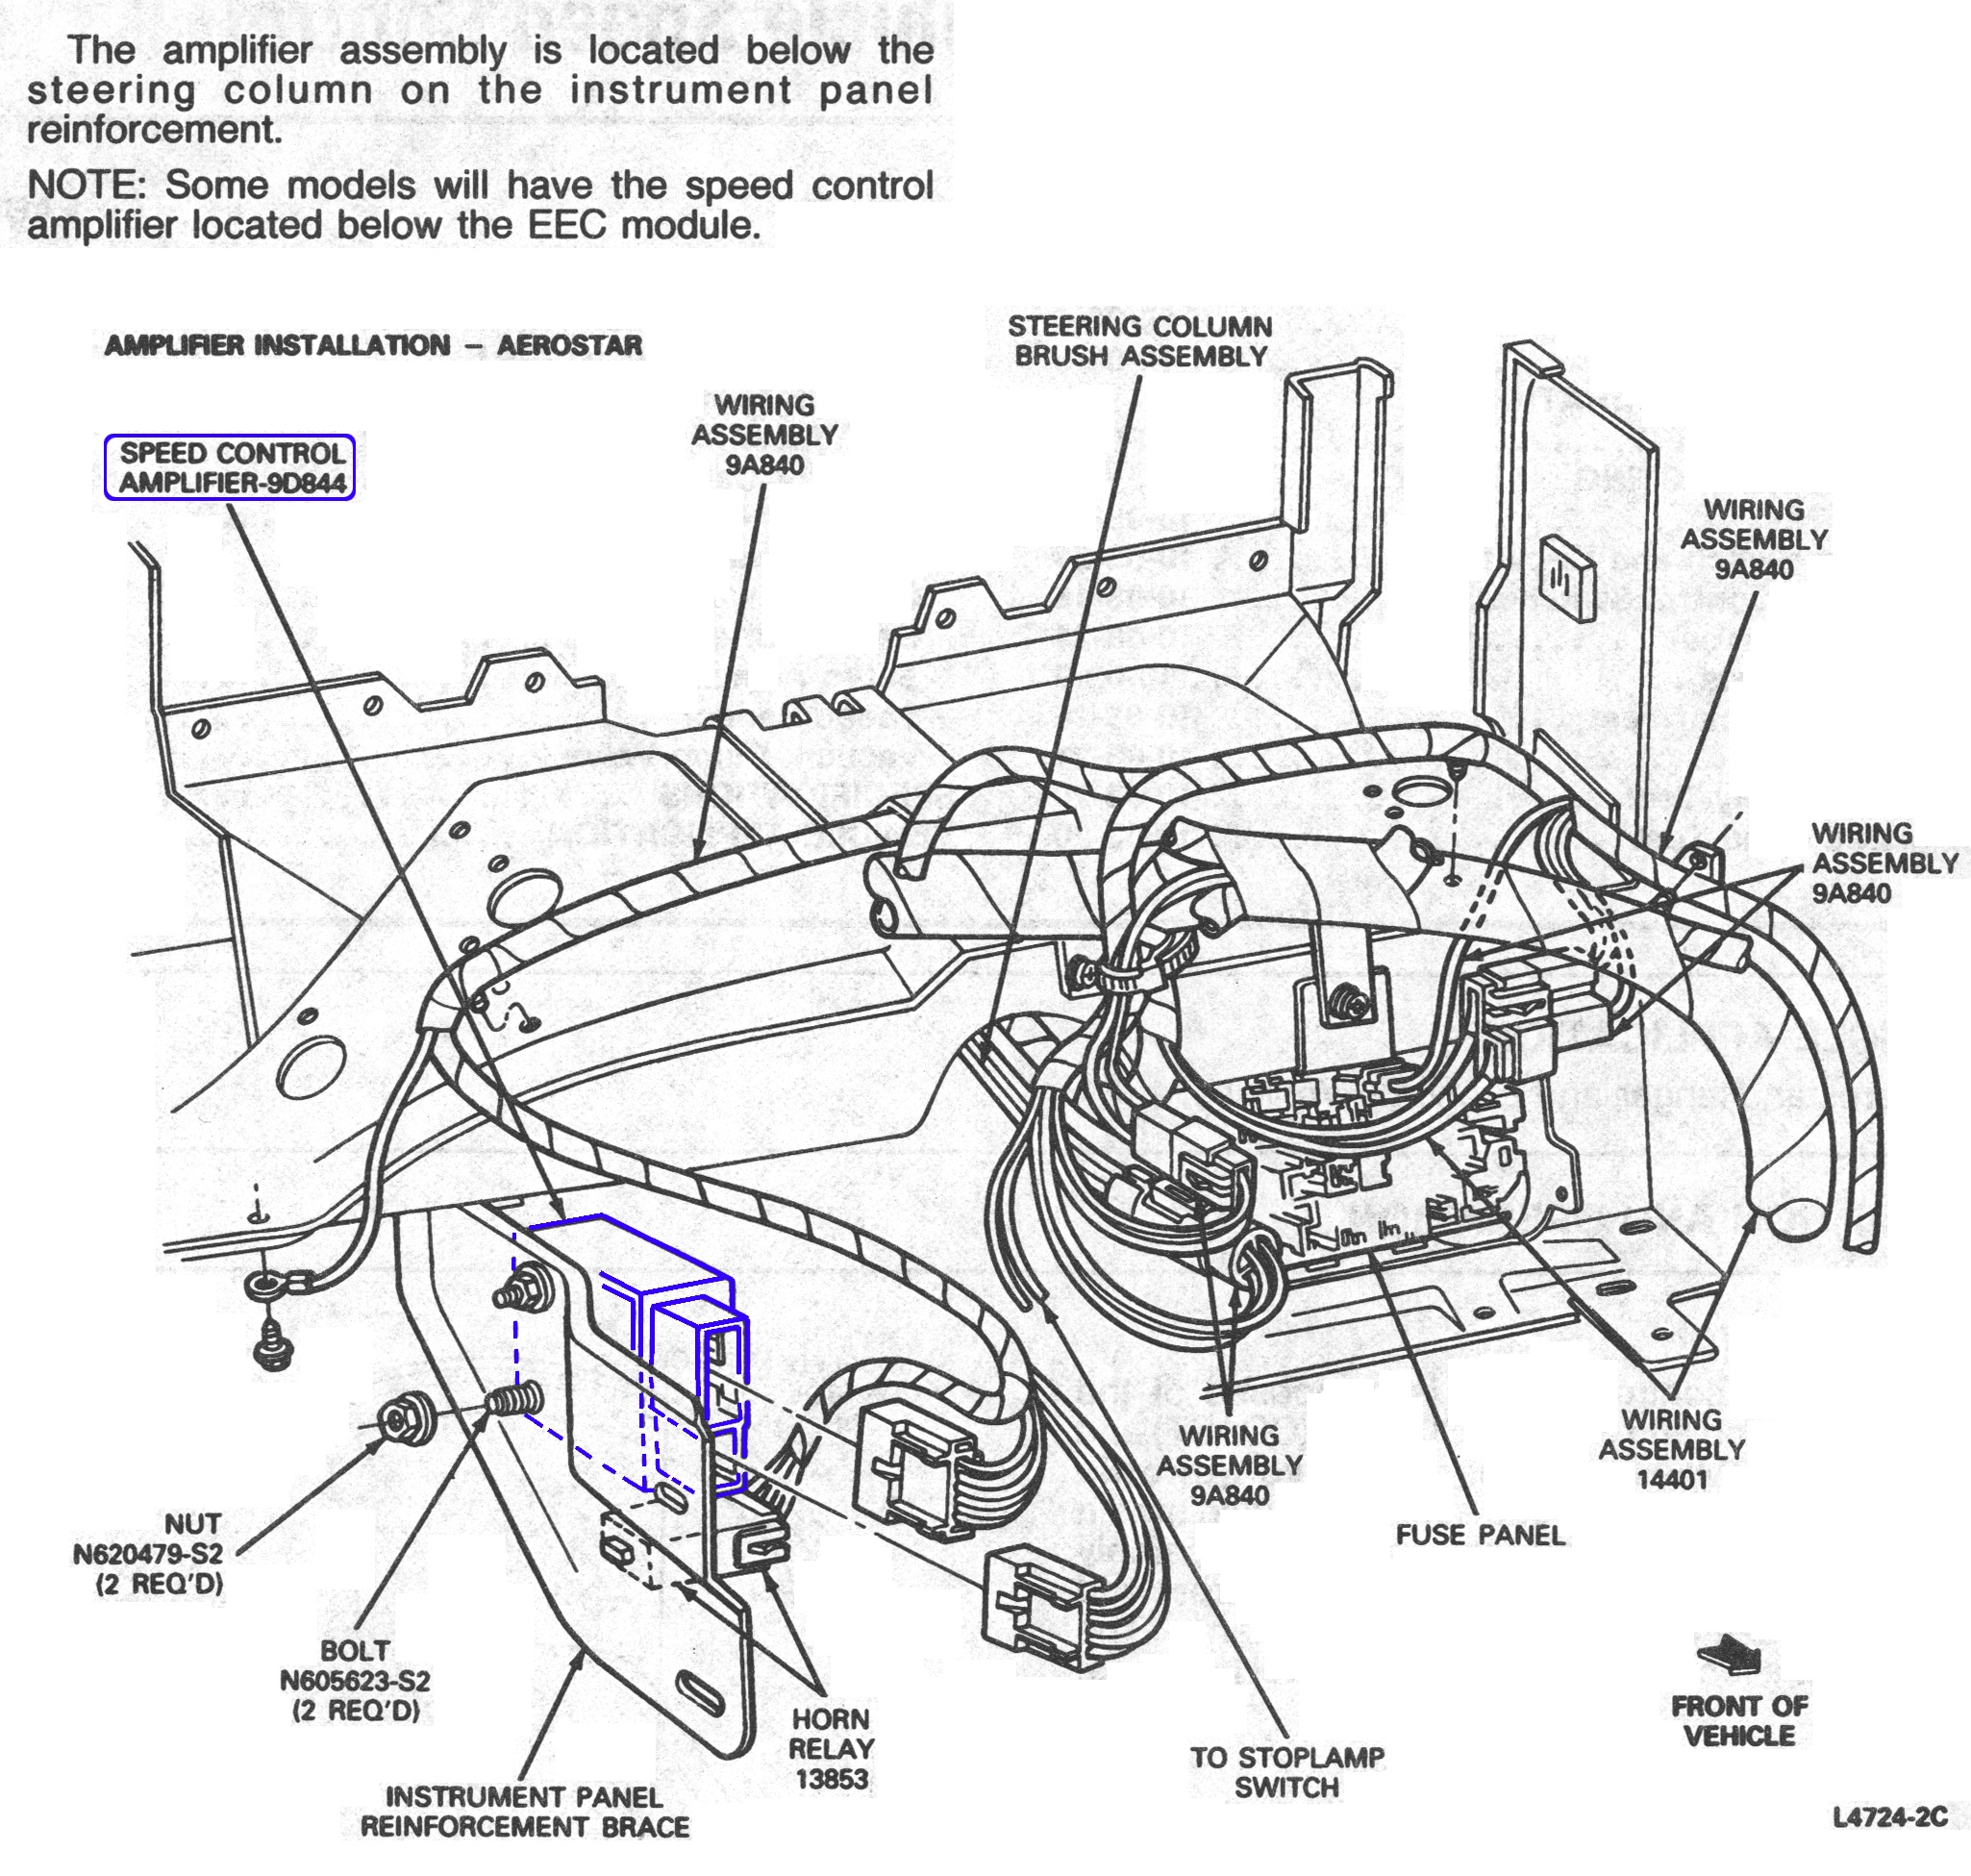
Basically, there are three parts:
- CC Amplifier (under dash, see below)
- CC Servo & cable to throttle body
- Steering wheel switches & brake switch
The factory manual and the Alldata CD both describe how to troubleshoot the system. You can use some clip leads at the Servo connector and test the two vacuum valves, diaphragm, and cable. You run the engine, and make a couple of connections and the engine should speed up in one test, and something else happens in the next test, I can't recall. But that'll allow you to test that the Servo & cable are working.
The steering wheel swithes & brake switch are easy to check (if you have that test info).
In my case, on my '89, both the Servo and Amp were failed, and the switches were fine. I bought a JY Servo, which tested OK but I still had no CC, so I went to a different JY and bought an Amp, which got me going. Later, I had to clean and lubricate the position potentiometer in the Servo. See below.
I'm gonna cheat a bit: Here's some pics I took in about 1999 and posted back in 2007:
The CC Amp can pull-in speed can be "tuned up" via the potentiometer on the amp:
(click on any image for larger)
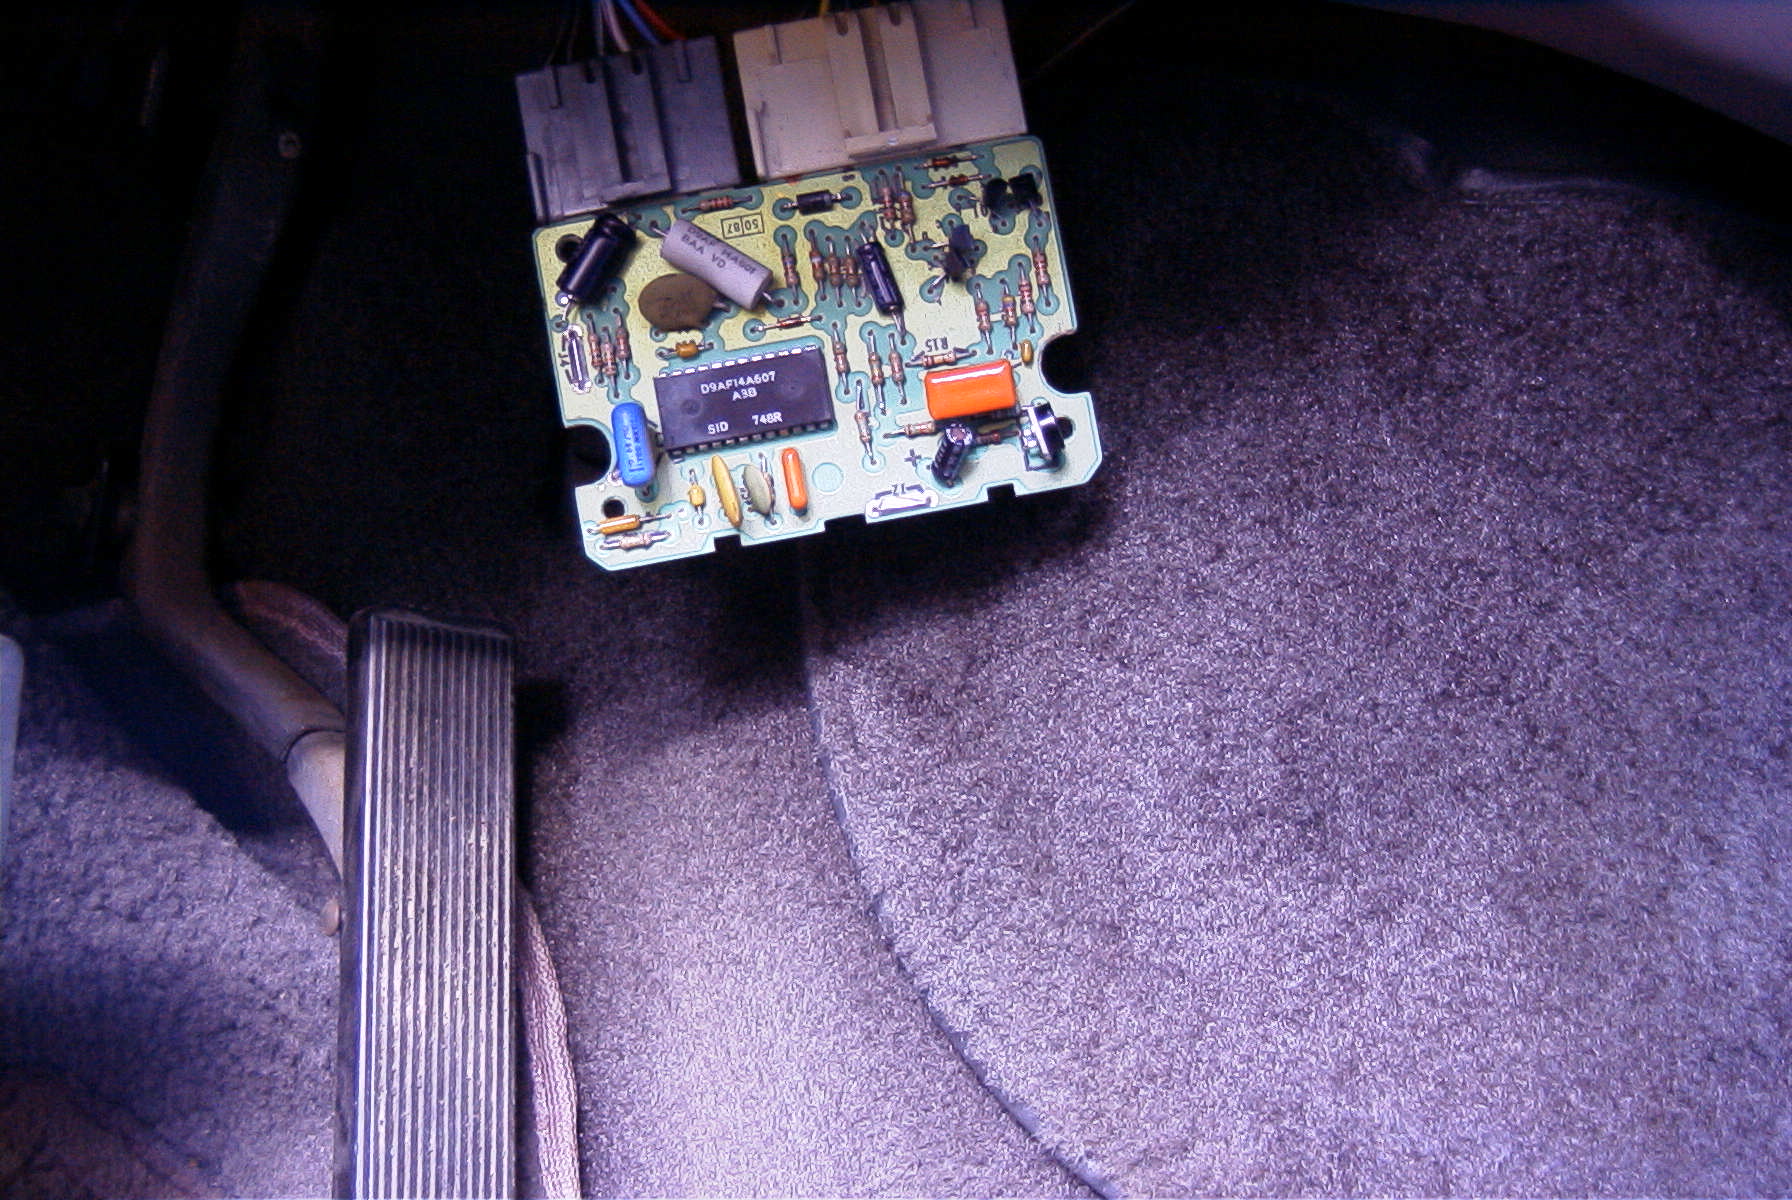
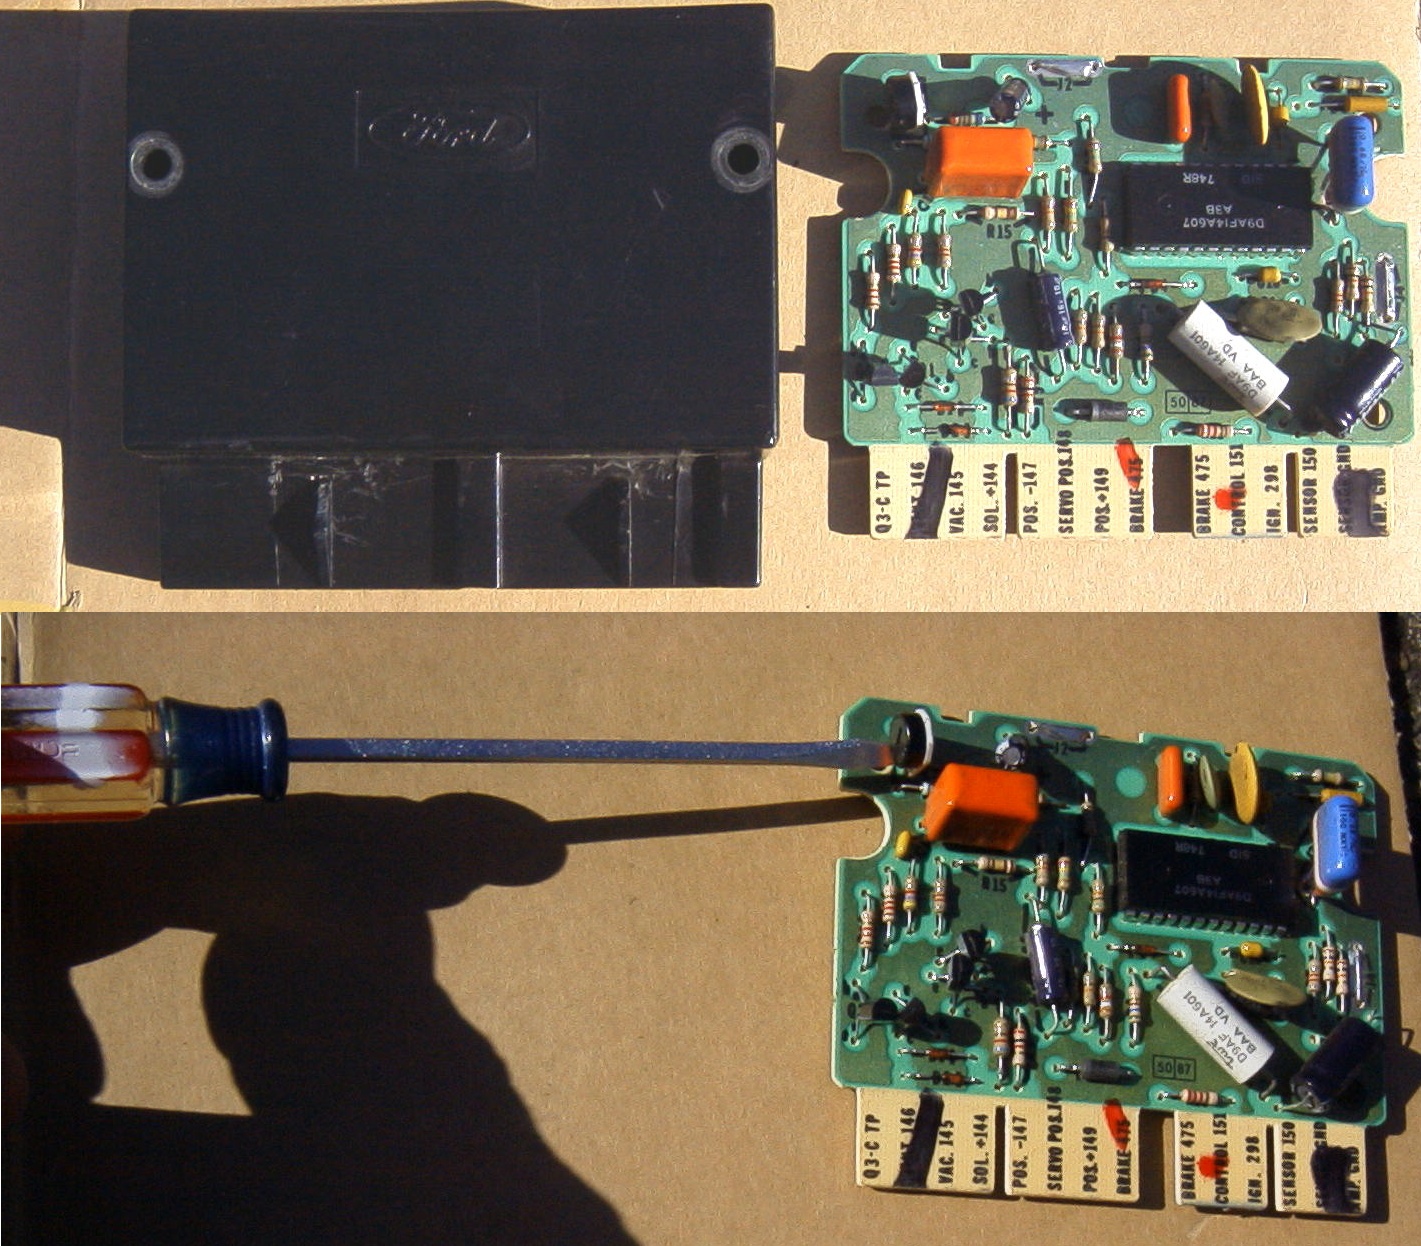
Tweak that pot to change the pull-in speed. When I press the Set button, it sets there, very nice. Try that with a GM!
I've had one CC servo cable fray and die -- always happens on a trip, doesn't it? Middle of nowhere, it snaps. Well, $3 at a JY and I was back in business. Fairly easy to replace.
However, I had an odd surging problem on CC in very cold temps that I lived with through one winter, but fixed this last winter. The CC position feedback pots got grimy and were giving bad data back to the CC module:


Cleaning the pots, then lubricating with silicone oil (Tri-Flow, again), fixed that right up. I was getting some truly weird readings out of those pots until I lubed them.
#11
05-09-2012, 11:01 AM
I found a troubleshooting guide for the '96 system. While the speed signal source and amplifier is different for the '92-on, I think the servo may be the same, and I think you can check your servo & switches using the same methods. But I'm not certain; wiring colors may have changed. Use at your own risk.
Servo, Electrical Check
Servo, Functional Check
Originally Posted by Factory Service Manual, 1996
Servo, Electrical Check
- Disconnect the 8-pin connector at the speed control servo (9C735).
- Measure the resistance in the circuits listed in the following chart.
If resistance readings are not as shown in chart, replace speed control servo. If readings are within specifications, proceed to Step 3.
Code:Circuit Resistance (Ohms) 144 (O/Y)-145 (GY/BK) 40-70 144 (O/Y)-146 (W/PK) 100-150 147 (P/BL)-149 (BR/GR) 35K-70K 147 (P/BL)-148 (Y/R) 15K-35K 148 (Y/R)-149 (BR/GR) 15K-35K
- Connect wiring at speed control servo and disconnect 8-pin wiring connector at amplifier.
- Measure the resistances in the circuits listed in Step 2 chart.
If resistance readings are not as shown in chart, repair wiring between amplifier and speed control servo. If readings are within specifications, speed control servo and wiring are serviceable.
Servo, Functional Check
- Disconnect wiring at speed control servo.
- Start engine (6007).
- Connect Circuit 144 (O/Y) lead of speed control servo to battery positive terminal.
- Connect Circuit 146 (W/PK) lead of speed control servo to ground.
- Momentarily touch Circuit 145 (GY/BK) lead of servo to ground.
- Disconnect Circuit 146 (W/PK) from ground.
- Servo throttle actuator arm should pull in and the engine speed should increase when Circuit 145 (GY/BK) is connected to ground. Speed control servo should release when Circuit 146 (W/PK) is disconnected from ground.

Thread
Thread Starter
Forum
Replies
Last Post
lovemy150's
1999 - 2003 7.3L Power Stroke Diesel
9
12-11-2008 09:32 AM