DON'T MOVE THE ENGINE BACK ! MOVE THE TRUCK FORWARD
#1
 03-29-2012, 07:51 AM


Join Date: Jul 1997
Location: Beautiful Hueytown Alabam
Posts: 5,668
Received 726 Likes
on
259 Posts
DON'T MOVE THE ENGINE BACK ! MOVE THE TRUCK FORWARD
ok guys... see if you follow my logic and shoot holes in my theory...
very probably I'm going to have to move my engine back some... (see my thread on blunder) the frame is pretty and painted and I don't want to talk about it.
We were discussing 'where/how much/how' (we're way past why) and the suggestion was made to try and find offset motor mounts. don't know if they are available but the discussion continued into modifying my existing ones..
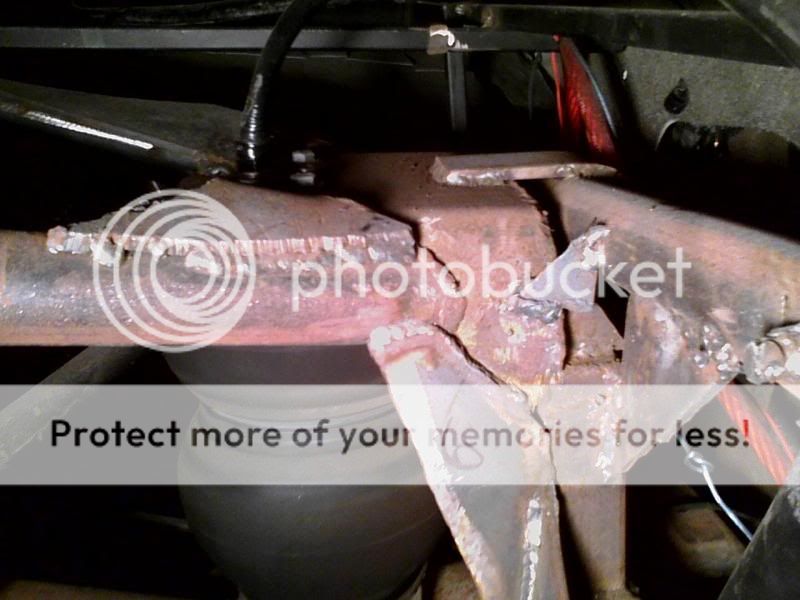
looking at the picture below... what about making new bolt flanges that would effectively move the mount back where it attaches to the engine mounts welded to the frame.
or
make a completely new plate with the flanges and weld it onto the existing motor mount after cutting off the existing bolt flanges... have to be careful about heat and the rubber pad... but short welding time and water should fix that .. In my thinking it would only raise the engine the thickness of the new plate/the angle they are mounted... so less than 1/4"... give me a little more down angle but nothing critical AFAIK.
ok... lock, load and fire
john
very probably I'm going to have to move my engine back some... (see my thread on blunder) the frame is pretty and painted and I don't want to talk about it.
We were discussing 'where/how much/how' (we're way past why) and the suggestion was made to try and find offset motor mounts. don't know if they are available but the discussion continued into modifying my existing ones..
looking at the picture below... what about making new bolt flanges that would effectively move the mount back where it attaches to the engine mounts welded to the frame.
or
make a completely new plate with the flanges and weld it onto the existing motor mount after cutting off the existing bolt flanges... have to be careful about heat and the rubber pad... but short welding time and water should fix that .. In my thinking it would only raise the engine the thickness of the new plate/the angle they are mounted... so less than 1/4"... give me a little more down angle but nothing critical AFAIK.
ok... lock, load and fire
john
#2
03-29-2012, 07:57 AM
John,
I'm with ya on this one. My first approach would be to modify the motor mounts with an offset plate. That way you're not having to jump right in there and mess up pretty frame, etc. Worst case scenario is that the heat from the welding will be too much and start melting the rubber and you'll have to move on to plan B.
So, I say roll up your sleeves an go for it.
Good luck
Bobby
#3
03-29-2012, 08:32 AM


#6
03-29-2012, 10:37 AM
Posting Guru
ok guys... see if you follow my logic and shoot holes in my theory...
very probably I'm going to have to move my engine back some... (see my thread on blunder) the frame is pretty and painted and I don't want to talk about it.
We were discussing 'where/how much/how' (we're way past why) and the suggestion was made to try and find offset motor mounts. don't know if they are available but the discussion continued into modifying my existing ones..
looking at the picture below... what about making new bolt flanges that would effectively move the mount back where it attaches to the engine mounts welded to the frame.
or
make a completely new plate with the flanges and weld it onto the existing motor mount after cutting off the existing bolt flanges... have to be careful about heat and the rubber pad... but short welding time and water should fix that .. In my thinking it would only raise the engine the thickness of the new plate/the angle they are mounted... so less than 1/4"... give me a little more down angle but nothing critical AFAIK.
ok... lock, load and fire
john
#7
03-29-2012, 10:51 AM

Fleet Owner
I can't see how you will get a full-penetration weld on there without smoking off the rubber, or at least separating it. If I understand the mount's construction correctly, couldn't you put a new plate against the engine, weld the edges of the mount to that, with new holes just to the right (in the picture)? The lower hole would need a small amount of rubber ground off, it appears. But all welding would be plug welds at the old holes, or edge welds, not directly on rubber surfaces.
Trending Topics
#8
03-29-2012, 11:06 AM
#9
03-29-2012, 11:39 AM

Maybe an adapter plate, like the ones used on the GM LSx engines

bolts to the block, and the stock Mount bolts to the adapter..
need some flush mounts bolts, and some threads on the plate..
my adapters are 1/4 in thick. I had to drill and thread another hole for where I wanted to mount the engine.
these of course have side effects.. on headers and starter fitment..
| I assume the block can handle the new twisting motion of the offset brackets.
Sam
#10
03-29-2012, 12:21 PM
Join Date: Jul 1997
Location: Beautiful Hueytown Alabam
Posts: 5,668
Received 726 Likes
on
259 Posts
John, can you not just move the holes over and re-drill? from the pic it looks like it can be done on top, the bottom you would have to cut the top part of the mount slightly and trim the rubber and re-drill? you could also add a spacer plate of steel under the mount for more support, from the pic it might look like the top left bolt if re-drilled might miss the mount, with the spacer plate you could use a plow bolt recessed underneath if need be?
#11
03-29-2012, 12:23 PM
Logistics Pro
Jon, seriously, I too doubt the chances of welding on the existing motor mounts without harming the rubber and the/or the bond. If it was mine, I would go with the plan to fabricate a spacer and install it between the motor mount and the bolt locations on the block.
Now wait a minute.... I get it. This has been a test from the master of mischief. Jon has no intention of welding that motor mount. He is just setting us all up for an April Fool's joke this Sunday. Well Jon, I see right through your scheme.. HA HA! Good one! But not good enough! Jag
Jag
PS: Unless you ARE serious, then I say no way Jose.
Now wait a minute.... I get it. This has been a test from the master of mischief. Jon has no intention of welding that motor mount. He is just setting us all up for an April Fool's joke this Sunday. Well Jon, I see right through your scheme.. HA HA! Good one! But not good enough!
JagPS: Unless you ARE serious, then I say no way Jose.
#12
03-29-2012, 06:31 PM
Cargo Master
#13
03-29-2012, 06:51 PM
Join Date: Jul 1997
Location: Beautiful Hueytown Alabam
Posts: 5,668
Received 726 Likes
on
259 Posts
Jon, seriously, I too doubt the chances of welding on the existing motor mounts without harming the rubber and the/or the bond. If it was mine, I would go with the plan to fabricate a spacer and install it between the motor mount and the bolt locations on the block.
Now wait a minute.... I get it. This has been a test from the master of mischief. Jon has no intention of welding that motor mount. He is just setting us all up for an April Fool's joke this Sunday. Well Jon, I see right through your scheme.. HA HA! Good one! But not good enough! Jag
PS: Unless you ARE serious, then I say no way Jose.
Now wait a minute.... I get it. This has been a test from the master of mischief. Jon has no intention of welding that motor mount. He is just setting us all up for an April Fool's joke this Sunday. Well Jon, I see right through your scheme.. HA HA! Good one! But not good enough!
JagPS: Unless you ARE serious, then I say no way Jose.
 Sadly Jag... it's probably true and I"m serious. I'm thinking about it more and the welding just won't work without lots of bad smoke/soot and ruined motor mounts... Albuq is right about the penetration...
 Plan B would be to cut off the orignal engine mounts from the crossmember and redo... but it's a hassle to have to hang the motor from the hoist and get everything plumb, centered, angled correctly then do the fabbing for the mounts...... then rework the welded areas and repaint.. that's at least two times to install the engine and take it out... and transmout to rework... which is probably just 4 new holes if I'm lucky... just lots of time crawling and climbing and laying under the ride... so I was looking for an easier way...
Investigation of the offset plates begins tomorrow.....
Sam... where did you find 7/16" flat head bolts in a grade 8 ?? those are some pretty adapters... lazer cut and all prettied up... someone somewhere has done this on a 460.
First thing is to break in run the engine and get it off the breakin stand... then remove the doghouse and install engine/trans and the radiator and see just how much I can steal from the fan/radiator/coil and the little space between the pulley and the fan... then begin...
thanks for all the wise input... you just convinced me of what I already suspected... I'm screwed (probably)... hey if I hit the 5oo mill Ga lottery, I'm gonna pack it all up and ship it to Chuck and let him figure it out

later
John
#14
03-29-2012, 07:02 PM